


前言
OpenCV是强大的计算机视觉工具,在目标识别、自动驾驶、医学影像分析、视频内容理解方面有着广泛运用。总结自B站孔工码字,为个人学习笔记,致敬大佬。
孔工码字
读显操作
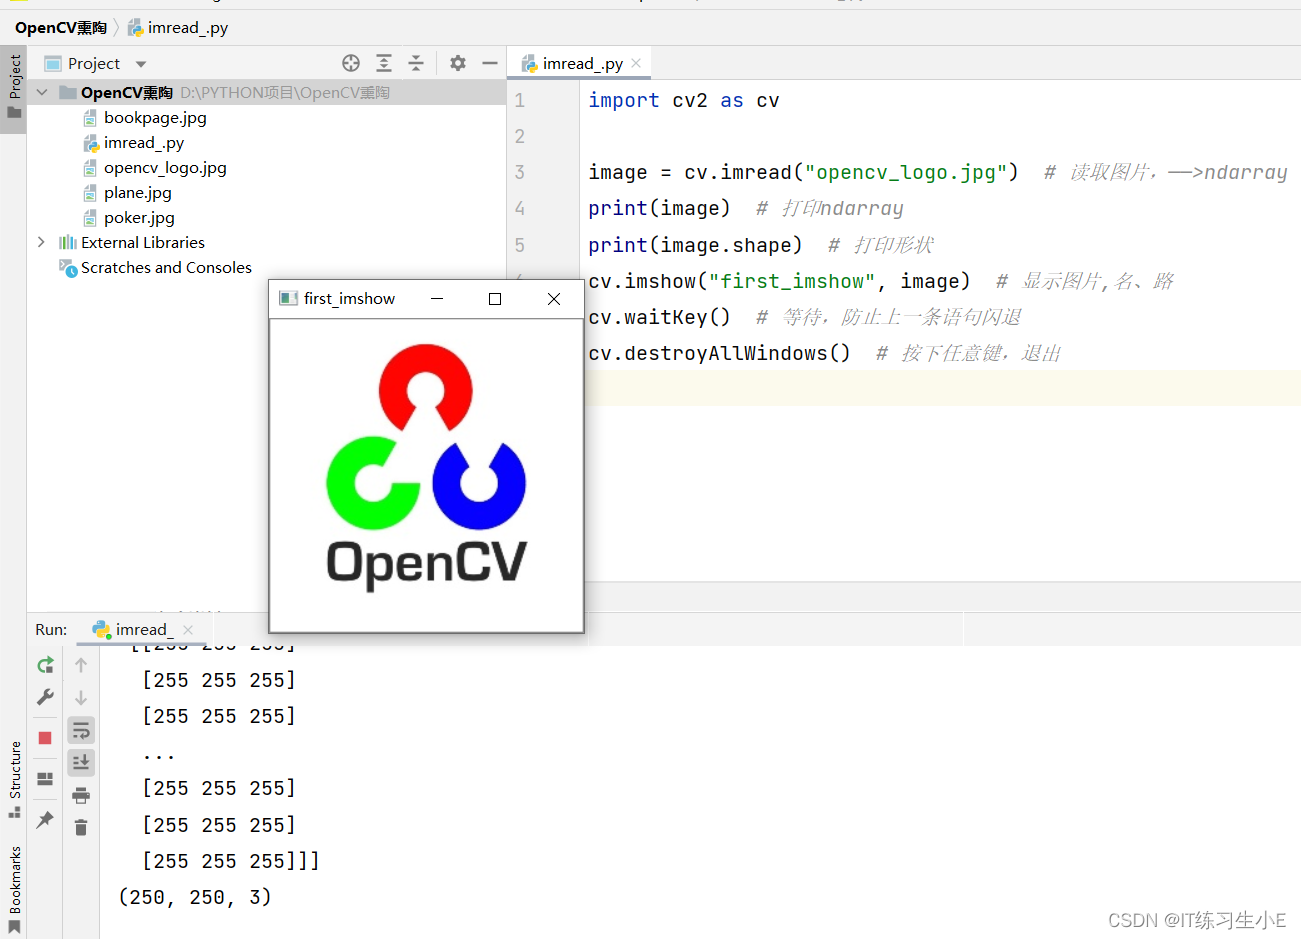
import cv2 as cv

image = cv.imread("opencv_logo.jpg")  # 读取图片,——>ndarray
print(image)  # 打印ndarray
print(image.shape) # 打印形状,(250, 250, 3):像素,横行、纵列;三颜色通道
cv.imshow("first_imshow", image)  # 显示图片,名、路
cv.waitKey()  # 等待,防止上一条语句闪退
cv.destroyAllWindows()  # 按下任意键,退出
import cv2 as cv
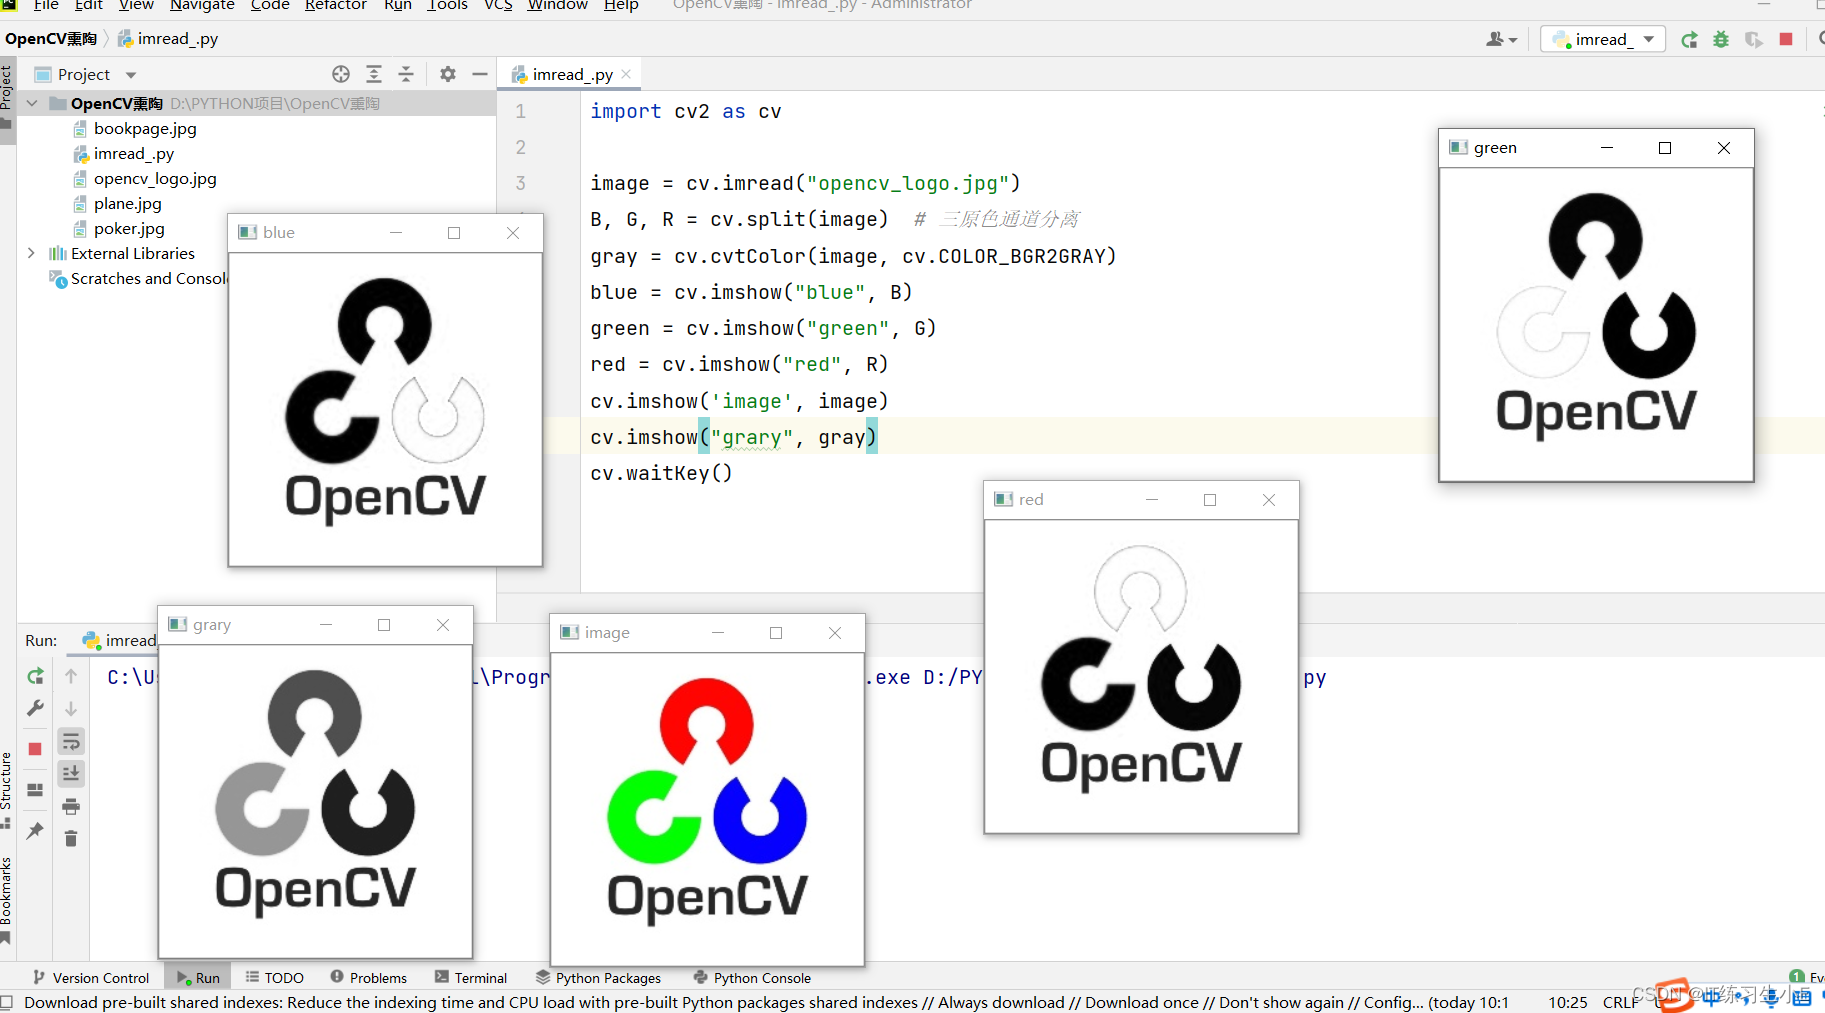
image = cv.imread("opencv_logo.jpg")
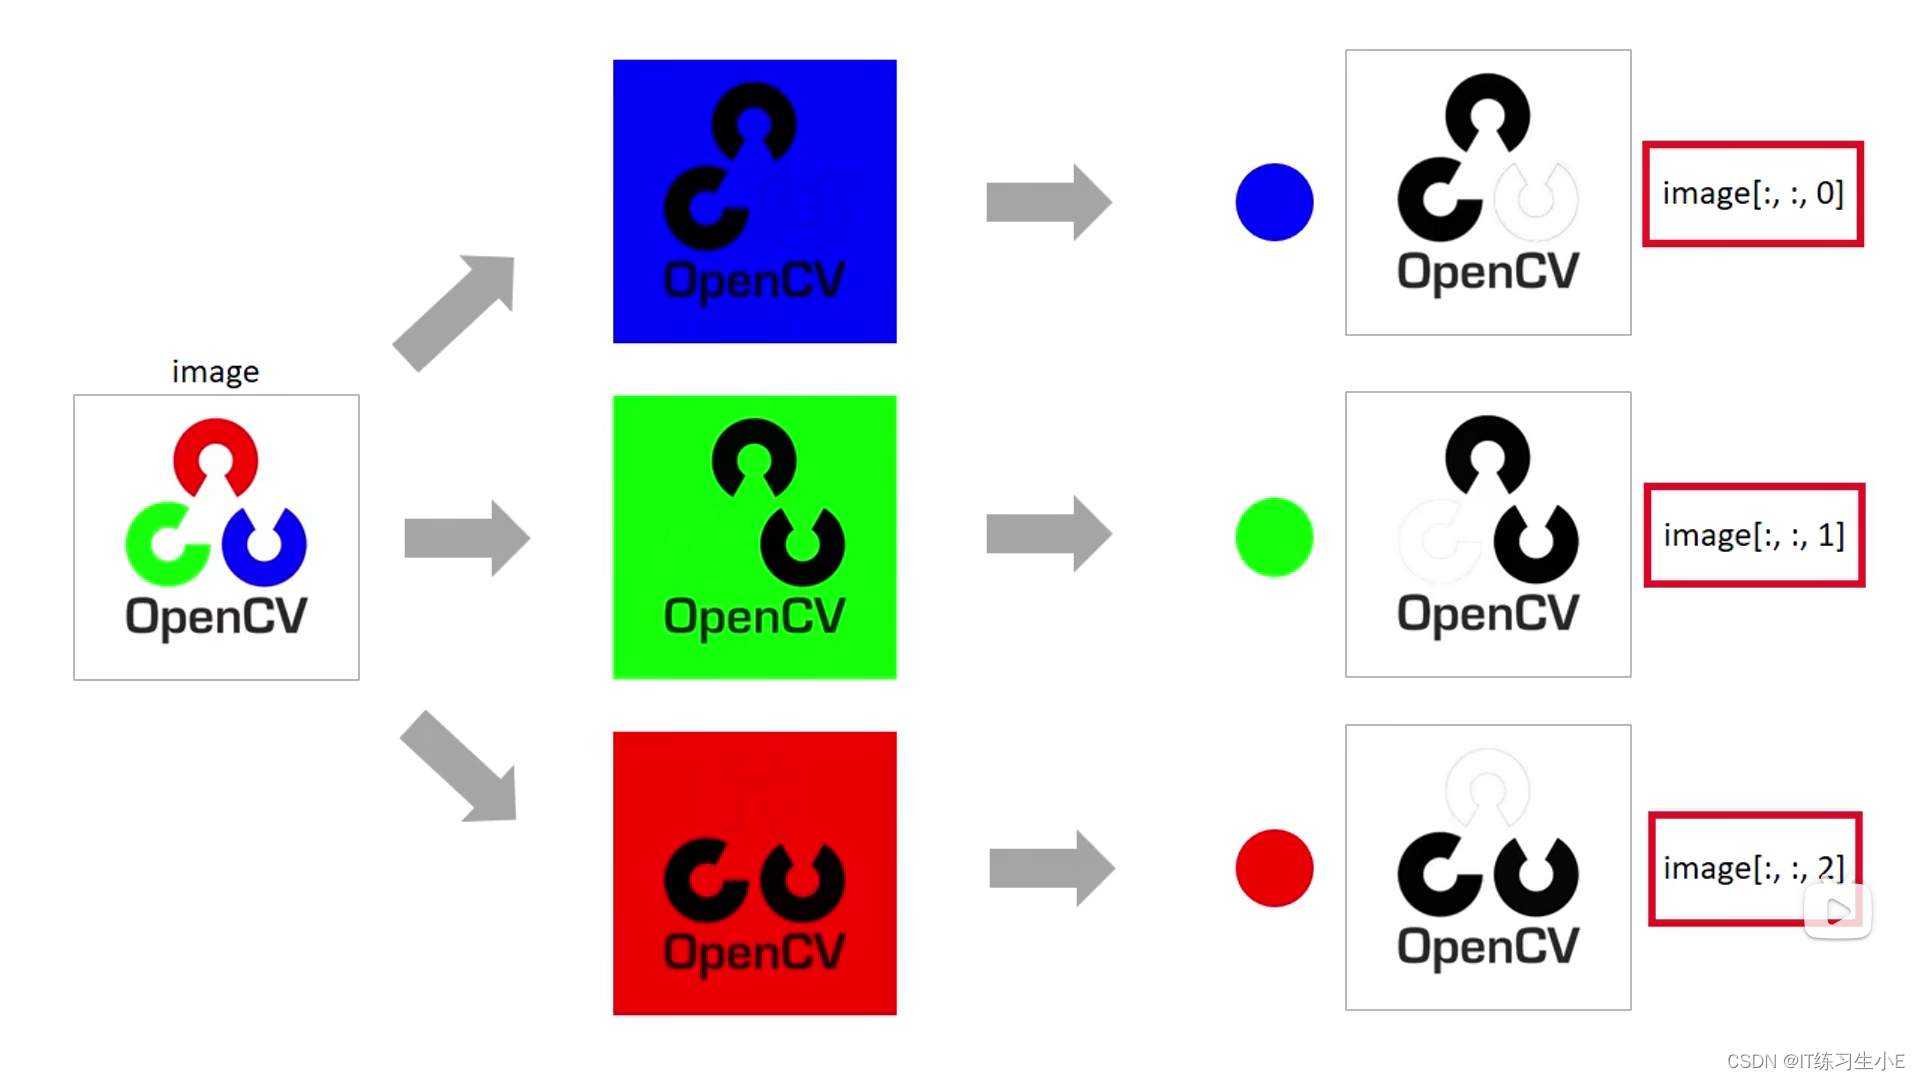
B, G, R = cv.split(image) # 三原色通道分离
gray = cv.cvtColor(image, cv.COLOR_BGR2GRAY) # cv.COLOR_BGR2GRAY,BGR三原色的平均
blue = cv.imshow("blue", B)
green = cv.imshow("green", G)
red = cv.imshow("red", R)
cv.imshow('image', image)
cv.imshow("grary", gray)
cv.waitKey()
裁剪(取样)
import cv2 as cv

image = cv.imread("opencv_logo.jpg")
crop = image[10:180, 10: 240]  # 裁剪,先横行再纵列,此处就是裁剪第10行到第180行,还有第10列到第240列
cv.imshow("crop",crop)
cv.waitKey()

绘制
import cv2 as cv
import numpy as np

image = np.zeros([300, 300, 3], dtype=np.uint8)  # 创建一个300*300大小的黑色画布
cv.line(image, (0, 0), (300, 300), (255, 255, 255), 2)
# 画一条直线,坐标(0,0)——>(300,300),颜色(255, 255, 255)白色,thickness=2,就是粗为两个像素
cv.circle(image, (150, 150), 70, (255, 0, 255), 2)  # 画圆,参数依次为:圆心坐标,半径,颜色,粗细
cv.rectangle(image, (30, 100), (60, 180), (0, 255, 0), 3) # 画矩形,参数依次为:point1,point2,颜色,粗细
cv.putText(image, "my love", (100, 50), 0, 1, (255, 255, 255)) # 输出文本
cv.imshow("image", image)
cv.waitKey()

均值滤波器
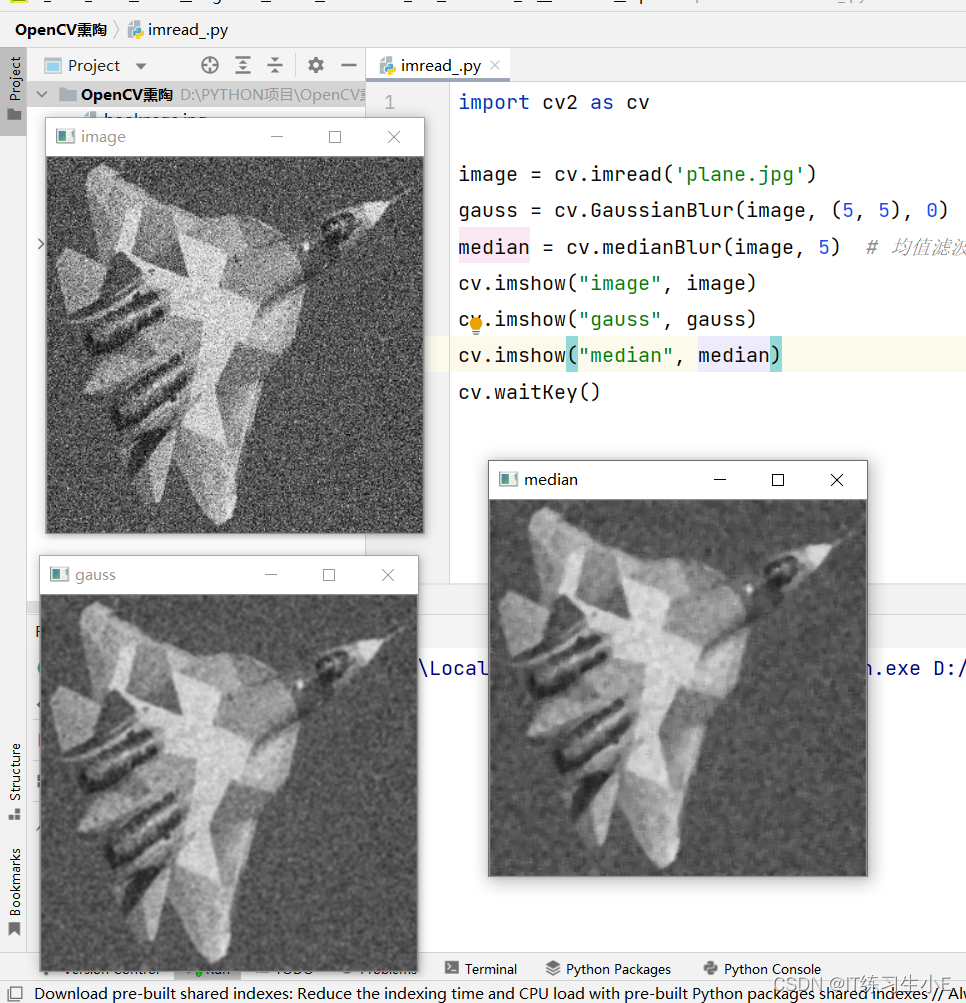
滤波器可以除去图片中的噪点。
import cv2 as cv

image = cv.imread('plane.jpg')
gauss = cv.GaussianBlur(image, (5, 5), 0)  # 高斯滤波器 像素为5
median = cv.medianBlur(image, 5)  # 均值滤波器,像素为5
cv.imshow("image", image)
cv.imshow("gauss", gauss)
cv.imshow("median", median)
cv.waitKey()
图形特征的提取
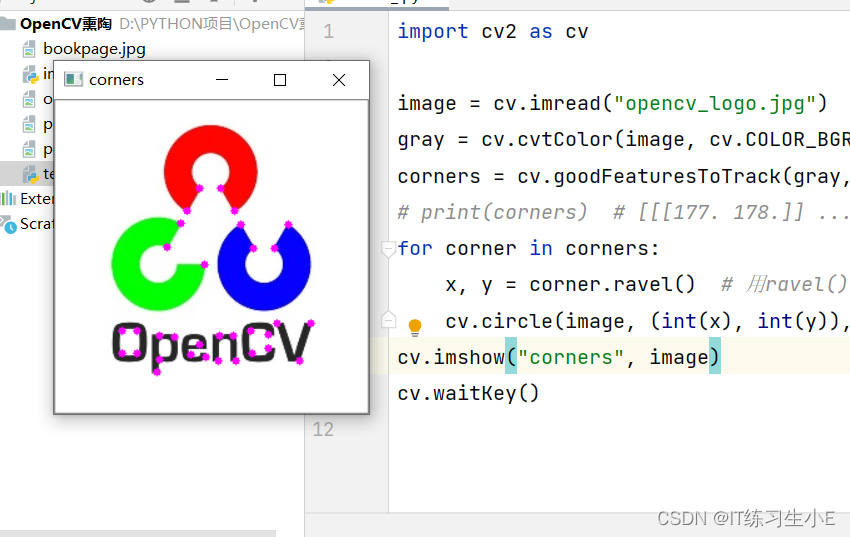
拐角
import cv2 as cv

image = cv.imread("opencv_logo.jpg")
gray = cv.cvtColor(image, cv.COLOR_BGR2GRAY)  # 灰度图
corners = cv.goodFeaturesToTrack(gray, 500, 0.1, 10)  # 最多提取500个点,像素大于0.1,两个特征点间的距离大于10
# print(corners)  # [[[177. 178.]] ......]
for corner in corners:
    x, y = corner.ravel()  # 用ravel()方法将数组拉成一维数组
    cv.circle(image, (int(x), int(y)), 3, (255, 0, 255), -1)  # 画圆标记
cv.imshow("corners", image)
cv.waitKey()
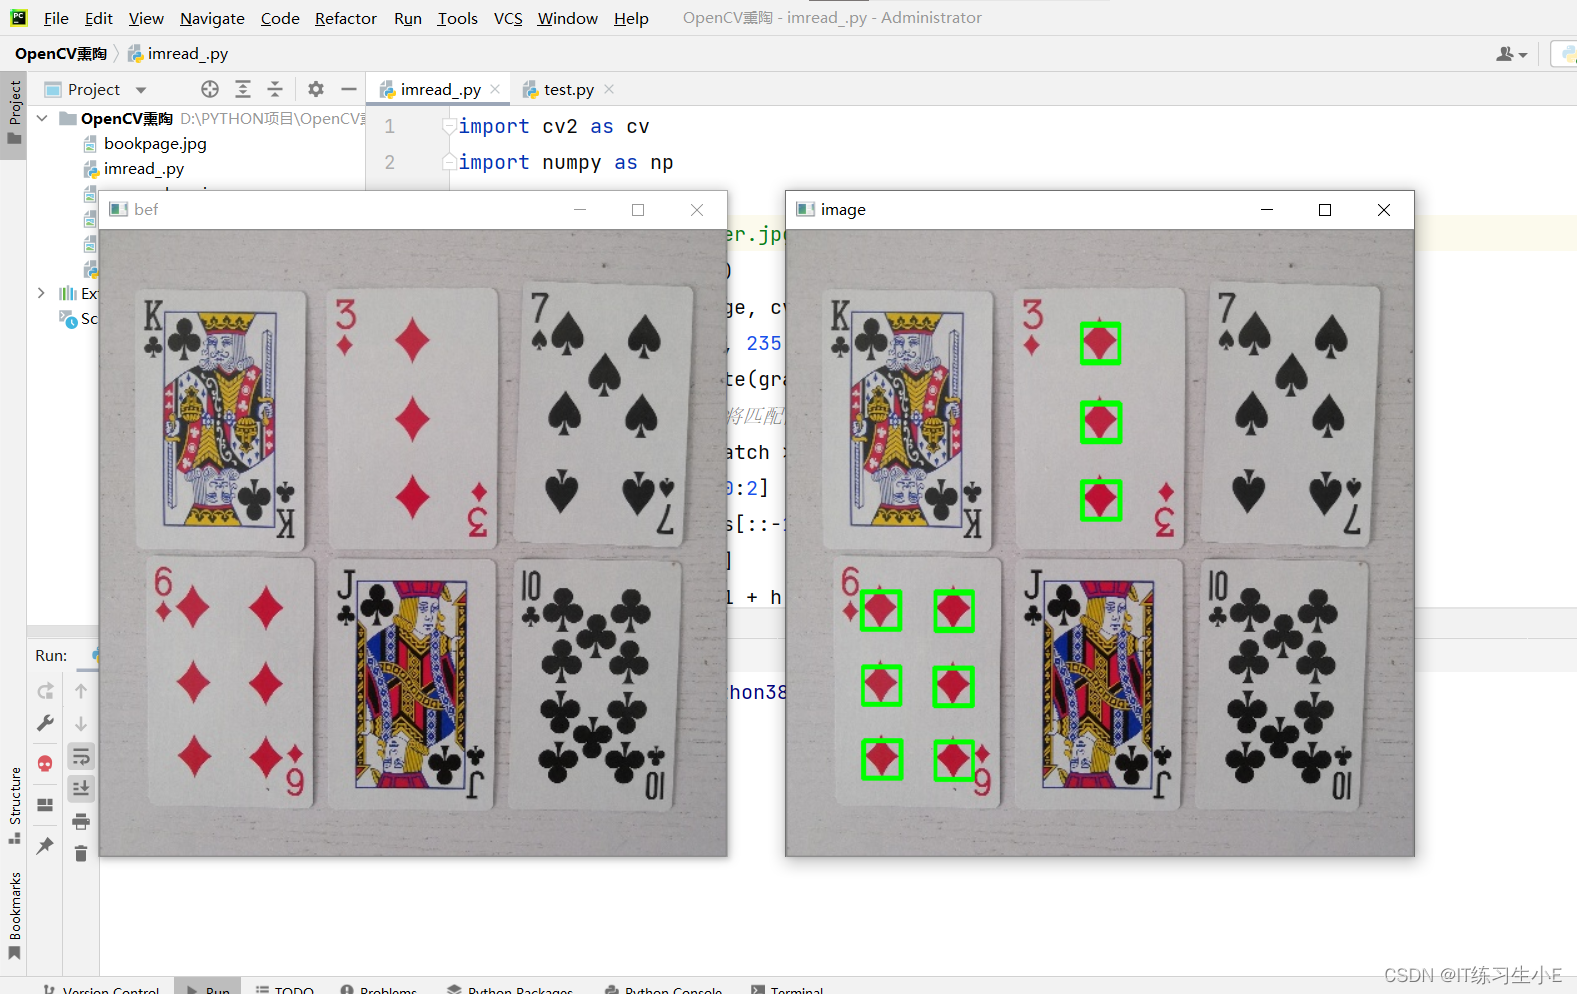
模板匹配
import cv2 as cv
import numpy as np

image = cv.imread("poker.jpg")
cv.imshow("bef", image)
gray = cv.cvtColor(image, cv.COLOR_BGR2GRAY)  # 使用灰度图
template = gray[75:105, 235:265]  # 一个菱形所在处
match = cv.matchTemplate(gray, template, cv.TM_CCOEFF_NORMED)
# cv.TM_CCOEFF_NORMED 将匹配图和模板标准化的函数,使得图片匹配不受光照影响
locations = np.where(match >= 0.9)  # 找出匹配系数大于0.9的匹配点
w, h = template.shape[0:2]  # 拿到模板的长与宽
for p in zip(*locations[::-1]):
    x1, y1 = p[0], p[1]
    x2, y2 = x1 + w, y1 + h
    cv.rectangle(image, (x1, y1), (x2, y2), (0, 255, 0), 2) # 画矩形框
cv.imshow("image", image)
cv.waitKey()
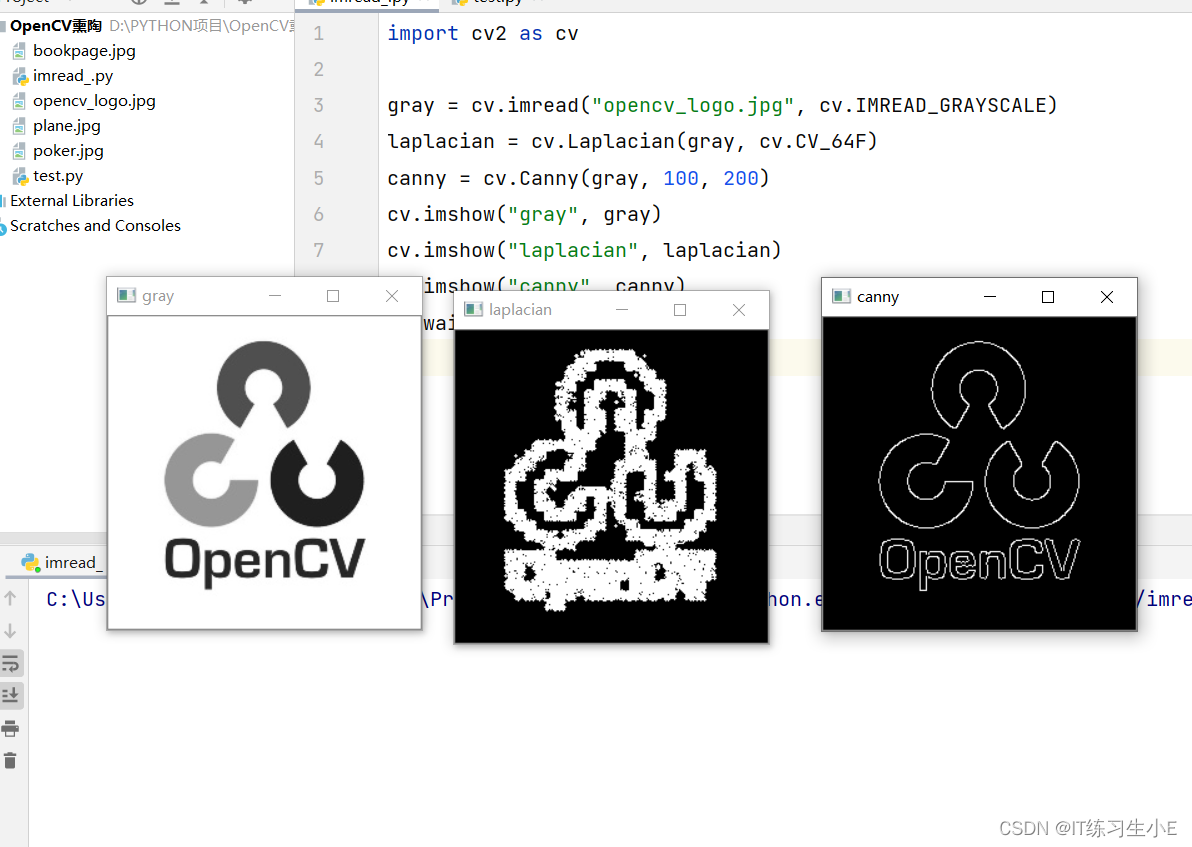
图像梯度(图片明暗变化)
因为几何图形的边缘有着明暗变化,所以梯度算法,可以用于边缘检测。
import cv2 as cv

gray = cv.imread("opencv_logo.jpg", cv.IMREAD_GRAYSCALE)  # cv.IMREAD_GRAYSCALE,读取灰度图
laplacian = cv.Laplacian(gray, cv.CV_64F)
canny = cv.Canny(gray, 100, 200)
# canny边缘检测,100, 200为梯度区间;边缘梯度大于200,可知为边缘,在100-200之间待定,小于100则不是边缘
cv.imshow("gray", gray)
cv.imshow("laplacian", laplacian)
cv.imshow("canny", canny)
cv.waitKey()
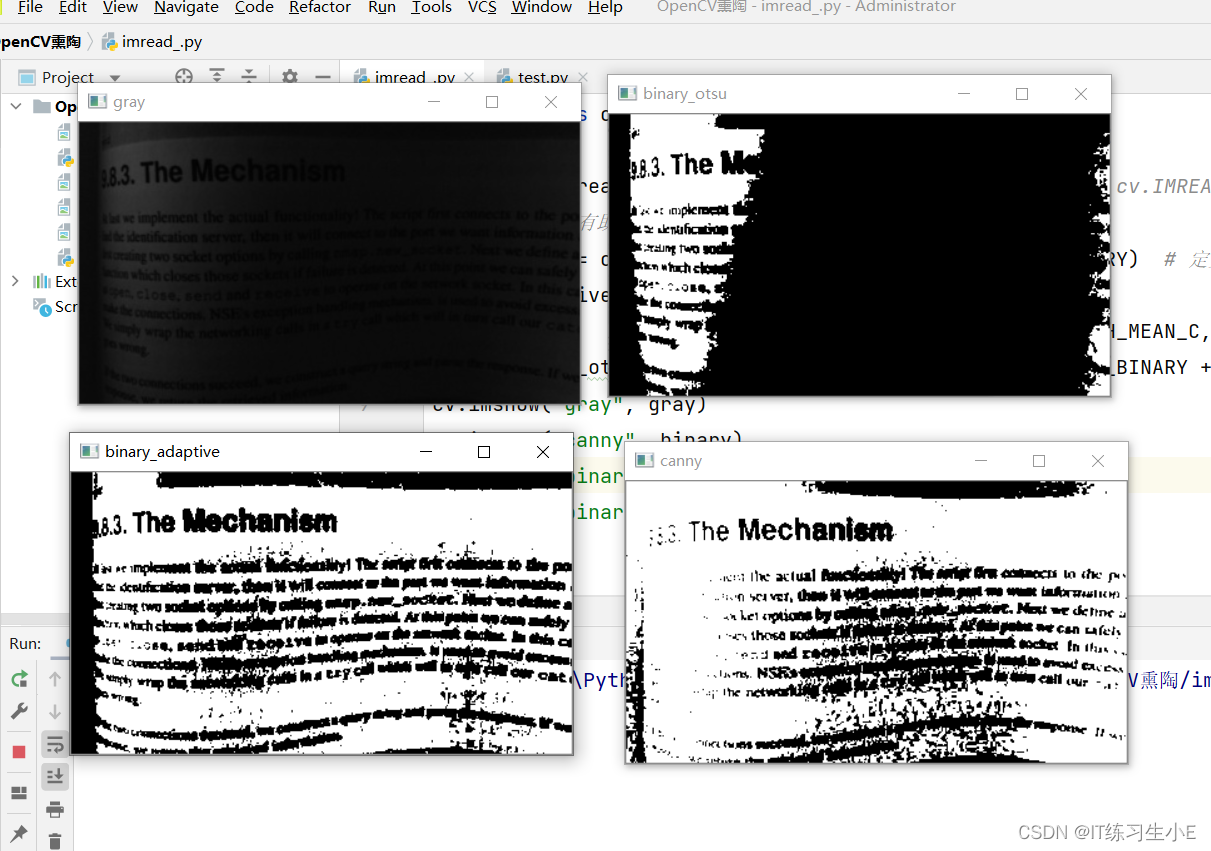
阈值算法(非黑即白)
import cv2 as cv

gray = cv.imread("bookpage.jpg", cv.IMREAD_GRAYSCALE)  # cv.IMREAD_GRAYSCALE,读取灰度图
# 此图像处理,有助于文字识别
ret, binary = cv.threshold(gray, 10, 255, cv.THRESH_BINARY)  # 定义固定阈值,阈值为10,最大灰度255
binary_adaptive = cv.adaptiveThreshold(gray, 255,  # 因为各个片区的明暗变化不一样,此算法切片独立计算阈值
                                       cv.ADAPTIVE_THRESH_MEAN_C, cv.THRESH_BINARY, 115, 1)
ret1, binary_otsu = cv.threshold(gray, 0, 255, cv.THRESH_BINARY + cv.THRESH_OTSU)  # 自动确定阈值
cv.imshow("gray", gray)
cv.imshow("canny", binary)
cv.imshow("binary_adaptive", binary_adaptive)
cv.imshow('binary_otsu', binary_otsu)
cv.waitKey()
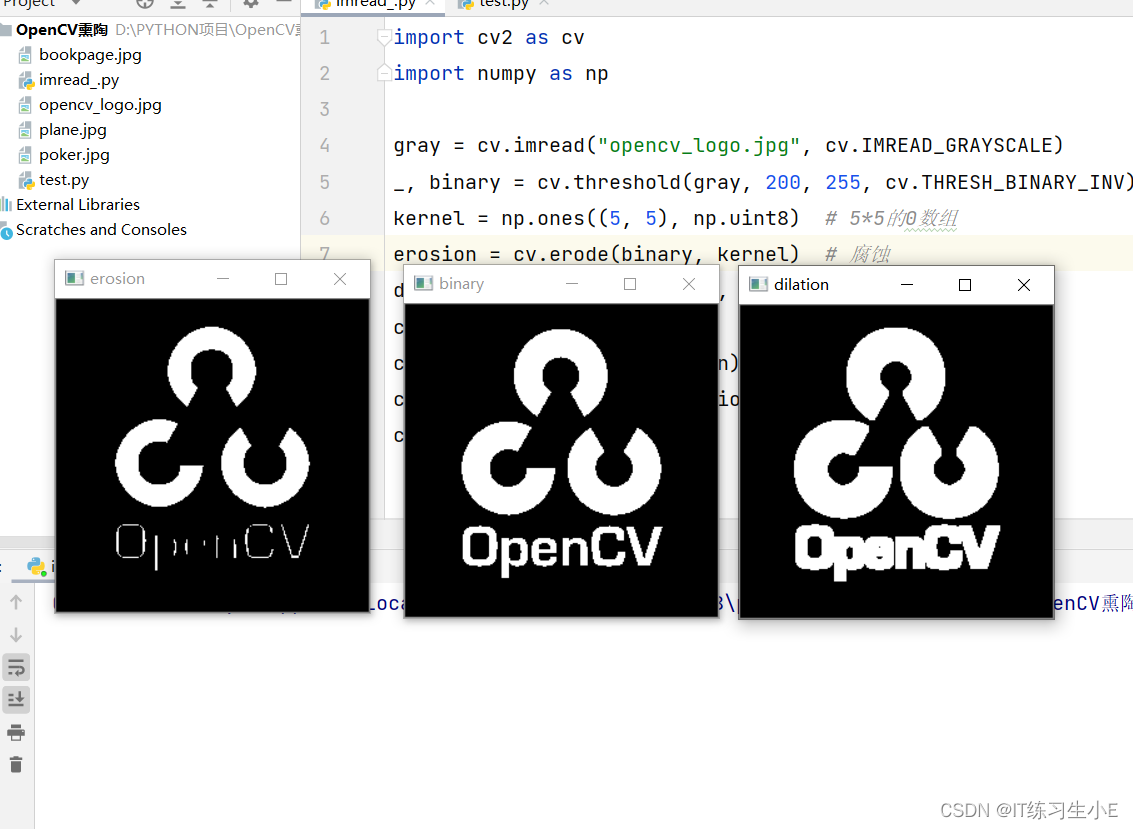
图像形态学算法
腐蚀与膨胀
处理图像边缘细节
import cv2 as cv
import numpy as np

gray = cv.imread("opencv_logo.jpg", cv.IMREAD_GRAYSCALE)
_, binary = cv.threshold(gray, 200, 255, cv.THRESH_BINARY_INV)
# cv.THRESH_BINARY_INV 反向阈值处理,原本背景为白色,处理后为黑色
kernel = np.ones((5, 5), np.uint8)  # 5*5的0正方形数组
erosion = cv.erode(binary, kernel)  # 腐蚀
dilation = cv.dilate(binary, kernel)  # 膨胀
cv.imshow("binary", binary)
cv.imshow('erosion', erosion)
cv.imshow("dilation", dilation)
cv.waitKey()
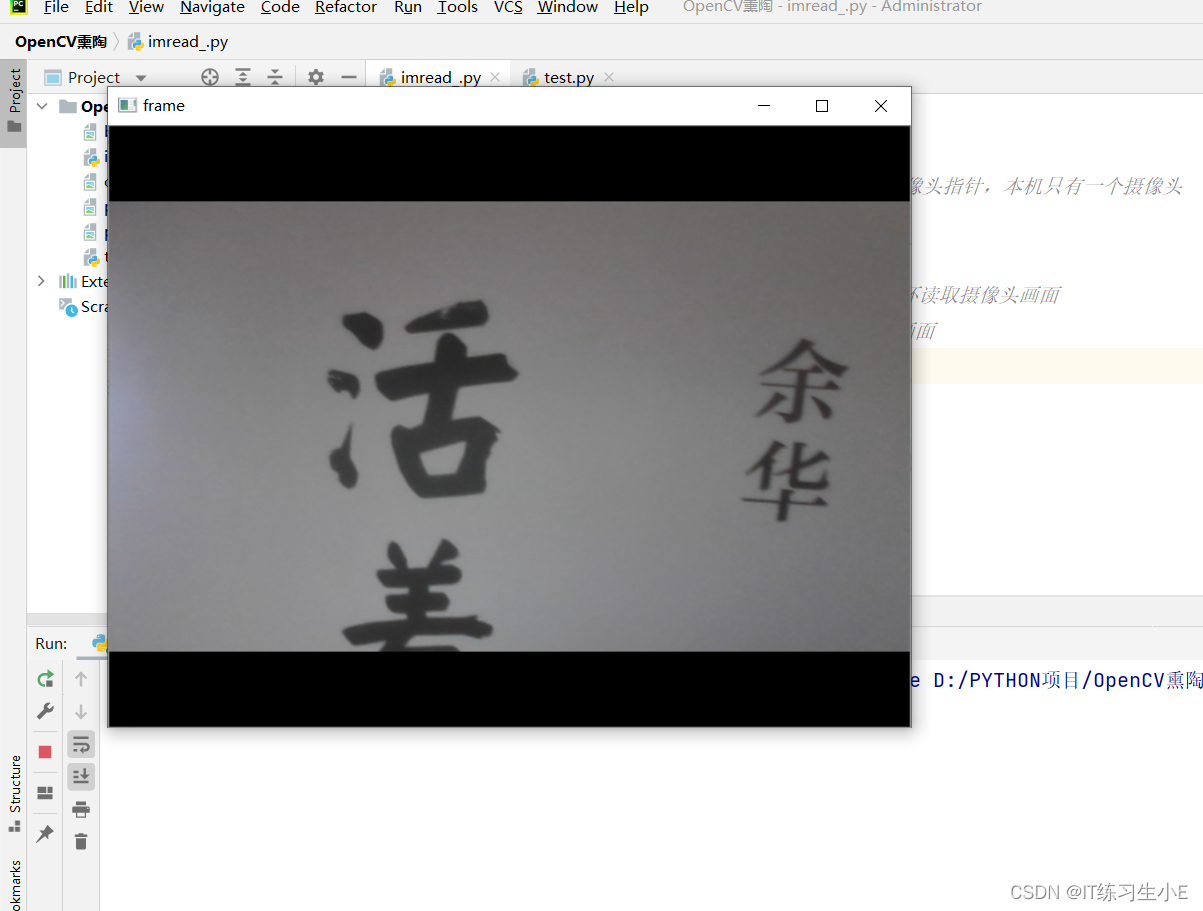
调用电脑摄像头
import cv2 as cv

captrue = cv.VideoCapture(0)  # 获取摄像头指针,本机只有一个摄像头

while True:
    ret, frame = captrue.read()  # 循环读取摄像头画面
    cv.imshow("frame", frame)  # 显示画面
    key = cv.waitKey(1)
    if key != -1:
        break
captrue.release()  # 释放摄像头
总结
本文为个人学习笔记,总结自b站孔工码字。欢迎━(`∀´)ノ亻!各位小伙伴,前去观看。


 7万+
7万+


 被折叠的 条评论
为什么被折叠?
被折叠的 条评论
为什么被折叠?
 到【灌水乐园】发言


