


前言
本项目是我自己在学校里完成的一个小项目,本项目为基于python-opencv,svm的人脸识别开源项目,不同于其他的直接从kaggle等获取划分好的数据集,本项目致力于从无到有的完成机器学习的所有步骤,即:
目录
项目展示:


一、数据采集
在数据采集方面我使用的是 Scrapy 结合 selenium 直接从百度上爬取需要的图片
1.创建爬虫项目
scrapy startproject DownloadImag
创建完成之后进入到spiders文件夹
cd .\DownloadImag\DownloadImag\spiders
之后开启爬虫【网址默认写百度图片的网址】
scrapy genspider downloadimag https://image.baidu.com
2.修改setting
需要修改的内容只有三个,第一个是不遵循机器人协议【ROBOTSTXT_OBEY】,第二个是打开管道【ITEM_PIPELINES】,第三个是打开下载中间【DOWNLOADER_MIDDLEWARES】,其他的不用管即可。(为什么不用加上User-Agent,cookie这些来防止网页反爬,因为百度有一个很厉害的人机验证,一般的爬虫加上这些东西也都无法绕过百度安全验证,因此直接用selenium请求网页)
代码如下:
BOT_NAME = 'DownloadImag'

SPIDER_MODULES = ['DownloadImag.spiders']
NEWSPIDER_MODULE = 'DownloadImag.spiders'


ROBOTSTXT_OBEY = False

# LOG_LEVEL = 'WARNING'

# 下面这个请求头可以不写,我是因为当时尝试绕过百度安全验证加上去的
DEFAULT_REQUEST_HEADERS = {
  'Accept': 'text/html,application/xhtml+xml,application/xml;q=0.9,img/webp,img/apng,*/*;q=0.8,application/signed-exchange;v=b3;q=0.9',
  'Accept-Language': 'en',
  'USER_AGENT' : 'Mozilla/5.0 (Windows NT 10.0; Win64; x64) AppleWebKit/537.36 (KHTML, like Gecko) Chrome/110.0.0.0 Safari/537.36 Edg/110.0.1587.69',
  'referer':'https://image.baidu.com/search/index?tn=baiduimage&word=%E5%91%A8%E6%9D%B0%E4%BC%A'
}


DOWNLOADER_MIDDLEWARES = {
   'DownloadImag.middlewares.DownloadimagDownloaderMiddleware': 543,
}


ITEM_PIPELINES = {
   'DownloadImag.pipelines.DownloadimagPipeline': 300,
}

middleware-settings
3.确认要提取的数据,items项
本项目需要的仅仅是需要下载的图片的网址【用于下载图片】,一个图片编号【图片的名字】,以及输入的关键字【文件夹的名字】,Field方法实际上的做法是创建一个字典,给字典添加一个建,暂时不赋值,等待提取数据后再赋值。
代码如下:
import scrapy


class DownloadimagItem(scrapy.Item):
    # define the fields for your item here like:
    name = scrapy.Field()
    src = scrapy.Field()
    title = scrapy.Field()
4.编写爬虫程序【downloadimag.py】
例如我这里要爬的是 周杰伦,林俊杰, 王力宏 三个人的图片,各爬100张。
代码如下:
import urllib.parse

import scrapy

# 导入items
from ..items import DownloadimagItem


class DownloadimagSpider(scrapy.Spider):
    # name是爬虫程序的名字,启动爬虫时用到
    name = 'downloadimag'
    # 允许爬取的网址【爬取的网页必须在这个区间】
    allowed_domains = ['img.baidu.com']

    def start_requests(self):
        names = ['周杰伦', '林俊杰', '王力宏']
        for temp in names:
            # 这里使用parse将字符串编码为浏览器能识别的格式【没有这一步会报错,无法访问网址】
            name = urllib.parse.quote(temp)
            url = f'https://image.baidu.com/search/index?tn=baiduimage&word={name}'
            # 回调函数,拼接完url后将其回调给Request让其访问网址
            yield scrapy.Request(url, callback=self.parse)

    def parse(self, response):
        # 使用xpath定位到需要爬取的元素的位置 src是图片的网址 title是输入的关键词(如"周杰伦")
        srcs = response.xpath('//li[@class="imgitem"]//img[@class="main_img img-hover"]/@src').extract()
        title = response.xpath('//div[@class="s_nav"]//span[@class="s_ipt_wr"]/input/@value').extract_first()
        num = 0
        for src in srcs:
            num += 1
            img_items = DownloadimagItem(src=src, name=str(num), title=title)
            if num > 100:
                break
            # 回调函数,将获取到的数据交给items
            yield img_items
5.编写pipelines
pipelines【管道】,用于处理提取的数据,如存数据库,下载等。我们这里需要将爬取到的图片数据下载下来。
代码如下:
import os
import urllib.request
# 这个包用于将汉字转化为拼音
from xpinyin import Pinyin
class DownloadimagPipeline:
# 这个路径是我要保存图片的位置
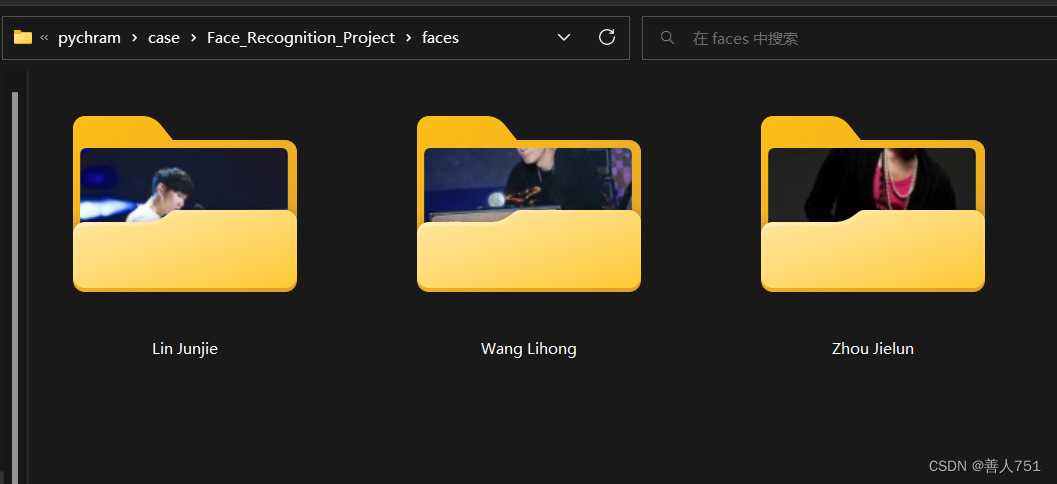
path = 'C:/Users/z1ta1/Documents/python/pychram/case/Face_Recognition_Project/faces'
# 判断是否存在该文件夹【faces】,没有就创建,有就pass
if os.path.exists(path):
pass
else:
os.mkdir(path)
# 下载items中的暂存的数据
def process_item(self, item, spider):
# 获取item中的数据
title = item.get('title')
# 下面这四步就是将汉字转化成拼音【如将'周杰伦'转化成'Zhou Jielun'】,因为如果路径中存在中文,后面python就会定位不到相应的位置
p = Pinyin()
result = p.get_pinyin(title)
s = result.split('-')
result1 = s[0].capitalize() + ' ' + ''.join(s[1:]).capitalize()
targetPath = f'C:/Users/z1ta1/Documents/python/pychram/case/Face_Recognition_Project/faces/{result1}'
if os.path.exists(targetPath):
pass
else:
os.mkdir(targetPath)
url = item.get('src')
filename = 'C:/Users/z1ta1/Documents/python/pychram/case/Face_Recognition_Project/faces/' + result1 + '/' + item.get('name') + '.jpg'
# urlretrieve是用于下载的接口,下载需要的图片
urllib.request.urlretrieve(url=url, filename=filename)
return item
6.编写middlewares中间件
前面说到我们无法绕过百度的安全验证,那干脆就不去绕过他,直接在下载中间件中使用selenium真正使用浏览器访问网页再爬取数据。
代码如下:
代码看似很长其实要修改的只有【class DownloadimagDownloaderMiddleware】
即【下载中间件】
import time

from scrapy import signals
from scrapy.http import HtmlResponse
from selenium.webdriver import Edge
from selenium.webdriver.edge.service import Service
from selenium.webdriver.edge.options import Options

# useful for handling different item types with a single interface
from itemadapter import is_item, ItemAdapter


class DownloadimagSpiderMiddleware:
    @classmethod
    def from_crawler(cls, crawler):
        s = cls()
        crawler.signals.connect(s.spider_opened, signal=signals.spider_opened)
        return s

    def process_spider_input(self, response, spider):
        return None

    def process_spider_output(self, response, result, spider):
        for i in result:
            yield i

    def process_spider_exception(self, response, exception, spider):
        pass

    def process_start_requests(self, start_requests, spider):
        for r in start_requests:
            yield r

    def spider_opened(self, spider):
        spider.logger.info('Spider opened: %s' % spider.name)


class DownloadimagDownloaderMiddleware:


    # 初始化
    def __init__(self):
        # 这里因为我用的是Edge,因此需要下载Edge相关的selenium驱动和包,下面这个地址就是我下载的Edge的驱动位置
        path = 'C:\Program Files (x86)\Microsoft\Edge\Application\msedgedriver.exe'
        # 设置options函数设置浏览器的启动参数
        self.options = Options()
        # 下面这一行代码表示开启了无界浏览器【即没有界面,在后台运行】
        self.options.add_argument("headless")
        # 下面这一行代码表示开启无图模式【即不调用gpu,不加载图形界面】(能加速,减少占用)
        self.options.add_argument("disable-gpu")
        # 下面这一行代码表示开启Edge浏览器引擎
        self.browser = Edge(service=Service(path), options=self.options)
        # 用开启的浏览器访问网址
        self.browser.get('https://image.baidu.com')

    # 关闭浏览器引擎
    def __del__(self):
        self.browser.close()

    @classmethod
    def from_crawler(cls, crawler):
        # This method is used by Scrapy to create your spiders.
        s = cls()
        crawler.signals.connect(s.spider_opened, signal=signals.spider_opened)
        return s

    # 这个函数是selenium操作的关键
    def process_request(self, request, spider):
        self.browser.get(request.url)
        for x in range(1, 11, 2):
            height = float(x) / 10
            # 下面这行js代码表示的是滑动滚动条,让页面缓慢下滑【通过改变heigth来实现】
            js = "document.documentElement.scrollTop = document.documentElement.scrollHeight * %f" % height
            # 让浏览器执行js代码
            self.browser.execute_script(js)
            # 让浏览器休眠一秒后再进行下一次向下滑动滚动条【为了让数据加载完全,预防页面懒加载】
            time.sleep(1)
        # 获取网页源码
        origin_code = self.browser.page_source
        res = HtmlResponse(url=request.url, encoding='utf-8', body=origin_code, request=request)
        # 将源码交给response
        return res

    def process_response(self, request, response, spider):
        return response

    def process_exception(self, request, exception, spider):
        pass

    def spider_opened(self, spider):
        spider.logger.info('Spider opened: %s' % spider.name)
二、特征提取【数据准备】
1.引入库
下面是特征提取需要的库:
import os
import cv2
import numpy as np
2.读入数据【将图片矩阵化】
代码如下(示例):
# 这个函数用来获取对应name下的所有图片【例如现在传到了"Zhou Jielun"参数,则PathArray中全是类似于'faces/Zhou Jielun/1.jpg'这样的图片地址】
def get_path(name):
    PathArray = []
    # 读取爬虫爬取的对应人的100张图片
    for j in range(1, 100):
        path = 'faces' + '/' + name + '/' + str(j) + '.jpg'
        PathArray.append(path)
    return PathArray


# 这个是人脸识别的函数,从传入的大图中是被到人脸,并将其另存到"train_faces"文件夹中
def read_PicSaveFace(name, targetPath):
    try:
        ImagePaths = get_path(name)
        # 对list中图片逐一进行检查,找出其中的人脸然后写到目标文件夹下
        count = 1
        # haarcascade_frontalface_alt.xml为库训练好的分类器文件,下载opencv,安装目录中可找到
        face_cascade = cv2.CascadeClassifier(
            r'C:\Users\z1ta1\miniconda3\Lib\site-packages\cv2\data\haarcascade_frontalface_alt.xml')
        n = 0
        for imagePath in ImagePaths:
            try:
                # cv2的读取图片的函数接口
                img = cv2.imread(imagePath)

                if type(img) != str:
                    # detectMultiScale是haarcascade_frontalface_alt人脸识别分类器中的以一个函数接口,其中img为cv2读取的图片信息,1.1表示每次选取的范围以1.1倍扩大,5表示检测目标的相邻矩形的最小个数为5【如果组成检测目标的小矩形的个数和小于 min_neighbors - 1 都会被排除】
                    faces = face_cascade.detectMultiScale(img, 1.1, 5)
                    if len(faces):
                        # 这四个参数中x,y表示扫描到人脸矩形的坐标位置,w,h表示矩形的宽高
                        for (x, y, w, h) in faces:
                            # 设置人脸宽度大于64像素,去除较小的人脸
                            if w >= 64 and h >= 64:
                                n += 1
                                fileName = str(n)
                                # 获取人脸图片【坐标位置和人脸区域大小】(保留了原图【截图的人脸区域】大小)
                                X = int(x)
                                W = int(x + w)
                                Y = int(y)
                                H = int(y + h)
                                # reasize接口用于将所有图片都以指定的大小展示,第一个参数表示img指定的坐标位置【即选中的人脸矩形区域】,第二个参数表示图片的大小【这里是以原尺寸输出】
                                f = cv2.resize(img[Y:H, X:W], (W - X, H - Y))
                                # 将人脸图片另存
                                cv2.imwrite(targetPath + os.sep + '%s.jpg' % fileName, f)
                                count += 1
                                print(imagePath + "have face")
            except:
                continue

    except IOError:
        print("Error")

    else:
        print('Find ' + str(count - 1) + ' faces to Destination ' + targetPath)


def get_data(name, targetPath):
    data = []  # 存放图像数据
    label = []  # 存放标签
    # 读取图片
    for i in name:
        # 这里的38张图片其实是人脸识别分类器识别到的最小的人脸数【我这里是“Lin Junjie”只识别到了38张人脸,有些图片因为各种原因识别不到人脸】
        for j in range(1, 39):
            path = targetPath + '/' + i + '/' + str(j) + '.jpg'
            img = cv2.imread(path, cv2.IMREAD_GRAYSCALE)
            img = cv2.resize(img, (150, 150), interpolation=cv2.INTER_AREA)

            h, w = img.shape
            # 将图片转化成列表
            img_col = img.reshape(h * w)
            data.append(img_col)
            label.append(i)

    # 将图片列表转化成矩阵类型
    C_data = np.array(data)
    C_label = np.array(label)
    return C_data, C_label
三. 模型训练
1.引入库
下面是svm模型训练需要的库:
import pickle
from sklearn.decomposition import PCA
from sklearn.metrics import accuracy_score
from sklearn.model_selection import train_test_split, GridSearchCV
from sklearn.svm import SVC
2.数据划分
将准备好的数据划分为训练集和测试集,以便模型训练
# 划分训练集和测试集
def split_data(C_data, C_label)

    # 将 C_data, C_label 以0.2测试集0.8训练集的比例分别划分成x_train, x_test, y_train, y_test
    x_train, x_test, y_train, y_test = train_test_split(C_data, C_label, test_size=0.2, random_state=42)
    print("get_data success!")
    return x_train, x_test, y_train, y_test
3.PCA模型训练
一般在svm训练前需要一个PCA模型来对数据进行降维,因为图片的特征大维数高,数据量大,svm又不擅长大数据计算,因此需要pca,代码如下:
def train_pca_model(x_train, x_test):
    print("training model...")
    # n_components是最常用的参数,代表返回的主成分的个数,也就是你想把数据降到几维,0 < n_components < 1代表满足最低的主成分方差累计贡献率,这里写0.95指返回满足主成分方差累计贡献率达到95%的主成分,筛选掉一些不重要的特征
    pca = PCA(n_components=0.95, svd_solver='auto').fit(x_train)

    # 用训练好的pca模型对数据降维处理
    x_train_pca = pca.transform(x_train)
    x_test_pca = pca.transform(x_test)
    return x_train_pca, x_test_pca, pca
4.SVM模型训练
代码如下:
def train_svm_model(x_train_pca, x_test_pca, y_test, y_train):
    # 创建SVM模型,这里C表示惩罚系数,kernel表示核函数,decision_function_shape表示SVM分类器的决策函数的形状,这些参数都影响模型的准确率【这里为当前最佳参数】
    clf = SVC(C=2.6826957952797246, kernel='rbf', decision_function_shape='ovo', tol=0.0001)

    print("Training dataset size: ", x_train_pca.shape)
    # 训练模型
    try:
        # 用准备好的数据来训练调好参的svm模型
        clf.fit(x_train_pca.reshape(x_train.shape[0], -1), y_train)
    except Exception as e:
        print("Error during model training:", e)

    return clf
5. 模型评估
训练好模型后,我们需要测试模型的可行性,如果预测分太低则模型不可用,代码如下:
def predict(clf, x_test_pca, y_test):
    # 预测测试集【用降好维的测试集去预测,不然预测结果不准】
    y_pred = clf.predict(x_test_pca)

    # 计算准确率
    accuracy = accuracy_score(y_test, y_pred)
    print("train_model success!")
    print('Accuracy:', accuracy)
6.参数优化
在上面说到在训练svm模型时,各个参数都会影响模型的好坏,因此我们需要在所有参数中选出最优参数,这就需要用到交叉验证,网格搜索来获取,代码如下:
def model_cv(x_train, y_train):
    print("testing parameters...")
    svc = SVC()
    # GridSearchCV中的param_grid的参数表示将需要验证的参数以字典的形式传入,字典中的值都是需要验证的候选参数,其中np.logspace表示构造一个等比数列集【默认是以10为幂底,第一第二个参数为次方区间,第三个参数为这区间的数的个数】
    params = {"C": np.logspace(-3, 3, 50), "kernel": ["rbf", "linear", "poly"],
              "decision_function_shape": ["ovo", "ovr"], "tol": [0.0001, 0.01, 0.1, 1]}

    # estimator为估计模型,这里用svc,cv为交叉验证需要的折数,n_jobs表示cpu跑满运行
    gc = GridSearchCV(estimator=svc, param_grid=params, cv=5, n_jobs=-1)
    gc.fit(x_train, y_train)
    # best_params_和 best_score_都是GridSearchCV的函数接口,用处如下
    print("最好的参数为:\n", gc.best_params_)
    print("最好的结果为:\n", gc.best_score_)
7.模型保存
模型训练好了之后要将训练好的模型保存下来,方便之后预测使用,代码如下:
def save_model(clf, pca):
    # 保存训练模型
    print('saving model...')
    with open('clf.pickle', 'wb') as f:
        # 将模型dump进f里面
        pickle.dump({'clf': clf,
                     'pca': pca
                     }, f)
    print("save_model success!")
四.模型测试
1.引入库
下面是模型测试需要的库:
import os
import pickle
import cv2
import numpy as np
from matplotlib import pyplot as plt, image as mpimg
from temp1 import face_recognition
2.模型测试
代码如下:
data = [] # 存放图像数据
pathArray = []
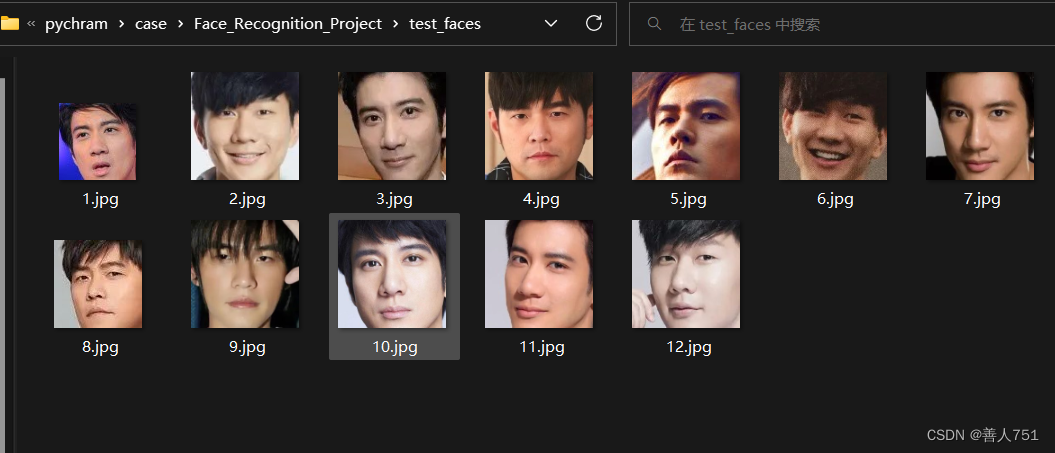
faces_test = []
targetPath = 'test_faces'
if os.path.exists(targetPath):
pass
else:
os.mkdir(targetPath)
# 识别图片中的人脸,准备数据
for i in range(1, 16):
path = 'test_img' + '/' + str(i) + '.jpg'
pathArray.append(path)
n = face_recognition(pathArray, targetPath)
# 准备数据
for j in range(1, 13):
test_path = 'test_faces' + '/' + str(j) + '.jpg'
faces_test.append(test_path)
img = cv2.imread(test_path, cv2.IMREAD_GRAYSCALE)
img = cv2.resize(img, (150, 150), interpolation=cv2.INTER_AREA)
h, w = img.shape
# 将图片转化成列表
img_col = img.reshape(h * w)
data.append(img_col)
C_data = np.array(data)
# 从f文件中提取出模型赋给model
with open('clf.pickle', 'rb') as f:
model = pickle.load(f)
pca = model['pca']
# 将训练和测试样本都进行降维
x_test_pca = pca.transform(C_data)
clf = model['clf']
print("识别结果是:")
#print(clf.predict(x_test_pca))
clf.predict(x_test_pca)
3.识别结果可视化
为了让识别结果更加直观,这里采用matplotlib库来实现可视化,代码如下:
def visualization(faces_test):
    # 布置画布,figsize为画布指定的宽和高【这里用4,3是因为我这里识别了12张照片,以4*3的布局显示】
    plt.figure(figsize=(4 * 2, 3 * 3))
    for i in range(1, 13):
        # 创建子图,第一个参数为子图的行数,第二个参数为子图的列数,第三个参数为索引值,表示把图画在第对应的位置
        ax = plt.subplot(4, 3, i)
        # 用mpimg.imread将图像转换成plt能识别的格式【不加这一行可能会报错】
        img = mpimg.imread(faces_test[i-1])
        # 展示图片
        ax.imshow(img, cmap="gray")
        ax.axis("off")
        plt.title("Predict:%s" % predict_name[i-1])
    plt.show()
总结
以上就是本项目所有函数详解,完整代码如下:【因为Scrapy部分展示的就是完整的代码,故而下面不展示】
完整代码:
训练模型
import os
import pickle
import cv2
import numpy as np
from sklearn.decomposition import PCA
from sklearn.metrics import accuracy_score
from sklearn.model_selection import train_test_split, GridSearchCV
from sklearn.svm import SVC


def get_path(name):
    PathArray = []
    for j in range(1, 100):
        path = 'faces' + '/' + name + '/' + str(j) + '.jpg'
        PathArray.append(path)
    return PathArray


def face_recognition(ImagePaths, targetPath):
    # 对list中图片逐一进行检查,找出其中的人脸然后写到目标文件夹下
    count = 1
    # haarcascade_frontalface_alt.xml为库训练好的分类器文件,下载opencv,安装目录中可找到
    face_cascade = cv2.CascadeClassifier(
        r'C:\Users\z1ta1\miniconda3\Lib\site-packages\cv2\data\haarcascade_frontalface_alt.xml')
    n = 0
    for imagePath in ImagePaths:
        try:
            img = cv2.imread(imagePath)

            if type(img) != str:
                faces = face_cascade.detectMultiScale(img, 1.1, 5)
                if len(faces):
                    for (x, y, w, h) in faces:
                        # 设置人脸宽度大于64像素,去除较小的人脸
                        if w >= 64 and h >= 64:
                            n += 1
                            fileName = str(n)
                            # 获取人脸图片【坐标位置和人脸区域大小】(保留了原图【截图的人脸区域】大小)
                            X = int(x)
                            W = int(x + w)
                            Y = int(y)
                            H = int(y + h)

                            f = cv2.resize(img[Y:H, X:W], (W - X, H - Y))
                            cv2.imwrite(targetPath + os.sep + '%s.jpg' % fileName, f)
                            count += 1
                            print(imagePath + "have face")
        except:
            continue
    return count


def read_PicSaveFace(name, targetPath):
    try:
        ImagePaths = get_path(name)
        count = face_recognition(ImagePaths, targetPath)

    except IOError:
        print("Error")
    else:
        print('Find ' + str(count - 1) + ' faces to Destination ' + targetPath)


def get_data(name, targetPath):
    data = []  # 存放图像数据
    label = []  # 存放标签
    # 读取图片
    for i in name:
        for j in range(1, 39):
            path = targetPath + '/' + i + '/' + str(j) + '.jpg'
            img = cv2.imread(path, cv2.IMREAD_GRAYSCALE)
            img = cv2.resize(img, (150, 150), interpolation=cv2.INTER_AREA)

            h, w = img.shape
            # 将图片转化成列表
            img_col = img.reshape(h * w)
            data.append(img_col)
            label.append(i)

    # 将图片列表转化成矩阵类型
    C_data = np.array(data)
    C_label = np.array(label)

    print("found...")
    # 划分训练集和测试集
    x_train, x_test, y_train, y_test = train_test_split(C_data, C_label, test_size=0.2, random_state=42)
    print("get_data success!")
    return x_train, x_test, y_train, y_test


def train_model(x_train, x_test, y_train, y_test):
    print("training model...")
    pca = PCA(n_components=0.95, svd_solver='auto').fit(x_train)
    # 将训练和测试样本都进行降维
    x_train_pca = pca.transform(x_train)
    x_test_pca = pca.transform(x_test)

    # 创建SVM模型
    clf = SVC(C=2.6826957952797246, kernel='rbf', decision_function_shape='ovo', tol=0.0001)

    # 训练模型
    print("Training dataset size: ", x_train_pca.shape)
    try:
        clf.fit(x_train_pca.reshape(x_train.shape[0], -1), y_train)
    except Exception as e:
        print("Error during model training:", e)

    # 预测测试集
    y_pred = clf.predict(x_test_pca)

    # 计算准确率
    accuracy = accuracy_score(y_test, y_pred)
    print("train_model success!")
    print('Accuracy:', accuracy)
    return clf, pca


def model_cv(x_train, y_train):
    print("testing parameters...")
    svc = SVC()
    params = {"C": np.logspace(-3, 3, 50), "kernel": ["rbf", "linear", "poly"],
              "decision_function_shape": ["ovo", "ovr"], "tol": [0.0001, 0.01, 0.1, 1]}
    gc = GridSearchCV(estimator=svc, param_grid=params, cv=5, n_jobs=-1)
    gc.fit(x_train, y_train)
    print("最好的参数为:\n", gc.best_params_)
    print("最好的结果为:\n", gc.best_score_)


def save_model(clf, pca):
    # 保存训练模型
    print('saving model...')
    with open('clf.pickle', 'wb') as f:
        pickle.dump({'clf': clf,
                     'pca': pca
                     }, f)  # 将模型dump进f里面
    print("save_model success!")


if __name__ == '__main__':
    path = './faces'
    name = os.listdir(path)
    targetPath = 'train_faces'
    if os.path.exists(targetPath):
        pass
    else:
        os.mkdir(targetPath)
    # 获取人脸数据
    for i in name:
        path = targetPath + '/' + i
        if os.path.exists(path):
            pass
        else:
            os.mkdir(path)
        read_PicSaveFace(i, path)

    # 获取数据
    x_train, x_test, y_train, y_test = get_data(name, targetPath)

    # 参数优化
    # model_cv(x_train, y_train)

    # 训练模型
    clf, pca = train_model(x_train, x_test, y_train, y_test)

    # 保存模型
    save_model(clf, pca)
模型测试
import os
import pickle
import cv2
import numpy as np
from matplotlib import pyplot as plt, image as mpimg
from temp1 import face_recognition

data = []  # 存放图像数据
pathArray = []
faces_test = []
targetPath = 'test_faces'
if os.path.exists(targetPath):
    pass
else:
    os.mkdir(targetPath)
# 识别图片中的人脸,准备数据
for i in range(1, 16):
    path = 'test_img' + '/' + str(i) + '.jpg'
    pathArray.append(path)
    n = face_recognition(pathArray, targetPath)

# 准备数据
for j in range(1, 13):
    test_path = 'test_faces' + '/' + str(j) + '.jpg'
    faces_test.append(test_path)
    img = cv2.imread(test_path, cv2.IMREAD_GRAYSCALE)
    img = cv2.resize(img, (150, 150), interpolation=cv2.INTER_AREA)

    h, w = img.shape
    # 将图片转化成列表
    img_col = img.reshape(h * w)
    data.append(img_col)

C_data = np.array(data)

# 从f文件中提取出模型赋给model
with open('clf.pickle', 'rb') as f:
    model = pickle.load(f)

pca = model['pca']
# 将训练和测试样本都进行降维
x_test_pca = pca.transform(C_data)

clf = model['clf']

print("识别结果是:")
#print(clf.predict(x_test_pca))

predict_name = clf.predict(x_test_pca)
# 可视化
plt.figure(figsize=(4 * 2, 3 * 3))
for i in range(1, 13):
    ax = plt.subplot(4, 3, i)
    img = mpimg.imread(faces_test[i-1])
    ax.imshow(img, cmap="gray")
    ax.axis("off")
    plt.title("Predict:%s" % predict_name[i-1])
plt.show()


 2万+
2万+


 被折叠的 条评论
为什么被折叠?
被折叠的 条评论
为什么被折叠?
 到【灌水乐园】发言


