


Nooploop_ROS驱动包图文教程 https://www.yuque.com/nooploop/spseqo/hp6ib2?
小车主机的工作空间位置:~/tqz_newcode/nooploop_ws
1.终端内配置SSH
在ubuntu上位机的终端内输入:
ssh wheeltec@<小车ip地址>
密码:dongguan
2.通过VSCODE连接小车主机
1.按下快捷键 ctrl+shift+P
2.输入并选择 Remote-SSH:Add new SSH Host
如果不是第一次连,可以选择
Remote-SSH:connect to Host
3.在弹出的框内输入 wheeltec@<小车ip地址> 后输入 密码 确认
4.选择保存配置文件的路径
5.成功连接后,VSCODE会在远程主机上启动一个工作环境,左下角会显示 SSH:<小车主机名>
3.移植workspace
2号车、3号车均已移植完毕,现可忽略
1.从上位机中把workspace的复制到小车下位机中
2.将工作空间下的build、devel两文件夹以及src目录下的CMakeLists.txt文件删除
3.进行catkin_make clean和catkin_make完成编译
说明:每次运行时无需在当前工作环境启动
roscore,小车的网络、内核均挂载于实验室的组网中。
4.编译后运行nlink_parser官方文件
1.首先检查linktrack.launch文件内指定的USB端口是否与当前小车主机连接UWB使用的端口一致
ls -l /dev/ttyUSB*
ls -l /dev/ttyCH343USB*
2.对当前UWB占用的端口赋予读写权限
(robot2或3)sudo chmod 777 /dev/ttyCH343USB1
(robot4)sudo chmod 777 /dev/ttyCH343USB0
3.执行
/nooploop_ws$ source devel/setup.bash
/nooploop_ws$ roslaunch nlink_parser linktrack.launch
4.执行后检查是否有相应话题活跃
/nooploop_ws$ source devel/setup.bash
/nooploop_ws$ rostopic list
应检查到nlink_linktrack_nodeframe2话题活跃
5.运行自定义ROSCPP:nlink_example_distributed
~/tqz_newcode/nooploop_ws/src/nlink_parser/src/nlink_example_distributed
功能:指定小车搭载的UWB节点为中心节点,并以float32multiarray以数组形式转发distances至对应话题
1.通过ros参数管理器,指定当前的anchor_id (放置于车上的UWB,作为数据流向的中心) ,robot_id,在终端中输入以下rosparam命令:rosparam set anchor_id 4
1.在main.cpp中修改uint8_t全局变量anchor_id和robot_id为正确编号,保存并编译。
2.执行
/nooploop_ws$ source devel/setup.bash
/nooploop_ws$ rosrun nlink_parser nlink_example_distributed
3.执行后可在话题列表查看到相应话题,若需查看话题消息内容
/nooploop_ws$ source devel/setup.bash
/nooploop_ws$ rostopic echo /<话题名称>
数据、话题消息结构说明
一辆车运行一次ROSCPP,产生2个话题(话题内消息均为Float32MultiArray结构):
-
robot_i_range_data
-
robot_i_nokov_position
设当前小车上连着的UWB的id为4,则main.cpp程序内需手动确保anchor_id赋值为4,robot_id赋值为小车编号。UWB数组包含distance数据的原理如下图所示,每个箭头对应一段distance值:(代码详见main.cpp)
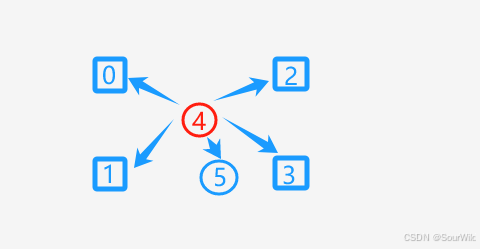
UWB数组的data部分,索引与各段dis对应关系如下:
| 索引 | 0 | 1 | 2 | 3 | 4 | 5 |
|---|---|---|---|---|---|---|
| 元素 | dis_From_anchor_To_0 | dis_From_anchor_To_1 | dis_From_anchor_To_2 | dis_From_anchor_To_3 | dis_From_anchor_To_4 | dis_From_anchor_To_5 |
动捕真值数组的data部分包含当前车辆的x,y,z值,两数组的headers部分均存有时间戳,详细构造如下:
| 话题名 | 消息构造 | |
|---|---|---|
| UWB数据 | /robot_i_range_data | 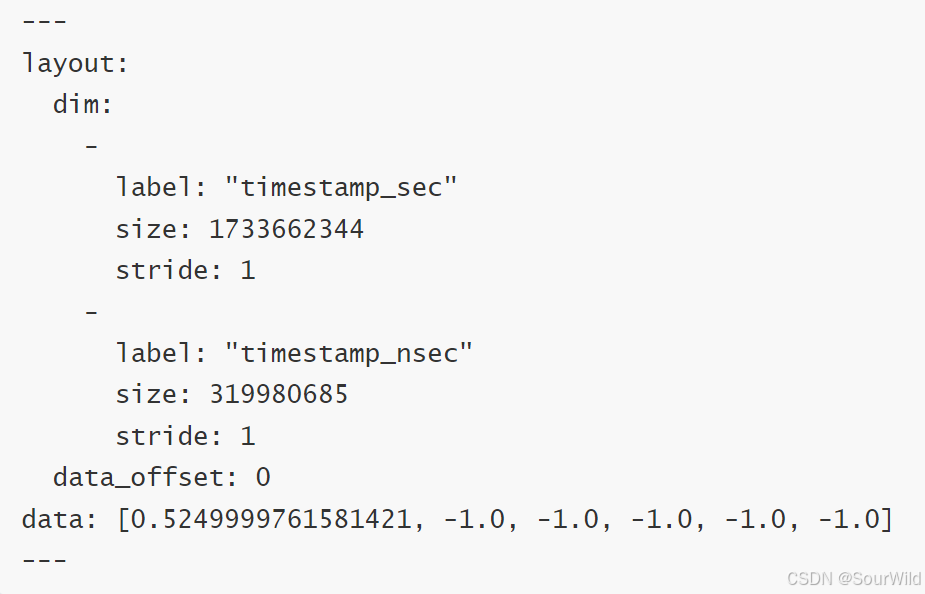 |
| 动捕真值 | /robot_i_nokov_position |  |
main.cpp具体展示
代码实现:将数组distance_array的data部分长度为max_nodes=6,distance_array.data的索引0~5分别对应车上UWB(anchor_id)到0~5编号的UWB的距离dis,未读入数据时默认初值为-1;数组robot2_position_array的data部分存储小车的动捕坐标真值。
#include <nlink_parser/LinktrackNodeframe2.h> // 订阅的消息格式
#include <geometry_msgs/PoseStamped.h>       // 用于接收PoseStamped消息
#include <std_msgs/Float32MultiArray.h>      // 用于发布多个浮点数信息
#include <ros/ros.h>
#include <vector>
#include <iostream>

// 全局发布者
ros::Publisher publisher_uwb;
ros::Publisher publisher_robot2_nokov;

// anchor_id 和 robot_id 配置
uint8_t anchor_id = 4;
uint8_t robot_id = 4;

// UWB数据的回调函数
void nodeframeCallback(const boost::shared_ptr<const nlink_parser::LinktrackNodeframe2>& msg) {
    ROS_INFO("msg LinktrackNodeframe2 received, systemTime: %d", msg->system_time);

    // 假设节点 ID 的范围是固定的(例如 0-5),初始化距离数组为 -1
    const size_t max_nodes = 6; // 最大节点数量
    std_msgs::Float32MultiArray distance_array;
    distance_array.data.resize(max_nodes, -1.0); // 默认所有节点的距离为 -1(无效值)

    // 获取当前时间
    ros::Time now = ros::Time::now();

    // 设置时间戳(秒和纳秒分别存储在 layout.dim 中)
    distance_array.layout.dim.clear();
    std_msgs::MultiArrayDimension dim_sec, dim_nsec;

    dim_sec.label = "timestamp_sec";
    dim_sec.size = now.sec;     // 秒部分
    dim_sec.stride = 1;

    dim_nsec.label = "timestamp_nsec";
    dim_nsec.size = now.nsec;   // 纳秒部分
    dim_nsec.stride = 1;

    distance_array.layout.dim.push_back(dim_sec);
    distance_array.layout.dim.push_back(dim_nsec);

    // 遍历消息中的所有节点
    if (msg->id == anchor_id) {
        for (size_t i = 0; i < msg->nodes.size(); ++i) {
            uint8_t node_id = msg->nodes[i].id; // 当前节点 ID
            if (node_id < max_nodes) {
                distance_array.data[node_id] = msg->nodes[i].dis; // 将距离填入对应索引
                ROS_INFO("Node %d -> Anchor %d, Distance: %f", node_id, anchor_id, msg->nodes[i].dis);
            }
        }
    }

    // 发布距离数据
    publisher_uwb.publish(distance_array);
    ROS_INFO("Published distances for anchor %d", anchor_id);

    // //limit the topic to 20Hz
    // ros::Duration(0.05).sleep();
}

// /robot_2/nokov 的回调函数
void robot2NokovCallback(const geometry_msgs::PoseStamped::ConstPtr& msg) {
    // 创建用于发布的 Float32MultiArray 消息
    std_msgs::Float32MultiArray robot2_position_array;
    robot2_position_array.data.resize(3);

    // 提取 x, y, z 坐标
    robot2_position_array.data[0] = msg->pose.position.x;
    robot2_position_array.data[1] = msg->pose.position.y;
    robot2_position_array.data[2] = msg->pose.position.z;

    // 获取当前时间
    ros::Time now = ros::Time::now();

    // 设置时间戳(秒和纳秒分别存储在 layout.dim 中)
    robot2_position_array.layout.dim.clear();
    std_msgs::MultiArrayDimension dim_sec, dim_nsec;

    dim_sec.label = "timestamp_sec";
    dim_sec.size = now.sec;     // 秒部分
    dim_sec.stride = 1;

    dim_nsec.label = "timestamp_nsec";
    dim_nsec.size = now.nsec;   // 纳秒部分
    dim_nsec.stride = 1;

    robot2_position_array.layout.dim.push_back(dim_sec);
    robot2_position_array.layout.dim.push_back(dim_nsec);

    // 发布位置信息
    publisher_robot2_nokov.publish(robot2_position_array);

    ROS_INFO("Published /robot_2/nokov position: [%.2f, %.2f, %.2f], timestamp: %d.%d",
             robot2_position_array.data[0],
             robot2_position_array.data[1],
             robot2_position_array.data[2],
             now.sec,
             now.nsec);

    // //limit the topic to 20Hz
    // ros::Duration(0.05).sleep();
}

int main(int argc, char** argv) {
    ros::init(argc, argv, "distributed_uwb_and_robot2_processor");
    ros::NodeHandle nh;

    // 获取 anchor_id 参数(如果需要在启动时传入),默认值为 2
    int temp_anchor_id = anchor_id;
    int default_anchor_id = anchor_id;
    nh.param("anchor_id", temp_anchor_id, default_anchor_id);
    anchor_id = static_cast<uint8_t>(temp_anchor_id);

    // 初始化发布者
    publisher_uwb = nh.advertise<std_msgs::Float32MultiArray>("/robot_" + std::to_string(robot_id) + "_range_data", 1000);
    publisher_robot2_nokov = nh.advertise<std_msgs::Float32MultiArray>("/robot_"+std::to_string(robot_id)+"_nokov_position", 10);

    // 初始化订阅者
    ros::Subscriber sub_uwb = nh.subscribe("nlink_linktrack_nodeframe2", 1000, nodeframeCallback);
    ros::Subscriber sub_robot2_nokov = nh.subscribe("/robot_"+std::to_string(robot_id)+"/nokov", 10, robot2NokovCallback);
    //ros::Subscriber sub_robot2_nokov = nh.subscribe("/robot_2/nokov", 10, robot2NokovCallback);

    ROS_INFO("Node initialized. Subscribed to nlink_linktrack_nodeframe2 and /robot_2/nokov");

    // 进入回调循环
    ros::spin();

    return 0;
}
6.车辆与UWB实物连接关系
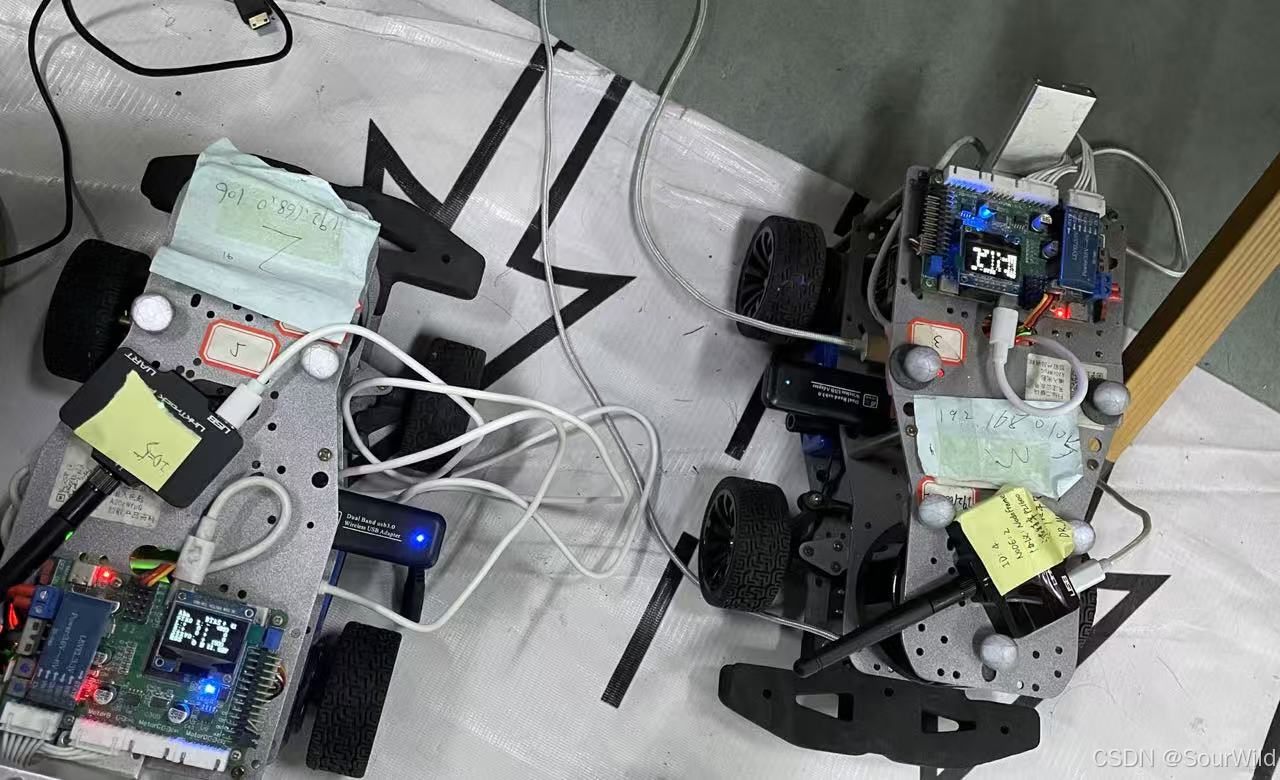
| 左边 Robot_2 | 右边 Robot_3 | Robot_4 |
|---|---|---|
| 192.168.0.106 | 192.168.0.105 | 192.168.0.107 |
| UWB_id=5 | UWB_id=4 | 4/5/待定 |
运行nlink_example_distributed包前需修改main.cpp中的uint8_t全局变量anchor_id和robot_id | 运行nlink_example_distributed包前需修改main.cpp中的uint8_t全局变量anchor_id和robot_id | 运行nlink_example_distributed包前需修改main.cpp中的uint8_t全局变量anchor_id和robot_id |
| USB端口:ttyCH343USB1 | USB端口:ttyCH343USB1 | USB端口:ttyCH343USB0 |


 985
985

 被折叠的 条评论
为什么被折叠?
被折叠的 条评论
为什么被折叠?
 到【灌水乐园】发言


