


FPN要解决的问题:
为了增强语义性,传统的物体检测模型通常只在深度卷积网络的最后一个特征图进行后续操作,而这一层对应的下采样率(图像缩小倍数)通常又比较大,造成小物体在特征图上的信息较少,小物体的检测性能会急剧下降,这个问题也被称作多尺度问题。
卷积神经网络不同层的大小与语义信息不同,本身就类似一个金字塔,2017的FPN方法融合了不同层的特征,较好的改善了多尺度检测问题。
一,FPN原理
FPN的架构如下图所示,主要包括自下而上的残差网络,自上而下的上采样网络,横向连接与卷积融合4部分构成:
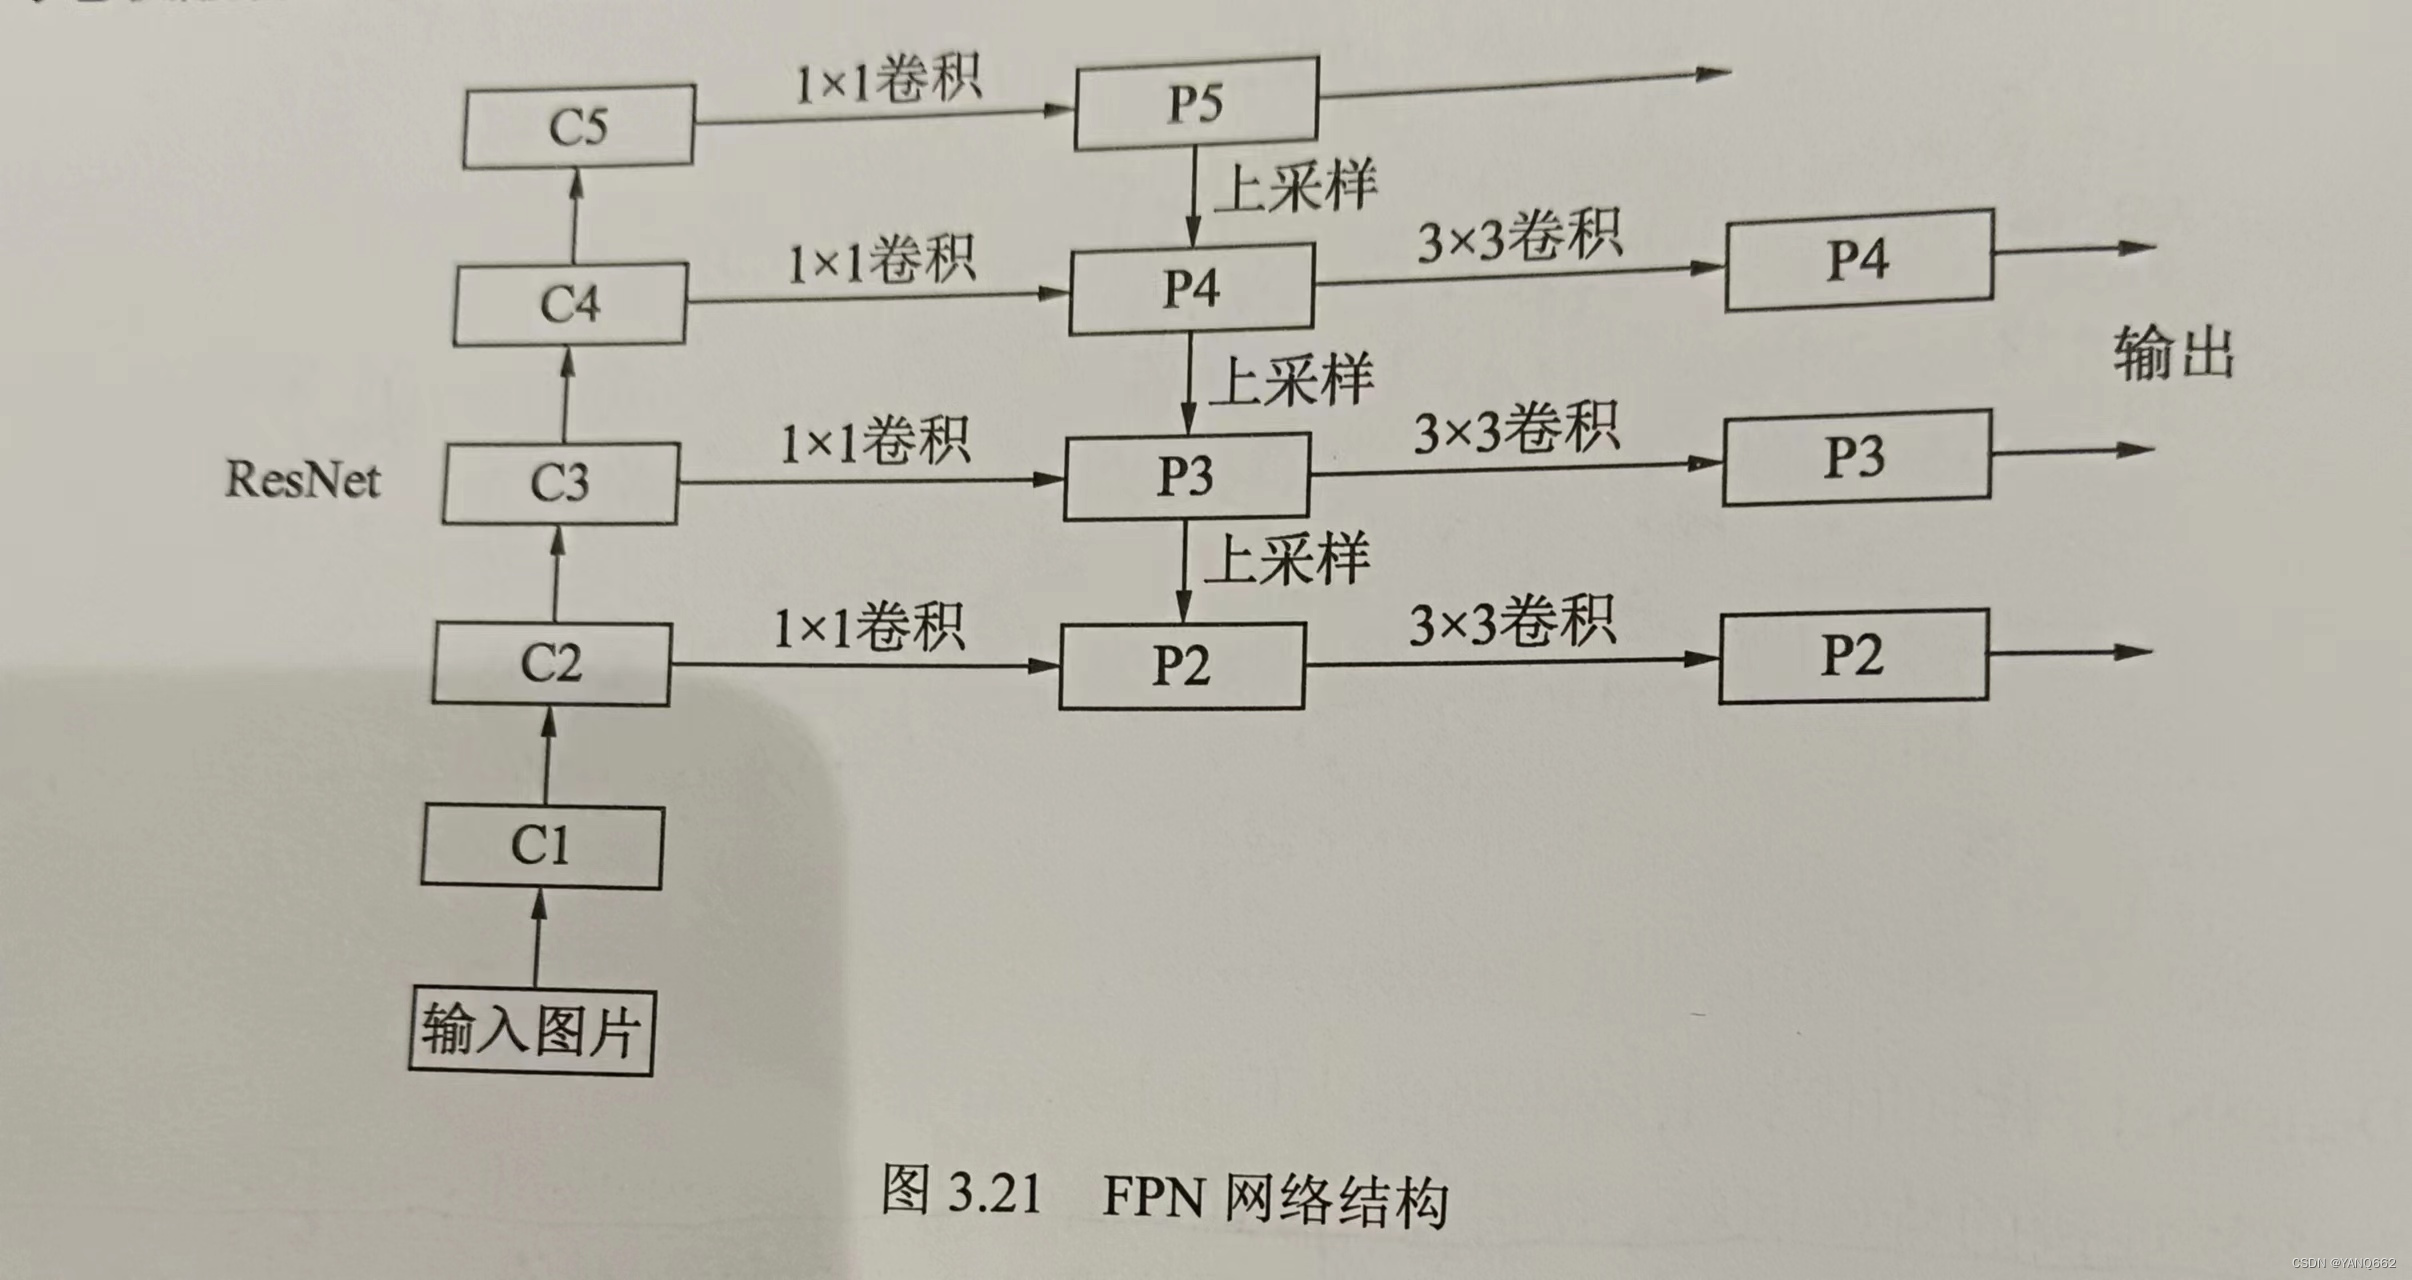
1.输入图片大小为[1,3,224,224];
2.自下而上的残差网络(ResNet):
C1:输入3,输出64,keras=7,stride=2,padding=3,bias=False;
C2:输入64,输出256,keras=1,stride=1,padding=3,bias=False; 3个BottleBlock
C3:输入128,输出512,keras=1,stride=1,padding=3,bias=False;4个BottleBlock
C4:输入256,输出1024,keras=1,stride=1,padding=3,bias=False;6个BottleBlock
C5:输入512,输出2048,keras=1,stride=1,padding=3,bias=False;3个BottleBlock
该网络用作提取语义信息,C1到C5的各自卷积组包含了多个BottleBlock结构,每个组内的特征图大小相同,组间大小递减。
3.自上而下的上采样网络(up_sample):
P5:对C5进行降低通道,输入2048,输出256,keras=1,stride=1,padding=0
P4:对C4进行降低通道,输入1024,输出256,keras=1,stride=1,padding=0
P3:对C3进行降低通道,输入512,输出256,keras=1,stride=1,padding=0
P2:对C2进行降低通道,输入256,输出256,keras=1,stride=1,padding=0
该网络的目的是为了得到与C5,C4,C3,C2长宽相同的特征,以方便下一步进行逐元素相加,这里采用2倍最近邻上采样(上采样的详细解释可以看上采样内容)。
4.横向连接:目的是为了将上采样后的高语义特征与浅层的细节特征进行融合。由于C1的特征图尺寸较大且语义信息不足,故没有把C1放到横向连接中。
5.卷积融合:在得到特征相加后,利用3X3的卷积对P2到P4进行融合,目的是消除上采样过程中带来的重叠效应,以生成最终的特征图。
如上图所示,FPN有4个输出的特征图,将深层的语义信息传到底层,来补充浅层的语义信息,从而获得高分辨率,强语义的特征,在小物体检测,实例分割等邻域有着不俗的表现。
二,代码如下
import torch.nn as nn
import torch
import torch.nn.functional as F

#1.resNet的基本BottleBlock类

class Bottleneck(nn.Module):
    expension=4
    def __init__(self,in_planes,planes,stride=1,downsample=None):
        super(Bottleneck,self).__init__()

        self.bottleneck=nn.Sequential(
            #1.对输入变量x进行卷积、归一化、RELU激活
            nn.Conv2d(in_planes,planes,1,bias=False),
            nn.BatchNorm2d(planes),
            nn.ReLU(inplace=True),

            #2.构造f(x)输出
            nn.Conv2d(planes,planes,3,stride,1,bias=False),
            nn.BatchNorm2d(planes),
            nn.ReLU(inplace=True),

            nn.Conv2d(planes,self.expension*planes,1,bias=False),
            nn.BatchNorm2d(self.expension*planes)
        )

        #3.构造激活函数,构造下采样函数为None
        self.relu=nn.ReLU(inplace=True)
        self.downsample=downsample
        # self.downsample =nn.Sequential(
        #     nn.Conv2d(in_planes,self.expension*planes,1,1),
        #     nn.BatchNorm2d(self.expension*planes)
        # )


    def forward(self,x):

        identity=x

        #4.构造f(x)
        out=self.bottleneck(x)

        #5.如果有下采样,则进行下采样
        if self.downsample is not None:
            identity=self.downsample(x)

        #6.构造 x+f(x)
        out+=identity

        #7.对 x+f(x) 进行激活
        out=self.relu(out)

        #8.返回激活后的 x+f(x)
        return out

#2.FPN的类,初始化需要一个list,代表ResNet的每一个阶段的Bottleneck数量
class FPN(nn.Module):
    def __init__(self,layers):
        super(FPN,self).__init__()
        self.inplanes=64

        #1.处理输入的C1模块
        self.conv1=nn.Conv2d(3,64,7,2,3,bias=False)
        self.bn1=nn.BatchNorm2d(64)
        self.relu=nn.ReLU(inplace=True)
        self.maxpool=nn.MaxPool2d(3,2,1)

        #2.搭建自上而下的C2,C3,C4,C5
        self.layer1=self.make_layer(64,layers[0])
        self.layer2=self.make_layer(128,layers[1],2)
        self.layer3 = self.make_layer(256, layers[2],2)
        self.layer4 = self.make_layer(512, layers[3],2)

        #3.对C5减少通道数,得到P5    输入通道数2048,输出通道数256,卷积核大小1,步长为1,0填充
        self.toplayer=nn.Conv2d(2048,256,1,1,0)

        #4.3X3卷积融合特征
        self.smooth1=nn.Conv2d(256,256,3,1,1)
        self.smooth2 = nn.Conv2d(256, 256, 3, 1, 1)
        self.smooth3 = nn.Conv2d(256, 256, 3, 1, 1)

        #5.横向连接,保证通道数相同
        self.latlayer1=nn.Conv2d(1024,256,1,1,0)
        self.latlayer2= nn.Conv2d(512, 256, 1, 1, 0)
        self.latlayer3= nn.Conv2d(256, 256, 1, 1, 0)


    #2.构造C2到C5,注意区分stride为1和2的情况
    def make_layer(self,planes,blocks,stride=1):
        downsample=None
        if stride!=1 or self.inplanes!=Bottleneck.expension*planes:
            #下采样的卷积核大小为1,目的是使输入x和输出的f(x)的通道数相同,使x的通道数是输入的4倍,这样残差网络才能做 x+f(x) 运算
            downsample=nn.Sequential(
                nn.Conv2d(self.inplanes,Bottleneck.expension*planes,1,stride,bias=False),
                nn.BatchNorm2d(Bottleneck.expension*planes)
            )

        layers=[]
        #加入第一层
        layers.append(Bottleneck(self.inplanes,planes,stride,downsample))
        self.inplanes=planes*Bottleneck.expension

        # C2,C3,C4,C5的bottleneck个数不同,其个数分别是[3,4,6,3]
        for i in range(1,blocks):
            layers.append(Bottleneck(self.inplanes,planes))
        return nn.Sequential(*layers)

    #3.自上而下的上采样模块
    def _upsample(self,x,y):
        _,_,H,W=y.shape
        #用最近邻插值法进行下采样
        return F.upsample(x,size=(H,W),mode="bilinear")+y

    def forward(self,x):
        #1.自下而上的C1,C2,C3,C4,C5
        c1=self.maxpool(self.relu(self.bn1(self.conv1(x))))
        c2=self.layer1(c1)
        c3=self.layer2(c2)
        c4=self.layer3(c3)
        c5=self.layer4(c4)

        #2.自上而下的上采样
        p5=self.toplayer(c5)
        p4=self._upsample(p5,self.latlayer1(c4))
        p3 = self._upsample(p5, self.latlayer2(c3))
        p2 = self._upsample(p5, self.latlayer3(c2))

        #3.卷积融合,平滑处理
        p4=self.smooth1(p4)
        p3=self.smooth2(p3)
        p2=self.smooth3(p2)

        return p2,p3,p4,p5


if __name__ == '__main__':

    net_fpn=FPN([3,4,6,3])
    # print(net_fpn.conv1)
    # print(net_fpn.layer1)
    input=torch.randn(1,3,224,224)
    output=net_fpn(input)

    print(len(output),output[0].shape)#print(len(output),output[0].shape)#
    print( output[1].shape)#[1, 256, 28, 28]
    print(output[2].shape)#[1, 256, 14, 14]
    print(output[3].shape)#[1, 256, 7, 7]


 1108
1108


 被折叠的 条评论
为什么被折叠?
被折叠的 条评论
为什么被折叠?
 到【灌水乐园】发言


