


目录
遍历 goods-item 组件,并将数据传递给 goods-item
一,项目介绍
1.项目概况
花坊小程序是一个线上花店小程序
2.项目功能
功能模块:项⽬⾸⻚

商品分类
商品详情
⽤户管理
购物车
订单管理等...
3.项目技术栈
项⽬使⽤原⽣⼩程序进⾏搭建开发,项⽬涵盖⼩程序开发所有常⽤的知识点:
1. ⼩程序内置组件:采⽤⼩程序内置组件,结合 Vant 组件库实现⻚⾯结构的搭建。
2. 项⽬中使⽤了 css 拓展语⾔ Scss 绘制⻚⾯的结构。
3. ⼩程序内置 API :交互、⽀付、⽂件上传、地图定位、⽹络请求、预览图⽚、本地存储等。
4. ⼩程序分包加载:降低⼩程序的启动时间、包的体积,提升⽤户体验度。
5. ⼩程序组件开发:将⻚⾯内的功能模块抽象成⾃定义组件,实现代码的复⽤。
6. ⽹络请求封装:request ⽅法封装、快捷⽅式封装、响应拦截器、请求拦截器。
7. ⻣架屏组件:利⽤开发者⼯具提供了⾃动⽣成⻣架屏代码的能⼒,提⾼了整体使⽤体验和⽤户满意
度。
8. UI 组件库:使⽤ Vant 组件库实现⼩程序 结构的绘制。
9. LBS :使⽤腾讯地图服务进⾏ LBS 逆地址解析,实现选择收货地址功能。
10. miniprogram-licia :使⽤ licia 进⾏函数的防抖节流。
11. async-validator :使⽤ async-validator 实现表单验证。
12. miniprogram-computed : 使⽤ miniprogram-computed 进⾏计算属性功能。
13. mobx-miniprogram :使⽤ mobx-miniprogram 进⾏项⽬状态的管理。
4.接口文档
二,项目初始化
1.创建项目
在微信开发者⼯具的开始界⾯左侧检查项⽬类型,需要为 [⼩程序]。
然后在右侧点击 [+] 开始新建项⽬。
最后在弹出的界⾯中输⼊项⽬相关的信息,点击确定即可。
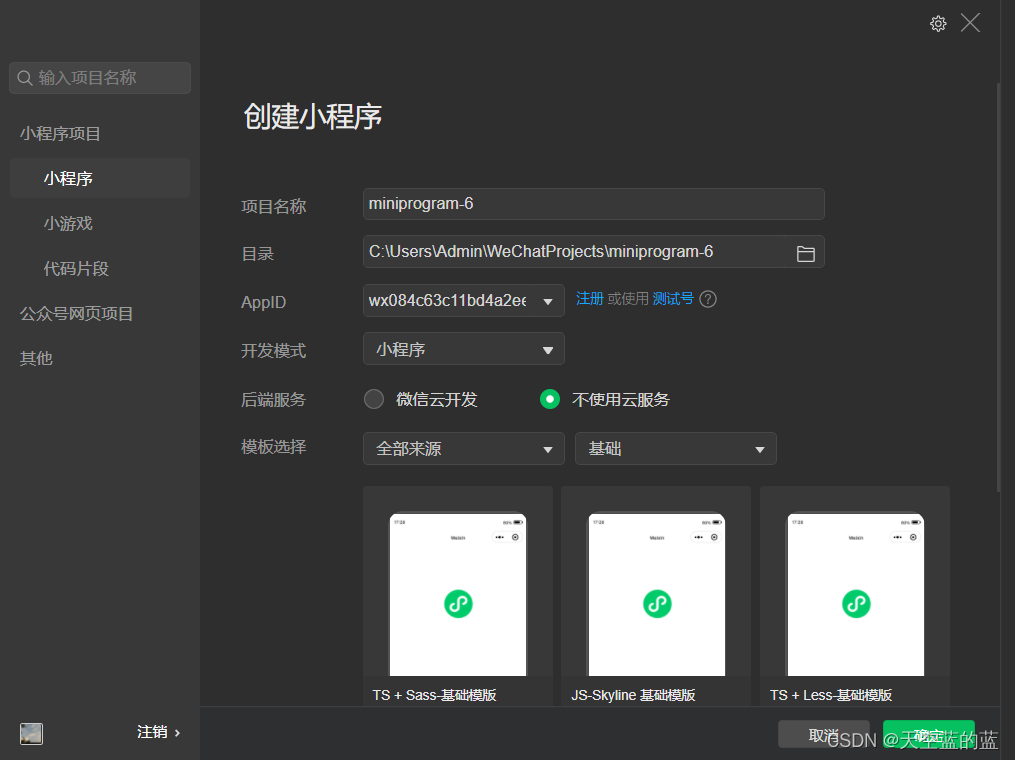
选择js基础模板
2.项目初始化
// app.js:⼩程序的项⽬⼊⼝⽂件
App({

 })
删除 app.json 中 pages 下的 "rendererOptions" 以及 "componentFramework" 字段。
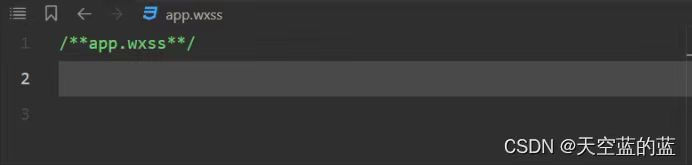
重置 app.wxss 中的代码。
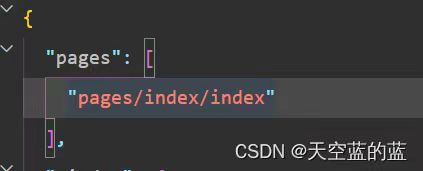
删除 app.json 中 pages 下的 "pages/logs/logs" 路径,同时删除 pages/logs ⽂件夹。
删除 components 中的⾃定义组件。
重置 pages/index ⽂件夹下的 index.js 、 index.wxss 、 index.html 以及 index.json ⽂件。
更新 utils 下 util.js 的⽂件名为 formatTime.js。
3.自定义构建 npm + 集成Sass
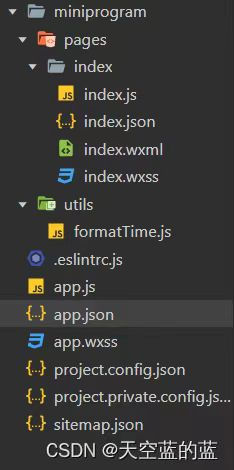
为了⽅便进⾏项⽬的开发将⼩程序源码放到miniprogram ⽬录下
自定义构建:⾸先在project.config.json 配置 miniprogramRoot 选项,指定⼩程序源码的⽬录。
"miniprogramRoot": "miniprogram/"然后配置 project.config.json 的 setting.packNpmManually 为 true。
"setting": {
"packNpmManually":true,
 ...
 },
初始化项⽬
npm init -y

//⽣成package.json⽂件"setting": {
"packNpmManually":true,
"packNpmRelationList": [
{
"packageJsonPath": "./package.json",
"miniprogramNpmDistDir": "./miniprogram"
}
],
},
// packageJsonPath 表示 node_modules 源对应的 package.json
// miniprogramNpmDistDir 表示 node_modules 的构建结果⽬标位置集成 Sass
1 "setting": {
2 "packNpmManually": true,
3 "packNpmRelationList": [
4 {
5 "packageJsonPath": "./package.json",
6 "miniprogramNpmDistDir": "./miniprogram"
7 }
8 ],
9 "useCompilerPlugins":[
10 "sass"
11 ],
12 ...
13 },三,首页
1.构建项目页面
1// app.json
2
3 {
4 "pages": [
5 "pages/index/index",
6 "pages/category/category",
7 "pages/cart/cart",
8 "pages/my/my"
9 ],
10 "window": {
11 "backgroundTextStyle": "light",
12 "navigationBarBackgroundColor": "#f3514f",
13 "navigationBarTitleText": "花坊",
14 "navigationBarTextStyle": "white"
15 },
16 "tabBar": {
17 "color": "#252933",
18 "selectedColor": "#FF734C",
19 "backgroundColor": "#ffffff",
20 "borderStyle": "black",
21 "list": [
22 {
23 "pagePath": "pages/index/index",
24 "text": "⾸⻚",
25 "iconPath": "assets/tabbar/index.png",
26 "selectedIconPath": "assets/tabbar/index-active.png"
27 },
28 {
29 "pagePath": "pages/category/category",
30 "text": "分类",
31 "iconPath": "assets/tabbar/cate.png",
32 "selectedIconPath": "assets/tabbar/cate-active.png"
33 },
34 {
35 "pagePath": "pages/cart/cart",
36 "text": "购物⻋",
37 "iconPath": "assets/tabbar/cart.png",
38 "selectedIconPath": "assets/tabbar/cart-active.png"
39 },
40 {
41 "pagePath": "pages/my/my",
42 "text": "我的",
43 "iconPath": "assets/tabbar/my.png",
44 "selectedIconPath": "assets/tabbar/my-active.png"
45 }
46 ]
47 },
48 ...
49 }
2.集成项目页面
首页
完成效果:

首页结构:
<!--index.wxml-->
2 <view class="index-container">
3
4 <!-- ⾸⻚背景图 -->
5 <view class="window-bgc"></view>
6
7 <!-- ⻚⾯主体区域 -->
8 <view class="container">
9
10 <!-- 轮播图区域 -->
11
12 <!-- 导航区域 -->
13
14 <!-- ⼴告区域 -->
15 <view class="adver">
16 <view class="adver-left"></view>
17 <view class="adver-right"></view>
18 </view>
19
20 <!-- 商品列表 -->
21
22 </view>
23
24 </view>
首页背景图片
1 /**index.wxss**/
2 .index-container {
3
4 // ⾸⻚背景图
5 .window-bgc {
6 height: 200rpx;
7 width: 100%;
8 background-color: #f3514f;
9 border-radius:0 0 50% 50%;
10 }
11 }
banner组件
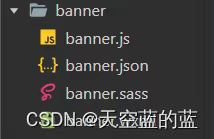
1 // banner.js
2 Component({
3
4 })
1 // banner.json
2 {
3 "component": true,
4 "usingComponents": {}
5 }
1 // banner.wxml
2 <view>我是banner组件</view>
1 // index.json
2 {
3 "usingComponents": {
4 "banner": "./banner/banner"
5 }
6 }
1 // index.html
2 <!-- 轮播图区域 -->
3 <banner />
轮播图组件
完成后效果:

<!--pages/index/banner/banner.wxml-->
2 <!-- 轮播图 -->
3 <view class="swiper-box">
4 <swiper autoplay class="swiper" indicator-active-color="#FF734C"
interval="2000" duration="1000" indicator-color="rgba(0, 0, 0, .3)">
5 <block wx:for="{{ bannerList }}" wx:key="index">
6 <swiper-item class="swiper-item">
7 <image class="img" src="{{ item }}"></image>
8 </swiper-item>
9 </block>
10 </swiper>
11
12 <!-- 轮播图的⾯板指示点-->
13 <view class="indicator">
14 <text wx:for="{{bannerList.length}}" wx:key="id"
15 class="rectangle"></text>
16 </view>
17 </view>
1 .swiper-box {
2 position: relative;
3 .swiper {
4 height: 320rpx;
5 // 设置圆⻆弧度
6 border-radius: 18rpx;
7 // 设置溢出隐藏
8 overflow: hidden;
9 width: 95%;
10 // margin设置外边距
11 margin:0 auto ;
12 }
13 .swiper-item {
14 .img {
15 width: 100%;
16 height: 100%;
17 border-radius: 18rpx;
18 }
19 }
20 .indicator {
21 display: flex;
22 justify-content: center;
23 position: absolute;
24 bottom:16rpx;
25 left: 0;
26 right: 0;
27 .rectangle {
28 width: 30rpx;
29 height: 6rpx;
30 background-color: #f3514f;
31 margin: 0 8rpx;
32 border-radius: 6rpx;
33 }
34 }
35 }3.知识点
flex布局
1 <!DOCTYPE html>
2 <html lang="en">
3 <head>
4 <meta charset="UTF-8" />
5 <meta name="viewport" content="width=device-width, initial-scale=1.0" />
6 <title>Document</title>
7 <style>
8 /* 第⼀个案例 */
9 .demoOne {
10 border: 2px solid blue;
11 width: 600px;
12 height: 600px;
13
14 display: flex;
15
16 /* flex-direction属性
17 flex-direction属性⽤于设置主轴⽅向,通过设置主轴⽅向可以规定项⽬的排列⽅向。 */
18 /* row:默认值,主轴为从左到右的⽔平⽅向。
19 row-reverse:主轴为从右到左的⽔平⽅向。
20 column:主轴为从上到下的垂直⽅向。
21 column-reverse:主轴为从下到上的垂直⽅向。 */
22 /* flex-direction: row; */
23 /* flex-direction: row-reverse; */
24 /* flex-direction: column; */
25 /* flex-direction: column-reverse; */
26
27 /* justify-content属性
28 justify-content属性⽤于设置项⽬在主轴⽅向上的对⻬⽅式,能够分配项⽬之间及其周围
多余的空间。 */
29 /* flex-start:默认值,表示项⽬对⻬到主轴起点,项⽬间不留空隙。
30 flex-end:项⽬对⻬到主轴终点,项⽬间不留空隙。
31 center:项⽬在主轴上居中排列,项⽬间不留空隙。主轴上第⼀个项⽬离主轴起点的距离等
于最后⼀个项⽬离主轴终点的距离。
32 space-between:两端对⻬,两端的项⽬分别靠向容器的两端,其他项⽬之间的间隔相等。
33 space-around:每个项⽬之间的距离相等,第⼀个项⽬离主轴起点和最后⼀个项⽬离终点的
距离为中间项⽬间距的⼀半。 */
34 /* justify-content: flex-start; */
35 /* justify-content: flex-end; */
36 /* justify-content: center; */
37 /* justify-content: space-between; */
38 /* justify-content: space-around; */
39
40 /* align-items属性
41 align-items属性⽤于设置项⽬在交叉轴上的对⻬⽅式。*/
42 /* center:项⽬在交叉轴的中间位置对⻬。
43 flex-start:项⽬顶部与交叉轴起点对⻬。
44 flex-end:项⽬底部与交叉轴终点对⻬。
45 baseline:项⽬的第⼀⾏⽂字的基线对⻬。 */
46 /* align-items: center; */
47 /* align-items: flex-start; */
48 /* align-items: flex-end; */
49 /* align-items: baseline; */
50 }
51
52 .boxOne {
53 width: 100px;
54 height: 100px;
55 background-color: red;
56 }
57
58 .boxTwo {
59 width: 200px;
60 height: 200px;
61 background-color: yellow;
62 }
63
64 .boxThree {
65 width: 300px;
66 height: 300px;
67 background-color: green;
68 }
69
70 /* 第⼆个案例 */
71 .demoTwo {
72 height: 606px;
73 width: 606px;
74 border: 2px solid blue;
75 display: flex;
76 /* flex-wrap属性:
77 flex-wrap属性⽤于规定是否允许项⽬换⾏,能够设置多⾏排列时换⾏的⽅向. */
78 /* nowrap:默认值,表示不换⾏,如果单⾏内容过多,项⽬宽度可能会被压缩。
79 wrap:当容器单⾏容不下所有项⽬时允许换⾏排列。
80 wrap-reverse:当容器单⾏容不下所有项⽬时允许换⾏排列,换⾏⽅向为wrap的反⽅向。
*/
81 /* flex-wrap: nowrap; */
82 flex-wrap: wrap;
83 /* flex-wrap: wrap-reverse; */
84 }
85
86 .box {
87 width: 200px;
88 height: 200px;
89 border: 1px solid red;
90
91 /* 每个⼩格⼦⾥的数字居中对⻬ */
92 display: flex;
93 justify-content: center;
94 align-items: center;
95 }
96
97 /* 结构伪类选择器 :nth-child() 作为⽗元素的第n个元素。*/
98 .box:nth-child(9) {
99 background-color: red;
100 }
101
102 /* 第三个案例 */
103 .demoThree {
104 margin: 0;
105 padding: 0;
106 border: 2px solid blue;
107 display: flex;
108 flex-direction: row;
109 }
110
111 .boxA {
112 width: 150px;
113 height: 150px;
114 background-color: green;
115 }
116
117 .boxB {
118 width: 150px;
119 height: 150px;
120 background-color: yellow;
121 }
122
123 .boxC {
124 width: 150px;
125 height: 150px;
126 background-color: red;
127 flex: 1;
128 }
129 </style>
130 </head>
131 <body>
132 <div class="demoOne">
133 <div class="boxOne">1</div>
134 <div class="boxTwo">2</div>
135 <div class="boxThree">3</div>
136 </div>
137
138 <br>
139
140 <div class="demoTwo">
141 <div class="box">1</div>
142 <div class="box">2</div>
143 <div class="box">3</div>
144 <div class="box">4</div>
145 <div class="box">5</div>
146 <div class="box">6</div>
147 <div class="box">7</div>
148 <div class="box">8</div>
149 <div class="box">9</div>
150 </div>
151
152 <br>
153
154 <div class="demoThree">
155 <div class="boxA">1</div>
156 <div class="boxB">2</div>
157 <div class="boxC">3</div>
158 </div>
159 </body>
160 </html>
161
元素定位
1 <!DOCTYPE html>
2 <html lang="en">
3 <head>
4 <meta charset="UTF-8">
5 <meta name="viewport" content="width=device-width, initial-scale=1.0">
6 <title>Document</title>
7 <style>
8 .rel-father{
9 width: 300px;
10 height: 300px;
11 background-color: #ccc;
12 border:1px solid #000;
13 margin: 10px auto;
14 }
15 .rel-child01,.rel-child02,.rel-child03{
16 width: 100px;
17 height: 50px;
18 background-color: #ff0;
19 border: 1px solid #000;
20 margin: 10px 0px;
21 text-align: center;
22 /* line-height属性设置⾏内的距离(⾏⾼)
23 将⼀段⽂本的line-hight设置为⽗容器的⾼度就可以实现⽂本垂直居中了*/
24 line-height: 50px;
25 }
26 /* .rel-child01 {
27 position: relative;
28 }
29 .rel-child02{
30 position: relative;
31 left: 100px;
32 bottom:62px;
33 }
34 .rel-child03{
35 position: relative;
36 } */
37
38
39 .abs-father{
40 width: 300px;
41 height: 300px;
42 background-color: #ccc;
43 border: 1px solid #000;
44 margin: 10px auto;
45 /* 对⽗元素设置相对定位,但不设置偏移量 */
46 position: relative;
47 }
48 .abs-child01 {
49 width: 100px;
50 height: 50px;
51 background-color: #ff0;
52 border: 1px solid #000;
53 border-radius: 50px;
54 line-height: 50px;
55 text-align: center;
56 margin: 10px 0px;
57 }
58 .abs-child01{
59 position: absolute;
60 bottom:-10px;
61 right: 0px;
62 }
63
64 body{
65 height: 1000px;
66 }
67 .fix-father {
68 width: 100%;
69 height: 10px;
70 background-color: #000;
71 position: fixed;
72 top:0px;
73 }
74 </style>
75 </head>
76 <body>
77 <!-- 通过定位属性position可以实现⽹⻚标签的精准定位。 -->
78
79 <!--
80 选择器{
81 position:属性值
82 }
83
84 static:静态定位。(默认定位⽅式)
85 relative:相对定位,相对于其原⽂档流的位置进⾏定位。
86 absolute:绝对定位,相对于上⼀个已经定位的⽗元素进⾏定位。
87 fiexed:固定定位,相对于浏览器窗⼝进⾏定位。
88
89 postion属性仅仅⽤于定义元素以哪种⽅式定位,
90 通过边偏移属性top(上)、bottom(下)、left(左)、right(右)来精准定义元素的位
置。
91 -->
92
93 <!-- 相对定位 -->
94 <div class="rel-father">
95 <div class="rel-child01">child-01</div>
96 <div class="rel-child02">child-02</div>
97 <div class="rel-child03">child-03</div>
98 </div>
99
100 <!-- 绝对定位 -->
101 <div class="abs-father">
102 <div class="abs-child01">child-01</div>
103 </div>
104
105 <!-- 固定定位 -->
106 <div class="fix-father">
107 </div>
108 </body>
109 </html>
4.集成项目页面
entrance组件
1 // entrance.html
2 <view class="nav-list">
3
4 <view wx:for="{{ 10 }}" wx:key="index" class="nav-item">
5 <navigator url="" class="navigator-nav">
6 <image src="../../../assets/images/cate-1.png" class="nav-img"/>
7 <text class="nav-text">鲜花玫瑰</text>
8 </navigator>
9 </view>
10
11 </view>
1 /* pages/index/entrance/entrance.wxss */
2
3 /* 导航分类样式 */
4 .nav-list {
5 margin: 20rpx;
6 border-radius: 18rpx;
7 padding: 10px 0px 10px 10px ;
8 background-color:white;
9
10 display: flex;
11 flex-wrap: wrap;
12
13 .nav-item {
14
15 .navigator-nav {
16 display: flex;
17 flex-direction: column;
18 align-items: center;
19 justify-content: center;
20 margin-right: 10px;
21 margin-top: 10px;
22
23 .nav-text {
24 margin-top: 4px;
25 font-size: 12px;
26 }
27
28 .nav-img {
29 width: 66rpx;
30 height: 66rpx;
31 }
32 }
33 }
34 }
35
5.广告区域
完成效果:

<!-- ⼴告区域 -->
2 <view class="adver">
3 <view class="adver-left">
4 <navigator url="">
5 <image src="../../assets/images/love.jpg" mode="widthFix" />
6 </navigator>
7 </view>
8 <view class="adver-right">
9 <view>
10 <navigator url="">
11 <image src="../../assets/images/elder.jpg"
mode="widthFix" />
12 </navigator>
13 </view>
14 <view>
15 <navigator url="">
16 <image src="../../assets/images/friend.jpg"
mode="widthFix" />
17 </navigator>
18 </view>
19 </view>
20 </view>
1 .adver {
2 display: flex;
3 margin: 0 20rpx;
4 width: 96%;
5 padding:18rpx;
6 box-sizing: border-box;
7 background-color: white;
8 border-radius: 18rpx;
9
10 .adver-left {
11 width: 50%;
12 padding: 8rpx 8rpx 0rpx 8rpx;
13 }
14
15 .adver-right {
16 width: 50%;
17 padding: 8rpx 8rpx 0rpx 8rpx;
18
19 view:laat-child {
20 padding-top: 10rpx;
21 }
22 }
23
24 image {
25 width: 100%
26 }
27 }6.注册goods-card和goods-list全局组件
1 // components/goods-card/index.js
2 Component({
3 /**
4 * 组件的属性列表
5 */
6 properties: {
7 // 每⼀项商品的数据
8 goodItem: {
9 type: Object,
10 value: {}
11 }
12 },
13
14 /**
15 * 组件的初始数据
16 */
17 data: {},
18
19 /**
20 * 组件的⽅法列表
21 */
22 methods: {}
23 })
1 // goods-card
1 // goods-card.json
2 {
3 "component": true,
4 "usingComponents": {}
5 }
1 .goods_cart_container {
2 width: 350rpx;
3 border-radius: 18rpx;
4 background-color: #fff;
5 margin-top: 18rpx;
6
7 }
8
9 .good_img {
10 width: 100%;
11 height: 360rpx;
12 border-top-left-radius:16rpx;
13 border-top-right-radius:16rpx;
14 }
15
16 .goods_item_info {
17 display: flex;
18 flex-direction: column;
19 padding: 10rpx 20rpx;
20
21 .goods_item_info_name {
22 font-weight: 600;
23 font-size: 30rpx;
24 overflow: hidden;
25 text-overflow: ellipsis;
26 white-space: nowrap;
27 }
28
29 .goods_item_info_promo {
30 font-size: 12px;
31 color: #71797f;
32 overflow: hidden;
33 text-overflow: ellipsis;
34 white-space: nowrap;
35 margin-top: 20rpx;
36 margin-bottom: 3px;
37 }
38
39 .goods_item_info_bottom {
40 display: flex;
41 line-height: 50rpx;
42 margin-top: 20rpx;
43
44 .goods_image {
45 width: 48rpx;
46 height: 48rpx;
47 }
48
49 .goods_item_info_price {
50 font-size: 30rpx;
51 font-weight: bold;
52 color: #f3514f;
53
54 .text {
55 font-size: 24rpx;
56 padding-right: 4rpx;
57 font-weight: normal;
58 }
59 }
60
61 .goods_item_info_origin_price {
62 flex: 1;
63 font-size: 20rpx;
64 color: #71797f;
65 text-decoration-line: line-through;
66 margin-left: 6%;
67 margin-top: 4rpx;
68
69 .text {
70 font-size: 20rpx;
71 }
72 }
73 }
74
75 }1 // goods-card.wxml
2
3 <!-- 列表分类卡⽚ -->
4 <view class="goods_cart_container">
5 <navigator
6 class="navigator_nav"
7 url="/pages/goods/detail/detail?goodsId={{goodItem.id}}"
8 >
9 <!-- 商品图⽚ -->
10 <image class="good_img" src="/assets/images/floor.jpg" mode="widthFix" />
11
12 <!-- 商品详细信息 -->
13 <view class="goods_item_info">
14 <!-- 商品名称 -->
15 <text class="goods_item_info_name">亲爱的/情⼈节⽹红款/19枝</text>
16 <!-- 商品描述 -->
17 <text class="goods_item_info_promo"
18 >情⼈节新品情⼈节新品情⼈节新品情⼈节新品</text
19 >
20 <!-- 商品价格 -->
21 <view class="goods_item_info_bottom">
22 <view class="goods_item_info_price">
23 <text class="text">¥</text>399
24 </view>
25 <view class="goods_item_info_origin_price">
26 <text class="text">¥</text> 1{{goodItem.marketPrice}}
27 </view>
28 <!-- 加⼊购物⻋图⽚ -->
29 <view class="goods_item_info_btn">
30 <image class="goods_image" src="/assets/images/buybtn.png" mode="" />
31 </view>
32 </view>
33 </view>
34 </navigator>
35 </view>1 // components/goods-list/index.js
2
3 Component({
4 /**
5 * 组件的属性列表
6 */
7 properties: {
8 // 列表标题
9 title: {
10 type: String,
11 value: ''
12 },
13
14 // 传递的列表数据
15 list: {
16 type: Array,
17 value: [{}, {}, {}]
18 }
19 },
20
21 /**
22 * 组件的初始数据
23 */
24 data: {},
25
26 /**
27 * 组件的⽅法列表
28 */
29 methods: {}
30 })1 // goods-list.json
2
3 {
4 "component": true,
5 "usingComponents": {
6 "goods-card": "/components/goods-card/goods-card"
7 }
8 }
1 /* components/goodsList/goodsList.wxss */
2
3 .goods_title {
4 text-align: center;
5 font-size: 40rpx;
6 line-height: 52rpx;
7 font-weight: bold;
8 color: #232628;
9 padding: 20rpx 0 0rpx 0rpx;
10 }
11
12 .goods_card_list {
13 display: flex;
14 flex-wrap: wrap;
15 justify-content: space-between;
16 }
17
18 .goods_card_list::after {
19 content: '';
20 width: 350rpx;
21 }
22
23 .goods_more {
24 margin: 20rpx 0;
25 }
26
27 .goods_more_btn {
28 display: block;
29 margin: 0 auto;
30 background: #ffffff;
31 border-radius: 20px;
32 height: 40px;
33 line-height: 40px;
34 text-align: center;
35 font-size: 14px;
36 color: rgba(35, 38, 40, 0.7);
37 }1 <!--components/goods-list/goods-list.wxml-->
2
3 <!-- 商品列表组件 -->
4 <view class="goods_container">
5 <!-- 标题 -->
6 <view class="goods_title">{{title}}
7 </view>
8
9
10 <!-- 列表区域 -->
11 <view class="goods_card_list">
12 <block wx:for="{{ 3 }}" wx:key="index">
13 <goods-card>
14 <view>
15 <view>
16 </view>
17 </view>
18 </goods-card>
19
20 </block>
21 </view>
22
23 <!-- 查看更多 -->
24 <view class="goods_more">
25 <navigator class="goods_more_btn" url="/pages/goods/list/list" hoverclass="navigator-hover" open-type="navigate">
26
27 查看更多
28 </navigator>
29 </view>
30 </view>7.⾸⻚⻚⾯
<!-- 商品列表 -->
2 <goods-list title="猜你喜欢"></goods-list>
3 <goods-list title="⼈⽓推荐"></goods-list>
1 {
2 "usingComponents": {
3 "goods-list": "/components/goods-list/goods-list",
4 "entrance": "./entrance/entrance",
5 "banner": "./banner/banner"
6 },
7 "navigationBarTitleText": "花坊"
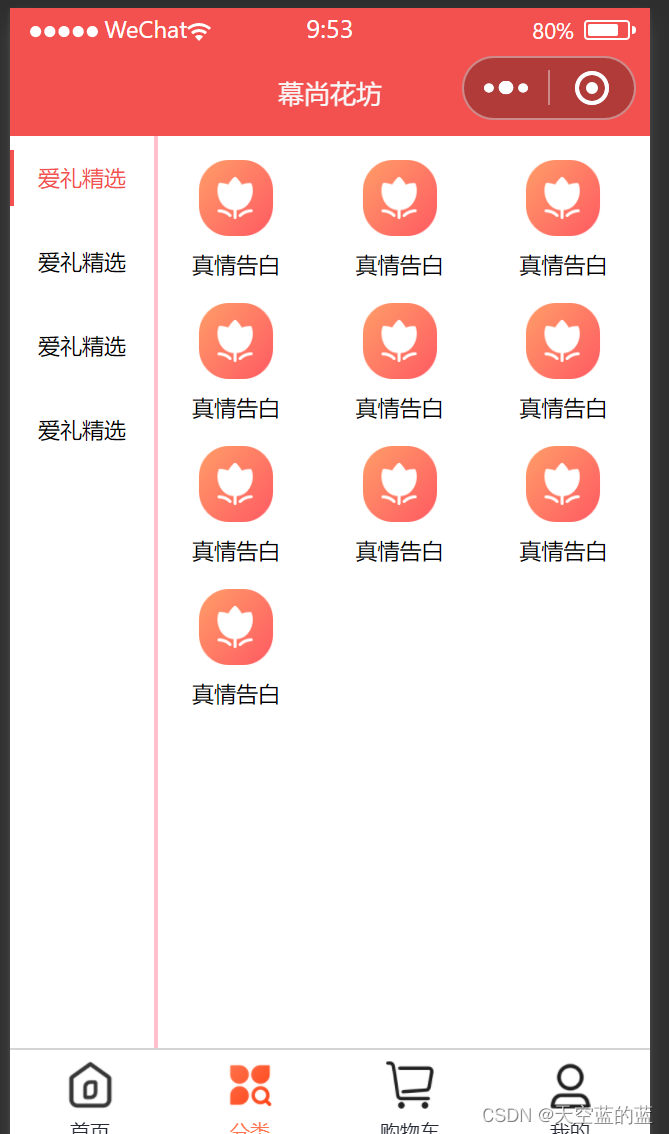
8 }四,分类页面
完成效果:
wxml页面:
1 <!--index.wxml-->
2 <view>
3 <view class="category-container">
4 <!-- 左侧的滚动视图区域 -->
5 <scroll-view class="category-left-view" scroll-y>
6 <!-- ⼀级分类 -->
7 <view class="left-view-item active"> 爱礼精选 </view>
8 <view class="left-view-item"> 鲜花玫瑰 </view>
9 <view class="left-view-item"> 永⽣玫瑰 </view>
10 <view class="left-view-item"> 玫瑰珠宝 </view>
11 </scroll-view>
12
13 <!-- 右侧的滚动视图区域 -->
14 <scroll-view class="category-right-view" scroll-y>
15 <!-- ⼆级分类 -->
16 <view class="test">
17 <view wx:for="{{ 10 }}" wx:key="index" class="right-view-item">
18 <navigator
19 class="navigator"
20
21 >
22 <image class="" src="../../assets/images/cate-1.png"></image>
23 <text class="goods_item_name">真情告⽩</text>
24 </navigator>
25 </view>
26 </view>
27 </scroll-view>
28 </view>
29 </view>
wxss页面
1 /**index.wxss**/
2 .category-container {
3 display: flex;
4 // 左侧⼀级分类
5 .category-left-view {
6 width: 220rpx;
7 height: 100vh;
8 .left-view-item {
9 font-size: 26rpx;
10 line-height: 99rpx;
11 text-align: center;
12 }
13 .active {
14 color: #f3514f;
15 &::before {
16 content: "";
17 width: 6rpx;
18 height: 66rpx;
19 background-color: #f3514f;
20 display: block;
21 position: absolute;
22 transform: translateY(25%);
23 }
24 }
25 }
26 // 右侧⼆级分类
27 .category-right-view {
28 height: 100vh;
29 &::before {
30 content: "";
31 width: 6rpx;
32 height: 100vh;
33 background-color: rgba(255, 68, 0, 0.24);
34 display: block;
35 position: absolute;
36 }
37 .right-view-item {
38 width: 33%;
39 margin-top: 30rpx;
40 float: left;
41
42
43 .navigator {
44 display: flex;
45 flex-direction: column;
46 align-items: center;
47 }
48 }
49 }
50 }
51 image {
52 width: 90rpx;
53 height: 90rpx;
54 }
55 text {
56 margin-top: 18rpx;
57 font-size: 26rpx;
58
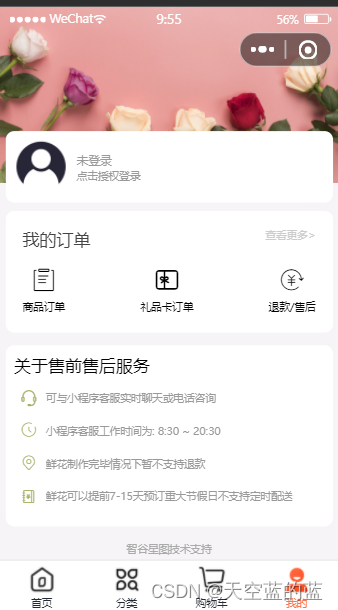
59 }五,个人页面
完成效果:

代码:
1 // pages/my/my.js
2 Page({
3
4 /**
5 * ⻚⾯的初始数据
6 */
7 data: {
8 // 初始化第⼆个⾯板数据
9 initpanel: [
10 {
11 url: '/pages/order/list/list',
12 title: '商品订单',
13 iconfont: 'icon-dingdan'
14 },
15 {
16 url: '/pages/order/list/list',
17 title: '礼品卡订单',
18 iconfont: 'icon-lipinka'
19 },
20 {
21 url: '/pages/order/list/list',
22 title: '退款/售后',
23 iconfont: 'icon-tuikuan'
24 }
25 ]
26 },
27
28 /**
29 * ⽣命周期函数--监听⻚⾯加载
30 */
31 onLoad(options) {
32
33 },
34
35 /**
36 * ⽣命周期函数--监听⻚⾯初次渲染完成
37 */
38 onReady() {
39
40 },
41
42 /**
43 * ⽣命周期函数--监听⻚⾯显示
44 */
45 onShow() {
46
47 },
48
49 /**
50 * ⽣命周期函数--监听⻚⾯隐藏
51 */
52 onHide() {
53
54 },
55
56 /**
57 * ⽣命周期函数--监听⻚⾯卸载
58 */
59 onUnload() {
60
61 },
62
63 /**
64 * ⻚⾯相关事件处理函数--监听⽤户下拉动作
65 */
66 onPullDownRefresh() {
67
68 },
69
70 /**
71 * ⻚⾯上拉触底事件的处理函数
72 */
73 onReachBottom() {
74
75 },
76
77 /**
78 * ⽤户点击右上⻆分享
79 */
80 onShareAppMessage() {
81
82 }
83 })
1 {
2 "usingComponents": {},
3 "navigationStyle": "custom"
4 }1 <view class="container">
2
3 <!-- 顶部展示图 -->
4 <view class="top-show">
5 <image src="../../assets/images/banner.jpg" mode="widthFix" class="top-showimg" />
6 </view>
7
8 <!-- ⽩⾊背景⾯板 -->
9 <view class="bottom-show">
10 <!-- 未登录⾯板 -->
11 <view class="user-container">
12 <!-- 左边头像区域 -->
13 <view class="avatar-container">
14 <image src="../../assets/images/avatar.png" class="avatar" mode="" />
15 </view>
16 <!-- 右边⽂字区域 -->
17 <view class="no-login">
18 <text>未登录</text>
19 <text>点击授权登录</text>
20 </view>
21 </view>
22 <!-- 已登陆⾯板 -->
23 </view>
24
25 <!-- 订单⾯板 -->
26 <view class="order">
27 <view class="order-title-wrap">
28 <text class="title">我的订单</text>
29 <text class="more">查看更多></text>
30 </view>
31 <view class="order-item">
32 <view class="order-content-item" wx:for="{{ initpanel }}">
33 <navigator url="{{ item.url }}">
34 <view class="iconfont {{ item.iconfont }}"></view>
35 <text>{{ item.title }}</text>
36 </navigator>
37 </view>
38 </view>
39 </view>
40
41 <!-- 关于售前售后服务⾯板 -->
42 <view class="after-scale">
43 <view class="order-title-wrap">
44 <text class="title">关于售前售后服务</text>
45 </view>
46 <view class="after-scale-item">
47 <view class="iconfont icon-kefufenxiermaikefu"></view>
48 <text>可与⼩程序客服实时聊天或电话咨询</text>
49 </view>
50 <view class="after-scale-item">
51 <view class="iconfont icon-shijian"></view>
52 <text>⼩程序客服⼯作时间为: 8:30 ~ 20:30</text>
53 </view>
54 <view class="after-scale-item">
55 <view class="iconfont icon-dizhiguanli"></view>
56 <text>鲜花制作完毕情况下暂不⽀持退款</text>
57 </view>
58 <view class="after-scale-item">
59 <view class="iconfont icon-zhangben"></view>
60 <text>鲜花可以提前7-15天预订重⼤节假⽇不⽀持定时配送</text>
61 </view>
62 </view>
63
64 <!-- 底部⾯板 -->
65 <view class="info-footer"> 智⾕星图技术⽀持 </view>
66
67
68 </view>1 .container {
2 background-color: whitesmoke;
3 height: 100vh;
4 .top-show {
5 width: 100%;
6 height: 360rpx;
7 .top-show-img {
8 width: 100%;
9 height: 100%;
10 }
11 }
12 .bottom-show {
13 position: relative;
14 top:-100rpx;
15 border-radius: 20rpx;
16 margin: 0 auto;
17 width: 96%;
18 background-color: white;
19 .user-container {
20 display: flex;
21 align-items: center;
22 .avatar-container{
23 margin: 20rpx;
24 .avatar {
25 height: 120rpx;
26 width: 120rpx;
27 }
28 }
29 .no-login {
30 display: flex;
31 flex-direction: column;
32 font-size: 24rpx;
33 color: gray;
34 text:first-child {
35 font-size: 28rpx;
36 }
37 }
38 }
39 }
40 .order{
41 width: 96%;
42 background-color: white;
43 margin: 0 auto;
44 border-radius: 20rpx;
45 margin-top: -80rpx;
46 .order-title-wrap {
47 display: flex;
48 justify-content: space-between;
49 padding: 40rpx;
50 .more {
51 font-size: 30rpx;
52 color: #ccc;
53 }
54 }
55 .order-item {
56 display: flex;
57 justify-content: space-evenly;
58 padding-bottom: 24rpx;
59 .order-content-item {
60 text-align: center;
61 .iconfont {
62 font-size: 60rpx;
63 }
64 text {
65 font-size: 26rpx;
66 }
67 }
68 }
69 }
70 .after-scale {
71 width: 96%;
72 background-color: white;
73 margin: 0 auto;
74 border-radius: 20rpx;
75 margin-top: 20rpx;
76 padding-bottom: 15rpx;
77 .order-title-wrap {
78 padding: 20rpx 20rpx 0 20rpx;
79 }
80 .after-scale-item {
81 display: flex;
82 margin: 30rpx 25rpx;
83 text{
84 font-size: 25rpx;
85 margin-left: 20rpx;
86 color: #999;
87 }
88 .iconfont {
89 color: #a2b364;
90 }
91 }
92 }
93 .info-footer {
94 text-align: center;
95 font-size: 24rpx;
96 color: #999;
97 margin-top: 30rpx;
98 }
99 }(部分内容需要引入阿里图标库)
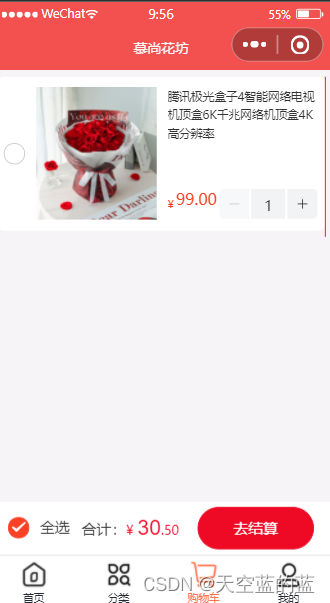
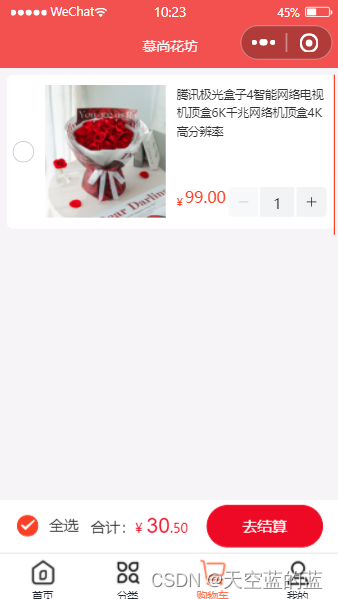
六,购物车页面
完成效果:
代码:
1 // pages/cart/cart.js
2 Page({
3
4 /**
5 * ⻚⾯的初始数据
6 */
7 data: {
8 checked: true,
9 cartList: [1,2],
10 },
11
12 })
1 <view class="container">
2
3 <!-- 购物⻋列表 -->
4 <view class="carList" wx:if="{{ cartList.length }}">
5 <view wx:for="{{cartList}}" wx:key="index" class="carList-item">
6 <van-swipe-cell right-width="{{ 65 }}" left-width="{{ 65 }}">
7 <van-cell-group>
8 <view class="goods-info">
9 <view class="left">
10 <van-checkbox value="{{ false }}" checkedcolor="#da3231" bind:change="onChange">
11 </van-checkbox>
12 </view>
13 <view class="mid">
14 <image src="../../assets/images/floor-img.jpg"
mode="" />
15 </view>
16 <view class="right">
17 <view class="title">【⼀往情深】11⽀红玫瑰圆形花束买花送⼥
友送爱⼈送⽼婆送花上⻔售后不退</view>
18 <view class="buy">
19 <view class="price">¥ 99.00</view>
20 <view class="buy-btn">
21 <van-stepper value="{{ 1 }}"
bind:change="onChange" />
22 </view>
23 </view>
24 </view>
25 </view>
26 </van-cell-group>
27 <view slot="right" class="van-swipe-cell__right">删除</view>
28 </van-swipe-cell>
29 </view>
30 </view>
31
32 <!-- 购物⻋列表为空结构 -->
33 <van-empty description="还没有添加商品,快去添加吧~" wx:else>
34 <navigator url="">
35 <van-button round type="danger" class="bottom-button">去购物</vanbutton>
36 </navigator>
37 <navigator url="">
38 <van-button round type="danger" class="bottom-button">去登录</vanbutton>
39 </navigator>
40 </van-empty>
41
42 <!-- 底部⼯具栏 -->
43 <van-submit-bar price="{{ 3050 }}" button-text="提交订单"
bind:submit="onClickButton" tip="{{ true }}">
44 <van-checkbox value="{{ checked }}" checked-color="#da3231"
bind:change="onChange">
45 全选
46 </van-checkbox>
47 </van-submit-bar>
48
49 </view>
1 .container {
2 background-color: whitesmoke;
3 height: 100vh;
4
5 .goods-info {
6 display: flex;
7 align-items: center;
8 background-color: white;
9 padding: 24rpx 16rpx;
10 margin: 20rpx 20rpx 10rpx 20rpx;
11 border-radius: 16rpx;
12
13 .mid {
14 width: 550rpx;
15 height: 300rpx;
16
17 image {
18 height: 100%;
19 width: 100%;
20 }
21 }
22
23 .right {
24 height: 300rpx;
25 display: flex;
26 justify-content: space-between;
27 flex-direction: column;
28 padding-left: 20rpx;
29
30 .title {
31 font-size: 26rpx;
32 }
33
34 .buy {
35 display: flex;
36 flex-direction: row;
37
38 .price {
39 color: #fa4126;
40 }
41 }
42 }
43 }
44
45 .van-swipe-cell__right {
46 background-color: #fa4126;
47 width: 130rpx;
48 display: flex;
49 justify-content: center;
50 align-items: center;
51 color: #fff;
52 font-size: 24rpx;
53 }
54
55 .van-empty__bottom {
56 height: 250rpx;
57 display: flex;
58 flex-direction: column;
59 justify-content: space-between;
60 margin-bottom: 20rpx;
61 }
62
63 }1 {
2 "component": true,
3 "styleIsolation": "shared",
4 "usingComponents": {}
5 }七,商品列表页面
完成效果:
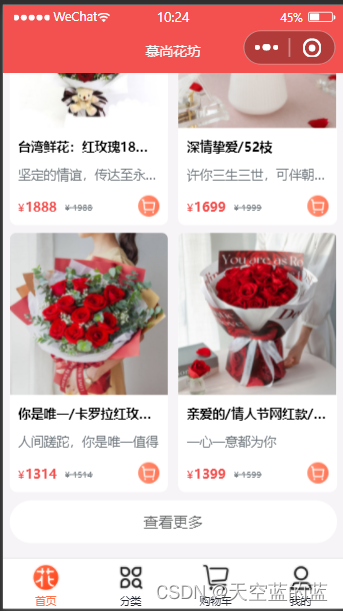
代码:
1 <!--pages/goods/list/list.wxml-->
2 <view class="container">
3
4 <!-- 商品列表功能 -->
5 <view class="goods-list">
6 <block>
7 <goods-card></goods-card>
8 <goods-card></goods-card>
9 <goods-card></goods-card>
10 <goods-card></goods-card>
11 </block>
12 </view>
13
14 <!-- 数据是否加载完毕 -->
15 <view class="finish" hidden="{{ !isFinish }}">数据加载完毕~~~</view>
16 </view>
1 /* pages/goods/list/list.wxss */
2 .container {
3 .goods-list {
4 display: flex;
5 flex-wrap: wrap;
6 justify-content: space-evenly;
7 }
8 .finish {
9 text-align: center;
10 font-size: 28rpx;
11 color: #f3514f;
12 line-height: 80rpx;
13 border-top: 1rpx solid #ccc;
14 }
15 }1 {
2 "usingComponents": {"goods-card": "/components/goods-card/goods-card"},
3 "navigationBarTitleText": "商品列表"
4 }1 /**
2 * ⻚⾯的初始数据
3 */
4 data: {
5 goodsList: [], // 商品列表数据
6 isFinish: true // 判断数据是否加载完毕
7 }1 <navigator url="/pages/goods/list/list" class="navigator-nav">
2 ......
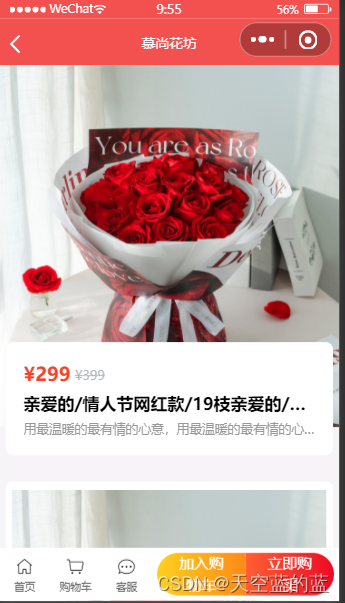
3 </navigator>八,商品细节页面
完成效果:

代码:
1 <!--pages/detail/detail.wxml-->
2 <view class="container">
3
4 <!-- 商品⼤图 -->
5 <view class="banner-img">
6 <image src="../../assets/images/floor-img.jpg" mode="" />
7 </view>
8
9 <!-- 商品的基本信息 -->
10 <view class="content">
11 <view class="price">
12 <view class="price-num">¥299</view>
13 <view class="price-origin-num">¥399</view>
14 </view>
15 <view class="title">亲爱的/情⼈节⽹红款/19枝亲爱的/情⼈节⽹红款</view>
16 <view class="info">⽤最温暖的最有情的⼼意,⽤最温暖的最有情的⼼意</view>
17 </view>
18
19 <!-- 商品的详细信息 -->
20 <view class="detail">
21 <image src="../../assets/images/floor-img.jpg" mode="" class="img" />
22 <image src="../../assets/images/floor-img.jpg" mode="" class="img" />
23 <image src="../../assets/images/floor-img.jpg" mode="" class="img" />
24 </view>
25
26 <!-- 商品的底部导航栏 -->
27 <van-goods-action>
28 <!-- 图标区域 -->
29 <navigator url="/pages/index/index" open-type="switchTab">
30 <van-goods-action-icon icon="shop-o" text="⾸⻚" dot />
31 </navigator>
32 <navigator url="/pages/cart/cart" open-type="switchTab">
33 <van-goods-action-icon icon="cart-o" text="购物⻋" info="5" />
34 </navigator>
35 <van-goods-action-icon icon="chat-o" text="客服" />
36 <!-- 按钮区域 -->
37 <van-goods-action-button text="加⼊购物⻋" type="warning"
bindtap="handleAddcart" />
38 <van-goods-action-button text="⽴即购买" bindtap="handleAddcart" />
39 </van-goods-action>
40
41 <!-- 加⼊购物⻋/⽴即购买弹窗 -->
42 <van-action-sheet show="{{ show }}" bind:close="onClose">
43 <!-- 弹窗⾯板 -->
44 <view class="sheet-contanier">
45 <!-- 商品信息区域 -->
46 <view class="goods-item">
47 <!-- 图⽚ -->
48 <view class="img">
49 <image class="img" src="/assets/images/floor-img.jpg" />
50 </view>
51 <!-- 商品基本信息 -->
52 <view class="baseInfo">
53 <!-- 商品名字 -->
54 <view class="title"> 亲爱的/情⼈节⽹红款/19枝 </view>
55 <!-- 商品价格 -->
56 <view class="buy">
57 <view class="price">
58 <view class="symbol">¥</view>
59 <view class="num">100</view>
60 </view>
61 <!-- 步进器组件控制购买数量 -->
62 <view class="buy-btn">
63 <!-- Stepper 步进器,由增加按钮、减少按钮和输⼊框组成,控制
购买数量 -->
64 <van-stepper value="{{ count }}"
bind:change="onChangeGoodsCount" />
65 </view>
66 </view>
67 </view>
68 </view>
69
70 <!-- 祝福语输⼊框 -->
71 <view class="time-wraper">
72 <view class="title">祝福语</view>
73 <textarea model:value="{{ blessing }}"
bindinput="onTextAreaChange" class="form-textarea" placeholder="必填,写上您的祝福
语,给⼼爱的他(她)送上你的祝福(请勿填写特殊符号或表情符号)" name="textarea" />
74 </view>
75
76 <!-- 确定按钮 -->
77 <view class="sheet-footer-btn">
78 <van-button block type="primary" round> 确定 </van-button>
79 </view>
80 </view>
81 </van-action-sheet>
82 </view>
1 /* pages/detail/detail.wxss */
2 .container {
3 background-color: whitesmoke;
4
5 // 商品⼤图
6 .banner-img {
7 height: 800rpx;
8
9 image {
10 height: 100%;
11 }
12 }
13
14 // 商品基本信息
15 .content {
16 background-color: white;
17 margin: 0 16rpx;
18 padding: 40rpx;
19 border-radius: 18rpx;
20 height: 170rpx;
21 display: flex;
22 flex-direction: column;
23 justify-content: space-between;
24
25 position: relative;
26 top: -80px;
27
28 .price {
29 display: flex;
30
31 .price-num {
32 font-size: 18px;
33 color: #fa4126;
34 font-weight: bold;
35 }
36
37 .price-origin-num {
38 font-size: 12px;
39 color: #b4babf;
40 margin-left: 4px;
41 text-decoration: line-through;
42 margin-top: 6px;
43 }
44 }
45
46 .title {
47 overflow: hidden;
48 text-overflow: ellipsis;
49 white-space: nowrap;
50 font-size: 16px;
51 font-weight: bold;
52 }
53
54 .info {
55 overflow: hidden;
56 text-overflow: ellipsis;
57 white-space: nowrap;
58 font-size: 12px;
59 color: #999999;
60 }
61 }
62
63 // 商品的详细信息
64 .detail {
65 background-color: white;
66 margin: -150rpx 16rpx 0;
67 padding: 20rpx 16rpx;
68 border-radius: 16rpx;
69
70 .img {
71 width: 100%;
72 height: 700rpx;
73 }
74 }
75
76 .sheet-contanier {
77 // background-color: yellowgreen;
78 margin: 40rpx;
79
80 .img {
81 height: 125px;
82 width: 114px;
83 }
84
85 .goods-item {
86 display: flex;
87
88
89 .buy {
90 display: flex;
91
92 .price {
93 display: flex;
94 color: #fa4126;
95 ;
96 }
97
98 .buy-btn {
99 margin-left: 80rpx;
100 }
101 }
102 }
103
104 .baseInfo {
105 display: flex;
106 flex-direction: column;
107 justify-content: space-between;
108 margin-left: 20rpx;
109
110 .title {
111 font-size: 14px;
112 }
113 }
114
115 .time-wraper {
116 margin: 20px 0;
117
118 .form-textarea {
119 background-color: #f7f8fa;
120 border-radius: 12px;
121 padding: 16px;
122 width: 90%;
123 margin: 20rpx 0;
124 font-size: 13px;
125 }
126 }
127
128 }
129 }1 // pages/detail/detail.js
2 Page({
3
4 /**
5 * ⻚⾯的初始数据
6 */
7 data: {
8
9 },
10 // 加⼊购物⻋
11 handleAddcart() {
12 this.setData({
13 show: true
14 })
15 },
16
17 // 点击关闭弹框时触发的回调
18 onClose() {
19 this.setData({ show: false })
20 },
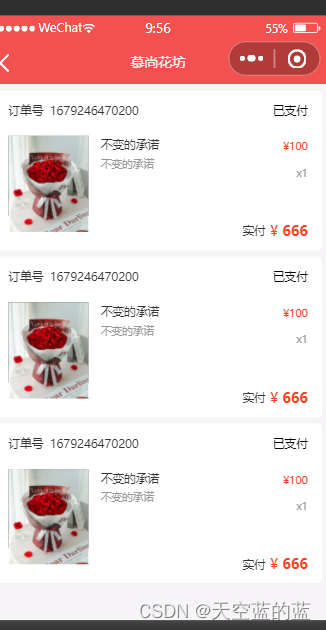
21 })九,订单页面
完成效果:

代码:
1 <!--pages/order/order.wxml-->
2 <view class="container" wx:if="{{ orderList.length }}">
3
4 <view class="order-list" wx:for="{{ orderList }}" wx:key="index">
5
6 <view class="order-item">
7 <view class="top">
8 <view class="order-num">订单号 <text
class="num">679246470200</text></view>
9 <view class="order-status">已⽀付</view>
10 </view>
11 <view class="middle">
12 <view class="img">
13 <image src="../../assets/images/floor-img.jpg"
mode="widthFix" />
14 </view>
15 <view class="text">
16 <view class="goods-name">不变的承诺</view>
17 <view class="goods-blessing">不变的承诺</view>
18 </view>
19 <view class="number">
20 <view class="goods-price">¥100</view>
21 <view class="goods-count">x 1</view>
22 </view>
23 </view>
24 <view class="bottom">
25 <view class="total-price">
26 <view class="text">实付</view>
27 <view class="price"><text>¥</text>666</view>
28 </view>
29 </view>
30 </view>
31
32 </view>
33 </view>
34 <!-- 购物⻋列表为空的情况 -->
35 <van-empty description="还没有购买商品,快去购买吧~" wx:else>
36 </van-empty>
1 /* pages/order/order.wxss */
2 .container {
3 background-color: whitesmoke;
4 height: 100vh;
5
6 .order-list {
7
8 .order-item {
9 width: 90%;
10 height: 380rpx;
11 margin: 20rpx auto;
12 padding: 20rpx;
13 border-radius: 20rpx;
14 background-color: white;
15 position: relative;
16
17 .top {
18 display: flex;
19 justify-content: space-between;
20 margin-bottom: 10rpx;
21 font-size: 28rpx;
22 font-weight: normal;
23 color: #333333;
24
25 }
26
27 .middle {
28 display: flex;
29
30 .img {
31 height: 200rpx;
32 width: 250rpx;
33
34 image {
35 width: 100%;
36 }
37 }
38
39 .text {
40 margin: 0 220rpx 0 20rpx;
41 .goods-name {
42 font-size: 28rpx;
43 color: #333;
44 line-height: 40rpx;
45 font-weight: 400;
46 }
47
48 .goods-blessing {
49 font-size: 24rpx;
50 height: 32rpx;
51 line-height: 32rpx;
52 color: #999999;
53 margin: 8rpx 0;
54 }
55 }
56
57 .number {
58 .goods-price {
59 white-space: nowrap;
60 color: #fa4126;
61 font-size: 24rpx;
62 line-height: 48rpx;
63 }
64
65 .goods-count {
66 white-space: nowrap;
67 order: 4;
68 text-align: right;
69 font-size: 24rpx;
70 color: #999;
71 margin: 20rpx 0 0 auto;
72 }
73 }
74 }
75
76 .bottom {
77 position: absolute;
78 right: 50rpx;
79 bottom: 50rpx;
80
81
82 .total-price {
83 display: flex;
84
85 .text {
86 font-size: 28rpx;
87 color: #333333;
88 margin-right: 10px;
89 }
90
91 .price {
92 font-size: 32rpx;
93 color: #fa4126;
94 font-weight: bold;
95 }
96 }
97 }
98
99
100 }
101 }
102
103 }1 // pages/order/order.js
2 Page({
3
4 /**
5 * ⻚⾯的初始数据
6 */
7 data: {
8 orderList:[1,2,3]
9
10 },
11 })十,通用模块封装
1.消息提示模块
使用方法:
1 // app.js
2
3 App({
4 // ⻚⾯显示⽣命周期函数
5 onShow(){
6 wx.showToast({
7 title: '消息提示框', // 提示的内容
8 icon: 'success', // 提示的图标,success(成功)、error(失败)、loading(加
载)、none(不显示图标)
9 duration: 2000, // 提示的延迟时间
10 mask: true // 是否显示透明蒙层,防⽌触摸穿透
11 })
12
13 }
14
15 // ⽣命周期函数
16 // 在使⽤Page()构造⻚⾯时,需要使⽤⽣命周期函数。
17 // onLoad:⻚⾯加载时⽣命周期函数。
18 // onShow:⻚⾯显示⽣命周期函数。每次打开⻚⾯时都会调⽤⼀次。⻚⾯显示/切⼊前台前触发。
19 // onReady:⻚⾯初次渲染完成⽣命周期函数。⻚⾯初次渲染完成时触发。
20 // onHide:⻚⾯隐藏⽣命周期函数。如⻚⾯之间跳转或通过底部Tab切换到其他⻚⾯,⼩程序切⼊后
台。
21 // onUnload:⻚⾯卸载⽣命周期函数。⻚⾯卸载时触发,如⻚⾯跳转或者返回到之前的⻚⾯时。
22
23 })
为什么要进行模块封装
封装流程
1 const toast = ({title="数据加载中",icon="none",duration=2000,mask=true} = {}) =>
{
2 wx.showToast({
3 title,
4 icon,
5 duration,
6 mask
7 })
8 }调用方法
模块化的⽅式导⼊使⽤
1 export { toast }
2
3 import { toast } from './extendApi'
4
5 toast()
6 toast({ title: '数据加载失败....', mask: true })1 wx.toast = toast
2
3 import './utils/extendApi'
4
5 wx.toast()
6 wx.toast({ title: '数据加载失败....', mask: true })封装步骤
1 // function toast () {}
2
3 // 在使⽤toast⽅法时,可以传⼊参数,也可以不传⼊参数。
4 // 如果需要传⼊参数,要传⼊对象作为参数。
5 // const toast = (option = {}) => { }
6
7 // 在形参数、位置通过解构的⽅式获取⽤户传⼊的参数,同时设置默认
8 const toast = ({title="数据加载中",icon="none",duration=2000,mask=true} = {}) =>
{
9 wx.showToast({
10 title,
11 icon,
12 duration,
13 mask
14 })
15 }
16
17 // 局部暴露toast⽅法
18 export { toast }
19
20 // 如果其他.js⽂件,需要使⽤toast⽅法,需要导⼊toast,然后进⾏调⽤才可以。
21
22 // 如果有很多的.js⽂件,都需要调⽤toast⽅法
23 // 每次使⽤都需要导⼊toast再调⽤,太麻烦了
24 // 可以将toast⽅法挂载到wx全局对象上
25 // 全局挂载⽅法
26 wx.toast = toast1 // app.js
2 // import { toast } from './utils/extendApi'
3 // import './utils/extendApi'
4
5 App({
6 // ⻚⾯显示⽣命周期函数
7 onShow() {
8
9 // 局部导⼊
10 // 不传参数
11 // toast()
12 // 传⼊参数,传⼊的参数会覆盖默认的参数。
13 // toast({title:'数据加载完毕', icon:'success'})
14
15 // 全局导⼊
16 // wx.toast()
17 // wx.toast({ title: '数据加载失败....', mask: true })
18
19 }
20 })
212.模块对话框封装
基本使用:
1
wx.showModal(
2 title: '提示', // 提示的标题
3 content: '您确定执⾏该操作吗?', // 提示的内容
4 confirmColor: '#f3514f',
5 // 接⼝调⽤结束的回调函数(调⽤成功、失败都会执⾏)
6 complete({ confirm, cancel }) {
7 confirm && console.log('点击了确定')
8 cancel && console.log('点击了取消')
9 }
10 })
封装思路
调用方式
实现步骤
代码
1 // exendApi.js
2
3 // function toast () {}
4
5 // 在调⽤modal⽅法时,可以传递参数,也可以不传递参数。
6 // 如果不传递参数,默认值就是空对象。
7 // 如果传递参数,参数需要时⼀个对象,对象中的属性需要和wx.showModal参数保持⼀致。
8 const modal = (options = {}) => {
9 // 在⽅法内部需要通过Promise返回⽤户的操作
10 // 如果⽤户点击了确认,需要通过resolve返回true
11 // 如果⽤户点击了取消,需要通过resolve返回false
12
13 return new Promise((resolve) => {
14 // 默认的参数
15 const defaultOpt = {
16 title: '提示', // 提示的标题
17 content: '您确定执⾏该操作吗?', // 提示的内容
18 confirmColor: '#f3514f',
19 // 接⼝调⽤结束的回调函数(调⽤成功、失败都会执⾏)
20 complete({ confirm, cancel }) {
21 confirm && console.log('点击了确定')
22 cancel && console.log('点击了取消')
23 }
24 }
25
26 // 通过object.assgin⽅法将参数进⾏合并
27 // 需要使⽤传⼊的参数覆盖默认的参数
28 // 为了不影响默认的参数,需要将合并以后的参数赋值给⼀个空对象
29 const opts = Object.assign({}, defaultOpt, options)
30
31 wx.showModal({
32 // 将合并以后的参数通过展开运算符赋值给wx.showModal对象
33 ...opts,
34 complete({ confirm, cancel }) {
35 // 如果⽤户点击了确定,通过 resolve 抛出 true
36 // 如果⽤户点击了取消,通过 resolve 抛出 false
37 confirm && resolve(true)
38 cancel && resolve(false)
39 }
40 })
41 })
42 }
43
44 export { modal }
45
46 wx.modal = modal
1 // app.js
2
3 // app.js
4 // import { toast } from './utils/extendApi'
5 import './utils/extendApi'
6
7 App({
8 // ⻚⾯显示⽣命周期函数
9 async onShow() {
10
11 // wx.showModal({
12 // title: '提示', // 提示的标题
13 // content: '您确定执⾏该操作吗?', // 提示的内容
14 // confirmColor: '#f3514f',
15 // // 接⼝调⽤结束的回调函数(调⽤成功、失败都会执⾏)
16 // complete({ confirm, cancel }) {
17 // confirm && console.log('点击了确定')
18 // cancel && console.log('点击了取消')
19 // }
20 // })
21
22 // 不传⼊参数
23 // const res = await wx.modal()
24
25 // 传⼊参数
26 const res = await wx.modal({
27 title:'新的提示',
28 showCancel:false
29 })
30
31 console.log(res);
32
33 }
34
35 })3.模块对话框封装
基本使用
1 wx.showModal(
2 title: '提示', // 提示的标题
3 content: '您确定执⾏该操作吗?', // 提示的内容
4 confirmColor: '#f3514f',
5 // 接⼝调⽤结束的回调函数(调⽤成功、失败都会执⾏)
6 complete({ confirm, cancel }) {
7 confirm && console.log('点击了确定')
8 cancel && console.log('点击了取消')
9 }
10 })封装思路
调⽤⽅式
实现步骤
代码
1 // exendApi.js
2
3 // function toast () {}
4
5 // 在调⽤modal⽅法时,可以传递参数,也可以不传递参数。
6 // 如果不传递参数,默认值就是空对象。
7 // 如果传递参数,参数需要时⼀个对象,对象中的属性需要和wx.showModal参数保持⼀致。
8 const modal = (options = {}) => {
9 // 在⽅法内部需要通过Promise返回⽤户的操作
10 // 如果⽤户点击了确认,需要通过resolve返回true
11 // 如果⽤户点击了取消,需要通过resolve返回false
12
13 return new Promise((resolve) => {
14 // 默认的参数
15 const defaultOpt = {
16 title: '提示', // 提示的标题
17 content: '您确定执⾏该操作吗?', // 提示的内容
18 confirmColor: '#f3514f',
19 // 接⼝调⽤结束的回调函数(调⽤成功、失败都会执⾏)
20 complete({ confirm, cancel }) {
21 confirm && console.log('点击了确定')
22 cancel && console.log('点击了取消')
23 }
24 }
25
26 // 通过object.assgin⽅法将参数进⾏合并
27 // 需要使⽤传⼊的参数覆盖默认的参数
28 // 为了不影响默认的参数,需要将合并以后的参数赋值给⼀个空对象
29 const opts = Object.assign({}, defaultOpt, options)
30
31 wx.showModal({
32 // 将合并以后的参数通过展开运算符赋值给wx.showModal对象
33 ...opts,
34 complete({ confirm, cancel }) {
35 // 如果⽤户点击了确定,通过 resolve 抛出 true
36 // 如果⽤户点击了取消,通过 resolve 抛出 false
37 confirm && resolve(true)
38 cancel && resolve(false)
39 }
40 })
41 })
42 }
43
44 export { modal }
45
46 wx.modal = modal
1 // app.js
2
3 // app.js
4 // import { toast } from './utils/extendApi'
5 import './utils/extendApi'
6
7 App({
8 // ⻚⾯显示⽣命周期函数
9 async onShow() {
10
11 // wx.showModal({
12 // title: '提示', // 提示的标题
13 // content: '您确定执⾏该操作吗?', // 提示的内容
14 // confirmColor: '#f3514f',
15 // // 接⼝调⽤结束的回调函数(调⽤成功、失败都会执⾏)
16 // complete({ confirm, cancel }) {
17 // confirm && console.log('点击了确定')
18 // cancel && console.log('点击了取消')
19 // }
20 // })
21
22 // 不传⼊参数
23 // const res = await wx.modal()
24
25 // 传⼊参数
26 const res = await wx.modal({
27 title:'新的提示',
28 showCancel:false
29 })
30
31 console.log(res);
32
33 }
34
35 })4.封装本地存储 API
1 try {
2 wx.setStorageSync(key, value)
3 } catch (err) {
4 console.error(`存储指定 ${key} 数据发⽣错误:`, err)
5 }
6
7 wx.setStorage({
8 key: 'key',
9 data: 'data',
10 success (res) => {},
11 fail (err) => {}
12 })实现步骤
代码
1 // utils/storage.js
2
3 /**
4 * @description 存储数据
5 * @param {*} key 本地缓存中指定的 key
6 * @param {*} value 需要缓存的数据
7 */
8 export const setStorage = (key, value) => {
9 try {
10 wx.setStorageSync(key, value)
11 } catch (e) {
12 console.error(`存储指定 ${key} 数据发⽣错误:`, e)
13 }
14 }
15
16 /**
17 * @description 从本地读取对应 key 的数据
18 * @param {*} key
19 */
20 export const getStorage = (key) => {
21 try {
22 const value = wx.getStorageSync(key)
23 if (value) {
24 return value
25 }
26 } catch (e) {
27 console.error(`获取指定 ${key} 数据发⽣错误:`, e)
28 }
29 }
30
31 /**
32 * @description 从本地移除指定 key 数据
33 * @param {*} key
34 */
35 export const removeStorage = (key) => {
36 try {
37 wx.removeStorageSync(key)
38 } catch (err) {
39 console.error(`移除指定 ${key} 数据发⽣错误:`, e)
40 }
41 }
42
43 /**
44 * @description 从本地清空全部的数据
45 */
46 export const clearStorage = () => {
47 try {
48 wx.clearStorageSync()
49 } catch (e) {
50 console.error("清空本地存储时发⽣错误:", e);
51 }
52 }
1 // app.js
2
3 import {setStorage,getStorage,removeStorage,clearStorage} from './utils/storage'
4
5 App({
6 // ⻚⾯显示⽣命周期函数
7 async onShow() {
8
9 setStorage('name','tom'),
10 setStorage('age',10)
11
12 const name = getStorage('name')
13 console.log(name);
14
15 removeStorage('name')
16
17 clearStorage()
18
19 }
20
21 })十一,网络请求封装
请求封装-request⽅法
1 // utils/request.js
2
3 // 创建 WxRequest 类
4 // 通过类的⽅式来进⾏封装,会让代码更加具有复⽤性
5 // 也可以⽅便添加新的属性和⽅法
6
7 class WxRequest {
8
9 // ⽤于创建和初始化类的属性以及⽅法
10 constructor(){}
11
12 // request实例⽅法接受⼀个对象类型的参数
13 // 属性值和wx.request⽅法调⽤时传递的参数保持⼀致
14 request(options){
15
16 // 需要通过Promise封装wx.requset,处理异步请求
17 return new Promise((resolve,reject) => {
18
19 wx.request({
20 ...options,
21
22 // 当接⼝调⽤成功时会触发 success 回调函数
23 success:(res) => {
24 resolve(res)
25 },
26
27 // 当接⼝调⽤失败时会触发 fail 回调函数
28 fail:(err) => {
29 reject(err)
30 }
31 })
32 })
33 }
34 }
35
36 // ----------------------以下是实例化代码------------------------
37 // ⽬前写到同⼀个⽂件中,是为了⽅便进⾏测试,以后会提取成多个⽂件
38
39 // 对wxRequest进⾏实例化
40 const instance = new WxRequest()
41
42 // 将Wxquest实例进⾏暴露出去,⽅便在其他⽂件中进⾏使⽤
43 export default instance
request方法使用
1 <!--pages/test/test.wxml-->
2 <!-- <text>pages/test/test.wxml</text> -->
3
4 <view class="box">
5 <button type="warn" plain size="mini" bindtap="handler">测试发送请求</button>
6 </view>
1 /* pages/test/test.wxss */
2
3 .box {
4 display: flex;
5 height: 200rpx;
6 justify-content: center;
7 align-items: center;
8 }
1 // test.js
2
3 import instance from '../../utils/request'
4
5 Page({
6
7 // 点击按钮触发 handler ⽅法
8 async handler() {
9
10 // 第⼀种调⽤⽅式:通过 then 和 catch 接收返回的值
11 instance
12 .request({
13 url: 'https://gmall-prod.atguigu.cn/mall-api/index/findBanner',
14 method: 'GET'
15 })
16 .then((res) => {
17 console.log(res)
18 })
19 .catch((err) => {
20 console.log(err)
21 })
22
23 // 第⼆种调⽤⽅式:通过 await 和 async 接收返回的值
24 // const res = await instance.request({
25 // url: 'https://gmall-prod.atguigu.cn/mall-api/index/findBanner',
26 // method: 'GET'
27 // })
28
29 console.log(res)
30 }
31
32 })
完善请求/响应拦截器
在响应拦截器,我们需要判断是请求成功,还是请求失败,然后进⾏不同的业务逻辑处理
代码
1 // utils/request.js
2
3 class WxRequest {
4
5 // coding....
6
7 request(options) {
8 // coding....
9
10 // 使⽤ Promise 封装异步请求
11 return new Promise((resolve, reject) => {
12 // 使⽤ wx.request 发起请求
13 wx.request({
14 ...options,
15
16 // 接⼝调⽤成功的回调函数
17 success: (res) => {
18 // 响应成功以后触发响应拦截器
19 if (this.interceptors.response) {
20 + // 调⽤响应拦截器⽅法,获取到响应拦截器内部返回数据
21 + // success: true 表示服务器成功响应了结果,我们需要对业务状态码进⾏判断
22 + res = this.interceptors.response({ response: res, isSuccess: true
})
23 }
24
25 // 将数据通过 resolve 进⾏返回即可
26 resolve(res)
27 },
28
29 // 接⼝调⽤失败的回调函数
30 fail: (err) => {
31 // 响应失败以后也要执⾏响应拦截器
32 if (this.interceptors.response) {
33 + // isSuccess: false 表示是⽹络超时或其他问题
34 + err = this.interceptors.response({ response: err, isSuccess: false
})
35 }
36
37 // 当请求失败以后,通过 reject 返回错误原因
38 reject(err)
39 }
40
41 })
42 })
43 }
44
45 // coding......
46 }
47
48
49 // -----------------------------------------------------
50
51
52 // 对 WxRequest 进⾏实例化
53 const instance = new WxRequest({
54 baseURL: 'https://gmall-prod.atguigu.cn/mall-api'
55 })
56
57 // 设置请求拦截器
58 instance.setRequestInterceptor((config) => {
59 console.log('执⾏请求拦截器')
60
61 return config
62 })
63
// 响应拦截
64 instance.interceptors.response = (response) => {
65
66 console.log(response);
67
68 // 从response中结构isSuccess
69 // const { isSuccess } = response
70 const { isSuccess, data } = response
71
72 // 如果isSuccess为false,说明执⾏了fail回调函数
73 // 这时候说明⽹络异常,需要给⽤户提示⽹络异常
74 if (!isSuccess) {
75 wx.showToast({
76 title: '⽹络异常请重试',
77 icon: 'error'
78 })
79
80 return response
81 }
82
83 // 对响应数据做点什么
84 // return response
85 return data
86 }
87
88
89 // 将 WxRequest 的实例通过模块化的⽅式暴露出去
90 export default instance
使⽤请求/响应拦截器
代码
1 import {getStorage} from './storage'
2
3 // 添加请求拦截器 (在请求发送之前对请求参数进⾏新增或者修改)
4 instance.interceptors.request = (config) => {
5
6 // 在实际开发中,有⼀些接⼝需要使⽤访问令牌 token
7 // 访问令牌 token 通常是存储到本地
8 // 需要先从本地获取到存储的 token
9 const token = getStorage('token')
10
11 // 如果本地存在 token,这时候就需要在请求头中添加 token 字段
12 if (token) {
13 config.header['token'] = token
14 }
15
16 // 在发送请求之前做些什么
17 return config
18 }
使⽤npm包发送请求
命令:npm install mina-request
安装好后,需要在微信开发者⼯具中进⾏ npm 构建,点击 ⼯具 构建 npm。
http.js代码
1 // 导⼊模块、包提供的类
2 import WxRequest from 'mina-request'
3 // 导⼊封装的本地存储操作模块
4 import { getStorage, clearStorage } from './storage'
5 // 导⼊封装的增强 API
6 import { toast, modal } from './extendApi'
7
8 // 对类进⾏实例化
9 const instance = new WxRequest({
10 baseURL: 'https://gmall-prod.atguigu.cn/mall-api',
11 timeout: 15000
12 })
13
14 // 添加请求拦截器 (在请求发送之前对请求参数进⾏新增或者修改)
15 instance.interceptors.request = (config) => {
16 // 在实际开发中,有⼀些接⼝需要使⽤访问令牌 token
17 // 访问令牌 token 通常是存储到本地
18 // 需要先从本地获取到存储的 token
19 const token = getStorage('token')
20
21 // 如果本地存在 token,这时候就需要在请求头中添加 token 字段
22 if (token) {
23 config.header['token'] = token
24 }
25
26 // 在发送请求之前做些什么
27 return config
28 }
29
30 // 添加响应拦截器 (在服务器响应数据以后,对返回的数据进⾏逻辑处理)
31 instance.interceptors.response = async (response) => {
32 // 从 response 对象中解构两个数据
33 const { isSuccess, data } = response
34
35 // response 服务器响应的数据,只不过数据被 wx.request 进⾏了⼀层包装
36 // console.log(response)
37
38 // response.config 封装的包⾥⾯提供的 config 属性,是请求的参数信息
39 // 可以使⽤请求参数进⾏代码的调试
40
41 // response.data 服务器真正响应的数据
42
43 // response.isSuccess 判断代码执⾏了哪⼀个回调函数
44 // isSuccess = true,说明代码执⾏了 wx.request ⽅法的 success 回调函数
45 // isSuccess = false,说明代码执⾏了 wx.request ⽅法的 fail 回调函数
46
47 // 如果 isSuccess = false,说明⽹络出现了问题
48 if (!isSuccess) {
49 toast({
50 title: '⽹络异常请重试',
51 icon: 'error'
52 })
53
54 return Promise.reject(response)
55 }
56
57 // 如果 isSuccess = true,说明代码执⾏到了 success 回调函数
58 // 需要开发者对返回的参数进⾏逻辑判断
59 // 需要对后端返回的业务状态码进⾏判断
60 // 业务状态码 === 200,接⼝调⽤成功,服务器成功返回了数据
61 // 业务状态码 === 208,没有 token 或者 token 失效,需要让⽤户重新进⾏登录
62 // 业务状态码既不等于 200,也不等于 208,说明出现了其他异常,需要给⽤户统⼀进⾏提示
63 switch (data.code) {
64 case 200:
65 // 接⼝调⽤成功,服务器成功返回了数据,只需要将数据简化以后返回即可
66 return data
67
68 case 208:
69 const res = await modal({
70 content: '鉴权失败,请重新登录',
71 showCancel: false
72 })
73
74 if (res) {
75 // 既然⽤户需要重新进⾏登录,就需要把之前⽤户存储的信息(过期的 token) 进⾏清除
76 clearStorage()
77
78 wx.navigateTo({
79 url: '/pages/login/login'
80 })
81 }
82
83 return Promise.reject(response)
84
85 default:
86 toast({
87 title: '程序出现异常,请联系客服或稍后重试!'
88 })
89 return Promise.reject(response)
90 }
91
92 // return response
93 }
94
95 // 导出实例
96 export default instance
项目首页
轮播图结构
1 {
2 "usingComponents": {
3 "banner": "./banner/banner"
4 }
5 }
1 <!--pages/index/banner/banner.wxml-->
2
3 <!-- 轮播图 -->
4 <view class="swiper-box">
5 <!-- swiper 滑块视图容器 -->
6 <swiper
7 autoplay
8 class="swiper"
9 indicator-active-color="#FF734C"
10 interval="2000"
11 duration="1000"
12 indicator-color="rgba(0, 0, 0, .3)"
13 >
14 <!-- 使⽤ block 标签实现通过数组进⾏列表渲染 -->
15 <block wx:for="{{ bannerList }}" wx:key="index">
16 <!-- swiper-item 单个滑块视图容器 -->
17 <swiper-item class="swiper-item">
18 <!-- 通过 navigator 组件跳转的链接 -->
19 <navigator
20 class="navigator"
21 url="/pages/goods/detail/detail?goodsId=id"
22 >
23 <image class="img" src="{{ item }}"></image>
24 </navigator>
25 </swiper-item>
26 </block>
27 </swiper>
28
29 <!-- 轮播图的⾯板指示点,因为⾯板指示点不⽀持,所以我们只能通过⾃定义结构的⽅式 -->
30 <view class="indicator">
31 <!-- active 类名:当前被激活的⾯板指示点颜⾊ -->
32 <!-- circle 类名:默认的⾯板指示点颜⾊ -->
33 <text
34 wx:for="{{bannerList.length}}"
35 wx:key="id"
36 class="{{ 'active rectangle' }}"
37 ></text>
38 </view>
39 </view>渲染⻚⾯结构
1 // page/index/index.html
2
3 <!-- 轮播图区域 -->
4 <banner bannerList="{{ bannerList }}" />
1 // page/index/banner/banner.wxml
2
3 <!-- 使⽤ block 标签实现通过数组进⾏列表渲染 -->
4 <block wx:for="{{ bannerList }}" wx:key="index">
5 <!-- swiper-item 单个滑块视图容器 -->
6 <swiper-item class="swiper-item">
7 <!-- 通过 navigator 组件跳转的链接 -->
8 <navigator
9 class="navigator"
10 + url="/pages/goods/detail/detail?goodsId={{item.id}}"
11 >
12 + <image class="img" src="{{ item.imageUrl }}"></image>
13 </navigator>
14 </swiper-item>
15 </block>
渲染分类导航
1 <!-- 导航分类 -->
2 <entrance cateList="{{ categoryList }}"/>
1 // pages/index/entrance/entrance.html
2
3 <view class="nav-list">
4 <!-- ⼀级分类导航容器 -->
5 <view
6 + wx:for="{{ cateList }}"
7 wx:key="index"
8 class="nav-item {{ index >= 5 ? 'small' : '' }}"
9 >
10 <!-- 导航链接 -->
11 <navigator
12 class="navigator-nav"
13 + url="/pages/goods/list/list?category1Id={{item.id}}"
14 >
15 + <image class="nav-img" src="{{ item.imageUrl }}" />
16 + <text class="nav-text">{{ item.name }}</text>
17 </navigator>
18 </view>
19 </view>
导航分类结构样式调整
1 /* pages/index/entrance/entrance.wxss */
2
3 /* 导航分类样式 */
4 .nav-list {
5 display: flex;
6 align-items: center;
7 flex-wrap: wrap;
8 margin: 20rpx 0rpx;
9 border-radius: 18rpx;
10 padding: 10px 0;
11 background-color: #fff;
12
13 .nav-item {
14 flex: 1;
15 min-width: 20%;
16 max-width: 20%;
17
18 &.small {
19 margin-top: 36rpx;
20
21 + .nav-img {
22 + width: 50rpx !important;
23 + height: 50rpx !important;
24 }
25 }
26 }
27 }
渲染活动区域
1 // pages/index/index.html
2
3 <!-- ⼴告区域 -->
4 <view class="adver">
5 <view class="adver-left">
6 + <navigator url="/pages/goods/list/list?category2Id={{
activeList[0].category2Id }}">
7 + <image src="{{ activeList[0].imageUrl }}" mode="widthFix" />
8 + </navigator>
9 </view>
10
11 <view class="adver-right">
12 <view>
13 + <navigator url="/pages/goods/list/list?category2Id={{
activeList[1].category2Id }}">
14 + <image src="{{ activeList[1].imageUrl }}" mode="widthFix" />
15 + </navigator>
16 </view>
17 <view>
18 + <navigator url="/pages/goods/list/list?category2Id={{
activeList[2].category2Id }}">
19 + <image src="{{ activeList[2].imageUrl }}" mode="widthFix" />
20 + </navigator>
21 </view>
22 </view>
23 </view>
猜你喜欢+⼈⽓推荐区域渲染
将数据传递给 goods-list 组件
1 // page/index/index.wxml
2
3 <!-- 商品列表 -->
4 <goods-list title="猜你喜欢" list="{{ guessList }}"></goods-list>
5 <goods-list title="⼈⽓推荐" list="{{ hotList }}"></goods-list>
接收⾸⻚传递的 list 数据
1 // components/goods-list/good-list.js
2
3 Component({
4 // 组件的属性列表
5 properties: {
6 // 列表标题
7 title: {
8 type: String,
9 value: '',
10 },
11
12 // 传递的列表数据
13 list: {
14 type: Array,
15 value: []
16 }
17 }
18
19 // coding...
20 }
遍历 goods-item 组件,并将数据传递给 goods-item
1 // components/goods-card/goods-card.js
2
3 Component({
4
5 // 组件的属性列表
6 properties: {
7 // 每⼀项商品的数据
8 goodItem: {
9 type: Object,
10 value: {}
11 }
12 }
13
14 // coding...
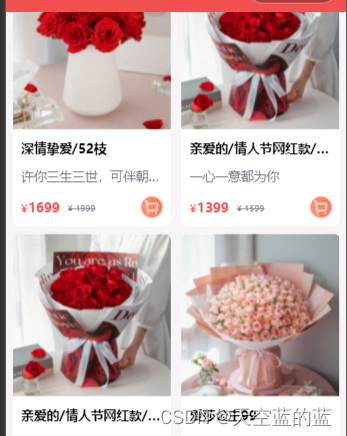
15 }完成后效果图:
将数据传递给 goods-item 组件
1 // components/goods-list/goods-item.wxml
2
3 <!-- 列表分类卡⽚ -->
4 <view class="goods_cart_container">
5 <navigator class="navigator_nav" url="/pages/goods/detail/detail?goodsId=
{{goodItem.id}}">
6
7 <!-- 商品图⽚ -->
8 <image class="good_img" src="{{ goodItem.imageUrl }}" mode="widthFix" />
9
10 <!-- 商品详细信息 -->
11 <view class="goods_item_info">
12 <!-- 商品名称 -->
13 <text class="goods_item_info_name">{{ goodItem.name }}</text>
14 <!-- 商品描述 -->
15 <text class="goods_item_info_promo">{{ goodItem.floralLanguage }}</text>
16 <!-- 商品价格 -->
17 <view class="goods_item_info_bottom">
18 <view class="goods_item_info_price">
19 <text class="text">¥</text>{{ goodItem.price }}
20 </view>
21 <view class="goods_item_info_origin_price">
22 <text class="text">¥</text> {{goodItem.marketPrice}}
23 </view>
24 <!-- 加⼊购物⻋图⽚ -->
25 <view class="goods_item_info_btn">
26 <image class="goods_image" src="/static/images/buybtn.png" mode="" />
27 </view>
28 </view>
29 </view>
30 </navigator>
31 </view>


 461
461


 被折叠的 条评论
为什么被折叠?
被折叠的 条评论
为什么被折叠?
 到【灌水乐园】发言


