


原文地址:
Tutorial 5: Texturing
第五章:纹理
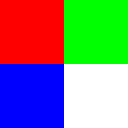
This tutorial will explain how to use texturing in OpenGL 4.0. Texturing allows us to add photorealism to our scenes by applying photographs and other images onto polygon faces. For example in this tutorial we will take the following image:
本章将介绍在OpenGL 4.0中如何使用纹理。纹理是通过在多边形面上应用图像和其他形式的影像来增加场景的现实感。本章我们将使用下面的图片:
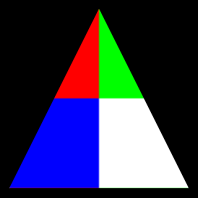
And then apply it to the polygon from the previous tutorial to produce the following:
然后我们把图片应用到多边形上,效果如下:

The format of the textures we will be using are .tga files. This is a 32 bit format called targa that supports an alpha channel and can be created using most image editing applications.
我们使用.tga文件作为纹理。tga文件是32位带alpha通道格式,可以使用大部分图像编辑软件创建和修改。
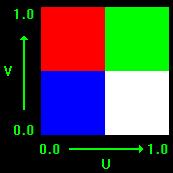
And before we get into the code we should discuss how texture mapping works. To map pixels from the .tga image onto the polygon we use what is called the Texel Coordinate System. This system converts the integer value of the pixel into a floating point value between 0.0f and 1.0f. For example if a texture width is 256 pixels wide then the first pixel will map to 0.0f, the 256th pixel will map to 1.0f, and a middle pixel of 128 would map to 0.5f.
开始代码前,我们先讨论下纹理映射的工作原理。将tga图像的像素映射到多边形上的操作由纹理坐标系统完成。这个系统将图片上像素的整数值的位置转换为0.0f到1.0f间的浮点值。例如,一张宽度为256像素的图片,第一个像素对应0.0f位置,第256个像素对应1.0f位置,中部的第128个像素对应0.5f位置。
In the texel coordinate system the width value is named "U" and the height value is named "V". The width goes from 0.0 on the left to 1.0 on the right. The height goes from 0.0 on the bottom to 1.0 on the top. For example bottom left would be denoted as U 0.0, V 0.0 and top right would be denoted as U 1.0, V 1.0. I have made a diagram below to illustrate this system:
在文理坐标系统中宽度命名为“U”高度命名为“V”。宽度从左到右的值为0.0到1.0。高度从下到上的值为0.0到1.0。例如左下角的U为0.0,V为0.0。右上角的U为1.0,V为1.0。可参考下图:
Now that we have a basic understanding of how to map textures onto polygons we can look at the updated frame work for this tutorial:
现在我们已经理解了纹理映射的基本原理,下面来看下本章更新后的框架:
Frame Work
框架
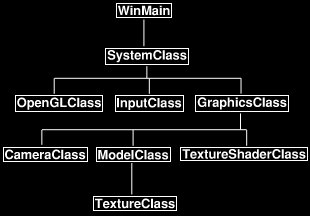
The changes to the frame work since the previous tutorial is the new TextureClass which is inside ModelClass as well as the new TextureShaderClass which replaces the ColorShaderClass. We'll start the code section by looking at the new TextureClass first.
对比上一章,本章在ModelClass下新添加了TextureClass类,并将ColorShaderClass类替换为TexutreShaderClass类。下面先从TextureClass开始。
Textureclass.h
The TextureClass encapsulates the loading, unloading, and accessing of a single texture resource. For each texture needed an object of this class must be instantiated.
TextureClass包含了加载、释放和访问一个纹理资源。每个纹理都需要创建一个此类的对象。
// Filename: textureclass.h

#ifndef _TEXTURECLASS_H_
#define _TEXTURECLASS_H_

//
// INCLUDES //
//
#include <stdio.h>

///
// MY CLASS INCLUDES //
///
#include "openglclass.h"


// Class name: TextureClass

class TextureClass
{
private:
The image format we use is called Targa and has a unique header that we require this structure for.
我们使用tga格式的图片。这种格式文件包含下面结构定义的特殊头部数据。
struct TargaHeader
 {
  unsigned char data1[12];
  unsigned short width;
  unsigned short height;
  unsigned char bpp;
  unsigned char data2;
 };

public:
 TextureClass();
 TextureClass(const TextureClass&);
 ~TextureClass();
The first two functions will load a texture from a given file name and unload that texture when it is no longer needed.
下面两个方法用来从给定的文件加载一个纹理和当纹理不使用时释放。
bool Initialize(OpenGLClass*, char*, unsigned int, bool);
 void Shutdown();

private:
The LoadTarga functions loads a targa image into an OpenGL texture. If you were to use other formats such as .bmp, .dds, and so forth you would place the loading function here.
LoadTarga方法加载tag图像为OpenGL纹理。如果要使用其他格式的资源,例如bmp、dds等等,需要替换这里的加载方法。
bool LoadTarga(OpenGLClass*, char*, unsigned int, bool);private:
The loaded boolean indicates if a texture has been loaded into this class object or not. The m_textureID is the ID number of the texture as OpenGL sees it.
变量loaded表明纹理是否被加载。变量m_textureID是OpenGL使用的纹理标记。
 bool loaded;
 unsigned int m_textureID;
};

#endif
Textureclass.cpp
// Filename: textureclass.cpp

#include "textureclass.h"
The class constructor will initialize the loaded boolean to false so that we know there has not been a texture loaded yet.
类的构造方法将loaded变量的值初始化为false,这样我们就知道纹理还没有被加载。
TextureClass::TextureClass()
{
 loaded = false;
}

TextureClass::TextureClass(const TextureClass& other)
{
}

TextureClass::~TextureClass()
{
}
Initialize takes in the OpenGL pointer, the file name of the texture, the texture unit to load the texture into, and a boolean value indicating if the texture should wrap or clamp the colors at the edges. It then loads the targa file into the OpenGL texture unit specified by calling the LoadTarga function. The texture can now be used to render with.
Initialize方法通过输入OpenGL指针,纹理资源的文件名,纹理单元(?感觉是用来唯一标识纹理资源用的),一个布尔值表示纹理边缘使用循环还是裁剪。然后通过调用LoadTarga方法加载tga文件到OpenGL纹理单元。纹理就可以用来做渲染了。
bool TextureClass::Initialize(OpenGLClass* OpenGL, char* filename, unsigned int textureUnit, bool wrap)
{
 bool result;

 // Load the targa file.
 result = LoadTarga(OpenGL, filename, textureUnit, wrap);
 if(!result)
 {
  return false;
 }

 return true;
}
The Shutdown function releases the texture resource if it has been loaded.
Shutdown方法释放已经加载的纹理资源。
void TextureClass::Shutdown()
{
 // If the texture was loaded then make sure to release it on shutdown.
 if(loaded)
 {
  glDeleteTextures(1, &m_textureID);
  loaded = false;
 }

 return;
}
LoadTarga loads a .tga image onto an OpenGL texture. It also sets up texture filtering, texture wrapping, and mipmaps for the texture.
LoadTarga方法加载tga图像到OpenGL纹理。同时也设置纹理过滤、纹理循环、纹理的mipmap。
bool TextureClass::LoadTarga(OpenGLClass* OpenGL, char* filename, unsigned int textureUnit, bool wrap)
{
 int error, width, height, bpp, imageSize;
 FILE* filePtr;
 unsigned int count;
 TargaHeader targaFileHeader;
 unsigned char* targaImage;
The beginning section loads the .tga file into a buffer called targaImage.
开始部分是加载tag文件到名为targaImage的缓冲区。
// Open the targa file for reading in binary.
 error = fopen_s(&filePtr, filename, "rb");
 if(error != 0)
 {
  return false;
 }

 // Read in the file header.
 count = fread(&targaFileHeader, sizeof(TargaHeader), 1, filePtr);
 if(count != 1)
 {
  return false;
 }

 // Get the important information from the header.
 width = (int)targaFileHeader.width;
 height = (int)targaFileHeader.height;
 bpp = (int)targaFileHeader.bpp;

 // Check that it is 32 bit and not 24 bit.
 if(bpp != 32)
 {
  return false;
 }

 // Calculate the size of the 32 bit image data.
 imageSize = width * height * 4;

 // Allocate memory for the targa image data.
 targaImage = new unsigned char[imageSize];
 if(!targaImage)
 {
  return false;
 }

 // Read in the targa image data.
 count = fread(targaImage, 1, imageSize, filePtr);
 if(count != imageSize)
 {
  return false;
 }

 // Close the file.
 error = fclose(filePtr);
 if(error != 0)
 {
  return false;
 }
Now that the buffer contains the .tga data we create an OpenGL texture object and copy the buffer into that texture object. Note that .tga have the RGB reversed so in glTextImage2D we need to set the input format as GL_BGRA so it will reverse the red and blue component for us when loading it in.
现在缓冲区包含了tga的数据,我们可以通过拷贝缓冲区数据到纹理对象的方法创建OpenGL纹理。注意,tga的RGB是颠倒的,glTextImage2D中需要设置输入的格式为GL_BGRA。
 // Set the unique texture unit in which to store the data.
// 设置唯一纹理单元来保存数据。
 OpenGL->glActiveTexture(GL_TEXTURE0 + textureUnit);

 // Generate an ID for the texture.
 glGenTextures(1, &m_textureID);

 // Bind the texture as a 2D texture.
 glBindTexture(GL_TEXTURE_2D, m_textureID);

 // Load the image data into the texture unit.
 glTexImage2D(GL_TEXTURE_2D, 0, GL_RGBA, width, height, 0, GL_BGRA, GL_UNSIGNED_BYTE, targaImage);
Once the texture has been loaded we can set the wrap, filtering, and generate mipmaps for it.
纹理加载后我们可以设置循环,过滤并生成mipmaps。
// Set the texture color to either wrap around or clamp to the edge.
 if(wrap)
 {
  glTexParameteri(GL_TEXTURE_2D, GL_TEXTURE_WRAP_S, GL_REPEAT);
  glTexParameteri(GL_TEXTURE_2D, GL_TEXTURE_WRAP_T, GL_REPEAT);
 }
 else
 {
  glTexParameteri(GL_TEXTURE_2D, GL_TEXTURE_WRAP_S, GL_CLAMP);
  glTexParameteri(GL_TEXTURE_2D, GL_TEXTURE_WRAP_T, GL_CLAMP);
 }

 // Set the texture filtering.
 glTexParameteri(GL_TEXTURE_2D, GL_TEXTURE_MAG_FILTER, GL_LINEAR);
 glTexParameteri(GL_TEXTURE_2D, GL_TEXTURE_MIN_FILTER, GL_LINEAR_MIPMAP_LINEAR);

 // Generate mipmaps for the texture.
 OpenGL->glGenerateMipmap(GL_TEXTURE_2D);

 // Release the targa image data.
 delete [] targaImage;
 targaImage = 0;

 // Set that the texture is loaded.
 loaded = true;

 return true;
}
Texture.vs
The new GLSL texture vertex shader is very similar to the color vertex shader that we covered in the previous tutorial. However instead of a color input and color output we now have a texture coordinate input and a texture coordinate output. Also note that the texture coordinates use the vec2 type since it only contains two floats for the U and V coordinates whereas the color input and output had three floats for R, G, and B. And just like the color in the previous tutorial we also pass the texture coordinates straight through to the pixel shader. Otherwise the vertex shader remains the same as the previous tutorial.
本章GLSL纹理顶点着色器和前面教程的颜色顶点着色器非常类似。使用纹理坐标输入输出替换了之前的颜色输入输出。注意纹理坐标使用vec2类型,这个类型包含两个浮点类型的变量表示U、V坐标。和颜色着色器一样,只是将纹理坐标传递到像素着色器中。其他部分和之前的着色器保持一致。
// Filename: texture.vs

#version 400

/
// INPUT VARIABLES //
/
in vec3 inputPosition;
in vec2 inputTexCoord;

//
// OUTPUT VARIABLES //
//
out vec2 texCoord;

///
// UNIFORM VARIABLES //
///
uniform mat4 worldMatrix;
uniform mat4 viewMatrix;
uniform mat4 projectionMatrix;


// Vertex Shader

void main(void)
{
 // Calculate the position of the vertex against the world, view, and projection matrices.
 gl_Position = worldMatrix * vec4(inputPosition, 1.0f);
 gl_Position = viewMatrix * gl_Position;
 gl_Position = projectionMatrix * gl_Position;

 // Store the texture coordinates for the pixel shader.
 texCoord = inputTexCoord;
}
Texture.ps
The pixel shader has a new uniform variable called shaderTexture. This is a texture sampler that allows us to access the targa image that was loaded into the OpenGL texture. To access it the pixel shader uses a new function called "texture" which samples the pixel from the shaderTexture using the input texture coordinates from the vertex shader. Note that OpenGL takes care of interpolating the texture coordinates to match up with the current pixel that we are drawing on the screen. Once the pixel is sampled from the texture using the texture coordinates it is then returned as the final output pixel color.
像素着色器加入了一个新的一致变量shaderTexture。这是个纹理采样器,它可以访问我们之前加载的OpenGL纹理。这里使用一个叫做texture的方法,此方法通过传入纹理和纹理坐标获取纹理上的像素颜色。注意,OpenGL会负责处理我们绘制到屏幕上的像素的纹理坐标插值。通过纹理坐标采样获取的像素就是我们输出到屏幕上的像素。
// Filename: texture.ps

#version 400

/
// INPUT VARIABLES //
/
in vec2 texCoord;

//
// OUTPUT VARIABLES //
//
out vec4 outputColor;

///
// UNIFORM VARIABLES //
///
uniform sampler2D shaderTexture;


// Pixel Shader

void main(void)
{
 vec4 textureColor;

 // Sample the pixel color from the texture using the sampler at this texture coordinate location.
 textureColor = texture(shaderTexture, texCoord);

 outputColor = textureColor;
}
Textureshaderclass.h
The TextureShaderClass is just an updated version of the ColorShaderClass from the previous tutorial modified to handle texture coordinates instead of color components.
本章的TextureShaderClass类和前面教程的ColorShaderClass相比只是将处理颜色的部分替换为处理纹理坐标。
// Filename: textureshaderclass.h

#ifndef _TEXTURESHADERCLASS_H_
#define _TEXTURESHADERCLASS_H_

//
// INCLUDES //
//
#include <fstream>
using namespace std;

///
// MY CLASS INCLUDES //
///
#include "openglclass.h"


// Class name: TextureShaderClass

class TextureShaderClass
{
public:
 TextureShaderClass();
 TextureShaderClass(const TextureShaderClass&);
 ~TextureShaderClass();

 bool Initialize(OpenGLClass*, HWND);
 void Shutdown(OpenGLClass*);
 void SetShader(OpenGLClass*);
 bool SetShaderParameters(OpenGLClass*, float*, float*, float*, int);

private:
 bool InitializeShader(char*, char*, OpenGLClass*, HWND);
 char* LoadShaderSourceFile(char*);
 void OutputShaderErrorMessage(OpenGLClass*, HWND, unsigned int, char*);
 void OutputLinkerErrorMessage(OpenGLClass*, HWND, unsigned int);
 void ShutdownShader(OpenGLClass*);

private:
 unsigned int m_vertexShader;
 unsigned int m_fragmentShader;
 unsigned int m_shaderProgram;
};

#endif
Textureshaderclass.cpp
There are just a couple changes to the source file (other than renaming it TextureShaderClass) which I will point out.
// Filename: textureshaderclass.cpp

#include "textureshaderclass.h"

TextureShaderClass::TextureShaderClass()
{
}

TextureShaderClass::TextureShaderClass(const TextureShaderClass& other)
{
}

TextureShaderClass::~TextureShaderClass()
{
}

bool TextureShaderClass::Initialize(OpenGLClass* OpenGL, HWND hwnd)
{
 bool result;
The new texture.vs and texture.ps GLSL files are loaded for this shader.

 // Initialize the vertex and pixel shaders.
 result = InitializeShader("../Engine/texture.vs", "../Engine/texture.ps", OpenGL, hwnd);
 if(!result)
 {
  return false;
 }

 return true;
}

void TextureShaderClass::Shutdown(OpenGLClass* OpenGL)
{
 // Shutdown the vertex and pixel shaders as well as the related objects.
 ShutdownShader(OpenGL);

 return;
}

void TextureShaderClass::SetShader(OpenGLClass* OpenGL)
{
 // Install the shader program as part of the current rendering state.
 OpenGL->glUseProgram(m_shaderProgram);

 return;
}

bool TextureShaderClass::InitializeShader(char* vsFilename, char* fsFilename, OpenGLClass* OpenGL, HWND hwnd)
{
 const char* vertexShaderBuffer;
 const char* fragmentShaderBuffer;
 int status;

 // Load the vertex shader source file into a text buffer.
 vertexShaderBuffer = LoadShaderSourceFile(vsFilename);
 if(!vertexShaderBuffer)
 {
  return false;
 }

 // Load the fragment shader source file into a text buffer.
 fragmentShaderBuffer = LoadShaderSourceFile(fsFilename);
 if(!fragmentShaderBuffer)
 {
  return false;
 }

 // Create a vertex and fragment shader object.
 m_vertexShader = OpenGL->glCreateShader(GL_VERTEX_SHADER);
 m_fragmentShader = OpenGL->glCreateShader(GL_FRAGMENT_SHADER);

 // Copy the shader source code strings into the vertex and fragment shader objects.
 OpenGL->glShaderSource(m_vertexShader, 1, &vertexShaderBuffer, NULL);
 OpenGL->glShaderSource(m_fragmentShader, 1, &fragmentShaderBuffer, NULL);

 // Release the vertex and fragment shader buffers.
 delete [] vertexShaderBuffer;
 vertexShaderBuffer = 0;

 delete [] fragmentShaderBuffer;
 fragmentShaderBuffer = 0;

 // Compile the shaders.
 OpenGL->glCompileShader(m_vertexShader);
 OpenGL->glCompileShader(m_fragmentShader);

 // Check to see if the vertex shader compiled successfully.
 OpenGL->glGetShaderiv(m_vertexShader, GL_COMPILE_STATUS, &status);
 if(status != 1)
 {
  // If it did not compile then write the syntax error message out to a text file for review.
  OutputShaderErrorMessage(OpenGL, hwnd, m_vertexShader, vsFilename);
  return false;
 }

 // Check to see if the fragment shader compiled successfully.
 OpenGL->glGetShaderiv(m_fragmentShader, GL_COMPILE_STATUS, &status);
 if(status != 1)
 {
  // If it did not compile then write the syntax error message out to a text file for review.
  OutputShaderErrorMessage(OpenGL, hwnd, m_fragmentShader, fsFilename);
  return false;
 }

 // Create a shader program object.
 m_shaderProgram = OpenGL->glCreateProgram();

 // Attach the vertex and fragment shader to the program object.
 OpenGL->glAttachShader(m_shaderProgram, m_vertexShader);
 OpenGL->glAttachShader(m_shaderProgram, m_fragmentShader);
The second shader input variable has been changed to match the input in the vertex shader for inputTexCoord.

 // Bind the shader input variables.
 OpenGL->glBindAttribLocation(m_shaderProgram, 0, "inputPosition");
 OpenGL->glBindAttribLocation(m_shaderProgram, 1, "inputTexCoord");

 // Link the shader program.
 OpenGL->glLinkProgram(m_shaderProgram);

 // Check the status of the link.
 OpenGL->glGetProgramiv(m_shaderProgram, GL_LINK_STATUS, &status);
 if(status != 1)
 {
  // If it did not link then write the syntax error message out to a text file for review.
  OutputLinkerErrorMessage(OpenGL, hwnd, m_shaderProgram);
  return false;
 }

 return true;
}

char* TextureShaderClass::LoadShaderSourceFile(char* filename)
{
 ifstream fin;
 int fileSize;
 char input;
 char* buffer;

 // Open the shader source file.
 fin.open(filename);

 // If it could not open the file then exit.
 if(fin.fail())
 {
  return 0;
 }

 // Initialize the size of the file.
 fileSize = 0;

 // Read the first element of the file.
 fin.get(input);

 // Count the number of elements in the text file.
 while(!fin.eof())
 {
  fileSize++;
  fin.get(input);
 }

 // Close the file for now.
 fin.close();

 // Initialize the buffer to read the shader source file into.
 buffer = new char[fileSize+1];
 if(!buffer)
 {
  return 0;
 }

 // Open the shader source file again.
 fin.open(filename);

 // Read the shader text file into the buffer as a block.
 fin.read(buffer, fileSize);

 // Close the file.
 fin.close();

 // Null terminate the buffer.
 buffer[fileSize] = '\0';

 return buffer;
}

void TextureShaderClass::OutputShaderErrorMessage(OpenGLClass* OpenGL, HWND hwnd, unsigned int shaderId, char* shaderFilename)
{
 int logSize, i;
 char* infoLog;
 ofstream fout;
 wchar_t newString[128];
 unsigned int error, convertedChars;

 // Get the size of the string containing the information log for the failed shader compilation message.
 OpenGL->glGetShaderiv(shaderId, GL_INFO_LOG_LENGTH, &logSize);

 // Increment the size by one to handle also the null terminator.
 logSize++;

 // Create a char buffer to hold the info log.
 infoLog = new char[logSize];
 if(!infoLog)
 {
  return;
 }

 // Now retrieve the info log.
 OpenGL->glGetShaderInfoLog(shaderId, logSize, NULL, infoLog);

 // Open a file to write the error message to.
 fout.open("shader-error.txt");

 // Write out the error message.
 for(i=0; i<logSize; i++)
 {
  fout << infoLog[i];
 }

 // Close the file.
 fout.close();

 // Convert the shader filename to a wide character string.
 error = mbstowcs_s(&convertedChars, newString, 128, shaderFilename, 128);
 if(error != 0)
 {
  return;
 }

 // Pop a message up on the screen to notify the user to check the text file for compile errors.
 MessageBox(hwnd, L"Error compiling shader.  Check shader-error.txt for message.", newString, MB_OK);

 return;
}

void TextureShaderClass::OutputLinkerErrorMessage(OpenGLClass* OpenGL, HWND hwnd, unsigned int programId)
{
 int logSize, i;
 char* infoLog;
 ofstream fout;

 // Get the size of the string containing the information log for the failed shader compilation message.
 OpenGL->glGetProgramiv(programId, GL_INFO_LOG_LENGTH, &logSize);

 // Increment the size by one to handle also the null terminator.
 logSize++;

 // Create a char buffer to hold the info log.
 infoLog = new char[logSize];
 if(!infoLog)
 {
  return;
 }

 // Now retrieve the info log.
 OpenGL->glGetProgramInfoLog(programId, logSize, NULL, infoLog);

 // Open a file to write the error message to.
 fout.open("linker-error.txt");

 // Write out the error message.
 for(i=0; i<logSize; i++)
 {
  fout << infoLog[i];
 }

 // Close the file.
 fout.close();

 // Pop a message up on the screen to notify the user to check the text file for linker errors.
 MessageBox(hwnd, L"Error compiling linker.  Check linker-error.txt for message.", L"Linker Error", MB_OK);

 return;
}

void TextureShaderClass::ShutdownShader(OpenGLClass* OpenGL)
{
 // Detach the vertex and fragment shaders from the program.
 OpenGL->glDetachShader(m_shaderProgram, m_vertexShader);
 OpenGL->glDetachShader(m_shaderProgram, m_fragmentShader);

 // Delete the vertex and fragment shaders.
 OpenGL->glDeleteShader(m_vertexShader);
 OpenGL->glDeleteShader(m_fragmentShader);

 // Delete the shader program.
 OpenGL->glDeleteProgram(m_shaderProgram);

 return;
}
The SetShaderParameters function now takes an extra input value called textureUnit. This allows us to specify which texture unit to bind so that OpenGL knows which texture to sample in the pixel shader.
SetShaderParameters方法增加了一个参数textureUnit(纹理单元)。这样我们可以通过指定纹理单元来让OpenGL知道像素着色器里对哪个纹理进行采样。
bool TextureShaderClass::SetShaderParameters(OpenGLClass* OpenGL, float* worldMatrix, float* viewMatrix, float* projectionMatrix, int textureUnit)
{
 unsigned int location;

 // Set the world matrix in the vertex shader.
 location = OpenGL->glGetUniformLocation(m_shaderProgram, "worldMatrix");
 if(location == -1)
 {
  return false;
 }
 OpenGL->glUniformMatrix4fv(location, 1, false, worldMatrix);

 // Set the view matrix in the vertex shader.
 location = OpenGL->glGetUniformLocation(m_shaderProgram, "viewMatrix");
 if(location == -1)
 {
  return false;
 }
 OpenGL->glUniformMatrix4fv(location, 1, false, viewMatrix);

 // Set the projection matrix in the vertex shader.
 location = OpenGL->glGetUniformLocation(m_shaderProgram, "projectionMatrix");
 if(location == -1)
 {
  return false;
 }
 OpenGL->glUniformMatrix4fv(location, 1, false, projectionMatrix);
The location in the pixel shader for the shaderTexture variable is obtained here and then the texture unit is set. The texture can now be sampled in the pixel shader.
通过纹理单元定位像素着色器中shaderTexture关联的纹理。然后像素着色器就可以对其进行采样了。
// Set the texture in the pixel shader to use the data from the first texture unit.
 location = OpenGL->glGetUniformLocation(m_shaderProgram, "shaderTexture");
 if(location == -1)
 {
  return false;
 }
 OpenGL->glUniform1i(location, textureUnit);

 return true;
}
Modelclass.h
The ModelClass has changed since the previous tutorial so that it can now accommodate texturing.
ModelClass相比前面的教包含了纹理。
// Filename: modelclass.h

#ifndef _MODELCLASS_H_
#define _MODELCLASS_H_
The TextureClass header is now included in the ModelClass header.

///
// MY CLASS INCLUDES //
///
#include "textureclass.h"


// Class name: ModelClass

class ModelClass
{
private:
The VertexType has replaced the color component with texture coordinates.

 struct VertexType
 {
  float x, y, z;
  float tu, tv;
 };

public:
 ModelClass();
 ModelClass(const ModelClass&);
 ~ModelClass();
The Initialize function now takes new inputs related to the texture.

 bool Initialize(OpenGLClass*, char*, unsigned int, bool);
 void Shutdown(OpenGLClass*);
 void Render(OpenGLClass*);

private:
 bool InitializeBuffers(OpenGLClass*);
 void ShutdownBuffers(OpenGLClass*);
 void RenderBuffers(OpenGLClass*);

ModelClass also now has both a private LoadTexture and ReleaseTexture for loading and releasing the texture that will be used to render this model.
ModelClass增加了两个私有方法LoadTexture和ReleaseTexture,用来加载和释放模型用的纹理资源。

 bool LoadTexture(OpenGLClass*, char*, unsigned int, bool);
 void ReleaseTexture();

private:
 int m_vertexCount, m_indexCount;
 unsigned int m_vertexArrayId, m_vertexBufferId, m_indexBufferId;
And finally the new m_Texture variable is used for loading, releasing, and accessing the texture resource for this model.
最后新增了m_Texture变量用来加载、释放、访问模型的纹理资源。
TextureClass* m_Texture;
};

#endif
Modelclass.cpp
// Filename: modelclass.cpp

#include "modelclass.h"
The class constructor now initializes the new texture object to null.
类的构造函数初始化纹理为null。
ModelClass::ModelClass()
{
 m_Texture = 0;
}

ModelClass::ModelClass(const ModelClass& other)
{
}

ModelClass::~ModelClass()
{
}
Initialize now takes as input the file name of the .tga texture that the model will be using. It also takes as input the texture unit in which to load the .tga file into. And it also takes a boolean value which indicates if the color should wrap around or clamp at the edges.
Initialize方法的输入参数包含模型要使用的tga纹理资源文件名,纹理单元用来加载tga文件,循环标记纹理边缘是循环还是裁剪。
bool ModelClass::Initialize(OpenGLClass* OpenGL, char* textureFilename, unsigned int textureUnit, bool wrap)
{
 bool result;

 // Initialize the vertex and index buffer that hold the geometry for the triangle.
 result = InitializeBuffers(OpenGL);
 if(!result)
 {
  return false;
 }
The Initialize function calls a new private function that will load the .tga texture.
加载tga纹理。
 // Load the texture for this model.
 result = LoadTexture(OpenGL, textureFilename, textureUnit, wrap);
 if(!result)
 {
  return false;
 }

 return true;
}
The Shutdown function now calls the new private function to release the texture object that was loaded during initialization.
Shutdown方法增加了释放纹理对象的方法。
void ModelClass::Shutdown(OpenGLClass* OpenGL)
{
 // Release the texture used for this model.
 ReleaseTexture();

 // Release the vertex and index buffers.
 ShutdownBuffers(OpenGL);

 return;
}

void ModelClass::Render(OpenGLClass* OpenGL)
{
 // Put the vertex and index buffers on the graphics pipeline to prepare them for drawing.
 RenderBuffers(OpenGL);

 return;
}

bool ModelClass::InitializeBuffers(OpenGLClass* OpenGL)
{
 VertexType* vertices;
 unsigned int* indices;

 // Set the number of vertices in the vertex array.
 m_vertexCount = 3;

 // Set the number of indices in the index array.
 m_indexCount = 3;

 // Create the vertex array.
 vertices = new VertexType[m_vertexCount];
 if(!vertices)
 {
  return false;
 }

 // Create the index array.
 indices = new unsigned int[m_indexCount];
 if(!indices)
 {
  return false;
 }
The vertex array now has a texture coordinate component instead of a color component. The texture vector is always U first and V second. For example the first texture coordinate is bottom left of the triangle which corresponds to U 0.0, V 0.0. Use the diagram at the top of this page to figure out what your coordinates need to be. Note that you can change the coordinates to map any part of the texture to any part of the polygon face. In this tutorial I'm just doing a direct mapping for simplicity reasons.
本章顶点数组用纹理坐标替代了颜色。纹理向量永远U在前V在后。比如第一个纹理坐标是三角形的左下角,对应U为0.0,V为0.0。根据本章前面给的图确定纹理坐标。你可以通过修改纹理坐标来使用任意的部分覆盖多边形表面。为了简单,本章直接将纹理映射到多边形上。
// Load the vertex array with data.

 // Bottom left.
 vertices[0].x = -1.0f;  // Position.
 vertices[0].y = -1.0f;
 vertices[0].z =  0.0f;

 vertices[0].tu = 0.0f;  // Texture coordinates.
 vertices[0].tv = 0.0f;

 // Top middle.
 vertices[1].x = 0.0f;  // Position.
 vertices[1].y = 1.0f;
 vertices[1].z = 0.0f;

 vertices[1].tu = 0.5f;  // Texture coordinates.
 vertices[1].tv = 1.0f;

 // Bottom right.
 vertices[2].x =  1.0f;  // Position.
 vertices[2].y = -1.0f;
 vertices[2].z =  0.0f;

 vertices[2].tu = 1.0f;  // Texture coordinates.
 vertices[2].tv = 0.0f;

 // Load the index array with data.
 indices[0] = 0;  // Bottom left.
 indices[1] = 1;  // Top middle.
 indices[2] = 2;  // Bottom right.

 // Allocate an OpenGL vertex array object.
 OpenGL->glGenVertexArrays(1, &m_vertexArrayId);

 // Bind the vertex array object to store all the buffers and vertex attributes we create here.
 OpenGL->glBindVertexArray(m_vertexArrayId);

 // Generate an ID for the vertex buffer.
 OpenGL->glGenBuffers(1, &m_vertexBufferId);

 // Bind the vertex buffer and load the vertex (position and texture) data into the vertex buffer.
 OpenGL->glBindBuffer(GL_ARRAY_BUFFER, m_vertexBufferId);
 OpenGL->glBufferData(GL_ARRAY_BUFFER, m_vertexCount * sizeof(VertexType), vertices, GL_STATIC_DRAW);
Although enabling the second vertex attribute hasn't changed, it now means something different since it is now texture coordinates and no longer color components.
这部分代码没有改变,只是意义略有不同,第二句代码是开启纹理坐标对应的变量。
// Enable the two vertex array attributes.
 OpenGL->glEnableVertexAttribArray(0);  // Vertex position.
 OpenGL->glEnableVertexAttribArray(1);  // Texture coordinates.

 // Specify the location and format of the position portion of the vertex buffer.
 OpenGL->glBindBuffer(GL_ARRAY_BUFFER, m_vertexBufferId);
 OpenGL->glVertexAttribPointer(0, 3, GL_FLOAT, false, sizeof(VertexType), 0);
When we specify the layout of the texture coordinate portion of the vertex buffer we need to change the second argument to 2 since there are only two floats now instead of three. Otherwise the rest of the inputs remain the same.
由于我们使用纹理坐标(纹理坐标只包含2个参数u & v,之前的颜色是3个参数r, g & b),需要将glVertexAttribPointer方法的第二个参数修改为2。其他部分不变。
// Specify the location and format of the texture coordinate portion of the vertex buffer.
 OpenGL->glBindBuffer(GL_ARRAY_BUFFER, m_vertexBufferId);
 OpenGL->glVertexAttribPointer(1, 2, GL_FLOAT, false, sizeof(VertexType), (unsigned char*)NULL + (3 * sizeof(float)));

 // Generate an ID for the index buffer.
 OpenGL->glGenBuffers(1, &m_indexBufferId);

 // Bind the index buffer and load the index data into it.
 OpenGL->glBindBuffer(GL_ELEMENT_ARRAY_BUFFER, m_indexBufferId);
 OpenGL->glBufferData(GL_ELEMENT_ARRAY_BUFFER, m_indexCount* sizeof(unsigned int), indices, GL_STATIC_DRAW);

 // Now that the buffers have been loaded we can release the array data.
 delete [] vertices;
 vertices = 0;

 delete [] indices;
 indices = 0;

 return true;
}

void ModelClass::ShutdownBuffers(OpenGLClass* OpenGL)
{
 // Disable the two vertex array attributes.
 OpenGL->glDisableVertexAttribArray(0);
 OpenGL->glDisableVertexAttribArray(1);

 // Release the vertex buffer.
 OpenGL->glBindBuffer(GL_ARRAY_BUFFER, 0);
 OpenGL->glDeleteBuffers(1, &m_vertexBufferId);

 // Release the index buffer.
 OpenGL->glBindBuffer(GL_ELEMENT_ARRAY_BUFFER, 0);
 OpenGL->glDeleteBuffers(1, &m_indexBufferId);

 // Release the vertex array object.
 OpenGL->glBindVertexArray(0);
 OpenGL->glDeleteVertexArrays(1, &m_vertexArrayId);

 return;
}

void ModelClass::RenderBuffers(OpenGLClass* OpenGL)
{
 // Bind the vertex array object that stored all the information about the vertex and index buffers.
 OpenGL->glBindVertexArray(m_vertexArrayId);

 // Render the vertex buffer using the index buffer.
 glDrawElements(GL_TRIANGLES, m_indexCount, GL_UNSIGNED_INT, 0);

 return;
}
LoadTexture is a new private function that will create the texture object and then initialize it with the input file name provided. This function is called during initialization.
LoadTexture方法使用给定的文件名创建纹理并进行初始化。此方法在初始化时被调用。
bool ModelClass::LoadTexture(OpenGLClass* OpenGL, char* textureFilename, unsigned int textureUnit, bool wrap)
{
 bool result;

 // Create the texture object.
 m_Texture = new TextureClass;
 if(!m_Texture)
 {
  return false;
 }

 // Initialize the texture object.
 result = m_Texture->Initialize(OpenGL, textureFilename, textureUnit, wrap);
 if(!result)
 {
  return false;
 }

 return true;
}
The ReleaseTexture function will release the texture object that was created and loaded during the LoadTexture function.
ReleaseTexture方法释放在LoadTexture方法里创建的纹理对象。
void ModelClass::ReleaseTexture()
{
 // Release the texture object.
 if(m_Texture)
 {
  m_Texture->Shutdown();
  delete m_Texture;
  m_Texture = 0;
 }

 return;
}
// Filename: graphicsclass.h

#ifndef _GRAPHICSCLASS_H_
#define _GRAPHICSCLASS_H_

///
// MY CLASS INCLUDES //
///
#include "openglclass.h"
#include "cameraclass.h"
#include "modelclass.h"
The GraphicsClass now includes the new TextureShaderClass header and the ColorShaderClass header has been removed.
GraphicsClass用TextureShaderClass的头文件替换了ColorShaderClass的头文件。
#include "textureshaderclass.h"

/
// GLOBALS //
/
const bool FULL_SCREEN = true;
const bool VSYNC_ENABLED = true;
const float SCREEN_DEPTH = 1000.0f;
const float SCREEN_NEAR = 0.1f;


// Class name: GraphicsClass

class GraphicsClass
{
public:
 GraphicsClass();
 GraphicsClass(const GraphicsClass&);
 ~GraphicsClass();

 bool Initialize(OpenGLClass*, HWND);
 void Shutdown();
 bool Frame();

private:
 bool Render();

private:
 OpenGLClass* m_OpenGL;
 CameraClass* m_Camera;
 ModelClass* m_Model;
A new TextureShaderClass private object has been added.

 TextureShaderClass* m_TextureShader;
};

#endif
// Filename: graphicsclass.cpp

#include "graphicsclass.h"
The m_TextureShader variable is set to null in the constructor.
构造方法初始化m_TextureShader变量为null。
GraphicsClass::GraphicsClass()
{
 m_OpenGL = 0;
 m_Camera = 0;
 m_Model = 0;
 m_TextureShader = 0;
}

GraphicsClass::GraphicsClass(const GraphicsClass& other)
{
}

GraphicsClass::~GraphicsClass()
{
}

bool GraphicsClass::Initialize(OpenGLClass* OpenGL, HWND hwnd)
{
 bool result;

 // Store a pointer to the OpenGL class object.
 m_OpenGL = OpenGL;

 // Create the camera object.
 m_Camera = new CameraClass;
 if(!m_Camera)
 {
  return false;
 }

 // Set the initial position of the camera.
 m_Camera->SetPosition(0.0f, 0.0f, -10.0f);

 // Create the model object.
 m_Model = new ModelClass;
 if(!m_Model)
 {
  return false;
 }
The ModelClass::Initialize function now takes in the name of the texture that will be used for rendering the model as well as the texture unit and wrapping boolean.
ModelClass::Initialize方法传入模型用的纹理文件名,纹理单元和纹理循环设置。
// Initialize the model object.
 result = m_Model->Initialize(m_OpenGL, "../Engine/data/test.tga", 0, true);
 if(!result)
 {
  MessageBox(hwnd, L"Could not initialize the model object.", L"Error", MB_OK);
  return false;
 }
The new TextureShaderClass object is created and initialized.
创建TextureShaderClass对象并初始化。
 // Create the texture shader object.
 m_TextureShader = new TextureShaderClass;
 if(!m_TextureShader)
 {
  return false;
 }

 // Initialize the texture shader object.
 result = m_TextureShader->Initialize(m_OpenGL, hwnd);
 if(!result)
 {
  MessageBox(hwnd, L"Could not initialize the texture shader object.", L"Error", MB_OK);
  return false;
 }

 return true;
}

void GraphicsClass::Shutdown()
{
The TextureShaderClass object is also released in the Shutdown function.

 // Release the texture shader object.
 if(m_TextureShader)
 {
  m_TextureShader->Shutdown(m_OpenGL);
  delete m_TextureShader;
  m_TextureShader = 0;
 }

 // Release the model object.
 if(m_Model)
 {
  m_Model->Shutdown(m_OpenGL);
  delete m_Model;
  m_Model = 0;
 }

 // Release the camera object.
 if(m_Camera)
 {
  delete m_Camera;
  m_Camera = 0;
 }

 // Release the pointer to the OpenGL class object.
 m_OpenGL = 0;

 return;
}

bool GraphicsClass::Frame()
{
 bool result;

 // Render the graphics scene.
 result = Render();
 if(!result)
 {
  return false;
 }

 return true;
}

bool GraphicsClass::Render()
{
 float worldMatrix[16];
 float viewMatrix[16];
 float projectionMatrix[16];

 // Clear the buffers to begin the scene.
 m_OpenGL->BeginScene(0.0f, 0.0f, 0.0f, 1.0f);

 // Generate the view matrix based on the camera's position.
 m_Camera->Render();

 // Get the world, view, and projection matrices from the opengl and camera objects.
 m_OpenGL->GetWorldMatrix(worldMatrix);
 m_Camera->GetViewMatrix(viewMatrix);
 m_OpenGL->GetProjectionMatrix(projectionMatrix);
The texture shader is called now instead of the color shader to render the model. Notice it also takes the texture unit as the last input parameter to the SetShaderParameters function. Zero represents the first texture unit in OpenGL.
使用纹理着色器替代之前的颜色着色器。注意,这里增加了一个纹理单元参数。0意味着OpenGL系统中的第一个纹理单元。
// Set the texture shader as the current shader program and set the matrices that it will use for rendering.
 m_TextureShader->SetShader(m_OpenGL);
 m_TextureShader->SetShaderParameters(m_OpenGL, worldMatrix, viewMatrix, projectionMatrix, 0);

 // Render the model using the texture shader.
 m_Model->Render(m_OpenGL);

 // Present the rendered scene to the screen.
 m_OpenGL->EndScene();

 return true;
}
Summary
总结
You should now understand the basics of loading a texture, mapping it to a polygon face, and then rendering it with a shader.
本章介绍了加载纹理,将纹理映射到多边形表面和如何使用纹理着色器的基本知识。
To Do Exercises
练习
1. Re-compile the code and ensure that a texture mapped triangle does appear on your screen. Press escape to quit once done.
1. 重新编译并运行代码,确保屏幕上出现一个带纹理的三角形。然后按ESC键退出程序。
2. Create your own tga texture and place it in the same data directory with test.tga. Inside the GraphicsClass::Initialize function change the model initialization to have your texture name and then re-compile and run the program.
2. 自己创建一张与test.tga类似的tga纹理文件。通过修改GraphicsClass::Initialize方法里的文件名让模型使用你自己的纹理。
3. Change the code to create two triangles that form a square. Map the entire texture to this square so that the entire texture shows up correctly on the screen.
3. 使用两个三角形组成一个方形。将整个纹理映射到方形上。
4. Move the camera to different distances to see the effect of the filtering.
4. 移动摄像机从不同的距离观察纹理过滤的效果。
5. Try some of the other filters and move the camera to different distances to see the different results.
5. 尝试使用其他的纹理过滤方式,然后移动摄像机观察他们间的区别。
Source Code
源代码
http://www.rastertek.com/gl40src05.zip


 1925
1925

 被折叠的 条评论
为什么被折叠?
被折叠的 条评论
为什么被折叠?
 到【灌水乐园】发言


