


如何在 Python 中创建图像的差异
原文:https://www.blog.pythonlibrary.org/2016/10/11/how-to-create-a-diff-of-an-image-in-python/
在过去的几年里,我一直在为我的雇主编写自动化测试。我做的许多测试类型之一是比较应用程序如何绘制。它每次都是以同样的方式画的吗?如果不是,那么我们就有一个严重的问题。检查它每次都绘制相同图形的一个简单方法是截取一个屏幕截图,然后在应用程序更新时将其与同一图形的未来版本进行比较。
枕头库为这种叫做图像印章的东西提供了一个方便的工具。如果你还没有枕头,你应该现在就去安装它,这样你就可以跟随这个简短的教程。
比较两幅图像
我们需要做的第一件事是找到两幅略有不同的图像。你可以使用相机的连拍模式,拍摄一组动物移动的照片,最好是使用三脚架。或者你可以在一张现有的照片上添加某种覆盖,比如文字。我打算采用后一种方法。这是我在俄勒冈州摩特诺玛瀑布的原始照片:

这是修改后的版本,我添加了一些文字来标识照片的位置:

现在让我们使用 ImageChops 来找出我们的不同之处!
import Image
import ImageChops

def compare_images(path_one, path_two, diff_save_location):
    """
    Compares to images and saves a diff image, if there
    is a difference

    @param: path_one: The path to the first image
    @param: path_two: The path to the second image
    """
    image_one = Image.open(path_one)
    image_two = Image.open(path_two)

    diff = ImageChops.difference(image_one, image_two)

    if diff.getbbox():
        diff.save(diff_save_location)

if __name__ == '__main__':
    compare_images('/path/to/multnomah_falls.jpg',
                   '/path/to/multnomah_falls_text.jpg',
                   '/path/to/diff.jpg')
这里我们有一个简单的函数,我们可以用它来寻找图像中的差异。你需要做的就是通过三条路径!前两条路径用于我们想要比较的图像。最后一个路径是保存 diff 图像的位置,如果我们找到一个 diff。对于这个例子,我们肯定应该找到一个差异,我们做到了。下面是我运行这段代码时得到的结果:

包扎
枕头包有许多惊人的功能来处理图像。我喜欢摄影,所以能够拍摄照片,然后使用我最喜欢的编程语言来帮助我处理结果,这很有趣。你也应该尝试一下,看看枕头文档,看看这个聪明的包还能做什么!
相关阅读
- 蟒蛇枕官网
- 枕头文档
- 介绍 Python 图像库/ Pillow
如何用 Python 创建“不可变”的类
原文:https://www.blog.pythonlibrary.org/2014/01/17/how-to-create-immutable-classes-in-python/
我最近读了很多关于 Python 的神奇方法,最近还读了一些创建不可变类的方法。不可变类不允许程序员向实例添加属性(即猴子补丁)。如果我们实际上先看一个正常的类,会更容易理解一点。我们将从一个猴子补丁的例子开始,然后看一种使类“不可变”的方法。
猴子修补 Python 类
首先,我们需要创建一个可以玩的类。这里有一个简单的类,它不做任何事情:
########################################################################
class Mutable(object):
    """
    A mutable class
    """

    #----------------------------------------------------------------------
    def __init__(self):
        """Constructor"""
        pass
现在让我们创建这个类的一个实例,看看是否可以添加一个属性:
>>> mut_obj = Mutable()
>>> mut_obj.monkey = "tamarin"
>>> mut_obj.monkey
'tamarin'
这个类允许我们在运行时向它添加属性。现在我们知道了如何做一些简单的猴子补丁,让我们尝试阻止这种行为。
创建不可变的类
我读到的一个关于不可变类的例子提到,你可以通过用**_ _ 插槽 __** 替换一个类的 dict 来创建一个不可变类。让我们看看这是什么样子:
########################################################################
class Immutable(object):
    """
    An immutable class
    """
    __slots__ = ["one", "two", "three"]

    #----------------------------------------------------------------------
    def __init__(self, one, two, three):
        """Constructor"""
        super(Immutable, self).__setattr__("one", one)
        super(Immutable, self).__setattr__("two", two)
        super(Immutable, self).__setattr__("three", three)

    #----------------------------------------------------------------------
    def __setattr__(self, name, value):
        """"""
        msg = "'%s' has no attribute %s" % (self.__class__,
                                            name)
        raise AttributeError(msg)
现在我们只需要创建这个类的一个实例,看看我们是否可以用猴子来修补它:
>>> i = Immutable(1, 2, 3)
>>> i.four = 4
Traceback (most recent call last):
  File "", line 1, in <fragment>AttributeError: 'Immutable' object has no attribute 'four'
在这种情况下,该类不允许我们对实例进行猴子修补。相反,我们收到一个 AttibuteError。让我们尝试更改其中一个属性:
>>> i = Immutable(1, 2, 3)
>>> i.one = 2
Traceback (most recent call last):
  File "c:\Users\mdriscoll\Desktop\rep-fonts\immutable\immute_slots.py", line 1, in ########################################################################
  File "c:\Users\mdriscoll\Desktop\rep-fonts\immutable\immute_slots.py", line 33, in __setattr__
    raise AttributeError(msg)
AttributeError: '<class>' has no attribute one
这是因为我们已经覆盖了 setattr 方法。如果你想的话,你可以重写这个方法,什么都不做。这将阻止追溯的发生,但也防止值被更改。如果您喜欢明确说明正在发生的事情,那么提出一个错误可能是一种方法。
如果你读了一些关于插槽的书,你会很快发现不鼓励以这种方式使用插槽。为什么?因为槽主要是作为内存优化而创建的(它减少了属性访问时间)。
您可以通过以下链接了解更多关于插槽的信息:
- 关于插槽的 Python 文档
- stack overflow:python _ _ slots _ _
- 什么是插槽?
https://stackoverflow.com/questions/472000/python-slots
如何用 Python 裁剪照片
原文:https://www.blog.pythonlibrary.org/2017/10/03/how-to-crop-a-photo-with-python/
如果你喜欢拍照,你可能会发现自己会时不时地裁剪照片。我会裁剪照片,以消除背景噪音,或者更专注于我试图捕捉的主题。我也喜欢拍摄昆虫或其他小生物的高分辨率照片,然后进行裁剪,让我看起来比实际情况更接近昆虫。
现在大多数人会使用照片编辑应用程序来裁剪他们的图像,例如 Photoshop Elements。我也使用这些工具,但是你也可以使用 Python 编程语言来为你进行裁剪。一个您可能想要使用 Python 的好例子是,如果您有数千个相同类型的扫描图像,那么只需编写一个脚本来为您进行裁剪就更有意义了。
Python 中最流行的图像操作包是 Pillow 包,它是“Python 图像库(PIL)的友好分支”。您可以使用 pip 安装枕头:
pip install Pillow
现在我们已经安装了枕头,我们只需要一张照片。这是我拍的一只蚱蜢:

让我们编写一些代码,尝试将图片裁剪到蚱蜢的头部:
from PIL import Image

def crop(image_path, coords, saved_location):
    """
    @param image_path: The path to the image to edit
    @param coords: A tuple of x/y coordinates (x1, y1, x2, y2)
    @param saved_location: Path to save the cropped image
    """
    image_obj = Image.open(image_path)
    cropped_image = image_obj.crop(coords)
    cropped_image.save(saved_location)
    cropped_image.show()

if __name__ == '__main__':
    image = 'grasshopper.jpg'
    crop(image, (161, 166, 706, 1050), 'cropped.jpg')
在这段代码中,我们做的第一件事是从 PIL 导入图像子模块。然后我们创建一个 crop() 函数,它有 3 个参数:
- image_path -要裁剪的文件的文件路径
- coords——一个 4 元素元组,包含图像裁剪的开始和结束坐标
- saved_location -保存裁剪文件的文件路径
在我们打开初始图像后,我们得到一个可以调用 crop() on 的对象。crop 方法获取我们传入的坐标,并适当地裁剪图像,然后返回第二个图像对象。然后我们调用第二个图像对象的 save() 方法,并告诉它将它保存到指定的位置。
当您运行代码时,它将显示裁剪后的图像并保存它:

这非常接近我想要的。您可以在上面的代码中对 x/y 坐标进行一点试验,尝试以各种方式裁剪图像,看看效果如何。
包扎
这段代码应该有一个检查,防止用户覆盖原始图像。任何好的照片编辑器都不会覆盖原始照片,因为那真的很烦人,而且通常是件坏事。但是我将把它留给读者去解决。
无论如何,Pillow 项目对于用 Python 处理图像来说是一个非常强大和有用的包。试一试,看看你能完成什么有趣的事情!
相关阅读
如何用 Python 和 functools 做一个简单的缓存(视频)
了解如何使用 Python 惊人的标准库为函数添加缓存。在本视频教程中,您将学习如何使用 functools.cache 为函数添加缓存
https://www.youtube.com/embed/CtpSBau84xg?feature=oembed
如果你想了解更多关于 functools 模块的信息,你可以看看我的另一个视频:
https://www.youtube.com/embed/gIVRaAb-XzA?feature=oembed
如何用 Python 下载文件(视频)
原文:https://www.blog.pythonlibrary.org/2020/06/18/how-to-download-a-file-with-python-video/
在本视频教程中,您将学习如何使用 Python 的 urllib 从互联网下载文件:
https://www.youtube.com/embed/dkGRWJD0oQ4?feature=oembed
如果你喜欢阅读而不是观看,那么你可以看看这个相关的教程:
- Python 101: 如何下载文件
|  | 你想了解更多关于 Python 的知识吗?
Python 101 -第二版
在 Leanpub 上立即购买 |
如何将 jupiter 笔记本导出为其他格式
原文:https://www.blog.pythonlibrary.org/2018/10/09/how-to-export-jupyter-notebooks-into-other-formats/
使用 Jupyter Notebook 时,您会发现自己需要分发笔记本,而不是笔记本文件。最有可能的原因是,您希望将笔记本的内容共享给非技术用户,这些用户不想安装 Python 或使用笔记本所需的其他依赖项。将笔记本导出为其他格式的最流行的解决方案是内置的 nbconvert 工具。您可以使用 nbconvert 导出到以下格式:
- HTML ( -到 HTML)
- 乳胶(至乳胶)
- PDF ( -至 PDF)
- 显示 JS ( -到幻灯片)
- 降价(md)
- 重新构造的文本(rst)
- 可执行脚本(- to 脚本)
nbconvert 工具使用 Jinja 模板来转换您的笔记本文件()。ipynb )转换为其他静态格式。Jinja 是 Python 的模板引擎。nbconvert 工具依赖于 Pandoc 和 TeX 进行一些转换。您可能需要在您的计算机上单独安装这些软件。这在 ReadTheDocs 上有记录。
|  | 想了解更多关于使用 Jupyter 笔记本的信息吗?然后看看我的书:
Jupyter 笔记型电脑 101
在 Leanpub 上立即购买 |
使用 nbconvert
我们首先需要的是一台想要转换的笔记本。我用一个 Jupyter 笔记本做了一个关于 Python decorators 的演示。我们将使用那一个。可以在 Github 上获取。如果你想使用其他的东西,请随意下载你最喜欢的笔记本。我还发现了这个有趣的笔记本图库,你也可以用它。
我们将使用的笔记本名为 Decorators.ipynb 。使用 nbconvert 导出的典型命令如下:
jupyter nbconvert --to
默认的输出格式是 HTML。但是让我们从尝试将 Decorators 笔记本转换成 PDF 开始:
jupyter nbconvert Decorators.ipynb --to pdf
我不会在每次运行 nbconvert 时都提到这一点,但是当我运行这个命令时,我在终端中得到以下输出:
[NbConvertApp] Converting notebook Decorators.ipynb to pdf
[NbConvertApp] Writing 45119 bytes to notebook.tex
[NbConvertApp] Building PDF
[NbConvertApp] Running xelatex 3 times: [u'xelatex', u'notebook.tex']
[NbConvertApp] Running bibtex 1 time: [u'bibtex', u'notebook']
[NbConvertApp] WARNING | bibtex had problems, most likely because there were no citations
[NbConvertApp] PDF successfully created
[NbConvertApp] Writing 62334 bytes to Decorators.pdf
当您将笔记本转换为其他格式时,您会看到类似的内容,尽管输出会明显不同。这是输出的样子:

如果您将笔记本转换为 reStructuredText 或 latex,那么 nbconvert 将使用封面下的 pandoc 进行转换。这意味着 pandoc 是一个依赖项,在转换成这些格式之前,您可能需要安装它。
让我们尝试将我们的笔记本电脑转换为 Markdown,看看我们会得到什么:
jupyter nbconvert Decorators.ipynb --to markdown
当您运行此命令时,您将得到如下所示的输出:

让我们对笔记本进行一次转换。对于这种转换,我们将把我们的笔记本变成 HTML。HTML 转换实际上有两种模式:
- -模板完整(默认)
- -模板基本
完整版将使笔记本的 HTML 呈现看起来非常像普通笔记本在其“交互式视图”中的样子,而基本版使用 HTML 标题,主要针对那些希望将笔记本嵌入网页或博客的人。让我们试一试:
jupyter nbconvert Decorators.ipynb --to html
当我运行这个程序时,我得到了一个很好的 HTML 文件。如果在 web 浏览器中打开 HTML,您应该会看到以下内容:

转换多个笔记本
nbconvert 实用程序还支持一次转换多个笔记本。如果您有一组名称相似的笔记本,您可以使用以下命令:
jupyter nbconvert notebook*.ipynb --to FORMAT
这将把文件夹中的所有笔记本转换为您指定的格式,只要笔记本以“Notebook”开头。您也可以只向 nbconvert 提供一个以空格分隔的笔记本列表:
jupyter nbconvert Decorators.ipynb my_other_notebook.ipynb --to FORMAT
如果您有许多笔记本,另一种批量转换它们的方法是创建一个 Python 脚本作为配置文件。根据此文档,您可以创建一个包含以下内容的 Python 脚本:
c = get_config()
c.NbConvertApp.notebooks = ["notebook1.ipynb", "notebook2.ipynb"]
如果保存该文件,则可以使用以下命令运行它:
jupyter nbconvert --config mycfg.py
这将把列出的笔记本转换成您选择的格式。
执行笔记本
正如您所料,大多数情况下,Jupyter 笔记本是在输出单元格被清除的情况下保存的。这意味着,当您运行转换时,您不会自动在导出中获得输出。要做到这一点,您必须使用 - execute 标志。这里有一个例子:
jupyter nbconvert --execute my_notebook.ipynb --to pdf
请注意,笔记本中的代码不能有任何错误,否则转换将会失败。这就是为什么我在这个例子中没有使用 Decorators 笔记本的原因,因为我有一些故意创建的单元格,但它们不能用于演示目的。
使用 Python 执行笔记本
您还可以创建一个 Python 脚本,用于以编程方式执行笔记本。让我们写一些代码来运行我的 Decorators 笔记本中的所有单元,包括抛出异常的单元。让我们创建一个空的 Python 脚本,并将其命名为 notebook_runner.py 。在编辑器中输入以下代码:
# notebook_runner.py

import nbformat
import os

from nbconvert.preprocessors import ExecutePreprocessor

def run_notebook(notebook_path):
    nb_name, _ = os.path.splitext(os.path.basename(notebook_path))
    dirname = os.path.dirname(notebook_path)

    with open(notebook_path) as f:
        nb = nbformat.read(f, as_version=4)

    proc = ExecutePreprocessor(timeout=600, kernel_name='python3')
    proc.allow_errors = True

    proc.preprocess(nb, {'metadata': {'path': '/'}})
    output_path = os.path.join(dirname, '{}_all_output.ipynb'.format(nb_name))

    with open(output_path, mode='wt') as f:
        nbformat.write(nb, f)

if __name__ == '__main__':
    run_notebook('Decorators.ipynb')
感兴趣的第一项位于代码的顶部。这里我们从 nbconvert.preprocessors 导入 nbformat 和一个预处理器,称为execute preprocessors。接下来,我们创建一个名为 run_notebook 的函数,它接受一个指向我们想要运行的笔记本的路径。在这个函数中,我们从传入的路径中提取文件名和目录名。
然后我们使用 nbformat.read 读取笔记本文件。您会注意到,您可以告诉 nbformat 将文件读取为哪个版本。请务必将此设置为与您正在使用的 Jupyter 笔记本的版本相匹配。下一步是实例化 ExecutePreprocessor 类。这里我们给它一个超时和内核名。如果您使用的是 Python 之外的东西,那么这里就是您想要指定该信息的地方。
因为我们想忽略错误,我们将 allow_errors 属性设置为 True 。默认为假。如果我们没有这样做,我们将需要在一个 try/except 块中包装下一步。无论如何,我们告诉 Python 通过预处理方法调用进行预处理。您会注意到,我们需要传入我们读取的笔记本数据,并通过元数据字典告诉它笔记本的位置。如果您的路径不同于本例中使用的路径,请务必更新此信息。
最后,我们创建输出路径,并将笔记本写到一个新位置。如果您打开它,您应该看到所有实际产生输出的代码单元格的输出。
配置
nbconvert 实用程序有许多配置选项,您可以使用它们来自定义其工作方式。要了解完整的细节,我推荐阅读这里的文档。
包扎
在本文中,我们学习了如何将 Jupyter 笔记本导出/转换为其他格式,如 HTML、Markdown 和 PDF。我们还了解到,我们可以用几种不同的方式一次转换多台笔记本电脑。最后,我们学习了在导出笔记本之前执行它的不同方法。
- Jupyter 笔记本扩展基础知识
- 使用 Jupyter 笔记本创建演示文稿
如何用 Python 从 Jenkins 提取构建信息
原文:https://www.blog.pythonlibrary.org/2019/05/14/how-to-extract-build-info-from-jenkins-with-python/
我工作的一部分是使用持续集成软件。我在我的角色中同时使用 Hudson 和 Jenkins,偶尔需要以编程方式与他们进行交互。有两个 Python 包可用于此任务:
- Python Jenkins 包
- 詹金斯皮
Python Jenkins 包可以与 Hudson 和 Jenkins 一起工作,而 JenkinsAPI 只能与 Jenkins 一起工作。因为这个原因,我通常使用 Python Jenkins,尽管我最近开始寻找哪一个更适合工件,并且我发现 JenkinsAPI 实际上更适合这种事情。所以你需要根据你需要做什么来评估这两个包。
安装 Python Jenkins
为了遵循本文中的代码示例,您需要安装 Python Jenkins。您可以使用画中画来做到这一点:
pip install python-jenkins
现在已经安装好了,让我们试一试 Python Jenkins 吧!
从詹金斯那里得到所有的工作
一个常见的任务是需要获得构建系统中配置的所有作业的列表。
要开始,您需要登录到您的 Jenkins 服务器:
import jenkins

server = jenkins.Jenkins('http://server:port/', username='user',
                         password='secret')
现在您有了一个 Jenkins 对象,您可以使用它对您的 Jenkins CI 服务器执行 REST 请求。返回的结果通常是 Python 字典或字典的字典。
以下是获取 CI 系统上配置的所有作业的示例:
import jenkins

server = jenkins.Jenkins('http://server:port/', username='user',
                         password='secret')

# Get all builds
jobs = server.get_all_jobs(folder_depth=None)
for job in jobs:
    print(job['fullname'])
这将遍历 Jenkins 中配置的所有作业,并打印出它们的作业名。
获取工作信息
现在您已经知道了 Jenkins box 上的作业名称,您可以获得关于每个作业的更详细的信息。
方法如下:
import jenkins

server = jenkins.Jenkins('http://server:port/', username='user',
                         password='secret')

# Get information on specific build job
# This returns all the builds that are currently shown in
# hudson for this job
info = server.get_job_info('job-name')

# Passed
print(info['lastCompletedBuild'])

# Unstable
print(info['lastUnstableBuild'])

# Failed
print(info['lastFailedBuild'])
get_job_info() will give you a lot of information about the job, including all the currently saved builds. It is nice to be able to extract which builds have passed, failed or are unstable.
获取构建信息
如果您想知道一个作业运行需要多长时间,那么您需要深入到构建级别。
让我们来看看如何实现:
import jenkins

server = jenkins.Jenkins('http://server:port/', username='user',
                         password='secret')

info = server.get_job_info('job-name')

# Loop over builds
builds = info['builds']
for build in builds:
    for build in builds:
        print(server.get_build_info('job-name',
                                    build['number']))
要获取构建元数据,您需要调用get_build_info(). This method takes in the job name and the build number and returns the metadata as a dictionary.
包扎
使用 Python Jenkins 包可以做更多的事情。例如,您可以使用它来启动一个构建作业、创建一个新作业或删除一个旧作业以及许多其他事情。不幸的是,文档是非常粗略的,所以您必须做一些试验来让它按照您想要的方式工作。
附加阅读
如何用 Python 找到并列出所有正在运行的进程
前几天,我的任务是找到一种方法来获取 Windows XP 虚拟机上所有正在运行的进程的列表。我还应该包括每个进程使用了多少 CPU 和内存的信息。幸运的是,这不必是一个远程脚本,而是一个可以在客户机上运行的脚本。在到处搜索了一番后,我终于找到了解决办法。在这篇文章中,我们将看看一些拒绝以及最终的解决方案,这恰好是跨平台的工作。
我发现的第一批脚本之一是 2006 年 3 月的这个脚本:
# http://mail.python.org/pipermail/python-win32/2006-March/004340.html
import win32com.client
wmi=win32com.client.GetObject('winmgmts:')
for p in wmi.InstancesOf('win32_process'):
    print p.Name, p.Properties_('ProcessId'), \
        int(p.Properties_('UserModeTime').Value)+int(p.Properties_('KernelModeTime').Value)
    children=wmi.ExecQuery('Select * from win32_process where ParentProcessId=%s' %p.Properties_('ProcessId'))
    for child in children:
        print '\t',child.Name,child.Properties_('ProcessId'), \
            int(child.Properties_('UserModeTime').Value)+int(child.Properties_('KernelModeTime').Value)
这个脚本需要 PyWin32 包才能工作。然而,虽然这是一个方便的小脚本,但除了 ProcessId 之外,它没有显示我想要的任何内容。我并不真正关心用户或内核模式时间(即用户或内核的总 CPU 时间)。此外,我真的不喜欢使用 COM 的黑魔法,所以我最终拒绝了这个。
接下来是一个活动状态配方。看起来很有希望:
# http://code.activestate.com/recipes/303339-getting-process-information-on-windows/
import win32pdh, string, win32api

def procids():
    #each instance is a process, you can have multiple processes w/same name
    junk, instances = win32pdh.EnumObjectItems(None,None,'process', win32pdh.PERF_DETAIL_WIZARD)
    proc_ids=[]
    proc_dict={}
    for instance in instances:
        if instance in proc_dict:
            proc_dict[instance] = proc_dict[instance] + 1
        else:
            proc_dict[instance]=0
    for instance, max_instances in proc_dict.items():
        for inum in xrange(max_instances+1):
            hq = win32pdh.OpenQuery() # initializes the query handle
            path = win32pdh.MakeCounterPath( (None,'process',instance, None, inum,'ID Process') )
            counter_handle=win32pdh.AddCounter(hq, path)
            win32pdh.CollectQueryData(hq) #collects data for the counter
            type, val = win32pdh.GetFormattedCounterValue(counter_handle, win32pdh.PDH_FMT_LONG)
            proc_ids.append((instance,str(val)))
            win32pdh.CloseQuery(hq)

    proc_ids.sort()
    return proc_ids

print procids()
唉,虽然这也从我的 Windows 系统中获得了一个进程列表(以及 PID),但它没有给我任何关于 CPU 和内存利用率的信息。我认为如果我使用不同的计数器名称,这个方法可能会有效。我猜如果你愿意,你可以通过 MSDN 找到这些信息。我不想搞砸,所以我继续挖。
这个配方让我想到了下面这个基于 ctypes 的配方:
# http://code.activestate.com/recipes/305279/

"""
Enumerates active processes as seen under windows Task Manager on Win NT/2k/XP using PSAPI.dll
(new api for processes) and using ctypes.Use it as you please.

Based on information from http://support.microsoft.com/default.aspx?scid=KB;EN-US;Q175030&ID=KB;EN-US;Q175030

By Eric Koome
email ekoome@yahoo.com
license GPL
"""
from ctypes import *

#PSAPI.DLL
psapi = windll.psapi
#Kernel32.DLL
kernel = windll.kernel32

def EnumProcesses():
    arr = c_ulong * 256
    lpidProcess= arr()
    cb = sizeof(lpidProcess)
    cbNeeded = c_ulong()
    hModule = c_ulong()
    count = c_ulong()
    modname = c_buffer(30)
    PROCESS_QUERY_INFORMATION = 0x0400
    PROCESS_VM_READ = 0x0010

    #Call Enumprocesses to get hold of process id's
    psapi.EnumProcesses(byref(lpidProcess),
                        cb,
                        byref(cbNeeded))

    #Number of processes returned
    nReturned = cbNeeded.value/sizeof(c_ulong())

    pidProcess = [i for i in lpidProcess][:nReturned]

    for pid in pidProcess:

        #Get handle to the process based on PID
        hProcess = kernel.OpenProcess(PROCESS_QUERY_INFORMATION | PROCESS_VM_READ,
                                      False, pid)
        if hProcess:
            psapi.EnumProcessModules(hProcess, byref(hModule), sizeof(hModule), byref(count))
            psapi.GetModuleBaseNameA(hProcess, hModule.value, modname, sizeof(modname))
            print "".join([ i for i in modname if i != '\x00'])

            #-- Clean up
            for i in range(modname._length_):
                modname[i]='\x00'

            kernel.CloseHandle(hProcess)

if __name__ == '__main__':
    EnumProcesses()
这看起来很聪明,但是我很不擅长解析 ctypes。这是我想学的东西,但是我有一个截止日期,该死的!另外,这个程序只显示了正在运行的进程列表,但没有关于它们的信息。幸运的是,作者附上了参考文献,但我决定继续寻找。
接下来,我发现了一个关于使用蒂姆·戈登的便捷的 WMI 模块来做这类事情的帖子(下面是从该帖子直接复制的):
# http://mail.python.org/pipermail/python-win32/2003-December/001482.html
>>> processes = WMI.InstancesOf('Win32_Process')
>>> len(processes)
41
>>> [process.Properties_('Name').Value for process in processes] # get
the process names
[u'System Idle Process', u'System', u'SMSS.EXE', u'CSRSS.EXE',
u'WINLOGON.EXE', u'SERVICES.EXE', u'LSASS.EXE', u'SVCHOST.EXE',
u'SVCHOST.EXE', u'SVCHOST.EXE', u'SVCHOST.EXE', u'SPOOLSV.EXE',
u'ati2evxx.exe', u'BAsfIpM.exe', u'defwatch.exe', u'inetinfo.exe',
u'mdm.exe', u'rtvscan.exe', u'SCARDSVR.EXE', u'WLTRYSVC.EXE',
u'BCMWLTRY.EXE', u'EXPLORER.EXE', u'Apoint.exe', u'carpserv.exe',
u'atiptaxx.exe', u'quickset.exe', u'DSentry.exe', u'Directcd.exe',
u'vptray.exe', u'ApntEx.exe', u'FaxCtrl.exe', u'digstream.exe',
u'CTFMON.EXE', u'wuauclt.exe', u'IEXPLORE.EXE', u'Pythonwin.exe',
u'MMC.EXE', u'OUTLOOK.EXE', u'LineMgr.exe', u'SAPISVR.EXE',
u'WMIPRVSE.EXE']

Here is how to get a single process and get its PID.

>>> p = WMI.ExecQuery('select * from Win32_Process where
Name="Pythonwin.exe"')
>>> [prop.Name for prop in p[0].Properties_] # let's look at all the
process property names
[u'Caption', u'CommandLine', u'CreationClassName', u'CreationDate',
u'CSCreationClassName', u'CSName', u'Description', u'ExecutablePath',
u'ExecutionState', u'Handle', u'HandleCount', u'InstallDate',
u'KernelModeTime', u'MaximumWorkingSetSize', u'MinimumWorkingSetSize',
u'Name', u'OSCreationClassName', u'OSName', u'OtherOperationCount',
u'OtherTransferCount', u'PageFaults', u'PageFileUsage',
u'ParentProcessId', u'PeakPageFileUsage', u'PeakVirtualSize',
u'PeakWorkingSetSize', u'Priority', u'PrivatePageCount', u'ProcessId',
u'QuotaNonPagedPoolUsage', u'QuotaPagedPoolUsage',
u'QuotaPeakNonPagedPoolUsage', u'QuotaPeakPagedPoolUsage',
u'ReadOperationCount', u'ReadTransferCount', u'SessionId', u'Status',
u'TerminationDate', u'ThreadCount', u'UserModeTime', u'VirtualSize',
u'WindowsVersion', u'WorkingSetSize', u'WriteOperationCount',
u'WriteTransferCount']
>>> p[0].Properties_('ProcessId').Value # get our ProcessId
928
这是一些很酷的东西,我在其他代码中使用了 Golden 的模块。然而,我仍然不确定使用哪个柜台来获取我的信息。我以为这些东西大部分都是为我编码的。好吧,结果是有一个软件包完全满足了我的需求,它可以在所有三个主要平台上运行!太神奇了!
跨平台解决方案!
这个包的名字是 psutil ,这是我决定使用的。这是我最后得到的结果:
import os
import psutil
import time

logPath = r'some\path\proclogs'
if not os.path.exists(logPath):
    os.mkdir(logPath)

separator = "-" * 80
format = "%7s %7s %12s %12s %30s, %s"
format2 = "%7.4f %7.2f %12s %12s %30s, %s"
while 1:
    procs = psutil.get_process_list()
    procs = sorted(procs, key=lambda proc: proc.name)

    logPath = r'some\path\proclogs\procLog%i.log' % int(time.time())
    f = open(logPath, 'w')
    f.write(separator + "\n")
    f.write(time.ctime() + "\n")
    f.write(format % ("%CPU", "%MEM", "VMS", "RSS", "NAME", "PATH"))
    f.write("\n")

    for proc in procs:
        cpu_percent = proc.get_cpu_percent()
        mem_percent = proc.get_memory_percent()
        rss, vms = proc.get_memory_info()
        rss = str(rss)
        vms = str(vms)
        name = proc.name
        path = proc.path
        f.write(format2 % (cpu_percent, mem_percent, vms, rss, name, path))
        f.write("\n\n")
    f.close()
    print "Finished log update!"
    time.sleep(300)
    print "writing new log data!"
是的,这是一个无限循环,是的,这通常是一件非常糟糕的事情(除了在 GUI 编程中)。然而,出于我的目的,我需要一种方法来每隔 5 分钟左右检查用户的进程,看看是什么导致机器行为如此怪异。因此,脚本需要永远运行,并将结果记录到唯一命名的文件中。这就是这个脚本所做的一切,还有一点格式化的魔力。你觉得合适就随意用或不用。
我希望这些资料对你有所帮助。希望它能让你省去我所有的挖掘工作!
注意:虽然最后一个脚本似乎在 Windows XP 上工作得很好,但在 Windows 7 32 和 64 位上,您将得到一个“拒绝访问”的回溯,我怀疑这是由 Windows 7 增强的安全性引起的,但我会尝试找到一个解决方法。
更新(10/09/2010)-psutil 的人不知道为什么它不能工作,但他们的一个开发者已经确认了这个问题。你可以关注他们的谷歌群列表。
如何在 Python 中获得类属性列表
原文:https://www.blog.pythonlibrary.org/2013/01/11/how-to-get-a-list-of-class-attributes/
前几天,我试图弄清楚是否有一种简单的方法来获取类的已定义属性(又名“实例变量”)。原因是我们使用我们创建的属性来匹配我们解析的文件中的字段。所以基本上我们一行一行地读取一个文件,每行可以分成 150 多个片段,这些片段需要映射到我们在类中创建的字段。问题是,我们最近向类中添加了更多的字段,并且在代码中有一个检查,该检查是用文件中应该有的字段的数量硬编码的。因此,当我添加更多的字段时,它打破了检查。我希望这些都有意义。现在你知道背景了,我们可以继续了。我发现了三种不同的方法来实现这一点,所以我们将从最复杂的到最简单的。
正如大多数 Python 程序员应该知道的,Python 提供了一个方便的小内置程序,叫做 dir 。我可以在一个类实例上使用它来获得该类的所有属性和方法的列表,以及一些继承的神奇方法,如’ delattr ‘、’ dict ‘、’ doc ‘、’ format '等。您可以通过执行以下操作自己尝试一下:
x = dir(myClassInstance)
然而,我不想要魔法方法,我也不想要方法。我只想要属性。为了让一切都清晰明了,让我们写一些代码吧!
########################################################################
class Test:
    """"""

    #----------------------------------------------------------------------
    def __init__(self):
        self.varOne = ""
        self.varTwo = ""
        self.varThree = ""

    #----------------------------------------------------------------------
    def methodOne(self):
        """"""
        print "You just called methodOne!"

#----------------------------------------------------------------------
if __name__ == "__main__":
    t = Test()
我们想要得到的是一个只包含 self.varOne、self.varTwo 和 self.varThree 的列表。
import inspect
variables = [i for i in dir(t) if not inspect.ismethod(i)]
看起来不太复杂,是吗?但这需要进口,我不想这么做。另一方面,如果您需要进行自省,inspect 模块是一个不错的选择。它非常强大,可以告诉你很多关于你的班级或者你没有写过的班级的精彩内容。无论如何,我发现的下一个最简单的方法是使用 Python 的可调用内置:
variables = [i for i in dir(t) if not callable(i)]
你可以在 Python 文档中阅读更多关于 callable 的内容。基本上 callable 所做的就是根据你传递给它的对象是否可调用来返回一个 True 或 False。方法是可调用的,变量不是。因此,我们循环遍历类字典中的每一项,只有当它们是不可调用的(即不是方法)时,才把它们添加到列表中。相当光滑,它不需要任何进口!但是有一个更简单的方法!
我发现的最简单的方法是使用魔法方法, dict 。除非您覆盖它,否则它内置于您创建的每个类中。因为我们正在处理一个 Python 字典,我们可以直接调用它的键方法!
variables = t.__dict__.keys()
现在真正的问题是,你应该使用一种神奇的方法来做到这一点吗?大多数 Python 程序员可能会反对它。它们很神奇,所以除非你在做元编程,否则不应该使用它们。我个人认为对于这个用例来说完全可以接受。让我知道我错过的或者你认为更好的其他方法。
资源
- StackOverflow: 列出对象的属性
- StackOverflow: Python : 断言变量是实例方法?
如何用 Python 合并字典(视频)
原文:https://www.blog.pythonlibrary.org/2022/08/10/how-to-merge-dictionaries-with-python-video/
学习用 Mike Driscoll 合并 Python 字典的三种不同方法
您将学习三种不同的合并字典的方法:
- 使用字典的 update() 方法
- 使用**
- 使用 Union 运算符
https://www.youtube.com/embed/sak3PhNekaw?feature=oembed
如何用 Python 调整照片大小
原文:https://www.blog.pythonlibrary.org/2017/10/12/how-to-resize-a-photo-with-python/
有时你会发现自己想要调整照片的大小。我通常想这样做的照片,我想通过电子邮件或张贴在网站上,因为我的一些图像可以相当大。正常人用的是图像编辑器。我通常也这样做,但是为了好玩,我想我会研究如何用 Python 编程语言来做这件事。
最快的方法是使用 pip 可以安装的枕头包。一旦你有了它,打开你最喜欢的代码编辑器,尝试下面的代码:
from PIL import Image

def resize_image(input_image_path,
                 output_image_path,
                 size):
    original_image = Image.open(input_image_path)
    width, height = original_image.size
    print('The original image size is {wide} wide x {height} '
          'high'.format(wide=width, height=height))

    resized_image = original_image.resize(size)
    width, height = resized_image.size
    print('The resized image size is {wide} wide x {height} '
          'high'.format(wide=width, height=height))
    resized_image.show()
    resized_image.save(output_image_path)

if __name__ == '__main__':
    resize_image(input_image_path='caterpillar.jpg',
                 output_image_path='caterpillar_small.jpg',
                 size=(800, 400))
这里我们从枕头包中导入图像类。接下来,我们有一个带 3 个参数的函数:我们要打开的文件的位置,我们要保存调整后的图像的位置,以及一个表示图像新大小的元组,其中元组分别是宽度和高度。接下来,我们打开我们的图像并打印出它的大小。然后我们用传入的 size 元组调用图像对象的 resize() 方法。最后,我们获取新的尺寸,将其打印出来,然后在保存调整后的照片之前显示图像。现在看起来是这样的:

如您所见,resize()方法不做任何缩放。接下来我们将看看如何去做!
缩放图像
大多数时候,除非你想写一个缩放方法,否则你不会想像我们在前面的例子中那样调整你的图像的大小。前一种方法的问题是,当调整大小时,它不能保持照片的纵横比。所以不用调整大小,你可以使用 thumbnail() 方法。让我们来看看:
from PIL import Image

def scale_image(input_image_path,
                output_image_path,
                width=None,
                height=None
                ):
    original_image = Image.open(input_image_path)
    w, h = original_image.size
    print('The original image size is {wide} wide x {height} '
          'high'.format(wide=w, height=h))

    if width and height:
        max_size = (width, height)
    elif width:
        max_size = (width, h)
    elif height:
        max_size = (w, height)
    else:
        # No width or height specified
        raise RuntimeError('Width or height required!')

    original_image.thumbnail(max_size, Image.ANTIALIAS)
    original_image.save(output_image_path)

    scaled_image = Image.open(output_image_path)
    width, height = scaled_image.size
    print('The scaled image size is {wide} wide x {height} '
          'high'.format(wide=width, height=height))

if __name__ == '__main__':
    scale_image(input_image_path='caterpillar.jpg',
                output_image_path='caterpillar_scaled.jpg',
                width=800)
这里我们允许程序员传入输入和输出路径以及我们的最大宽度和高度。然后我们使用一个条件来决定我们的最大尺寸应该是多少,然后我们在打开的图像对象上调用 thumbnail() 方法。我们也传入了的图像。抗锯齿标志,该标志将应用高质量下采样滤波器,从而产生更好的图像。最后,我们打开新保存的缩放图像,并打印出它的大小,以便与原始大小进行比较。如果你打开缩放后的图像,你会看到照片的纵横比保持不变。
包扎
玩枕头包很有趣!在本文中,您了解了如何调整图像的大小,以及如何在保持照片纵横比的同时缩放照片。现在,您可以使用这些知识来创建一个函数,该函数可以迭代一个文件夹并创建该文件夹中所有照片的缩略图,或者您可以创建一个简单的照片查看应用程序,其中这种功能可能很方便。
相关阅读
- stack overflow:Python/Pillow:如何缩放图像
- 用 Python 将一张照片转换成黑白
- 如何用 Python 旋转/镜像照片
- 如何用 Python 裁剪照片
如何使用 Python 和 Pillow 旋转和镜像图像(视频)
在本视频教程中,您将学习如何使用 Python 和 Pillow 包旋转和镜像图像。这也称为移调图像。
https://www.youtube.com/embed/MwfBdEz1W8I?feature=oembed
想了解有关使用 Python 处理图像的更多信息吗?
看看我的书:枕头:用 Python 进行图像处理
如何用 Python 旋转/镜像照片
原文:https://www.blog.pythonlibrary.org/2017/10/05/how-to-rotate-mirror-photos-with-python/
在我们上一篇文章中,我们学习了如何用 Pillow 软件包裁剪图像。在这篇文章中,我们将学习如何旋转和镜像我们的图像。
旋转图像

使用 Python 和 Pillow 旋转图像非常简单。我们来看一些代码:
from PIL import Image

def rotate(image_path, degrees_to_rotate, saved_location):
    """
    Rotate the given photo the amount of given degreesk, show it and save it

    @param image_path: The path to the image to edit
    @param degrees_to_rotate: The number of degrees to rotate the image
    @param saved_location: Path to save the cropped image
    """
    image_obj = Image.open(image_path)
    rotated_image = image_obj.rotate(degrees_to_rotate)
    rotated_image.save(saved_location)
    rotated_image.show()

if __name__ == '__main__':
    image = 'mantis.png'
    rotate(image, 90, 'rotated_mantis.jpg')
这里我们只是从 PIL 导入图像模块,并创建一个 rotate() 函数。我们的自定义旋转函数采用以下参数:我们将要旋转的图像路径、我们想要旋转的角度以及我们想要保存结果的位置。实际代码非常简单。我们所做的就是打开图像,然后调用图像对象的 rotate() 方法,同时向它传递逆时针旋转的度数。然后我们保存结果并调用 image 对象的 show()方法来查看结果:

在上面的例子中,我们将螳螂逆时针旋转了 90 度。
镜像图像

现在让我们试着翻转或镜像我们的螳螂图像。下面是一个从左到右镜像图像的示例:
from PIL import Image

def flip_image(image_path, saved_location):
    """
    Flip or mirror the image

    @param image_path: The path to the image to edit
    @param saved_location: Path to save the cropped image
    """
    image_obj = Image.open(image_path)
    rotated_image = image_obj.transpose(Image.FLIP_LEFT_RIGHT)
    rotated_image.save(saved_location)
    rotated_image.show()

if __name__ == '__main__':
    image = 'mantis.png'
    flip_image(image, 'flipped_mantis.jpg')
这段代码与前面的例子非常相似。这段代码的核心是我们使用图像对象的 transpose() 方法,该方法采用以下常量之一:
- PIL。图像。向左向右翻转
- PIL。图像.翻转 _ 顶部 _ 底部
- PIL。图像。转置
您也可以在这里使用 Pillow 的 ROTATE 常量之一,但是我们只关注 transpose()方法的镜像方面。试着将这些常量中的一个交换到上面的代码中,看看会发生什么。
包扎
现在你知道如何使用枕头包来旋转和翻转/镜像你的图像。Python 让这种事情变得很简单。你应该试一试,一定要查看 Pillow 的文档,看看你还能做些什么!
相关阅读
- 图像模块上的枕头文档
- 如何在 Python 中裁剪图像
- 介绍 Python 图像库/ Pillow
如何在编码时“连续”运行 Python 测试
原文:https://www.blog.pythonlibrary.org/2017/03/14/how-to-run-python-tests-continuously-while-coding/
上周,我做了一些测试驱动开发培训,无意中听到有人提到另一种编程语言,它有一个测试运行程序,你可以设置它来监视你的项目目录,并在文件改变时运行你的测试。我认为这是个好主意。我还认为我可以轻松地编写自己的 Python 脚本来做同样的事情。这是一个相当粗略的版本:
import argparse
import os
import subprocess
import time

def get_args():
    parser = argparse.ArgumentParser(
        description="A File Watcher that executes the specified tests"
        )
    parser.add_argument('--tests', action='store', required=True,
                        help='The path to the test file to run')
    parser.add_argument('--project', action='store', required=False,
                        help='The folder where the project files are')
    return parser.parse_args()

def watcher(test_path, project_path=None):
    if not project_path:
        project_path = os.path.dirname(test_path)

    f_dict = {}

    while True:
        files = os.listdir(project_path)
        for f in files:
            full_path = os.path.join(project_path, f)
            mod_time = os.stat(full_path).st_mtime
            if full_path not in f_dict:
                f_dict[full_path] = mod_time
            elif mod_time != f_dict[full_path]:
                # Run the tests
                cmd = ['python', test_path]
                subprocess.call(cmd)
                print('-' * 70)
                f_dict[full_path] = mod_time

        time.sleep(1)

def main():
    args = get_args()
    w = watcher(args.tests, args.project)

if __name__ == '__main__':
    main()
要运行这个脚本,您需要执行如下操作:
python watcher.py --test ~/path/to/tests.py --project ~/project/path
现在让我们花点时间来谈谈这个脚本。第一个函数使用 Python 的 argparse 模块让程序接受最多两个命令行参数:- test 和- project。第一个是 Python 测试脚本的路径,第二个是要测试的代码所在的文件夹。下一个函数, watcher ,将永远循环下去,从传入的文件夹中抓取所有文件,或者使用测试文件所在的文件夹。它将获取每个文件的修改时间,并将其保存到字典中。密钥设置为文件的完整路径,值为修改时间。接下来,我们检查修改时间是否已经更改。如果没有,我们睡一会儿,再检查一遍。如果它改变了,我们就运行测试。
此时,您应该能够在您最喜欢的 Python 编辑器中编辑您的代码和测试,并在终端中观察您的测试运行。
使用看门狗
我四处寻找其他跨平台的监视目录的方法,发现了 看门狗 项目。自 2015 年(撰写本文时)以来,它一直没有更新,但我测试了一下,似乎对我来说效果不错。您可以使用 pip 安装看门狗:
pip install watchdog
现在我们已经安装了 watchdog,让我们创建一些代码来执行类似于上一个示例的操作:
import argparse
import os
import subprocess
import time

from watchdog.observers import Observer
from watchdog.events import FileSystemEventHandler

def get_args():
    parser = argparse.ArgumentParser(
        description="A File Watcher that executes the specified tests"
        )
    parser.add_argument('--tests', action="store", required=True,
                        help='The path to the test file to run')
    parser.add_argument('--project', action='store', required=False,
                        help='The folder where the project files are')
    return parser.parse_args()

class FW(FileSystemEventHandler):
    def __init__(self, test_file_path):
        self.test_file_path = test_file_path

    def on_any_event(self, event):

        if os.path.exists(self.test_file_path):
            cmd = ['python', self.test_file_path]
            subprocess.call(cmd)
            print('-' * 70)

if __name__ =='__main__':
    args = get_args()
    observer = Observer()
    path = args.tests
    watcher = FW(path)

    if not args.project:
        project_path = os.path.dirname(args.tests)
    else:
        project_path = args.project

    if os.path.exists(path) and os.path.isfile(path):
        observer.schedule(watcher, project_path, recursive=True)
        observer.start()
        try:
            while True:
                time.sleep(1)
        except KeyboardInterrupt:
            observer.stop()
        observer.join()
    else:
        print('There is something wrong with your test path')
在这段代码中,我们保留了我们的 get_args() 函数,并添加了一个类。class 子类的看门狗的 FileSystemEventHandler 类。我们最终将测试文件路径传递给该类,并覆盖了 on_any_event() 方法。此方法在文件系统事件发生时触发。当那发生时,我们运行我们的测试。最后一点在代码的末尾,我们创建了一个 Observer() 对象,告诉它监视指定的项目路径,并在文件发生任何变化时调用我们的事件处理程序。
包扎
此时,您应该能够在自己的代码中尝试这些想法了。也有一些特定于平台的方法来监视一个文件夹(比如 PyWin32 ),但是如果你像我一样在多个操作系统上运行,那么 watchdog 或者 rolling your own 可能是更好的选择。
相关阅读
- 如何使用 Python 来观察文件的变化?
- 观察目录的变化
如何用 Python 发邮件(视频)
原文:https://www.blog.pythonlibrary.org/2022/07/28/how-to-send-an-email-with-python-video/
了解如何发送电子邮件(带附件!)使用 Python
https://www.youtube.com/embed/2qvOqzK135Y?feature=oembed
想了解更多?查看我的 Python 101 书籍:
- Leanpub (电子书)
- 亚马逊(平装)
或者查阅我的其他书籍,学习如何创建 Excel 电子表格、编辑图像、使用 Jupyter Notebook、创建 GUI 等等:
- Gumroad (电子书和视频)
如何用 Python 发送电子邮件
原文:https://www.blog.pythonlibrary.org/2010/05/14/how-to-send-email-with-python/
在我工作的地方,我们运行许多用 Python 编写的登录脚本。当其中一个脚本出现错误时,我们想知道。因此,我们编写了一个简单的 Python 脚本,通过电子邮件将错误发送给我们。从那时起,我就需要想办法用一些更高级的脚本来发送附件。如果你是这个博客的长期读者,那么你可能还记得 wxPyMail ,这是一个简单的 wxPython 程序,可以发送电子邮件。在本文中,您将发现如何仅使用 Python 的标准库来发送电子邮件。我们将重点讨论 smtplib 和电子邮件模块。
使用 smtplib 发送电子邮件
用 smtplib 发邮件超级简单。你想看看有多简单吗?你当然知道!让我们来看看:
import smtplib
import string

SUBJECT = "Test email from Python"
TO = "mike@mydomain.com"
FROM = "python@mydomain.com"
text = "blah blah blah"
BODY = string.join((
        "From: %s" % FROM,
        "To: %s" % TO,
        "Subject: %s" % SUBJECT ,
        "",
        text
        ), "\r\n")
server = smtplib.SMTP(HOST)
server.sendmail(FROM, [TO], BODY)
server.quit()
请注意,电子邮件的实际连接和发送只有两行代码。剩下的代码只是设置要发送的消息。在工作中,我们将所有这些都包装在一个可调用的函数中,并向它传递一些信息,比如错误是什么以及将错误发送给谁。如果需要登录,请在创建服务器变量后添加一行,执行以下操作:server.login(username,password)
发送带有附件的电子邮件
现在让我们看看如何发送带有附件的电子邮件。对于这个脚本,我们还将使用电子邮件模块。这里有一个简单的例子,基于我最近写的一些代码:
import os
import smtplib

from email import Encoders
from email.MIMEBase import MIMEBase
from email.MIMEMultipart import MIMEMultipart
from email.Utils import formatdate

filePath = r'\\some\path\to\a\file'

def sendEmail(TO = "mike@mydomain.com",
              FROM="support@mydomain.com"):
    HOST = "mail.mydomain.com"

    msg = MIMEMultipart()
    msg["From"] = FROM
    msg["To"] = TO
    msg["Subject"] = "You've got mail!"
    msg['Date']    = formatdate(localtime=True)

    # attach a file
    part = MIMEBase('application', "octet-stream")
    part.set_payload( open(filePath,"rb").read() )
    Encoders.encode_base64(part)
    part.add_header('Content-Disposition', 'attachment; filename="%s"' % os.path.basename(filePath))
    msg.attach(part)

    server = smtplib.SMTP(HOST)
    # server.login(username, password)  # optional

    try:
        failed = server.sendmail(FROM, TO, msg.as_string())
        server.close()
    except Exception, e:
        errorMsg = "Unable to send email. Error: %s" % str(e)

if __name__ == "__main__":
    sendEmail()
这里发生了相当多的事情,所以让我们来看看新的内容。首先,我们从电子邮件模块导入所有我们需要的零碎信息。然后我们创建一个发送电子邮件的函数。接下来,我们创建一个 MIMEMultipart 对象。这个方便的东西可以保存我们的电子邮件。它使用一个类似 dict 的界面来添加字段,如收件人、发件人、主题等。您会注意到我们还有一个日期字段。这只是抓取你的电脑的当前日期,并将其转换为适当的 MIME 电子邮件格式。
我们最感兴趣的是如何附加文件。这里我们创建了一个 MIMEBase 对象,并将其有效负载设置为我们想要附加的文件。注意,我们需要告诉它将文件作为二进制文件读取,即使文件是纯文本的。接下来,我们用 64 进制对数据流进行编码。最后两步是添加一个头,然后将 MIMEBase 对象附加到我们的 MIMEMultipart 对象。如果您有多个文件要附加,那么您可能希望将这一部分放入某种循环中,并对这些文件进行循环。事实上,我在前面提到的 wxPyMail 示例中就是这么做的。
无论如何,一旦你完成了所有这些,你就可以做和上面的 smtplib 例子中一样的事情了。唯一的区别是我们更改了下面的行:
server.sendmail(FROM, TO, msg.as_string())
请注意 msg.as_string。我们需要将对象转换成字符串来完成这项工作。我们还将 sendmail 函数放在一个 try/except 语句中,以防发生不好的事情,我们的电子邮件无法发送。如果我们愿意,我们可以将 try/except 封装在一个 while 循环中,这样如果失败,我们可以重试发送 X 次电子邮件。
包扎
我们已经介绍了如何发送一封简单的电子邮件以及如何发送一封带有附件的电子邮件。电子邮件模块内置了更多的功能,这里没有介绍,所以请务必阅读文档。祝编码愉快!
附加阅读
- smtplib 模块
- Python 的邮件模块
如何用 Python 发送电子邮件
原文:https://www.blog.pythonlibrary.org/2021/09/21/how-to-send-emails-with-python/
Python 提供了几个非常好的模块,可以用来制作电子邮件。它们是电子邮件和 smtplib 模块。在这两个模块中,您将花一些时间学习如何实际使用这些模块,而不是复习各种方法。
具体来说,您将涉及以下内容:
- 电子邮件的基础
- 如何一次发送到多个地址
- 如何使用“收件人”、“抄送”和“密件抄送”行发送电子邮件
- 如何使用电子邮件模块添加附件和正文
我们开始吧!
电子邮件基础-如何用 smtplib 发送电子邮件
smtplib 模块使用起来非常直观。你将写一个简单的例子,展示如何发送电子邮件。
打开您最喜欢的 Python IDE 或文本编辑器,创建一个新的 Python 文件。将以下代码添加到该文件并保存:
import smtplib

HOST = "mySMTP.server.com"
SUBJECT = "Test email from Python"
TO = "mike@someAddress.org"
FROM = "python@mydomain.com"
text = "Python 3.4 rules them all!"

BODY = "\r\n".join((
"From: %s" % FROM,
"To: %s" % TO,
"Subject: %s" % SUBJECT ,
"",
text
))

server = smtplib.SMTP(HOST)
server.sendmail(FROM, [TO], BODY)
server.quit()
这里您只导入了 smtplib 模块。该代码的三分之二用于设置电子邮件。大多数变量都是显而易见的,所以您将只关注奇怪的一个,即 BODY。
在这里,您使用字符串的 join() 方法将前面的所有变量组合成一个字符串,其中每一行都以回车符("/r “)加新行(”/n ")结束。如果你把正文打印出来,它会是这样的:
'From: python@mydomain.com\r\nTo: mike@mydomain.com\r\nSubject: Test email from Python\r\n\r\nblah blah blah'
之后,建立一个到主机的服务器连接,然后调用 smtplib 模块的 sendmail 方法发送电子邮件。然后断开与服务器的连接。您会注意到这段代码中没有用户名或密码。如果您的服务器需要身份验证,那么您需要添加以下代码:
server.login(username, password)
这应该在创建服务器对象后立即添加。通常,您会希望将这段代码放入一个函数中,并使用其中的一些参数来调用它。您甚至可能希望将这些信息放入配置文件中。
让我们将这段代码放入一个函数中。
import smtplib

def send_email(host, subject, to_addr, from_addr, body_text):
    """
    Send an email
    """
    BODY = "\r\n".join((
            "From: %s" % from_addr,
            "To: %s" % to_addr,
            "Subject: %s" % subject ,
            "",
            body_text
            ))
    server = smtplib.SMTP(host)
    server.sendmail(from_addr, [to_addr], BODY)
    server.quit()

if __name__ == "__main__":
    host = "mySMTP.server.com"
    subject = "Test email from Python"
    to_addr = "mike@someAddress.org"
    from_addr = "python@mydomain.com"
    body_text = "Python rules them all!"
    send_email(host, subject, to_addr, from_addr, body_text)
现在,您可以通过查看函数本身来了解实际代码有多小。那是 13 行!如果你不把正文中的每一项都放在自己的行上,你可以把它变得更短,但是它没有可读性。现在,您将添加一个配置文件来保存服务器信息和 from 地址。
你为什么要这么做?许多组织使用不同的电子邮件服务器来发送电子邮件,或者如果电子邮件服务器升级并且名称改变,那么你只需要改变配置文件而不是代码。如果你的公司被另一家公司收购并合并,同样的事情也适用于发件人地址。
让我们看看配置文件(保存为 email.ini ):
[smtp]
server = some.server.com
from_addr = python@mydomain.com
这是一个非常简单的配置文件。在其中,您有一个标记为 smtp 的部分,其中有两个项目:服务器和 from_addr 。您将使用 ConfigParser 来读取这个文件,并将它转换成一个 Python 字典。下面是代码的更新版本(保存为 smtp_config.py )
import os
import smtplib
import sys

from configparser import ConfigParser

def send_email(subject, to_addr, body_text):
    """
    Send an email
    """
    base_path = os.path.dirname(os.path.abspath(__file__))
    config_path = os.path.join(base_path, "email.ini")

    if os.path.exists(config_path):
        cfg = ConfigParser()
        cfg.read(config_path)
    else:
        print("Config not found! Exiting!")
        sys.exit(1)

    host = cfg.get("smtp", "server")
    from_addr = cfg.get("smtp", "from_addr")

    BODY = "\r\n".join((
        "From: %s" % from_addr,
        "To: %s" % to_addr,
        "Subject: %s" % subject ,
        "",
        body_text
    ))
    server = smtplib.SMTP(host)
    server.sendmail(from_addr, [to_addr], BODY)
    server.quit()

if __name__ == "__main__":
    subject = "Test email from Python"
    to_addr = "mike@someAddress.org"
    body_text = "Python rules them all!"
    send_email(subject, to_addr, body_text)
您在这段代码中添加了一个小检查。你想首先获取脚本本身所在的路径,这就是 base_path 所代表的。接下来,将路径和文件名结合起来,得到配置文件的完全限定路径。然后检查该文件是否存在。
如果存在,您创建一个 ConfigParser ,如果不存在,您打印一条消息并退出脚本。为了安全起见,您应该在 ConfigParser.read() 调用周围添加一个异常处理程序,尽管该文件可能存在,但可能已损坏,或者您可能没有权限打开它,这将引发一个异常。
这将是一个你可以自己尝试的小项目。无论如何,假设一切顺利,并且成功创建了 ConfigParser 对象。现在,您可以使用常用的 ConfigParser 语法从 _addr 信息中提取主机和**。**
现在你已经准备好学习如何同时发送多封电子邮件了!
一次发送多封电子邮件
能够一次发送多封电子邮件是一个很好的功能。
继续修改你的最后一个例子,这样你就可以发送多封电子邮件了!
import os
import smtplib
import sys

from configparser import ConfigParser

def send_email(subject, body_text, emails):
    """
    Send an email
    """
    base_path = os.path.dirname(os.path.abspath(__file__))
    config_path = os.path.join(base_path, "email.ini")

    if os.path.exists(config_path):
        cfg = ConfigParser()
        cfg.read(config_path)
    else:
        print("Config not found! Exiting!")
        sys.exit(1)

    host = cfg.get("smtp", "server")
    from_addr = cfg.get("smtp", "from_addr")

    BODY = "\r\n".join((
            "From: %s" % from_addr,
            "To: %s" % ', '.join(emails),
            "Subject: %s" % subject ,
            "",
            body_text
            ))
    server = smtplib.SMTP(host)
    server.sendmail(from_addr, emails, BODY)
    server.quit()

if __name__ == "__main__":
    emails = ["mike@someAddress.org", "someone@gmail.com"]
    subject = "Test email from Python"
    body_text = "Python rules them all!"
    send_email(subject, body_text, emails)
您会注意到,在这个例子中,您删除了 to_addr 参数,并添加了一个 emails 参数,这是一个电子邮件地址列表。为此,您需要在正文的 To:部分创建一个逗号分隔的字符串,并将电子邮件列表传递给 sendmail 方法。因此,您执行以下操作来创建一个简单的逗号分隔的字符串:‘,’。加入(邮件)。很简单,是吧?
使用“收件人”、“抄送”和“密件抄送”行发送电子邮件
现在你只需要弄清楚如何使用“抄送”和“密件抄送”字段发送邮件。
让我们创建一个支持该功能的新版本的代码!
import os
import smtplib
import sys

from configparser import ConfigParser

def send_email(subject, body_text, to_emails, cc_emails, bcc_emails):
    """
    Send an email
    """
    base_path = os.path.dirname(os.path.abspath(__file__))
    config_path = os.path.join(base_path, "email.ini")

    if os.path.exists(config_path):
        cfg = ConfigParser()
        cfg.read(config_path)
    else:
        print("Config not found! Exiting!")
        sys.exit(1)

    host = cfg.get("smtp", "server")
    from_addr = cfg.get("smtp", "from_addr")

    BODY = "\r\n".join((
            "From: %s" % from_addr,
            "To: %s" % ', '.join(to_emails),
            "CC: %s" % ', '.join(cc_emails),
            "BCC: %s" % ', '.join(bcc_emails),
            "Subject: %s" % subject ,
            "",
            body_text
            ))
    emails = to_emails + cc_emails + bcc_emails

    server = smtplib.SMTP(host)
    server.sendmail(from_addr, emails, BODY)
    server.quit()

if __name__ == "__main__":
    emails = ["mike@somewhere.org"]
    cc_emails = ["someone@gmail.com"]
    bcc_emails = ["schmuck@newtel.net"]

    subject = "Test email from Python"
    body_text = "Python rules them all!"
    send_email(subject, body_text, emails, cc_emails, bcc_emails)
在这段代码中,你传入 3 个列表,每个列表有一个电子邮件地址。您创建的抄送和密件抄送字段与之前完全相同,但是您还需要将 3 个列表合并成一个,这样您就可以将合并后的列表传递给 sendmail() 方法。
在 StackOverflow 这样的论坛上有一些传言说,一些电子邮件客户端可能会以奇怪的方式处理密件抄送字段,从而允许收件人通过电子邮件标题看到密件抄送列表。我无法确认这种行为,但我知道 Gmail 成功地从邮件标题中删除了密件抄送信息。
现在您已经准备好使用 Python 的电子邮件模块了!
使用电子邮件模块添加附件/正文
现在,您将利用从上一节中学到的知识,将它与 Python 电子邮件模块结合起来,以便发送附件。
电子邮件模块使得添加附件变得极其容易。代码如下:
import os
import smtplib
import sys

from configparser import ConfigParser
from email import encoders
from email.mime.text import MIMEText
from email.mime.base import MIMEBase
from email.mime.multipart import MIMEMultipart
from email.utils import formatdate

def send_email_with_attachment(subject, body_text, to_emails,
                               cc_emails, bcc_emails, file_to_attach):
    """
    Send an email with an attachment
    """
    base_path = os.path.dirname(os.path.abspath(__file__))
    config_path = os.path.join(base_path, "email.ini")
    header = 'Content-Disposition', 'attachment; filename="%s"' % file_to_attach

    # get the config
    if os.path.exists(config_path):
        cfg = ConfigParser()
        cfg.read(config_path)
    else:
        print("Config not found! Exiting!")
        sys.exit(1)

    # extract server and from_addr from config
    host = cfg.get("smtp", "server")
    from_addr = cfg.get("smtp", "from_addr")

    # create the message
    msg = MIMEMultipart()
    msg["From"] = from_addr
    msg["Subject"] = subject
    msg["Date"] = formatdate(localtime=True)
    if body_text:
        msg.attach( MIMEText(body_text) )

    msg["To"] = ', '.join(to_emails)
    msg["cc"] = ', '.join(cc_emails)

    attachment = MIMEBase('application', "octet-stream")
    try:
        with open(file_to_attach, "rb") as fh:
            data = fh.read()
        attachment.set_payload( data )
        encoders.encode_base64(attachment)
        attachment.add_header(*header)
        msg.attach(attachment)
    except IOError:
        msg = "Error opening attachment file %s" % file_to_attach
        print(msg)
        sys.exit(1)

    emails = to_emails + cc_emails

    server = smtplib.SMTP(host)
    server.sendmail(from_addr, emails, msg.as_string())
    server.quit()

if __name__ == "__main__":
    emails = ["mike@someAddress.org", "nedry@jp.net"]
    cc_emails = ["someone@gmail.com"]
    bcc_emails = ["anonymous@circe.org"]

    subject = "Test email with attachment from Python"
    body_text = "This email contains an attachment!"
    path = "/path/to/some/file"
    send_email_with_attachment(subject, body_text, emails,
                               cc_emails, bcc_emails, path)
在这里,您重命名了您的函数并添加了一个新参数, file_to_attach 。您还需要添加一个头并创建一个 MIMEMultipart 对象。在添加附件之前,可以随时创建标题。
向 MIMEMultipart 对象( msg )添加元素,就像向字典中添加键一样。您会注意到,您必须使用 email 模块的 formatdate 方法来插入正确格式化的日期。
要添加消息体,您需要创建一个 MIMEText 的实例。如果您注意的话,您会发现您没有添加密件抄送信息,但是您可以通过遵循上面代码中的约定很容易地这样做。
接下来,添加附件。您将它包装在一个异常处理程序中,并使用带有语句的来提取文件,并将其放入您的 MIMEBase 对象中。最后,你把它添加到 msg 变量中,然后发送出去。注意,您必须在 sendmail ()方法中将 msg 转换成一个字符串。
包扎
现在你知道如何用 Python 发送电子邮件了。对于那些喜欢小型项目的人来说,您应该回去在服务器周围添加额外的错误处理。 sendmail 部分代码,以防在这个过程中发生一些奇怪的事情。
一个例子是 SMTPAuthenticationError 或 SMTPConnectError 。您还可以在附加文件的过程中加强错误处理,以捕捉其他错误。最后,您可能希望获得这些不同的电子邮件列表,并创建一个已删除重复项的规范化列表。如果您正在从文件中读取电子邮件地址列表,这一点尤其重要。
另外,请注意,您的发件人地址是假的。你可以使用 Python 和其他编程语言来欺骗电子邮件,但这是非常不礼貌的,而且可能是非法的,这取决于你住在哪里。你已经被警告了!
明智地使用你的知识,享受 Python 带来的乐趣和收益!
相关阅读
想学习更多 Python 基础知识?然后查看以下教程:
-
Python 101: 使用 JSON 的介绍
-
python 101-创建多个流程
-
python 101-用 pdb 调试你的代码
如何在 Windows 上为 Kivy 设置 Wing IDE
原文:https://www.blog.pythonlibrary.org/2013/11/18/how-to-set-up-wing-ide-for-kivy-on-windows/
我喜欢用 Wingware 的 IDE 用 Python 编码。我正在用 Kivy 开发一些示例应用程序,这是一个跨平台的 Python GUI 框架,也可以为移动设备创建 UI。无论如何,在 Wing 中设置 Kivy 有点令人困惑,所以这里有一个速成班:
- Download Kivy
- 拉开 Kivy 的拉链。在我的例子中,我在这里解压它:C:\kivy1.7.2\
- 运行解压到的目录中的 kivy.bat。您应该会看到如下所示的内容

现在我们准备打开机翼。一旦你打开了,开始一个新的项目。然后进入项目菜单,选择位于列表底部的项目属性选项。您应该会看到如下所示的内容:
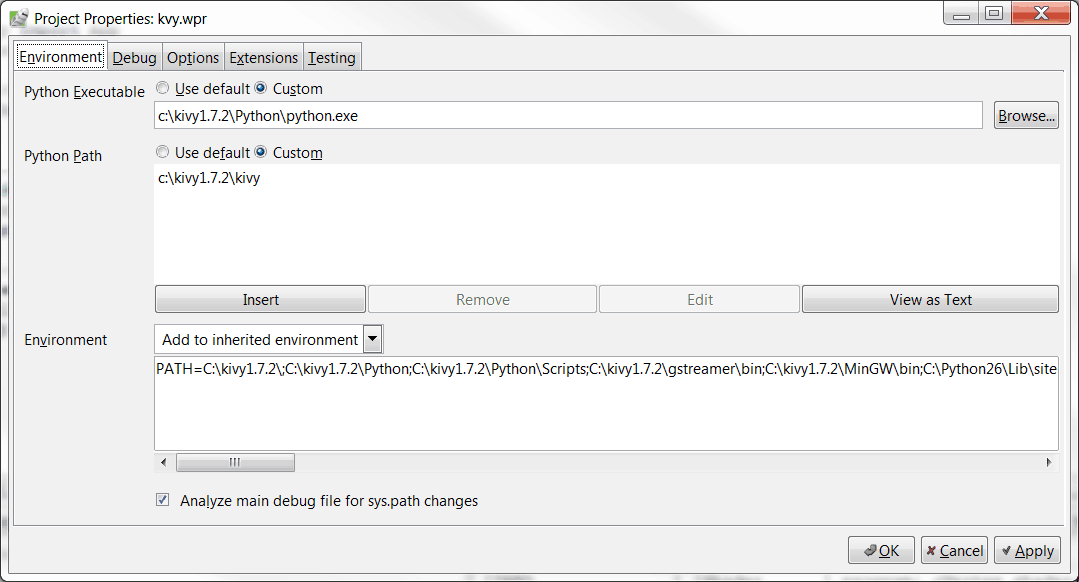
将 Python 可执行文件选项设置为你的 Kivy 的 Python,在我的例子中是:c:\ Kivy 1 . 7 . 2 \ Python \ Python . exe
将 Python 路径设置为 C:\kivy1.7.2\kivy (或者修改以匹配提取 kivy 的位置)。
此时,您应该能够在您的环境中导入 kivy,但是您将无法实际执行您的 kivy 脚本。要解决这个问题,你需要进入项目属性对话框的底部,将环境设置下拉菜单更改为添加到继承的环境。最后,您需要将上面看到的 kivy.bat 屏幕中的路径信息复制到环境设置下的文本框中。在我的例子中,它看起来像这样:
PATH=C:\kivy1.7.2\;C:\kivy1.7.2\Python;C:\kivy1.7.2\Python\Scripts;C:\kivy1.7.2\gstreamer\bin;C:\kivy1.7.2\MinGW\bin;C:\Python26\Lib\site-packages\PyQt4;C:\Python27\Lib\site-packages\PyQt4;C:\Windows\system32;C:\Windows;C:\Windows\System32\Wbem;C:\Windows\System32\WindowsPowerShell\v1.0\;c:\Program Files (x86)\ATI Technologies\ATI.ACE\Core-Static;C:\Program Files (x86)\Intel\Services\IPT\;C:\Program Files (x86)\IBM\Client Access\Emulator;C:\Program Files (x86)\IBM\Client Access\Shared;C:\Program Files (x86)\IBM\Client Access\;C:\Python26;C:\Python26\Scripts;C:\Program Files\TortoiseSVN\bin;C:\Program Files\SlikSvn\bin;C:\Program Files (x86)\Calibre2\;C:\Program Files (x86)\QuickTime\QTSystem\;C:\Program Files (x86)\GNU\GnuPG\pub;C:\Windows\Microsoft.NET\Framework64\v4.0.30319;C:\PROGRA~1\IBM\SQLLIB\BIN;C:\PROGRA~1\IBM\SQLLIB\FUNCTION;C:\Program Files (x86)\Git\cmd;C:\Program Files (x86)\Mercurial;C:\MinGW\bin
除了它应该都在一行上。否则 Wing 会抱怨每个变量必须在 var=value 对中。一旦你完成了所有这些,你就可以在 Wing 中运行一个 kivy 脚本。这避免了将 Python 文件拖到 kivy.bat 上来运行 kivy 程序的需要。
如何截图并打印你的 wxPython 应用程序
你有没有想过让你的 wxPython 代码自己截图会很酷?嗯, Andrea Gavana 想出了一个很酷的方法来做到这一点,根据他在 wxPython 邮件列表上告诉我们的内容和我从其他来源了解到的内容,你很快就会知道如何不仅截取屏幕截图,而且如何将它发送到你的打印机!
我们先来看看如何截图:
import sys
import wx
import snapshotPrinter
class MyForm(wx.Frame):
#----------------------------------------------------------------------
def __init__(self):
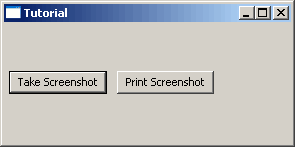
wx.Frame.__init__(self, None, wx.ID_ANY, "Tutorial", size=(500,500))
# Add a panel so it looks the correct on all platforms
panel = wx.Panel(self, wx.ID_ANY)
screenshotBtn = wx.Button(panel, wx.ID_ANY, "Take Screenshot")
screenshotBtn.Bind(wx.EVT_BUTTON, self.onTakeScreenShot)
printBtn = wx.Button(panel, label="Print Screenshot")
printBtn.Bind(wx.EVT_BUTTON, self.onPrint)
sizer = wx.BoxSizer(wx.HORIZONTAL)
sizer.Add(screenshotBtn, 0, wx.ALL|wx.CENTER, 5)
sizer.Add(printBtn, 0, wx.ALL|wx.CENTER, 5)
panel.SetSizer(sizer)
def onTakeScreenShot(self, event):
""" Takes a screenshot of the screen at give pos & size (rect). """
print 'Taking screenshot...'
rect = self.GetRect()
# see http://aspn.activestate.com/ASPN/Mail/Message/wxpython-users/3575899
# created by Andrea Gavana
# adjust widths for Linux (figured out by John Torres
# http://article.gmane.org/gmane.comp.python.wxpython/67327)
if sys.platform == 'linux2':
client_x, client_y = self.ClientToScreen((0, 0))
border_width = client_x - rect.x
title_bar_height = client_y - rect.y
rect.width += (border_width * 2)
rect.height += title_bar_height + border_width
#Create a DC for the whole screen area
dcScreen = wx.ScreenDC()
#Create a Bitmap that will hold the screenshot image later on
#Note that the Bitmap must have a size big enough to hold the screenshot
#-1 means using the current default colour depth
bmp = wx.EmptyBitmap(rect.width, rect.height)
#Create a memory DC that will be used for actually taking the screenshot
memDC = wx.MemoryDC()
#Tell the memory DC to use our Bitmap
#all drawing action on the memory DC will go to the Bitmap now
memDC.SelectObject(bmp)
#Blit (in this case copy) the actual screen on the memory DC
#and thus the Bitmap
memDC.Blit( 0, #Copy to this X coordinate
0, #Copy to this Y coordinate
rect.width, #Copy this width
rect.height, #Copy this height
dcScreen, #From where do we copy?
rect.x, #What's the X offset in the original DC?
rect.y #What's the Y offset in the original DC?
)
#Select the Bitmap out of the memory DC by selecting a new
#uninitialized Bitmap
memDC.SelectObject(wx.NullBitmap)
img = bmp.ConvertToImage()
fileName = "myImage.png"
img.SaveFile(fileName, wx.BITMAP_TYPE_PNG)
print '...saving as png!'
#----------------------------------------------------------------------
def onPrint(self, event):
"""
Send screenshot to the printer
"""
printer = snapshotPrinter.SnapshotPrinter()
printer.sendToPrinter()
# Run the program
if __name__ == "__main__":
app = wx.App(False)
frame = MyForm()
frame.Show()
app.MainLoop()
这段代码创建了一个相当大框架,其中有两个按钮。是的,很无聊,但这是演示,不是艺术展。我们最关心的部分是 onTakeScreenShot 方法。如果你去第一个评论链接,你会找到安德里亚·加瓦那的这个剧本的原始版本。我们添加了一个来自 John Torres 的条件,使得这个脚本在 Linux 上表现得更好,因为它最初是为 Windows 编写的。注释讲述了代码的故事,所以请花点时间阅读它们,当您完成后,我们可以继续讨论如何将结果发送到打印机。
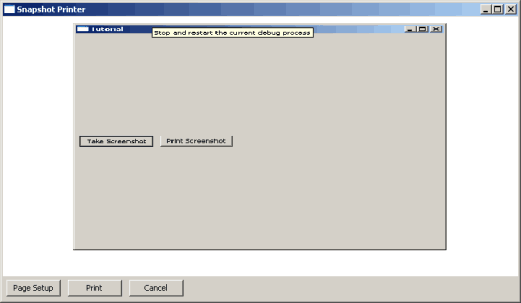
快照打印机脚本
#######################################################################
# snapshotPrinter.py
#
# Created: 12/26/2007 by mld
#
# Description: Displays screenshot image using html and then allows
# the user to print it.
#######################################################################
import os
import wx
from wx.html import HtmlEasyPrinting, HtmlWindow
class SnapshotPrinter(wx.Frame):
#----------------------------------------------------------------------
def __init__(self, title='Snapshot Printer'):
wx.Frame.__init__(self, None, wx.ID_ANY, title, size=(650,400))
self.panel = wx.Panel(self, wx.ID_ANY)
self.printer = HtmlEasyPrinting(name='Printing', parentWindow=None)
self.html = HtmlWindow(self.panel)
self.html.SetRelatedFrame(self, self.GetTitle())
if not os.path.exists('screenshot.htm'):
self.createHtml()
self.html.LoadPage('screenshot.htm')
pageSetupBtn = wx.Button(self.panel, wx.ID_ANY, 'Page Setup')
printBtn = wx.Button(self.panel, wx.ID_ANY, 'Print')
cancelBtn = wx.Button(self.panel, wx.ID_ANY, 'Cancel')
self.Bind(wx.EVT_BUTTON, self.onSetup, pageSetupBtn)
self.Bind(wx.EVT_BUTTON, self.onPrint, printBtn)
self.Bind(wx.EVT_BUTTON, self.onCancel, cancelBtn)
sizer = wx.BoxSizer(wx.VERTICAL)
btnSizer = wx.BoxSizer(wx.HORIZONTAL)
sizer.Add(self.html, 1, wx.GROW)
btnSizer.Add(pageSetupBtn, 0, wx.ALL, 5)
btnSizer.Add(printBtn, 0, wx.ALL, 5)
btnSizer.Add(cancelBtn, 0, wx.ALL, 5)
sizer.Add(btnSizer)
self.panel.SetSizer(sizer)
self.panel.SetAutoLayout(True)
#----------------------------------------------------------------------
def createHtml(self):
'''
Creates an html file in the home directory of the application
that contains the information to display the snapshot
'''
print 'creating html...'
html = '\n\n\n\n'
f = file('screenshot.htm', 'w')
f.write(html)
f.close()
#----------------------------------------------------------------------
def onSetup(self, event):
self.printer.PageSetup()
#----------------------------------------------------------------------
def onPrint(self, event):
self.sendToPrinter()
#----------------------------------------------------------------------
def sendToPrinter(self):
""""""
self.printer.GetPrintData().SetPaperId(wx.PAPER_LETTER)
self.printer.PrintFile(self.html.GetOpenedPage())
#----------------------------------------------------------------------
def onCancel(self, event):
self.Close()
class wxHTML(HtmlWindow):
#----------------------------------------------------------------------
def __init__(self, parent, id):
html.HtmlWindow.__init__(self, parent, id, style=wx.NO_FULL_REPAINT_ON_RESIZE)
if __name__ == '__main__':
app = wx.App(False)
frame = SnapshotPrinter()
frame.Show()
app.MainLoop()
这个小脚本使用 HtmlWindow 小部件和 HtmlEasyPrinting 方法向打印机发送内容。基本上,您可以创建一些非常简单的 HTML 代码(参见 createHtml 方法),然后使用 HtmlWindow 查看它。接下来,您使用 HtmlEasyPrinting 将其发送到打印机。它实际上会显示打印机对话框,让您选择要将文档发送到哪台打印机。
我希望这篇文章对您的编程有所帮助。希望能在评论里听到你的声音!
如何用 timeit 为小块 Python 代码计时
原文:https://www.blog.pythonlibrary.org/2014/01/30/how-to-time-small-pieces-of-python-code-with-timeit/
有时候当你在编码的时候,你想知道一个特定的函数运行需要多长时间。这个主题称为性能分析或性能调优。Python 的标准库中内置了几个分析器,但是对于小段代码,使用 Python 的 timeit 模块会更容易。因此, timeit 将是本教程的重点。 timeit 模块使用特定于平台的方法来获得最准确的运行时间。基本上, timeit 模块将进行一次设置,运行代码 n 次,并返回运行所用的时间。通常它会输出一个“3 分中最好”的分数。奇怪的是,默认运行代码的次数是 1,000,000 次循环。 timeit 在 Linux / Mac 上用 time.time()计时,在 Windows 上用 time.clock()计时,以获得最准确的读数,这是大多数人不会想到的。
您可以从命令行或通过导入来运行 timeit 模块。我们将查看这两个用例。
在控制台中计时
在命令行上使用 timeit 模块非常简单。这里有几个例子:
python -m timeit -s "[ord(x) for x in 'abcdfghi']"
100000000 loops, best of 3: 0.0115 usec per loop

python -m timeit -s "[chr(int(x)) for x in '123456789']"
100000000 loops, best of 3: 0.0119 usec per loop
这是怎么回事?当你在命令行上调用 Python 并给它传递“-m”选项时,你是在告诉它查找一个模块并把它作为主程序使用。“-s”告诉 timeit 模块运行一次设置。然后,它将代码运行 n 次循环,并返回 3 次运行的最佳平均值。对于这些愚蠢的例子,你不会看到太大的区别。让我们快速看一下 timeit’s help,这样我们可以了解更多关于它是如何工作的:
C:\Users\mdriscoll>python -m timeit -h
Tool for measuring execution time of small code snippets.

This module avoids a number of common traps for measuring execution
times.  See also Tim Peters' introduction to the Algorithms chapter in
the Python Cookbook, published by O'Reilly.

Library usage: see the Timer class.

Command line usage:
    python timeit.py [-n N] [-r N] [-s S] [-t] [-c] [-h] [--] [statement]

Options:
  -n/--number N: how many times to execute 'statement' (default: see below)
  -r/--repeat N: how many times to repeat the timer (default 3)
  -s/--setup S: statement to be executed once initially (default 'pass')
  -t/--time: use time.time() (default on Unix)
  -c/--clock: use time.clock() (default on Windows)
  -v/--verbose: print raw timing results; repeat for more digits precision
  -h/--help: print this usage message and exit
  --: separate options from statement, use when statement starts with -
  statement: statement to be timed (default 'pass')

A multi-line statement may be given by specifying each line as a
separate argument; indented lines are possible by enclosing an
argument in quotes and using leading spaces.  Multiple -s options are
treated similarly.

If -n is not given, a suitable number of loops is calculated by trying
successive powers of 10 until the total time is at least 0.2 seconds.

The difference in default timer function is because on Windows,
clock() has microsecond granularity but time()'s granularity is 1/60th
of a second; on Unix, clock() has 1/100th of a second granularity and
time() is much more precise.  On either platform, the default timer
functions measure wall clock time, not the CPU time.  This means that
other processes running on the same computer may interfere with the
timing.  The best thing to do when accurate timing is necessary is to
repeat the timing a few times and use the best time.  The -r option is
good for this; the default of 3 repetitions is probably enough in most
cases.  On Unix, you can use clock() to measure CPU time.

Note: there is a certain baseline overhead associated with executing a
pass statement.  The code here doesn't try to hide it, but you should
be aware of it.  The baseline overhead can be measured by invoking the
program without arguments.

The baseline overhead differs between Python versions!  Also, to
fairly compare older Python versions to Python 2.3, you may want to
use python -O for the older versions to avoid timing SET_LINENO
instructions.
这告诉使用所有我们可以通过的奇妙的标志,以及它们做什么。它也告诉我们一些关于 timeit 如何在幕后运作的事情。让我们写一个简单的函数,看看我们能否从命令行计时:
# simple_func.py
def my_function():
    try:
        1 / 0
    except ZeroDivisionError:
        pass
这个函数所做的只是导致一个被忽略的错误。是的,这是一个愚蠢的例子。为了让 timeit 在命令行上运行这段代码,我们需要将代码导入到它的名称空间中,所以请确保您已经将当前的工作目录更改为该脚本所在的文件夹。然后运行以下命令:
python -m timeit "import simple_func; simple_func.my_function()"
1000000 loops, best of 3: 1.77 usec per loop
这里导入函数,然后调用它。注意,我们用分号分隔导入和函数调用,Python 代码用引号括起来。现在我们准备学习如何在实际的 Python 脚本中使用 timeit 。
导入 timeit 进行测试
在代码中使用 timeit 模块也很容易。我们将使用之前相同的愚蠢脚本,并在下面向您展示如何操作:
def my_function():
    try:
        1 / 0
    except ZeroDivisionError:
        pass

if __name__ == "__main__":
    import timeit
    setup = "from __main__ import my_function"
    print timeit.timeit("my_function()", setup=setup)
在这里,我们检查脚本是否正在直接运行(即没有导入)。如果是,那么我们导入 timeit ,创建一个设置字符串将函数导入到 timeit 的名称空间,然后我们调用 timeit.timeit 。您会注意到,我们用引号将对函数的调用传递出去,然后是设置字符串。这真的就是全部了!
包扎
现在你知道如何使用 timeit 模块了。它非常擅长计时简单的代码片段。您通常会将它用于您怀疑运行时间过长的代码。如果您想要更详细地了解代码中正在发生的事情,那么您可能希望切换到分析器。开心快乐编码!
- 关于 timeit 的 Python 文档
- py motw-Time it "对小部分 Python 代码的执行进行计时。
- 在 timeit 上深入研究 Python 部分
- 关于 timeit 的梦想代码论坛教程
如何在演示之外使用 wxPython 演示代码
原文:https://www.blog.pythonlibrary.org/2018/01/23/how-to-use-wxpython-demo-code-outside-the-demo/
有时,有人会问他们如何在演示之外运行来自 wxPython 的演示代码。换句话说,他们想知道如何从演示中提取代码并在自己的程序中运行。我想我很久以前在 wxPython wiki 上写过这个主题,但是我想我也应该在这里写这个主题。
如何处理日志
我经常看到的第一个问题是,演示代码中充满了对某种日志的调用。它总是写入该日志,以帮助开发人员了解不同的事件是如何触发的,或者不同的方法是如何调用的。这一切都很好,但这使得从演示中复制代码变得很困难。让我们从 wx 中取出代码。ListBox 演示作为一个例子,看看我们是否可以让它在演示之外工作。下面是演示代码:
import wx

#----------------------------------------------------------------------
# BEGIN Demo Code
class FindPrefixListBox(wx.ListBox):
    def __init__(self, parent, id, pos=wx.DefaultPosition, size=wx.DefaultSize,
                 choices=[], style=0, validator=wx.DefaultValidator):
        wx.ListBox.__init__(self, parent, id, pos, size, choices, style, validator)
        self.typedText = ''
        self.log = parent.log
        self.Bind(wx.EVT_KEY_DOWN, self.OnKey)

    def FindPrefix(self, prefix):
        self.log.WriteText('Looking for prefix: %s\n' % prefix)

        if prefix:
            prefix = prefix.lower()
            length = len(prefix)

            # Changed in 2.5 because ListBox.Number() is no longer supported.
            # ListBox.GetCount() is now the appropriate way to go.
            for x in range(self.GetCount()):
                text = self.GetString(x)
                text = text.lower()

                if text[:length] == prefix:
                    self.log.WriteText('Prefix %s is found.\n' % prefix)
                    return x

        self.log.WriteText('Prefix %s is not found.\n' % prefix)
        return -1

    def OnKey(self, evt):
        key = evt.GetKeyCode()

        if key >= 32 and key <= 127:
            self.typedText = self.typedText + chr(key)
            item = self.FindPrefix(self.typedText)

            if item != -1:
                self.SetSelection(item)

        elif key == wx.WXK_BACK:   # backspace removes one character and backs up
            self.typedText = self.typedText[:-1]

            if not self.typedText:
                self.SetSelection(0)
            else:
                item = self.FindPrefix(self.typedText)

                if item != -1:
                    self.SetSelection(item)
        else:
            self.typedText = ''
            evt.Skip()

    def OnKeyDown(self, evt):
        pass

#---------------------------------------------------------------------------

class TestListBox(wx.Panel):
    def __init__(self, parent, log):
        self.log = log
        wx.Panel.__init__(self, parent, -1)

        sampleList = ['zero', 'one', 'two', 'three', 'four', 'five',
                      'six', 'seven', 'eight', 'nine', 'ten', 'eleven',
                      'twelve', 'thirteen', 'fourteen']

        wx.StaticText(self, -1, "This example uses the wx.ListBox control.", (45, 10))
        wx.StaticText(self, -1, "Select one:", (15, 50))
        self.lb1 = wx.ListBox(self, 60, (100, 50), (90, 120), sampleList, wx.LB_SINGLE)
        self.Bind(wx.EVT_LISTBOX, self.EvtListBox, self.lb1)
        self.Bind(wx.EVT_LISTBOX_DCLICK, self.EvtListBoxDClick, self.lb1)
        self.lb1.Bind(wx.EVT_RIGHT_UP, self.EvtRightButton)
        self.lb1.SetSelection(3)
        self.lb1.Append("with data", "This one has data");
        self.lb1.SetClientData(2, "This one has data");

        wx.StaticText(self, -1, "Select many:", (220, 50))
        self.lb2 = wx.ListBox(self, 70, (320, 50), (90, 120), sampleList, wx.LB_EXTENDED)
        self.Bind(wx.EVT_LISTBOX, self.EvtMultiListBox, self.lb2)
        self.lb2.Bind(wx.EVT_RIGHT_UP, self.EvtRightButton)
        self.lb2.SetSelection(0)

        sampleList = sampleList + ['test a', 'test aa', 'test aab',
                                   'test ab', 'test abc', 'test abcc',
                                   'test abcd' ]
        sampleList.sort()
        wx.StaticText(self, -1, "Find Prefix:", (15, 250))
        fp = FindPrefixListBox(self, -1, (100, 250), (90, 120), sampleList, wx.LB_SINGLE)
        fp.SetSelection(0)

    def EvtListBox(self, event):
        self.log.WriteText('EvtListBox: %s, %s, %s\n' %
                           (event.GetString(),
                            event.IsSelection(),
                            event.GetSelection()
                            # event.GetClientData()
                            ))

        lb = event.GetEventObject()
        # data = lb.GetClientData(lb.GetSelection())

        # if data is not None:
            # self.log.WriteText('\tdata: %s\n' % data)

    def EvtListBoxDClick(self, event):
        self.log.WriteText('EvtListBoxDClick: %s\n' % self.lb1.GetSelection())
        self.lb1.Delete(self.lb1.GetSelection())

    def EvtMultiListBox(self, event):
        self.log.WriteText('EvtMultiListBox: %s\n' % str(self.lb2.GetSelections()))

    def EvtRightButton(self, event):
        self.log.WriteText('EvtRightButton: %s\n' % event.GetPosition())

        if event.GetEventObject().GetId() == 70:
            selections = list(self.lb2.GetSelections())
            selections.reverse()

            for index in selections:
                self.lb2.Delete(index)
#----------------------------------------------------------------------
# END Demo Code
#----------------------------------------------------------------------
我不打算解释演示代码本身。相反,当我想尝试在演示之外运行它时,我将把重点放在这段代码出现的问题上。在演示的最后有一个 runTest 函数,我没有复制它,因为如果你在演示之外复制它,代码不会做任何事情。你看,演示代码有某种包装来使它工作。如果你想使用演示代码,你需要添加你自己的“包装器”。
这段代码呈现的主要问题是许多方法都调用了 self.log.WriteText 。您不能从代码中看出 log 对象是什么,但是您知道它有一个 WriteText 方法。在演示中,您会注意到,当其中一个方法触发时,WriteText 调用似乎会写入演示底部的文本控件。所以日志必须是一个文本控件!
有许多不同的方法可以解决日志问题。以下是我最喜欢的三个:
- 移除对 self.log.WriteText 的所有调用
- 创建我自己的文本控件并将其传入
- 用 WriteText 方法创建一个简单的类
我在很多场合都选择了第一种,因为这是一种简单的开始方式。但是对于教程来说,这有点无聊,所以我们将选择第三个选项,用 WriteText 方法创建一个类!将以下代码添加到包含上述代码的同一文件中:
#----------------------------------------------------------------------
# Start Your own code here
class FakeLog:
    """
    The log in the demo is a text control, so just create a class
    with an overridden WriteText function
    """

    def WriteText(self, string):
        print(string)

# Create a frame that can wrap your demo code (works in most cases)

class MyFrame(wx.Frame):

    def __init__(self):
        wx.Frame.__init__(self, None, title='Listbox demo',
                          size=(800,600))
        log = FakeLog()
        panel = TestListBox(self, log=log)

        self.Show()

if __name__ == '__main__':
    app = wx.App(False)
    frame = MyFrame()
    app.MainLoop()
这里我们只是用 WriteText 方法创建了一个 FakeLog ,它接受一个字符串作为唯一的参数。该方法所做的就是将字符串打印到 stdout。然后我们创建 wx 的一个子类。框架,初始化我们的假日志和演示代码,并显示我们的框架。现在我们有了一个不在演示中的演示代码!如果你愿意,你可以在 Github 上获得完整的代码。
其他演示问题
还有一些其他的演示没有遵循与列表框演示完全相同的 API。例如,如果你尝试使用我在上面为 wx 创建的类。按钮演示,你会发现它的 log 对象调用的是 write()方法而不是 WriteText()方法。在这种情况下,解决方案是显而易见的,因为我们只需要向我们的假日志记录类添加第二个方法:
class FakeLog:
    """
    The log in the demo is a text control, so just create a class
    with an overridden WriteText function
    """

    def WriteText(self, string):
        print(string)

    def write(self, string):
        print(string)
现在我们的演示运行代码更加灵活了。然而,当我让我的一个读者测试这段代码时,他们注意到了一个关于 wx 的问题。ListCtrl 演示。问题是它导入了一个名为“images”的模块。实际上有几个演示引用了这个模块。你只需要从演示中复制 images.py ,并把它放在你正在编写的脚本所在的位置,这样你就可以导入它了。
注意:我收到一份报告,说 wxPython 4 最新测试版中包含的 images.py 文件对他们不适用,他们不得不从旧版本的演示中获取一份副本。我自己没有遇到过这个问题,但请记住这一点。
包扎
现在,您应该有了让 wxPython 演示中的大多数演示在您自己的代码中工作所需的工具。去抓些代码来试试吧!编码快乐!
如何用 Python 给你的照片加水印
原文:https://www.blog.pythonlibrary.org/2017/10/17/how-to-watermark-your-photos-with-python/
当你在网上查找照片时,你会注意到有些照片带有水印。水印通常是覆盖在照片上的一些文本或徽标,用于标识照片的拍摄者或照片的所有者。一些专业人士建议在社交媒体上分享照片之前给照片添加水印,以防止其他人将你的照片用作自己的照片,并从你的作品中获利。当然,水印可以很容易地被移除,所以这并不像过去作为数字版权工具那样有用。
反正枕头包提供了给照片添加水印所需的工具!如果你还没有安装枕头,你需要做的第一件事是:
pip install pillow
一旦安装完毕,我们就可以继续了!
添加文本水印
我们将从给照片添加一些文字开始。让我们用这张我在俄勒冈州拍摄的耶奎纳灯塔的照片:

现在我们将添加一些文字到图像中。在这种情况下,让我们添加我的域名:www.mousevspython.com
from PIL import Image
from PIL import ImageDraw
from PIL import ImageFont

def watermark_text(input_image_path,
                   output_image_path,
                   text, pos):
    photo = Image.open(input_image_path)

    # make the image editable
    drawing = ImageDraw.Draw(photo)

    black = (3, 8, 12)
    font = ImageFont.truetype("Pillow/Tests/fonts/FreeMono.ttf", 40)
    drawing.text(pos, text, fill=black, font=font)
    photo.show()
    photo.save(output_image_path)

if __name__ == '__main__':
    img = 'lighthouse.jpg'
    watermark_text(img, 'lighthouse_watermarked.jpg',
                   text='www.mousevspython.com',
                   pos=(0, 0))
这里我们从 PIL 导入几个类: Image 、 ImageDraw 和 ImageFont 。然后我们创建一个函数, watermark_text ,它有四个参数:输入图像页面、输出图像路径、要添加到图像中的文本以及放置文本的位置坐标。
接下来,我们打开我们的形象。然后,我们基本上通过使用 ImageDraw 重新绘制图像来制作图像的副本。绘制方法。这使得我们可以更容易地向其中添加文本。然后我们使用 ImageFont.truetype 创建一个字体。该字体是 Pillow 库中包含的一种字体。我们也将字体大小设置为 40 磅。最后我们显示结果并保存到磁盘。结果如下:

现在让我们继续添加图像,而不仅仅是文本!
用图像加水印
大多数专业摄影师最终都会在他们的照片上打上商标。有时这包括他们网站的风格化“照片”版本。在 Pillow 中将一张照片添加到另一张照片也相当容易。让我们来看看怎么做吧!
在这个例子中,我们将使用我的一个标志作为水印图像。
from PIL import Image

def watermark_photo(input_image_path,
                    output_image_path,
                    watermark_image_path,
                    position):
    base_image = Image.open(input_image_path)
    watermark = Image.open(watermark_image_path)

    # add watermark to your image
    base_image.paste(watermark, position)
    base_image.show()
    base_image.save(output_image_path)

if __name__ == '__main__':
    img = 'lighthouse.jpg'
    watermark_with_photo(img, 'lighthouse_watermarked2.jpg',
                         'watermark.png', position=(0,0))
这里我们创建了一个与上一节中的函数非常相似的函数,但是我们没有传入文本,而是传入水印的文件路径。在该函数中,我们打开了我们想要水印的图像以及水印图像本身。然后,我们获取要添加水印的图像并调用它的 paste() 方法,同时传入我们想要粘贴的内容(即水印)和我们想要粘贴的位置。最后,我们显示图像并保存它。结果如下:

嗯,这并没有按照我预想的方式进行。正如你所看到的,有一个黑色的背景遮挡了很多照片,因为当我们粘贴它时,我们没有考虑到透明度。
用透明度给图像加水印
让我们创建一个新的函数,可以使用透明度,所以我们从水印中删除所有的黑色。我在 StackOverflow 上找到了这个问题的解决方案,所以我在这个例子中使用了它并稍微修改了一下
from PIL import Image

def watermark_with_transparency(input_image_path,
                                output_image_path,
                                watermark_image_path,
                                position):
    base_image = Image.open(input_image_path)
    watermark = Image.open(watermark_image_path)
    width, height = base_image.size

    transparent = Image.new('RGBA', (width, height), (0,0,0,0))
    transparent.paste(base_image, (0,0))
    transparent.paste(watermark, position, mask=watermark)
    transparent.show()
    transparent.save(output_image_path)

if __name__ == '__main__':
    img = 'lighthouse.jpg'
    watermark_with_transparency(img, 'lighthouse_watermarked3.jpg',
                                'watermark.png', position=(0,0))
在这段代码中,我们接受了与上一个例子中相同的所有参数。这一次,我们不仅打开了两幅图像,而且还获取了想要添加水印的图像的宽度和高度。然后,我们创建一个新的图像使用相同的宽度和高度的图像,我们是水印。你会注意到,我们创建的这个图像是 RGBA,这意味着它有红色,绿色和蓝色的阿尔法。接下来,我们粘贴在图像中,我们想水印从左上角开始,这是(0,0)。然后,我们使用传入的位置粘贴我们的水印,我们还用水印本身来屏蔽水印。最后我们显示并保存图像。
生成的图像如下所示:

很酷,是吧?
包扎
在这篇文章中,我们介绍了两种不同的给照片添加水印的方法。在第一个例子中,我们所做的只是将您选择的文本添加到图像中。第二个例子演示了一种添加图像水印的方法,但是它没有考虑 alpha(透明度)。我们用第三个例子纠正了这个问题。我希望这些例子对你有所帮助。编码快乐!
相关阅读
- StackOverflow: 如何将一张带有透明度的 PNG 图片粘贴到另一张没有白色像素的 PIL 图片上?
- 如何用 Python 调整照片大小
- 用 Python 将一张照片转换成黑白
- 如何用 Python 旋转/镜像照片
- 如何用 Python 裁剪照片


 2971
2971

 被折叠的 条评论
为什么被折叠?
被折叠的 条评论
为什么被折叠?
 到【灌水乐园】发言


