


好歌分享: 《怨苍天变了心》 谭晶(B站链接)(里面的戏曲腔很赞)
说在前面:
*caffe框架从编译到源码分析,其他框架大同小异
如何直观理解img2col?
*
一、编译caffe c++接口和python接口
Tips: 下面从基础的编译和运行例程开始,高级选手,请略过
- 下载caffe源码, 本文使用1.0 release版本
直接从 github下载源码,或用以下命令clone源码
git clone git@github.com:BVLC/caffe.git -b 1.0
- 开发环境准备
- 在公司中基本都是在docker中进行开发编译工作, 下面的步骤是从基本的ubuntu:18.04 开始
docker pull ubuntu:18.04                             #从dockerhub  拉取基础镜像
docker run -it ubuntu:18.04 bash                     #进入docker
apt-get update && apt-get install -y vim             #安装vim
- 换源, 一般使用清华源或者阿里源, 快的飞起哦
echo "deb http://mirrors.tuna.tsinghua.edu.cn/ubuntu/ bionic main restricted universe multiverse
deb http://mirrors.tuna.tsinghua.edu.cn/ubuntu/ bionic-updates main restricted universe multiverse
deb http://mirrors.tuna.tsinghua.edu.cn/ubuntu/ bionic-backports main restricted universe multiverse
deb http://mirrors.tuna.tsinghua.edu.cn/ubuntu/ bionic-security main restricted universe multiverse">/etc/apt/sources.list
apt update        # 换源后,update一下, 有时用https的源报错,换用http即可,一点问题没有
- 按照caffe的文档 docs/install_apt.md 中所述,安装依赖:
apt-get install -y libprotobuf-dev libleveldb-dev libsnappy-dev libopencv-dev libhdf5-serial-dev protobuf-compiler
apt-get install -y --no-install-recommends libboost-all-dev
apt-get install -y libgflags-dev libgoogle-glog-dev liblmdb-dev
apt-get install -y libopenblas-dev python-dev  python-pip
apt-get install -y cmake

#若不编译caffe python接口不必操作
#pip 换清华源
python -m pip install --upgrade pip -i https://pypi.tuna.tsinghua.edu.cn/simple
pip config set global.index-url https://pypi.tuna.tsinghua.edu.cn/simple
pip install -r python/requirements.txt        #安装caffe python接口依赖
-
若编译GPU版本的caffe,需要注意:
A. 需要安装cuda, 可按照nvidia官网操作即可
例如cuda11.2 安装步骤
安装完cuda后,使用nvidia-smi就可以看到你的gpu了
如果报“Failed to initialize NVML: Unknown Error”, 则启动docker时应该加上 “–runtime=nvidia --privileged” 两个参数
B. 报CUDA_cublas_device_LIBRARY 相关的错误,是cmake 版本太低的问题,升级即可解决
C. 编译时通常需要设置计算能力, 可以参考 《nvidia计算能力那些事儿》
D. 默认编译的caffe只能使用单卡训练,若想用多卡训练,则必须 安装 nccl 并且 打开NCCL选项 -DUSE_NCCL=ON
NCCL 与 cuda版本需要一致,服了, 去官网找即可, 按照步骤写的也很详细 -
另外要注意的是,一般在公司中都有预编译的protobuf、glog、opencv这种通用库,只需要在编译caffe时设置好路径即可,不用自己安装。
- 编译caffe 源码
-方案1:cmake 编译
# 很简单
mkdir build && cd build
cmake ..  -Dpython_version=2 -DCPU_ONLY=ON  -DCMAKE_INSTALL_PREFIX="./install"   -DProtobuf_LIBRARY=/usr/lib/x86_64-linux-gnu/libprotobuf.so  -DBLAS=open   **-DCMAKE_BUILD_TYPE=Debug**
make install
编译完成的c++ 接口和python接口:

-方案2: make编译
cp Makefile.config.example   Makefile.config
# 修改Makefile.config, 下面只列出需要修改的地方
###
CPU_ONLY := 1                  #测试目的,编译CPU版本的caffe
OPENCV_VERSION := 3            #打开opencv开关
BLAS := open                   #使用OpenBLAS库
BLAS_LIB := /usr/lib/x86_64-linux-gnu/openblas     #设置blas库目录
INCLUDE_DIRS := $(PYTHON_INCLUDE) /usr/local/include   \
/usr/include/hdf5/serial                           #设置HDF头文件目录
LIBRARY_DIRS := $(PYTHON_LIB) /usr/local/lib /usr/lib \
/usr/lib/x86_64-linux-gnu/hdf5/serial              #设置HDF库目录
BUILD_DIR := build                                 #不需要修改,  编译目录
PYTHON_INCLUDE := /usr/include/python2.7 \
		/usr/lib/python2.7/dist-packages/numpy/core/include \
		/usr/local/lib/python2.7/dist-packages/numpy/core/include    #编译python接口时需要能用到numpy/arrayobject.h 头文件
###

#执行编译, 编译caffe c++接口和python接口
make lib pycaffe  -j
编译生成的caffe c++库位于 build/lib目录下, 头文件在源码include目录:

编译生成的caffe python接口 位于python目录,_caffe.so只是个壳子,基本和是哪个所有功能仍在libcaffe.so中实现

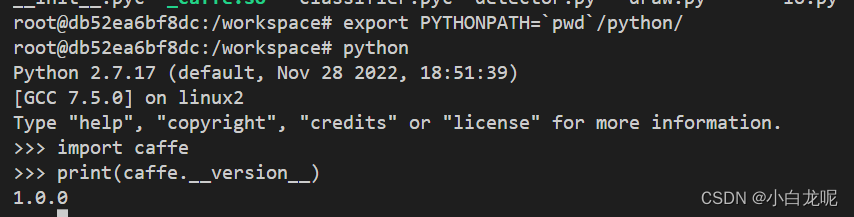
python 接口的使用:
二、运行例程
这里以以examples/cpp_classification 为例, 主要关注前向过程。
前面步骤中,已经编译生成例子程序:

- 按照 readme中所述,准备模型和数据
./scripts/download_model_binary.py models/bvlc_reference_caffenet
./data/ilsvrc12/get_ilsvrc_aux.sh
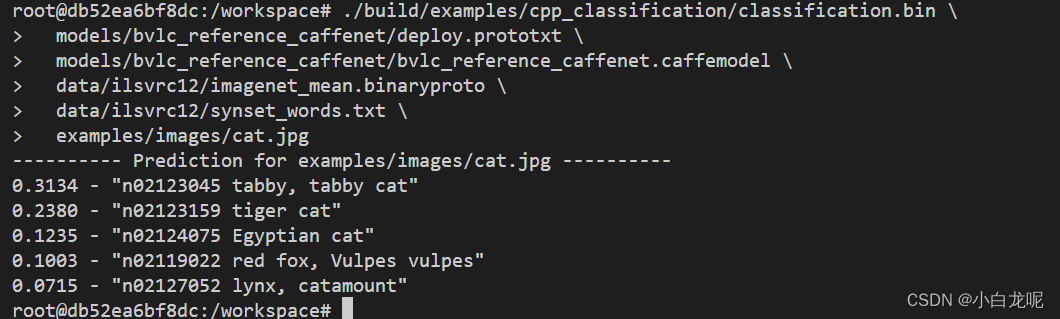
- 运行程序
./build/examples/cpp_classification/classification.bin \
  models/bvlc_reference_caffenet/deploy.prototxt \
  models/bvlc_reference_caffenet/bvlc_reference_caffenet.caffemodel \
  data/ilsvrc12/imagenet_mean.binaryproto \
  data/ilsvrc12/synset_words.txt \
  examples/images/cat.jpg
执行结果如下图所示:
ok, 到现在就可以使用gdb调试的办法,一步一步查看调用关系了。
其他的预训练模型可以从caffe ModelZoo下载
三、源码分析
3.1 先搞清网络前向流程
通过第二节的例程可以看出,一次前向主要包括4个步骤
- 加载模型
  /* Load the network. */
  std::shared_ptr<Net<float> > net_;
  net_.reset(new Net<float>(model_file, TEST));
  net_->CopyTrainedLayersFrom(trained_file);
- 设置模型输入
  Blob<float>* input_layer = net_->input_blobs()[0];
  // 注意下面两句,caffe在前向之前需要根据输入NCHW 对输入和模型进行reshape操作,分配内存
  input_layer->Reshape(1, num_channels_, input_geometry_.height, input_geometry_.width);
  /* Forward dimension change to all layers. */
  net_->Reshape();
  std::vector<cv::Mat> input_channels;
  WrapInputLayer(&input_channels);          //在函数内部对输入进行赋值
  {
  	Blob<float>* input_layer = net_->input_blobs()[0];
  	int width = input_layer->width();
  	int height = input_layer->height();
  	float* input_data = input_layer->mutable_cpu_data();          //向input_data赋值即可
  	.....
  }
- 前向计算
net_->Forward(); //没错,只需要调用一个API即可
- 获取输出数据
  /* Copy the output layer to a std::vector */
  Blob<float>* output_layer = net_->output_blobs()[0];
  const float* begin = output_layer->cpu_data();                  //输出数据指针
  const float* end = begin + output_layer->channels();
  return std::vector<float>(begin, end);
3.2 可见一切都围绕 Net 类展开
- Net就表示那个传说中的有向无环图
Net中包含了层Layer以及权重Blob, 与前向相关的主要类成员如下:
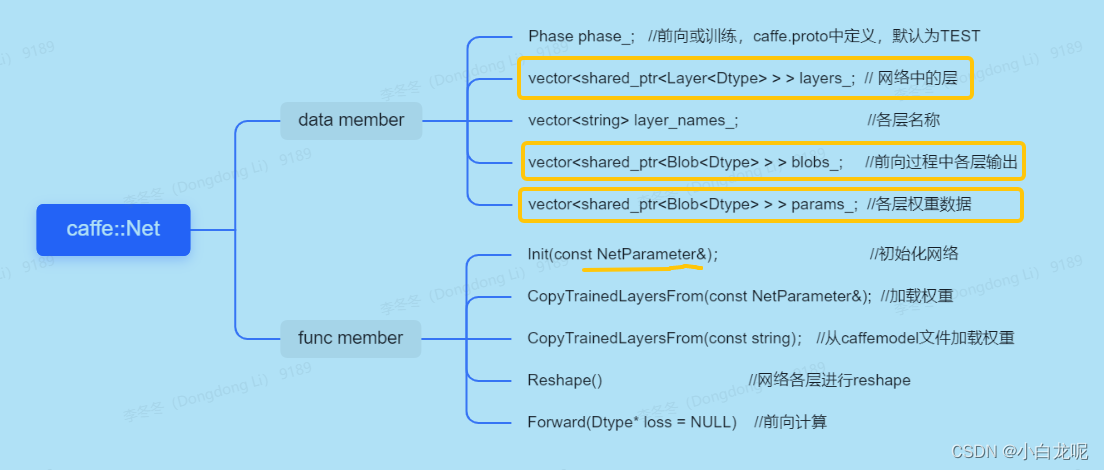
- 相关类
- NetParameter
在 caffe.proto 中定义。
目前我们可以理解 proto文件中定义的每个message都是一个类,我们只需要关注类的数据成员,类的序列化和反序列化由protobuf 实现
由定义可以看出NetParameter包含了网络名称、网络输入shape、网络中各层参数和权重数据,在搞清楚网络前向流程后,我们关心的大部分内容都在caffe.proto文件上,例如添加自定义算子,算子添加参数等等。
LayerParameter 中包含各层的输入、输出层名称,由此Net类就可以构建网络了。
message NetParameter {
  optional string name = 1;
  repeated string input = 3;
  repeated BlobShape input_shape = 8;
  repeated int32 input_dim = 4;
  optional NetState state = 6;
  repeated **LayerParameter** layer = 100;
  .......
}

message LayerParameter {
  optional string name = 1;
  optional string type = 2;
  repeated string **bottom** = 3;
  repeated string **top** = 4;
  optional Phase phase = 10;
  repeated float loss_weight = 5;
  repeated ParamSpec param = 6;
  repeated BlobProto blobs = 7;
  repeated NetStateRule include = 8;
  repeated NetStateRule exclude = 9;
  optional LossParameter loss_param = 101;
  optional BatchNormParameter batch_norm_param = 139;
  optional **ConvolutionParameter** convolution_param = 106;
  ............
}
- Layer
Layer是一个模板虚基类, BatchNormLayer、ConcatLayer、ConvolutionLayer等都是它的派生类
下面列出了Layer类的主要成员,有关caffe中层的创建过程和与之相关的类注册机制将在后文详述,这部分挺有意思的,买个关子先。
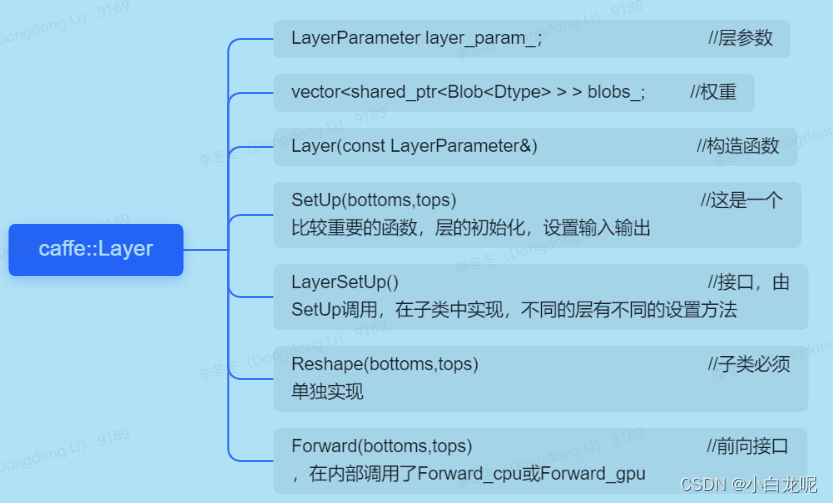
值得一提的是:Forward_gpu的默认实现是调用Forward_cpu,也就是说我们在派生类中实现前向计算时,若没有实现Forward_gpu函数,默认走的是CPU, Forward_cpu 是纯虚函数, 也就是说派生类必须实现该函数。
这就是为什么有的层只实现了Forward_cpu,在GPU上也能正常前向计算的原因,当真源码之前无秘密。
  /** @brief Using the CPU device, compute the layer output. */
  virtual void Forward_cpu(const vector<Blob<Dtype>*>& bottom, const vector<Blob<Dtype>*>& top) **= 0;**
  /**
   * @brief Using the GPU device, compute the layer output. Fall back to Forward_cpu() if unavailable.
   */
  virtual void Forward_gpu(const vector<Blob<Dtype>*>& bottom,
      const vector<Blob<Dtype>*>& top) {
    return Forward_cpu(bottom, top);
  }
- Blob
表示N维数据,是一个包装类,数据相关的操作委托给SyncedMemory实现。
主要是给上层提供了一些常用接口,没什么可说的,晕
template <typename Dtype>
class Blob{
......
void Reshape(const int num, const int channels, const int height, const int width);
void ReshapeLike(const Blob& other);
const Dtype* cpu_data() const;
void set_cpu_data(Dtype* data);
Dtype* mutable_cpu_data();
.....
shared_ptr<**SyncedMemory**> data_;
vector<int> shape_;
}
SyncedMemory 类主要负责根据设置分配内存, 后端可以是CPU 内存或者 GPU现存,主要的知识点是cuda编程,是比较大的一块内容,以后再说吧。
3.3 caffe模型加载过程
在Net类中:Init()函数解析 prototxt 构建网络,CopyTrainedLayersFrom()函数加载caffemodel权重,加载权重更多的是protobuf反序列化的过程,也有部分对网络的update,下面主要分析 Init() 函数
只摘录了与网络前向相关的主要步骤
// 根据 prototxt 构建caffe计算网络
template <typename Dtype>
void Net<Dtype>::Init(const NetParameter& in_param)
{
// 根据各层配置的规则NetStateRule和网络状态NetState过滤进行层过滤,比如前向时去除prototxt中Train的层
// 例如 官方 示例中的[Lenet](https://github.com/BVLC/caffe/blob/9b891540183ddc834a02b2bd81b31afae71b2153/examples/mnist/lenet_train_test.prototxt#L7)
FilterNet(in_param, &filtered_param);
// 插入split层(将数据复制N份),对于上层的一个输出需要对应下层多个输入的情况就需要将上一层的输出进行复制
InsertSplits(filtered_param, ¶m);
// 根据prototxt中的层参数,循环创建每个Layer
for (int layer_id = 0; layer_id < param.layer_size(); ++layer_id) {
// 根据type创建不同种类的Layer
layers_.push_back(LayerRegistry<Dtype>::CreateLayer(layer_param));
// get该层的所有输入名称, 处理该层时,它的输入层已经创建完毕了
// 这里是记录输入关系,并不会真正的创建LayerParameter 以及 Blob
for (int bottom_id = 0; bottom_id < layer_param.bottom_size();++bottom_id) {
AppendBottom(param, layer_id, bottom_id,&available_blobs, &blob_name_to_idx);
}
// get该层的所有输出, 创建和保存 LayerParameter、Blob, 真正new的地方 AppendTop
for (int top_id = 0; top_id < num_top; ++top_id) {
AppendTop(param, layer_id, top_id, &available_blobs, &blob_name_to_idx);
// 如果该层是输入层,保存网络输入层信息
if (layer_param.type() == "Input") {
const int blob_id = blobs_.size() - 1;
net_input_blob_indices_.push_back(blob_id);
net_input_blobs_.push_back(blobs_[blob_id].get());
}
}
// 到这里,该层已经连接到网络中,下面开始初始化该层,包括
layers_[layer_id]->SetUp(bottom_vecs_[layer_id], top_vecs_[layer_id]);
}
// 构建完 网络后,剩余的层都是输出层,保存网络输出层信息
for (set<string>::iterator it = available_blobs.begin(); it != available_blobs.end(); ++it) {
net_output_blobs_.push_back(blobs_[blob_name_to_idx[*it]].get());
net_output_blob_indices_.push_back(blob_name_to_idx[*it]);
}
}
从上面的源码可见,
- 构建网络的过程就是逐层解析prototxt的过程,prototext文件中层的顺序不能随便动哦。
- 另外,在AppendTop函数中会判断算子计算过程是否是in_place的,对于 element-wise 类型的操作通常都是in_place的,这种操作不需要分配新的Blob,直接复用前一层的输出即可,在caffe中 top和bottom名称相同的层都是这种类型。例如:
layer {
  name: "relu1"
  type: "ReLU"
  bottom: "ip1"
  top: "ip1"
}
四、类注册机制
深度学习中设计多种不同的算子
由此引出一个需求:要能够根据算子类型来实例化不同的算子,并且能够很方便的添加新的算子实现。
如果你是框架作者会如何实现呢?思考两分钟…
caffe 提供了一种类分散注册的方式来实现, 非常赏心悦目…值得学习
主要实现位于: layer_factory.hpp 中。
下面只摘录主要代码:
- LayerRegistry 就是一个存储 算子类型 与 相应算子构建方法 的仓库
LayerRegisterer 类负责向 仓库中注册
// Layer 仓库
template <typename Dtype>
class LayerRegistry {
 public:
  typedef shared_ptr<Layer<Dtype> > (*Creator)(const LayerParameter&);
  typedef std::map<string, Creator> CreatorRegistry;

  // 返回Layer仓库
  static CreatorRegistry& Registry() {}
  //注册, 即用map保存Layer 类型与创建该类型Layer接口指针 的对应关系
  static void AddCreator(const string& type, Creator creator);
  // 根据创建LayerParameter 创建 Layer
  static shared_ptr<Layer<Dtype> > CreateLayer(const LayerParameter&)
};


// Layer 注册类
template <typename Dtype>
class LayerRegisterer {
 public:
  LayerRegisterer(
      const string& type,
      shared_ptr<Layer<Dtype> > (*creator)(const LayerParameter&))
  {
    LayerRegistry<Dtype>::AddCreator(type, creator);
  }
};
- 接下来,caffe 定义了下面两个宏:
#define REGISTER_LAYER_CREATOR(type, creator)                                  \
  **static** LayerRegisterer<float> g_creator_f_##type(#type, creator<float>);     \
  **static** LayerRegisterer<double> g_creator_d_##type(#type, creator<double>)    \

// 首先定义一个算子构建函数,每种算子都有相应的构建函数
// 然后实例化两个static 类型的LayerRegisterer 对象
#define REGISTER_LAYER_CLASS(type)                                             \
  template <typename Dtype>                                                    \
  shared_ptr<Layer<Dtype> > Creator_##type##Layer(const LayerParameter& param) \
  {                                                                            \
    return shared_ptr<Layer<Dtype> >(new type##Layer<Dtype>(param));           \
  }                                                                            \
  REGISTER_LAYER_CREATOR(type, Creator_##type##Layer)
}
这里最重要的是 实例化 了全局的 static LayerRegisterer 对象,想想静态全局对象变量的特点…这样,在main()执行之前就已经完成了Layer的注册,大功告成。
有了这两个宏,在添加新的算子时,只需要在算子实现文件中添加如下语句就可以完成算子注册了,仓库即注册的代码是不需要修改的… 有没有被惊艳到?
REGISTER_LAYER_CLASS(BatchNorm);
五、 模型训练流程
按照 官网提供的 Lenet 进行训练。
- 准备训练数据和测试数据
cd $CAFFE_ROOT
# 下载 mnist 数据集
./data/mnist/get_mnist.sh
# mnist 数据集格式转换-》LMDB格式
./examples/mnist/create_mnist.sh
- 定义Lenet模型
构建一个protobuf格式的网络, 下面的网络即官网给出的Lenet
name: "LeNet"
layer {
  name: "mnist"
  type: "Data"
  top: "data"
  top: "label"
  include {
    phase: TRAIN
  }
  transform_param {
    scale: 0.00390625
  }
  data_param {
    source: "examples/mnist/mnist_train_lmdb"
    batch_size: 64
    backend: LMDB
  }
}
layer {
  name: "mnist"
  type: "Data"
  top: "data"
  top: "label"
  include {
    phase: TEST
  }
  transform_param {
    scale: 0.00390625
  }
  data_param {
    source: "examples/mnist/mnist_test_lmdb"
    batch_size: 100
    backend: LMDB
  }
}
layer {
  name: "conv1"
  type: "Convolution"
  bottom: "data"
  top: "conv1"
  param {
    lr_mult: 1
  }
  param {
    lr_mult: 2
  }
  convolution_param {
    num_output: 20
    kernel_size: 5
    stride: 1
    weight_filler {
      type: "xavier"
    }
    bias_filler {
      type: "constant"
    }
  }
}
layer {
  name: "pool1"
  type: "Pooling"
  bottom: "conv1"
  top: "pool1"
  pooling_param {
    pool: MAX
    kernel_size: 2
    stride: 2
  }
}
layer {
  name: "conv2"
  type: "Convolution"
  bottom: "pool1"
  top: "conv2"
  param {
    lr_mult: 1
  }
  param {
    lr_mult: 2
  }
  convolution_param {
    num_output: 50
    kernel_size: 5
    stride: 1
    weight_filler {
      type: "xavier"
    }
    bias_filler {
      type: "constant"
    }
  }
}
layer {
  name: "pool2"
  type: "Pooling"
  bottom: "conv2"
  top: "pool2"
  pooling_param {
    pool: MAX
    kernel_size: 2
    stride: 2
  }
}
layer {
  name: "ip1"
  type: "InnerProduct"
  bottom: "pool2"
  top: "ip1"
  param {
    lr_mult: 1
  }
  param {
    lr_mult: 2
  }
  inner_product_param {
    num_output: 500
    weight_filler {
      type: "xavier"
    }
    bias_filler {
      type: "constant"
    }
  }
}
layer {
  name: "relu1"
  type: "ReLU"
  bottom: "ip1"
  top: "ip1"
}
layer {
  name: "ip2"
  type: "InnerProduct"
  bottom: "ip1"
  top: "ip2"
  param {
    lr_mult: 1
  }
  param {
    lr_mult: 2
  }
  inner_product_param {
    num_output: 10
    weight_filler {
      type: "xavier"
    }
    bias_filler {
      type: "constant"
    }
  }
}
layer {
  name: "accuracy"
  type: "Accuracy"
  bottom: "ip2"
  bottom: "label"
  top: "accuracy"
  include {
    phase: TEST
  }
}
layer {
  name: "loss"
  type: "SoftmaxWithLoss"
  bottom: "ip2"
  bottom: "label"
  top: "loss"
}
- 定义求解器(solver)
其实就是一个protobuf 类型的配置文件,在文件中定义训练相关的超参,例如学习率、训练多少个epoch、是否使用GPU等等
# 待训练的模型
net: "examples/mnist/lenet_train_test.prototxt"
# 测试次数
test_iter: 100
# 每500轮训练执行一次测试
test_interval: 500
# 学习率、动量、权重衰减系数
base_lr: 0.01
momentum: 0.9
weight_decay: 0.0005
#学习率变化策略
lr_policy: "inv"
gamma: 0.0001
power: 0.75
# 每多少个iter 打印一次训练状态,我们每隔几次就得看一下loss嘛
display: 100
# 训练多少轮
max_iter: 10000
# 每训练多少次保存一次权重
snapshot: 5000
# 权重文件前缀, 训练后会保存类似   examples/mnist/lenet_iter_10000.caffemodel 文件
snapshot_prefix: "examples/mnist/lenet"
# 使用GPU训练
solver_mode: GPU
- 开始训练
若用GPU进行训练需要编译GPU版本的caffe,若用多个GPU进行训练需要打开NCCL开关,参考第一节中的编译部分。
./examples/mnist/train_lenet.sh
# 使用多GPU训练
./example/mnist/train_lenet.sh --gpu 1,2,3
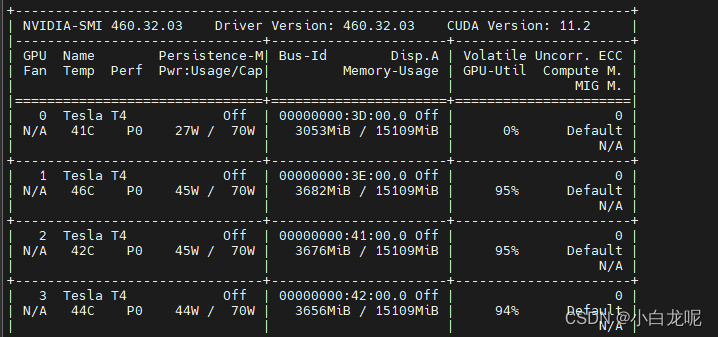
用GPU训练时,可以看到GPU使用率:
训练完成
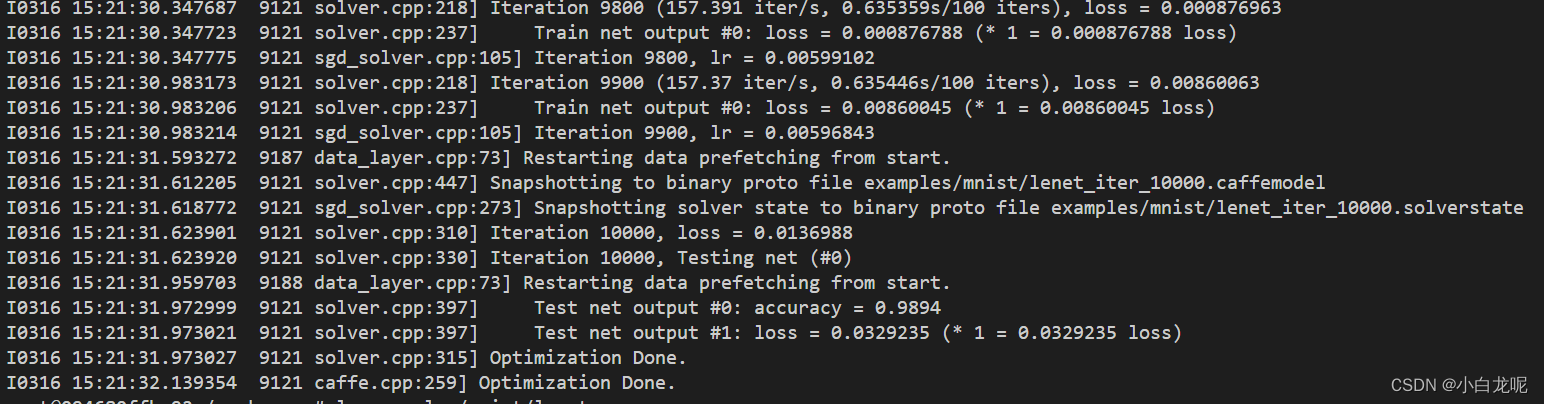
训练完成后,可以看到权重已经保存,大功告成。

六、 后记
- caffe 只支持gpu和cpu两种backends, 支持多后端的框架,同时多后端有的算子有交叉的情况,该怎样设计?
- 能力所限,难免有不足的地方,请批评指正
我搬砖,我快乐


 1万+
1万+


 被折叠的 条评论
为什么被折叠?
被折叠的 条评论
为什么被折叠?
 到【灌水乐园】发言


