


爆破物体
-
尽管绘制房子非常有趣,但我们不会经常这么做。这也是为什么我们接下来要继续深入,来爆破(Explode)物体!虽然这也是一个不怎么常用的东西,但是它能向你展示几何着色器的强大之处。
当我们说爆破一个物体时,我们并不是指要将宝贵的顶点集给炸掉,我们是要将每个三角形沿着法向量的方向移动一小段时间。效果就是,整个物体看起来像是沿着每个三角形的法线向量爆炸一样。爆炸三角形的效果在纳米装模型上看起来像是这样的:
-
因为每一个点的法线值和面的法线值是不一样的,所以我们要自己进行计算
过程(教程中的例子)
- 顶点着色器
#version 330 core
layout (location = 0) in vec3 aPos;
layout(location  = 1) in vec3 aNormal;
layout (location = 2) in vec2 aTexCoords;//纹理坐标

out VS_OUT {
    vec2 texCoords;
	vec3 normal;
} vs_out;
//这里使用了uniform 缓冲对象
layout (std140) uniform Matrices
{
    mat4 projection;
};
uniform mat4 view;
uniform mat4 model;

void main()
{
	vs_out.normal = mat3(transpose(inverse(model)))*aNormal;//因为旋转的时候法向量是要变的,考虑到等比例缩放这里需要给值(光照理论的部分也用到了)
    vs_out.texCoords = aTexCoords;
    gl_Position = projection * view * model * vec4(aPos, 1.0);
}
- 片段着色器
#version 330 core

out vec4 FragColor;
in vec2 TexCoords;
uniform sampler2D texture_diffuse1;

void main()
{
    FragColor = texture(texture_diffuse1, TexCoords);	//根据纹理坐标放到像素上
}
- 几何着色器:获取法向量函数
#version 330 core
layout (triangles) in;
layout (triangle_strip, max_vertices = 3) out;

in VS_OUT {
    vec2 texCoords;
		vec3 normal;
} gs_in[];

out vec2 TexCoords;

uniform float time;

//根据时间来计算新的位置
vec4 explode(vec4 position, vec3 normal)
{
    float magnitude = 2.0;
    vec3 direction = normal * ((sin(time) + 1.0) / 2.0) * magnitude;
    return position + vec4(direction, 0.0);	//返回新的位置
}

//获取法向量函数
//因为每一个点的法线值和面的法线值是不一样的,所以我们要自己进行计算
vec3 GetNormal()
{
	//3个点,通过右手法则来进行计算
    vec3 a = vec3(gl_in[0].gl_Position) - vec3(gl_in[1].gl_Position);
    vec3 b = vec3(gl_in[2].gl_Position) - vec3(gl_in[1].gl_Position);
    return normalize(cross(b, a));
}

void main() {

	//一个一个点来进行计算位置的值和颜色,然后发布褚图元
    vec3 normal = -GetNormal();
	//normal=-gs_in[0].normal;	//看一下使用点的法向有什么不同
    gl_Position = explode(gl_in[0].gl_Position, normal);
    TexCoords = gs_in[0].texCoords;
    EmitVertex();
	//normal=-gs_in[1].normal;
    gl_Position = explode(gl_in[1].gl_Position, normal);
    TexCoords = gs_in[1].texCoords;
    EmitVertex();
	//normal=-gs_in[2].normal;
    gl_Position = explode(gl_in[2].gl_Position, normal);
    TexCoords = gs_in[2].texCoords;
    EmitVertex();
    EndPrimitive();
}
- 主函数
int main()
{
GLFWwindow* window=init();
Shader skyboxShader("skybox.vert","skybox.frag");
Shader geoShader("geometry_shader.vert", "geometry_shader.frag", "geometry_shader.glsl");//这里不适用cube进行着色
//glPolygonMode(GL_FRONT_AND_BACK,/*GL_FILL*/GL_LINE);
glfwSetScrollCallback(window,scroll_callback);
glEnable(GL_DEPTH_TEST);
glEnable(GL_STENCIL_TEST);
glStencilOp(GL_KEEP,GL_KEEP,GL_REPLACE);
//glEnable(GL_PROGRAM_POINT_SIZE);
Model ourModel("D:/openGLResource/bin/nanosuit/nanosuit.obj");
_models.insert(pair<string,pair<glm::vec3,Model>>("Zhang3",pair<glm::vec3,Model>(cubePositions[0],ourModel)));
_models["Li4"]=pair<glm::vec3,Model>(cubePositions[2],ourModel);
unsigned int skyboxVAO, skyboxVBO;
glGenVertexArrays(1, &skyboxVAO);
glGenBuffers(1, &skyboxVBO);
glBindVertexArray(skyboxVAO);
glBindBuffer(GL_ARRAY_BUFFER, skyboxVBO);
glBufferData(GL_ARRAY_BUFFER, sizeof(skyboxVertices), &skyboxVertices, GL_STATIC_DRAW);
glEnableVertexAttribArray(0);
glVertexAttribPointer(0, 3, GL_FLOAT, GL_FALSE, 3 * sizeof(float), (void*)0);
vector<std::string> faces;
faces.push_back("skybox/right.jpg");
faces.push_back("skybox/left.jpg");
faces.push_back("skybox/top.jpg");
faces.push_back("skybox/bottom.jpg");
faces.push_back("skybox/front.jpg");
faces.push_back("skybox/back.jpg");
unsigned int cubemapTexture=loadCubemap(faces);
unsigned int uboExampleBlock;
glGenBuffers(1, &uboExampleBlock);
glBindBuffer(GL_UNIFORM_BUFFER, uboExampleBlock);
glBufferData(GL_UNIFORM_BUFFER, sizeof(glm::mat4), NULL, GL_STATIC_DRAW); // 分配152字节的内存
glBindBuffer(GL_UNIFORM_BUFFER, 0);
glBindBufferRange(GL_UNIFORM_BUFFER, 0, uboExampleBlock, 0, sizeof(glm::mat4));
while(!glfwWindowShouldClose(window))
{
currentFrame=glfwGetTime();
deltaTime=currentFrame-lastFrame;
lastFrame=currentFrame;
processInput(window);
float radius=10.0f;
float camX=sin(glfwGetTime())*radius;
float camZ=cos(glfwGetTime())*radius;
glClearColor(0.2f, 0.3f, 0.3f, 1.0f);
glClear(GL_COLOR_BUFFER_BIT|GL_DEPTH_BUFFER_BIT|GL_STENCIL_BUFFER_BIT);
glm::mat4 trans=glm::mat4(1.0f);
model=glm::mat4(1.0f);
view=glm::mat4(1.0f);
view=camera.GetViewMatrix();
projection=glm::mat4(1.0f);;
projection=glm::perspective(glm::radians(camera.fov),800.0f/600.0f,near,far);
//深度缓冲处理
glBindBuffer(GL_UNIFORM_BUFFER, uboExampleBlock);
glBufferData(GL_UNIFORM_BUFFER, sizeof(glm::mat4), &projection, GL_STATIC_DRAW);
glBindBuffer(GL_UNIFORM_BUFFER, 0);
//给几何着色器的shader传值
geoShader.useShader();
geoShader.setMat4("view",view);
geoShader.setFloat("time", glfwGetTime());
for(_modelsIter=_models.begin();_modelsIter!=_models.end();_modelsIter++)
{
model=glm::translate(trans,_modelsIter->second.first);
model=glm::rotate(model,(float)glfwGetTime(),glm::vec3(0.0f,1.0f,0.0f));
geoShader.useShader();
geoShader.setMat4("model",model);
_modelsIter->second.second.Draw(geoShader);
}
glDepthFunc(GL_LEQUAL);
skyboxShader.useShader();
view=glm::mat4(glm::mat3(camera.GetViewMatrix()));
skyboxShader.setMat4("view",view);
//skyboxShader.setMat4("projection",projection);
glBindVertexArray(skyboxVAO);
glBindTexture(GL_TEXTURE_CUBE_MAP,cubemapTexture);
glDrawArrays(GL_TRIANGLES,0,36);
glDepthFunc(GL_LESS);
glBindVertexArray(0);
glfwPollEvents();
glfwSwapBuffers(window);
}
//退出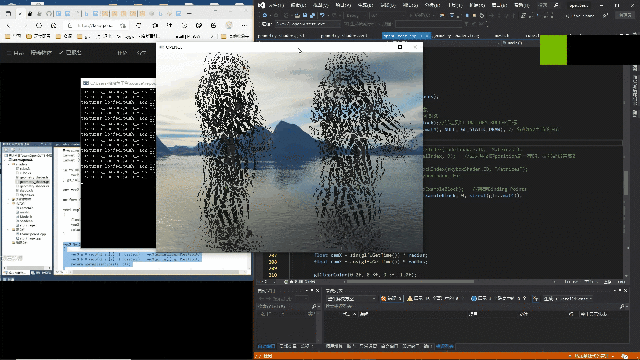
glfwTerminate();
return 0;
}
- 效果


 9356
9356

 被折叠的 条评论
为什么被折叠?
被折叠的 条评论
为什么被折叠?
 到【灌水乐园】发言


