


Introduction
We want to connect the stadium type with images as is typically done with products; i.e. the same image has to be available in different formats.
For example, a small image for a basket overview, a medium one for search pages, and a large one for details pages.
We provide the basic implementation in this trail. It is a simple task for you to provide the needed images to either the stadium
listing or the stadium details view.
The two different scaled images should be managed with an asset represented by a MediaContainer.
Preparation
If you are using Windows or Linux, the necessary binaries of ImageMagick are already bundeled with the mediaconversion extension,
and there's no need for a separate installation for this trail. You need to only check the prerequisites in ImageMagick - Integration Guide
for ImageMagick. If you are using Mac, you should install ImageMagick; the specific instructions for each operating system
is in ImageMagick - Integration Guide.
Next, enable mediaconversion extension:
Run ant clean all, and don't forget to update the system including Project data from mediaconversion plus sampledata:


Finally, add the new extension to your Eclipse workspace.
---
Modelling the Stadium asset
As mentioned above, we want to model the asset using a MediaContainer. Logically, a Media Container holds all Media items that are different formats of one particular Media item. Add this new attribute to the Stadium type:
<attribute qualifier="stadiumImage" type="MediaContainer" >
    <persistence type="property"/>
</attribute>
Do an ant all and Sytem update -> Update running system.
MediaContainer
and
Media
are catalog-aware. We will have to take this into account later.
From now on, we can assign a MediaContainer to a Stadium (e.g. in the hmc).
But considering our goal of having different scaled Media for different pages,
we will have a Controller decide which Media to take from the MediaContainer.
Hence we have to determine compulsory MediaFormats assigned to the Media inside the MediaContainer.
Media Conversion
Define Media Formats
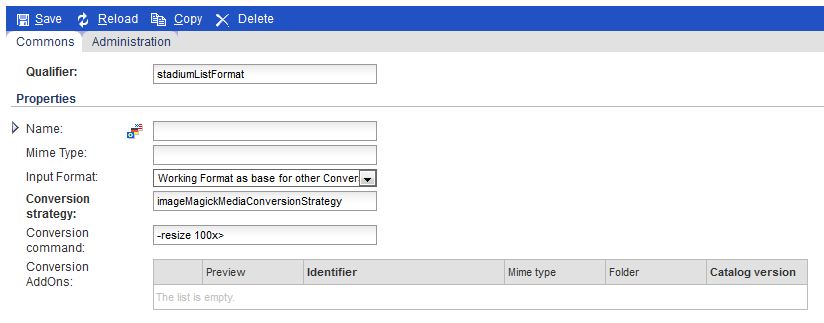
Go to the hmc and then to the Media section:1.Create new ConversionFormats
2.One for the listview.
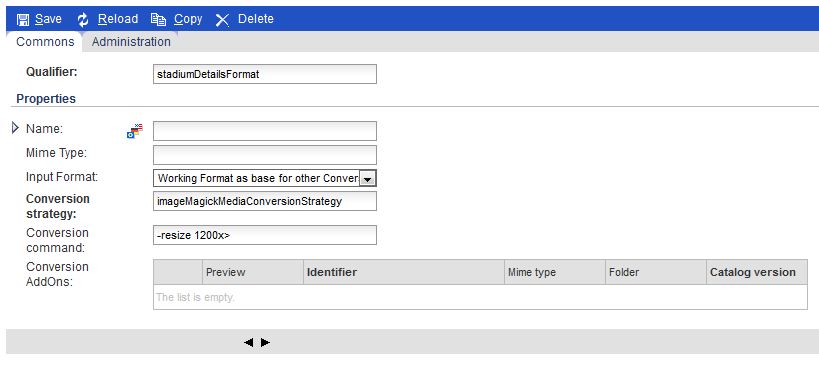
3.Andd one for the detailview.
----
=====
Both ConversionMediaFormats refer to a conversion strategy set up in the Spring configuration. The default value which we will adopt isimageMagickMediaConversionStrategy. Further we specify the input format for media conversion:
We take the Working Format as base for other Conversion MediaFormats which is part of the sampledata.
For the conversion command, we specify -resize 100x> and -resize 1200x>.
In the former case the format requires a width resizing to 100px in the latter case a resizing to 1200px. Find more information on commands here.
Define a ConversionGroup
A ConversionGroup holds different ConversionMediaFormats.
1.Create a new conversion group
2.Add the two conversionFormats
Create Stadium Media Files
Download the following three files and copy them to resources/cuppytrail/media/.
The images have a resolution of 1920x1280.
--- Next we need to create Media Items. We do this with ImpEx in the Import Console in the hac.
$catalogVersion=catalogVersion(catalog(id[default='Default']),version[default='Staged'])[unique=true];

INSERT_UPDATE Media;code[unique=true];$catalogVersion; mime;realfilename;mediaFormat(qualifier);@media[translator=de.hybris.platform.impex.jalo.media.MediaDataTranslator][forceWrite=true];
;beachStadium;;image/jpeg;nature_work.jpg;Default-WorkingFormat;jar:de.hybris.platform.cuppytrail.jalo.CuppytrailManager&/cuppytrail/media/nature_work.jpg;
;cityStadium;;image/jpeg;city_work.jpg;Default-WorkingFormat;jar:de.hybris.platform.cuppytrail.jalo.CuppytrailManager&/cuppytrail/media/city_work.jpg;
;discoStadium;;image/jpeg;nightlife_work.jpg;Default-WorkingFormat;jar:de.hybris.platform.cuppytrail.jalo.CuppytrailManager&/cuppytrail/media/nightlife_work.jpg;
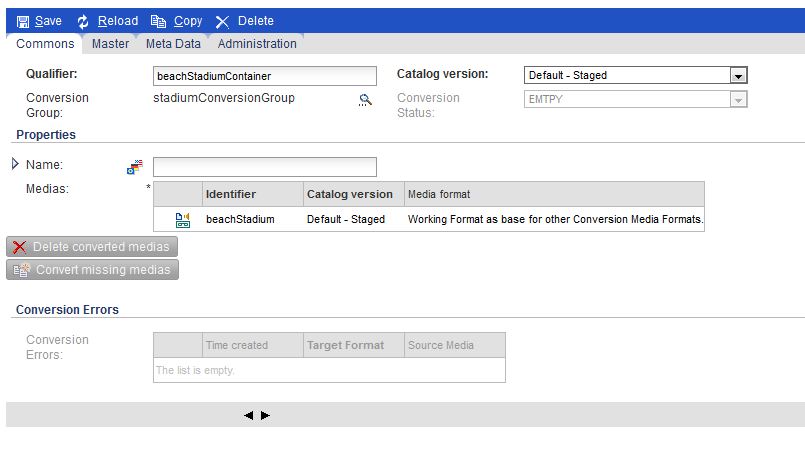
Create a sample MediaContainer
Now it's time to create a MediaContainer (e.g. for a beachstadium) and assign the ConversionGroup and the working Media to it.
We will do this again in the hmc:
1.Create a new MediaContainer.
2.Create a beachStadiumContainer.
3.Assign the working media to it.
----
Now we can convert the missing medias. Save the container and click on the Convert missing medias button.
Repeat the above steps for city (as cityStadiumContainer) and disco (as discoStadiumContainer).
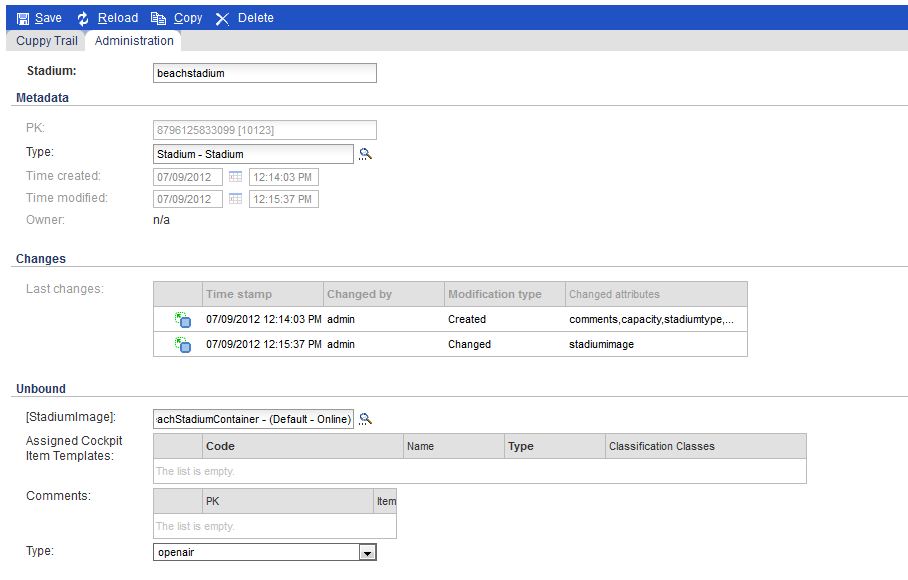
Assign the MediaContainer to a stadium
Before creating a new stadium we should think about the catalog-awareness of the MediaContainer and Media items.
The sample MediaContainer from the last section comes from the staged catalog version of our Default catalog. It might be a good idea to assign an online catalog version MediaContainer to a Stadium. Thus we can work on a staging backend without affecting the frontend. To do so, we synchronize the staging version of the Default catalog:
Select Catalog->Catalog Management Tools->Synchronization from the hmc and click on start:
Create a new stadium beachstadium and assign the MediaContainer to it.
ImpEx'ing the previous steps
We would now like to manifest the manual configuration we did in the hmc and provide a proper projectdata script. Here it is:
$lang=en
$catalogVersion=catalogVersion(catalog(id[default='Default']),version[default='Staged'])[unique=true];

INSERT_UPDATE ConversionMediaFormat;qualifier[unique=true];inputFormat(qualifier);conversion
;stadiumListFormat;Default-WorkingFormat;-resize 100x>
;stadiumDetailsFormat;Default-WorkingFormat;-resize 1200x>

INSERT_UPDATE ConversionGroup;code[unique=true];supportedFormats(qualifier)
;stadiumConversionGroup;stadiumListFormat,stadiumDetailsFormat

INSERT_UPDATE MediaContainer;qualifier[unique=true];$catalogVersion;conversionGroup(code)
;beachStadiumContainer;;stadiumConversionGroup
;beachStadiumContainer;Default:Online;stadiumConversionGroup
;cityStadiumContainer;;stadiumConversionGroup
;cityStadiumContainer;Default:Online;stadiumConversionGroup
;discoStadiumContainer;;stadiumConversionGroup
;discoStadiumContainer;Default:Online;stadiumConversionGroup

INSERT_UPDATE Media;code[unique=true];mediaContainer(qualifier,$catalogVersion);$catalogVersion; mime;realfilename;mediaFormat(qualifier);@media[translator=de.hybris.platform.impex.jalo.media.MediaDataTranslator][forceWrite=true];
;beachStadium;beachStadiumContainer;;image/jpeg;nature_work.jpg;Default-WorkingFormat;jar:de.hybris.platform.cuppytrail.jalo.CuppytrailManager&/cuppytrail/media/nature_work.jpg;
;cityStadium;cityStadiumContainer;;image/jpeg;city_work.jpg;Default-WorkingFormat;jar:de.hybris.platform.cuppytrail.jalo.CuppytrailManager&/cuppytrail/media/city_work.jpg;
;discoStadium;discoStadiumContainer;;image/jpeg;nightlife_work.jpg;Default-WorkingFormat;jar:de.hybris.platform.cuppytrail.jalo.CuppytrailManager&/cuppytrail/media/nightlife_work.jpg;

INSERT_UPDATE MediaConversionCronJob;code[unique=true];$catalogVersion;job(code);includedFormats(qualifier);sessionLanguage(isoCode[default=$lang])
;cuppytrailMediaConversionCronJob;;mediaConversionJob;stadiumListFormat,stadiumDetailsFormat;

INSERT_UPDATE CatalogVersionSyncCronJob; code[unique=true];job(code);sessionLanguage(isoCode[default=$lang]);logToFile[default=false];logToDataBase[default=false];forceUpdate[default=false]
;cuppytrailMediaSyncCronJob;Sync Default\:Staged -> Default\:Online;

#% import de.hybris.platform.core.Registry
#% import de.hybris.platform.servicelayer.cronjob.CronJobService
#% CronJobService cronJobService = Registry.getApplicationContext().getBean("cronJobService")
#% cronJobService.performCronJob(cronJobService.getCronJob("cuppytrailMediaConversionCronJob"),true)
#% cronJobService.performCronJob(cronJobService.getCronJob("cuppytrailMediaSyncCronJob"),true)

INSERT_UPDATE Stadium;code[unique=true];capacity;stadiumImage(qualifier,$catalogVersion)
;beachstadium;20000;beachStadiumContainer::Online
;citystadium;60000;cityStadiumContainer::Online
;discostadium;5000;discoStadiumContainer::Online
Providing the code
Having gone through the DAO, Services, Facades and Frontend trail you will probably have a good understanding of the necessary steps.
The rough idea is that the StadiumsController tells the StadiumFacade the required format which itself will delegate the call to an appropriate service.
The Service
Add a new definition to StadiumService


 1131
1131

 被折叠的 条评论
为什么被折叠?
被折叠的 条评论
为什么被折叠?
 到【灌水乐园】发言


