


Unity3D 游戏引擎之FBX模型的载入与人物行走动画的播放
雨松MOMO原创文章如转载,请注明:转载至我的独立域名博客雨松MOMO程序研究院,原文地址:http://www.xuanyusong.com/archives/532
3D 世界中自定义模型的使用恐怕是重中之重,因为系统自身提供的模型肯定是无法满足GD对游戏的策划,所以为了让游戏更加绚丽,我们须要调用美术制作的精品模型与动画,本章MOMO将带领盆友们学习Unity3D中模型的载入与动画的播放,哇咔咔~~
由于MOMO手头上没有现成的模型,所以我将在Unity3D 官网中下载官方提供的游戏DEMO 中的模型来使用。另外官方提供了很多Unity3D 游戏DEMO,与详细的文档。可以帮助我们学习Unity.有兴趣的盆友可以去看看哈。
下载页面:http://unity3d.com/support/resources/
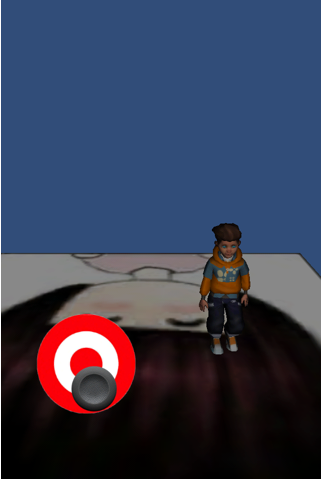
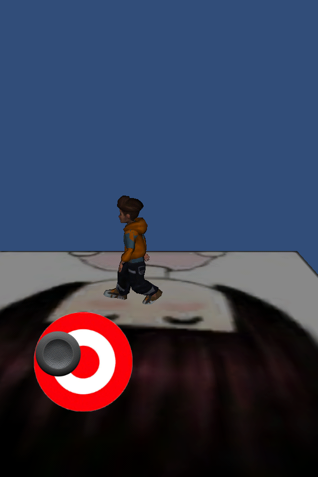
本章博文的目的是利用上一章介绍的游戏摇杆来控制人物模型的移动,与行走动画的播放。
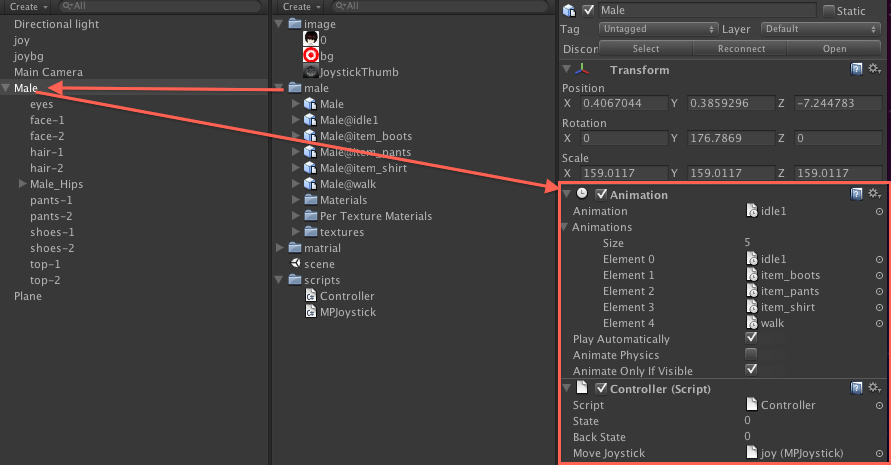
如上图所示Create中的文件夹male中存放着模型动画与贴图等,这个应该是美术提供给我们的。然后将整个male用鼠标拖动到左侧3D世界中,通过移动,旋转,缩放将人物模型放置在一个理想的位置。右侧红框内设置模型动画的属性。
Animation
idle1 该模型默认动画名称为idle1
Animations
size 该模型动画的数量
Element 该模型的动画名称
Play Automatically 是否自动播放
Animation Physics 是否设置该模型物理碰撞
Animation Only if Visable 是否设置该模型仅自己显示
给该模型绑定一个脚本Controller.cs 用来接收摇杆返回的信息更新模型动画。
Controller.cs
using UnityEngine;
using System.Collections;


public class Controller : MonoBehaviour {

	//人物的行走方向状态
	public const int HERO_UP= 0;
	public const int HERO_RIGHT= 1;
	public const int HERO_DOWN= 2;
	public const int HERO_LEFT= 3;

	//人物当前行走方向状态
	public int state = 0;

	//备份上一次人物当前行走方向状态
	//这里暂时没有用到
	public int backState = 0;

	//游戏摇杆对象
	public MPJoystick moveJoystick;

	//这个方法只调用一次,在Start方法之前调用
	public void Awake() {

	}

	//这个方法只调用一次,在Awake方法之后调用
	void Start () {
		state = HERO_DOWN;
	}


	void Update () {

	//获取摇杆控制的方向数据 上一章有详细介绍
    float touchKey_x =  moveJoystick.position.x;
    float touchKey_y =  moveJoystick.position.y;


    if(touchKey_x == -1){
       setHeroState(HERO_LEFT);

    }else if(touchKey_x == 1){
       setHeroState(HERO_RIGHT);

    }

    if(touchKey_y == -1){
        setHeroState(HERO_DOWN);

    }else if(touchKey_y == 1){
    	setHeroState(HERO_UP);
    }

	if(touchKey_x == 0 && touchKey_y ==0){
		//松开摇杆后播放默认动画,
		//不穿参数为播放默认动画。
		animation.Play();
	}


	}

	public void setHeroState(int newState)
	{

		//根据当前人物方向 与上一次备份方向计算出模型旋转的角度
		int rotateValue = (newState - state) * 90;
		Vector3 transformValue = new Vector3();

		//播放行走动画
		animation.Play("walk");

		//模型移动的位移的数值
		switch(newState){
			case HERO_UP:
				transformValue = Vector3.forward * Time.deltaTime;
			break;
			case HERO_DOWN:
				transformValue = -Vector3.forward * Time.deltaTime;
			break;
			case HERO_LEFT:
				transformValue = Vector3.left * Time.deltaTime;

			break;
			case HERO_RIGHT:
				transformValue = -Vector3.left * Time.deltaTime;
			break;
		}


        //模型旋转
		transform.Rotate(Vector3.up, rotateValue);

		//模型移动
		transform.Translate(transformValue, Space.World);

		backState = state;
		state = newState;

	}

}
上一章介绍了javaScript脚本使用游戏摇杆的方法,本章MOMO告诉大家使用C#脚本来使用游戏摇杆,上面我用 Controller.cs C#脚本来接收系统提供的Joystick.js是肯定无法使用的,须要修改成.cs文件,我在国外的一个网站上看到了一个老外帮我们已经修改了,那么我将他修改后的代码贴出来方便大家学习,有兴趣的朋友可以研究研究。哇咔咔~
MPJoystick.cs
using UnityEngine;

/**

 * File: MPJoystick.cs

 * Author: Chris Danielson of (monkeyprism.com)

 *

// USED TO BE: Joystick.js taken from Penelope iPhone Tutorial

//

// Joystick creates a movable joystick (via GUITexture) that

// handles touch input, taps, and phases. Dead zones can control

// where the joystick input gets picked up and can be normalized.

//

// Optionally, you can enable the touchPad property from the editor

// to treat this Joystick as a TouchPad. A TouchPad allows the finger

// to touch down at any point and it tracks the movement relatively

// without moving the graphic

*/
[RequireComponent(typeof(GUITexture))]

public class MPJoystick : MonoBehaviour

{

class Boundary {

public Vector2 min = Vector2.zero;

public Vector2 max = Vector2.zero;

}
private static MPJoystick[] joysticks;	 // A static collection of all joysticks

private static bool enumeratedJoysticks = false;

private static float tapTimeDelta = 0.3f;	 // Time allowed between taps
public bool touchPad;

public Vector2 position = Vector2.zero;

public Rect touchZone;

public Vector2 deadZone = Vector2.zero;	 // Control when position is output

public bool normalize = false; // Normalize output after the dead-zone?

public int tapCount;

private int lastFingerId = -1;	 // Finger last used for this joystick

private float tapTimeWindow;	 // How much time there is left for a tap to occur

private Vector2 fingerDownPos;

//private float fingerDownTime;

//private float firstDeltaTime = 0.5f;
private GUITexture gui;

private Rect defaultRect;	 // Default position / extents of the joystick graphic

private Boundary guiBoundary = new Boundary();	 // Boundary for joystick graphic

private Vector2 guiTouchOffset;	 // Offset to apply to touch input

private Vector2 guiCenter;	 // Center of joystick
void Start() {

gui = (GUITexture)GetComponent(typeof(GUITexture));
defaultRect = gui.pixelInset;

defaultRect.x += transform.position.x * Screen.width;// + gui.pixelInset.x; // -  Screen.width * 0.5;

    	defaultRect.y += transform.position.y * Screen.height;// - Screen.height * 0.5;
transform.position = Vector3.zero;
if (touchPad) {

// If a texture has been assigned, then use the rect ferom the gui as our touchZone

if ( gui.texture )

touchZone = defaultRect;

} else {

guiTouchOffset.x = defaultRect.width * 0.5f;

guiTouchOffset.y = defaultRect.height * 0.5f;
// Cache the center of the GUI, since it doesn't change

guiCenter.x = defaultRect.x + guiTouchOffset.x;

guiCenter.y = defaultRect.y + guiTouchOffset.y;
// Let's build the GUI boundary, so we can clamp joystick movement

guiBoundary.min.x = defaultRect.x - guiTouchOffset.x;

guiBoundary.max.x = defaultRect.x + guiTouchOffset.x;

guiBoundary.min.y = defaultRect.y - guiTouchOffset.y;

guiBoundary.max.y = defaultRect.y + guiTouchOffset.y;

}

}
public Vector2 getGUICenter() {

return guiCenter;

}
void Disable() {

gameObject.active = false;

//enumeratedJoysticks = false;

}
private void ResetJoystick() {

gui.pixelInset = defaultRect;

lastFingerId = -1;

position = Vector2.zero;

fingerDownPos = Vector2.zero;

}
private bool IsFingerDown() {

return (lastFingerId != -1);

}
public void LatchedFinger(int fingerId) {

// If another joystick has latched this finger, then we must release it

if ( lastFingerId == fingerId )

ResetJoystick();

}
void Update() {

if (!enumeratedJoysticks) {

// Collect all joysticks in the game, so we can relay finger latching messages

joysticks = (MPJoystick[])FindObjectsOfType(typeof(MPJoystick));

enumeratedJoysticks = true;

}
int count = Input.touchCount;
if ( tapTimeWindow > 0 )

tapTimeWindow -= Time.deltaTime;

else

tapCount = 0;
if ( count == 0 )

ResetJoystick();

else

{

for(int i = 0; i < count; i++) {

Touch touch = Input.GetTouch(i);

Vector2 guiTouchPos = touch.position - guiTouchOffset;
bool shouldLatchFinger = false;

if (touchPad) {

if (touchZone.Contains(touch.position))

shouldLatchFinger = true;

}

else if (gui.HitTest(touch.position)) {

shouldLatchFinger = true;

}
// Latch the finger if this is a new touch

if (shouldLatchFinger && (lastFingerId == -1 || lastFingerId != touch.fingerId )) {
if (touchPad) {

//gui.color.a = 0.15;

lastFingerId = touch.fingerId;

//fingerDownPos = touch.position;

//fingerDownTime = Time.time;

}
lastFingerId = touch.fingerId;


// Accumulate taps if it is within the time window

if ( tapTimeWindow > 0 )

tapCount++;

else {

tapCount = 1;

tapTimeWindow = tapTimeDelta;

}
// Tell other joysticks we've latched this finger

//for (  j : Joystick in joysticks )

foreach (MPJoystick j in joysticks) {

if (j != this)

j.LatchedFinger( touch.fingerId );

}

}
if ( lastFingerId == touch.fingerId ) {

// Override the tap count with what the iPhone SDK reports if it is greater

// This is a workaround, since the iPhone SDK does not currently track taps

// for multiple touches

if ( touch.tapCount > tapCount )

tapCount = touch.tapCount;
if ( touchPad ) {

// For a touchpad, let's just set the position directly based on distance from initial touchdown

position.x = Mathf.Clamp( ( touch.position.x - fingerDownPos.x ) / ( touchZone.width / 2 ), -1, 1 );

position.y = Mathf.Clamp( ( touch.position.y - fingerDownPos.y ) / ( touchZone.height / 2 ), -1, 1 );

} else {

// Change the location of the joystick graphic to match where the touch is

Rect r = gui.pixelInset;

r.x =  Mathf.Clamp( guiTouchPos.x, guiBoundary.min.x, guiBoundary.max.x );

r.y =  Mathf.Clamp( guiTouchPos.y, guiBoundary.min.y, guiBoundary.max.y );

gui.pixelInset = r;

}
if (touch.phase == TouchPhase.Ended || touch.phase == TouchPhase.Canceled)

ResetJoystick();

}

}

}
if (!touchPad) {

// Get a value between -1 and 1 based on the joystick graphic location

position.x = ( gui.pixelInset.x + guiTouchOffset.x - guiCenter.x ) / guiTouchOffset.x;

position.y = ( gui.pixelInset.y + guiTouchOffset.y - guiCenter.y ) / guiTouchOffset.y;

}
// Adjust for dead zone

var absoluteX = Mathf.Abs( position.x );

var absoluteY = Mathf.Abs( position.y );


if (absoluteX < deadZone.x) {

// Report the joystick as being at the center if it is within the dead zone

position.x = 0;

}

else if (normalize) {

// Rescale the output after taking the dead zone into account

position.x = Mathf.Sign( position.x ) * ( absoluteX - deadZone.x ) / ( 1 - deadZone.x );

}
if (absoluteY < deadZone.y) {

// Report the joystick as being at the center if it is within the dead zone

position.y = 0;

}

else if (normalize) {

// Rescale the output after taking the dead zone into account

position.y = Mathf.Sign( position.y ) * ( absoluteY - deadZone.y ) / ( 1 - deadZone.y );

}
}
}
导出 build and run 看看在iPhone 上的效果,通过触摸游戏摇杆可以控制人物的上,下,左,右 ,左上,右上,左下,右下 8个方向的移动啦,不错吧,哇咔咔~~
最后欢迎各位盆友可以和MOMO一起讨论Unity3D游戏开发,本来昨天就想发表这篇文章,结果晚上去打高尔夫球连挥N杆,打的回家后浑身酸痛,回家就睡觉啦~希望大家在学习的同时别忘了多运动。哇咔咔~~~ 附上Unity3D工程的下载地址,Xcode项目我就不上传了,须要的自己导出。
下载地址:http://www.xuanyusong.com/archives/532


 196
196

 被折叠的 条评论
为什么被折叠?
被折叠的 条评论
为什么被折叠?
 到【灌水乐园】发言


