


AlexNet
AlexNet是在2012年由多伦多大学的Alex Krizhevsky等人提出的,其在ImageNet竞赛中以巨大的优势取得了冠军,也因此拉开了深度学习的大幕,在该网络之后,人们逐渐向卷积神经网络和深度学习投入关注,也造就了现在深度学习及CNN的火热。下面我们就一起来认识一下这个网络。
AlexNet的网络结构
AlexNet网络结构继承了LeNet,都是先卷积然后再使用全连接进行结果的预测输出。它的网络结构如下图所示:
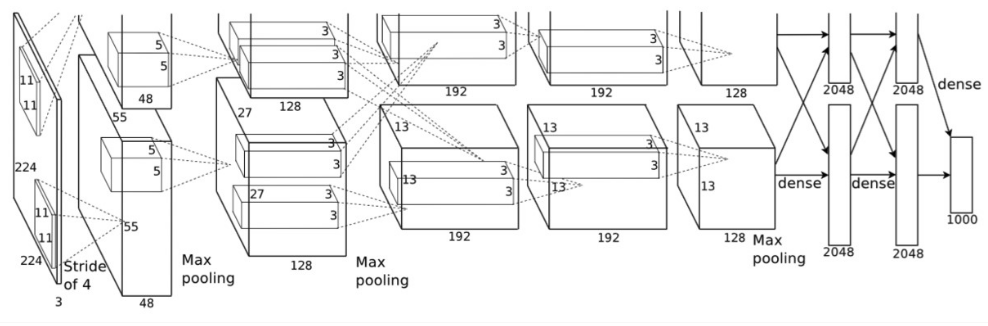
图 1-1-1 AlexNet的网络结构图
在上图中,原文作者使用了两片GPU用于网络训练,所以是上下重复的两个部分,我们单看下半部分对网络进行解析:
第一层:卷积层1,输入为 224 × 224 × 3的图像,卷积核的数量为96(输出特征的通道数为96),卷积核的大小为 11 × 11 × 3,步长 stride = 4,填充数pad = 0, 表示不扩充边缘;
第二层:卷积层2, 输入为上一层卷积的feature map, 卷积核的个数为256,卷积核的大小为:5 × 5 × 96, pad = 2, stride = 1; 与第一层不同,该层随后使用了局部响应归一化(LRN), 最后进行 max_pooling, pool_size = (3, 3), stride = 2;
第三层:卷积层3, 输入为第二层的输出,卷积核个数为384, kernel_size = 3 × 3 × 256, padding = 1, 第三层没有做LRN和Pool
第四层:卷积层4, 输入为第三层的输出,卷积核个数为384, kernel_size = 3 × 3 × 384 , padding = 1, 和第三层一样,没有LRN和Pool
第五层:卷积层5, 输入为第四层的输出,卷积核个数为256, kernel_size = 3 × 3 × 384, padding = 1。然后直接进行max_pooling, pool_size = (3, 3), stride = 2;
第六,七,八层是全连接层,每一层的神经元的个数为4096,最终输出softmax为1000,这是因为ImageNet比赛的分类个数为1000。全连接层中使用了RELU和Dropout输出。
综合上面的结构分析来看,AlexNet在使用了卷积和全连接结合的形式外,还使用了一些新的操作加入到网络中,具有以下的一些特点:
- 更深的网络结构
- 使用层叠的卷积层,即卷积层+卷积层+池化层来提取图像的特征
- 使用Dropout抑制过拟合
- 使用Relu替换之前的sigmoid的作为激活函数
Pytorch搭建AlexNet
AlexNet的网络实现代码如下:
import torch
from torch import nn
import numpy as np
from torch.autograd import Variable
class AlexNet(nn.Module):
    def __init__(self):
        super().__init__()
        # 第一层是 5x5 的卷积,输入的channels 是 3,输出的channels是 64,步长 1,没有 padding
        # Conv2d 的第一个参数为输入通道,第二个参数为输出通道,第三个参数为卷积核大小
        # ReLU 的参数为inplace,True表示直接对输入进行修改,False表示创建新创建一个对象进行修改
        self.conv1 = nn.Sequential(
            nn.Conv2d(3,64,5),
            nn.ReLU()
        )

        # 第二层为 3x3 的池化,步长为2,没有padding
        self.max_pool1 = nn.MaxPool2d(3, 2)

        # 第三层是 5x5 的卷积, 输入的channels 是64,输出的channels 是64,没有padding
        self.conv2 = nn.Sequential(
            nn.Conv2d(64, 64, 5, 1),
            nn.ReLU(True)
        )

        #第四层是 3x3 的池化, 步长是 2,没有padding
        self.max_pool2 = nn.MaxPool2d(3,2)

        #第五层是全连接层,输入是 1204 ,输出是384
        self.fc1 = nn.Sequential(
            nn.Linear(1024,384),
            nn.ReLU(True)
        )

        # 第六层是全连接层,输入是 384, 输出是192
        self.fc2 = nn.Sequential(
            nn.Linear(384, 192),
            nn.ReLU(True)
        )

        # 第七层是全连接层,输入是192, 输出是 10
        self.fc3 = nn.Linear(192, 10)

    def forward(self, x):
        x = self.conv1(x)
        x = self.max_pool1(x)
        x = self.conv2(x)
        x = self.max_pool2(x)
        #将图片矩阵拉平
        x = x.view(x.shape[0], -1)
        x = self.fc1(x)
        x = self.fc2(x)
        x = self.fc3(x)
        return x


model = AlexNet()
print(model)
VGG
任务描述
通过本关卡,你将掌握VGG的网络结构,并使用pytorch进行网络结构搭建。
相关知识
VGG是在2014年由牛津大学计算机视觉组(Visual Geometry Group)和Google DeepMind公司一起研发出了新的深度卷积神经网络,该网络取得了ILSVRC2014比赛分类项目的第二名,VGG可以看成是加深版的AlexNet,整个网络由卷积层和全连接层叠加而成,和AlexNet不同,也正是VGG的贡献在于:VGG是使用很小的卷积核(3×3)构建各种深度的卷积神经网络结构,并对这些网络结构进行了评估,在最终的结果上16-19层的网络深度,能够取得较好的识别精度。 这也就是常用来提取图像特征的VGG-16和VGG-19。
VGG的网络结构
VGG整个结构只有3×3的卷积层,连续的卷积层后使用池化层隔开。虽然层数很多,但是很简洁。网络流程如下:
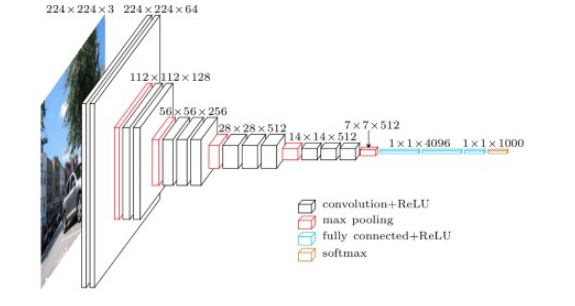
图 2-1-1 VGG网络结构 整个结构具有如下的特点:
- 使用连续的的多个小卷积核(3×3),来代替一个大的卷积核(例如(5×5),从而减少参数
- 通道数更多,特征度更宽,每个通道代表着一个FeatureMap,更多的通道数能表示更丰富的图像特征
- 在网络测试阶段将训练阶段的三个全连接替换为三个卷积,使得测试得到的全卷积网络因为没有全连接的限制,因而可以接收任意宽或高为的输入
VGG网络的具体参数设置如下图所示:
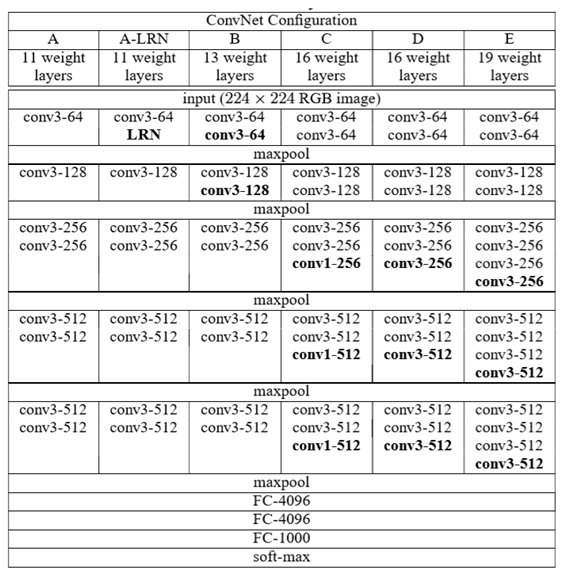
图2-1-2 VGG网络结构 它具有如下的特点:
- VGG的输入为224×224×3的图像。
- 网络使用连续的小卷积核(3×3)做连续卷积,卷积的固定步长为1,并在图像的边缘填充1个像素,这样卷积后保持图像的分辨率不变。
- 连续的卷积层会接着一个池化层,降低图像的分辨率。空间池化由五个最大池化层进行,这些层在一些卷积层之后(不是所有的卷积层之后都是最大池化)。在2×2像素窗口上进行最大池化,步长为2。
- 卷积层后,接着的是3个全连接层,前两个每个都有4096个通道,第三是输出层输出1000个分类。
- 所有的隐藏层的激活函数都使用的是ReLU
- 使用1×1的卷积核,为了添加非线性激活函数的个数,而且不影响卷积层的感受野。
Pytorch搭建VGG
VGG 网络实现代码如下:
import torch as torch
import torch.nn as nn
class VGG16(nn.Module):
    def __init__(self,num_classes):
        super(VGG16,self).__init__()
        self.features = nn.Sequential(
            nn.Conv2d(3,64,kernel_size=3,padding=1),
            nn.ReLU(inplace=True),
            nn.Conv2d(64,64,kernel_size=3,padding=1),
            nn.ReLU(inplace=True),
            nn.Conv2d(64,128,kernel_size=3,padding=1),
            nn.ReLU(inplace=True),
            nn.Conv2d(128, 128, kernel_size=3, padding=1),
            nn.ReLU(inplace=True),
            nn.Conv2d(128, 256, kernel_size=3, padding=1),
            nn.ReLU(inplace=True),
            nn.Conv2d(256, 256, kernel_size=3, padding=1),
            nn.ReLU(inplace=True),
            nn.Conv2d(256, 256, kernel_size=3, padding=1),
            nn.ReLU(inplace=True),
            nn.Conv2d(256, 512, kernel_size=3, padding=1),
            nn.ReLU(inplace=True),
            nn.Conv2d(512, 512, kernel_size=3, padding=1),
            nn.ReLU(inplace=True),
            nn.Conv2d(512, 512, kernel_size=3, padding=1),
            nn.ReLU(inplace=True),
            nn.Conv2d(512, 512, kernel_size=3, padding=1),
            nn.ReLU(inplace=True),
            nn.Conv2d(512, 512, kernel_size=3, padding=1),
            nn.ReLU(inplace=True),
            nn.Conv2d(512, 512, kernel_size=3, padding=1),
            nn.ReLU(inplace=True)
        )
        self.classifier = nn.Sequential(
            nn.Linear(512*7*7,4096),
            nn.ReLU(inplace=True),
            nn.Dropout(),
            nn.Linear(4096,4096),
            nn.ReLU(True),
            nn.Dropout(),
            nn.Linear(4096,num_classes)
        )
    def forward(self, x):
        x = self.features(x),
        x = x.view(x.size(0),-1)
        x = self.classifier(x)
        return x


model = VGG16()
print(model)
Inception
任务描述
通过本关卡,你将掌握Inception的网络结构,并使用pytorch进行网络结构搭建。
相关知识
Inception是在2014年由google的研究人员提出的,它是GoogLeNet的基础模块,该网络是2014年的ImageNet图像识别挑战赛中的第一名。该网络从提升网络性能的出发点开始,不同于增加网络的深度和宽度,Inception基于将稀疏矩阵聚类成相对密集的子矩阵的思想来能提高计算性能。
Inception
Inception结构的主要思路是:如何使用一个密集成分来近似或者代替最优的局部稀疏结构。Inception V1的结构如图所示:

图 3-1-1 Inception的网络结构 由图可以看出,Inception块里有4条并行的线路。前3条线路使用卷积核大小分别是1×1、3×3和5×5的卷积层来抽取不同空间尺寸下的信息,其中中间2个线路会对输入先做卷积再使用1×1卷积来减少输入通道数,以降低模型复杂度。第四条线路则使用3×3最大池化层,后接1×1卷积层来改变通道数。 该模块具有以下的特点:
- 采用1、3和5不同大小的卷积核意味着不同大小的感受野,最后拼接意味着不同尺度特征的融合;
- 为减少使用3*3和5x5的卷积核带来的巨大计算量,借鉴NIN,采用1x1卷积核紧随其后进行降维;
Pytorch搭建Inception
Inception 网络实现代码如下:
import time
import torch
from torch import nn, optim
import torch.nn.functional as F
import sys
sys.path.append("..")
import d2lzh_pytorch as d2l


device = torch.device('cuda' if torch.cuda.is_available() else 'cpu')


class Inception(nn.Module):
    # c1 - c4为每条线路里的层的输出通道数
    def __init__(self, in_c, c1, c2, c3, c4):
        super(Inception, self).__init__()
        # 线路1,单1 x 1卷积层
        self.p1_1 = nn.Conv2d(in_c, c1, kernel_size=1)
        # 线路2,1 x 1卷积层后接3 x 3卷积层
        self.p2_1 = nn.Conv2d(in_c, c2[0], kernel_size=1)
        self.p2_2 = nn.Conv2d(c2[0], c2[1], kernel_size=3, padding=1)
        # 线路3,1 x 1卷积层后接5 x 5卷积层
        self.p3_1 = nn.Conv2d(in_c, c3[0], kernel_size=1)
        self.p3_2 = nn.Conv2d(c3[0], c3[1], kernel_size=5, padding=2)
        # 线路4,3 x 3最大池化层后接1 x 1卷积层
        self.p4_1 = nn.MaxPool2d(kernel_size=3, stride=1, padding=1)
        self.p4_2 = nn.Conv2d(in_c, c4, kernel_size=1)

    def forward(self, x):
        p1 = F.relu(self.p1_1(x))
        p2 = F.relu(self.p2_2(F.relu(self.p2_1(x))))
        p3 = F.relu(self.p3_2(F.relu(self.p3_1(x))))
        p4 = F.relu(self.p4_2(self.p4_1(x)))
        return torch.cat((p1, p2, p3, p4), dim=1)  # 在通道维上连结输出


model = Inception(192, 64, (96, 128), (16, 32), 32)
print(model)
Resnet
任务描述
通过本关卡,你将掌握ResNet网络结构,并使用pytorch进行网络结构搭建。
相关知识
ResNet是2015年由He-Kaiming等人提出的,是深度学习任务中的经典且有效的网络,虽然最开始在分类任务中被使用,但后续在各个任务中被广泛验证。ResNet着眼于VGG网络等深度网络在深度达到一定程度后再增加层数,分类的性能就会下降,基于此,ResNet提出残差结构来解决这个问题。
ResNet
残差是指实际观察值与估计值之间的差,某个残差块的输入为x ,拟合的输出为H(x),如果我们直接把输入x 直接传到输出作为观测结果,那么我们需要学习的残差就是F ( x ) = H ( x ) − x。下图是一个残差学习单元:
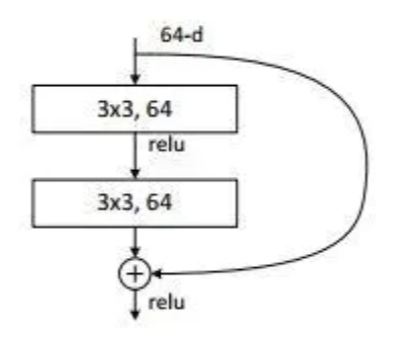
图 4-1-1 残差结构
通过上图我们可以看出,残差学习是致力于使用多个有参网络层来学习输入、输出之间的残差F(x),有别于之前网络通过x学习网络的输出H(x),残差学习可以有效保留x的特性,这有利于消除深度网络中出现的梯度消失,保留更多上一层网络学习到的信息,从而解决网络不能加深的问题。
为了实际计算的考虑,ResNet使用了了一种bottleneck的结构块来代替常规的Resedual block,它像Inception网络那样通过使用1x1 conv来巧妙地缩减或扩张feature map维度从而使得我们的3x3 conv的filters数目不受外界即上一层输入的影响,自然它的输出也不会影响到下一层module。,它的网络结构如下:
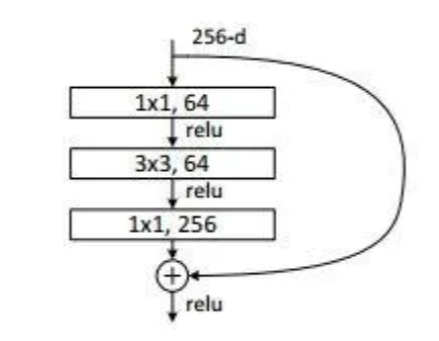
图4-1-2 Bottleneck的网络结构 ResNet就是使用这样的Bottleneck层层堆叠形成了最后的网络,根据层数的多少有ResNet18,ResNet34,ResNet50等结构。具体的网络结构参数如下图:

图4-1-3 ResNet网络结构
如上图,每一个括号内为一个Bottlencek,后面相乘的数量为该模块重复的次数。
Pytorch搭建Resnet
ResNet 网络实现代码如下:
import torch.nn as nn
import torch.nn.functional as F

# 用于ResNet18和34的残差块,用的是2个3x3的卷积
class BasicBlock(nn.Module):
    expansion = 1
    def __init__(self, in_planes, planes, stride=1):
        super(BasicBlock, self).__init__()
        ########## Begin ##########
        self.conv1 = nn.Conv2d(in_planes, planes, kernel_size=3,
        stride=stride, padding=1, bias=False)
        self.bn1 = nn.BatchNorm2d(planes)
        self.conv2 = nn.Conv2d(planes, planes, kernel_size=3,
        stride=1, padding=1, bias=False)
        self.bn2 = nn.BatchNorm2d(planes)
        self.shortcut = nn.Sequential()
        if stride != 1 or in_planes != self.expansion * planes:
            self.shortcut = nn.Sequential(
                nn.Conv2d(in_places, self,expansion * planes,
                kernel_size=1, stride=stride, bias=False),
                nn.BatchNorm2d(self,expansion * planes)
            )
        ########## End ##########

    def forward(self, x):
        out = F.relu(self.bn1(self.conv1(x)))
        out = self.bn2(self.conv2(out))
        out += self.shortcut(x)
        out = F.relu(out)
        return out

# 用于ResNet50,101和152的残差块,用的是1x1+3x3+1x1的卷积
class Bottleneck(nn.Module):
    # 前面1x1和3x3卷积的filter个数相等,最后1x1卷积是其expansion倍
    expansion = 4
    def __init__(self, in_planes, planes, stride=1):
        super(Bottleneck, self).__init__()
        self.conv1 = nn.Conv2d(in_planes, planes, kernel_size=1, bias=False)
        self.bn1 = nn.BatchNorm2d(planes)
        self.conv2 = nn.Conv2d(planes, planes, kernel_size=3,
                               stride=stride, padding=1, bias=False)
        self.bn2 = nn.BatchNorm2d(planes)
        self.conv3 = nn.Conv2d(planes, self.expansion*planes,
                               kernel_size=1, bias=False)
        self.bn3 = nn.BatchNorm2d(self.expansion*planes)
        self.shortcut = nn.Sequential()
        if stride != 1 or in_planes != self.expansion*planes:
            self.shortcut = nn.Sequential(
                nn.Conv2d(in_planes, self.expansion*planes,
                          kernel_size=1, stride=stride, bias=False),
                nn.BatchNorm2d(self.expansion*planes)
            )
        ########## End ##########

    def forward(self, x):
        out = F.relu(self.bn1(self.conv1(x)))
        out = F.relu(self.bn2(self.conv2(out)))
        out = self.bn3(self.conv3(out))
        out += self.shortcut(x)
        out = F.relu(out)
        return out

class ResNet(nn.Module):
    def __init__(self, block, num_blocks, num_classes=1000):
        super(ResNet, self).__init__()
        self.in_planes = 64
        self.conv1 = nn.Conv2d(3, 64, kernel_size=3,
                               stride=1, padding=1, bias=False)
        self.bn1 = nn.BatchNorm2d(64)
        self.layer1 = self._make_layer(block, 64, num_blocks[0], stride=1)
        self.layer2 = self._make_layer(block, 128, num_blocks[1], stride=2)
        self.layer3 = self._make_layer(block, 256, num_blocks[2], stride=2)
        self.layer4 = self._make_layer(block, 512, num_blocks[3], stride=2)
        self.linear = nn.Linear(512*block.expansion, num_classes)
    def _make_layer(self, block, planes, num_blocks, stride):
        strides = [stride] + [1]*(num_blocks-1)
        layers = []
        for stride in strides:
            layers.append(block(self.in_planes, planes, stride))
            self.in_planes = planes * block.expansion
        return nn.Sequential(*layers)

    def forward(self, x):
        out = F.relu(self.bn1(self.conv1(x)))
        out = self.layer1(out)
        out = self.layer2(out)
        out = self.layer3(out)
        out = self.layer4(out)
        out = F.avg_pool2d(out, 4)
        out = out.view(out.size(0), -1)
        out = self.linear(out)
        return out

def ResNet50():
    return ResNet(Bottleneck, [3,4,6,3])

print(ResNet50())
DenseNet
任务描述
通过本关卡,你将掌握DenseNet网络结构,并使用pytorch进行网络结构搭建。
相关知识
DenseNet作为CVPR2017年的Best Paper,不同于加深网络层数(ResNet)和加宽网络结构(Inception)来提升网络性能,DenseNet从特征的角度考虑,通过特征重用和旁路(Bypass)设置,既大幅度减少了网络的参数量,又在一定程度上缓解了gradient vanishing问题的产生.
DenseNet
不同于ResNet单一地进行网络层之间的短连接,DenseNet的当前层会与前面的每一层进行相连,是一种密集连接的形式,这样做的好处可以是可以实现特征重用。下图是一个Dense block 的网络结构:

图 5-1-1 Dense block 的网络结构 正是得益于这种dense block的设计,DenseNet可以设计成一个较窄的网络从而使得参数更少,同时这种连接方式使得特征和梯度的传递更加有效,网络也就更加容易训练。另一个方面,当网络很深时,输入信息和梯度信息在很多层之间传递会导致梯度消失,而现在这种dense connection相当于每一层都直接连接输入和损失,因此就可以减轻梯度消失现象,就可以放心地加深网络。
DenseNet就是使用这样的层堆叠形成了最后的网络,DensNet的网络结构如下图:

图5-1-2 DenseNet的网络结构 在上述网络中,每两个Dense block之间使用了下采样来增大感受野,参数量,这里使用Transition Layer来实现,一般的Transition Layer包含BN、Conv和Avg_pool。 DenseNet作为另一种拥有较深层数的卷积神经网络,具有如下优点:
- 相比ResNet拥有更少的参数数量.
- 当前层与前面每一层都concatation加强了特征的重用.
- 网络更易于训练,并具有一定的正则效果.
- 缓解了梯度消失和模型退化的问题.
DenseNet的具体网络参数如下图:

图5-1-3 DenseNet的网络参数
Pytorch搭建DenseNet
DenseNet 网络实现代码如下:
import math
import torch
import torch.nn as nn
import torch.nn.functional as F
import os


class Bottleneck(nn.Module):
  def __init__(self, in_planes, growth_rate):
      super(Bottleneck, self).__init__()
      ########## Begin ##########
      self.bn1 = nn.BatchNorm2d(in_planes)
      self.conv1 = nn.Conv2d(in_planes, 4*growth_rate, kernel_size=1, bias=False)
      self.bn2 = nn.BatchNorm2d(4*growth_rate)
      self.conv2 = nn.Conv2d(4*growth_rate, growth_rate, kernel_size=3, padding=1, bias=False)
      ########## End ##########

  def forward(self, x):
      out = self.conv1(F.relu(self.bn1(x)))
      out = self.conv2(F.relu(self.bn2(out)))
      out = torch.cat([out,x], 1)
      return out


class Transition(nn.Module):
  def __init__(self, in_planes, out_planes):
      super(Transition, self).__init__()
      ########## Begin ##########
      self.bn = nn.BatchNorm2d(in_planes)
      self.conv = nn.Conv2d(in_planes, out_planes, kernel_size=1, bias=False)
      ########## End ##########

  def forward(self, x):
      out = self.conv(F.relu(self.bn(x)))
      # use average pooling change the size of feature map here
      out = F.avg_pool2d(out, 2)
      return out


class DenseNet(nn.Module):
  def __init__(self, block, nblocks, growth_rate=12, reduction=0.5, num_classes=100):
      super(DenseNet, self).__init__()
      self.growth_rate = growth_rate
      num_planes = 2*growth_rate
      self.conv1 = nn.Conv2d(3, num_planes, kernel_size=3, padding=1, bias=False)
      #  Dense block和转换层
      self.dense1 = self._make_dense_layers(block, num_planes, nblocks[0])
      num_planes += nblocks[0]*growth_rate
      out_planes = int(math.floor(num_planes*reduction))
      self.trans1 = Transition(num_planes, out_planes)
      num_planes = out_planes
      #  Dense block和转换层
      self.dense2 = self._make_dense_layers(block, num_planes, nblocks[1])
      num_planes += nblocks[1]*growth_rate
      out_planes = int(math.floor(num_planes*reduction))
      self.trans2 = Transition(num_planes, out_planes)
      num_planes = out_planes
      # Dense block和转换层
      self.dense3 = self._make_dense_layers(block, num_planes, nblocks[2])
      num_planes += nblocks[2]*growth_rate
      out_planes = int(math.floor(num_planes*reduction))
      self.trans3 = Transition(num_planes, out_planes)
      num_planes = out_planes
      # DenseBlock
      self.dense4 = self._make_dense_layers(block, num_planes, nblocks[3])
      num_planes += nblocks[3]*growth_rate
      # 全连接层
      self.bn = nn.BatchNorm2d(num_planes)
      self.linear = nn.Linear(num_planes, num_classes)

  def _make_dense_layers(self, block, in_planes, nblock):
      layers = []
      for i in range(nblock):
          layers.append(block(in_planes, self.growth_rate))
          in_planes += self.growth_rate
      return nn.Sequential(*layers)

  def forward(self, x):
      out = self.conv1(x)
      out = self.trans1(self.dense1(out))
      out = self.trans2(self.dense2(out))
      out = self.trans3(self.dense3(out))
      out = self.dense4(out)
      out = F.avg_pool2d(F.relu(self.bn(out)), 4)
      out = out.view(out.size(0), -1)
      out = self.linear(out)
      return out

def densenet():
  return DenseNet(Bottleneck, [2, 5, 4, 6])

print(densenet())


 1125
1125


 被折叠的 条评论
为什么被折叠?
被折叠的 条评论
为什么被折叠?
 到【灌水乐园】发言


