


MediaPipe Solutions 提供了一套库和工具,可帮助您在您的应用中快速应用人工智能 (AI) 和机器学习 (ML) 技术。您可以立即将这些解决方案插入到您的应用中,根据需要对其进行自定义,并在多个开发平台上使用。MediaPipe Solutions 是 MediaPipe 开源项目的一部分,因此您可以进一步自定义解决方案代码以满足您的应用需求。MediaPipe 解决方案套件包括以下内容:
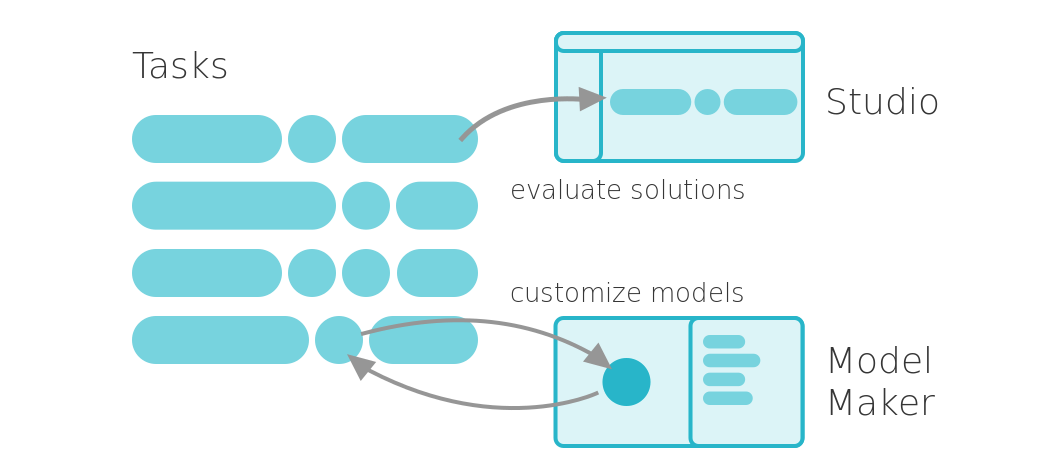
MediaPipe 解决方案、Studio 和 Model Maker 的示意图
以下库和资源提供了每个 MediaPipe 解决方案的核心功能:
- MediaPipe Tasks:用于部署解决方案的跨平台 API 和库。
- MediaPipe 模型:预训练、可直接运行的模型,可与每个解决方案搭配使用。
借助以下工具,您可以自定义和评估解决方案:
- MediaPipe Model Maker:为使用你的数据的解决方案自定义模型
- MediaPipe Studio:在浏览器中直观呈现、评估解决方案并对其进行基准测试。
可用的解决方案
MediaPipe 解决方案适用于多个平台。每个解决方案都包含一个或多个模型,您也可以为某些解决方案自定义模型。以下列表显示了适用于每个受支持平台的解决方案,以及您是否可以使用 Model Maker 自定义模型:
| 解决方案 | Android | 网站 | Python | iOS | 自定义模型 |
|---|---|---|---|---|---|
| LLM Inference API | √ \surd √ | √ \surd √ | √ \surd √ | √ \surd √ | |
| 对象检测 | √ \surd √ | √ \surd √ | √ \surd √ | √ \surd √ | √ \surd √ |
| 图片分类 | √ \surd √ | √ \surd √ | √ \surd √ | √ \surd √ | √ \surd √ |
| 图像分割 | √ \surd √ | √ \surd √ | √ \surd √ | ||
| 交互式分割 | √ \surd √ | √ \surd √ | √ \surd √ | ||
| 手部特征点检测 | √ \surd √ | √ \surd √ | √ \surd √ | √ \surd √ | |
| 手势识别 | √ \surd √ | √ \surd √ | √ \surd √ | √ \surd √ | √ \surd √ |
| 图片嵌入 | √ \surd √ | √ \surd √ | √ \surd √ | ||
| 人脸检测 | √ \surd √ | √ \surd √ | √ \surd √ | √ \surd √ | |
| 人脸特征点检测 | √ \surd √ | √ \surd √ | √ \surd √ | ||
| 人脸风格化 | √ \surd √ | √ \surd √ | √ \surd √ | √ \surd √ | |
| 姿势特征点检测 | √ \surd √ | √ \surd √ | √ \surd √ | ||
| 图片生成 | √ \surd √ | √ \surd √ | |||
| 文本分类 | √ \surd √ | √ \surd √ | √ \surd √ | √ \surd √ | √ \surd √ |
| 文本嵌入 | √ \surd √ | √ \surd √ | √ \surd √ | ||
| 语言检测器 | √ \surd √ | √ \surd √ | √ \surd √ | ||
| 音频分类 |
安装
Python
pip安装mediapipe软件包
安装使用 mediapipe pip 软件包。您可以使用以下命令安装所需的软件包:
$ python -m pip install mediapipe
导入以下类来验证安装结果:
import mediapipe as mp
from mediapipe.tasks import python
from mediapipe.tasks.python import vision
运行示例
安装验证无误后,运行以下示例。
# STEP 1: Import the necessary modules.
import numpy as np
import mediapipe as mp
from mediapipe.tasks import python
from mediapipe.tasks.python import vision

# STEP 2: Create an ObjectDetector object.
base_options = python.BaseOptions(model_asset_path='efficientdet.tflite')
options = vision.ObjectDetectorOptions(base_options=base_options,
                                       score_threshold=0.5)
detector = vision.ObjectDetector.create_from_options(options)

# STEP 3: Load the input image.
image = mp.Image.create_from_file(IMAGE_FILE)

# STEP 4: Detect objects in the input image.
detection_result = detector.detect(image)

# STEP 5: Process the detection result. In this case, visualize it.
image_copy = np.copy(image.numpy_view())
annotated_image = visualize(image_copy, detection_result)
rgb_annotated_image = cv2.cvtColor(annotated_image, cv2.COLOR_BGR2RGB)
cv2_imshow(rgb_annotated_image)
C++
-
安装 Bazelisk。
Step 1: Add Bazel distribution URI as a package source
   sudo apt install apt-transport-https curl gnupg -y
   curl -fsSL https://bazel.build/bazel-release.pub.gpg | gpg --dearmor >bazel-archive-keyring.gpg
   sudo mv bazel-archive-keyring.gpg /usr/share/keyrings
   echo "deb [arch=amd64 signed-by=/usr/share/keyrings/bazel-archive-keyring.gpg] https://storage.googleapis.com/bazel-apt stable jdk1.8" | sudo tee /etc/apt/sources.list.d/bazel.list
   ```

   The component name "jdk1.8" is kept only for legacy reasons and doesn't relate to supported or included JDK versions. Bazel releases are Java-version agnostic. Changing the "jdk1.8" component name would break existing users of the repo.
   ```

   ### Step 2: Install and update Bazel

   ```sh
   sudo apt update && sudo apt install bazel
   ```
Once installed, you can upgrade to a newer version of Bazel as part of your normal system updates:

```sh
sudo apt update && sudo apt full-upgrade
The
bazelpackage always installs the latest stable version of Bazel. You can install specific, older versions of Bazel in addition to the latest one, such as this:sudo apt install bazel-1.0.0This installs Bazel 1.0.0 as
/usr/bin/bazel-1.0.0on your system. This can be useful if you need a specific version of Bazel to build a project, for example because it uses a.bazelversionfile to explicitly state with which Bazel version it should be built.Optionally, you can set
bazelto a specific version by creating a symlink:sudo ln -s /usr/bin/bazel-1.0.0 /usr/bin/bazel bazel --version # 1.0.0
-
检出 MediaPipe 代码库。
$ cd $HOME
$ git clone --depth 1 https://github.com/google/mediapipe.git

# Change directory into MediaPipe root directory
$ cd mediapipe
配置opencv编译选项,打开mediapipe-master/third_party/opencv_linux.BUILD。取消注释,若为手动编译安装opencv, 应该选择最后一项,例如include/opencv4/:
# Description:
#   OpenCV libraries for video/image processing on Linux

licenses(["notice"])  # BSD license

exports_files(["LICENSE"])

# The following build rule assumes that OpenCV is installed by
# 'apt-get install libopencv-core-dev libopencv-highgui-dev \'
# '                libopencv-calib3d-dev libopencv-features2d-dev \'
# '                libopencv-imgproc-dev libopencv-video-dev'
# on Debian Buster/Ubuntu 18.04.
# If you install OpenCV separately, please modify the build rule accordingly.
cc_library(
    name = "opencv",
    hdrs = glob([
        # For OpenCV 4.x
        #"include/aarch64-linux-gnu/opencv4/opencv2/cvconfig.h",
        #"include/arm-linux-gnueabihf/opencv4/opencv2/cvconfig.h",
        #"include/x86_64-linux-gnu/opencv4/opencv2/cvconfig.h",
        "include/opencv4/opencv2/**/*.h*",
    ]),
    includes = [
        # For OpenCV 4.x
        #"include/aarch64-linux-gnu/opencv4/",
        #"include/arm-linux-gnueabihf/opencv4/",
        #"include/x86_64-linux-gnu/opencv4/",
        "include/opencv4/",
    ],
    linkopts = [
        "-l:libopencv_core.so",
        "-l:libopencv_calib3d.so",
        "-l:libopencv_features2d.so",
        "-l:libopencv_highgui.so",
        "-l:libopencv_imgcodecs.so",
        "-l:libopencv_imgproc.so",
        "-l:libopencv_video.so",
        "-l:libopencv_videoio.so",
    ],
    visibility = ["//visibility:public"],
)
运行 [Hello World! in C++ 示例](https://ai.google.dev/edge/mediapipe/framework/getting_started/hello_world_cpp.md?hl=zh-cn)。

```bash
$ export GLOG_logtostderr=1

# if you are running on Linux desktop with CPU only
$ bazel run --define MEDIAPIPE_DISABLE_GPU=1 \
    mediapipe/examples/desktop/hello_world:hello_world

# If you are running on Linux desktop with GPU support enabled (via mesa drivers)
$ bazel run --copt -DMESA_EGL_NO_X11_HEADERS --copt -DEGL_NO_X11 \
    mediapipe/examples/desktop/hello_world:hello_world
```
在 GPU 上运行
注意 :此命令目前仅适用于 Linux,请先按照在 Linux 桌面上设置 OpenGL ES 进行操作。
-
例如,如需构建带 GPU 的旧版 MediaPipe 手部检测解决方案的 C++ 示例应用,请运行以下命令:
bazel build -c opt --copt -DMESA_EGL_NO_X11_HEADERS --copt -DEGL_NO_X11 \ mediapipe/examples/desktop/hand_tracking:hand_tracking_gpu -
如需运行该应用,请执行以下操作:
GLOG_logtostderr=1 bazel-bin/mediapipe/examples/desktop/hand_tracking/hand_tracking_gpu \
  --calculator_graph_config_file=mediapipe/graphs/hand_tracking/hand_tracking_desktop_live_gpu.pbtxt
只要摄像头已连接并开启,这就会打开摄像头。出现任何错误都可能是因为无法访问摄像头,或 GPU 驱动程序未正确设置。


 597
597

 被折叠的 条评论
为什么被折叠?
被折叠的 条评论
为什么被折叠?
 到【灌水乐园】发言


