其实一般情况下没有人这样搞,如果这样搞还不如直接写框架。虽然Smarty已经被推到一个两头不到岸的尴尬地位,单纯用Smarty对下不如php与html开发快好理解,对上不如直接上ThinkPHP等框架清晰,但是现在许许多多的php开源项目Discuz!、Wordpress、ThinkPHP或多或少包含着Smarty的影子,毕竟当年Smarty的霸主地位不是吹出来的,正如VC6的MFC。下面利用Smarty编写一个VC分离的php网站,只是希望读者能够进一步了解Smarty的运行过程。
其实这文章没有什么新的东西,只是把之前写过的东西,综合起来。
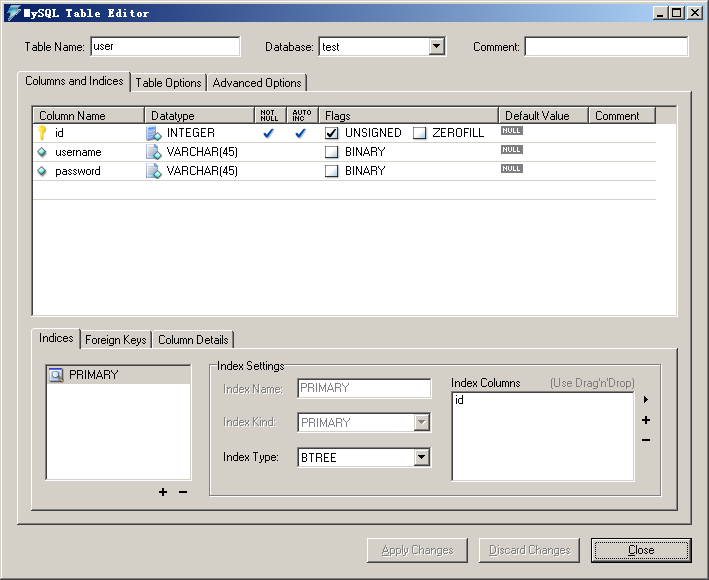
说是php网站,实质就是对如下一张user表做增删改查的操作。
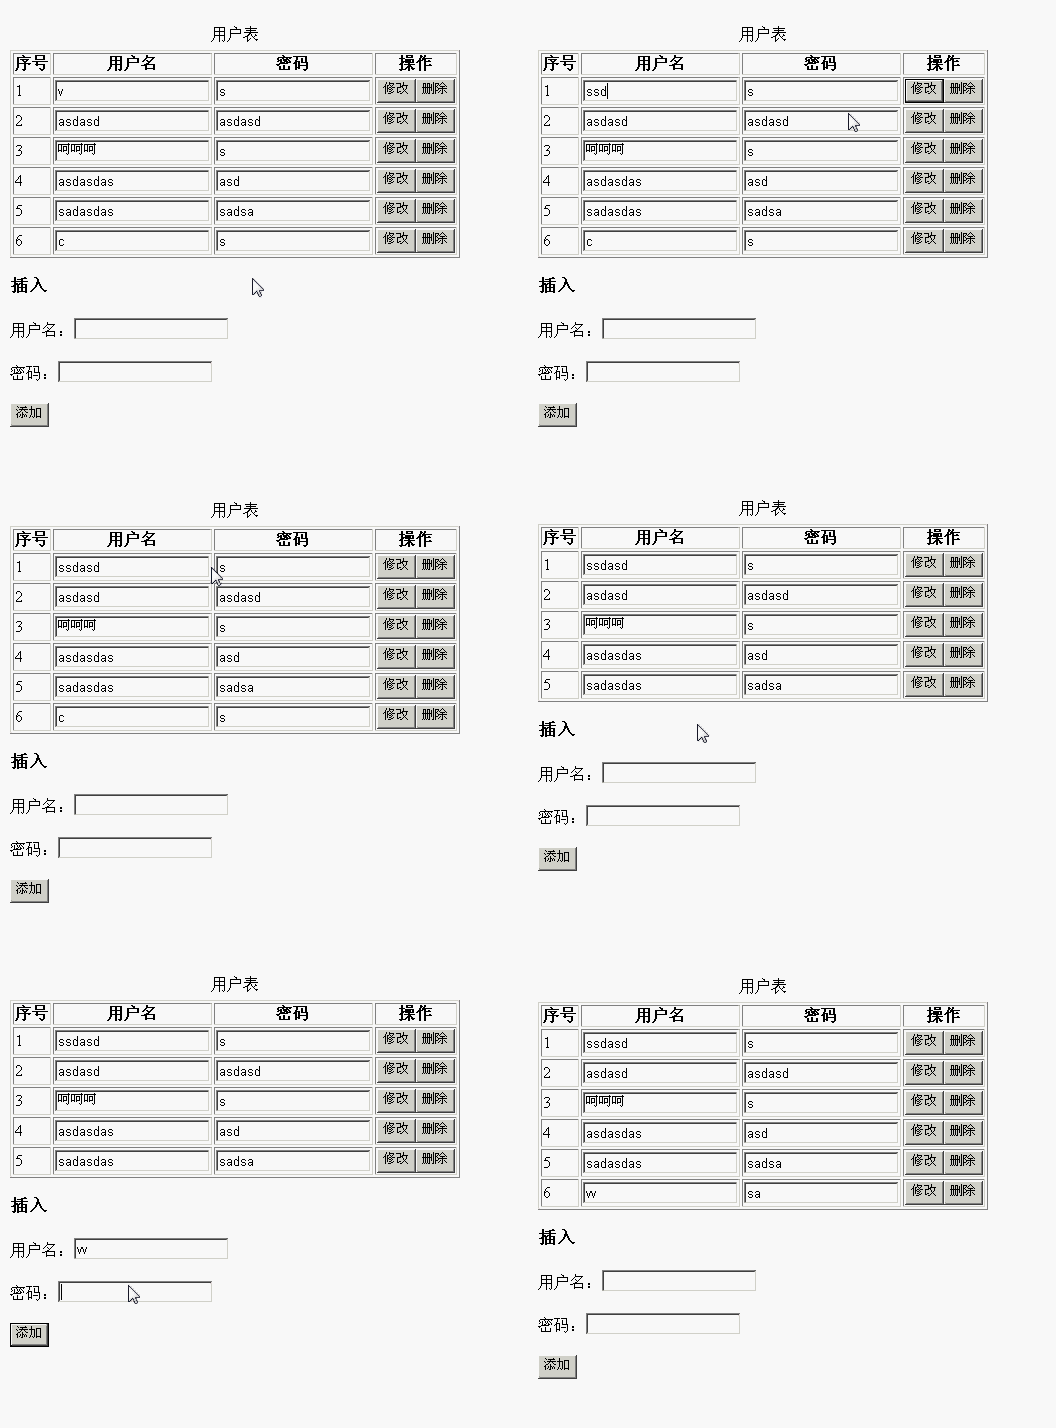
效果如下图所示:
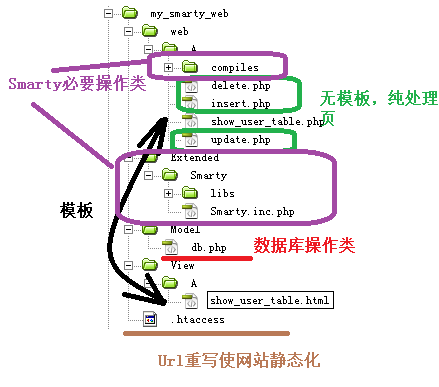
网站的结构如下,假设我的网络名称叫Web,在A模块,要实现这个一个增删改查的东西。
请注意的上述的文件结构树,用紫色框框住的,是一些Smarty必须的文件,各个文件夹的作用已经在《【Smarty】Smarty的下载、配置与Helloworld》(点击打开链接)说过了,
之后.htaccess的代码,完全与《【php】利用.htaccess文件使网站静态化,将php页面伪装成html》(点击打开链接)中的作用一模一样,Smarty需要访问show_user_table.php才能将数据渲染到show_user_table.html这个模板,有了.htaccess,用户可以通过访问show_user_table.html来访问web/A中的show_user_table.php,而他们以为自己是在访问html。
<IfModule mod_rewrite.c>
RewriteEngine On
RewriteRule ^(.*)\.html$ $1.php [NC]
</IfModule>
之后,先在Model文件夹中自建一个单例的数据库类db.php,代码如下,这个东西在《【php】利用单例模式设计数据库连接Model类》( 点击打开链接)中已经介绍过了,这里不再赘述。这个文件夹作为M层,届时,在web\A中的php如果要操作数据库,则引入这个php,获取实例之后,直接调用里面的方法就可以了。
<?php
class db{
    private $link;
    //db类单例开始
    //保存类实例的私有静态成员变量
    private static $_instance;
    //定义一个私有的构造函数,确保单例类不能通过new关键字实例化,只能被其自身实例化
    private function __construct($host,$username,$password,$database){
        $this->link=mysql_connect($host,$username,$password);
        if(!$this->link){
            die("连接失败!");
        }
        mysql_query("set names utf8;");
        mysql_select_db($database);
    }
    //定义私有的__clone()方法,确保单例类不能被复制或克隆
    private function __clone(){}
    public static function getInstance($host, $username, $password,$database) {
        //检测类是否被实例化
        if(!(self::$_instance instanceof self)){
            self::$_instance=new db($host,$username,$password,$database);
        }
        return self::$_instance;
    }
    //执行SQL语句
    public function query($query){
        return mysql_query($query, $this->link);
    }
    //关闭数据库连接
    public function close(){
        return mysql_close($this->link);
    }
}
?>
通过上面的布置,此时,网站已经实现了各个部分代码的分离,web/A中的php实际就是要把View文件夹中的模板与Model文件夹中的操作数据库的db.php,两者联系起来,扮演C层的角色。首先是show_user_table.php,这个php就是查询test数据库中的user表,推给前台的show_user_table.html
<?php
include "../../Extended/Smarty/Smarty.inc.php";//使用Smarty特性
include "../../Model/db.php";//调用数据库的方法
$dbconnector=db::getInstance("localhost","root","root","test");//创建数据库连接类
$result=$dbconnector->query("select * from user");//查询数据库
$userList=array();//将查询结果存放到$userList这个数组里面
for($i=0;$row=mysql_fetch_array($result);$i++){
	$userList[$i]["id"]=$row["id"];
	$userList[$i]["username"]=$row["username"];
	$userList[$i]["password"]=$row["password"];
}
$smarty->assign("userList",$userList);//将到$userList这个数组推给前台的模版
$smarty->display("../../View/A/show_user_table.html");
?>
因此前台的View/A/show_user_table.html,利用《【Smarty】Smarty引用、常用内置变量、判断、循环、JavaScript脚本》( 点击打开链接)中的内容,将$userList这个数组读取出来。
<!DOCTYPE html PUBLIC "-//W3C//DTD XHTML 1.0 Transitional//EN" "http://www.w3.org/TR/xhtml1/DTD/xhtml1-transitional.dtd">
<html xmlns="http://www.w3.org/1999/xhtml">
<head>
<meta http-equiv="Content-Type" content="text/html; charset=utf-8" />
<title>用户表</title>
</head>

<body>

    <table border="1">
		<caption>用户表</caption>
    	<tr>
			<th>序号</th><th>用户名</th><th>密码</th><th>操作</th>
        </tr>
    	{foreach from=$userList item=user name=stat}
			<tr>
            <form action="update.html" method="post">
            <input type="hidden" value="{$user.id}" name="id"/>
                <td>{$smarty.foreach.stat.index+1}</td>
                <td><input type="text" value="{$user.username}" name="username"/></td>
                <td><input type="text" value="{$user.password}" name="password"/></td>
                <td>
                    <input type="submit" value="修改" />
                    <button οnclick="javascript:window.location.href='delete.html?id={$user.id}'">删除</button>
                </td>
            </form>
            </tr>
        {/foreach}
    </table>
    <h3>插入</h3>
    <form action="insert.html" method="post">
    <p>用户名:<input type="text" name="username"/></p>
    <p>密码:<input type="text" name="password"/></p>
    <p><input type="submit" value="添加" /></p>
    </form>
</body>
</html>
可以看到show_user_table.html表格的每一列都是一个小表单,将用户修改的内容提交到update.php中处理。update.php的代码如下,修改完数据库相应的username与password之后,直接用《【php】使用重定向,伪装表单处理页面不存在》( 点击打开链接)中介绍过的方式,跳转到同目录的show_user_table.php,重新读表,当然用户感觉不了这一点,这会发现show_user_table.html中的表格确实变化了。
<?php
include "../../Model/db.php";
$id=$_REQUEST["id"];
$username=$_REQUEST["username"];
$password=$_REQUEST["password"];
$dbconnector=db::getInstance("localhost","root","root","test");//创建数据库连接类
$dbconnector->query("update user set username='${username}' where id=${id}");
$dbconnector->query("update user set password='${password}' where id=${id}");
header("location: show_user_table.php");
exit;
?>
然后,对于show_user_table.html表格中的删除更简单,传一个id到delete.php,delete.php根据这个id删除相应的键值即可。这里都是php原生的内容,没有任何Smarty部分!
<?php
include "../../Model/db.php";
$id=$_REQUEST["id"];
$dbconnector=db::getInstance("localhost","root","root","test");//创建数据库连接类
$dbconnector->query("delete from user where id=${id}");//查询数据库
header("location: show_user_table.php");
exit;
?>
最后的插入数据同理,就是将这个表单提交到同目录的insert.php,数据库进行插入操作。注意到,现在用户真正处于的页面是在web/A中的show_user_table.php而不是在view中的show_user_table.html,只是这个show_user_table.php给.htaccess重写成html而已,因此这里说“同目录”的insert.php。
<?php
include "../../Model/db.php";
$username=$_REQUEST["username"];
$password=$_REQUEST["password"];
$dbconnector=db::getInstance("localhost","root","root","test");//创建数据库连接
$dbconnector->query("insert into user(username,password) values('${username}','${password}')");
header("location: show_user_table.php");
exit;
?>
至此,一个利用Smarty编写的MVC分离的网站完成了。可能有人说view中的show_user_table.html同样有一堆控制输出的标签,为何不用原生的php的语言呢?但,你要注意到,从show_user_table.php传递到show_user_table.html中的数据,Smarty已经帮你完成了,无须你自己又要压到Session中,再到show_user_table.html中取出来。这是Smarty比单纯php语言进步的地方,当然实质应用中,可以进一步使用类似ThinkPHP等框架进一步减少数据库查询部分的代码。
同时大家也注意到上面的代码关于目标的指明其实很糟糕的,用到很多的../../去到上一级目录。可以利用php中魔术常量__FILE__进一步优化。


 60
60

 被折叠的 条评论
为什么被折叠?


