


概述
关于自定义View之前已经说过可以分为两种,一种是自定义控件(继承View),还有一种就是自定义布局(继承ViewGroup)。上面一篇文章已经介绍过了自定义控件,这篇文章将会继续介绍自定义布局。想要了解自定义控件,可以直接移步上一篇Android 中自定义View的初步总结。
自定义ViewGroup
我们知道在自定义View时,需要重写onMeasure(),onDraw()两个方法。那么在自定义ViewGroup时,我们主要重写两个方法onMeasure()和onLayout()。onMeasure()方法主要负责计算子View的大小,以及设置自己的宽高。onLayout()方法主要是负责设置子View的位置,给子View定位。
定义构造方法
    public CustViewGroup(Context context) {
        super(context);
    }

    public CustViewGroup(Context context, AttributeSet attrs) {
        super(context, attrs);
    }
如同在上一篇自定义View中说明的一样,在继承ViewGroup时,这两种构造方法,表示创建该ViewGroup对象时,两种不同的方式。我们可以直接通过代码的方式创建对象,或者通过布局文件来创建ViewGroup的对象。当通过布局文件创建时,第二种构造方法不可省略,因为需要从该方法中获得XML文件中的属性。
重写onMeasure()方法
重写这个方法,在方法中你需要计算出所有子view的宽高大小的值。然后根据子view的大小去设置ViewGroup的大小。
代码如下:
    @Override
    protected void onMeasure(int widthMeasureSpec, int heightMeasureSpec) {
        super.onMeasure(widthMeasureSpec, heightMeasureSpec);

        measureChildren(widthMeasureSpec, heightMeasureSpec); //测量该ViewGroup中的所有子View,会触发子view的onMeasure函数。如果不执行该方法,则下面计算子view的大小都为0;

        int widthMode = MeasureSpec.getMode(widthMeasureSpec);
        int heightMode = MeasureSpec.getMode(heightMeasureSpec);
        int widthSize = MeasureSpec.getSize(widthMeasureSpec);
        int heightSize = MeasureSpec.getSize(heightMeasureSpec);

        int childCount = getChildCount(); //获得当前ViewGroup中的子View的数量
        if(childCount == 0){
            setMeasuredDimension(100, 100); //当ViewGroup中没有子View时,设置该ViewGroup宽高为100.
        }else{
            int width = getMaxChildWidth(childCount);
            int height = getAllChildHeight(childCount);
            //如果ViewGroup的宽高都是包裹内容,计算子View的宽高,取子view的最大宽度和所有高度之和
            if(widthMode == MeasureSpec.AT_MOST && heightMode == MeasureSpec.AT_MOST){
                setMeasuredDimension(width, height);
            }else if(widthMode == MeasureSpec.EXACTLY && heightMode == MeasureSpec.EXACTLY){
                if(widthSize < width){
                    widthSize = width;
                }
                if(heightSize < height){
                    heightSize = height;
                }
                setMeasuredDimension(widthSize, heightSize);
            }else if(widthMode == MeasureSpec.AT_MOST && heightMode == MeasureSpec.EXACTLY){
                if(heightSize < height){
                    heightSize = height;
                }
                setMeasuredDimension(getMeasuredWidth(), heightSize);
            }else if(widthMode == MeasureSpec.EXACTLY && heightMode == MeasureSpec.AT_MOST){
                if(widthSize < width){
                    widthSize = width;
                }
                setMeasuredDimension(getMeasuredWidth(), heightSize);
            }
        }
    }

    /**
     * 获得子view的最大宽度
     * @param childCount
     * @return
     */
    private int getMaxChildWidth(int childCount) {
        int maxWidth = 0;
        for (int i = 0; i < childCount; i++) {
            View childView = getChildAt(i);
            if(childView.getMeasuredWidth() > maxWidth){
                maxWidth = childView.getMeasuredWidth();
            }
        }
        return maxWidth;
    }

    /**
     * 获得子view的高度之和
     * @param childCount
     * @return
     */
    private int getAllChildHeight(int childCount) {
        int height = 0 ;
        for (int i = 0; i < childCount; i++) {
            View childView = getChildAt(i);
            height += childView.getMeasuredHeight();
        }
        return height;
    }
如上,在计算每个子View的大小时,首先需要去执行measureChildren(),来计算出所有子View的宽高。否则直接调用childView.getMeasuredWidth()无效。
重写onLayout()方法
重写onLayout()方法,我们在onMeasure方法中,根据子View的大小设置了ViewGroup的宽高。接下来需要在该方法中设置各个子View的位置了。
代码如下:
  @Override
    protected void onLayout(boolean changed, int l, int t, int r, int b) {
        int childCount = getChildCount(); //获得当前ViewGroup中的子View的数量
        int currHeight = 0;
        for (int i = 0; i < childCount; i++) {
            View childView = getChildAt(i);
            int width = childView.getMeasuredWidth();
            int height = childView.getMeasuredHeight();
            childView.layout(5, currHeight, width, height + currHeight);
            currHeight += height;
        }
    }
如上所述的代码中,设置子view的位置,需要调用的方法是layout()方法。
完整源代码如下:
package com.yuminfeng.myviewpager;

import android.content.Context;
import android.util.AttributeSet;
import android.view.View;
import android.view.ViewGroup;

public class CustViewGroup extends ViewGroup{

    public CustViewGroup(Context context) {
        super(context);
    }

    public CustViewGroup(Context context, AttributeSet attrs) {
        super(context, attrs);
    }

    @Override
    protected void onMeasure(int widthMeasureSpec, int heightMeasureSpec) {
        super.onMeasure(widthMeasureSpec, heightMeasureSpec);

        measureChildren(widthMeasureSpec, heightMeasureSpec); //测量该ViewGroup中的所有子View,会触发子view的onMeasure函数。如果不执行该方法,则下面计算子view的大小都为0;

        int widthMode = MeasureSpec.getMode(widthMeasureSpec);
        int heightMode = MeasureSpec.getMode(heightMeasureSpec);
        int widthSize = MeasureSpec.getSize(widthMeasureSpec);
        int heightSize = MeasureSpec.getSize(heightMeasureSpec);

        int childCount = getChildCount(); //获得当前ViewGroup中的子View的数量
        if(childCount == 0){
            setMeasuredDimension(100, 100); //当ViewGroup中没有子View时,设置该ViewGroup宽高为100.
        }else{
            int width = getMaxChildWidth(childCount);
            int height = getAllChildHeight(childCount);
            //如果ViewGroup的宽高都是包裹内容,计算子View的宽高,取子view的最大宽度和所有高度之和
            if(widthMode == MeasureSpec.AT_MOST && heightMode == MeasureSpec.AT_MOST){
                setMeasuredDimension(width, height);
            }else if(widthMode == MeasureSpec.EXACTLY && heightMode == MeasureSpec.EXACTLY){
                if(widthSize < width){
                    widthSize = width;
                }
                if(heightSize < height){
                    heightSize = height;
                }
                setMeasuredDimension(widthSize, heightSize);
            }else if(widthMode == MeasureSpec.AT_MOST && heightMode == MeasureSpec.EXACTLY){
                if(heightSize < height){
                    heightSize = height;
                }
                setMeasuredDimension(getMeasuredWidth(), heightSize);
            }else if(widthMode == MeasureSpec.EXACTLY && heightMode == MeasureSpec.AT_MOST){
                if(widthSize < width){
                    widthSize = width;
                }
                setMeasuredDimension(getMeasuredWidth(), heightSize);
            }
        }
    }

    /**
     * 获得子view的最大宽度
     * @param childCount
     * @return
     */
    private int getMaxChildWidth(int childCount) {
        int maxWidth = 0;
        for (int i = 0; i < childCount; i++) {
            View childView = getChildAt(i);
            if(childView.getMeasuredWidth() > maxWidth){
                maxWidth = childView.getMeasuredWidth();
            }
        }
        return maxWidth;
    }

    /**
     * 获得子view的高度之和
     * @param childCount
     * @return
     */
    private int getAllChildHeight(int childCount) {
        int height = 0 ;
        for (int i = 0; i < childCount; i++) {
            View childView = getChildAt(i);
            height += childView.getMeasuredHeight();
        }
        return height;
    }

    @Override
    protected void onLayout(boolean changed, int l, int t, int r, int b) {
        int childCount = getChildCount(); //获得当前ViewGroup中的子View的数量
        int currHeight = 0;
        for (int i = 0; i < childCount; i++) {
            View childView = getChildAt(i);
            int width = childView.getMeasuredWidth();
            int height = childView.getMeasuredHeight();
            childView.layout(5, currHeight, width, height + currHeight);
            currHeight += height;
        }
    }


}
xml布局文件:
<?xml version="1.0" encoding="utf-8"?>
<FrameLayout xmlns:android="http://schemas.android.com/apk/res/android"
android:layout_width="match_parent"
android:layout_height="match_parent" >
<com.yuminfeng.myviewpager.CustViewGroup
android:layout_width="wrap_content"
android:layout_height="50dp"
android:background="@android:color/holo_green_light" >
<Button
android:id="@+id/button1"
android:layout_width="wrap_content"
android:layout_height="wrap_content"
android:text="Button" />
<Button
android:id="@+id/button2"
android:layout_width="wrap_content"
android:layout_height="wrap_content"
android:text="Button" />
<Button
android:id="@+id/button3"
android:layout_width="wrap_content"
android:layout_height="wrap_content"
android:text="Button" />
</com.yuminfeng.myviewpager.CustViewGroup>
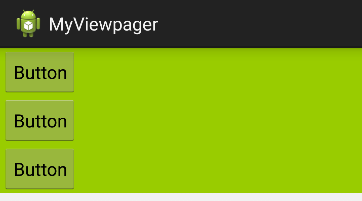
</FrameLayout>上面代码执行效果图,如下:
以上便完成了简单自定义布局的学习。


 9234
9234

 被折叠的 条评论
为什么被折叠?
被折叠的 条评论
为什么被折叠?
 到【灌水乐园】发言


