


项目需求:需要构建一个多用户登陆服务器上测试代码更新代码功能。同时共用服务器环境且禁止修改服务器环境(任何需要更改,新增包需求需要通过服务器管理员更新,保证环境与生产环境一致,该服务器实际上是测试环境)
初步设想:使用JupterLab作为核心服务,然后采用一个用户一个固定路径,采用路径分割的方式来限制用户。
jupyterlab
jupyter官方网址:
https://jupyter.org/
https://github.com/jupyter/notebook
JupterLab的官方网址:
https://jupyterlab.readthedocs.io/en/latest/getting_started/overview.html
https://jupyterlab.readthedocs.io/en/stable/getting_started/installation.html
JupterHub的官方网址:
https://jupyterhub.readthedocs.io/en/latest/
jupyter版本信息
jupyterlab                         3.6.5
jupyterlab-drawio                  0.9.0
jupyterlab-language-pack-zh-CN     4.0.post3
安装
win环境下
系统环境:win10
安装按照官方指引pip install jupyterlab
如果遇到vc安装包问题可以到以下网址下载。
https://patents.google.com/patent/CN101685452B/ko#title
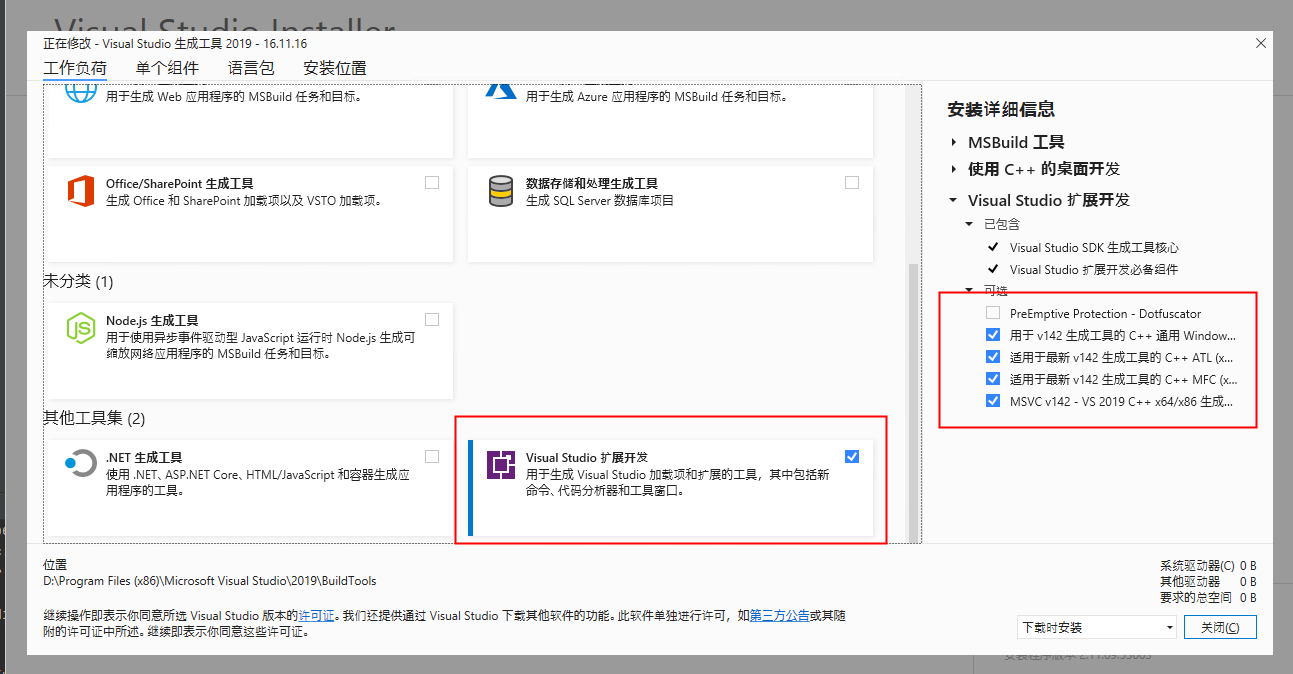
我的安装选项如下:

安装好后按照教程启动jupyter lab
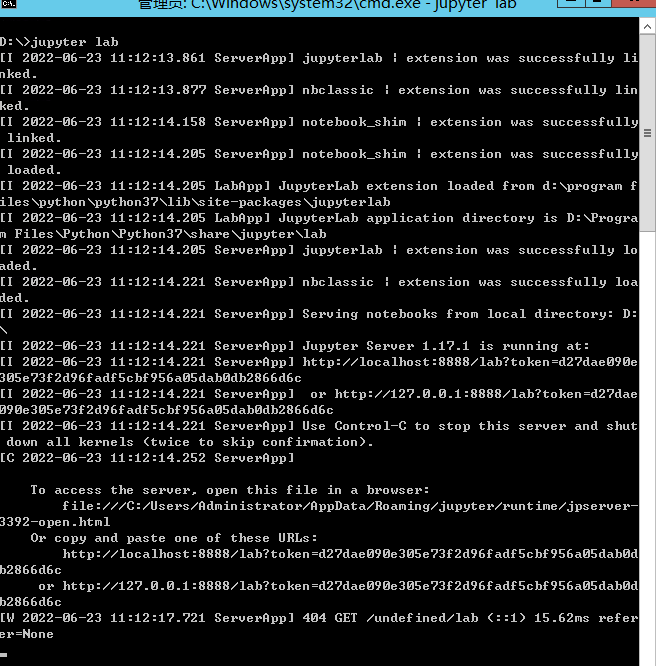
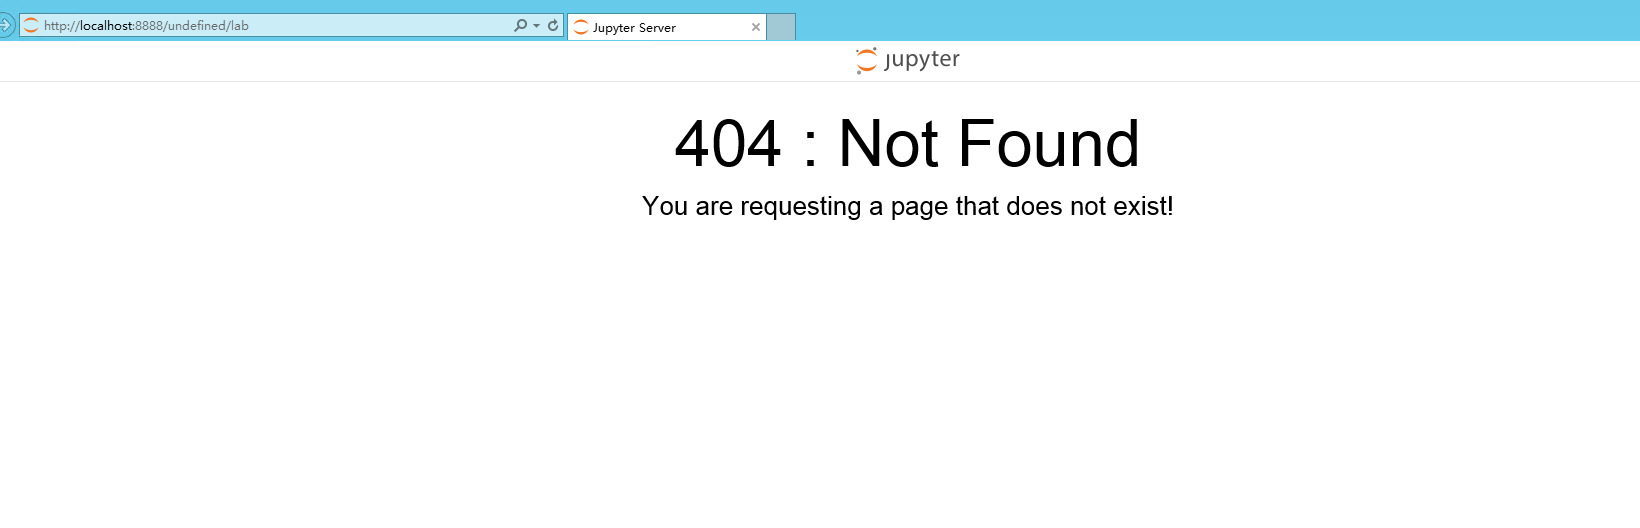
但是遇到404错误
但是运行jupyter notebook是正常的。
这里是配置文件出现问题。
Ubuntu 环境下
系统环境: Ubuntu 20.04.4 LTS (GNU/Linux 5.4.0-109-generic x86_64)
首先,先要安装sudo apt-get install nodejs npm
然后
sudo pip install jupyterlab
sudo pip install jupyterlab-drawio  # 画图功能
sudo pip install jupyterlab-language-pack-zh-CN  # 中文语言包
配置
具体参考方法:https://blog.csdn.net/GodDavide/article/details/89329758
先用jupyter lab --generate-config生成配置文件,会有文件生成的提示路径

这里我是写了一个小功能来自动生成我所需要的配置信息。
from notebook.auth import passwd
def addUser(user, password, notebook_dir, port):
    sha1 = passwd(password)
    # https://blog.csdn.net/GodDavide/article/details/8932975
    config = f'''
# Configuration file for jupyter-notebook.
c.InteractiveShellApp.matplotlib = 'inline'
c.ServerApp.base_url = '/{user}'  # url自定义域名
c.ServerApp.ip = '0.0.0.0' # 指定访问ip '0.0.0.0' 代表所有ip均可访问   ‘*’ 部分也可
c.ServerApp.open_browser = False  # 禁止自动打开浏览器
c.ServerApp.allow_root = True        # 以root身份运行
c.ServerApp.password = '{sha1}' # 刚才生成的秘钥
c.ServerApp.port = {port}           # 指定端口,默认8888
c.ServerApp.notebook_dir = '{notebook_dir}'     # 指定工作目录,注意win的符号
c.PAMAuthenticator.encoding = 'utf8'  #指定utf-8编码,解决读取中文路径或者文件乱码问题
c.ServerApp.allow_remote_access = True # 允许远程访问
c.GitLabConfig.allow_client_side_access_token = False
c.GitLabConfig.validate_cert = True
c.ServerApp.password_required = True
        '''
    with open("jupyter_lab_config.py", encoding="utf-8") as f:
        base_config = f.read()
    user_config = base_config + "\n" + config
    with open(f"jupyter_lab_config_{user}.py", encoding="utf-8", mode="w") as f:
        f.write(user_config)
if __name__ == '__main__':
    addUser('linyufeng', '123456', '/template_document/src/', '8888')
生成配置文档后,使用jupyter lab --config ~/.jupyter/jpconfig.py或者jupyter lab --config <config.py path>启动即可

设置成中文方便使用。
参考文章:http://zsduo.com/archives/244.html
参考文章:https://jupyterlab.readthedocs.io/en/stable/user/language.html
安装中文包:pip install jupyterlab-language-pack-zh-CN
安装完后在界面上选择即可。

Gitlab连接
第一次尝试: 非本次需求
参看文章:https://gitlab.com/beenje/jupyterlab-gitlab
参看文章:https://pypi.org/project/jupyterlab-gitlab/
官方网站上有提供具体的使用方法。首先使用pip install jupyterlab-gitlab安装,安装完后需要在配置文件中添加Gitlab的信息。

然后发现,这里的并不是gitlab的版本控制啥的,而是用于查看其他人的gitlab的浏览器。
第二次尝试
随后,又找到另外一个功能包
参考文章:https://github.com/jupyterlab/jupyterlab-git
使用pip install --upgrade jupyterlab jupyterlab-git
安装完后重新启动即可
其他插件
参考文章:https://kimtanyo.github.io/post/jupyter-lab-ji-chu-shi-yong-yu-cha-jian-kuo-zhan/
https://github.com/QuantStack/jupyterlab-drawio
部署
这里,选用supervisor作为调度启动,其启动配置文件如下
[program:manager-system__template_document]
command = jupyter lab --config /template_document/src/config/jupyter_config/jupyter_lab_config_linyufeng.py
directory =   /template_document/src/
autostart = true
autorestart = true
startretries = 3
user = root
priority = 1
redirect_stderr = true
stdout_logfile_maxbytes = 20MB
stdout_logfile_backups = 0
stdout_logfile = /template_document/pkg/supervisor/log/manager-system__template_document.log
JupterHub
单测试版本搭建好后,测试人员使用通过后,提出需要完善的用户管理,同时服务器也申请下来。所以将原本的设想改成使用hub做用户管理。
然后安装sudo apt-get install nodejs npm
python3 -m pip install jupyterhub
npm install -g configurable-http-proxy
python3 -m pip install jupyterlab notebook  # needed if running the notebook servers in the same environment
在安装完后运行sudo jupyterhub即可启动程序


跟lab一样,先用jupyterhub --generate-config生成默认配置文件。文件会自动生成在当前路径下面。
修改完配置文件后,使用jupyterhub -f /path/to/jupyterhub_config.py读取指定配置文件启动。
修改配置信息代码,其中user_info为账号密码的dict
    def addUser1(self, user_info):
        config = f'''
# Configuration file for jupyter-hub.
c.Spawner.cmd=["jupyter-labhub"]  # 使用lab
c.Spawner.notebook_dir='/data/cn/qhdata/python/git/universal_processor/universal_processor'  # 工作路径
c.JupyterHub.ip = '0.0.0.0'  # 指定访问ip '0.0.0.0' 代表所有ip均可访问   ‘*’ 部分也可
c.JupyterHub.port = 8000  # 指定端口,默认8000
# c.JupyterHub.base_url = '/qhdata/'  # url自定义域名
c.JupyterHub.shutdown_on_logout = True   # 用户登出时关闭servers
c.PAMAuthenticator.encoding = 'utf8'  #指定utf-8编码,解决读取中文路径或者文件乱码问题


# 用户验证
# https://jonuknownothingsnow.github.io/2019/04/13/%E8%B0%90%E9%97%A8%E6%AD%A6%E5%AD%A6%EF%BC%9A%E4%BD%BF%E7%94%A8JupyterHub%E6%90%AD%E5%BB%BA%E5%A4%9A%E7%94%A8%E6%88%B7%E6%95%B0%E6%8D%AE%E6%8E%A7%E5%88%B6%E5%8F%B0/
from tornado import gen
from jupyterhub.auth import Authenticator
def check_user_outside(username,password):
    user_info = {user_info}
    if user_info.get(username) == password:
        return True
    else:
        return False

class MyAuthenticator(Authenticator):
    def authenticate(self, handler, data):
        if check_user_outside(data["username"], data["password"]):
            return data["username"]

c.JupyterHub.admin_access = True
c.JupyterHub.authenticator_class = MyAuthenticator
c.JupyterHub.admin_users = set(["qhdata"])
                '''
        with open("jupyter_notebook_config/jupyterhub_config.py", encoding="utf-8") as f:
            base_config = f.read()
        user_config = base_config + "\n" + config
        with open(f"jupyter_notebook_config/jupyterhub_config_qhdata.py", encoding="utf-8", mode="w") as f:
            f.write(user_config)
但是发现即使用户区分了,还是使用同一个工作路径,暂时没有找到分开路径的方法。只能返回lab加粗样式模式处理。


 302
302


 被折叠的 条评论
为什么被折叠?
被折叠的 条评论
为什么被折叠?
 到【灌水乐园】发言


