


一、设计目的
- 掌握常用组件在布局文件中的设置
- 掌握在java程序中获取组件值
- 掌握对组件值得验证
- 掌握基本常用的监听器,和事件处理
- 掌握将组件值提交到下一个Activity活动的方法
二、设计内容
完成注册信息界面,部门列表框,单击确定检查提交成功、接受界面
三、软硬件环境
开发环境:Android Studio
模拟运行:Android Emulator – Nexus_5X_API_24
四、实现过程及结果
4.1 设计UI界面
4.1.1 将主布局修改为线性布局LinearLayout,垂直排列
<LinearLayout xmlns:android="http://schemas.android.com/apk/res/android"
    android:layout_width="match_parent"
    android:layout_height="match_parent"
android:orientation="vertical">
</LinearLayout>
4.1.2 在主布局中添加用户名文本框和输入框,添加密码文本框和输入框
<TextView
        android:layout_width="wrap_content"
        android:layout_height="wrap_content"
        android:text="用户名!"
        />
    <EditText
        android:id="@+id/name"
        android:layout_width="match_parent"
        android:layout_height="wrap_content" />
    <TextView
        android:layout_width="wrap_content"
        android:layout_height="wrap_content"
        android:text="密码"/>
    <EditText
        android:id="@+id/password"
        android:layout_width="match_parent"
        android:layout_height="wrap_content"
        android:inputType="textPassword"/>
4.1.3 在主布局中添加性别文本框和复选框
<TextView
        android:layout_width="wrap_content"
        android:layout_height="wrap_content"
        android:text="性别"/>
<RadioGroup
        android:id="@+id/sex"
        android:layout_width="wrap_content"
        android:layout_height="wrap_content"
        android:orientation="horizontal">

        <RadioButton
            android:id="@+id/man"
            android:layout_width="match_parent"
            android:layout_height="match_parent"
            android:text="男"/>
        <RadioButton
            android:id="@+id/woman"
            android:layout_width="match_parent"
            android:layout_height="match_parent"
            android:text="女"/>
    </RadioGroup>
4.1.4 在主布局中添加联系电话文本框和输入框,设置输入类型为android:inputType=”text|phone”
<TextView
        android:layout_width="wrap_content"
        android:layout_height="wrap_content"
        android:text="联系电话"/>
<EditText
        android:id="@+id/tel"
        android:layout_width="match_parent"
        android:layout_height="wrap_content"
        android:inputType="text|phone"/>
4.1.5 在主布局中添加部门文本框和列表框,设置列表框数据来源为depts.xml
<TextView
        android:layout_width="wrap_content"
        android:layout_height="wrap_content"
        android:text="部门"/>
<Spinner
        android:id="@+id/dept"
        android:entries="@array/dept"
        android:layout_width="wrap_content"
        android:layout_height="wrap_content"></Spinner>
4.1.6 在主布局中添加爱好文本框和一个线性布局,该布局中放置四个CheckBox组件,分别表示书籍、运动、音乐和电影
<TextView
        android:text="爱好"
        android:layout_width="wrap_content"
        android:layout_height="wrap_content" />
    <LinearLayout
        android:layout_width="wrap_content"
        android:layout_height="wrap_content">
        <CheckBox
            android:id="@+id/book"
            android:layout_width="wrap_content"
            android:layout_height="wrap_content"
            android:text="书籍"/>
        <CheckBox
            android:id="@+id/sport"
            android:layout_width="wrap_content"
            android:layout_height="wrap_content"
            android:text="运动"/>
        <CheckBox
            android:id="@+id/music"
            android:layout_width="wrap_content"
            android:layout_height="wrap_content"
            android:text="音乐"/>
        <CheckBox
            android:id="@+id/movie"
            android:layout_width="wrap_content"
            android:layout_height="wrap_content"
android:text="电影"/>
                    </LinearLayout>
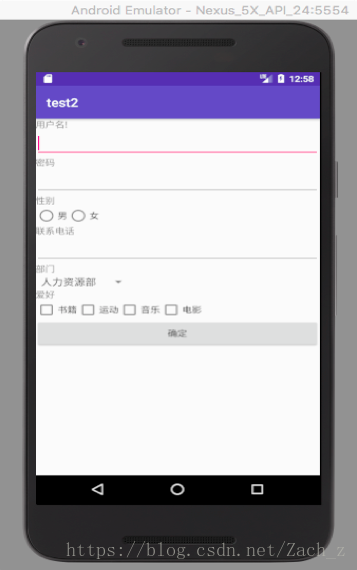
4.1.7 在主布局中最后添加一个确定按钮,设置android:onClick属性值为myclink,即当单机确定按钮时会调用myclick方法
<Button
        android:id="@+id/ok"
        android:layout_width="match_parent"
        android:layout_height="wrap_content"
        android:text="确定"
        android:onClick="myclick"/>
4.1.8完成后的界面如图所示:
4.2 表示部门的Spinner组件,其数据来源文件depts.xml位于res/values目录下
depts.xml:
    <?xml version="1.0" encoding="utf-8"?>
<resources>
        <string-array name="dept">
            <item>人力资源部</item>
            <item>销售部</item>
            <item>财务部</item>
            <item>开发部</item>
        </string-array>
</resources>
4.3 设计后台程序
4.3.1 在主Activity文件中,定义布局中的各组件对象和一个存放爱好中各复选框对象的favs动态数组
private ArrayList<CheckBox> favs;
private EditText userName;
private EditText password;
private EditText telephone;
private Spinner dept;
private RadioGroup sex;
private RadioButton man;
private RadioButton woman;
4.3.2 在onCreate()方法中,获取各组件
protected void onCreate(Bundle savedInstanceState) {
        super.onCreate(savedInstanceState);
        setContentView(R.layout.activity_main);
        userName=(EditText)findViewById(R.id.name);
        password=(EditText)findViewById(R.id.password);
        telephone=(EditText)findViewById(R.id.tel);
        sex=(RadioGroup)findViewById(R.id.sex);
        dept=(Spinner)findViewById(R.id.dept);
         man=(RadioButton)findViewById(R.id.man);
        woman=(RadioButton)findViewById(R.id.woman);
        favs=new ArrayList<CheckBox>();
        CheckBox book=(CheckBox) findViewById(R.id.book);
        CheckBox sport=(CheckBox) findViewById(R.id.sport);
        CheckBox music=(CheckBox) findViewById(R.id.music);
        CheckBox movie=(CheckBox) findViewById(R.id.movie);
        favs.add(book);
        favs.add(sport);
        favs.add(music);
        favs.add(movie);
    }
4.3.3 获取性别方法
public String getSex(){
RadioButtonradioButton= (RadioButton)findViewById(sex.getCheckedRadioButtonId());
    return radioButton.getText().toString();
    }
4.3.4 获取爱好方法,爱好以逗号分隔
public String getFavorite()
                {
                String favo="";
                for(CheckBox cb:favs){
                    if(cb.isChecked()){
                        favo+=cb.getText().toString();
                        favo+=",";
                    }
                }
                if(!"".equals(favo))
                    favo=favo.substring(0,favo.length()-1);
                else
                    favo="您未选择爱好!";
                return favo;
                }
4.3.5 当检查通过时,输出注册信息,提交到下一个Activity页面
public void myclick(View view){
        //if (true){
            StringBuilder sb =new StringBuilder();
            sb.append("用户名: "+userName.getText().toString()+"\n");
        Log.v("name","done");
            sb.append("性别: "+getSex()+"\n");
        Log.v("sex","done");
            sb.append("电话: "+telephone.getText().toString()+"\n");
        Log.v("tel","done");
            sb.append("部门: "+dept.getSelectedItem().toString()+"\n");
        Log.v("part","done");
            sb.append("爱好: "+getFavorite()+"\n");
        Log.v("fav","done");
            Toast.makeText(this,sb.toString(),Toast.LENGTH_LONG).show();
        Intent intent = new Intent();
        intent.setClass(this,ResultActivity.class);
        intent.putExtra("info",sb.toString());
        this.startActivity(intent);
        //}
    }
4.3.6 创建一个result_activity.xml布局文件,放置一个文本框组件,并创建ResultActivity类,修改onCreate()方法,显示上页传来的数据
result_activity.xml:
<?xml version="1.0" encoding="utf-8"?>
<android.support.constraint.ConstraintLayout xmlns:android="http://schemas.android.com/apk/res/android"
    xmlns:app="http://schemas.android.com/apk/res-auto"
    xmlns:tools="http://schemas.android.com/tools"
    android:layout_width="match_parent"
    android:layout_height="match_parent"
    tools:context="com.example.zkj.test2.ResultActivity">

    <TextView
        android:id="@+id/result"
        android:layout_width="match_parent"
        android:layout_height="match_parent" />

</android.support.constraint.ConstraintLayout>

        ResultActivity:
        protected void onCreate(Bundle savedInstanceState) {
        super.onCreate(savedInstanceState);
        requestWindowFeature(Window.FEATURE_NO_TITLE);
        setContentView(R.layout.activity_result);
        TextView result =(TextView)findViewById(R.id.result);
        result.setText("从前一页面传来如下:\n\n"+this.getIntent().getStringExtra("info"));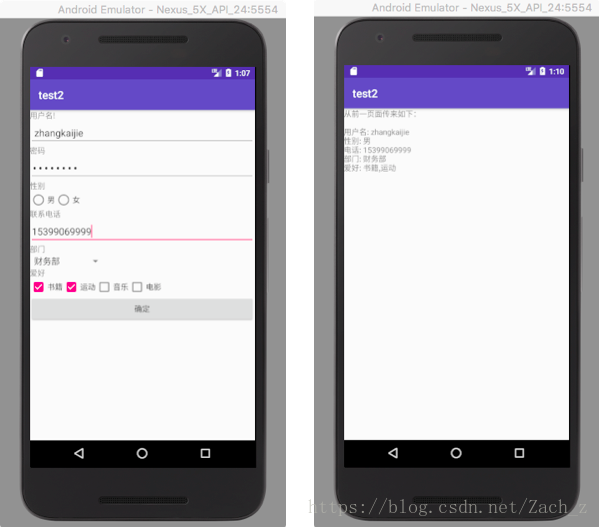


 1048
1048


 被折叠的 条评论
为什么被折叠?
被折叠的 条评论
为什么被折叠?
 到【灌水乐园】发言


