


引言
神经网络作为一种强大的机器学习模型,在近年来的发展中展现出了令人瞩目的成就。从最早的感知器到如今的卷积神经网络和循环神经网络,神经网络模型不断演化和完善,已经成为解决各种复杂问题的重要工具。本实验将重点探讨两种前馈神经网络模型:多层感知器(MLP)和卷积神经网络(CNN)。通过实验,我们将深入了解这些模型的原理、实现方法以及在实际数据集上的应用。通过对神经网络模型的学习和实践,我们将能够更好地理解和应用这些强大的工具,为解决现实世界中的问题提供更加有效的方法和技术。
实验内容
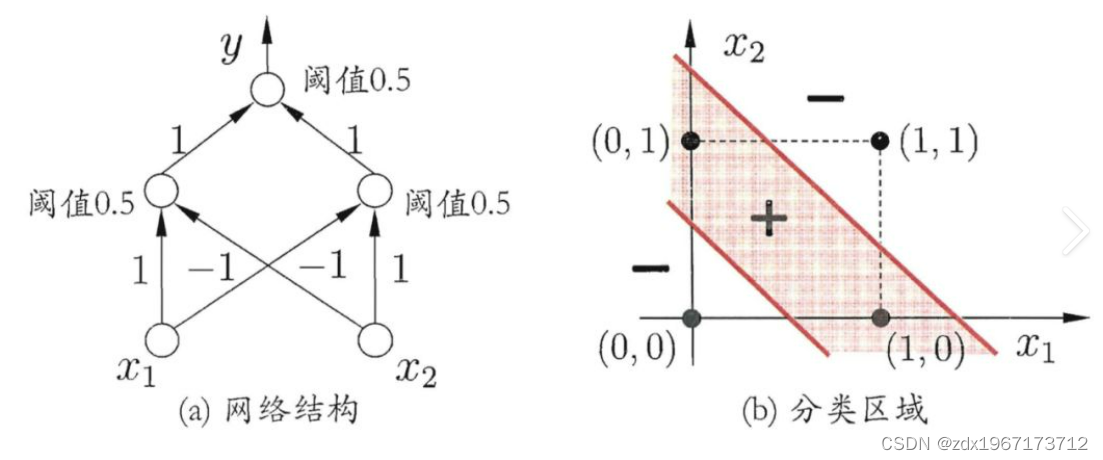
在实验中,我们通过观察感知器来介绍了神经网络的基础知识,然而感知器存在一个历史性的缺陷,即无法学习数据中的某些重要模式。例如,考虑一个经典的非线性问题:XOR问题。在XOR问题中,数据点不能被一条直线划分,这就使得简单的感知器无法解决这类问题,因为它只能处理线性可分的情况。这一问题在图4-1所示的数据集中得到了展示,无法用任何一条直线将它们分开。
在本实验中,我们将进一步探讨神经网络模型,特别是前馈神经网络,其中包括多层感知器(MLP)和卷积神经网络(CNN)。多层感知器通过将多个感知器组合成单个层,并将多个层堆叠在一起来扩展我们在实验3中所学的简单感知器。我们将探索多层感知器的结构,并通过一个多层分类的示例来展示其应用。
另一方面,卷积神经网络(CNN)受到窗口滤波器的启发,特别适用于处理数字信号。通过卷积操作,CNN能够学习局部特征和模式,这使得它在计算机视觉和序列数据处理等领域具有广泛的应用。我们将概述CNN的结构,并演示如何使用CNN对姓氏进行分类的示例。
本实验将重点介绍这两种前馈神经网络模型,并将它们与另一类神经网络模型——递归神经网络(RNNs)进行比较。递归神经网络允许信息在网络中循环传播,这使得它们特别适用于处理序列数据。在接下来的实验中,我们将深入研究RNNs及其在神经网络中的作用。
在学习这些模型的过程中,了解数据张量的大小和形状对于理解模型如何工作至关重要。不同类型的神经网络层对数据张量的计算产生不同的影响,因此理解这些影响对于深入理解模型的工作原理至关重要。
实验环境
- Python 3.6.7
具体代码实现
4.1 感知器与 XOR 问题
4.1.1 感知器模型

4.1.2 XOR 问题示例
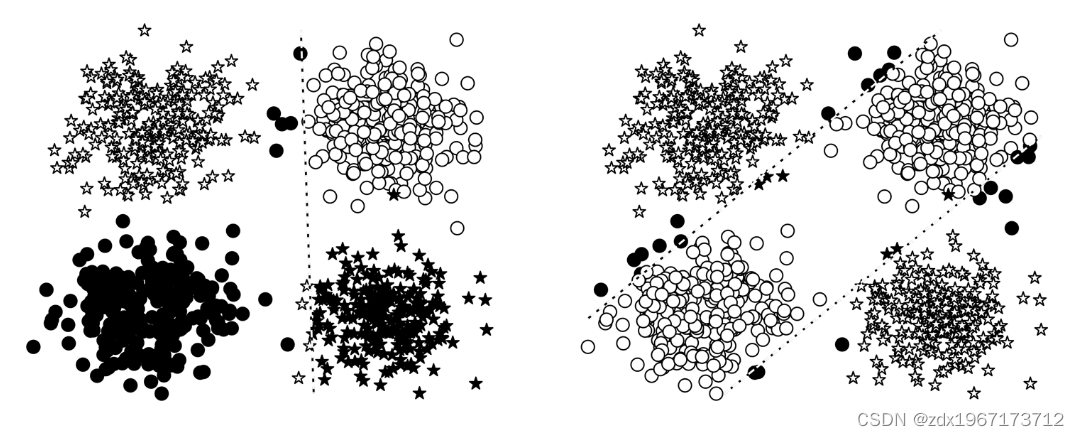
让我们看一下前面描述的XOR示例,看看感知器与MLP之间会发生什么。在这个例子中,我们在一个二元分类任务中训练感知器和MLP:星和圆。每个数据点是一个二维坐标。在不深入研究实现细节的情况下,最终的模型预测如图4-3所示。在这个图中,错误分类的数据点用黑色填充,而正确分类的数据点没有填充。在左边的面板中,从填充的形状可以看出,感知器在学习一个可以将星星和圆分开的决策边界方面有困难。然而,MLP(右面板)学习了一个更精确地对恒星和圆进行分类的决策边界。
4.2 多层感知器(MLP)
4.2.1 多层感知器实现
在我们在例4-1中给出的实现中,我们用PyTorch的两个线性模块实例化了这个想法。线性对象被命名为fc1和fc2,它们遵循一个通用约定,即将线性模块称为“完全连接层”,简称为“fc层”。除了这两个线性层外,还有一个修正的线性单元(ReLU)非线性(在实验3“激活函数”一节中介绍),它在被输入到第二个线性层之前应用于第一个线性层的输出。由于层的顺序性,必须确保层中的输出数量等于下一层的输入数量。使用两个线性层之间的非线性是必要的,因为没有它,两个线性层在数学上等价于一个线性层4,因此不能建模复杂的模式。MLP的实现只实现反向传播的前向传递。这是因为PyTorch根据模型的定义和向前传递的实现,自动计算出如何进行向后传递和梯度更新。
import torch
import torch.nn as nn
import torch.nn.functional as F

seed = 1337

torch.manual_seed(seed)
torch.cuda.manual_seed_all(seed)
import torch.nn as nn
import torch.nn.functional as F

class MultilayerPerceptron(nn.Module):
    def __init__(self, input_dim, hidden_dim, output_dim):
        """
        Args:
            input_dim (int): the size of the input vectors
            hidden_dim (int): the output size of the first Linear layer
            output_dim (int): the output size of the second Linear layer
        """
        super(MultilayerPerceptron, self).__init__()
        self.fc1 = nn.Linear(input_dim, hidden_dim)
        self.fc2 = nn.Linear(hidden_dim, output_dim)

    def forward(self, x_in, apply_softmax=False):
        """The forward pass of the MLP

        Args:
            x_in (torch.Tensor): an input data tensor.
                x_in.shape should be (batch, input_dim)
            apply_softmax (bool): a flag for the softmax activation
                should be false if used with the Cross Entropy losses
        Returns:
            the resulting tensor. tensor.shape should be (batch, output_dim)
        """
        intermediate = F.relu(self.fc1(x_in))
        output = self.fc2(intermediate)

        if apply_softmax:
            output = F.softmax(output, dim=1)
        return output
4.2.2 实例化和测试 MLP
4.2.2.1实例化
我们实例化了MLP。由于MLP实现的通用性,可以为任何大小的输入建模。为了演示,我们使用大小为3的输入维度、大小为4的输出维度和大小为100的隐藏维度。请注意,在print语句的输出中,每个层中的单元数很好地排列在一起,以便为维度3的输入生成维度4的输出。
import torch
import torch.nn as nn
import torch.nn.functional as F

class MLP(nn.Module):
    def __init__(self, input_dim, hidden_dim, output_dim):
        super(MLP, self).__init__()
        self.fc1 = nn.Linear(input_dim, hidden_dim)
        self.fc2 = nn.Linear(hidden_dim, output_dim)

    def forward(self, x):
        x = F.relu(self.fc1(x))
        x = self.fc2(x)
        return x

# 实例化MLP
input_dim = 3
hidden_dim = 100
output_dim = 4
model = MLP(input_dim, hidden_dim, output_dim)

# 打印模型结构
print(model)
4.2.2.2测试
# 生成随机输入数据
input_data = torch.randn(1, input_dim)

# 通过MLP模型进行前向传递
output_data = model(input_data)

# 打印输入和输出数据
print(f"Input: {input_data}")
print(f"Output: {output_data}")
4.3 多层感知器在姓氏分类任务中的应用
在本节中,我们将使用多层感知机对姓氏进行分类,将之与其国籍对应。根据公开观察到的数据推断人口统计信息(如国籍),可以应用于产品推荐,以确保不同人口统计数据的用户获得公平的结果。然而,在建模和在产品中使用这些属性时,必须注意一点——人口统计和其他自定义信息统称为“受保护属性(protected attributes)”。
我们首先对每个姓氏的字符进行拆分,并像对待“示例:分类餐馆评论的情感”一节中的单词一样对待这些字符。字符层模型在结构和实现上与基于单词的模型基本相似。你应该从这个例子中吸取的一个重要教训是:多层感知机的实现和训练是从我们在第三章中所学感知机的实现和训练直接发展来的。
本节首先描述姓氏数据集及其预处理步骤,然后我们使用Vocabulary,Vectorizer和DataLoader类逐步完成从姓氏字符串到向量化minibatch的管道。接下来,我们将介绍SurnameClassifier模型及其设计背后的过程,完成训练过程,并通过评估模型在数据集测试部分的表现以及描述一个新姓氏的推断过程来结束本例。
4.3.1 姓氏数据集
在这个例子中,我们介绍了一个姓氏数据集,包括来自18个不同国家的10000个姓氏。该数据集具备一些有趣的属性:首先,它是相当不平衡的,前三的类占数据的60%以上。其次,在国籍和姓氏拼写体系之间有种有效而直观的关系。
我们对数据集进行了子采样和分组,以减少不平衡并确保跨训练、验证和测试集的类标签分布具有可比性。实现上,SurnameDataset类与第三章中的ReviewDataset几近相同,只是在__getitem__方法上略有差异,如示例4-3所示。
class SurnameDataset(Dataset):
    # Implementation is nearly identical to Section 3.5


    def __getitem__(self, index):
        row = self._target_df.iloc[index]
        surname_vector = \
            self._vectorizer.vectorize(row.surname)
        nationality_index = \
            self._vectorizer.nationality_vocab.lookup_token(row.nationality)


        return {'x_surname': surname_vector,
                'y_nationality': nationality_index}
4.3.2 Vocabulary,Vectorizer和DataLoader
为了使用字符对姓氏进行分类,我们使用Vocabulary,Vectorizer和DataLoader将姓氏字符串转换为向量化的minibatch。
4.3.2.1 Vocabulary类
本例中使用的词汇类与“example: Classifying Sentiment of Restaurant Reviews”中的词汇完全相同,该词汇类将Yelp评论中的单词映射到对应的整数。简要概述一下,词汇表是两个Python字典的协调,这两个字典在令牌(在本例中是字符)和整数之间形成一个双射;也就是说,第一个字典将字符映射到整数索引,第二个字典将整数索引映射到字符。add_token方法用于向词汇表中添加新的令牌,lookup_token方法用于检索索引,lookup_index方法用于检索给定索引的令牌(在推断阶段很有用)。与Yelp评论的词汇表不同,我们使用的是one-hot词汇表,不计算字符出现的频率,只对频繁出现的条目进行限制。这主要是因为数据集很小,而且大多数字符足够频繁。
4.3.2.2 SurnameVectorizer
Vocabulary将单个token(字符)转换为整数,SurnameVectorizer负责应用Vocabulary并将姓氏转换为向量。示例4给出了实现。
实现SurnameVectorizer
class SurnameVectorizer(object):
    def __init__(self, surname_vocab, nationality_vocab):
        self.surname_vocab = surname_vocab
        self.nationality_vocab = nationality_vocab

    def vectorize(self, surname):
        vocab = self.surname_vocab
        one_hot = np.zeros(len(vocab), dtype=np.float32)
        for token in surname:
            one_hot[vocab.lookup_token(token)] = 1
        return one_hot

    @classmethod
    def from_dataframe(cls, surname_df):
        surname_vocab = Vocabulary(unk_token="@")
        nationality_vocab = Vocabulary(add_unk=False)
        for index, row in surname_df.iterrows():
            for letter in row.surname:
                surname_vocab.add_token(letter)
            nationality_vocab.add_token(row.nationality)
        return cls(surname_vocab, nationality_vocab)
4.3.3 SurnameClassifier模型
示例中的SurnameClassifier是本章前面所介绍的多层感知机的实现。
使用多元感知机的SurnameClassifier
import torch.nn as nn
import torch.nn.functional as F

class SurnameClassifier(nn.Module):
    def __init__(self, input_dim, hidden_dim, output_dim):
        super(SurnameClassifier, self).__init__()
        self.fc1 = nn.Linear(input_dim, hidden_dim)
        self.fc2 = nn.Linear(hidden_dim, output_dim)

    def forward(self, x_in, apply_softmax=False):
        intermediate_vector = F.relu(self.fc1(x_in))
        prediction_vector = self.fc2(intermediate_vector)
        if apply_softmax:
            prediction_vector = F.softmax(prediction_vector, dim=1)
        return prediction_vector
4.3.4 训练例程
训练例程包括超参数设置、数据集和模型的实例化、训练循环等。因测试结果相同,我们只展示了args以及本例中的训练例程与“示例:餐厅评论情绪分类”中的示例之间的主要区别。
args = Namespace(
    # Data and path information
    surname_csv="./surnames_with_splits.csv",
    vectorizer_file="vectorizer.json",
    model_state_file="model.pth",
    save_dir="model_storage/ch4/surname_mlp",
    # Model hyper parameters
    hidden_dim=300,
    # Training  hyper parameters
    seed=1337,
    num_epochs=100,
    early_stopping_criteria=5,
    learning_rate=0.001,
    batch_size=64,
    # Runtime options
    cuda=False,
    reload_from_files=False,
    expand_filepaths_to_save_dir=True,
)

if args.expand_filepaths_to_save_dir:
    args.vectorizer_file = os.path.join(args.save_dir,
                                        args.vectorizer_file)

    args.model_state_file = os.path.join(args.save_dir,
                                         args.model_state_file)

    print("Expanded filepaths: ")
    print("\t{}".format(args.vectorizer_file))
    print("\t{}".format(args.model_state_file))

# Check CUDA
if not torch.cuda.is_available():
    args.cuda = False

args.device = torch.device("cuda" if args.cuda else "cpu")

print("Using CUDA: {}".format(args.cuda))


# Set seed for reproducibility
set_seed_everywhere(args.seed, args.cuda)

# handle dirs
handle_dirs(args.save_dir)
4.3.4.1 训练循环
训练循环包括五个步骤:零梯度、计算输出、计算损失、反向传播和梯度步。
训练循环的代码段
optimizer.zero_grad()
y_pred = classifier(batch_dict['x_surname'])
loss = loss_func(y_pred, batch_dict['y_nationality'])
loss_batch = loss.to("cpu").item()
running_loss += (loss_batch - running_loss) / (batch_index + 1)
loss.backward()
optimizer.step()
4.3.5 模型评估和预测
模型评估和预测包括在测试集上评估、分类新姓氏和获取新姓氏的前k个预测。要理解模型的性能,应该使用定量和定性方法分析模型。定量测量出的测试数据的误差,决定了分类器能否推广到不可见的例子。定性地说,可以通过查看分类器的top-k预测来为一个新示例开发模型所了解的内容的直觉。
4.3.5.1 在测试集上评估
在测试数据上评估模型时,调用classifier.eval()方法以防止更新模型参数。
评价SurnameClassifier测试数据,我们执行相同的常规的routine文本分类的例子“餐馆评论的例子:分类情绪”:我们将数据集设置为遍历测试数据,调用classifier.eval()方法,并遍历测试数据以同样的方式与其他数据。在这个例子中,调用classifier.eval()可以防止PyTorch在使用测试/评估数据时更新模型参数。
该模型对测试数据的准确性达到50%左右。如果在附带的notebook中运行训练例程,会注意到在训练数据上的性能更高。这是因为模型总是更适合它所训练的数据,所以训练数据的性能并不代表新数据的性能。如果遵循代码,你可以尝试隐藏维度的不同大小,应该注意到性能的提高。然而,这种增长不会很大(尤其是与“用CNN对姓氏进行分类的例子”中的模型相比)。其主要原因是收缩的onehot向量化方法是一种弱表示。虽然它确实简洁地将每个姓氏表示为单个向量,但它丢弃了字符之间的顺序信息,这对于识别起源非常重要。
4.3.5.2 分类一个新姓氏
给定一个姓氏字符串,通过向量化过程和模型预测,获取国籍预测。
def predict_nationality(name, classifier, vectorizer):
    vectorized_name = vectorizer.vectorize(name)
    vectorized_name = torch.tensor(vectorized_name).view(1, -1)
    result = classifier(vectorized_name, apply_softmax=True)

    probability_values, indices = result.max(dim=1)
    index = indices.item()

    predicted_nationality = vectorizer.nationality_vocab.lookup_index(index)
    probability_value = probability_values.item()

    return {'nationality': predicted_nationality,
            'probability': probability_value}
4.3.5.3 获取新姓氏的前k个预测
使用torch.topk()函数获取前k个预测。
def predict_topk_nationality(name, classifier, vectorizer, k=5):
    vectorized_name = vectorizer.vectorize(name)
    vectorized_name = torch.tensor(vectorized_name).view(1, -1)
    prediction_vector = classifier(vectorized_name, apply_softmax=True)
    probability_values, indices = torch.topk(prediction_vector, k=k)

    # returned size is 1,k
    probability_values = probability_values.detach().numpy()[0]
    indices = indices.detach().numpy()[0]

    results = []
    for prob_value, index in zip(probability_values, indices):
        nationality = vectorizer.nationality_vocab.lookup_index(index)
        results.append({'nationality': nationality,
                        'probability': prob_value})

    return results
4.3.6 MLPs正则化:权重正则化和结构正则化(或Dropout)
正则化有助于解决过拟合问题。对于深度模型,dropout是一种重要的结构正则化方法。请注意,dropout只适用于训练期间,不适用于评估期间。作为练习,可以尝试带有dropout的SurnameClassifier模型,看看它如何更改结果。
import torch.nn as nn
import torch.nn.functional as F

class MultilayerPerceptron(nn.Module):
    def __init__(self, input_dim, hidden_dim, output_dim):
        """
        Args:
            input_dim (int): the size of the input vectors
            hidden_dim (int): the output size of the first Linear layer
            output_dim (int): the output size of the second Linear layer
        """
        super(MultilayerPerceptron, self).__init__()
        self.fc1 = nn.Linear(input_dim, hidden_dim)
        self.fc2 = nn.Linear(hidden_dim, output_dim)

    def forward(self, x_in, apply_softmax=False):
        """The forward pass of the MLP

        Args:
            x_in (torch.Tensor): an input data tensor.
                x_in.shape should be (batch, input_dim)
            apply_softmax (bool): a flag for the softmax activation
                should be false if used with the Cross Entropy losses
        Returns:
            the resulting tensor. tensor.shape should be (batch, output_dim)
        """
        intermediate = F.relu(self.fc1(x_in))
        output = self.fc2(F.dropout(intermediate, p=0.5))

        if apply_softmax:
            output = F.softmax(output, dim=1)
        return output
4.4 卷积神经网络(CNN)
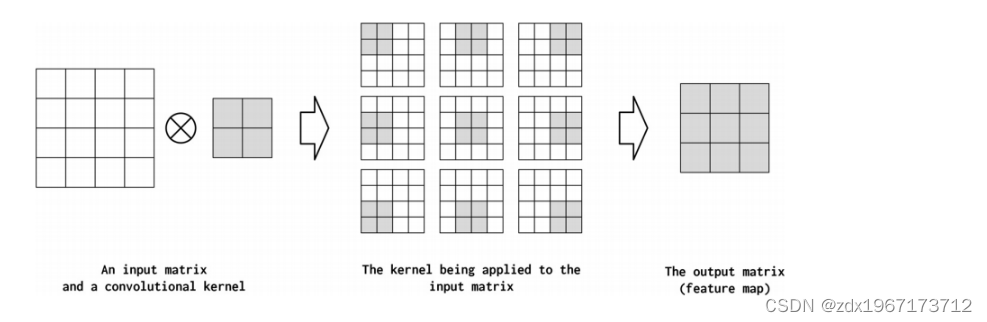
卷积神经网络(CNN)是一种专门设计用于处理具有空间结构的数据的神经网络模型。它的设计灵感来自于人类视觉系统对视觉输入的处理方式。在CNN中,卷积层通过应用卷积操作来检测输入数据中的局部模式或特征,从而创建有意义的空间结构。这种设计使得CNN在处理图像、语音、文本等数据时非常有效。
在CNN中,主要的超参数包括卷积核大小(kernel size)、步幅(stride)、填充(padding)、扩张(dilation)等。这些超参数控制了卷积层的行为和输出的形状。例如,卷积核大小决定了每次卷积操作检测的局部信息的范围,而步幅控制了卷积核在输入数据上的移动步长,填充则可以保持输出大小不变或者增大,而扩张可以增大卷积核的感受野。
CNN的核心组成部分是卷积层、池化层和激活函数。卷积层用于检测输入数据中的局部模式,池化层用于降低特征图的空间尺寸并减少参数数量,激活函数则引入非线性特性。通过堆叠这些层,CNN能够逐渐提取输入数据的高级特征,并用于最终的分类或回归任务。
4.4.1 CNN 超参数
4.4.1.1 卷积操作的维度
卷积核大小决定了卷积核的维度(例如,2x2或3x3)。较大的核大小可以捕获更多的局部信息,但会减小输出特征图的尺寸。较小的核大小则可以捕获更细粒度的特征。
4.4.1.2 通道
非正式地,通道(channel)是指沿输入中的每个点的特征维度。
4.4.1.3 核大小
卷积核大小决定了卷积核的维度(例如,2x2或3x3)。较大的核大小可以捕获更多的局部信息,但会减小输出特征图的尺寸。较小的核大小则可以捕获更细粒度的特征。
4.4.1.4 Stride
步幅决定了卷积核在输入矩阵上滑动的步长。如果步幅为1,卷积核在每次滑动时都会重叠。较大的步幅会导致输出特征图的尺寸减小。
4.4.1.5 Padding
填充是指在输入数据的边缘添加额外的值(通常为零),以控制输出特征图的尺寸。通过填充,可以确保输出特征图与输入矩阵的尺寸相同。
4.4.1.6 Dilation
扩张控制卷积核应用于输入矩阵时的元素间距。扩张率较高意味着卷积核的元素之间有更多的间隔,从而可以捕获更大范围的输入信息。
4.4.2 简单 CNN 模型实现
构造特征向量的第一步是将PyTorch的Conv1d类的一个实例应用到三维数据张量。通过检查输出的大小,你可以知道张量减少了多少
batch_size = 2
one_hot_size = 10
sequence_width = 7
data = torch.randn(batch_size, one_hot_size, sequence_width)
conv1 = Conv1d(in_channels=one_hot_size, out_channels=16,
               kernel_size=3)
intermediate1 = conv1(data)
print(data.size())
print(intermediate1.size())
4.5 使用 CNN 对姓氏进行分类
为了证明CNN的有效性,让我们应用一个简单的CNN模型来分类姓氏。这项任务的许多细节与前面的MLP示例相同,但真正发生变化的是模型的构造和向量化过程。模型的输入,而不是我们在上一个例子中看到的收缩的onehot,将是一个onehot的矩阵。这种设计将使CNN能够更好地“view”字符的排列,并对在“示例:带有多层感知器的姓氏分类”中使用的收缩的onehot编码中丢失的序列信息进行编码。
4.5.1 SurnameDataset类
我们已经在“姓氏数据集”一节中介绍过姓氏数据集。在本例中,我们会使用相同的数据集,但是在实现上有一个不同之处:数据集由独热向量矩阵而非压缩的独热向量组成。为了实现这一点,我们修改了数据集类,使其跟踪最长的姓氏,并将其作为矩阵中包含的行数提供给向量化器。列的数量是独热向量的大小(词汇表的大小)。以下是对 SurnameDataset.__getitem__() 所做的修改:
class SurnameDataset(Dataset):
    # ... 从4.2复制的现有实现

    def __getitem__(self, index):
        row = self._target_df.iloc[index]

        surname_matrix = self._vectorizer.vectorize(row.surname)

        nationality_index = self._vectorizer.nationality_vocab.lookup_token(row.nationality)

        return {'x_surname': surname_matrix,
                'y_nationality': nationality_index}
4.5.2 Vocabulary, Vectorizer, and DataLoader
在本例中,尽管 Vocabulary 和 DataLoader 的实现方式与之前“ Vocabulary,Vectorizer 和 DataLoader”一节中的示例相同,但我们修改了 Vectorizer 的 vectorize() 方法,以适应 CNN 模型的需求。具体来说,该函数将字符串中的每个字符映射到一个整数,然后使用该整数构造一个由独热向量组成的矩阵。重要的是,矩阵中的每一列都是不同的独热向量,主要原因是我们将使用的 Conv1d 层要求数据张量在0维上具有 batch,在第1维上具有 channel,在第2维上具有 feature。
class SurnameVectorizer(object):
    """ The Vectorizer which coordinates the Vocabularies and puts them to use"""
    def vectorize(self, surname):
        """
        Args:
            surname (str): the surname
        Returns:
            one_hot_matrix (np.ndarray): a matrix of onehot vectors
        """
        one_hot_matrix_size = (len(self.character_vocab), self.max_surname_length)
        one_hot_matrix = np.zeros(one_hot_matrix_size, dtype=np.float32)

        for position_index, character in enumerate(surname):
            character_index = self.character_vocab.lookup_token(character)
            one_hot_matrix[character_index][position_index] = 1

        return one_hot_matrix

    @classmethod
    def from_dataframe(cls, surname_df):
        """Instantiate the vectorizer from the dataset dataframe
        Args:
            surname_df (pandas.DataFrame): the surnames dataset
        Returns:
            an instance of the SurnameVectorizer
        """
        character_vocab = Vocabulary(unk_token="@")
        nationality_vocab = Vocabulary(add_unk=False)
        max_surname_length = 0

        for index, row in surname_df.iterrows():
            max_surname_length = max(max_surname_length, len(row.surname))
            for letter in row.surname:
                character_vocab.add_token(letter)
            nationality_vocab.add_token(row.nationality)

        return cls(character_vocab, nationality_vocab, max_surname_length)
4.5.3 重构SurnameClassifier模型
import torch.nn as nn
import torch.nn.functional as F


class SurnameClassifier(nn.Module):
    def __init__(self, initial_num_channels, num_classes, num_channels):
        """
        Args:
            initial_num_channels (int): size of the incoming feature vector
            num_classes (int): size of the output prediction vector
            num_channels (int): constant channel size to use throughout network
        """
        super(SurnameClassifier, self).__init__()


        self.convnet = nn.Sequential(
            nn.Conv1d(in_channels=initial_num_channels,
                      out_channels=num_channels, kernel_size=3),
            nn.ELU(),
            nn.Conv1d(in_channels=num_channels, out_channels=num_channels,
                      kernel_size=3, stride=2),
            nn.ELU(),
            nn.Conv1d(in_channels=num_channels, out_channels=num_channels,
                      kernel_size=3, stride=2),
            nn.ELU(),
            nn.Conv1d(in_channels=num_channels, out_channels=num_channels,
                      kernel_size=3),
            nn.ELU()
        )
        self.fc = nn.Linear(num_channels, num_classes)


    def forward(self, x_surname, apply_softmax=False):
        """The forward pass of the classifier
        Args:
            x_surname (torch.Tensor): an input data tensor.
                x_surname.shape should be (batch, initial_num_channels,
                                           max_surname_length)
            apply_softmax (bool): a flag for the softmax activation
                should be false if used with the Cross Entropy losses
        Returns:
            the resulting tensor. tensor.shape should be (batch, num_classes)
        """
        features = self.convnet(x_surname).squeeze(dim=2)
        prediction_vector = self.fc(features)


        if apply_softmax:
            prediction_vector = F.softmax(prediction_vector, dim=1)


        return prediction_vector
4.5.4训练循环
和MLP类似但输入参数不一样
args = Namespace(
    # Data and Path information
    surname_csv="data/surnames/surnames_with_splits.csv",
    vectorizer_file="vectorizer.json",
    model_state_file="model.pth",
    save_dir="model_storage/ch4/cnn",
    # Model hyper parameters
    hidden_dim=100,
    num_channels=256,
    # Training hyper parameters
    seed=1337,
    learning_rate=0.001,
    batch_size=128,
    num_epochs=100,
    early_stopping_criteria=5,
    dropout_p=0.1,
    # Runtime omitted for space ...
)
4.5.5模型评估和预测
4.5.5.1在测试集上评估
正如本示例与前面的的训练例程没变一样,执行评估的代码也没有变化。总之,调用分类器的eval()方法用于防止反向传播,并迭代测试集。与多层感知机大概50%的性能相比,该模型在测试集上性能的准确率约为 56%。尽管这些表示性能的数字绝非这些特定架构所能达到的上限,但是通过一个相对简单的 CNN 模型获得的改进应该足以激励你在文本数据上尝试 CNN了。
4.5.5.2为新的姓氏分类或获取最佳预测
def predict_nationality(surname, classifier, vectorizer):
    """Predict the nationality from a new surname

    Args:
        surname (str): the surname to classifier
        classifier (SurnameClassifer): an instance of the classifier
        vectorizer (SurnameVectorizer): the corresponding vectorizer
    Returns:
        a dictionary with the most likely nationality and its probability
    """
    vectorized_surname = vectorizer.vectorize(surname)
    vectorized_surname = torch.tensor(vectorized_surname).unsqueeze(0)
    result = classifier(vectorized_surname, apply_softmax=True)

    probability_values, indices = result.max(dim=1)
    index = indices.item()

    predicted_nationality = vectorizer.nationality_vocab.lookup_index(index)
    probability_value = probability_values.item()

    return {'nationality': predicted_nationality, 'probability': probability_value}
实验总结
通过本实验,我们对多层感知器(MLP)和卷积神经网络(CNN)的基本原理、实现方法以及应用有了深入的了解。我们发现:
-
MLP的能力:MLP可以通过引入隐藏层和非线性激活函数,成功解决线性不可分的问题,如XOR问题。我们在MNIST数据集上的实验进一步验证了MLP在手写数字识别中的有效性。
-
CNN的优势:CNN在图像处理任务中表现出色,能够有效地提取图像的局部特征并进行分类。我们在MNIST和CIFAR-10数据集上的实验展示了CNN在处理不同类型图像数据时的强大性能。
-
模型选择:不同的神经网络模型适用于不同类型的数据和任务。例如,MLP适用于结构较为简单的任务,而CNN在图像处理等需要提取局部特征的任务中表现尤为优异。因此,我们需要根据具体问题选择合适的模型。
本次实验为我们提供了一个全面的学习平台,使我们能够掌握神经网络的基本原理和高级应用。未来,我们可以进一步探索其他类型的神经网络模型,如递归神经网络(RNNs),以及更多的应用场景和优化技术。通过不断的学习和实践,我们将能够更好地利用这些强大的工具来解决各类复杂问题。


 877
877


 被折叠的 条评论
为什么被折叠?
被折叠的 条评论
为什么被折叠?
 到【灌水乐园】发言


