


Games101-作业2-光栅化和Z-buffer(含提高)
分析
显示一个三角形的步骤:
模型变换,视图变换,投影变换,视口变换,光栅化。。。
作业框架完成了前四个变换,需要完成光栅化采样。
以每个三角形为单位,遍历bounding box中的像素点,判断像素点是否在三角形内。如果在,进行深度测试。如果深度测试当前像素深度小于深度缓存,更新深度缓存并赋予颜色值。
判断像素是否在三角形内
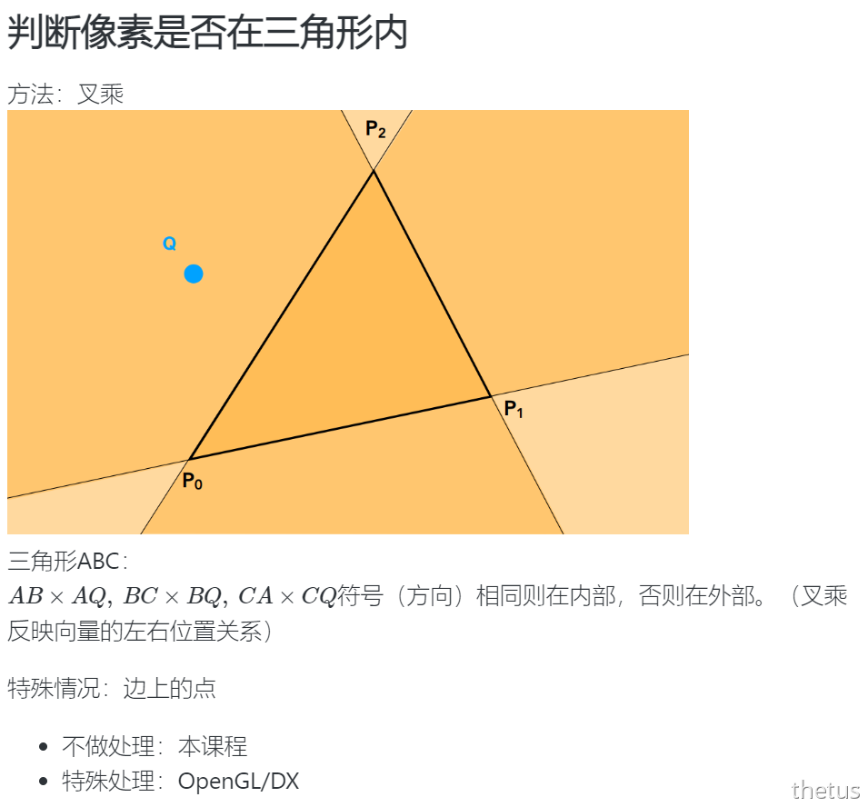
说明中也提到可以对函数定义进行修改,因为对于一个像素(x, y),进行判断的其实是像素中心即(x+0.5, y+0.5),所以把参数改成了float。
// 判断像素是否在三角形内,把参数改成了float
static bool insideTriangle(float x, float y, const Vector3f* _v)
{
    // TODO : Implement this function to check if the point (x, y) is inside the triangle represented by _v[0], _v[1], _v[2]
    Vector3f q(x, y, 0);
    Vector3f ab = _v[1] - _v[0], bc = _v[2] - _v[1], ca = _v[0] - _v[2];
    Vector3f aq = q - _v[0], bq = q - _v[1], cq = q - _v[2];
    return ab.cross(aq).dot(bc.cross(bq)) > 0 && ab.cross(aq).dot(ca.cross(cq)) > 0 && bc.cross(bq).dot(ca.cross(cq)) > 0;// 判断两两方向是否相同
}
光栅化
Bounding Box
注意Bouding Box 的边界是整数。
    // Bounding Box
    int min_x = std::min(v[0].x(), std::min(v[1].x(), v[2].x())), min_y = std::min(v[0].y(), 		       std::min(v[1].y(), v[2].y())), max_x = std::max(v[0].x(), std::max(v[1].x(), v[2].x())), max_y = std::max(v[0].y(), std::max(v[1].y(), v[2].y()));
采样
过一遍框架可以找出深度缓存数组depth_buf和用法depth_buf(get_index(x, y))。
计算当前像素深度的算法现在还没涉及到,是给出来的。
Eigen::Vector2f min_p, max_p;
    min_p.x() = MIN(MIN(v[0].x(), v[1].x()), v[2].x());
    min_p.y() = MIN(MIN(v[0].y(), v[1].y()), v[2].y());
    max_p.x() = MAX(MAX(v[0].x(), v[1].x()), v[2].x());
    max_p.y() = MAX(MAX(v[0].y(), v[1].y()), v[2].y());

    for (int i = min_p.x(); i <= max_p.x(); i++) {
        for (int j = min_p.y(); j <= max_p.y(); j++) {
            if(insideTriangle(i, j, t.v)) {
                auto[alpha, beta, gamma] = computeBarycentric2D(i, j, t.v);
                float w_reciprocal = 1.0/(alpha / v[0].w() + beta / v[1].w() + gamma / v[2].w());
                float z_interpolated = alpha * v[0].z() / v[0].w() + beta * v[1].z() / v[1].w() + gamma * v[2].z() / v[2].w();
                z_interpolated *= w_reciprocal;
                if (z_interpolated < depth_buf[get_index(i, j)]) {
                    set_pixel(Eigen::Vector3f((float)i, (float)j, z_interpolated), t.getColor());
                    depth_buf[get_index(i, j)] = z_interpolated;
                }
            }
        }
    }
结果

可以发现锯齿还是挺明显的。
MSAA采样
对采样使用MSAA抗锯齿算法。
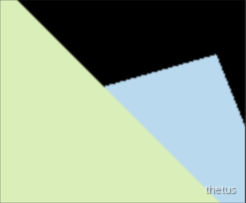
一个想法是枚举每个像素的每个样本中心位置在三角形里的个数,根据个数算出平均颜色,但这样做实际上只考虑了三角形外样本在黑色背景的情况,没有考虑三角形外样本在其他背景色(其他三角形)内的情况,所以会出现黑边。
根据笔记和作业说明,MSAA的核心就是把一个像素分为 n * n 的样本,对每个样本维护样本自己的深度值和颜色列表,这个像素的深度是样本最近深度,颜色是样本的平均,这样就不会出现因为rgb过小而产生的黑边。
定义和初始化样本深度和颜色缓存列表
仿照depth_buf和frame_buf的定义和初始化即可。
声明
rasterizer.hpp
		std::vector<Eigen::Vector3f> frame_sample;
		std::vector<float> depth_sample;
raterizer.cpp 构造函数
rst::rasterizer::rasterizer(int w, int h) : width(w), height(h)
{
	frame_buf.resize(w * h);
	depth_buf.resize(w * h);
	// 每个像素分成四个样本
	frame_sample.resize(w * h * 4);
	depth_sample.resize(w * h * 4);
}
clear样本颜色、深度
void rst::rasterizer::clear(rst::Buffers buff)
{
	if ((buff & rst::Buffers::Color) == rst::Buffers::Color)
	{
		std::fill(frame_buf.begin(), frame_buf.end(), Eigen::Vector3f{ 0, 0, 0 });
		std::fill(frame_sample.begin(), frame_sample.end(), Eigen::Vector3f{ 0, 0, 0 });
	}
	if ((buff & rst::Buffers::Depth) == rst::Buffers::Depth)
	{
		std::fill(depth_buf.begin(), depth_buf.end(), std::numeric_limits<float>::infinity());
		std::fill(depth_sample.begin(), depth_sample.end(), std::numeric_limits<float>::infinity());
	}
}
MSAA采样
void rst::rasterizer::rasterize_triangle(const Triangle& t)
{
	auto v = t.toVector4();

	// Bounding Box
	int min_x = std::min(v[0].x(), std::min(v[1].x(), v[2].x())), min_y = std::min(v[0].y(), std::min(v[1].y(), v[2].y())), max_x = std::max(v[0].x(), std::max(v[1].x(), v[2].x())), max_y = std::max(v[0].y(), std::max(v[1].y(), v[2].y()));

	// MSAA
	int pid = 0;// 当前像素的id
	float z_pixel = 0;// 当前像素的深度
	const float dx[4] = { 0.25, 0.25, 0.75, 0.75 }, dy[4] = { 0.25, 0.75, 0.25, 0.75 };// 四个样本中心偏移量
	for (int x = min_x; x <= max_x; x++)
		for (int y = min_y; y <= max_y; y++)
		{
			pid = get_index(x, y) * 4;
			z_pixel = 0x3f3f3f3f;
			// 对每个样本进行Z-Buffer算法
			for (int k = 0; k < 4; k++)
			{
				if (insideTriangle(x + dx[k], y + dy[k], t.v))
				{
					// Z-Buffer算法
					// 获取当前样本的深度
					auto tmp = computeBarycentric2D(x + dx[k], y + dy[k], t.v);
					float alpha, beta, gamma;
					std::tie(alpha, beta, gamma) = tmp;
					float w_reciprocal = 1.0 / (alpha / v[0].w() + beta / v[1].w() + gamma / v[2].w());
					float z_interpolated = alpha * v[0].z() / v[0].w() + beta * v[1].z() / v[1].w() + gamma * v[2].z() / v[2].w();
					z_interpolated *= w_reciprocal;
					// 深度测试
					if (z_interpolated < depth_sample[pid + k])// 当前像素在前面
					{
						depth_sample[pid + k] = z_interpolated;// 更新样本深度缓存
						frame_sample[pid + k] = t.getColor() / 4;// 更新样本颜色缓存
					}
					z_pixel = std::min(z_pixel, depth_sample[pid + k]);// 更新像素深度为最前面样本深度
				}
			}
			Vector3f point = { (float)x, (float)y, z_pixel }, color = frame_sample[pid] + frame_sample[pid + 1] + frame_sample[pid + 2] + frame_sample[pid + 3];
			depth_buf[get_index(x, y)] = z_pixel;// 更新深度缓存
			set_pixel(point, color);
		}
}
结果

z() / v[2].w();
z_interpolated *= w_reciprocal;
// 深度测试
if (z_interpolated < depth_sample[pid + k])// 当前像素在前面
{
depth_sample[pid + k] = z_interpolated;// 更新样本深度缓存
frame_sample[pid + k] = t.getColor() / 4;// 更新样本颜色缓存
}
z_pixel = std::min(z_pixel, depth_sample[pid + k]);// 更新像素深度为最前面样本深度
}
}
Vector3f point = { (float)x, (float)y, z_pixel }, color = frame_sample[pid] + frame_sample[pid + 1] + frame_sample[pid + 2] + frame_sample[pid + 3];
depth_buf[get_index(x, y)] = z_pixel;// 更新深度缓存
set_pixel(point, color);
}
}
结果


 4235
4235

 被折叠的 条评论
为什么被折叠?
被折叠的 条评论
为什么被折叠?
 到【灌水乐园】发言


