


基本思想:学习oak双目相机的使用复现官网demo和简单的人脸检测
前言:
设备型号:OAK-D-Pro
一、环境配置参考
台式机ubuntu系统调用OAK相机_MFT小白的博客-CSDN博客
二、测试
2.1 test_depthai.py
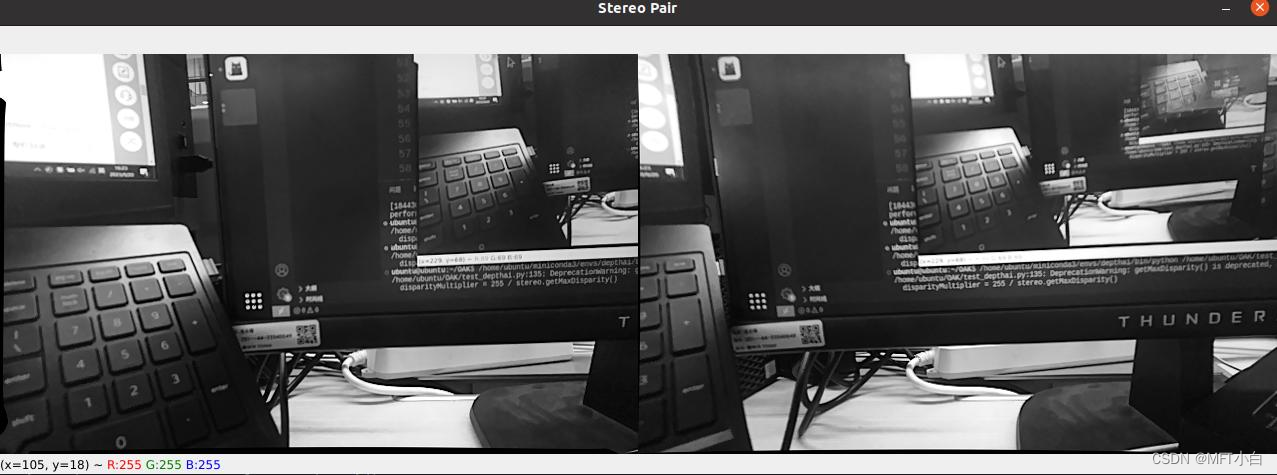
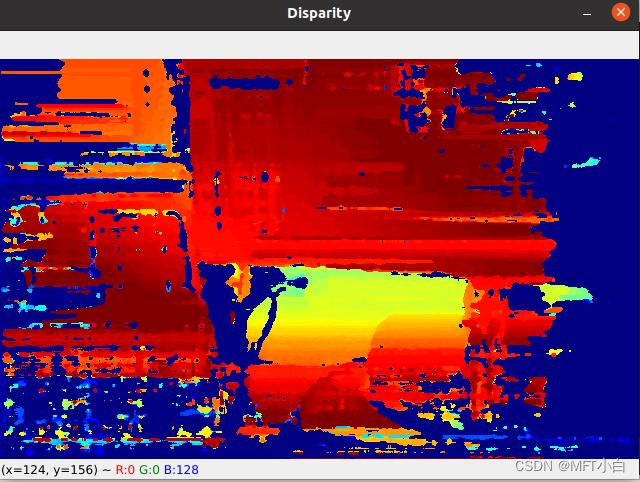
按下 t 键可实现图像切换,观察视差。
import depthai as dai
import cv2
import numpy as np


# # 实例化管道对象
# pipeline = dai.Pipeline()

# mono = pipeline.createMonoCamera()
# mono.setBoardSocket(dai.CameraBoardSocket.LEFT)

# xout = pipeline.createXLinkOut()
# xout.setStreamName("left")
# mono.out.link(xout.input)

# with dai.Device(pipeline) as device:
#     queue = device.getOutputQueue(name="left")
#     frame = queue.get()
#     imOut = frame.getCvFrame()
#     cv2.imshow("imOut", imOut)
#     cv2.waitKey()

def getFrame(queue):
    # Get frame from queue
    frame = queue.get()
    # Convert frame to OpenCV format and return
    return frame.getCvFrame()


def getMonoCamera(pipeline, isLeft):

    # Configure mono camera
    mono = pipeline.createMonoCamera()

    # Set Camera Resolution
    mono.setResolution(dai.MonoCameraProperties.SensorResolution.THE_400_P)

    if isLeft:
        # Get left camera
        mono.setBoardSocket(dai.CameraBoardSocket.LEFT)

    else :
        # Get right camera
        mono.setBoardSocket(dai.CameraBoardSocket.RIGHT)

    return mono


def getStereoPair(pipeline, monoLeft, monoRight):

    # Configure stereo pair for depth estimation
    stereo = pipeline.createStereoDepth()

    # Checks occluded pixels and marks them as invalid
    stereo.setLeftRightCheck(True)

    # Configure left and right cameras to work as a stereo pair
    monoLeft.out.link(stereo.left)
    monoRight.out.link(stereo.right)

    return stereo


def mouseCallback(event, x, y, flags, param):
    global mouseX, mouseY
    if event == cv2.EVENT_LBUTTONDOWN:
        mouseX = x
        mouseY = y


if __name__ == '__main__':

    # pipeline = dai.Pipeline()

    # # Set up left and right cameras
    # monoLeft = getMonoCamera(pipeline, isLeft = True)
    # monoRight = getMonoCamera(pipeline, isLeft = False)

    # # Set output Xlink for left camera
    # xoutLeft = pipeline.createXLinkOut()

    # xoutLeft.setStreamName("left")


    # # Set output Xlink for right camera
    # xoutRight = pipeline.createXLinkOut()

    # xoutRight.setStreamName("right")

    # # Attach cameras to output Xlink

    # monoLeft.out.link(xoutLeft.input)

    # monoRight.out.link(xoutRight.input)


    mouseX = 0
    mouseY = 640

    # Start defining a pipeline
    pipeline = dai.Pipeline()

    # Set up left and right cameras
    monoLeft = getMonoCamera(pipeline, isLeft=True)
    monoRight = getMonoCamera(pipeline, isLeft=False)

    # Combine left and right cameras to form a stereo pair
    stereo = getStereoPair(pipeline, monoLeft, monoRight)

    xoutDisp = pipeline.createXLinkOut()
    xoutDisp.setStreamName("disparity")

    xoutRectifiedLeft = pipeline.createXLinkOut()
    xoutRectifiedLeft.setStreamName("rectifiedLeft")

    xoutRectifiedRight = pipeline.createXLinkOut()
    xoutRectifiedRight.setStreamName("rectifiedRight")

    stereo.disparity.link(xoutDisp.input)
    stereo.rectifiedLeft.link(xoutRectifiedLeft.input)
    stereo.rectifiedRight.link(xoutRectifiedRight.input)


    with dai.Device(pipeline) as device:
        # Output queues will be used to get the rgb frames and nn data
        # from the outputs defined above
        disparityQueue = device.getOutputQueue(name="disparity",
                                            maxSize=1, blocking=False)
        rectifiedLeftQueue = device.getOutputQueue(name="rectifiedLeft",
                                            maxSize=1, blocking=False)
        rectifiedRightQueue=device.getOutputQueue(name="rectifiedRight",
                                            maxSize=1, blocking=False)

        # Calculate a multiplier for color mapping disparity map
        disparityMultiplier = 255 / stereo.getMaxDisparity()

        cv2.namedWindow("Stereo Pair")
        cv2.setMouseCallback("Stereo Pair", mouseCallback)

        # Variable use to toggle between side by side view and one frame
        # view.
        sideBySide = False

        while True:
            # Get the disparity map.
            disparity = getFrame(disparityQueue)

            # Colormap disparity for display.
            disparity = (disparity *
                        disparityMultiplier).astype(np.uint8)
            disparity = cv2.applyColorMap(disparity, cv2.COLORMAP_JET)

            # Get the left and right rectified frame.
            leftFrame = getFrame(rectifiedLeftQueue);
            rightFrame = getFrame(rectifiedRightQueue)

            if sideBySide:
                # Show side by side view.
                imOut = np.hstack((leftFrame, rightFrame))
            else:
                # Show overlapping frames.
                imOut = np.uint8(leftFrame / 2 + rightFrame / 2)
            # Convert to RGB.
            imOut = cv2.cvtColor(imOut, cv2.COLOR_GRAY2RGB)
            # Draw scan line.
            imOut = cv2.line(imOut, (mouseX, mouseY),
                            (1280, mouseY), (0, 0, 255), 2)
            # Draw clicked point.
            imOut = cv2.circle(imOut, (mouseX, mouseY), 2,
                            (255, 255, 128), 2)
            cv2.imshow("Stereo Pair", imOut)
            cv2.imshow("Disparity", disparity)

            # Check for keyboard input
            key = cv2.waitKey(1)
            if key == ord('q') or key == 27:
                # Quit when q is pressed
                break
            elif key == ord('t'):
                # Toggle display when t is pressed
                sideBySide = not sideBySide
效果图
2.2 test_model_depthai.py
模型下载地址:Index of blobconverter-backup/blobs
import depthai as dai
import cv2
import time
import blobconverter
import numpy as np

FRAME_SIZE = (640, 360)

DET_INPUT_SIZE = (300, 300)
# model_name = "face-detection-retail-0004"
# zoo_type = "depthai"
blob_path = "face-detection-retail-0004_openvino_2021.4_10shave.blob"

pipeline = dai.Pipeline()

# 定义RGB
cam = pipeline.createColorCamera()
cam.setPreviewSize(FRAME_SIZE[0], FRAME_SIZE[1])
cam.setInterleaved(False)
cam.setResolution(dai.ColorCameraProperties.SensorResolution.THE_1080_P)
cam.setBoardSocket(dai.CameraBoardSocket.RGB)


# 定义左相机
mono_left = pipeline.createMonoCamera()
mono_left.setResolution(dai.MonoCameraProperties.SensorResolution.THE_400_P)
mono_left.setBoardSocket(dai.CameraBoardSocket.LEFT)
# 定义右相机
mono_right = pipeline.createMonoCamera()
mono_right.setResolution(dai.MonoCameraProperties.SensorResolution.THE_400_P)
mono_right.setBoardSocket(dai.CameraBoardSocket.RIGHT)

# 创建stereo node
stereo = pipeline.createStereoDepth()


# 深度相机输出连接stereo node
mono_left.out.link(stereo.left)
mono_right.out.link(stereo.right)

# 使用blobconverter获取模型blob文件
# if model_name is not None:
#     blob_path = blobconverter.from_zoo(
#         name=model_name,
#         shaves=6,
#         zoo_type=zoo_type
#     )


# 定义人脸检测神经网络节点及参数
face_spac_det_nn = pipeline.createMobileNetSpatialDetectionNetwork()
face_spac_det_nn.setConfidenceThreshold(0.75)
face_spac_det_nn.setBlobPath(blob_path)
face_spac_det_nn.setDepthLowerThreshold(100)
face_spac_det_nn.setDepthUpperThreshold(5000)

# 定义人脸检测输入配置
face_det_manip = pipeline.createImageManip()
face_det_manip.initialConfig.setResize(DET_INPUT_SIZE[0], DET_INPUT_SIZE[1])
face_det_manip.initialConfig.setKeepAspectRatio(False)

# 连接   rgb --> ImageManip node -> net
#       stereo --> net
cam.preview.link(face_det_manip.inputImage)
face_det_manip.out.link(face_spac_det_nn.input)
stereo.depth.link(face_spac_det_nn.inputDepth)


# 创建预览输出
x_preview_out = pipeline.createXLinkOut()
x_preview_out.setStreamName("preview")
cam.preview.link(x_preview_out.input)
# 创建检测输出
det_out = pipeline.createXLinkOut()
det_out.setStreamName("det_out")
face_spac_det_nn.out.link(det_out.input)

# 输出视差图
xoutDisp = pipeline.createXLinkOut()
xoutDisp.setStreamName("disparity")
stereo.disparity.link(xoutDisp.input)


# 定义显示功能
def display_info(frame, disparity, bbox, coordinates, status, status_color, fps):
    # Display bounding box
    cv2.rectangle(frame, bbox, status_color[status], 2)
    cv2.rectangle(disparity, bbox, status_color[status], 2)

    # Display coordinates
    if coordinates is not None:
        coord_x, coord_y, coord_z = coordinates
        cv2.putText(frame, f"X: {int(coord_x)} mm", (bbox[0] + 10, bbox[1] + 20), cv2.FONT_HERSHEY_TRIPLEX, 0.5, 255)
        cv2.putText(frame, f"Y: {int(coord_y)} mm", (bbox[0] + 10, bbox[1] + 35), cv2.FONT_HERSHEY_TRIPLEX, 0.5, 255)
        cv2.putText(frame, f"Z: {int(coord_z)} mm", (bbox[0] + 10, bbox[1] + 50), cv2.FONT_HERSHEY_TRIPLEX, 0.5, 255)
        cv2.putText(disparity, f"Depth: {int(coord_z)} mm",  (10, 20), cv2.FONT_HERSHEY_SIMPLEX, 0.6, (255, 255, 255))

    # Create background for showing details
    cv2.rectangle(frame, (5, 5, 175, 100), (50, 0, 0), -1)

    # Display authentication status on the frame
    cv2.putText(frame, status, (20, 40), cv2.FONT_HERSHEY_SIMPLEX, 0.5, status_color[status])

    # Display instructions on the frame
    cv2.putText(frame, f'FPS: {fps:.2f}', (20, 80), cv2.FONT_HERSHEY_SIMPLEX, 0.6, (255, 255, 255))


# Frame count
frame_count = 0

# Placeholder fps value
fps = 0

# Used to record the time when we processed last frames
prev_frame_time = 0

# Used to record the time at which we processed current frames
new_frame_time = 0

# Set status colors
status_color = {
    'Face Detected': (0, 255, 0),
    'No Face Detected': (0, 0, 255)
}


# Start pipeline
with dai.Device(pipeline) as device:

    # Output queue will be used to get the right camera frames from the outputs defined above
    q_cam = device.getOutputQueue(name="preview", maxSize=1, blocking=False)

    # Output queue will be used to get nn data from the video frames.
    q_det = device.getOutputQueue(name="det_out", maxSize=1, blocking=False)


    disparityQueue = device.getOutputQueue(name="disparity", maxSize=1, blocking=False)
    disparityMultiplier = 255 / stereo.getMaxDisparity()

    # # Output queue will be used to get nn data from the video frames.
    # q_bbox_depth_mapping = device.getOutputQueue(name="bbox_depth_mapping_out", maxSize=4, blocking=False)

    while True:
        # Get right camera frame
        in_cam = q_cam.get()
        frame = in_cam.getCvFrame()

        disparity_ = disparityQueue.get()
        disparity = disparity_.getCvFrame()
        disparity = (disparity * disparityMultiplier).astype(np.uint8)
        disparity = cv2.applyColorMap(disparity, cv2.COLORMAP_JET)

        bbox = None
        coordinates = None

        inDet = q_det.tryGet()

        if inDet is not None:
            detections = inDet.detections

            # if face detected
            if len(detections) is not 0:
                detection = detections[0]

                # Correct bounding box
                xmin = max(0, detection.xmin)
                ymin = max(0, detection.ymin)
                xmax = min(detection.xmax, 1)
                ymax = min(detection.ymax, 1)

                # Calculate coordinates
                x = int(xmin*FRAME_SIZE[0])
                y = int(ymin*FRAME_SIZE[1])
                w = int(xmax*FRAME_SIZE[0]-xmin*FRAME_SIZE[0])
                h = int(ymax*FRAME_SIZE[1]-ymin*FRAME_SIZE[1])

                bbox = (x, y, w, h)

                # Get spacial coordinates
                coord_x = detection.spatialCoordinates.x
                coord_y = detection.spatialCoordinates.y
                coord_z = detection.spatialCoordinates.z

                coordinates = (coord_x, coord_y, coord_z)

        # Check if a face was detected in the frame
        if bbox:
            # Face detected
            status = 'Face Detected'
        else:
            # No face detected
            status = 'No Face Detected'

        # Display info on frame
        display_info(frame, disparity, bbox, coordinates, status, status_color, fps)

        # Calculate average fps
        if frame_count % 10 == 0:
            # Time when we finish processing last 100 frames
            new_frame_time = time.time()

            # Fps will be number of frame processed in one second
            fps = 1 / ((new_frame_time - prev_frame_time)/10)
            prev_frame_time = new_frame_time

        # Capture the key pressed
        key_pressed = cv2.waitKey(1) & 0xff

        # Stop the program if Esc key was pressed
        if key_pressed == 27 or key_pressed == ord('q'):
            break

        # Display the final frame
        cv2.imshow("Face Cam", frame)
        cv2.imshow("Disparity", disparity)


        # Increment frame count
        frame_count += 1

    cv2.destroyAllWindows()
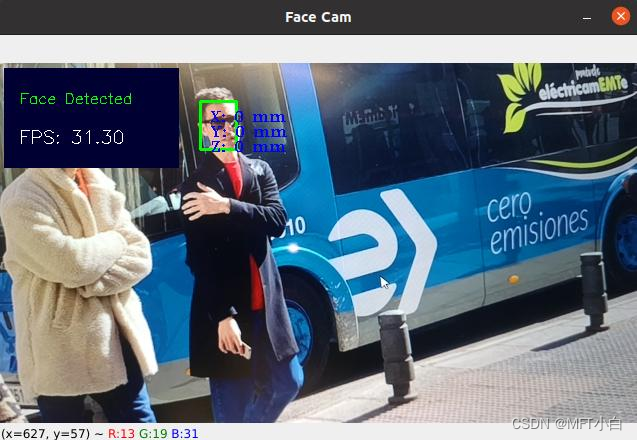
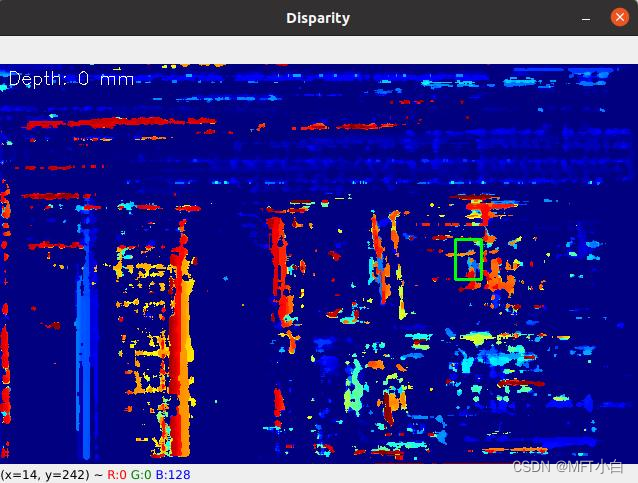
效果图:


 442
442


 被折叠的 条评论
为什么被折叠?
被折叠的 条评论
为什么被折叠?
 到【灌水乐园】发言


