一、引言
Vue.js是一款流行的前端框架,提供了强大的组件化功能。其中,插槽(Slot)技术是一种用于组件化开发的重要技术,允许我们在组件中定义一些占位符,然后在使用组件时,通过插槽来传递内容。插槽的灵活性使得我们可以轻松地定制组件的外观和行为,可以帮助我们更好地处理组件的可复用性和灵活性。
二、插槽基础使用
在Vue中,插槽的使用方式可以分为三种:默认插槽、具名插槽和作用域插槽。
1. 默认插槽
默认插槽是最简单的插槽形式,它允许我们将组件的内容传递到组件内部的一个占位符中。在组件的模板中使用定义默认插槽,然后在使用组件时,将内容传递给这个插槽。
| 1 2 3 4 5 6 7 | // Com01.vue
<template>
<h2>学习插槽</h2>
<div>
<slot>我是默认插槽,没给我传内容就会默认显示这句话</slot>
</div>
</template>
|
| 1 2 3 4 5 6 7 8 9 10 | // 父组件App.vue
<template>
<Com01>
<p>你好,世界!</p>
<!-- <p>你好,世界!</p> -->
</Com01>
</template>
<script setup>
import Com01 from './components/Com01.vue'
</script>
|


在上面的代码示例中,<slot></slot>表示一个默认插槽,将传递给Com01组件的内容放置在这个插槽中。如果把p标签那一行注释掉,就会显示默认内容。
2. 具名插槽
具名插槽允许我们在组件中定义多个插槽,并且可以根据插槽的名称来传递内容。在组件的模板中使用<slot name="slotName"></slot>定义具名插槽,然后在使用组件时,使用<template v-slot:slotName>或者<template slot="slotName">来传递内容给指定的插槽。
| 1 2 3 4 5 6 7 8 9 10 | // 子组件 Com02.vue
<template>
<div>
<slot name="header"></slot>
<div class="content">
<slot></slot>
</div>
<slot name="footer"></slot>
</div>
</template>
|
| 1 2 3 4 5 6 7 8 9 10 11 12 13 14 15 | // 父组件 App.vue
<template>
<Com02>
<template v-slot:header>
<h2>我是头部内容!</h2>
</template>
<h2>你好,世界!</h2>
<template v-slot:footer>
<h2>我是底部内容!</h2>
</template>
</Com02>
</template>
<script setup>
import Com02 from './components/Com02.vue'
</script>
|

3. 作用域插槽
作用域插槽是一种特殊的插槽,它允许我们在插槽内部访问组件实例的数据,允许父组件将数据传递到子组件中,并在子组件中使用。在组件的模板中使用<slot name="slotName" v-bind:slotData="data"></slot>定义作用域插槽,并在使用组件时,使用<template slot="slotName" v-slot="scope">来访问插槽内部的数据。
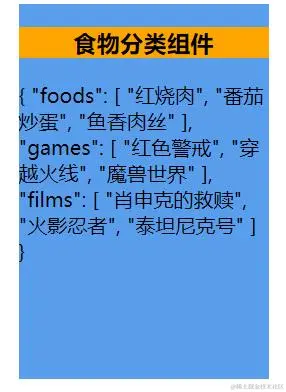
| 1 2 3 4 5 6 7 8 9 10 11 12 13 14 15 16 17 18 19 20 | // 子组件 Category.vue
<template>
<div class="category">
<h3>{{title}}分类组件</h3>
<slot :foods="foods" :games="games" :films="films">我是插槽1</slot>
</div>
</template>
<script>
export default {
name: "Category",
props: ["title"],
data(){
return {
foods: ["红烧肉","番茄炒蛋","鱼香肉丝"],
games: ["红色警戒", "穿越火线", "魔兽世界"],
films: ["肖申克的救赎", "火影忍者", "泰坦尼克号"]
}
}
}
</script>
|
| 1 2 3 4 5 6 7 8 9 10 11 12 13 14 15 16 17 | // 父组件 App.vue
<template>
<div class="container">
<Category title="食物" >
<template v-slot="scope">
{{ scope }}
</template>
</Category>
</div>
</template>
<script>
import Category from './components/Category.vue'
export default {
name: "App",
components: {Category},
}
</script>
|
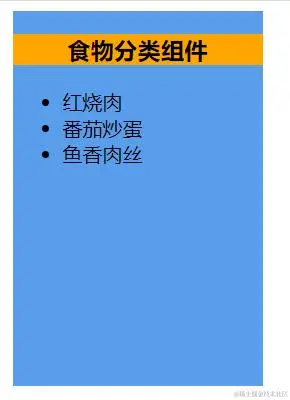
可以看到父组件中拿到的scope就是一个对象,包括了子组件中传来的三个数组,我们可以自己选择展示哪些数据。
| 1 2 3 4 5 6 7 8 9 10 11 12 13 14 15 16 17 18 19 | // 父组件 App.vue
<template>
<div class="container">
<Category title="食物" >
<template v-slot="scope">
<ul>
<li v-for="item in scope.foods">{{ item }}</li>
</ul>
</template>
</Category>
</div>
</template>
<script>
import Category from './components/Category.vue'
export default {
name: "App",
components: {Category},
}
</script>
|
三、插槽的高级用法
1. 具名作用域插槽
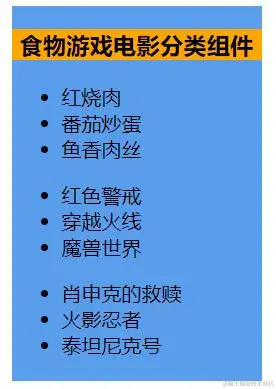
具名作用域插槽的工作方式也是类似的,插槽props可以作为v-slot指令的值被访问到:v-slot:header="props",也可以直接缩写成#header="props",这是缩写形式。
| 1 2 3 4 5 6 7 8 9 10 11 12 13 14 15 16 17 18 19 20 21 22 | // 子组件 Category02.vue
<template>
<div class="category">
<h3>{{title}}分类组件</h3>
<slot name="header" :foods="foods" >我是插槽1</slot>
<slot name="center" :games="games" >我是插槽2</slot>
<slot name="footer" :films="films" >我是插槽3</slot>
</div>
</template>
<script>
export default {
name: "Category",
props: ["title"],
data(){
return {
foods: ["红烧肉","番茄炒蛋","鱼香肉丝"],
games: ["红色警戒", "穿越火线", "魔兽世界"],
films: ["肖申克的救赎", "火影忍者", "泰坦尼克号"]
}
}
}
</script>
|
| 1 2 3 4 5 6 7 8 9 10 11 12 13 14 15 16 17 18 19 20 21 22 23 24 25 26 27 28 29 | // 父组件 App.vue
<template>
<div class="container">
<Category title="食物游戏电影" >
<template v-slot:header="scope">
<ul>
<li v-for="item in scope.foods">{{ item }}</li>
</ul>
</template>
<template v-slot:center="props">
<ul>
<li v-for="(item,index) in props.games" :key="index">{{ item }}</li>
</ul>
</template>
<template #footer="scope">
<ul slot="center">
<li v-for="(item,index) in scope.films" :key="index">{{ item }}</li>
</ul>
</template>
</Category>
</div>
</template>
<script>
import Category from './components/Category02.vue'
export default {
name: "App",
components: {Category},
}
</script>
|
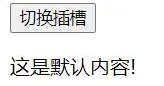
2. 动态插槽名
动态插槽是一种动态地选择插槽名称的方式。我们可以根据组件的状态或属性来决定使用哪个插槽,可以动态地决定将内容插入到哪个具名插槽中。
| 1 2 3 4 5 6 7 8 9 10 11 12 13 14 15 16 17 18 19 20 21 | // 子组件 Com06.vue
<template>
<div>
<button @click="toggleSlot">切换插槽</button>
<slot :name="currentSlot"></slot>
</div>
</template>
<script>
export default {
data() {
return {
currentSlot: 'default666',
};
},
methods: {
toggleSlot() {
this.currentSlot = this.currentSlot === 'default666' ? 'custom666' : 'default666';
},
},
};
</script>
|
| 1 2 3 4 5 6 7 8 9 10 11 12 13 14 15 16 17 18 19 20 | // 父组件 App.vue
<template>
<div>
<Com06>
<template v-slot:default666>
<p>这是默认内容!</p>
</template>
<template v-slot:custom666>
<p>这是自定义内容!</p>
</template>
</Com06>
</div>
</template>
<script>
import Com06 from './components/Com06.vue'
export default {
name: "App",
components: {Com06},
}
</script>
|
我们在组件中添加了一个按钮,并在按钮的点击事件处理程序中切换currentSlot的值。当按钮被点击时,currentSlot的值会从default切换到custom,或者从custom切换到default,从而实现默认内容和自定义内容的切换。
在父组件中使用这个组件时,可以根据currentSlot的值来动态地指定插槽名称。

3. 插槽内容的访问
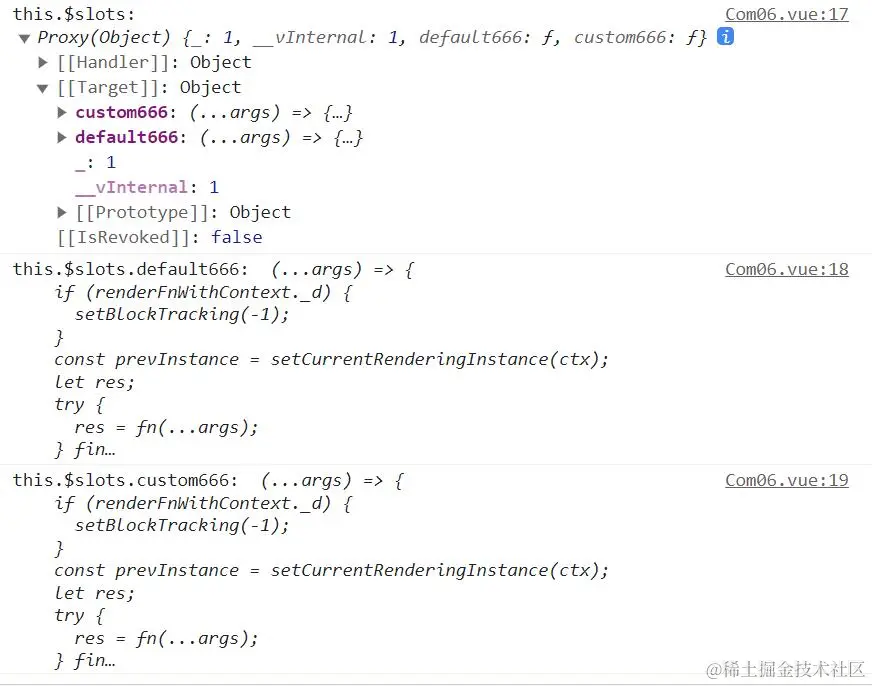
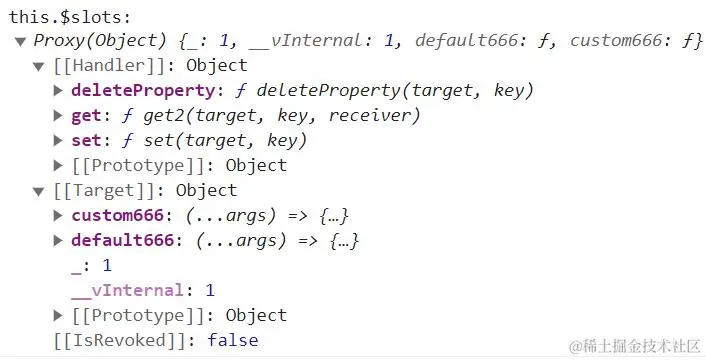
可以通过this.$slots访问到插槽的内容。
| 1 2 3 4 5 6 7 8 9 10 11 12 13 14 15 16 17 18 19 20 21 22 | <template>
<div>
<button @click="toggleSlot">切换插槽</button>
<slot :name="currentSlot"></slot>
</div>
</template>
<script>
export default {
data() {
return {
currentSlot: 'default666',
};
},
methods: {
toggleSlot() {
console.log("this.$slots: ", this.$slots);
console.log("this.$slots.default666: ", this.$slots.default666);
console.log("this.$slots.custom666: ", this.$slots.custom666);
},
},
};
</script>
|
四、插槽的本质
其实从打印结果可以看出,slot本质就是Proxy代理的对象,属性名就是各个插槽的名字,属性值就是对应的函数,调用函数得到的结果就是虚拟结点。
<slot name="slot1"></slot>就相当于在调用属性名为slot1的函数,<slot name="slot2" msg="你好世界!"></slot>就相当于在调用属性名为slot2的函数,该函数接收了msg的参数。
插槽的注意事项
插槽内容可以是任意类型,包括HTML、组件等。
默认插槽可以不用写name属性,具名插槽必须写name属性。
作用域插槽传递的数据可以根据需要命名。
五、最后的话
插槽技术是Vue.js中重要的组件化特性之一,为我们提供了灵活的组件化开发方式,通过合理使用插槽,我们可以轻松地定制和扩展组件的功能,使组件的可复用性和灵活性大大提高。
以上就是Vue中的插槽Slot技术详解的详细内容,更多关于Vue插槽的资料请关注脚本之家其它相关文章!


 3766
3766


 被折叠的 条评论
为什么被折叠?
被折叠的 条评论
为什么被折叠?
 到【灌水乐园】发言


