


一、Win7 64 安装theano:
1、 下载Anaconda1.9.2,自带MniGw;
C:\Anaconda;
C:\Anaconda\Scripts;C
:\Anaconda\MinGW\bin;
C:\Anaconda\MinGW\x86_64-w64-mingw32\bin;
2、 Github下载theano然后解压,讲theano文件夹里面的theano文件夹拷贝到
C:\Anaconda\Lib\site-packages3、 下载安装CUDA,版本随意
将
C:\Program Files (x86)\NVIDIA Corporation\PhysX\Common;
C:\Program Files\NVIDIA GPU Computing Toolkit\CUDA\v7.0\bin;
C:\Program Files\NVIDIA GPU Computing Toolkit\CUDA\v7.0\libnvvp;
C:\Program Files\NVIDIA GPU Computing Toolkit\CUDA\v7.0\lib\x64;
C:\Program Files (x86)\Microsoft SDKs\Windows\v7.0A\Include;加入到path。
测试Cuda安装成功与否,使用
nvcc –V看 cuda 版本
采用VS2010,将C:\Program Files (x86)\Microsoft SDKs\Windows\v7.0A\Include;加入到PATH,则最终PATH有:
C:\Program Files\NVIDIA GPU Computing Toolkit\CUDA\v6.0\bin;
C:\Program Files\NVIDIA GPU Computing Toolkit\CUDA\v6.0\libnvvp;
c:\Program Files (x86)\NVIDIA Corporation\PhysX\Common;
C:\Anaconda;
C:\Anaconda\Scripts;
C:\Anaconda\MinGW\bin;
C:\Anaconda\MinGW\x86_64-w64-mingw32\bin;
C:\git\bin;
C:\Program Files (x86)\Microsoft SDKs\Windows\v7.0A\Include;
4、 在C:\Users\Administrator下建立一个文件:.theanorc.txt
[global]
openmp = False
device = gpu0
floatX = float32
allow_input_downcast=True

[blas]
ldflags =

[gcc]
cxxflags = -IC:\Anaconda\MinGW


[cuda]
root=C:\Program Files\NVIDIA GPU Computing Toolkit\CUDA\v7.0\bin

[nvcc]
flags = -LC:\Anaconda\libs

compiler_bindir = C:\Program Files (x86)\Microsoft Visual Studio 10.0\VC\bin
fastmath = True
flags =  -arch=sm_30
注意错误:
1、c:\anaconda\include\pyconfig.h(227) : fatal error C1083: Cannot open include fil
e: 'basetsd.h': No such file or directory;
ERROR (theano.sandbox.cuda): Failed to compile cuda_ndarray.cu: ('nvcc return st
atus', 2, 'for cmd', 'nvcc -shared -O3 -arch=sm_30 -use_fast_math --compiler-bin
根据windows SDK查找这个文件,将这个文件对应的include加入到PATH,没有解决问题,后来compiler_bindir Vs2012更改为Vs2010解决问题。
compiler_bindir = C:\Program Files (x86)\Microsoft Visual Studio 10.0\VC\bin
二、安装Lasagne
1、目前还只能从源代码安装。
git clone https://github.com/Lasagne/Lasagne.git   # 会建立一个Lasagne目录
cd Lasagne
pip install -r requirements.txt  #  比较久
python setup.py install  #  这一步需要root权限
Daniel Nouri[Tutorial]上是这样安装的
pip install -r https://raw.githubusercontent.com/dnouri/kfkd-tutorial/master/requirements.txt
这样需要以root用户来执行,不推荐这样做。
尝试正确的安装方式:
git clone https://github.com/Lasagne/Lasagne.git # 会建立一个Lasagne目录
cd Lasagne
pip install -r https://raw.githubusercontent.com/dnouri/kfkd-tutorial/master/requirements.txt
问题:
1. 这是Python 2 mimetypes的bug
2. 需要将Python2.7/lib/mimetypes.py文件中如下片段注释或删除:
try:
    ctype = ctype.encode(default_encoding) # omit in 3.x!
except UnicodeEncodeError:
    pass
补充其它解决办法
解决办法:
在报错的页面添加代码:
 import sys
reload(sys)
sys.setdefaultencoding('utf8')
执行 Python ez_setup.py,报错:
UnicodeDecodeError: 'utf8' codec can't decode byte 0xb0 in position 35: invalid
start byte
解决办法:
在报错的页面添加代码:
import sys
reload(sys)
sys.setdefaultencoding('utf-8')
安装失败之后,重新安装,需要清理C:\Users\Administrator\AppData\Local\pip里面的内容
2、test on mnist
cd examples
python mnist.py
Epoch 103 of 500 took 11.717s
  training loss:                0.045202
  validation loss:              0.059163
  validation accuracy:          98.16 %%
Epoch 104 of 500 took 11.702s
  training loss:                0.046228
  validation loss:              0.058582
  validation accuracy:          98.14 %%
Epoch 105 of 500 took 11.704s
  training loss:                0.044530
  validation loss:              0.058295
  validation accuracy:          98.18 %%
三、Facial Keypoints Detection
1、从https://github.com/dylansun/Kaggle-Facial-Keypoint-Detection 上下载data数据进行训练:
Data Files:training .zip (60.10 mb)test .zip (15.99 mb)SampleSubmission .csv (201.08 kb)IdLookupTable .csv (842.51 kb)
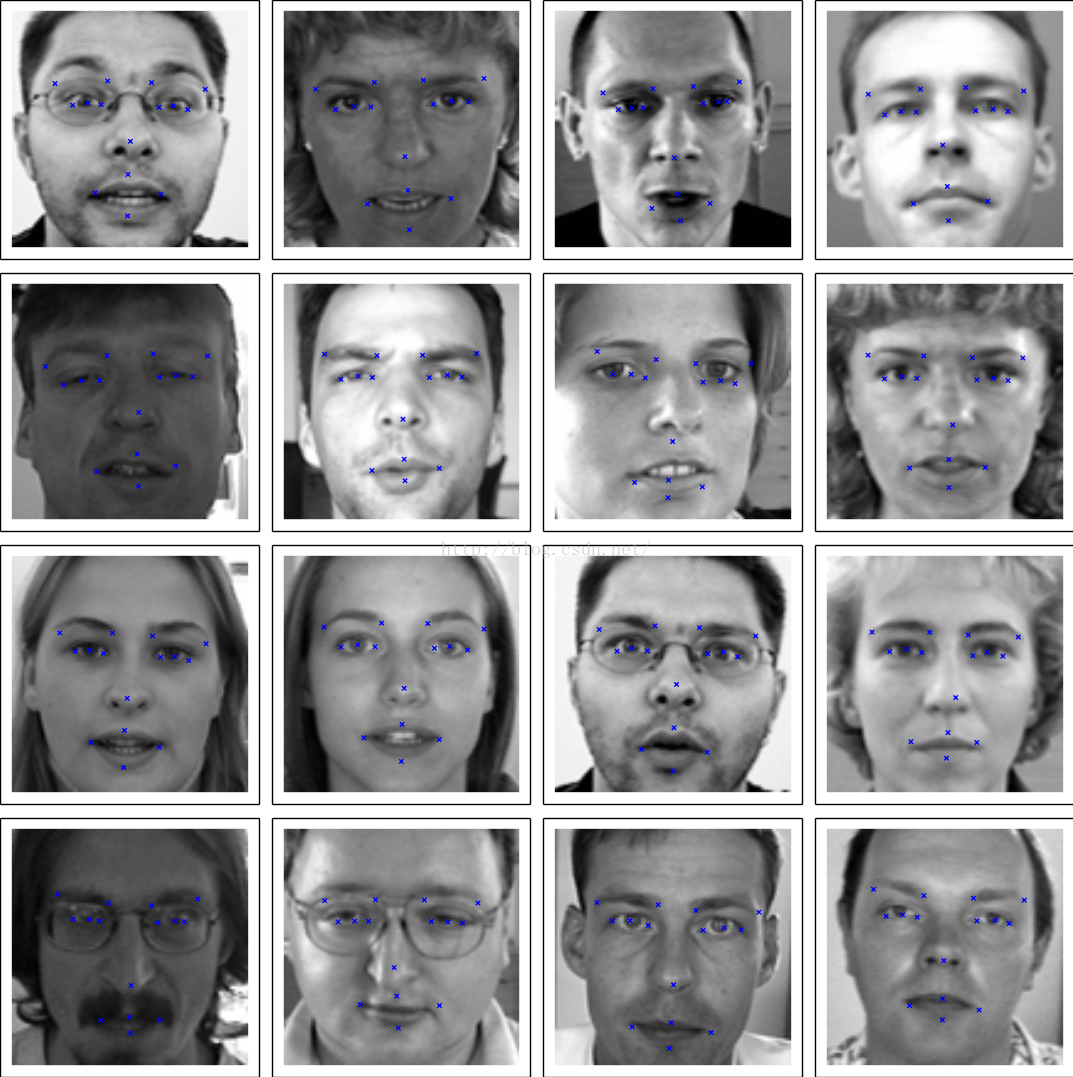
Each predicted keypoint is specified by an (x,y) real-valued pair in the space of pixel indices. There are 15 keypoints, which represent the following elements of the face:
left_eye_center, right_eye_center, left_eye_inner_corner, left_eye_outer_corner, right_eye_inner_corner, right_eye_outer_corner, left_eyebrow_inner_end, left_eyebrow_outer_end, right_eyebrow_inner_end, right_eyebrow_outer_end, nose_tip, mouth_left_corner, mouth_right_corner, mouth_center_top_lip, mouth_center_bottom_lip Left and right here refers to the point of view of the subject.
In some examples, some of the target keypoint positions are misssing (encoded as missing entries in the csv, i.e., with nothing between two commas).
The input image is given in the last field of the data files, and consists of a list of pixels (ordered by row), as integers in (0,255). The images are 96x96 pixels.
Data files
training.csv: list of training 7049 images. Each row contains the (x,y) coordinates for 15 keypoints, and image data as row-ordered list of pixels.
test.csv: list of 1783 test images. Each row contains ImageId and image data as row-ordered list of pixels
submissionFileFormat.csv: list of 27124 keypoints to predict. Each row contains a RowId, ImageId, FeatureName, Location. FeatureName are "left_eye_center_x," "right_eyebrow_outer_end_y," etc. Location is what you need to predict.
2、采用kfkd.py进行训练:
"""
To use this script, first run this to fit your first model:
python kfkd.py fitThen train a bunch of specialists that intiliaze their weights from
your first model:
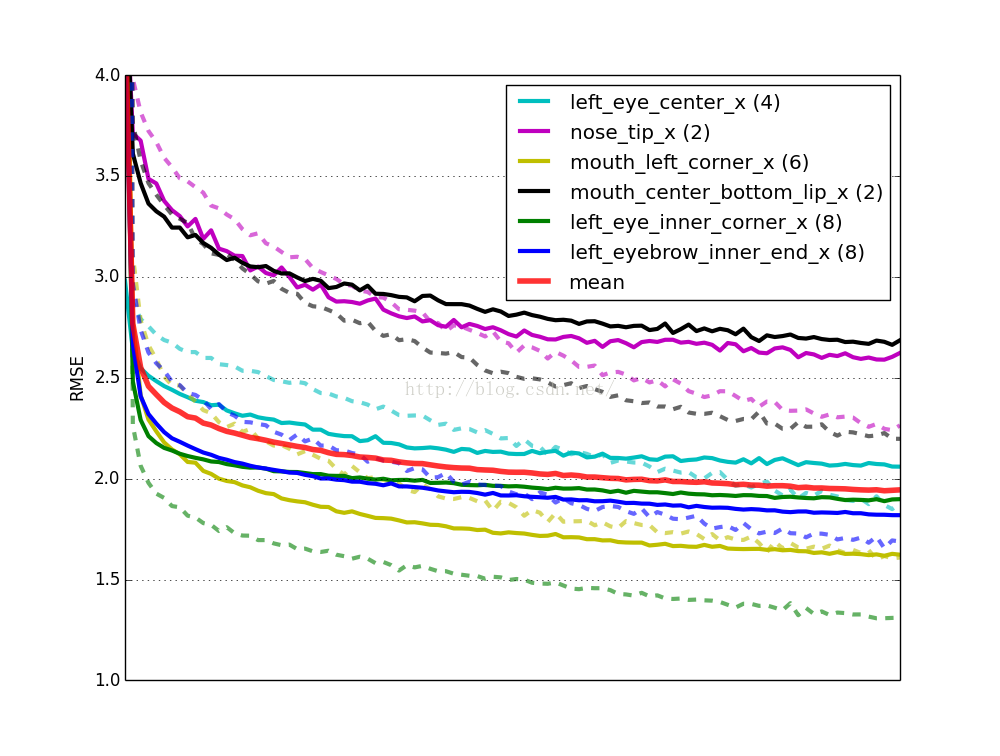
python kfkd.py fit_specialists net.picklePlot their error curves:
python kfkd.py plot_learning_curves net-specialists.pickle此处报错:
Traceback (most recent call last):
File "C:\Program Files (x86)\JetBrains\PyCharm 4.0.4\helpers\pydev\pydevd.py", line 2222, in <module>
globals = debugger.run(setup['file'], None, None)
File "C:\Program Files (x86)\JetBrains\PyCharm 4.0.4\helpers\pydev\pydevd.py", line 1648, in run
pydev_imports.execfile(file, globals, locals) # execute the script
File "C:/Anaconda/src/lasagne/examples/Kaggle Facial Keypoints Detection/kfkd.py", line 417, in <module>
func(*sys.argv[2:])
File "C:/Anaconda/src/lasagne/examples/Kaggle Facial Keypoints Detection/kfkd.py", line 371, in plot_learning_curves
models = pickle.load(f)
EOFError
解决方法:直接执行
plot_learning_curves
And finally make predictions to submit to Kaggle:
python kfkd.py predict net-specialists.pickle


 5925
5925


 被折叠的 条评论
为什么被折叠?
被折叠的 条评论
为什么被折叠?
 到【灌水乐园】发言


