


1. Launcher 端流程跟踪
我们先使用 Android Studio 创建一个空 Activity 项目,然后安装到模拟器上,接着我们在 Launcher 页面点击该应用图标。
点击图标的操作会触发到 onClick 方法回调:
    // packages/apps/Launcher3/src/com/android/launcher3/touch/ItemClickHandler.java
    // # ItemClickHandler.java

    private static void onClick(View v) {

        // ......
        Launcher launcher = Launcher.getLauncher(v.getContext());

       // ......

        Object tag = v.getTag();

        if (tag instanceof WorkspaceItemInfo) { // 会走这个if 分支
            onClickAppShortcut(v, (WorkspaceItemInfo) tag, launcher);
        }

        // ......
    }
获取到图标对应的 WorkspaceItemInfo 和 Launcher 对象后,接着执行 onClickAppShortcut 方法:
    // packages/apps/Launcher3/src/com/android/launcher3/touch/ItemClickHandler.java

    public static void onClickAppShortcut(View v, WorkspaceItemInfo shortcut, Launcher launcher) {

        // ......

        // 继续跳转到另一个方法
        startAppShortcutOrInfoActivity(v, shortcut, launcher);
    }
接着会调用 startAppShortcutOrInfoActivity 方法:
// packages/apps/Launcher3/src/com/android/launcher3/touch/ItemClickHandler.java
private static void startAppShortcutOrInfoActivity(View v, ItemInfo item, Launcher launcher) {
// ......
Intent intent;
if (item instanceof ItemInfoWithIcon
&& (((ItemInfoWithIcon) item).runtimeStatusFlags
& ItemInfoWithIcon.FLAG_INSTALL_SESSION_ACTIVE) != 0) {
// ......
} else { // 走这个分支,从 ItemInfo 从获取到 intent
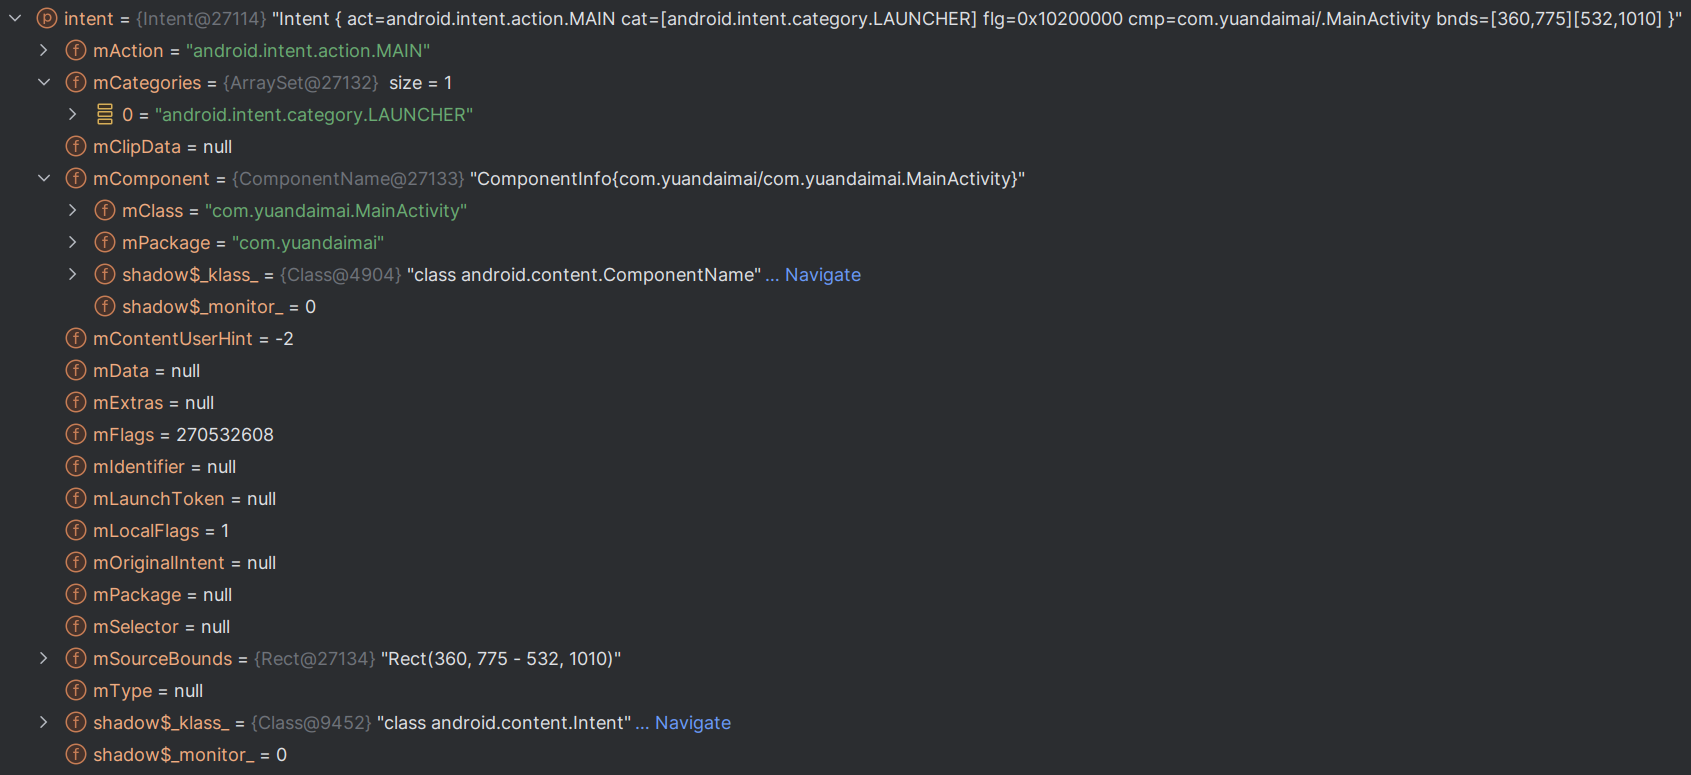
// 获取到的 Intent 的 flags 为 270532608,也就是二进制的 10200000
// 也就是说这里的 flags = FLAG_ACTIVITY_NEW_TASK & FLAG_ACTIVITY_RESET_TASK_IF_NEEDED
intent = item.getIntent();
}
// .......
// 接着调用另一个方法
launcher.startActivitySafely(v, intent, item);
}
先从 ItemInfo 从获取到启动目标 Activity 的 intent。
intent 的内部数据情况如下:
接着调用 startActivitySafely 方法:
// packages/apps/Launcher3/quickstep/src/com/android/launcher3/uioverrides/QuickstepLauncher.java

    public boolean startActivitySafely(View v, Intent intent, ItemInfo item,
            @Nullable String sourceContainer) {

        // ......

       RunnableList result = super.startActivitySafely(v, intent, item);

        // ......
    }
接着调用父类的 startActivitySafely 方法:
// packages/apps/Launcher3/src/com/android/launcher3/Launcher.java

    @Override
    public RunnableList startActivitySafely(View v, Intent intent, ItemInfo item) {

       // ......

        RunnableList result = super.startActivitySafely(v, intent, item);
        if (result != null && v instanceof BubbleTextView) { // 进入
            // This is set to the view that launched the activity that navigated the user away
            // from launcher. Since there is no callback for when the activity has finished
            // launching, enable the press state and keep this reference to reset the press
            // state when we return to launcher.
            BubbleTextView btv = (BubbleTextView) v;
            btv.setStayPressed(true);
            result.add(() -> btv.setStayPressed(false));
        }
        return result;
    }
接着调用父类的 startActivitySafely 方法
    // packages/apps/Launcher3/src/com/android/launcher3/views/ActivityContext.java

        default RunnableList startActivitySafely(
            View v, Intent intent, @Nullable ItemInfo item) {

       // ......
        Context context = (Context) this;

        // ......

        // 关注点1
        // getActivityLaunchOptions 方法根据 View 的位置构建一个 ActivityOptionsWrapper 对象返回,ActivityOptionsWrapper 内部有一个成员 ActivityOptions
        // ActivityOptions 主要用于转场动画
        // 关于 ActivityOptions 的使用,可以参考下面两篇文章
        // https://blog.csdn.net/JohanMan/article/details/76726638
        // https://blog.csdn.net/chuyouyinghe/article/details/109515766
        ActivityOptionsWrapper options = v != null ? getActivityLaunchOptions(v, item)
                : makeDefaultActivityOptions(item != null && item.animationType == DEFAULT_NO_ICON
                        ? SPLASH_SCREEN_STYLE_SOLID_COLOR : -1 /* SPLASH_SCREEN_STYLE_UNDEFINED */);

        // 关注点2
        //拿到 UserHandle,UserHandle 用于描述当前用户 id,具体可以参考前文的 ID
        UserHandle user = item == null ? null : item.user; // UserHandle{0}
        Bundle optsBundle = options.toBundle();

        /// 关注点3
        // 设置 FLAG_ACTIVITY_NEW_TASK,保证 Activity 在新任务栈中运行,实际已经有这个 flag 了
        // 值为 0x10000000
        // Prepare intent
        intent.addFlags(Intent.FLAG_ACTIVITY_NEW_TASK);
        if (v != null) {
            // ViewBounds 就是一个 Rect 对象,用于指定点击图标的位置
            intent.setSourceBounds(Utilities.getViewBounds(v));
        }
        try {
            // 关注点 4
            boolean isShortcut = (item instanceof WorkspaceItemInfo)
                    && (item.itemType == LauncherSettings.Favorites.ITEM_TYPE_SHORTCUT
                    || item.itemType == LauncherSettings.Favorites.ITEM_TYPE_DEEP_SHORTCUT)
                    && !((WorkspaceItemInfo) item).isPromise();
            if (isShortcut) { // // 应用快捷方式,不走这个分支
                // Shortcuts need some special checks due to legacy reasons.
                startShortcutIntentSafely(intent, optsBundle, item);
            } else if (user == null || user.equals(Process.myUserHandle())) {
                // Could be launching some bookkeeping activity
                // 走这里
                context.startActivity(intent, optsBundle);
            } else {
                context.getSystemService(LauncherApps.class).startMainActivity(
                        intent.getComponent(), user, intent.getSourceBounds(), optsBundle);
            }
            if (item != null) {
                InstanceId instanceId = new InstanceIdSequence().newInstanceId();
                logAppLaunch(getStatsLogManager(), item, instanceId);
            }
            return options.onEndCallback;
        } catch (NullPointerException | ActivityNotFoundException | SecurityException e) {
            Toast.makeText(context, R.string.activity_not_found, Toast.LENGTH_SHORT).show();
            Log.e(TAG, "Unable to launch. tag=" + item + " intent=" + intent, e);
        }
        return null;
    }
关注点 1 处,getActivityLaunchOptions 方法根据 View 的位置构建一个 ActivityOptionsWrapper 对象返回,ActivityOptionsWrapper 内部有一个成员 ActivityOptions。ActivityOptions 主要用于转场动画,不清楚的同学可以参考
- https://blog.csdn.net/JohanMan/article/details/76726638
- https://blog.csdn.net/chuyouyinghe/article/details/109515766
关注点 2 处,通过 ItemInfo 拿到目标 App 对应的 UserHandle 对象,不清楚 UserHandle 的同学可以参考Android的uid与UserHandle(opens new window)
关注点 3 处,设置 FLAG_ACTIVITY_NEW_TASK,保证 Activity 在新任务栈中运行
关注点 4 处,计算出一个 boolean 变量 isShortcut,这个变量决定是否显示应用快捷方式,当前情景下 isShortcut 为 false,进入到 else if 分支,在这个分支中接着会调用到父类 Activity 的成员方法 startActivity,其实现如下:
接着调用 Activity 的 startActivity 方法:
    // frameworks/base/core/java/android/app/Activity.java
    public void startActivity(Intent intent, @Nullable Bundle options) {
        getAutofillClientController().onStartActivity(intent, mIntent);
        if (options != null) { // 走这个分支
            startActivityForResult(intent, -1, options);
        } else {
            // Note we want to go through this call for compatibility with
            // applications that may have overridden the method.
            startActivityForResult(intent, -1);
        }
    }
这里 options 不为空,走第一个 if 分支,调用到子类 launcher 对象的 startActivityForResult 方法:
// packages/apps/Launcher3/quickstep/src/com/android/launcher3/uioverrides/QuickstepLauncher.java
    @Override
    public void startActivityForResult(Intent intent, int requestCode, Bundle options) {
        if (requestCode != -1) {
            // ......
        } else { // 走这个分支
            super.startActivityForResult(intent, requestCode, options);
        }
    }
requestCode 的值为 -1,这里走第二个 if 分支,接着调用到父类 Launcher 的 startActivityForResult 方法:
    // packages/apps/Launcher3/src/com/android/launcher3/Launcher.java

    @Override
    public void startActivityForResult(Intent intent, int requestCode, Bundle options) {
        if (requestCode != -1) { // 不进入
            mPendingActivityRequestCode = requestCode;
        }
        super.startActivityForResult(intent, requestCode, options);
    }
接着调用父类 Activity 的 startActivityForResult 方法
    // frameworks/base/core/java/android/app/Activity.java
    // requestcode -1
    public void startActivityForResult(@RequiresPermission Intent intent, int requestCode,
            @Nullable Bundle options) {
        if (mParent == null) {  // 一般走这个分支

            // 单独处理 options,特定情况下使用当前 Activity 的 options 作为启动目标 Activity 的 options
            options = transferSpringboardActivityOptions(options);

            // 调用 Instrumentation.execStartActivity 方法启动 Activity
            Instrumentation.ActivityResult ar =
                mInstrumentation.execStartActivity(
                    this, mMainThread.getApplicationThread(), mToken, this,
                    intent, requestCode, options);

            // 处理启动 Activity 的返回值
            if (ar != null) {
                mMainThread.sendActivityResult(
                    mToken, mEmbeddedID, requestCode, ar.getResultCode(),
                    ar.getResultData());
            }

            if (requestCode >= 0) {
                // If this start is requesting a result, we can avoid making
                // the activity visible until the result is received.  Setting
                // this code during onCreate(Bundle savedInstanceState) or onResume() will keep the
                // activity hidden during this time, to avoid flickering.
                // This can only be done when a result is requested because
                // that guarantees we will get information back when the
                // activity is finished, no matter what happens to it.
                mStartedActivity = true;
            }

            // 退出即将来临的输入事件,开始 Activity 退出的动画
            cancelInputsAndStartExitTransition(options);
            // TODO Consider clearing/flushing other event sources and events for child windows.
        } else { // 子 Activity 中会执行此分支
            if (options != null) {
                mParent.startActivityFromChild(this, intent, requestCode, options);
            } else {
                // Note we want to go through this method for compatibility with
                // existing applications that may have overridden it.
                mParent.startActivityFromChild(this, intent, requestCode);
            }
        }
    }
mParent 顾名思义,表示是当前 Activity 的父 Activity,那么在什么样的场景下会存在一个 Activity 中包含 Activity 的情况呢,很容易就想到是 TabActivity、DialogActivity,现在基本已经被 Fragment 替代了,这种情况已经很少了。
所以大部分情况下走第一个 if 分支。在 if 分支中会调用到 Instrumentation 对象的 execStartActivity 方法。
到此,Launcher 部分就结束,代码很繁琐,但总结一下,Launcher 阶段就干了一件事:准备下一阶段 Activity 启动的参数
2. Instrumentation 中流程跟踪
启动 Activity ,最终会调用到 Instrumentation 对象的 execStartActivity 方法。
Intrumentation 对象用来监控应用程序和系统之间的交互操作。由于启动 Activity 是应用程序与系统之间的交互操作,因此调用 Intrumentation 的成员函数 execStartActivity 来代替执行启动 Activity 的操作,以便可以监控这个交互过程。
Intrumentation 中主要有以下一些接口:
newActivity(…)
newApplication(…)
callApplicationOnCreate(…)
callActivityOnCreate(…)
callActivityOnNewIntent(…)
callActivityOnXXX(…)
execStartActivity(…)
我们关注上面使用到的 execStartActivity 方法:
    // frameworks/base/core/java/android/app/Instrumentation.java
    public ActivityResult execStartActivity(
            Context who, IBinder contextThread, IBinder token, Activity target,
            Intent intent, int requestCode, Bundle options) {

        // App 这边的匿名 Binder 服务,ATMS 向 App 发起远程函数调用的通道
        IApplicationThread whoThread = (IApplicationThread) contextThread;
        Uri referrer = target != null ? target.onProvideReferrer() : null;
        if (referrer != null) { // 不进入
            intent.putExtra(Intent.EXTRA_REFERRER, referrer);
        }

        // ......

        try {
            intent.migrateExtraStreamToClipData();
            intent.prepareToLeaveProcess(who);
            // 获取 ATMS 服务的客户端代理类
            // 通过客户端代理类发起远程过程调用
            int result = ActivityTaskManager.getService()
                .startActivity(whoThread, who.getBasePackageName(), intent,
                        intent.resolveTypeIfNeeded(who.getContentResolver()),
                        token, target != null ? target.mEmbeddedID : null,
                        requestCode, 0, null, options);
            // 检查 Activity 启动是否成功
            checkStartActivityResult(result, intent);
        } catch (RemoteException e) {
            throw new RuntimeException("Failure from system", e);
        }
        return null;
    }
execStartActivity 方法的参数由 Launcher 阶段准备,具体的,这些参数是:
- who:类型是 Context,实际就是源 Activity 对象 QuickstepLauncher
- contextThread:IBinder 对象,实际类型是 ApplicationThread,是一个 Binder 服务端对象
- token:IBinder 对象,是一个 Binder 代理端对象,对应的 Binder 服务端对象是 ActivityRecord 对象中的 Token。在服务端主要起索引作用,用于找到对应 ActivityRecord 对象的作用
- target:发起端 Activity 对象,这里是 QuickstepLauncher
- intent:启动目标 Activity 的 Intent 对象
- requestCode:启动目标 Activity 的请求码,这里是 -1
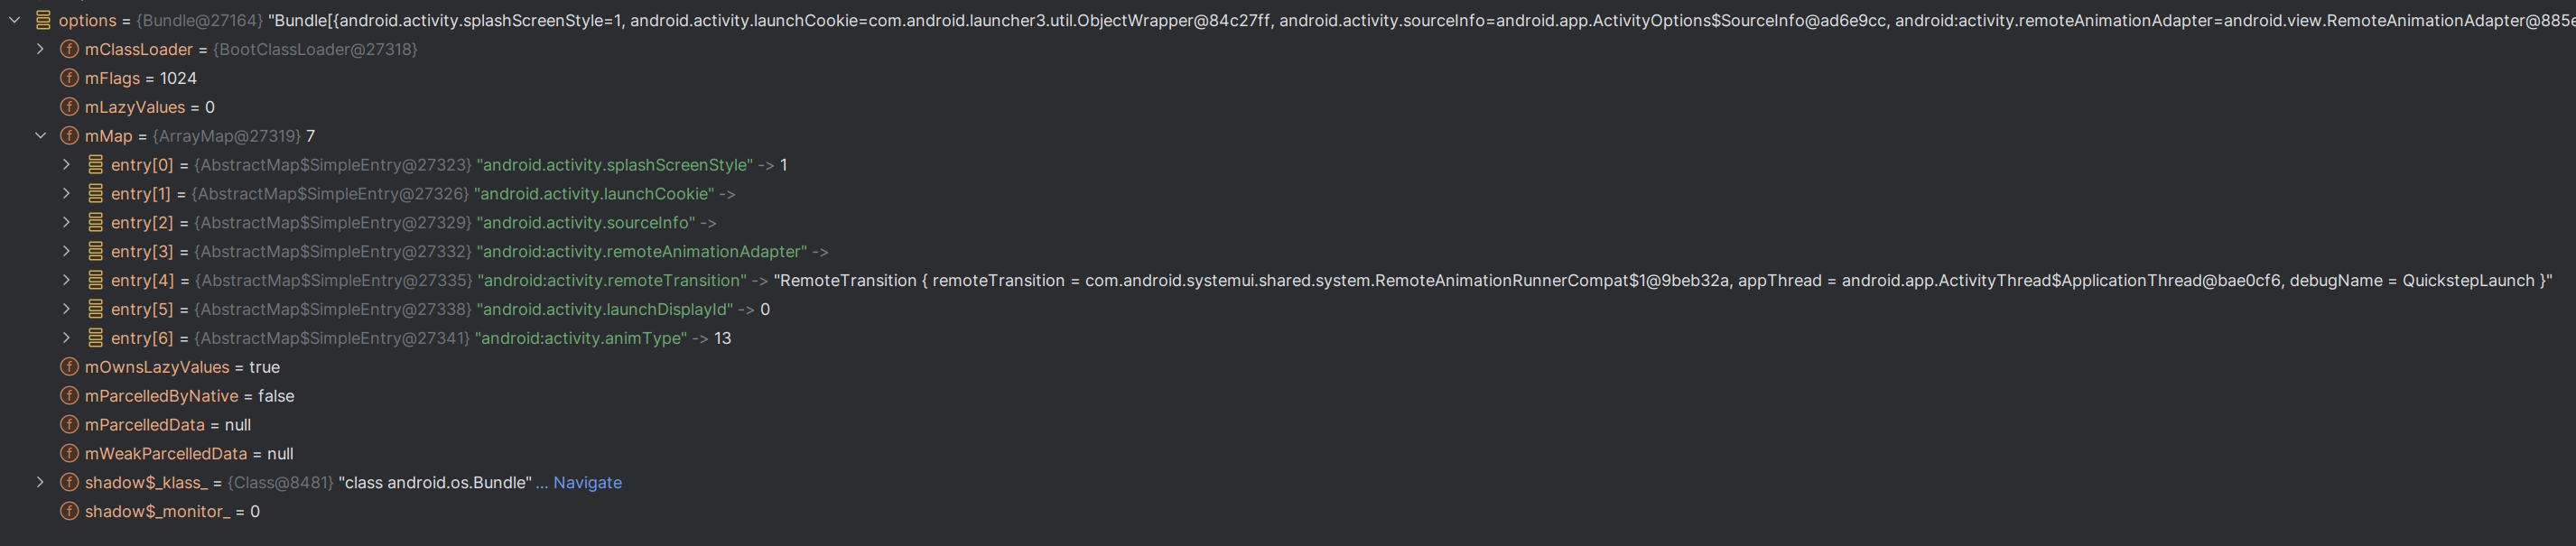
- options:启动目标 Activity 的附加参数,内部主要内容如下:
这里处理了传入的参数后,调用 ActivityTaskManager.getService() 获得 ActivityTaskManager 服务的客服端代理类对象:
// frameworks/base/core/java/android/app/ActivityTaskManager.java
    public static IActivityTaskManager getService() {
        return IActivityTaskManagerSingleton.get();
    }

    @UnsupportedAppUsage(trackingBug = 129726065)
    private static final Singleton<IActivityTaskManager> IActivityTaskManagerSingleton =
            new Singleton<IActivityTaskManager>() {
                @Override
                protected IActivityTaskManager create() {
                    final IBinder b = ServiceManager.getService(Context.ACTIVITY_TASK_SERVICE);
                    return IActivityTaskManager.Stub.asInterface(b);
                }
            };
这是一个通过 Singleton 类实现的单例模式,当调用到 IActivityTaskManagerSingleton.get() 时,会调用到 create 方法去获取一个单例对象,create 方法中通过 ServiceManager.getService获得 ATMS 系统服务的客户端代理,然后通过 IActivityTaskManager.Stub.asInterface 将其转换为具体的代理端对象。通过这个代理端对象我们就可以向 SystemServer 中的 ATMS Binder 服务发起 RPC 调用了。
接下来发起远程调用 startActivity,该远程调用在 aidl 文件中定义如下:
// frameworks/base/core/java/android/app/IActivityTaskManager.aidl
interface IActivityTaskManager {
    // ......
    int startActivity(in IApplicationThread caller, in String callingPackage,
            in String callingFeatureId, in Intent intent, in String resolvedType,
            in IBinder resultTo, in String resultWho, int requestCode,
            int flags, in ProfilerInfo profilerInfo, in Bundle options);
    // ......
}
方法的参数:
- IApplicationThread caller:当前应用(Launcher)的 ActivityThread 对象的 ApplicationThread 类型成员
- String callingPackage:当前 Activity 所在包名,这里的值为
intent.resolveTypeIfNeeded(who.getContentResolver() - Intent intent:启动目标 Activity 的 Intent,其中携带目标 Acitivity 隐式或者显示启动需要的参数
- String resolvedType:intent.resolveTypeIfNeeded 方法的返回值,表示 intent 的 MIME 数据类型
- IBinder resultTo:类型为 IBinder,是一个 Binder 代理端对象,对应的 Binder 服务端对象是发起端 Activity 对应的的 ActivityRecord 对象中的 Token 对象。用于在 SystemServer 端找到对应的 ActivityRecord 对象,起一个索引的作用
- String resultWho:当前发起端 Activity.mEmbeddedID,可能为 null
- int requestCode:启动目的端 Activity 的请求码,此时的取值为 -1
- int flags:此时取值为 0,用于指定 Activity 的启动模式
- ProfilerInfo profilerInfo:这里传入的是 null
- Bundle options:启动目的端 Activity 的附加参数
接下来,启动过程就会进入到服务端 SystemServer的 ATMS Binder 服务中去了。
总结
- Activity 的启动的 Launcher 阶段主要工作是准备 Instrumentation 阶段发起远程调用的参数
- Instrumentation 阶段向 SystemServer 发起远程调用,启动目标 Activity
- 整体的调用流程如下:
ItemClickHandler::onClick
    ItemClickHandler::onClickAppShortcut
        ItemClickHandler::startAppShortcutOrInfoActivity
            QuickstepLauncher::startActivitySafely
                Launcher::startActivitySafely
                    AppLauncher::startActivitySafely
                        BaseQuickstepLauncher::getActivityLaunchOptions    -- 构建 Option 参数
                        Activity::startActivity  -- 共用启动Activity流程
                            Activity::startActivity
                                Activity::startActivity
                                    Activity::startActivityForResult
                                        Instrumentation::execStartActivity
                                            ActivityTaskManagerService::startActivity -- 跨进程


 400
400

 被折叠的 条评论
为什么被折叠?
被折叠的 条评论
为什么被折叠?
 到【灌水乐园】发言


