


图像和像素
数字图像只不过是数据——数字表示像素网格上特定位置的红色、绿色和蓝色的变化。大多数时候,我们将这些像素视为夹在计算机屏幕上的微型矩形。然而,通过一些创造性的思考和使用代码对像素进行一些较低级别的操作,我们可以以多种方式显示该信息。本教程致力于打破处理中的简单形状绘制,并使用图像(及其像素)作为处理图形的构建块。
图像入门。
希望您对数据类型的概念感到满意。您可能经常指定它们——浮点变量“速度”、整数“x”等。这些都是原始数据类型,位于计算机内存中的位可供我们使用。虽然可能有点棘手,但您希望也可以使用对象、存储多条数据(以及功能)的复杂数据类型——例如,“Ball”类可能包括位置、大小和速度的浮点变量作为移动、显示自身等的方法。
除了用户定义的对象(例如 Ball)之外,Processing 还有一堆方便的类,无需我们编写任何代码即可使用。在本教程中,我们将研究PImage,这是一个用于加载和显示图像以及查看其像素的类。
PImage img; // Declare a variable of type PImage

void setup() {
  size(320,240);
  // Make a new instance of a PImage by loading an image file
  img = loadImage("mysummervacation.jpg");
}

void draw() {
  background(0);
  // Draw the image to the screen at coordinate (0,0)
  image(img,0,0);
}
使用PImage对象的实例与使用用户定义的类没有什么不同。首先,声明了一个名为“img”的PImage类型的变量。其次,通过loadImage()方法创建PImage对象的新实例。loadImage()接受一个参数,a指示文件名,并将该文件加载到内存中。loadImage()查找存储在处理草图的“数据”文件夹中的图像文件。String
数据文件夹:我如何到达那里?
图像可以通过以下方式自动添加到数据文件夹:
草图→添加文件。. .
或手动:
草图→显示草图文件夹
这将打开草图文件夹。如果没有数据目录创建一个。否则,将您的图像文件放入其中。
Processing 接受以下图像文件格式:GIF、JPG、TGA、PNG。
在上面的示例中,我们从未调用“构造函数”来实例化PImage对象,这似乎有点奇怪,比如new PImage(). 毕竟,在大多数与对象相关的示例中,构造函数是生成对象实例所必需的。
Spaceship ss = new Spaceship();
Flower flr = new Flower(25);
然而:
PImage img = loadImage("file.jpg");
实际上,loadImage()函数执行构造函数的工作,返回从指定文件名生成的PImage对象的全新实例。我们可以将其视为用于从文件加载图像的PImage构造函数。为了创建空白图像,使用createImage()函数。
// Create a blank image, 200 x 200 pixels with RGB color
PImage img = createImage(200, 200,RGB);
我们还应该注意,将图像从硬盘加载到内存的过程是一个缓慢的过程,我们应该确保我们的程序只需要执行一次,在setup(). 加载图像draw()可能会导致性能下降以及“内存不足”错误。
加载图像后,将使用image()函数显示它。image()函数必须包含 3 个参数——要显示的图像、x 位置和 y 位置。可以选择添加两个参数来将图像调整为特定的宽度和高度。
image(img,10,20,90,60);
您的第一个图像处理滤镜
显示图像时,您可能希望更改其外观。也许您希望图像看起来更暗、透明、偏蓝等。这种简单的图像过滤是通过 Processing 的tint()函数实现的。tint()本质上是 shape 的图像等价物fill(),设置在屏幕上显示图像的颜色和 alpha 透明度。然而,图像通常并不都是一种颜色。的参数tint()仅指定该图像的每个像素使用多少给定颜色,以及这些像素应该显示的透明程度。
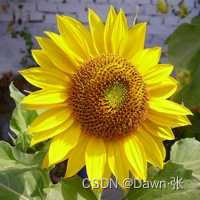
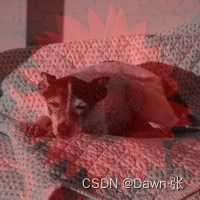
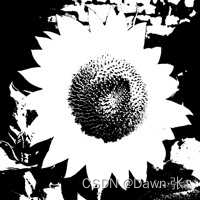
对于以下示例,我们将假设已加载两个图像(向日葵和狗),并且将狗显示为背景(这将允许我们展示透明度。)
PImage sunflower = loadImage("sunflower.jpg");
PImage dog = loadImage("dog.jpg");
background(dog);
如果tint()接收一个参数,则仅影响图像的亮度。
// The image retains its original state.
tint(255);
image(sunflower,0,0);
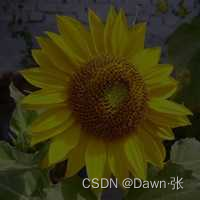
// The image appears darker.
tint(100);
image(sunflower,0,0);
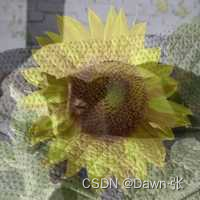
第二个参数将改变图像的 alpha 透明度。
// The image is at 50% opacity.
tint(255,127);
image(sunflower,0,0);
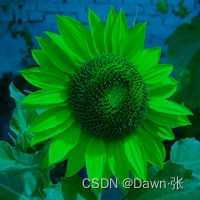
三个参数影响每种颜色的红色、绿色和蓝色分量的亮度。
// None of its red, most of its green, and all of its blue.
tint(0,200,255);
image(sunflower,0,0);
最后,向该方法添加第四个参数来操作 alpha(与 2 相同)。tint()顺便说一句,可以使用colorMode()指定值的范围。
// The image is tinted red and transparent.
tint(255,0,0,100);
image(sunflower,0,0);
像素、像素和更多像素
如果您刚刚开始使用 Processing,您可能会错误地认为唯一提供的用于绘制到屏幕的方法是通过函数调用。“在这些点之间画一条线”或“用红色填充椭圆”或“加载此 JPG 图像并将其放置在此处的屏幕上”。但不知何故,有人不得不编写代码,将这些函数调用转换为设置屏幕上的各个像素以反映所请求的形状。一条线没有出现是因为我们说line(),它出现是因为我们为两点之间的线性路径上的所有像素着色。幸运的是,我们不必每天管理这种较低级别的像素设置。我们要感谢 Processing(和 Java)的开发人员,感谢他们处理这项业务的许多绘图功能。
尽管如此,我们还是时不时想要打破我们世俗的图形绘制存在,直接处理屏幕上的像素。处理通过像素阵列提供此功能。
我们熟悉屏幕上的每个像素在二维窗口中都有一个 X 和 Y 位置的想法。然而,阵列像素只有一维,以线性顺序存储颜色值。
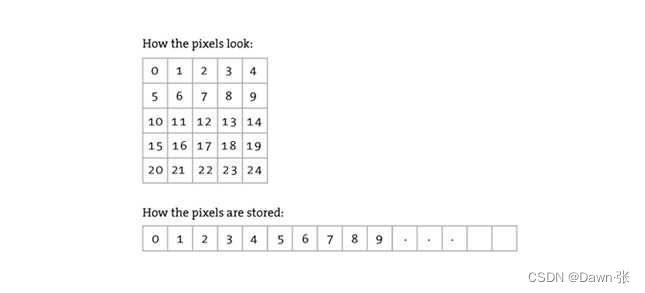
举个简单的例子。该程序将窗口中的每个像素设置为随机灰度值。像素数组就像其他数组一样,唯一的区别是我们不必声明它,因为它是一个处理内置变量。
示例:设置像素
size(200, 200);
// Before we deal with pixels
loadPixels();
// Loop through every pixel
for (int i = 0; i < pixels.length; i++) {
  // Pick a random number, 0 to 255
  float rand = random(255);
  // Create a grayscale color based on random number
  color c = color(rand);
  // Set pixel at that location to random color
  pixels[i] = c;
}
// When we are finished dealing with pixels
updatePixels();
首先,我们应该在上面的例子中指出一些重要的东西。每当您访问处理窗口的像素时,您必须提醒处理此活动。这是通过两个功能完成的:
- loadPixels()这个函数在你访问像素数组之前被调用,说“加载像素,我想和他们说话!”
- updatePixels()这个函数在你完成像素数组后调用,“继续更新像素,我已经完成了!”
在上面的例子中,因为颜色是随机设置的,所以我们不必担心像素在屏幕上的位置,因为我们只是设置了所有像素,而不考虑它们的相对位置。然而,在许多图像处理应用中,像素本身的 XY 位置是至关重要的信息。一个简单的示例可能是将每个偶数列像素设置为白色,将每个奇数列设置为黑色。你怎么能用一维像素阵列做到这一点?你怎么知道任何给定像素在哪一列或哪一行?
在使用像素进行编程时,我们需要能够将每个像素视为生活在二维世界中,但要继续访问一个二维世界中的数据(因为这就是我们可以使用它的方式)。我们可以通过以下公式做到这一点:
- 假设一个窗口或图像具有给定的宽度和高度。
- 然后我们知道像素阵列的元素总数等于 WIDTH * HEIGHT。
- 对于窗口中任何给定的 X、Y 点,我们的一维像素阵列中的位置为:LOCATION = X + Y * WIDTH
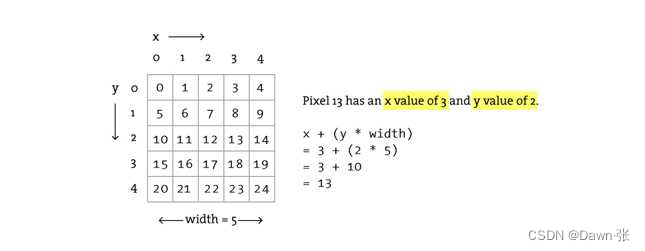
这可能会让您想起我们的二维数组教程。事实上,我们需要使用相同的嵌套 for 循环技术。不同之处在于,虽然我们想使用 for 循环来考虑二维像素,但当我们实际访问像素时,它们存在于一维数组中,我们必须应用上图中的公式。
让我们看看它是如何完成的。
示例:根据 2D 位置设置像素
size(200, 200);
loadPixels();
// Loop through every pixel column
for (int x = 0; x < width; x++) {
  // Loop through every pixel row
  for (int y = 0; y < height; y++) {
    // Use the formula to find the 1D location
    int loc = x + y * width;
    if (x % 2 == 0) { // If we are an even column
      pixels[loc] = color(255);
    } else {          // If we are an odd column
      pixels[loc] = color(0);
    }
  }
}
updatePixels();
图像处理简介
上一节介绍了根据任意计算设置像素值的示例。我们现在将看看如何根据现有PImage对象中的像素设置像素。这是一些伪代码。
将图像文件加载到 PImage 对象中
对于 PImage 中的每个像素,检索像素的颜色并将显示像素设置为该颜色。
PImage类包括一些有用的字段,用于存储与图像相关的数据——宽度、高度和像素。就像我们的用户定义的类一样,我们可以通过点语法访问这些字段。
PImage img = createImage(320,240,RGB); // Make a PImage object
println(img.width); // Yields 320
println(img.height); // Yields 240
img.pixels[0] = color(255,0,0); // Sets the first pixel of the image to red
访问这些字段使我们能够遍历图像的所有像素并将它们显示在屏幕上。
示例:显示图像的像素
PImage img;

void setup() {
  size(200, 200);
  img = loadImage("sunflower.jpg");
}

void draw() {
  loadPixels();
  // Since we are going to access the image's pixels too
  img.loadPixels();
  for (int y = 0; y < height; y++) {
    for (int x = 0; x < width; x++) {
      int loc = x + y*width;

      // The functions red(), green(), and blue() pull out the 3 color components from a pixel.
      float r = red(img.pixels[loc]);
      float g = green(img.pixels[loc]);
      float b = blue(img.pixels[loc]);

      // Image Processing would go here
      // If we were to change the RGB values, we would do it here,
      // before setting the pixel in the display window.

      // Set the display pixel to the image pixel
      pixels[loc] =  color(r,g,b);
    }
  }
  updatePixels();
}
现在,我们当然可以进行简化以仅显示图像(例如,不需要嵌套循环,更不用说使用image()函数将允许我们完全跳过所有这些像素工作。)但是,示例 15-7 提供了一个基本框架,用于根据每个像素的空间方向(XY 位置)获取每个像素的红色、绿色和蓝色值;最终,这将使我们能够开发更先进的图像处理算法。
在我们继续之前,我应该强调这个例子是有效的,因为显示区域与源图像具有相同的尺寸。如果不是这种情况,您只需计算两个像素位置,一个用于源图像,一个用于显示区域。
int imageLoc = x + y*img.width;
int displayLoc = x + y*width;
我们的第二个图像过滤器,制作我们自己的“色调”
就在几段前,我们正在享受轻松的编码会议,使用友好的tint()方法为图像着色并添加 alpha 透明度。对于基本过滤,这种方法可以解决问题。然而,逐像素方法将允许我们开发自定义算法,以数学方式改变图像的颜色。考虑亮度-较亮的颜色具有较高的红色、绿色和蓝色分量值。很自然地,我们可以通过增加或减少每个像素的颜色分量来改变图像的亮度。在下一个示例中,我们根据鼠标的水平位置动态地增加或减少这些值。(注意,接下来的两个示例仅包括图像处理循环本身,其余代码是假定的。)
示例:调整图像亮度
for (int x = 0; x < img.width; x++) {
  for (int y = 0; y < img.height; y++ ) {
    // Calculate the 1D pixel location
    int loc = x + y*img.width;
    // Get the R,G,B values from image
    float r = red   (img.pixels[loc]);
    float g = green (img.pixels[loc]);
    float b = blue  (img.pixels[loc]);
    // Change brightness according to the mouse here
    float adjustBrightness = ((float) mouseX / width) * 8.0;
    r *= adjustBrightness;
    g *= adjustBrightness;
    b *= adjustBrightness;
    // Constrain RGB to between 0-255
    r = constrain(r,0,255);
    g = constrain(g,0,255);
    b = constrain(b,0,255);
    // Make a new color and set pixel in the window
    color c = color(r,g,b);
    pixels[loc] = c;
  }
}
由于我们是在每个像素的基础上更改图像,因此不需要平等对待所有像素。例如,我们可以根据每个像素与鼠标的距离来改变每个像素的亮度。
示例:根据像素位置调整图像亮度
for (int x = 0; x < img.width; x++) {
  for (int y = 0; y < img.height; y++ ) {
    // Calculate the 1D pixel location
    int loc = x + y*img.width;
    // Get the R,G,B values from image
    float r = red   (img.pixels[loc]);
    float g = green (img.pixels[loc]);
    float b = blue  (img.pixels[loc]);
    // Calculate an amount to change brightness
    // based on proximity to the mouse
    float distance = dist(x,y,mouseX,mouseY);
    float adjustBrightness = (50-distance)/50;
    r *= adjustBrightness;
    g *= adjustBrightness;
    b *= adjustBrightness;
    // Constrain RGB to between 0-255
    r = constrain(r,0,255);
    g = constrain(g,0,255);
    b = constrain(b,0,255);
    // Make a new color and set pixel in the window
    color c = color(r,g,b);
    pixels[loc] = c;
  }
}
写入另一个 PImage 对象的像素
我们所有的图像处理示例都从源图像中读取了每个像素,并将一个新像素直接写入处理窗口。但是,将新像素写入目标图像(然后使用image()函数显示)通常更方便。我们将在查看另一个简单的像素操作时演示此技术:阈值。
阈值过滤器仅以两种状态(黑色或白色)中的一种显示图像的每个像素。该状态是根据特定阈值设置的。如果像素的亮度大于阈值,我们将像素着色为白色,小于,黑色。在下面的代码中,我们使用任意阈值 100。
示例:亮度阈值
PImage source;       // Source image
PImage destination;  // Destination image

void setup() {
  size(200, 200);
  source = loadImage("sunflower.jpg");
  // The destination image is created as a blank image the same size as the source.
  destination = createImage(source.width, source.height, RGB);
}

void draw() {
  float threshold = 127;

  // We are going to look at both image's pixels
  source.loadPixels();
  destination.loadPixels();

  for (int x = 0; x < source.width; x++) {
    for (int y = 0; y < source.height; y++ ) {
      int loc = x + y*source.width;
      // Test the brightness against the threshold
      if (brightness(source.pixels[loc]) > threshold) {
        destination.pixels[loc]  = color(255);  // White
      }  else {
        destination.pixels[loc]  = color(0);    // Black
      }
    }
  }

  // We changed the pixels in destination
  destination.updatePixels();
  // Display the destination
  image(destination,0,0);
}
作为 Processing 的filter()函数的一部分,此特定功能无需按像素处理即可使用。但是,如果您想实现自己的图像处理算法,了解较低级别的代码至关重要,而filter().
但是,如果您想要做的只是阈值,那么方法如下:
// Draw the image
image(img,0,0);
// Filter the window with a threshold effect
// 0.5 means threshold is 50% brightness
filter(THRESHOLD,0.5);
二级:像素组处理
在前面的示例中,我们已经看到源像素和目标像素之间存在一对一的关系。为了增加图像的亮度,我们从源图像中取出一个像素,增加 RGB 值,并在输出窗口中显示一个像素。为了执行更高级的图像处理功能,我们必须超越一对一的像素范式,进入像素组处理。
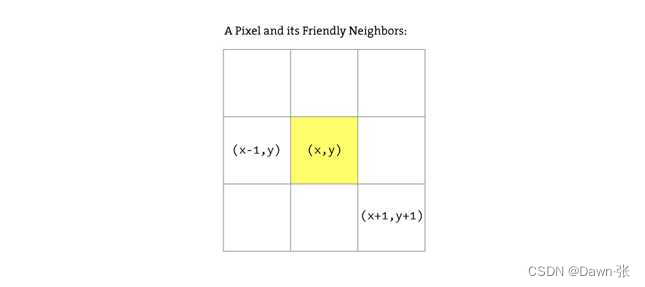
让我们从源图像的两个像素中创建一个新像素开始——一个像素及其左侧的邻居。
如果我们知道像素位于 (x,y):
int loc = x + y*img.width;
color pix = img.pixels[loc];
然后它的左邻居位于 (x-1,y):
int leftLoc = (x-1) + y*img.width;
color leftPix = img.pixels[leftLoc];
然后,我们可以根据像素与其左侧相邻像素之间的差异制作新颜色。
float diff = abs(brightness(pix) - brightness(leftPix));
pixels[loc] = color(diff);
这是完整的算法:
示例:像素相邻差异(边缘)
// Since we are looking at left neighbors
// We skip the first column
for (int x = 1; x < width; x++) {
  for (int y = 0; y < height; y++ ) {
    // Pixel location and color
    int loc = x + y*img.width;
    color pix = img.pixels[loc];

    // Pixel to the left location and color
    int leftLoc = (x-1) + y*img.width;
    color leftPix = img.pixels[leftLoc];

    // New color is difference between pixel and left neighbor
    float diff = abs(brightness(pix) - brightness(leftPix));
    pixels[loc] = color(diff);
  }
}

这个例子是一个简单的水平边缘检测算法。当像素与其相邻像素相差很大时,它们很可能是“边缘”像素。例如,想一想黑色桌面上的一张白纸图片。那张纸的边缘是颜色最不同的地方,白色与黑色的交汇处。
在前面的示例中,我们查看了两个像素以查找边缘。然而,更复杂的算法通常涉及一次查看多个像素。毕竟,每个像素都有 8 个直接邻居:左上、上、右上、右、右下、下、左下、左。
这些图像处理算法通常被称为“空间卷积”。该过程使用输入像素及其相邻像素的加权平均值来计算输出像素。换言之,该新像素是像素面积的函数。可以使用不同大小的相邻区域,例如 3x3 矩阵、5x5 等。
每个像素的不同权重组合会产生不同的效果。例如,我们通过减去相邻像素值并增加中心点像素来“锐化”图像。通过取所有相邻像素的平均值来实现模糊。(请注意,卷积矩阵中的值加起来为 1)。
例如,
Sharpen:
-1   -1   -1
-1    9   -1
-1   -1   -1

Blur:
1/9  1/9  1/9
1/9  1/9  1/9
1/9  1/9  1/9
下面是一个使用 2D 数组执行卷积的示例(参见第 13 章,第 XX 页,回顾 2D 数组)来存储 3x3 矩阵的像素权重。这个例子可能是迄今为止我们在本书中遇到的最高级的例子,因为它涉及很多元素(嵌套循环、2D 数组、PImage 像素等)。
示例:使用卷积锐化
PImage img;
int w = 80;

// It's possible to perform a convolution
// the image with different matrices

float[][] matrix = { { -1, -1, -1 },
                     { -1,  9, -1 },
                     { -1, -1, -1 } };

void setup() {
  size(200, 200);
  frameRate(30);
  img = loadImage("sunflower.jpg");
}

void draw() {
  // We're only going to process a portion of the image
  // so let's set the whole image as the background first
  image(img,0,0);
  // Where is the small rectangle we will process
  int xstart = constrain(mouseX-w/2,0,img.width);
  int ystart = constrain(mouseY-w/2,0,img.height);
  int xend = constrain(mouseX+w/2,0,img.width);
  int yend = constrain(mouseY+w/2,0,img.height);
  int matrixsize = 3;
  loadPixels();
  // Begin our loop for every pixel
  for (int x = xstart; x < xend; x++) {
    for (int y = ystart; y < yend; y++ ) {
      // Each pixel location (x,y) gets passed into a function called convolution()
      // which returns a new color value to be displayed.
      color c = convolution(x,y,matrix,matrixsize,img);
      int loc = x + y*img.width;
      pixels[loc] = c;
    }
  }
  updatePixels();

  stroke(0);
  noFill();
  rect(xstart,ystart,w,w);
}

color convolution(int x, int y, float[][] matrix, int matrixsize, PImage img) {
  float rtotal = 0.0;
  float gtotal = 0.0;
  float btotal = 0.0;
  int offset = matrixsize / 2;
  // Loop through convolution matrix
  for (int i = 0; i < matrixsize; i++){
    for (int j= 0; j < matrixsize; j++){
      // What pixel are we testing
      int xloc = x+i-offset;
      int yloc = y+j-offset;
      int loc = xloc + img.width*yloc;
      // Make sure we have not walked off the edge of the pixel array
      loc = constrain(loc,0,img.pixels.length-1);
      // Calculate the convolution
      // We sum all the neighboring pixels multiplied by the values in the convolution matrix.
      rtotal += (red(img.pixels[loc]) * matrix[i][j]);
      gtotal += (green(img.pixels[loc]) * matrix[i][j]);
      btotal += (blue(img.pixels[loc]) * matrix[i][j]);
    }
  }
  // Make sure RGB is within range
  rtotal = constrain(rtotal,0,255);
  gtotal = constrain(gtotal,0,255);
  btotal = constrain(btotal,0,255);
  // Return the resulting color
  return color(rtotal,gtotal,btotal);
}

可视化图像
你可能会想:“天哪,这一切都很有趣,但是说真的,当我想模糊图像或改变它的亮度时,我真的需要编写代码吗?我的意思是,我不能使用 Photoshop 吗?” 实际上,我们在这里所取得的成果仅仅是对 Adobe 高技能程序员所做工作的初步了解。然而,Processing 的强大之处在于实时、交互式图形应用程序的潜力。我们没有必要生活在“像素点”和“像素组”处理的范围内。
以下是绘制处理形状的算法的两个示例。我们不再像过去那样随机或使用硬编码值对形状进行着色,而是从PImage对象内部的像素中选择颜色。图像本身从不显示;相反,它是一个信息数据库,我们可以利用它来进行多种创造性的追求。
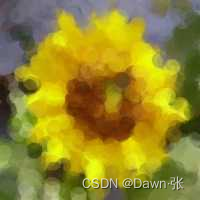
在第一个示例中,对于通过 draw() 的每个循环,我们在屏幕上的随机位置填充一个椭圆,颜色取自源图像中对应位置的颜色。结果是基本的“点画式”效果:
示例:“点画法”
PImage img;
int pointillize = 16;

void setup() {
  size(200,200);
  img = loadImage("sunflower.jpg");
  background(0);
  smooth();
}

void draw() {
  // Pick a random point
  int x = int(random(img.width));
  int y = int(random(img.height));
  int loc = x + y*img.width;

  // Look up the RGB color in the source image
  loadPixels();
  float r = red(img.pixels[loc]);
  float g = green(img.pixels[loc]);
  float b = blue(img.pixels[loc]);
  noStroke();

  // Draw an ellipse at that location with that color
  fill(r,g,b,100);
  ellipse(x,y,pointillize,pointillize);
}
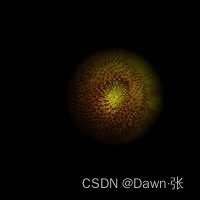
在下一个示例中,我们从二维图像中获取数据,并使用第 14 章中描述的 3D 平移技术,为三维空间中的每个像素渲染一个矩形。z 位置由颜色的亮度决定。较亮的颜色看起来更靠近观察者,而较暗的颜色则更远。

示例:2D 图像映射到 3D
PImage img;       // The source image
int cellsize = 2; // Dimensions of each cell in the grid
int cols, rows;   // Number of columns and rows in our system

void setup() {
  size(200, 200, P3D);
  img  = loadImage("sunflower.jpg"); // Load the image
  cols = width/cellsize;             // Calculate # of columns
  rows = height/cellsize;            // Calculate # of rows
}

void draw() {
  background(0);
  loadPixels();
  // Begin loop for columns
  for ( int i = 0; i < cols;i++) {
    // Begin loop for rows
    for ( int j = 0; j < rows;j++) {
      int x = i*cellsize + cellsize/2; // x position
      int y = j*cellsize + cellsize/2; // y position
      int loc = x + y*width;           // Pixel array location
      color c = img.pixels[loc];       // Grab the color
      // Calculate a z position as a function of mouseX and pixel brightness
      float z = (mouseX/(float)width) * brightness(img.pixels[loc]) - 100.0;
      // Translate to the location, set fill and stroke, and draw the rect
      pushMatrix();
      translate(x,y,z);
      fill(c);
      noStroke();
      rectMode(CENTER);
      rect(0,0,cellsize,cellsize);
      popMatrix();
    }
  }
}


 3537
3537


 被折叠的 条评论
为什么被折叠?
被折叠的 条评论
为什么被折叠?
 到【灌水乐园】发言


