


引子
2025年春节期间,阿里推出Qwen2.5-VL,开源了3B、7B、72B模型,,能够处理图像和文本的联合任务,如图像描述生成、视觉问答(VQA)、图文匹配等。。之前写了一篇Qwen2-VL的博客,感兴趣的童鞋请移步(Qwen2-VL环境搭建&推理测试-CSDN博客),如果对华为卡部署感兴趣的童鞋请移步(Qwen2-VL华为卡300i duo环境搭建&推理测试_ollama支持华为300i吗-CSDN博客),7B模型,显然我的机器是跑的起来的,OK,那就让我们开始吧。
一、模型介绍
Qwen2.5-VL模型不仅在对话、指令跟随、数学、代码等能力上有所提高,还支持坐标、json等返回格式、支持更长(1小时)的视频理解、更细粒度的时间感知、更全面的知识解析能力、具备更强的agent能力来操作手机和电脑。Agent和实时视频交互能力,看了官方几个视频,感觉处理相关任务效果还不错,具体等模型下完之后,体验再评价。
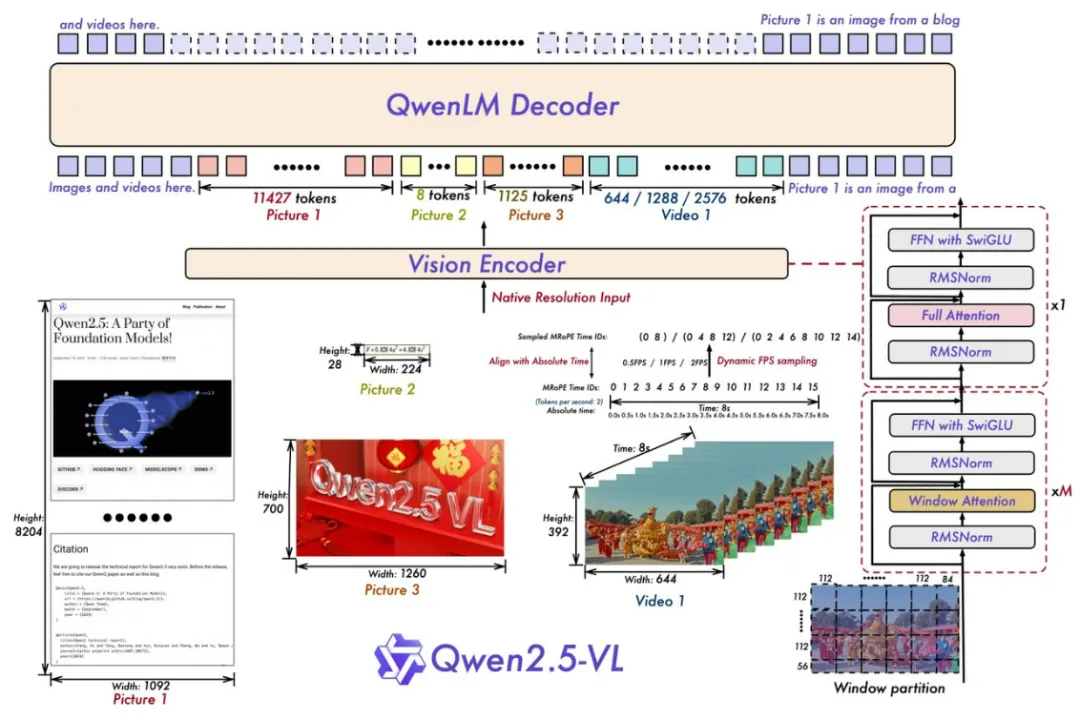
Qwen2.5-VL模型,在视觉编码器部分是原生训练的支持动态分辨率的ViT。同时在空间维度引入大量检测框和点等坐标,让模型理解空间的尺寸;
在时间维度引入动态FPS和绝对时间编码,使mRoPE的ids与时间快慢进行对齐,让模型理解时间的流速。
二、环境搭建
1、模型下载
modelscope download --model Qwen/Qwen2.5-VL-7B-Instruct --local_dir ./
2、环境安装
docker run -it --rm --gpus=all -v /datas/work/zzq:/workspace pytorch/pytorch:2.4.0-cuda12.4-cudnn9-devel bash
git clone https://github.com/QwenLM/Qwen2.5-VL.git
cd /workspace/Qwen2.5-VL/Qwen2.5-VL-main
pip install -r requirements_web_demo.txt -i Simple Index
三、推理测试
ffrom transformers import Qwen2_5_VLForConditionalGeneration, AutoProcessor
from qwen_vl_utils import process_vision_info

# default: Load the model on the available device(s)
model = Qwen2_5_VLForConditionalGeneration.from_pretrained(
    "Qwen/Qwen2.5-VL-7B-Instruct", torch_dtype="auto", device_map="auto"
)

# We recommend enabling flash_attention_2 for better acceleration and memory saving, especially in multi-image and video scenarios.
# model = Qwen2_5_VLForConditionalGeneration.from_pretrained(
#     "Qwen/Qwen2.5-VL-7B-Instruct",
#     torch_dtype=torch.bfloat16,
#     attn_implementation="flash_attention_2",
#     device_map="auto",
# )

# default processor
processor = AutoProcessor.from_pretrained("Qwen/Qwen2.5-VL-7B-Instruct")

# The default range for the number of visual tokens per image in the model is 4-16384.
# You can set min_pixels and max_pixels according to your needs, such as a token range of 256-1280, to balance performance and cost.
# min_pixels = 256*28*28
# max_pixels = 1280*28*28
# processor = AutoProcessor.from_pretrained("Qwen/Qwen2.5-VL-7B-Instruct", min_pixels=min_pixels, max_pixels=max_pixels)

messages = [
    {
        "role": "user",
        "content": [
            {
                "type": "image",
                "image": "https://qianwen-res.oss-cn-beijing.aliyuncs.com/Qwen-VL/assets/demo.jpeg",
            },
            {"type": "text", "text": "Describe this image."},
        ],
    }
]

# Preparation for inference
text = processor.apply_chat_template(
    messages, tokenize=False, add_generation_prompt=True
)
image_inputs, video_inputs = process_vision_info(messages)
inputs = processor(
    text=[text],
    images=image_inputs,
    videos=video_inputs,
    padding=True,
    return_tensors="pt",
)
inputs = inputs.to(model.device)

# Inference: Generation of the output
generated_ids = model.generate(**inputs, max_new_tokens=128)
generated_ids_trimmed = [
    out_ids[len(in_ids) :] for in_ids, out_ids in zip(inputs.input_ids, generated_ids)
]
output_text = processor.batch_decode(
    generated_ids_trimmed, skip_special_tokens=True, clean_up_tokenization_spaces=False
)
print(output_text)


 1190
1190

 被折叠的 条评论
为什么被折叠?
被折叠的 条评论
为什么被折叠?
 到【灌水乐园】发言


