


一、简单介绍
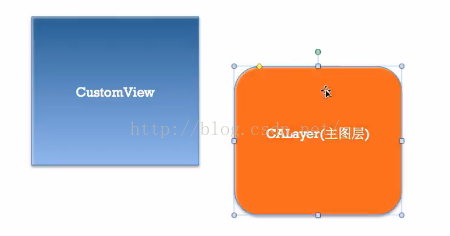
在iOS中,你能看得见摸得着的东西基本上都是UIView,比如一个按钮、一个文本标签、一个图标等等,这些都是UIView。
其实UIView之所以能够显示在屏幕上,完全是因为它内部的一个图层,在创建UIView对象时,UIView内部会自动创建一个图层(即CALayer对象),通过UIView的layer属性可以访问这个层。
当UIView需要显示到屏幕时,会调用drawRect:方法进行绘图,并且会将所有内容绘制在自己的图层上,绘图完毕后,系统会将图层拷贝到屏幕上,于是就完成了UIView的显示。
换句话说,UIView本身不具备显示功能,拥有显示功能的是他内部的图层。
二、简单使用
UIView之所以能够显示,完全是因为内部的CALayer对象。因此,通过操作这个CALayer对象,可以很方便的调整一些界面的属性,比如阴影、圆角大小、边框宽度和颜色等。
新建一个项目,在storyboard中添加一个view
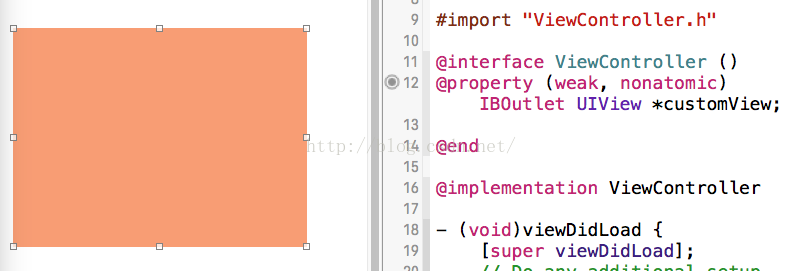
1、通过layer设置边框的宽度和颜色
#import "ViewController.h"

@interface ViewController ()

@property (weak, nonatomic) IBOutlet UIView *customView;

@end

@implementation ViewController

- (void)viewDidLoad {
    [super viewDidLoad];

//    设置边框宽度为20
    self.customView.layer.borderWidth = 20;
//    设置边框颜色
    self.customView.layer.borderColor = [UIColor cyanColor].CGColor;


}

@end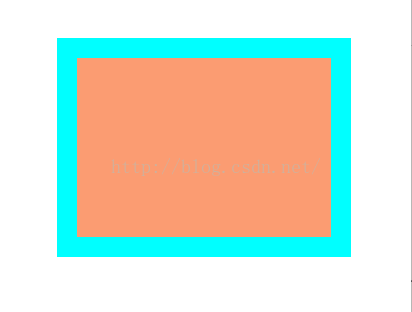
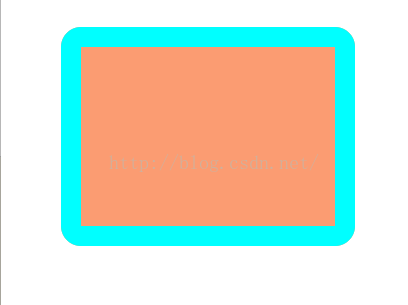
2、通过layer设置边框为圆角
//    设置layer的圆角
    self.customView.layer.cornerRadius = 20;
3、在layer上添加一张图片
#import "ViewController.h"

@interface ViewController ()

@property (weak, nonatomic) IBOutlet UIView *customView;

@end

@implementation ViewController

- (void)viewDidLoad {
    [super viewDidLoad];

//    设置边框宽度为10
    self.customView.layer.borderWidth = 10;
//    设置边框颜色
    self.customView.layer.borderColor = [UIColor blackColor].CGColor;
//    设置layer的圆角
    self.customView.layer.cornerRadius = 20;
//    在view的图层上添加一个image,contents表示接受内容
    self.customView.layer.contents = (id)[UIImage imageNamed:@"1"].CGImage;
}

@end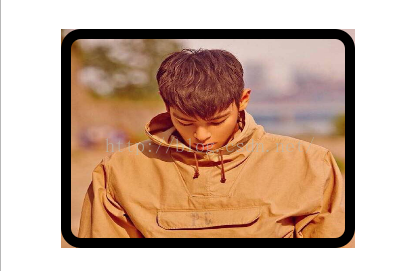
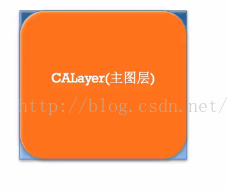
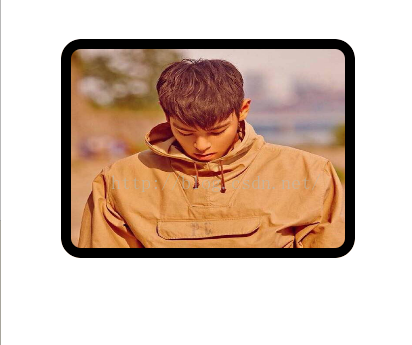
说明:contents是id类型,可以接受内容,上面的实例让layer显示一张图片,仔细观察可以发现四个圆角的部分露了一个角出来。
产生原因:
customview上的根layer
UIImage的图层
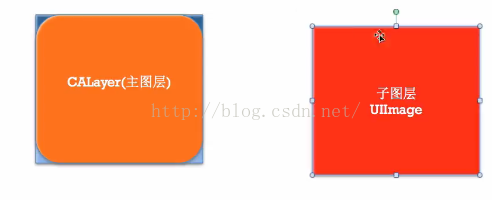
添加后
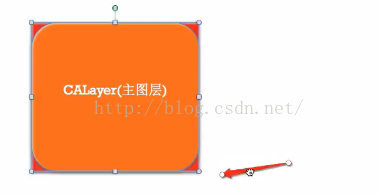
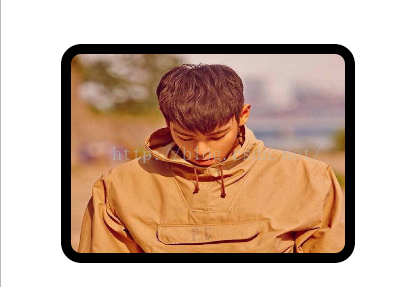
那是因为设置的image不是展示在主图层上的,而是显示在子图层上的。可以通过设置一个范围,设置超出主图层的部分把它给剪切掉。
#import "ViewController.h"

@interface ViewController ()

@property (weak, nonatomic) IBOutlet UIView *customView;

@end

@implementation ViewController

- (void)viewDidLoad {
    [super viewDidLoad];

//    设置边框宽度为20
    self.customView.layer.borderWidth = 10;
//    设置边框颜色
    self.customView.layer.borderColor = [UIColor blackColor].CGColor;
//    设置layer的圆角
    self.customView.layer.cornerRadius = 20;
//    设置超过子图层的部分减掉
//    第一种方式:UI框架中使用的方法
//    self.customView.clipsToBounds = YES;
//    第二种方式:常用的方式
    self.customView.layer.masksToBounds = YES;
//    在view的图层上添加一个image,contents表示接受内容
    self.customView.layer.contents = (id)[UIImage imageNamed:@"1"].CGImage;

}

@end
4、设置阴影
设置阴影,不光需要设置阴影颜色,还应该设置阴影的偏移位和透明度
因为如果不设置偏移位的话,那么阴影和Layer完全重叠,且默认透明度为0(即完全透明)
//    设置阴影颜色
    self.customView.layer.shadowColor = [UIColor blackColor].CGColor;
//    设置阴影的偏移量,如果为正数,则表示往右边偏移
    self.customView.layer.shadowOffset = CGSizeMake(15, 5);
//    设置阴影的透明度
    self.customView.layer.shadowOpacity = 0.6;
注意:如果设置了超过主视图的部分减掉,则设置阴影不会有显示效果
- (void)viewDidLoad {
    [super viewDidLoad];

//    设置边框宽度为20
    self.customView.layer.borderWidth = 10;
//    设置边框颜色
    self.customView.layer.borderColor = [UIColor blackColor].CGColor;
//    设置layer的圆角
    self.customView.layer.cornerRadius = 20;
//    设置超过子图层的部分减掉
//    第一种方式:UI框架中使用的方法
//    self.customView.clipsToBounds = YES;
//    第二种方式:常用的方式
    self.customView.layer.masksToBounds = YES;
//    在view的图层上添加一个image,contents表示接受内容
    self.customView.layer.contents = (id)[UIImage imageNamed:@"1"].CGImage;
//    设置阴影颜色
    self.customView.layer.shadowColor = [UIColor blackColor].CGColor;
//    设置阴影的偏移量,如果为正数,则表示往右边偏移
    self.customView.layer.shadowOffset = CGSizeMake(15, 5);
//    设置阴影的透明度
    self.customView.layer.shadowOpacity = 0.6;
}
5、只要是继承于UIView的都有Layer属性
在storyboard中新添加一张图片
- (void)viewDidLoad {
    [super viewDidLoad];
//    设置图片边框的颜色和宽度
    self.imageView.layer.borderColor = [UIColor blackColor].CGColor;
    self.imageView.layer.borderWidth = 5;
//    设置layer的圆角
    self.imageView.layer.cornerRadius = 20;
//    设置超过子图层的部分剪裁掉
    self.imageView.layer.masksToBounds = YES;

}
6、设置bounds属性,在设置是需要去除掉stroyboard中的自动布局属性
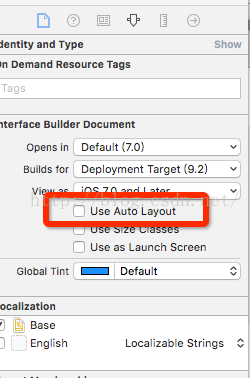
设置图片的形变属性(transform)
- (void)touchesBegan:(NSSet<UITouch *> *)touches withEvent:(UIEvent *)event {
//    通过uiview设置(2D效果)
    self.imageView.transform = CGAffineTransformMakeTranslation(0, -100);
//    通过layer来设置(3D效果)
    self.imageView.layer.transform = CATransform3DMakeTranslation(100, 20, 0);
}
通过UIView设置2D效果
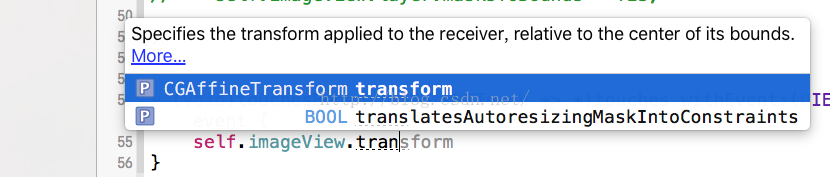
通过layer设置3D效果

使用KVC设置
- (void)touchesBegan:(NSSet<UITouch *> *)touches withEvent:(UIEvent *)event {
//    通过uiview设置(2D效果)
//    self.imageView.transform = CGAffineTransformMakeTranslation(0, -100);
//    通过layer来设置(3D效果)
//    self.imageView.layer.transform = CATransform3DMakeTranslation(100, 20, 0);
//    通过KVC来设置
    NSValue *value = [NSValue valueWithCATransform3D:CATransform3DMakeTranslation(100, 20, 0)];
    [self.imageView.layer setValue:value forKeyPath:@"transform"];
//    如果只是设置某一个方向上的移动,可以参考下面的代码
    [self.imageView.layer setValue:@(-100) forKeyPath:@"transform.translation.x"];
}
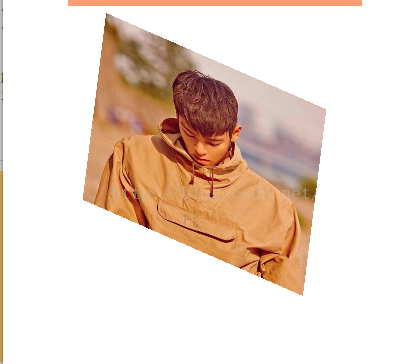
设置旋转
- (void)touchesBegan:(NSSet<UITouch *> *)touches withEvent:(UIEvent *)event {
//    通过uiview设置(2D效果)
//    self.imageView.transform = CGAffineTransformMakeTranslation(0, -100);
//    通过layer来设置(3D效果)
//    self.imageView.layer.transform = CATransform3DMakeTranslation(100, 20, 0);
//    通过KVC来设置
//    NSValue *value = [NSValue valueWithCATransform3D:CATransform3DMakeTranslation(100, 20, 0)];
//    [self.imageView.layer setValue:value forKeyPath:@"transform"];
//    如果只是设置某一个方向上的移动,可以参考下面的代码
//    [self.imageView.layer setValue:@(-100) forKeyPath:@"transform.translation.x"];

//    旋转
    self.imageView.layer.transform = CATransform3DMakeRotation(M_PI_4, 1, 1, 0.5);

}


 4968
4968


 被折叠的 条评论
为什么被折叠?
被折叠的 条评论
为什么被折叠?
 到【灌水乐园】发言


