


0. 功能简介
支持异构计算
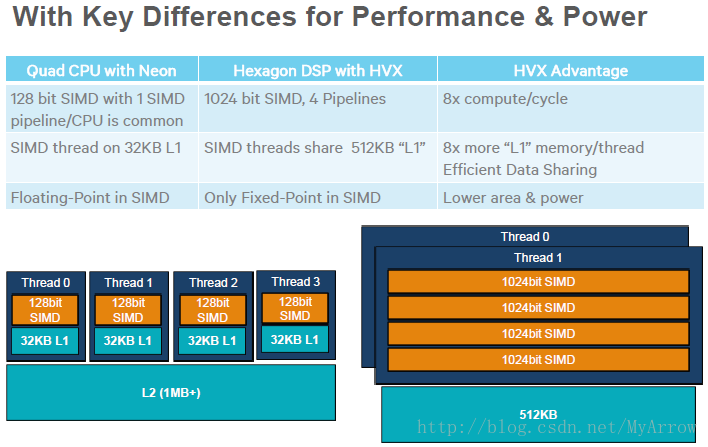
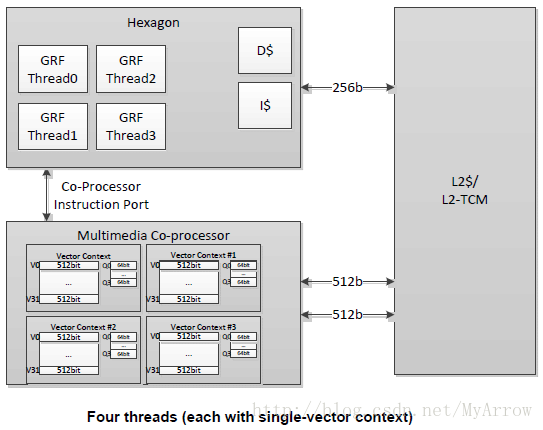
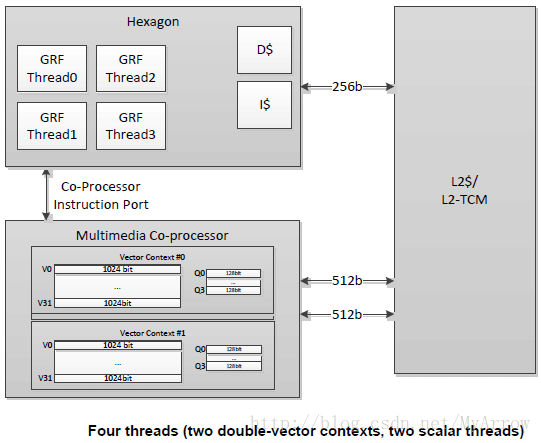
提升处理能力:每个时钟周期同时处理高达 1024位数据
HVX宽度——可同时处理的数据位数——每个时钟周期应用可执行更多工作。
标准移动CPU为32位指令宽度,其计算协处理器扩展4倍,达到128位宽度。基本Hexagon处理器为64位指令宽度,是移动CPU正常宽度的两倍,而HVX协处理器扩展了8倍,达到1024位宽度。如下图红色所示,Hexagon DSP可结合两个512位矢量模式单元,在单一时钟周期处理1024位数据。HVX使用超长指令字(VLIW)实现惊人的工作宽度。因此,内置HVX的Hexagon拥有比标准移动CPU 高出8-32倍的性能。
为什么这一点很重要?假设您在移动CPU控制代码模式进行处理,然后切换到协处理器的计算模式。此时,如果您需要使用控制代码,就必须暂停,从协处理器返回到主CPU。而利用Hexagon处理器,DSP的控制代码处理器和HVX的计算代码处理器可同时运行,紧密耦合控制和计算代码。这样,DSP可以获取HVX计算结果,并且用于下一个时钟周期的控制码决定。Corephotonics和SMI在他们的应用中利用了HVX紧密耦合的控制和计算代码。
提高计算效率:绕过 CPU的流式处理
HVX的流式处理模式适合于极低功耗相机处理。将数据直接从相机流传输到Hexagon DSP本地内存(二级缓存),HVX使得超越摄影的新用例成为可能,比如计算机视觉(CV)、计算成像和机器学习。
在相机流处理的例子中,比方说您的应用需要将数据从相机感光元件移动到设备处理器。如果没有HVX,应用需将数据读取到DDR内存,然后由CPU读取DDR执行计算,这样,在真正的处理还没有开始之前就消耗了数十毫瓦电量,并且造成DDR内存往返延迟。利用Hexagon SDK 3.0,您可以在Hexagon DSP的HVX中直接处理流式传输,避免临时存储,省却传输步骤,而且还不用涉及到CPU。
通过直接在DSP运行数据,HVX可以在本地处理数据,尽可能地降低总耗电量。这一点对于集成视觉和机器学习的应用来说尤其有用,可以在隔离状态下立即处理相机数据。如果DSP上的机器学习确认某事件需要额外的处理能力,HVX可以触发调动芯片上的其他元件。
降低功耗:始终在线感知
智能手机越来越聪明,如果它们能够始终保持警觉,就更加有用了。保持警觉的重要一环就是依赖DSP的始终在线感知:HVX 解决了始终在线感知领域两个挥之不去的问题。首先,始终保持警觉需要消耗巨多电量。但是,运行在DSP的HVX 本身耗电量极低,而且无需调动其它元件就可以做到始终在线感知。其次,视觉一直是最难以捉摸的始终在线感知能力,因为相机数据流式传输时会经过主芯片。但是,HVX 打通了一条直接从相机传输数据到DSP的通道。和其他感知能力一样,借助HVX,始终在线的视觉只有在需要额外处理能力时才会调用芯片的其它元件。
- 始终在线的语音——设备关闭,等待您称呼它,识别您的语音或关键字。
- 始终在线的触摸——设备在后台监控屏幕,在您触摸屏幕时唤醒。
- 始终在线的传感器——罗盘、加速度计等传感器连接到传感器中心,等待需要额外处理的事件。
- 始终在线的视觉——相机将数据流传输到设备,仅在出现阈值事件才触发处理。
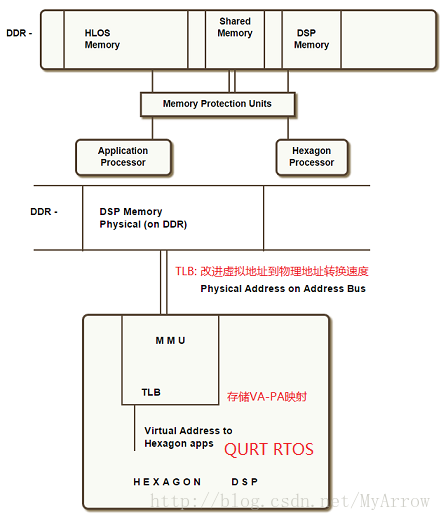
1. Hexagon内存管理
- Hexagon的内存管理支持MMU和TLB,为应用程序提供了灵活的VA(Virtual Address)访问,其框图如下所示:
2. Hexagon功能库 dspCV和FastCV#
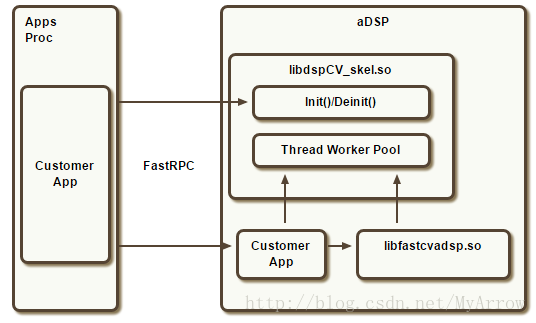
2.1 dspCV
- dspCV的目的:尽可能地封装DSP运行环境,以减小应用开发的风险
- 在SDK中有提供源码
- API功能列表:
- 时钟和电源设置
- 多线程回调
- 并发性检查
- HVX资源管理
- Application Processor可调用的API:
- dspCV_initQ6_with_attributes():把aDSP和SNOC的总线时钟设置为参数指定的值,且实例化“worker thread pool”,它是一个单实例,以接收多线程aDSP函数提交工作(参考计数设置为1)
- dspCV_deinitQ6():恢复总结时钟,并销毁“worker thread pool”(参考计数设置为0)
- dspCV_getQ6_concurrency_attributes() :查询aDSP的并发级别
2.2 FastCV
- 在SDK中只提供的对应的库(.a和.so)
- 官方详细文档
- QDSP6-V5 optimized functions:403个函数
- HVX optimized functions:36个函数
- fcvChannelExtractu8 (Y-extraction) - For FASTCV_NV12, FASTCV_NV21, FASTCV_IYUV and FASTCV_YUV4 only
- fcvColorYCrCb420PseudoPlanarToRGB8888u8 (only if width, height are even)
- fcvCornerFast9u8
- fcvCornerHarrisu8
- fcvFilterCanny3x3u8 - only if src, dst, strides, dx, and dy are 128-byte aligned, height > 60, and width ≥ 128
- fcvFilterCanny3x3u8_v2 - only if src, dst, strides, dx, and dy are 128-byte aligned, height > 60, and width ≥ 128
- fcvFilterCanny3x3u8_v3 - only if src, dst, strides, dx, and dy are 128-byte aligned, height > 60, and width ≥ 128
- fcvFilterDilate3x3u8
- fcvFilterDilate3x3u8_v2
- fcvFilterDilate3x3u8_v3
- fcvFilterDilateNxNu8
- fcvFilterErodeNxNu8
- fcvFilterMedian3x3u8
- fcvFilterMedian3x3u8_v3
- fcvFilterSobel3x3u8
- fcvFilterSobel3x3u8_v2
- fcvFilterThresholdu8
- fcvFilterThresholdu8_v2
- fcvHammingDistanceu8
- fcvImageIntensityHistogram
- fcvPyramidCreateu8 - only if (srcWidth≥128) && (srcHeight%2 == 0) && (srcWidth%4 == 0)
- fcvPyramidCreateu8_v2 - only if (srcWidth≥128) && (srcHeight%2 == 0) && (srcWidth%4 == 0)
- fcvScaleDownBy2Gaussian5x5u8
- fcvScaleDownBy2Gaussian5x5u8_v2
- fcvScaleDownBy2u8
- fcvScaleDownBy2u8_v2
- fcvScaleDownBy4u8
- fcvScaleDownBy4u8_v2
- fcvScaleDownMNInterleaveu8
- fcvScaleDownMNu8
- fcvScaleDownu8
- fcvScaleDownu8_v2
- fcvScaleUpBy2Gaussian5x5u8 - only if (srcWidth≥128)
- fcvScaleUpBy2Gaussian5x5u8_v2 - only if (srcWidth≥128)
- fcvTrackLKOpticalFlowu8_v3
- fcvTransposeu8
注: 使用命令“hexagon-nm libfastcvadsp.so”可查看此库支持哪些函数(前面带T的函数表示被实现了)
3. 常用指令及理解
3.1 向量操作 Vector operations
vrmpyh : Vector Reduce multiply Halfwords
R1:0 += vrmpyh(R3:2,R5:4)
它在一个cycle中执行以下操作:
R1:0 += ((R2.L * R4.L) + (R2.H * R4.H) + (R3.L * R5.L) + (R3.H * R5.H))
3.2 程序流程 Program Flow
3.2.1 条件指令 (Conditional instructions)
if (P0) R0 = memw(R2) // conditionally load word if P0
if (!P1) jump label // conditionally jump if not P1
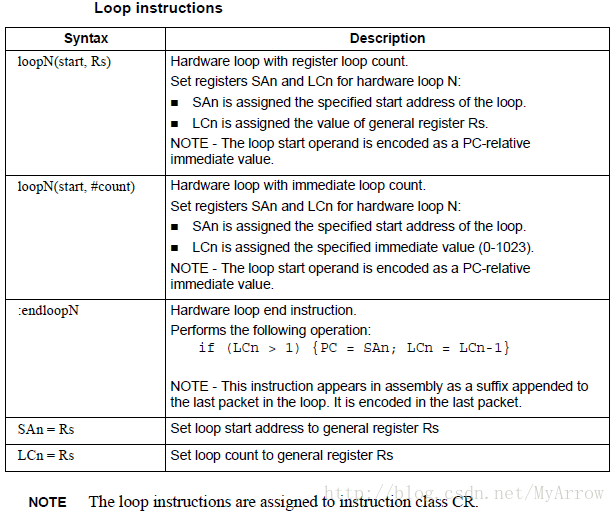
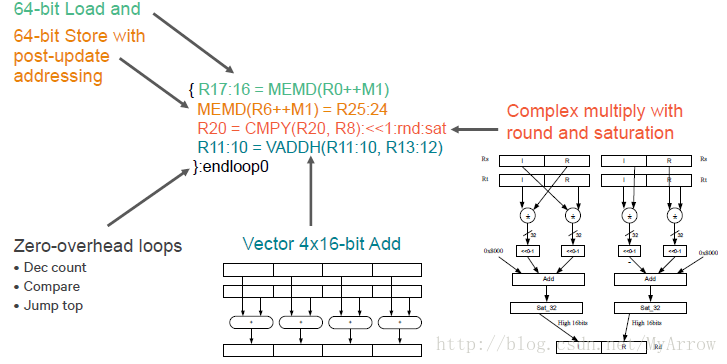
3.2.2 硬件循环(Hardware loops)
- 以0开销的方式执行循环分支,且有两个硬件分支:loop0和loop1,这两个硬件循环可以嵌套。
- 对于非嵌套循环,使用 loop0
- 对于嵌套循环,loop0 作为内循环,loop1 作为外循环
- 如果多于多个嵌套循环,则两个内循环使用硬件循环,外部使用软件分支
- SA0 和 LC0 由 loop0 使用
- SA1 和 LC1 由 loop1 使用
endloop0 和 endloop1 执行测试和分支,因此它类似于do … while循环
 // 一个简单的硬件循环
    loop0(start,#3) // loop 3 times : SA0=&start, LC0=3
start:
  { R0 = mpyi(R0,R0) } :endloop0

// 两个硬件循环嵌套
// Sum each row of a 100x200 matrix.
  loop1(outer_start,#100)
outer_start:
    R0 = #0
    loop0(inner_start,#200)
inner_start:
    R3 = memw(R1++#4)
    { R0 = add(R0,R3) }:endloop0
  { memw(R2++#4) = R0 }:endloop1
//Using loopN: R1 = #20000; loop0(start,R1) // LC0=20000, SA0=&start start: { R0 = mpyi(R0,R0) } :endloop0 // Using register transfers: R1 = #20000 LC0 = R1 // LC0=20000 R1 = #start SA0 = R1 // SA0=&start start: { R0 = mpyi(R0,R0) } :endloop0 // Using 32-bit constants: R1 = #20000; loop0(##start,R1) // LC0=20000, SA0=&start ... // Sum the rows of a 100x200 matrix. // Software pipeline the outer loop. p0 = cmp.gt(R0,R0) // p0 = false loop1(outer_start,#100) outer_start: { if (p0) memw(R2++#4) = R0 // save the sum of a row p0 = cmp.eq(R0,R0) // p0 = true R0 = #0 loop0(inner_start,#200) } inner_start: R3 = memw(R1++#4) { R0 = add(R0,R3) }:endloop0:endloop1 memw(R2++#4) = R0 // save the sum of the last row // 跳过循环体 loop0(start,R1) P0 = cmp.eq(R1,#0) // 这两行代码先被执行 if (P0) jump skip start: { R0 = mpyi(R0,R0) } :endloop0 skip:软件流水型循环(Software pipelined loop):缺点是需要开场白和后记
// C Code
int foo(int *A, int *result)
{
    int i;
    for (i=0;i<100;i++) {
        result[i]= A[i]*A[i];
    }
}

// ASM Code
foo:
    {
        R3 = R1
        loop0(.kernel,#98) // Decrease loop count by 2
    }
    R1 = memw(R0++#4) // 1st prologue stage
    {
        R1 = memw(R0++#4) // 2nd prologue stage
        R2 = mpyi(R1,R1)
    }
.falign
.kernel:
    {
        // 三级流水线,读一个, 算一个,保存一个
        R1 = memw(R0++#4)   // The load for iteration N+2
        R2 = mpyi(R1,R1)    // The multiply for iteration N+1
        memw(R3++#4) = R2   // The store for iteration N
    }:endloop0

    {
        R2 = mpyi(R1,R1) // 1st epilogue stage
        memw(R3++#4) = R2
    }
    memw(R3++#4) = R2 // 2nd epilogue stage
    jumpr lr
Software pipelined loop (using spNloop0)
int foo(int *A, int *result)
{
    int i;
    for (i=0;i<100;i++) {
        result[i]= A[i]*A[i];
    }
}

foo:
    // load safety assumed
    // When the spNloop0 instruction is executed,
    // it assigns the truth value false to the predicate register P3.
    // After the associated loop has executed N (N是spNloop0中的N) times,
    // P3 is automatically set to true.
    P3 = sp2loop0(.kernel,#102) // set up pipelined loop
    R3 = R1
}
.falign
.kernel:
{
    R1 = memw(R0++#4) // kernel
    R2 = mpyi(R1,R1)
    if (P3) memw(R3++#4) = R2
}:endloop0
    jumpr lr
3.2.3 软件分支(Software branches)
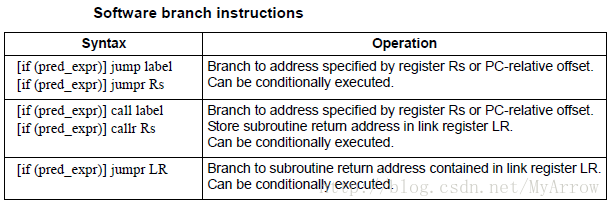
 // call subroutine
 jump end
 jumpr R1
 call function
 callr R2
- 返回指令(return)
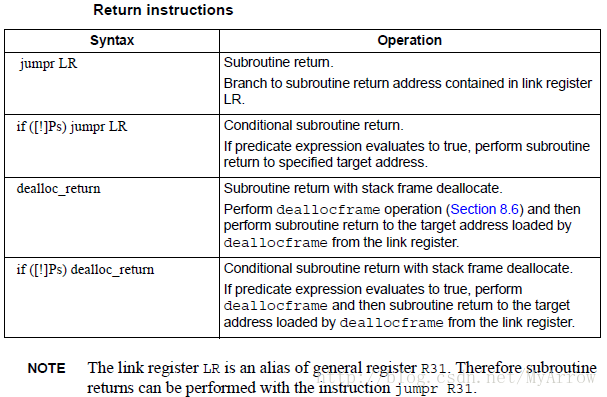
     // subroutine return
     jumpr R31  // R31 is the LR (Linker Register)
- 扩展分支(Extended branches)
    jump ##label // 32-bit offset
    call #label // non 32-bit offset
    jump label // offset size determined by assembler
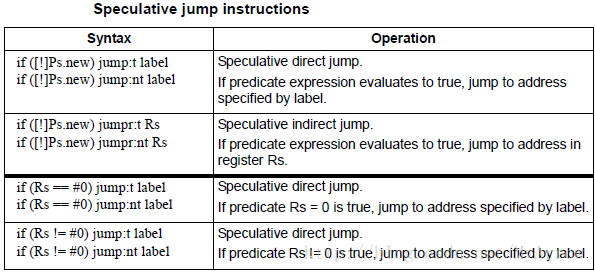
3.2.4 条件跳转(Speculative jumps)
如果在条件跳转中使用.new,则称此跳转为speculative jump.
{
P0 = cmp.eq(R9,#16) // single-packet compare-and-jump
IF (P0.new) jumpr:t R11 // ... enabled by use of P0.new
                        // direction hint必不可少
// jump:t – The jump instruction will most often be taken
// jump:nt – The jump instruction will most often be not taken
// 可以改善其性能
}
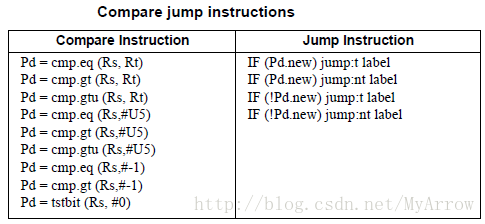
3.2.5 比较跳转(Compare jumps)
// 在编译时仅生成一条指令,通过组合指令(compound instruction)的方式,
// 只支持P0, P1,R0-R7, R16-R23寄存器。
{
    p0 = cmp.eq (R2,R5) // single-instr compare-and-jump
    if (p0.new) jump:nt target // enabled by compound instr
}
// load-compare-and-jump packet enabled by new-value compare jump
{
    R0 = memw(R2+#8)
    if (cmp.eq(R0.new,#0)) jump:nt target
}
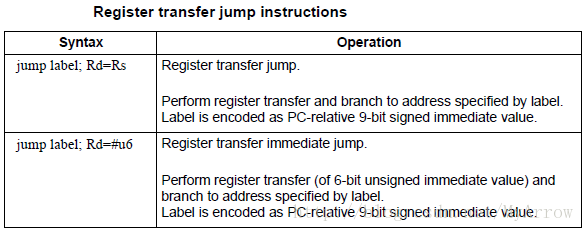
3.2.6 寄存器赋值跳转(Register transfer jumps)
3.2.7 双跳(Dual jumps)###
- 与大部分指令包操作不一样,dual jumps不并行执行,而是以下顺序执行:
- The predicate in the first jump is evaluated.
- If the first jump is taken, the second jump is ignored.
- If the first jump is not taken, the second jump is performed.
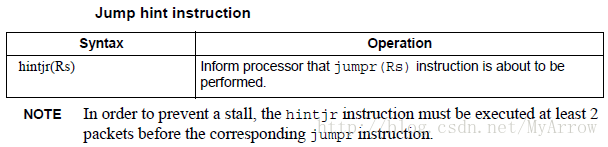
3.2.8 提示间接跳转目标(Hint indirect jump target)
3.3 指令包 Instruction packets
- 使用{}明确定义指令包,一个指令包可以包含1到4个指令,这些指令在一个Cycle中被执行。
指令包的特征:
- 原子性(要么全部执行,要么全部不执行,不能部分执行)
- 一个指令包有一个单一的PC地址,在指令包的中间不能执行分支操作
- 指令包所需要的资源不能超过可获得的硬件资源,如: 不能多于两个load指令,因为只有2个load单元
- endloopx指令不使用任何slots(总共有4个slots)
- 如果指令包违背了分组规则,则此包相当于未定义
- 包中的指令不能写同一个目标寄存器(destination register)
{
R8 = memh(R3++#2)
R12 = memw(R1++#4)
R = mpy(R10,R6):<<1:sat
R7 = add(R9,#2)
}
{ R2 = R3; R3 = R2; } // R2与R3交换
3.4 .new指令
如果一个寄存器的值在同一个指令包中产生并被使用,则使用时在寄存器后面加上.new。
{
    P0 = cmp.eq(R2,#4)
    if (P0.new) R3 = memw(R4)
    if (!P0.new) R5 = #5
}
{
    R2 = memh(R4+#8)
    memw(R5) = R2.new
}
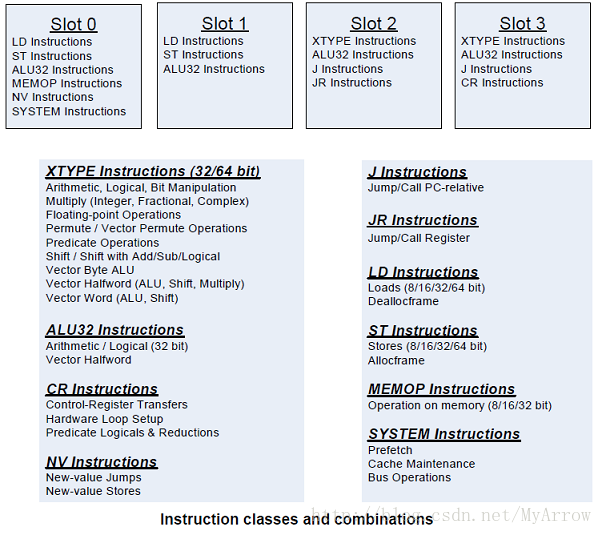
3.5 批令分类和组合 Instruction classes and combinations
3.6 指令内联函数 Instruction intrinsics
为了高效地执行代码,而又不使用汇编语言,C编译器支持内联函数;内联函数在C代码中直接表示Hexagon处理器指令。内联函数定义了大部分Hexagon处理器指令。
int main()
{
    long long v1 = 0xFFFF0000FFFF0000;
    long long v2 = 0x0000FFFF0000FFFF;
    long long result;
    // find the minimum for each half-word in 64-bit vector
    result = Q6_P_vminh_PP(v1,v2);
}
3.7 别名寄存器 Aliased registers
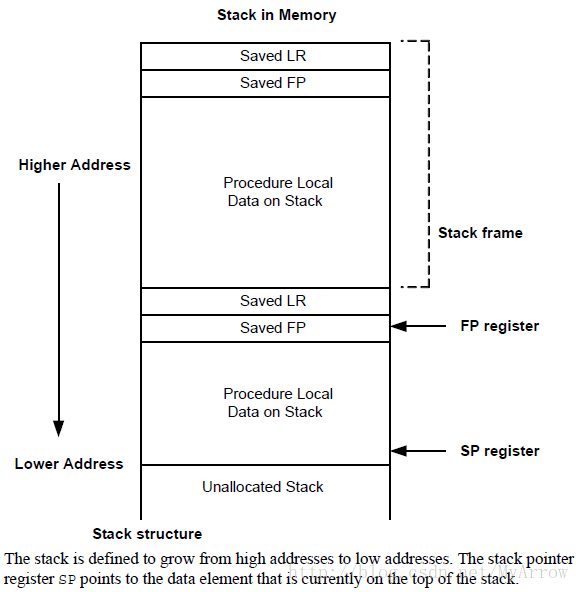
R29的别名:SP (Stack pointer:Points to topmost element of stack in memory.)
R30的别名:FR (Frame pointer:Points to current procedure frame on stack.)
R31的别名:LR (Link register:Stores return address of a subroutine call.)
以上寄存器的值由subroutine and stack指令隐含地修改。
SP = add(SP, #-8) // SP is alias of R29
allocframe        // Modifies SP (R29) and FP (R30)
call init         // Modifies LR (R31)
3.8 修改寄存器 Modifier registers##
3.8.1 间接自动增加:Indirect auto-increment
寄存器R0是值是先用后增加,与C中的for循环类似:
 M1 = R1           // Set modifier register
 R2 = memw(R0++M1) // The effective addr is the value of R0.
                   // Next, M1 is added to R0 and the result
                   // is stored in R0.
其效果与如下代码相当,只是它更加灵活,可以运行时修改:
R2 = memw(R3++#4) // R3 contains the effective address
                  // R3 is then incremented by 4

3.8.2 循环Buffer:Circular
3.8.2.1 Circular with auto-increment immediate
CS0和CS1:存储循环Buffer开始地址。
设置并访问150字节的循环Buffer:
    R4.H = #0                   // K = 0
    R4.L = #150                 // length = 150
    M0 = R4
    R2 = ##cbuf                 // start addr = cbuf
    CS0 = R2
    R0 = memb(R2++#4:circ(M0))  // Load byte from circ buf
                                // specified by M0/CS0
                                // inc R2 by 4 after load
                                // wrap R2 around if >= 150
上面的代码等效如下C代码(更新数据指针):
    unsigned int fcircadd(unsigned int pointer, int offset,
                unsigned int M_reg, unsigned int CS_reg)
    {
        unsigned int length;
        int new_pointer, start_addr, end_addr;
        length = (M_reg&0x01ffff); // lower 17-bits gives buffer size
        new_pointer = pointer+offset;
        start_addr = CS_reg;
        end_addr = CS_reg + lenth;

        if (new_pointer >= end_addr) {
            new_pointer -= length;
        } else if (new_pointer < start_addr) {
            new_pointer += length;
        }
        return (new_pointer);
    }
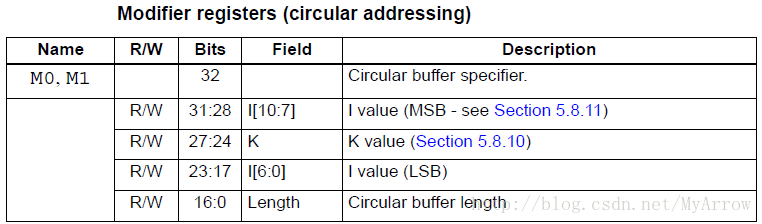
1) Mx寄存器的Length域是循环Buffer的大小(以字节为单位),其范围为:4~(128K-1)
2) Mx寄存器的K域设置为0
3) CSx寄存器被设置为循环Buffer的开始地址(CS0对应M0, CS1对应M1)
3.8.2.2 Circular with auto-increment register
R0 = memb(R2++I:circ(M1)) // load byte with incr of I*4 from
                          // circ buf specified by M1/CS1
3.8.3 位反转:Bit-reversed
位反转:是指内存访问地址在使用时执行位反转,其存储在寄存器中的内存访问地址按原来的规则变化,并不需要执行位反转。32位地址的位反转规则:
1)低16位执行交换:位0与位15交换,位1与位14交换,…
2)高16位不变
位反转应用:
1) FFT(Fast Fourier Transforms)
2) Viterbi Encoding
    M1 = R7                 // Set modifier register
    R2 = memub(R0++M1:brev) // The address is (R0.H | bitrev(R0.L))
                            // The orginal R0 (not reversed) is added
                            // to M1 and written back to R0

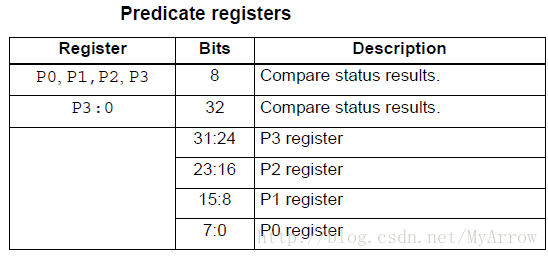
3.9 Predicate registers(存储标量和向量比较指令的结果)
P1 = cmp.eq(R2, R3) // Scalar compare
if (P1) jump end    // Jump to address (conditional)
R8 = P1             // Get compare status (P1 only)
P3:0 = R4           // Set compare status (P0-P3)
4. 数据处理(Data Processing)
4.1 数据类型
- 定点数据(Fixed-point data):支持8/16/32/64位定点数据,数据可以为有符号/无符号 整数、分数。
- 浮点数据(Floating-point data):支持32位单精度浮点数据
- 复数(Complex data):支持32位或64位复数(a+bi)(c+di)=(ac-bd) + (ad+bc)i
- 向量数据(Vector data):支持64位向量数据:8x8位, 4x16位, 2x32位
4.2 指令选项
分数缩放(Fractional scaling)
R3:2 = cmpy(R0,R1):<<1:sat饱和(Saturation):如果指令结果小于最小值,则设为最小值;若大于最大值,则设为最大值
R2 = abs(R1):sat四舍五入(Arithmetic rounding)
R2 = mpy(R1.h,R2.h):rnd- 收敛舍入(Convergent rounding)
These instructions work as follows:
- Compute (A+B) or (A-B) for AVG and NAVG respectively.
- Based on the two least-significant bits of the result, add a rounding constant as
follows:
If the two LSBs are 00, add 0
If the two LSBs are 01, add 0
If the two LSBs are 10, add 0
If the two LSBs are 11, add 1 - Shift the result right by one bit.
为除和平方根缩放(Scaling for divide and square-root)
在Hexagon中,浮点除和平方根是通过软件库来实现的。R3 += sfmpy(R0,R1,P2):scale
5. 内存(Memory)
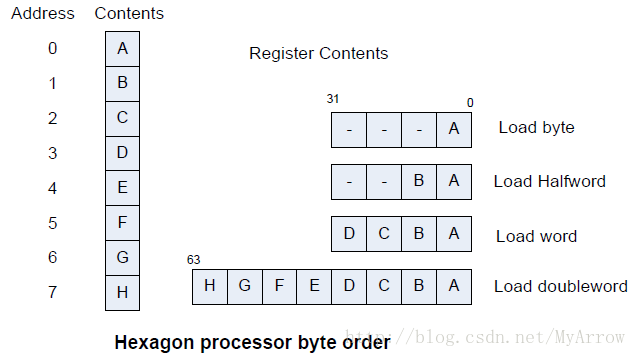
5.1 字节序(Byte Order)
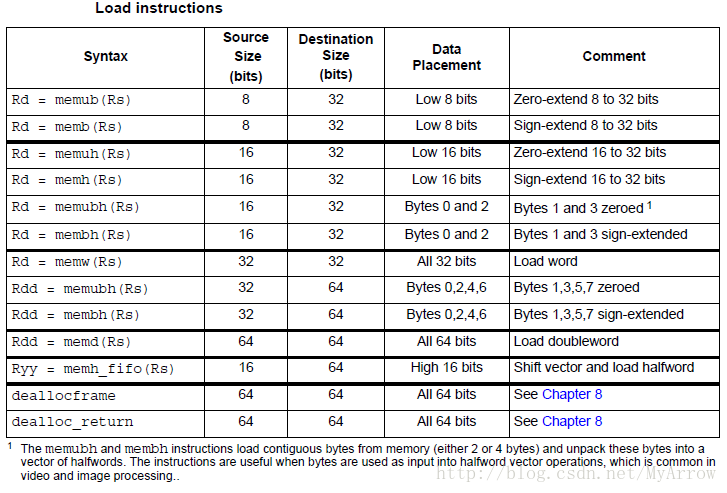
5.2 读内存 (Memory Loads)
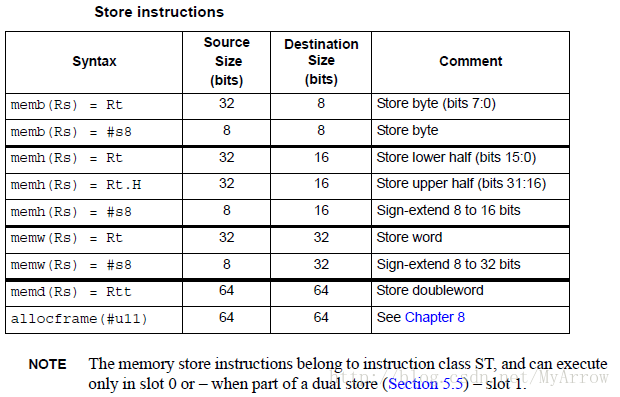
5.3 写内存(Memory stores)
5.4 寻址模式(Addressing modes)

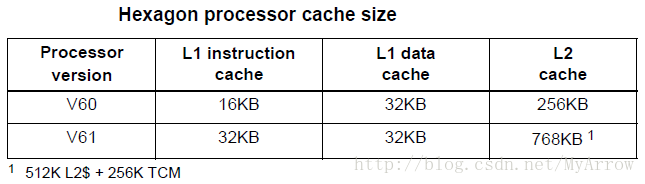
5.5 高速缓存 (Cache memory)
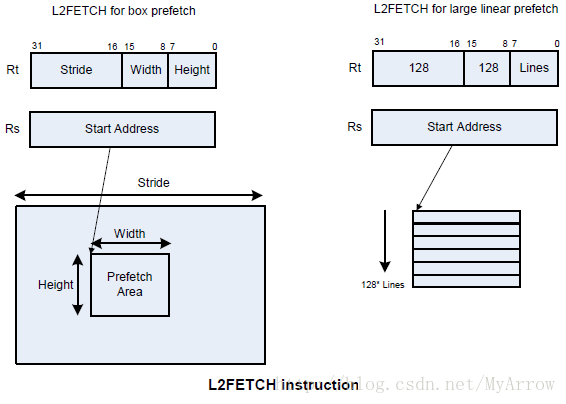
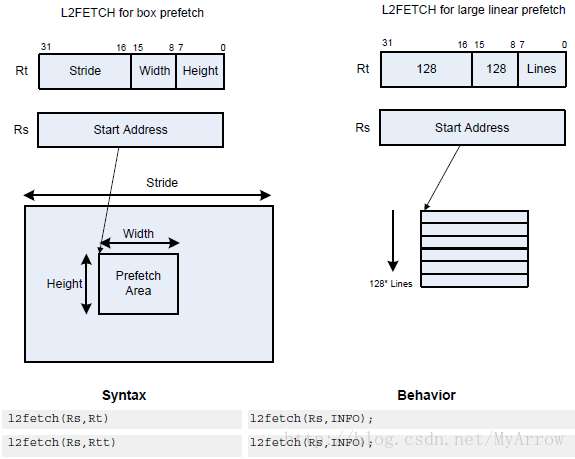
- l2fetch(Rs,Rt):L2 cache prefetch. 把Rs和Rt指定内存中的数据加载到L2高速缓存
- l2fetch:是非阻塞调用,它只负责发送预取请求
- Rs: 32位虚拟地址,指示内存区域的起始地址
- Rt包含3个位域:
- Rt[15:8]:宽度(Width),批定内存块的宽度,以字节为单位(8位)
- Rt[7:0]:高度(Height),指定有多少个Width数据行需要被预取(8位)
- Rt[31:16]:跨度(Stride),一个无符号的字节偏移,用于在取完一行(width字节)之后增加取数据的指针
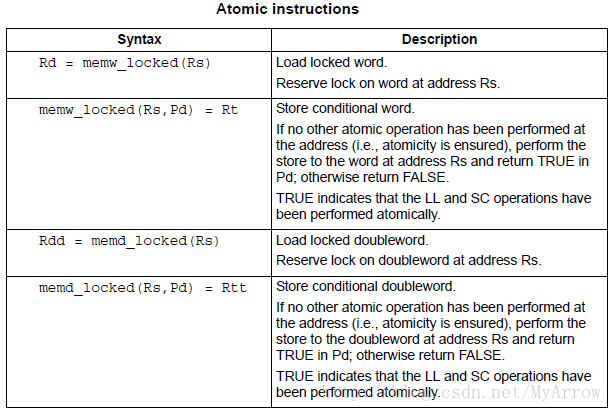
5.5 原子操作(Atomic operations)
/* Here is the recommended code sequence to acquire a mutex: */
// assume R1,R3,P0,P1 are scratch
lockMutex:
R3 = #1
lock_test_spin:
R1 = memw_locked(R0) // do normal test to wait
P1 = cmp.eq(R1,#0) // for lock to be available
if (!P1) jump lock_test_spin
memw_locked(R0,P0) = r3 // do store conditional (SC)
if (!P0) jump lock_test_spin // was LL and SC done atomically?

/* Here is the recommended code sequence to release a mutex: */
// assume mutex address is held in R0
// assume R1 is scratch
R1 = #0
memw(R0) = R1
6. 条件执行(Conditional Execution)
Hexagon条件执行:基于比较指令在4个8-bit判断寄存器(P0-P3)中的设置。
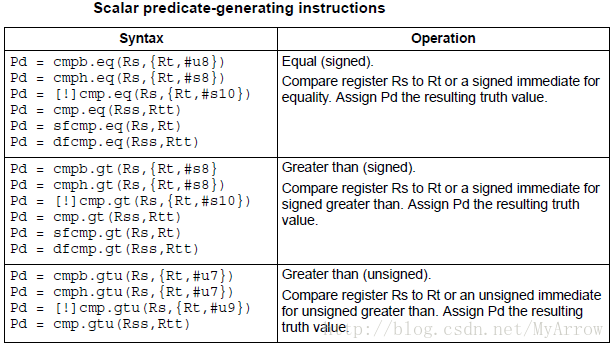
6.1 标量判断(Scalar predicates)
- 标量判断:由8位值表示
- true: 0xFF
- false:0x00
6.1.1 设置标量判断
6.1.2 使用标量判断(Consuming scalar predicates)
if (P0) jump target // jump if P0 is true
if (!P2) R2 = R5 // assign register if !P2 is true
if (P1) R0 = sub(R2,R3) // conditionally subtract if P1
if (P2) R0 = memw(R2) // conditionally load word if P2
// mux selects either Rs or Rt based on the least significant bit in Ps.
// If the least-significant bit in Ps is a 1, then Rd is set to Rs,
// otherwise it is set to Rt.
Rd = mux(Ps,Rs,Rt)
// 逻辑与(AND)
{
P0 = cmp(A) // if A && B then jump
P0 = cmp(B)
if (P0.new) jump:T taken_path
}
// 逻辑非(NOT)
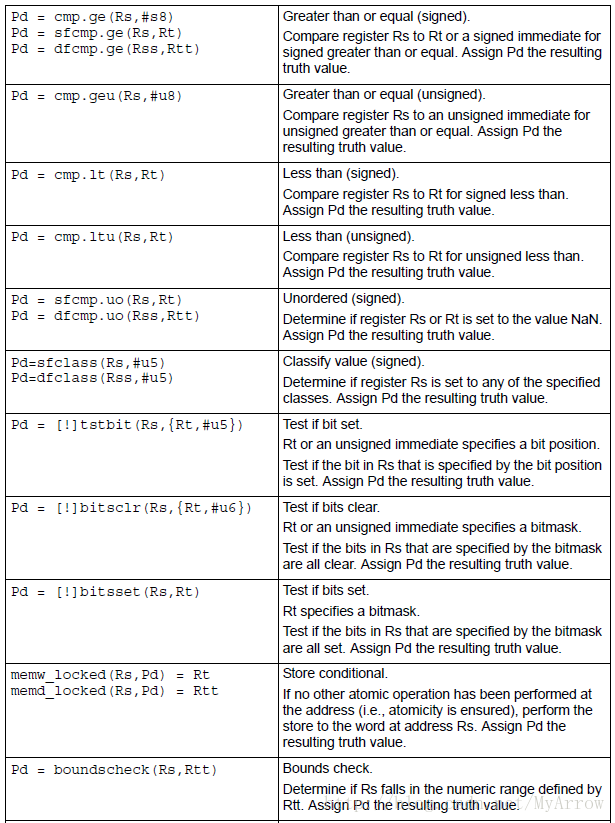
Pd = !cmp.{eq,gt}(Rs, {#s10,Rt} )
Pd = !cmp.gtu(Rs, {#u9,Rt} )
Pd = !tstbit(Rs, {#u5,Rt} )
Pd = !bitsclr(Rs, {#u6,Rt} )
Pd = !bitsset(Rs,Rt)
// .new 操作
//C statement
if (R2 == 4)
R3 = *R4;
else
R5 = 5;
//Assembly code
{
P0 = cmp.eq(R2,#4)
if (P0.new) R3 = memw(R4)
if (!P0.new) R5 = #5
}
// 同时使用新值和旧值
{
P0 = cmp.eq(R2,#4)
if (P0.new) R3 = memw(R4) // use newly-generated P0 value
if (P0) R5 = #5 // use previous P0 value
}
6.2 向量判断 (Vector predicates)
6.2.1 向量比较 (Vector compare)
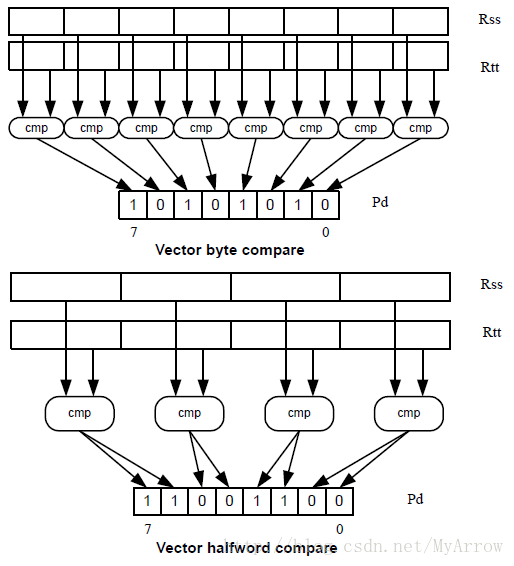
6.2.2 向量多路指令(Vector mux instruction)
根据Px的每个位选择对应的字节。
R1:0 = vmux(P0,R3:2,R5:4) // choose bytes from R3:2 if true
R1:0 = vmux(P0,R5:4,R3:2) // choose bytes from R3:2 if false
使用向量判断
// Consider the following C statement:
for (i=0; i<8; i++) {
    if (A[i]) {
        B[i] = C[i];
    }
}

// Assuming arrays of bytes, this code can be vectorized as follows:
R1:0 = memd(R_A) // R1:0 holds A[7]-A[0]
R3 = #0 // clear R3:2
R2 = #0
P0 = vcmpb.eq(R1:0,R3:2) // compare bytes in A to zero
R5:4 = memd(R_B) // R5:4 holds B[7]-B[0]
R7:6 = memd(R_C) // R7:6 holds C[7]-C[0]
R3:2 = vmux(P0,R7:6,R5:4) // if (A[i]) B[i]=C[i]
memd(R_B) = R3:2 // store B[7]-B[0]
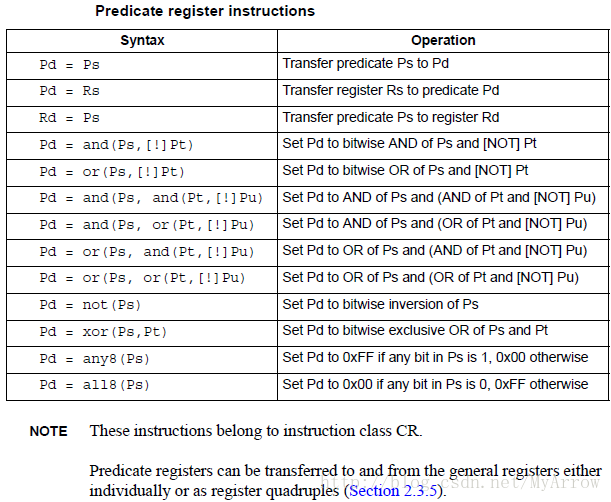
6.3 判断操作(Predicate operations)
7. 软件堆栈(Software Stack)
Hexagon stack结构遵行标准C堆栈规范。
7.1 堆栈结构(Stack Structure)
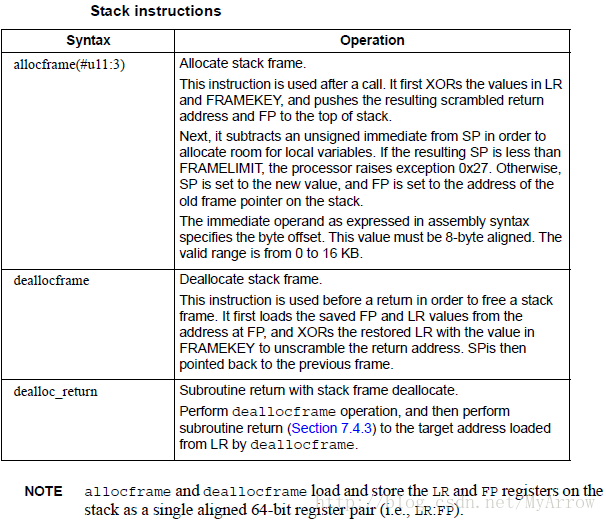
7.2 堆栈指令(Stack instructions)
8. HVX (Hexagon Vector eXtensions)
- HVX是Hexagon向量操作的扩展,它的指令可与普通的Hexagon指令一起在VLIW中混合使用,它可支持1024位(128字节)向量操作。
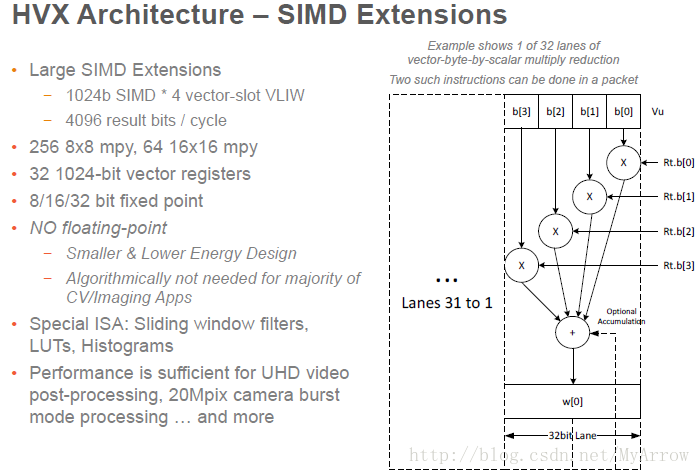
- HVX架构–SIMD扩展
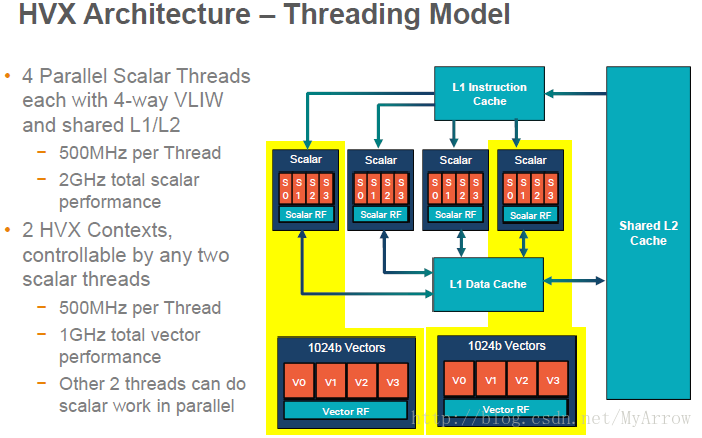
- HVX架构–线程模型
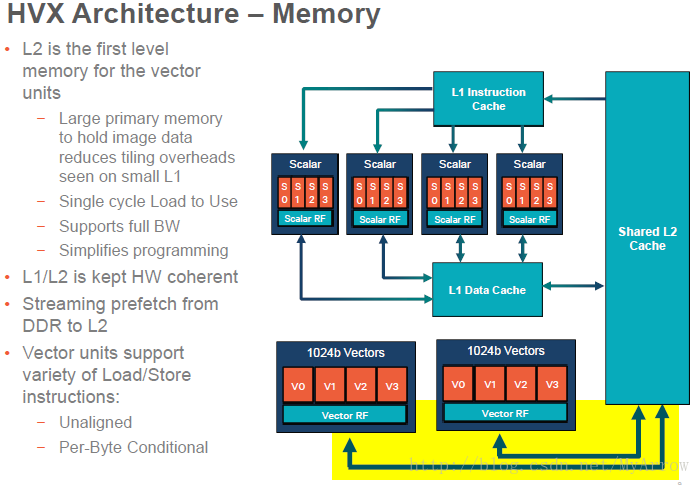
- HVX架构–内存模型
- HVX编程模型
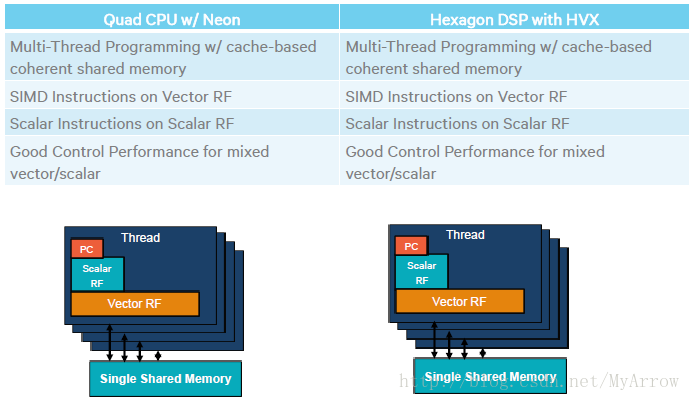
- ARM CPU与DSP的差异
- 摄像头流接口
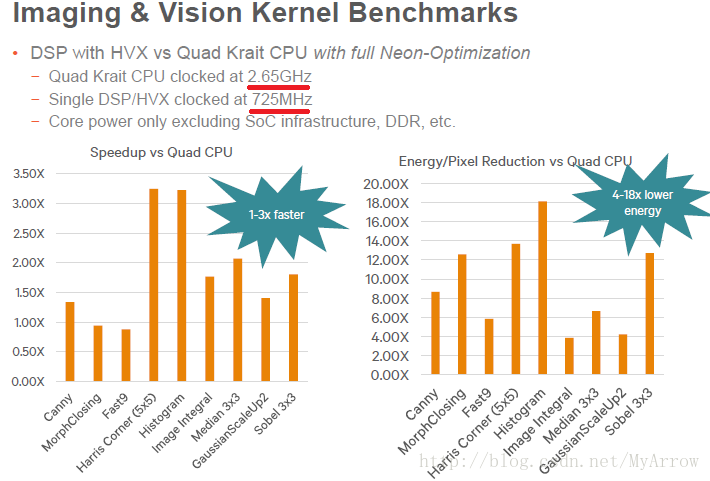
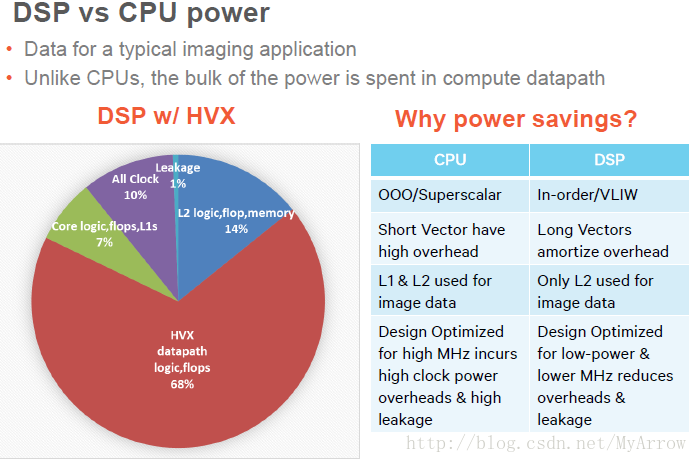
- ARM CPU与DSP的性能+功耗对比
- a

8.1 HVX特性简介
HVX增加了非常宽的SIMD,SIMD操作可操作1024位向量寄存器,且多个HVX SIMD指令可以并行执行(在同一个指令包),其特征如下:
- 向量Size可选(512位<64字节>或1024位<128字节>)
- 多个向量操作可以并行执行
- Vector 读取和存储与普通的lodd/stores共享相同的32位地址空间
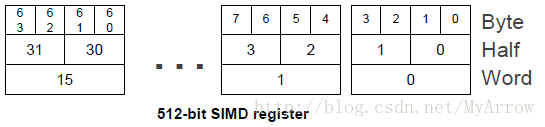
- 向量元素可以为有/无符号 字节、半字、字
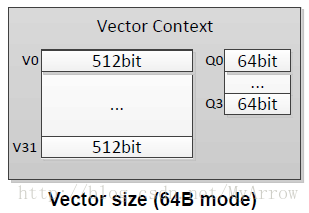
V2X=0(SYSCFG寄存器)【64字节模式】:向量512位宽(64字节),向量判断64位宽
V2X=1(SYSCFG寄存器)【128字节模式】:向量1024位宽(128字节),向量判断128位宽
向量寄存器
向量计算指令(Vector compute instructions)
■ .b for signed byte
■ .ub for unsigned byte
■ .h for signed halfword
■ .uh for unsigned halfword
■ .w for signed word
■ .uw for unsigned wordv0.b = vadd(v1.b,v2.b) // Add vectors of bytes
v1:0.b = vadd(v3:2.b, v5:4.b) // Add vector pairs of bytes
v1:0.h = vadd(v3:2.h, v5:4.h) // Add vector pairs of halfwords
v5:4.w = vmpy(v0.h,v1.h) // Widening vector 16x16 to 32
// multiplies: halfword inputs,
// word outputs
8.2 寄存器(Registers)
32个512位数据寄存器:V0 … V31
V1 = vmem(R0) // load 512 bits of data // from address R0 V4.w = vadd(V2.w, V3.w) // add each word in V2 // to corresponding word in V3 V5:4.w = vadd(V3:2.w, V1:0.w) // add each word in V1:0 to // corresponding word in V3:2向量寄存器与通用寄存器间的赋值
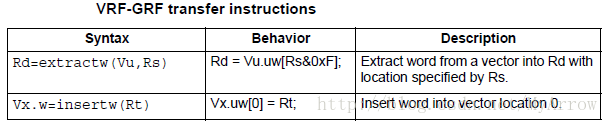
- 向量寄存器(VRF:Vector Register File)
- 通用寄存器(GRF:General Register File)
- 一个指令包可包含两个插入指令或一个提取指令
向量判断寄存器(Vector predicate registers)
- W: 对应4位
- H: 对应2位
B:对应1位
Q3 = vcmp.eq(V2.w, V5.w)
V4 = vmux(Q2, V5, V6)  // 根据Q2中的bit位,选择对应的字节
                       // 一个一个字节地进行选择
8.3 内存(Memory)
内存地址对齐
- 64字模式:需要64字节对齐,即地址的低6位无效
- 128字节模式: 需要128字节对齐,即地址的低7位无效
- 也可采用特殊指令VMEMU,而无需要对齐
HVX与L2 Cache或L2 TCM一起工作;对于L2 cache 数据,内存被标记为L2 Cacheable;对于位于L2 TCM中的数据,需要被标记为uncached.
VMEM(R0) = V1;  // Store to R0 & ~(0x3F)
V0 = VMEMU(R0); // Load a vector of bytes starting at R0
                // regardless of alignment
8.4 HVX指令简介
8.4.1 向量读取/存储 (Vector load/store)
// The immediate increment and post increments
// values correspond to multiples of vector length.
V2 = vmem(R1+#4)  // address R1 + 4 * (vector-size) bytes
V2 = vmem(R1++M1) // address R1, post-modify by the value of M1
“load-temp” and “load-current”
1)load-temp和load-current允许读取的数据在同一个指令包中使用,而Hexagon是通过.new的方式。
2)load-temp指令不会把读取的数据写入register文件// The “load-temp” and “load-current” forms allow // immediate use of load data in the same packet. // A “load-temp” instruction does not write the load data to the register file. { V2.tmp = vmem(R1+#1) // Data loaded into a tmp V5:4.ub = vadd(V3.ub, V2.ub) // Used the loaded data as the V2 source V7:6.uw = vrmpy(V5:4.ub, R5.ub, #0) }3) load-current指令会把读取的数据写入register文件
// load-current consumes a vector ALU resource as the
// loaded data is written to the register file
{
    V2.cur = vmem(R1+#1) // Data loaded into a V2
    V3 = valign(V1, V2, R4)  // load data used immediately
    V7:6.ub = vrmpy(V5:4.ub, R5.ub,#0)
}
向量存储
vmem(R1+#1)= V20.new // Store V20 that was generated
                     // in the current packet
if P0 vmem(R1++M1) = V20 // Store V20 if P0 is true
if Q0 vmem(R1++M1) = V20 // Store bytes of V20 where Q0 is true
8.4.2 直方图指令(Histogram Instruction)
{
    V31.tmp = VMEM(R2) // Load 64 bytes from memory
    VHIST();           // Perform histogram using counters
                       // in VRF and indexes from temp load
}
8.4.3 指令延迟(Instruction latency)
- 执行一个HVX指令需要2个或4个时钟周期。
- 新的指令包每个2个钟周期发出一个执行请求
以下指令需要先把源数据准备好,否则延迟将发生:
1)Input to the multiplier.
2)Input to Shift/Bit Count instructions.
3)Input to Permute instructions.
4)Unaligned Store Data
5)对于以上指令,如果源数据在同一个指令包中生成, 必将有一个停顿(STALL)V8 = VADD(V0,V0) V0 = VADD(V8,V9) // NO STALL V1 = VMPY(V0,R0) // STALL due to V0 V2 = VSUB(V2,V1) // NO STALL on V1 V5:4 = VUNPACK(V2) // STALL due to V2 V2 = VADD(V0,V4) // NO STALL on V4
9. DSP优化
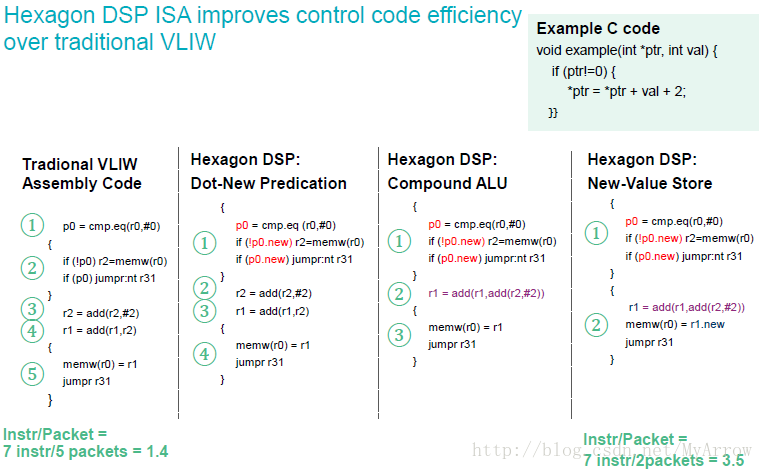
9.1 让每个指令包(VLIW Packet)处理更多的工作
9.2 让每个指令包(VLIW Packet)处理更多的控制代码工作
10. 常用指令
10.1 l2fetch
- 在使用VMEM指令加载(load)数据之前,应当使用l2fetch指令把需要的数据预加载到L2 Cache中
- l2fetch:在后台执行
- l2fetch:加载数量小于8KB
- 在使用数据之前的几百个Cycles时发布。如果l2fetch发布太早,数据在使用前可能失效;通常处理此行(Rows)或片(Tiles)时,预取下一行或片。
- 所有被VMEM使用的数据必须被预取,如果需要的数据没有被预取到L2,VMEM将停止(stall)
- l2fetch:是非阻塞调用
- 如果以前的l2fetch没有执行完,新的l2fetch排除等候,如果排队数达到3,则取消最早的l2fetch
线程主动取消以前自己请求的所有l2fetch,执行l2fetch(0,0)
HEXAGON_V64_CREATE_H((dir), (stride), (w), (h)) // for Rtt格式Rs:指定32位起始虚拟地址
- Rt:(32位)
- Rt[15:8] = Width:预取块的宽度(以字节为单位)
- Rt[7:0]=Height: 预取块的数量
- Rt[31:16] = Stride:一个无符号字节偏移量,当预取完一块之后,数据指针增加此Stride
- Rtt:(64位)
- Rtt[31:16]= Width:预取块的宽度(以字节为单位)
- Rtt[15:0] = Height: 预取块的数量
- Rtt[47:32] = Stride: 一个无符号字节偏移量,当预取完一块之后,数据指针增加此Stride
- Rtt[48] = Direction:
- 0:预取以行的方式执行,即在处理下一行之前,在一行中的所有cache lines应当被预取
- 1:预取以行的方式执行,即在处理下一列之前,在一列中的所有cache lines应当被预取


 7150
7150


 被折叠的 条评论
为什么被折叠?
被折叠的 条评论
为什么被折叠?
 到【灌水乐园】发言


