


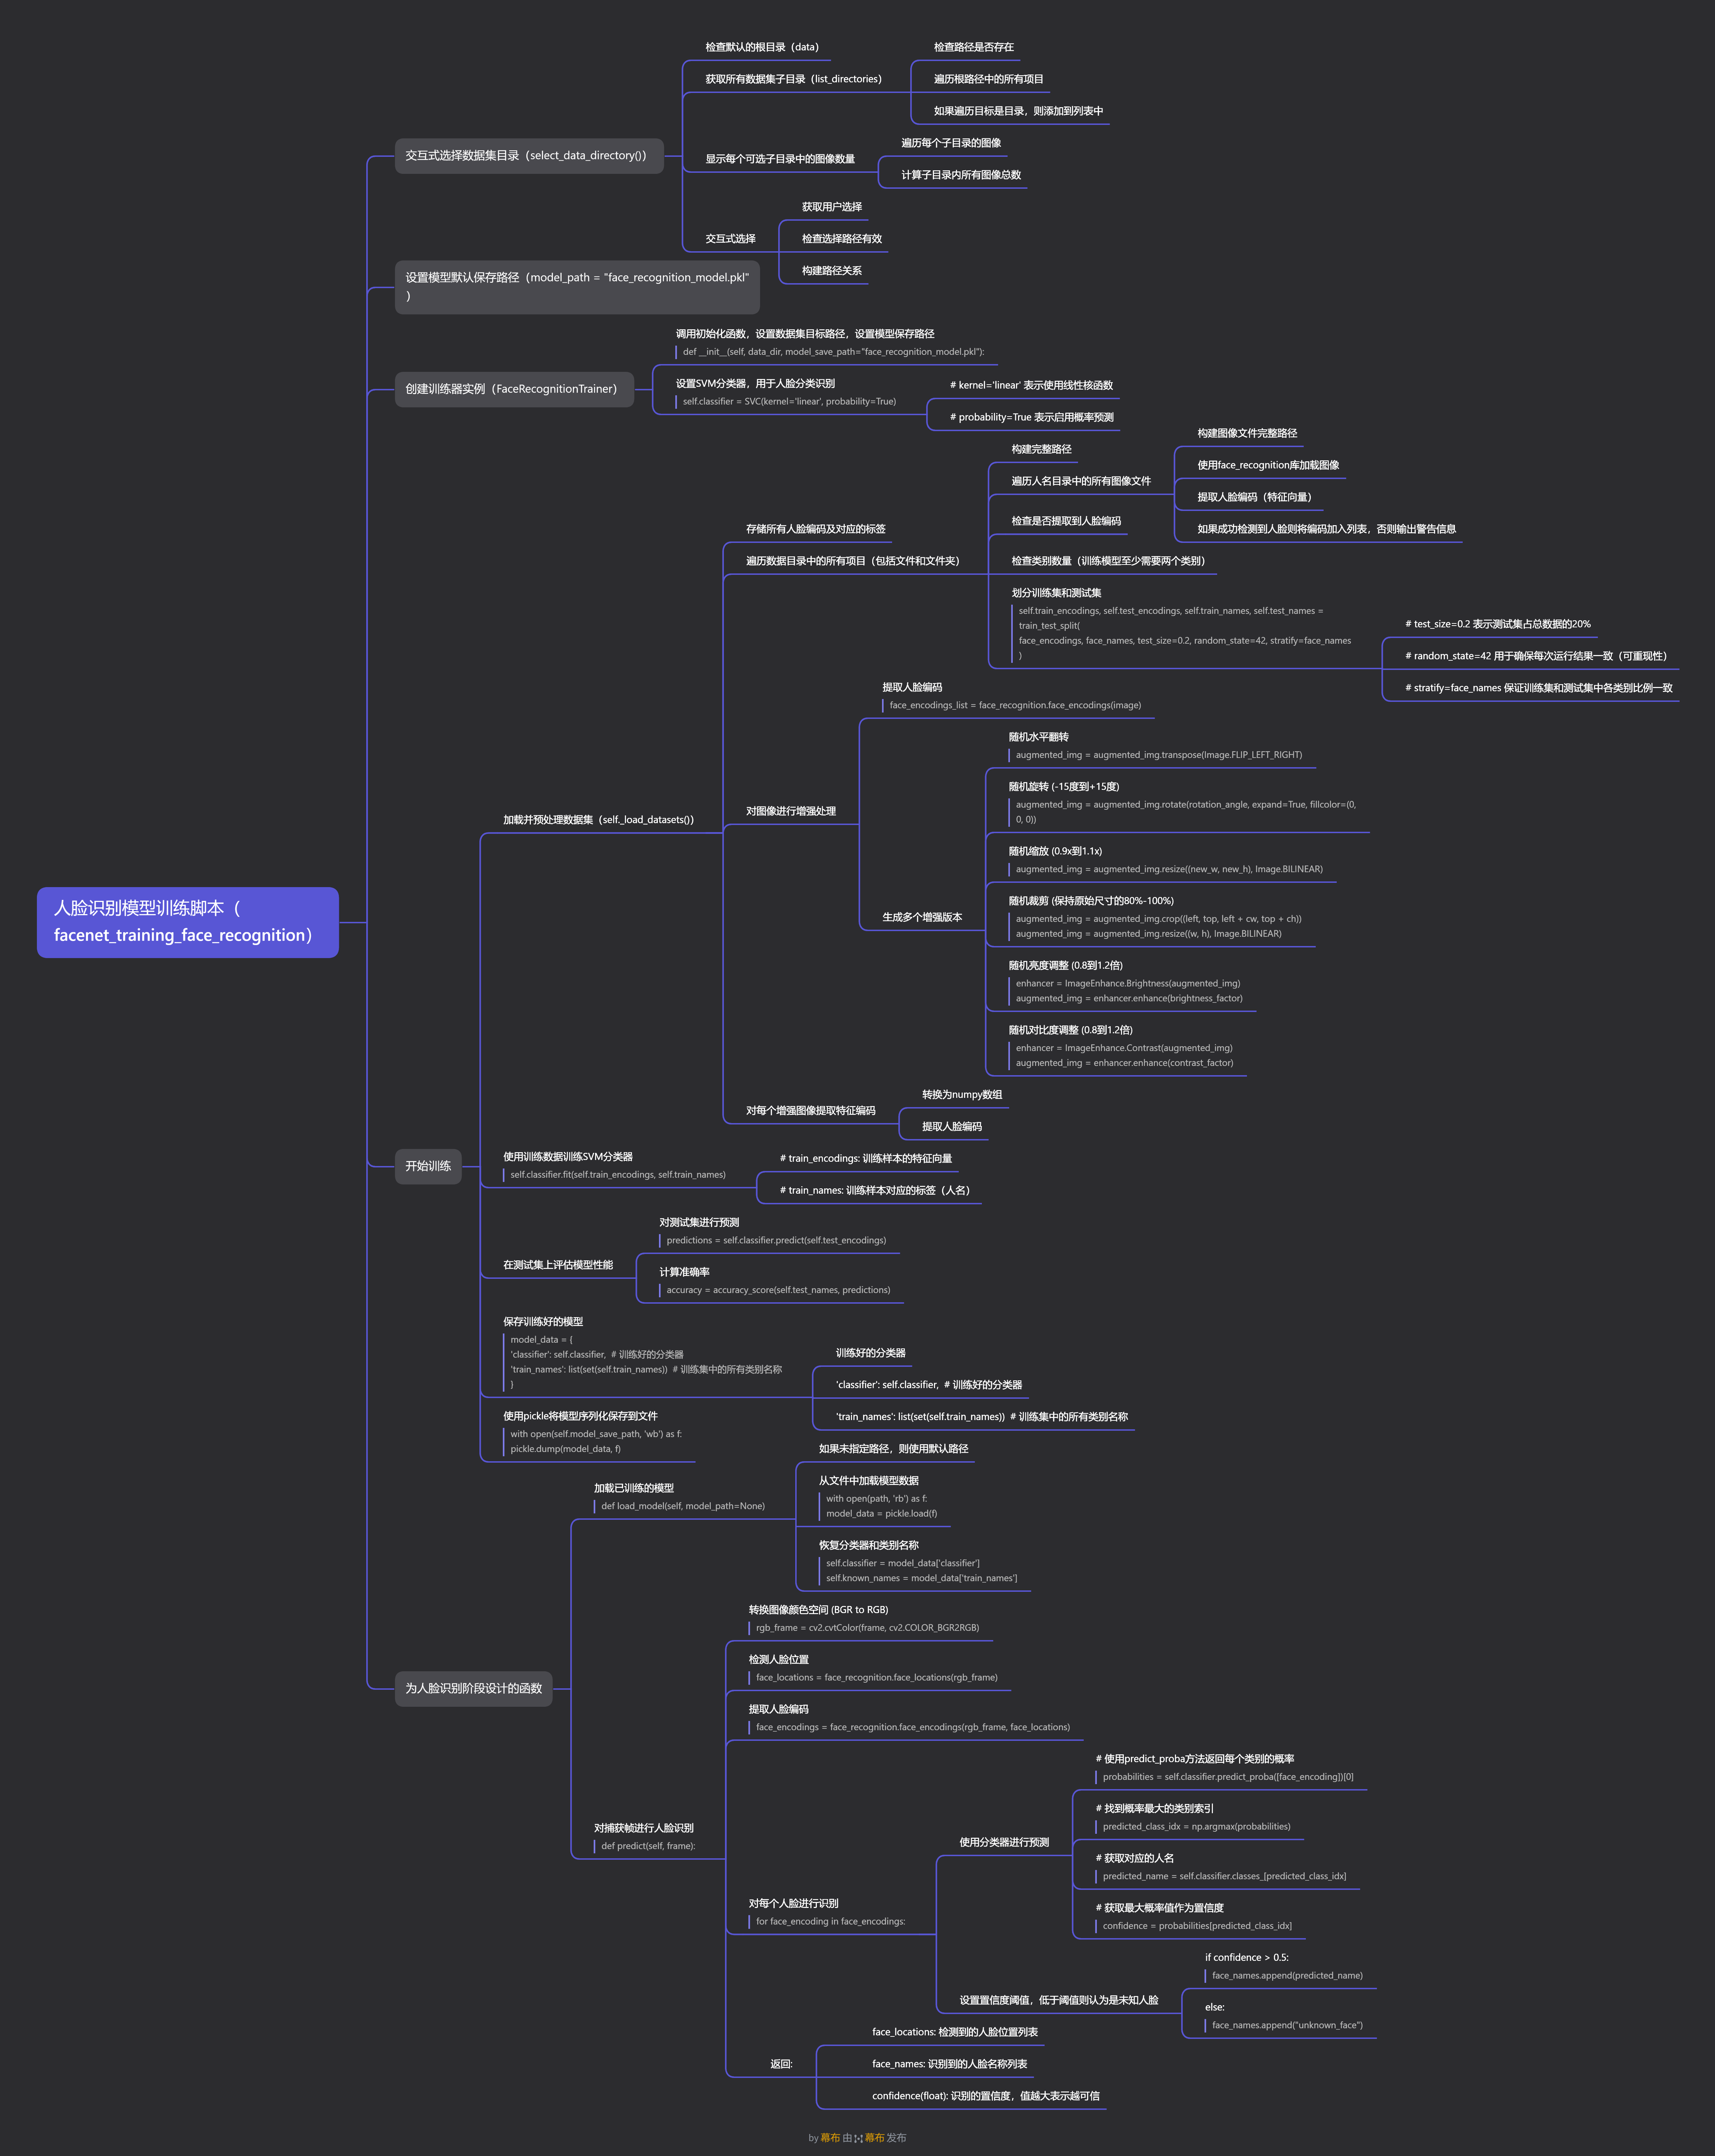
概述
本文为学习笔记--MTCNN人脸数据采集实现的后续内容,使用树莓派实现人脸识别项目的子内容。由于人脸识别项目的运行环境是树莓派4b,内存资源相对有限,因此选择face_recognition库作为人脸识别的模型。
核心模块分析
1. FaceRecognitionTrainer类(facenet_training_face_recognition.py)
这是人脸识别模型训练的核心类,主要功能包括:
初始化方法
def __init__(self, data_dir=None, model_save_path="face_recognition_model.pkl", augment_data=True)data_dir: 包含人脸图像数据集的目录路径,每个子目录代表一个人model_save_path: 训练后模型的保存路径augment_data: 是否启用数据增强功能
数据增强功能
系统实现了丰富的数据增强功能,包括:
- 随机水平翻转
- 随机旋转(-15°到+15°)
- 随机缩放(0.9x到1.1x)
- 随机裁剪
- 随机亮度调整(0.8到1.2倍)
- 随机对比度调整(0.8到1.2倍)
数据加载和处理
def _load_datasets(self)- 遍历数据目录中的所有子目录(每个人一个目录)
- 加载图像文件并提取人脸特征编码(128维向量)
- 如果启用数据增强,会对每张图像生成多个增强版本
- 将数据集按8:2比例划分为训练集和测试集
模型训练
def train(self)- 使用scikit-learn的SVM分类器进行训练
- 在测试集上评估模型性能
- 将训练好的模型保存到文件中
模型加载和预测
def load_model(self, model_path=None)
def predict(self, frame)- 从文件加载训练好的模型
- 对输入帧进行人脸识别,返回人脸位置、名称和置信度
2. 树莓派人脸识别系统(raspberry_pi_face_recognition.py)
这是在树莓派上运行的实时人脸识别程序,主要功能包括:
初始化和模型加载
def main()- 创建FaceRecognitionTrainer实例
- 加载预先训练好的模型
实时人脸识别
- 初始化摄像头并设置分辨率
- 循环读取摄像头帧
- 对每帧图像进行人脸识别
- 在图像上绘制人脸框和标签
- 显示结果
系统工作流程
训练阶段
- 准备人脸数据集(每个类别一个目录)
- 使用FaceRecognitionTrainer加载数据
- 提取人脸特征编码
- 应用数据增强(可选)
- 训练SVM分类器
- 评估模型性能
- 保存模型
识别阶段
- 加载训练好的模型
- 初始化摄像头
- 循环捕获视频帧
- 检测帧中的人脸
- 提取人脸特征
- 使用分类器进行预测
- 显示识别结果
技术要点
人脸特征提取
项目使用了face_recognition库:基于dlib的深度学习模型,提取128维特征向量。
分类器选择
使用SVM(支持向量机)作为分类器,具有以下优势:
- 适合处理高维特征向量
- 在小样本情况下表现良好
- 支持概率输出,便于设置置信度阈值
数据增强
通过随机水平翻转,旋转,缩放,裁剪等多种图像变换技术增加训练数据的多样性,提高模型的泛化能力。
实时处理
通过优化图像处理流程和合理设置摄像头参数,实现实时人脸识别。
项目学习思维导图
项目代码
facenet_training_face_recognition.py
"""
人脸识别模型训练脚本 (1版本)

该脚本使用face_recognition库进行人脸识别模型训练。
支持数据增强、训练/验证集划分等功能。
"""

import os
import cv2
import numpy as np
from sklearn.model_selection import train_test_split
from sklearn.svm import SVC
from sklearn.metrics import accuracy_score
import face_recognition
import pickle
import argparse
from PIL import Image, ImageEnhance
import random

class FaceRecognitionTrainer:
    """
    人脸识别模型训练器 (face_recognition版本)

    负责加载数据、提取特征、训练分类器和保存模型等完整训练流程。
    """

    def __init__(self, data_dir=None, model_save_path="face_recognition_model.pkl", augment_data=True):
        """
        初始化训练器

        参数:
            data_dir (str): 人脸数据集目录路径,该目录下应包含以人名命名的子目录,
                           每个子目录中包含对应人员的人脸图像文件
            model_save_path (str): 训练完成后的模型保存路径,默认为"face_recognition_model.pkl"
            augment_data (bool): 是否启用数据增强功能,默认为True
        """
        # 数据集根目录路径
        self.data_dir = data_dir
        # 模型保存路径
        self.model_save_path = model_save_path
        # 已知人脸编码列表(在本实现中未直接使用)
        self.known_face_encodings = []
        # 已知人名列表(在本实现中未直接使用)
        self.known_face_names = []
        # SVM分类器,用于人脸分类识别
        # kernel='linear' 表示使用线性核函数
        # probability=True 表示启用概率预测
        self.classifier = SVC(kernel='linear', probability=True)
        # 是否启用数据增强
        self.augment_data = augment_data
        # 数据增强参数
        self.augmentation_count = 5  # 每张原图生成的增强图像数量

    def _apply_data_augmentation(self, image):
        """
        对图像应用数据增强技术

        参数:
            image: PIL图像对象

        返回:
            list: 增强后的图像列表
        """
        augmented_images = []

        # 转换为PIL图像(如果需要)
        if isinstance(image, np.ndarray):
            # 如果是OpenCV图像(BGR),转换为RGB
            if len(image.shape) == 3 and image.shape[2] == 3:
                image = cv2.cvtColor(image, cv2.COLOR_BGR2RGB)
            # 转换为PIL图像
            image = Image.fromarray(image)

        # 生成多个增强版本
        for i in range(self.augmentation_count):
            augmented_img = image.copy()

            # 1. 随机水平翻转
            if random.random() > 0.5:
                augmented_img = augmented_img.transpose(Image.FLIP_LEFT_RIGHT)

            # 2. 随机旋转 (-15度到+15度)
            rotation_angle = random.uniform(-15, 15)
            augmented_img = augmented_img.rotate(rotation_angle, expand=True, fillcolor=(0, 0, 0))

            # 3. 随机缩放 (0.9x到1.1x)
            scale_factor = random.uniform(0.9, 1.1)
            w, h = augmented_img.size
            new_w, new_h = int(w * scale_factor), int(h * scale_factor)
            augmented_img = augmented_img.resize((new_w, new_h), Image.BILINEAR)

            # 4. 随机裁剪 (保持原始尺寸的80%-100%)
            crop_ratio = random.uniform(0.8, 1.0)
            cw, ch = int(new_w * crop_ratio), int(new_h * crop_ratio)
            left = random.randint(0, new_w - cw)
            top = random.randint(0, new_h - ch)
            augmented_img = augmented_img.crop((left, top, left + cw, top + ch))
            augmented_img = augmented_img.resize((w, h), Image.BILINEAR)

            # 5. 随机亮度调整 (0.8到1.2倍)
            brightness_factor = random.uniform(0.8, 1.2)
            enhancer = ImageEnhance.Brightness(augmented_img)
            augmented_img = enhancer.enhance(brightness_factor)

            # 6. 随机对比度调整 (0.8到1.2倍)
            contrast_factor = random.uniform(0.8, 1.2)
            enhancer = ImageEnhance.Contrast(augmented_img)
            augmented_img = enhancer.enhance(contrast_factor)

            augmented_images.append(augmented_img)

        return augmented_images

    def _load_datasets(self):
        """
        加载训练集和测试集

        该方法会遍历数据目录中的所有子目录,加载其中的人脸图像,
        提取人脸特征编码,并将数据集按8:2的比例划分为训练集和测试集。
        """
        # 存储所有人脸编码
        face_encodings = []
        # 存储所有人脸对应的人名标签
        face_names = []

        # 遍历数据目录中的所有项目(包括文件和文件夹)
        for person_name in os.listdir(self.data_dir):
            # 构建完整路径
            person_dir = os.path.join(self.data_dir, person_name)
            # 如果不是目录则跳过
            if not os.path.isdir(person_dir):
                continue

            print(f"处理 {person_name} 的人脸图像...")

            # 遍历人名目录中的所有图像文件
            for image_file in os.listdir(person_dir):
                # 只处理常见的图像格式文件
                if image_file.lower().endswith(('.jpg', '.jpeg', '.png')):
                    # 构建图像文件完整路径
                    image_path = os.path.join(person_dir, image_file)

                    try:
                        # 使用face_recognition库加载图像
                        image = face_recognition.load_image_file(image_path)

                        # 提取人脸编码(特征向量)
                        # face_encodings函数会检测图像中的人脸并提取128维特征向量
                        face_encodings_list = face_recognition.face_encodings(image)

                        # 如果成功检测到人脸
                        if len(face_encodings_list) > 0:
                            # 将第一个人脸的编码添加到列表中
                            face_encodings.append(face_encodings_list[0])
                            # 记录对应的人名标签
                            face_names.append(person_name)

                            # 如果启用数据增强,则对图像进行增强处理
                            if self.augment_data:
                                try:
                                    # 将numpy数组转换为PIL图像
                                    pil_image = Image.fromarray(image)
                                    # 应用数据增强
                                    augmented_images = self._apply_data_augmentation(pil_image)

                                    # 对每个增强图像提取特征编码
                                    for aug_image in augmented_images:
                                        # 转换为numpy数组
                                        aug_np_image = np.array(aug_image)
                                        # 提取人脸编码
                                        aug_face_encodings = face_recognition.face_encodings(aug_np_image)
                                        if len(aug_face_encodings) > 0:
                                            face_encodings.append(aug_face_encodings[0])
                                            face_names.append(person_name)
                                except Exception as aug_e:
                                    print(f"警告: 图像 {image_file} 的数据增强处理失败: {str(aug_e)}")
                        else:
                            # 如果未检测到人脸,输出警告信息
                            print(f"警告: 在 {image_file} 中未检测到人脸")
                    except Exception as e:
                        # 处理图像加载或编码提取过程中的异常
                        print(f"错误: 无法处理图像 {image_file}: {str(e)}")

        # 检查是否提取到有效的人脸数据
        if len(face_encodings) == 0:
            raise ValueError("没有成功提取到任何人脸编码,请检查数据集目录结构和图像文件")

        # 检查是否只有一个类别
        unique_names = list(set(face_names))
        if len(unique_names) < 2:
            raise ValueError(f"需要至少2个不同的人脸类别进行训练,当前只有 {len(unique_names)} 个类别: {unique_names}")

        # 划分训练集和测试集
        # test_size=0.2 表示测试集占总数据的20%
        # random_state=42 用于确保每次运行结果一致(可重现性)
        # stratify=face_names 保证训练集和测试集中各类别比例一致
        try:
            self.train_encodings, self.test_encodings, self.train_names, self.test_names = train_test_split(
                face_encodings, face_names, test_size=0.2, random_state=42, stratify=face_names
            )
        except ValueError as e:
            # 如果因为某个类别样本太少无法分层抽样,则使用普通分割
            print(f"无法进行分层抽样: {str(e)},使用普通分割方法")
            self.train_encodings, self.test_encodings, self.train_names, self.test_names = train_test_split(
                face_encodings, face_names, test_size=0.2, random_state=42
            )

        print(f"训练集大小: {len(self.train_encodings)}")
        print(f"测试集大小: {len(self.test_encodings)}")
        print(f"类别数量: {len(set(face_names))}")
        if self.augment_data:
            print(f"数据增强已启用,每张原图生成 {self.augmentation_count} 个增强样本")

    def train(self):
        """
        训练模型

        执行完整的训练流程,包括数据加载、特征提取和分类器训练。
        训练完成后会在测试集上评估模型性能,并将模型保存到指定路径。
        """
        print("正在加载数据集...")
        try:
            # 加载并预处理数据集
            self._load_datasets()
        except Exception as e:
            # 处理数据加载过程中的异常
            print(f"数据集加载失败: {str(e)}")
            return

        # 检查是否有训练数据
        if len(self.train_encodings) == 0:
            print("错误: 没有有效的训练数据")
            return

        print("开始训练模型...")
        # 使用训练数据训练SVM分类器
        # train_encodings: 训练样本的特征向量
        # train_names: 训练样本对应的标签(人名)
        self.classifier.fit(self.train_encodings, self.train_names)

        # 在测试集上评估模型性能
        print("正在评估模型...")
        # 对测试集进行预测
        predictions = self.classifier.predict(self.test_encodings)
        # 计算准确率
        accuracy = accuracy_score(self.test_names, predictions)
        print(f"测试集准确率: {accuracy:.4f}")

        # 保存训练好的模型
        model_data = {
            'classifier': self.classifier,  # 训练好的分类器
            'train_names': list(set(self.train_names))  # 训练集中的所有类别名称
        }

        # 使用pickle将模型序列化保存到文件
        with open(self.model_save_path, 'wb') as f:
            pickle.dump(model_data, f)

        print(f"模型已保存到: {self.model_save_path}")

    def load_model(self, model_path=None):
        """
        加载已训练的模型

        从文件中加载之前训练并保存的模型,用于后续的人脸识别任务。

        参数:
            model_path (str): 模型文件路径,如果未指定则使用初始化时设置的路径
        """
        # 如果未指定路径,则使用默认路径
        path = model_path or self.model_save_path
        # 从文件中加载模型数据
        with open(path, 'rb') as f:
            model_data = pickle.load(f)

        # 恢复分类器和类别名称
        self.classifier = model_data['classifier']
        self.known_names = model_data['train_names']
        print(f"模型已从 {path} 加载")

    def predict(self, frame):
        """
        对捕获帧进行人脸识别

        加载捕获帧,检测其中的人脸并识别其身份。

        参数:
            frame: 传入获取到的图像帧

        返回:
            face_locations: 检测到的人脸位置列表
            face_names: 识别到的人脸名称列表
            confidence(float): 识别的置信度,值越大表示越可信
        """
        # 转换图像颜色空间 (BGR to RGB)
        rgb_frame = cv2.cvtColor(frame, cv2.COLOR_BGR2RGB)
        # 检测人脸位置
        face_locations = face_recognition.face_locations(rgb_frame)


        # 如果检测到人脸,进行识别
        face_names = []
        face_confidences = []
        if len(face_locations) > 0:
            # 提取人脸编码
            face_encodings = face_recognition.face_encodings(rgb_frame, face_locations)
            # 对每个人脸进行识别
            for face_encoding in face_encodings:
                # 使用分类器进行预测
                # predict_proba返回每个类别的概率
                probabilities = self.classifier.predict_proba([face_encoding])[0]
                # 找到概率最大的类别索引
                predicted_class_idx = np.argmax(probabilities)
                # 获取对应的人名
                predicted_name = self.classifier.classes_[predicted_class_idx]
                # 获取最大概率值作为置信度
                confidence = probabilities[predicted_class_idx]

                # 设置置信度阈值,低于阈值则认为是未知人脸
                if confidence > 0.5:  # 可根据实际情况调整阈值
                    face_names.append(predicted_name)
                else:
                    face_names.append("unknown_face")

                face_confidences.append(confidence)
        else:
            print("未检测到人脸")
            return None, [], []
        return face_locations, face_names, face_confidences

def list_directories(path):
    """
    列出指定路径下的所有目录

    遍历指定路径,返回其中所有子目录的名称列表。

    参数:
        path (str): 要列出目录的路径

    返回:
        list: 目录名称列表,如果路径不存在则返回空列表
    """
    # 检查路径是否存在
    if not os.path.exists(path):
        return []

    directories = []
    # 遍历路径中的所有项目
    for item in os.listdir(path):
        item_path = os.path.join(path, item)
        # 如果是目录,则添加到列表中
        if os.path.isdir(item_path):
            directories.append(item)

    return directories

def select_data_directory():
    """
    交互式选择人脸数据集目录

    显示face_data目录下的所有子目录,并让用户选择一个作为数据集目录。
    用户可以通过输入数字选择目录,或输入'q'退出程序。

    返回:
        str: 用户选择的数据集目录路径,如果未选择或退出则返回None
    """
    # 默认的数据集根目录
    face_data_path = "data"

    # 检查data目录是否存在
    if not os.path.exists(face_data_path):
        print(f"错误: 找不到 '{face_data_path}' 目录")
        return None

    # 获取所有子目录
    directories = list_directories(face_data_path)

    # 如果没有子目录
    if not directories:
        print(f"'{face_data_path}' 目录下没有找到任何子目录")
        print("请确保数据集目录结构正确,每个人员应有一个独立的子目录")
        return None

    # 显示所有可选项
    print(f"\n在 '{face_data_path}' 目录下找到以下数据集:")
    for i, directory in enumerate(directories, 1):
        # 显示每个目录中的图像数量
        dir_path = os.path.join(face_data_path, directory)
        image_count = 0
        for j in os.listdir(dir_path):
            j = os.path.join(dir_path, j)
            image_files = [f for f in os.listdir(j) if f.lower().endswith(('.jpg', '.jpeg', '.png'))]
            image_count += len(image_files)
        print(f"{i}. {directory} ({image_count} 张图像)")


    # 获取用户选择
    while True:
        try:
            # 提示用户输入选择
            choice = input(f"\n请选择数据集 (1-{len(directories)}) 或输入 'q' 退出: ").strip()

            # 如果用户选择退出
            if choice.lower() == 'q':
                return None

            # 将输入转换为数字索引
            choice_index = int(choice) - 1
            # 检查索引是否有效
            if 0 <= choice_index < len(directories):
                # 构建并返回选中目录的完整路径
                selected_dir = os.path.join(face_data_path, directories[choice_index])
                print(f"已选择数据集目录: {selected_dir}")
                return selected_dir
            else:
                # 索引无效,提示用户重新输入
                print(f"无效选择,请输入 1 到 {len(directories)} 之间的数字")
        except ValueError:
            # 输入不是有效数字,提示用户重新输入
            print("请输入有效的数字或 'q' 退出")

def main():
    """
    主函数

    程序入口点,通过交互式方式获取数据集目录并启动训练流程。
    """
    print("人脸识别模型训练程序 (face_recognition版本)")
    print("=" * 40)

    # 交互式选择数据集目录
    data_dir = select_data_directory()

    # 如果用户取消选择,则退出程序
    if data_dir is None:
        print("程序已退出")
        return

    # 检查选择的目录是否存在数据
    if not os.listdir(data_dir):
        print(f"错误: 选择的目录 '{data_dir}' 为空")
        return

    # 询问是否启用数据增强
    augment_choice = input("\n是否启用数据增强功能? (y/n, 默认为y): ").strip().lower()
    augment_data = augment_choice != 'n' and augment_choice != 'no'

    # 设置模型保存路径
    model_path = "face_recognition_model.pkl"

    print(f"\n训练配置:")
    print(f"  数据集目录: {data_dir}")
    print(f"  模型保存路径: {model_path}")
    print(f"  数据增强: {'是' if augment_data else '否'}")

    # 确认开始训练
    confirm = input("\n是否开始训练? (y/n): ").strip().lower()
    if confirm != 'y' and confirm != 'yes':
        print("训练已取消")
        return

    # 创建训练器实例
    trainer = FaceRecognitionTrainer(
        data_dir=data_dir,        # 数据集目录路径
        model_save_path=model_path,  # 模型保存路径
        augment_data=augment_data   # 数据增强选项
    )

    # 开始训练
    trainer.train()

# 程序入口点
if __name__ == "__main__":
    # 当脚本被直接运行时执行主函数
    main()
raspberry_pi_face_recognition.py
import cv2
import face_recognition
import pickle
import os
import numpy as np
from facenet_training_face_recognition import FaceRecognitionTrainer

def main():
    """
    主函数:在树莓派上运行实时人脸识别
    """
    print("树莓派人脸识别系统启动中...")


    # 加载训练好的模型
    try:
        user = FaceRecognitionTrainer()
        user.load_model()
        if (user.classifier!=None and user.known_names!=None):print("人脸识别模型加载成功")
        else:print("人脸识别模型加载失败")
    except Exception as e:
        print(f"模型加载失败: {e}")
        return

    # 初始化摄像头
    video_capture = cv2.VideoCapture(0)

    # 检查摄像头是否成功打开
    if not video_capture.isOpened():
        print("错误: 无法打开摄像头")
        return

    # 设置摄像头分辨率 (可根据树莓派性能调整)
    video_capture.set(cv2.CAP_PROP_FRAME_WIDTH, 640)
    video_capture.set(cv2.CAP_PROP_FRAME_HEIGHT, 480)

    print("人脸识别系统已启动")
    print("按 'q' 键退出程序")

    try:
        while True:
            # 读取一帧图像
            ret, frame = video_capture.read()

            if not ret:
                print("无法获取摄像头画面")
                break

            # 识别人脸
            result = user.predict(frame)
            if result is not None:
                face_locations, face_names, confidences = result
                # 检查是否检测到人脸
                if face_locations is None:
                    # 未检测到人脸,显示原始帧
                    cv2.imshow('Raspberry Pi Face Recognition', frame)
                    # 按 'q' 键退出
                    if cv2.waitKey(1) & 0xFF == ord('q'):
                        break
                    continue
            else:
                continue

            # 在图像上绘制人脸框和标签
            for (top, right, bottom, left), name, confidence in zip(face_locations, face_names, confidences):
                # 绘制人脸框
                cv2.rectangle(frame, (left, top), (right, bottom), (0, 0, 255), 2)

                # 绘制标签背景
                cv2.rectangle(frame, (left, bottom - 35), (right, bottom), (0, 0, 255), cv2.FILLED)
                font = cv2.FONT_HERSHEY_DUPLEX

                # 绘制人名标签
                cv2.putText(frame, name, (left + 6, bottom - 6), font, 0.8, (255, 255, 255), 1)
                # 绘制置信度
                cv2.putText(frame, f"Conf: {confidence:.2f}", (left + 6, bottom - 20), font, 0.5, (255, 255, 255), 1)

            # 显示结果图像
            cv2.imshow('Raspberry Pi Face Recognition', frame)

            # 按 'q' 键退出
            if cv2.waitKey(1) & 0xFF == ord('q'):
                break

    except KeyboardInterrupt:
        print("\n用户中断程序")
    finally:
        # 释放资源
        video_capture.release()
        cv2.destroyAllWindows()
        print("程序已退出")

if __name__ == "__main__":
    main()


 1521
1521

 被折叠的 条评论
为什么被折叠?
被折叠的 条评论
为什么被折叠?
 到【灌水乐园】发言


