


概述
这是一个基于MTCNN(Multi-task Cascaded Convolutional Networks)算法的人脸捕获程序,用于收集训练人脸识别模型所需的人脸图像数据。程序使用facenet-pytorch库实现的MTCNN检测器。
思维导图
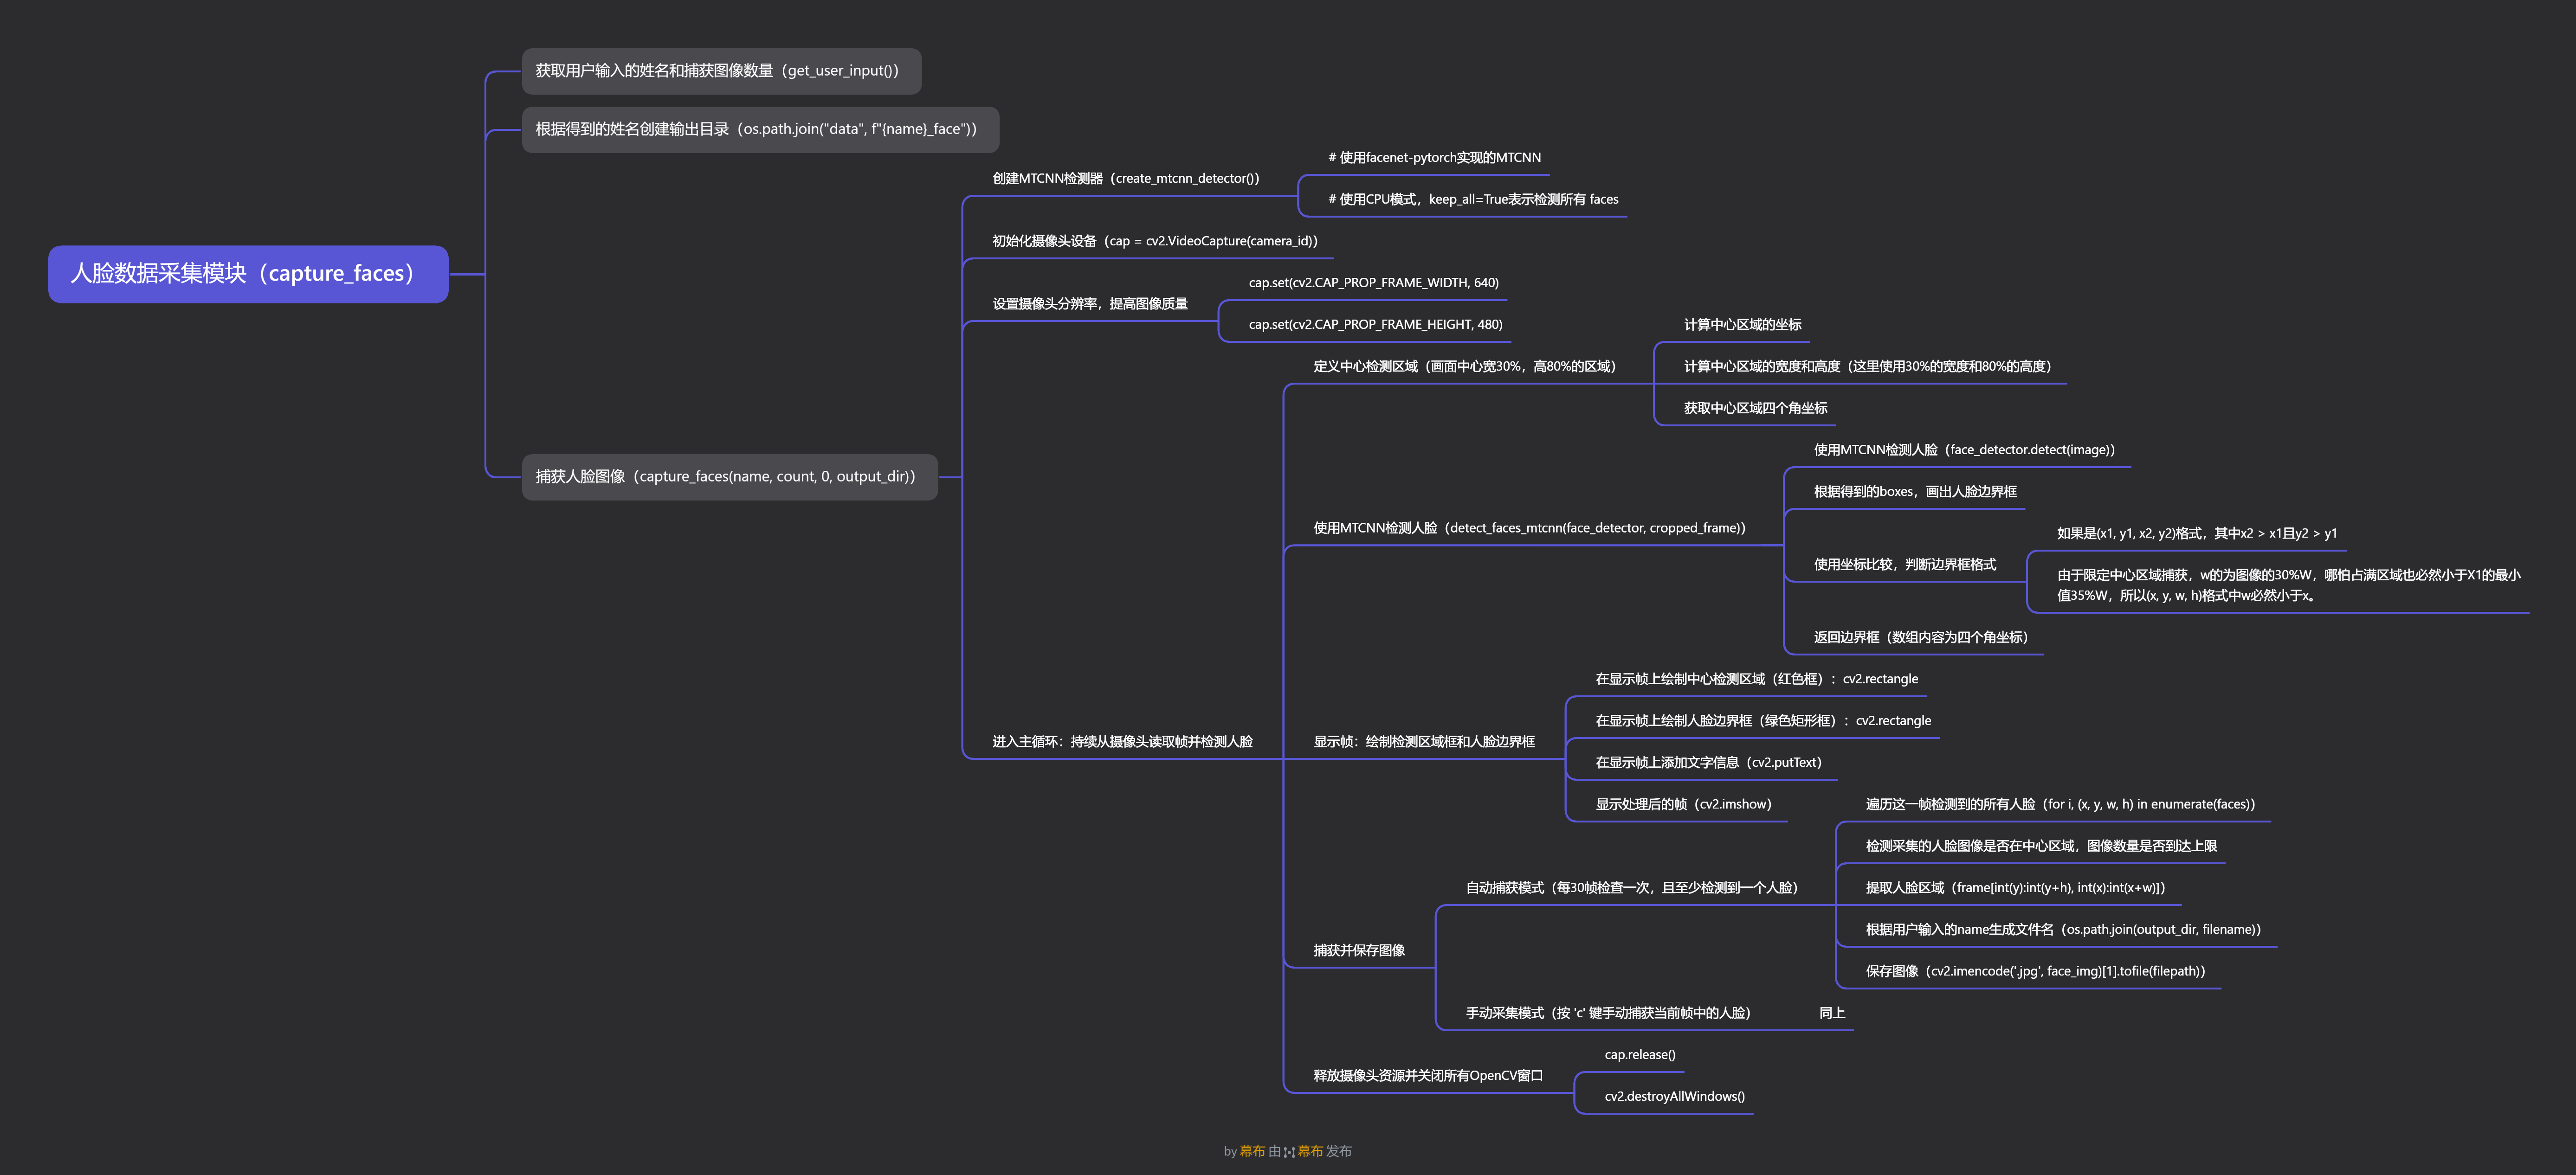
核心功能
1. **人脸检测**:使用MTCNN算法检测图像中的人脸
2. **图像捕获**:自动或手动捕获人脸图像
3. **中心区域限制**:限定人脸检测在画面中心区域,提高检测准确性
4. **中文路径支持**:使用imencode方法解决OpenCV对中文路径的支持问题
5. **交互式操作**:通过键盘控制图像捕获过程
技术要点
1.MTCNN人脸检测
MTCNN是一种多任务级联卷积神经网络,包含三个阶段:
1. P-Net(Proposal Network):快速生成人脸候选区域
2. R-Net(Refine Network):过滤掉大量非人脸区域
3. O-Net(Output Network):输出人脸关键点和更精确的人脸边界框
def create_mtcnn_detector():
    """
    创建MTCNN人脸检测器,使用facenet-pytorch实现

    Returns:
        MTCNN检测器对象或None(如果无法创建)
    """
    try:
        # 使用facenet-pytorch实现的MTCNN
        from facenet_pytorch import MTCNN
        # 使用CPU模式,keep_all=True表示检测所有 faces
        mtcnn = MTCNN(keep_all=True, device='cpu')
        print("使用facenet-pytorch的MTCNN实现")
        return mtcnn
    except ImportError:
        print("错误: 未找到facenet-pytorch库,请安装:")
        print("  pip install facenet-pytorch")
        return None

'''
'''
# 使用MTCNN检测人脸
# 返回boxes, probs
boxes, probs = face_detector.detect(image)
2.中文路径处理
为了解决OpenCV对中文路径支持不佳的问题,程序使用以下方法:
# 使用imencode和tofile方法保存包含中文的路径
# cv2.imencode(保存格式, 保存图片)[1].tofile(保存路径)
cv2.imencode('.jpg', face_img)[1].tofile(filepath)
# 使用isfile方法获取保存文件状态是否成功
success = os.path.isfile(filepath)
另注:关于在cv2的putText方法中使用中文会出现乱码的问题,可以通过以下方法解决
# 安装这个扩展之后puttext的中文显示问题就解决啦
# 但是文件中文名写入不使用上面的imencode方法还是会显示乱码
pip install opencv-python-rolling
3.边界框格式处理
MTCNN返回的边界框可能有两种格式:
1. `(x1, y1, x2, y2)`:矩形对角点坐标
2. `(x, y, w, h)`:左上角坐标和宽高
# 使用坐标比较判断边界框格式
# 如果是(x1, y1, x2, y2)格式,其中x2 > x1且y2 > y1
if box[2] > box[0] and box[3] > box[1]:
    x1, y1, x2, y2 = box
    w, h = x2 - x1, y2 - y1
    faces.append((int(x1), int(y1), int(w), int(h)))
else:
    # 可能已经是(x, y, w, h)格式
    faces.append((int(box[0]), int(box[1]), int(box[2]), int(box[3])))
思路:
实际上,很难通过返回的boxes的长度来判断格式,因为不同的库和版本可能返回不同的格式。
理想的方法是明确知道所使用的库和版本,并参考其文档来确定返回的边界框格式,但程序运行在不同的环境中,一般难以确定使用的库和版本。
根据坐标值的大小来判断?
如果boxes的长度为4且所有值均为正数且x2 > x1且y2 > y1,
不能判断为(x1, y1, x2, y2)格式的主要原因是(x, y, w, h)格式也可能满足这些条件。
比如:人脸贴摄像头比较近的时候,w和h可能会比较大,此时w和h的值可能会大于x1和y1。
探究靠得太近的本质,在于x,y的坐标,也就是左上角的坐标,距离边界的距离太小。
那么该如何控制人脸框和边界的距离大小呢?
有丰富生活经验的朋友应该已经想到了,就是人脸识别的时候经常会出现的人脸框。
在反馈的图像中标划出一个人脸区域,然后让用户调整摄像头位置,使得人脸框和边界的距离适中。这样就可以避免人脸框过大或过小的问题,同时也能确保人脸框的格式正确。
4.中心区域检测
# 定义中心检测区域(画面中心宽30%,高80%的区域)
# 计算中心区域的坐标
center_x, center_y = frame_width // 2, frame_height // 2
# 计算中心区域的宽度和高度
# 这里使用30%的宽度和80%的高度
crop_width, crop_height = int(frame_width * 0.3), int(frame_height * 0.8)
# 获取中心区域四个角坐标
crop_x1 = center_x - crop_width // 2
crop_y1 = center_y - crop_height // 2
crop_x2 = crop_x1 + crop_width
crop_y2 = crop_y1 + crop_height
这里使用30%的宽度和80%的高度的主要原因
1.人脸是个竖立的椭圆,需要的人脸框width小height大。
2.想要区分(x1, y1, x2, y2)和(x, y, w, h)格式,实际上只需要保证w总小于x1就够了。
因此,高度的限制可以放宽成80%H,宽度则严格设定为30%W,以此保证它始终小于x1的min值35%W。
项目流程图

项目代码
由于是学习代码,注释写得比较细琐,跟着debug一遍基本上都能理解了,大概。
import cv2
import os
import sys
import numpy as np

def create_mtcnn_detector():
    """
    创建MTCNN人脸检测器,使用facenet-pytorch实现

    Returns:
        MTCNN检测器对象或None(如果无法创建)
    """
    try:
        # 使用facenet-pytorch实现的MTCNN
        from facenet_pytorch import MTCNN
        # 使用CPU模式,keep_all=True表示检测所有 faces
        mtcnn = MTCNN(keep_all=True, device='cpu')
        print("使用facenet-pytorch的MTCNN实现")
        return mtcnn
    except ImportError:
        print("错误: 未找到facenet-pytorch库,请安装:")
        print("  pip install facenet-pytorch")
        return None

def capture_faces(name, num_images=50, camera_id=0, output_dir="known_faces"):
    """
    使用MTCNN捕获人脸图像用于训练人脸识别模型,在画面中心区域检测人脸

    Args:
        name (str): 人员姓名,将用作保存图像文件名的前缀
        num_images (int): 要捕获的图像数量,默认为50张
        camera_id (int): 摄像头设备ID,默认为0(第一个摄像头)
        output_dir (str): 图像保存的目录路径,默认为"known_faces"
    """
    # 创建MTCNN检测器
    face_detector = create_mtcnn_detector()
    if face_detector is None:
        return


    print(f"开始捕获人脸图像: {name}")
    print(f"目标数量: {num_images} 张")
    print(f"输出目录: {output_dir}")
    print("=" * 50)


    # 初始化摄像头设备
    cap = cv2.VideoCapture(camera_id)
    if not cap.isOpened():
        print(f"错误: 无法打开摄像头 {camera_id}")
        # 尝试其他设备ID (1-4),在某些系统中摄像头可能分配了不同的ID
        for i in range(1, 5):
            print(f"尝试摄像头 {i}...")
            cap = cv2.VideoCapture(i)
            if cap.isOpened():
                print(f"成功打开摄像头 {i}")
                camera_id = i
                break
        if not cap.isOpened():
            print("无法打开任何摄像头")
            return

    # 设置摄像头分辨率,提高图像质量
    cap.set(cv2.CAP_PROP_FRAME_WIDTH, 640)
    cap.set(cv2.CAP_PROP_FRAME_HEIGHT, 480)

    # 初始化计数器
    # captured_count: 已成功捕获并保存的图像数量
    # frame_count: 处理的视频帧总数,用于控制自动捕获频率
    captured_count = 0
    frame_count = 0

    print("\n操作说明:")
    print("- 确保人脸正对摄像头")
    print("- 保持不同角度和表情")
    print("- 确保光线充足且均匀")
    print("- 按 'q' 或 'ESC' 键退出")
    print("- 按 'c' 键捕获当前帧中的人脸")
    print("- 自动捕获模式下会自动保存检测到的人脸")
    print("- 人脸应出现在画面中心区域(红色框内)")
    print("\n准备开始...")

    # 等待2秒让用户准备
    cv2.waitKey(2000)

    try:
        # 主循环:持续从摄像头读取帧并检测人脸
        while True:
            # 从摄像头读取一帧图像
            ret, frame = cap.read()
            if not ret:
                print("无法获取摄像头画面")
                break

            # 帧计数器递增
            frame_count += 1

            # 获取帧的尺寸
            frame_height, frame_width = frame.shape[:2]

            # 定义中心检测区域(画面中心宽30%,高80%的区域)
            # 计算中心区域的坐标
            center_x, center_y = frame_width // 2, frame_height // 2
            # 计算中心区域的宽度和高度
            # 这里使用30%的宽度和80%的高度
            crop_width, crop_height = int(frame_width * 0.3), int(frame_height * 0.8)
            # 获取中心区域四个角坐标
            crop_x1 = center_x - crop_width // 2
            crop_y1 = center_y - crop_height // 2
            crop_x2 = crop_x1 + crop_width
            crop_y2 = crop_y1 + crop_height


            # 使用MTCNN检测人脸(仅在中心区域)
            faces = detect_faces_mtcnn(face_detector, frame)


            # 在显示帧上绘制中心检测区域(红色框)
            display_frame = frame.copy()
            cv2.rectangle(display_frame, (crop_x1, crop_y1), (crop_x2, crop_y2), (0, 0, 255), 2)
            cv2.putText(display_frame, "人脸检测区域", (crop_x1, crop_y1 - 10),
                       cv2.FONT_HERSHEY_SIMPLEX, 0.5, (0, 0, 255), 1)

            # 在显示帧上绘制绿色矩形框标记检测到的人脸
            for (x, y, w, h) in faces:
                cv2.rectangle(display_frame, (int(x), int(y)), (int(x+w), int(y+h)), (0, 255, 0), 2)

            # 在显示帧上添加文字信息
            cv2.putText(display_frame, f"已捕获: {captured_count}/{num_images}",
                       (10, 30), cv2.FONT_HERSHEY_SIMPLEX, 0.7, (0, 255, 0), 2)
            cv2.putText(display_frame, f"按 'c' 捕获, 'q' 退出",
                       (10, 60), cv2.FONT_HERSHEY_SIMPLEX, 0.7, (0, 255, 0), 2)

            # 显示处理后的帧
            cv2.imshow('人脸捕获 (MTCNN-中心区域)', display_frame)

            # 自动捕获模式(每30帧检查一次,且至少检测到一个人脸)
            # 这样可以避免保存过多重复的人脸图像
            if frame_count % 30 == 0 and len(faces) > 0 and captured_count < num_images:
                # 遍历这一帧中的所有检测到的人脸
                for i, (x, y, w, h) in enumerate(faces):
                    # 如果已达到目标数量则停止捕获
                    if captured_count >= num_images:
                        break
                    #检测采集的人脸图像是否在中心区域
                    if not (crop_x1 <= x <= crop_x2 and crop_y1 <= y <= crop_y2):
                        print(f"人脸不在中心区域内,跳过保存")
                        break

                    # 提取人脸区域(裁剪出人脸部分)
                    face_img = frame[int(y):int(y+h), int(x):int(x+w)]

                    # 生成文件名,格式为姓名+编号,如GUO01.jpg, GUO02.jpg
                    filename = f"{name.upper()}{captured_count+1:02d}.jpg"
                    filepath = os.path.join(output_dir, filename)

                    # 保存图像到指定目录
                    #success = cv2.imwrite(filepath, face_img)
                    cv2.imencode('.jpg', face_img)[1].tofile(filepath)
                    success = os.path.isfile(filepath)
                    if success:
                        captured_count += 1
                        print(f"已保存: {filename} (共{captured_count}张)")
                    else:
                        print(f"保存失败: {filename}")

            # 等待按键输入(1毫秒)
            key = cv2.waitKey(1) & 0xFF

            # 按 'q' 或 ESC 键退出程序
            if key == ord('q') or key == 27:  # 27 is ESC key
                break

            # 按 'c' 键手动捕获当前帧中的人脸(立即保存当前检测到的人脸)
            elif key == ord('c') and len(faces) > 0:
                # 遍历这一帧中的所有检测到的人脸
                for i, (x, y, w, h) in enumerate(faces):
                    # 如果已达到目标数量则停止捕获
                    if captured_count >= num_images:
                        break
                    #检测采集的人脸图像是否在中心区域
                    if not (crop_x1 <= x <= crop_x2 and crop_y1 <= y <= crop_y2):
                        print(f"人脸不在中心区域内,跳过保存")
                        break

                    # 提取人脸区域
                    face_img = frame[int(y):int(y+h), int(x):int(x+w)]

                    # 生成文件名
                    filename = f"{name.upper()}{captured_count+1:02d}.jpg"
                    filepath = os.path.join(output_dir, filename)

                    # 保存图像
                    #success = cv2.imwrite(filepath, face_img)
                    cv2.imencode('.jpg', face_img)[1].tofile(filepath)
                    success = os.path.isfile(filepath)
                    # 检查保存是否成功
                    if success:
                        captured_count += 1
                        print(f"已保存: {filename} (共{captured_count}张)")
                    else:
                        print(f"保存失败: {filename}")

            # 检查是否达到目标数量
            if captured_count >= num_images:
                print(f"\n已完成! 成功捕获 {captured_count} 张人脸图像")
                break

    except KeyboardInterrupt:
        # 处理用户按Ctrl+C中断程序的情况
        print("\n用户中断程序")
    finally:
        # 释放摄像头资源并关闭所有OpenCV窗口
        cap.release()
        cv2.destroyAllWindows()

    # 输出最终统计信息
    print(f"\n捕获完成!")
    print(f"目标数量: {num_images}")
    print(f"实际捕获: {captured_count}")
    print(f"保存位置: {os.path.abspath(output_dir)}")

def detect_faces_mtcnn(face_detector, image):
    """
    使用MTCNN检测图像中的人脸

    Args:
        face_detector: MTCNN人脸检测器对象
        image: 要检测的图像

    Returns:
        list: 人脸边界框列表,每个元素为(x, y, w, h)格式
    """
    try:
        # 使用MTCNN检测人脸
        # 返回boxes, probs
        boxes, probs = face_detector.detect(image)

        # 如果没有检测到人脸
        if boxes is None or len(boxes) == 0:
            return []

        # 确保boxes是numpy数组
        if not isinstance(boxes, np.ndarray):
            boxes = np.array(boxes)

        # 如果是三维数组,取第一个元素
        if boxes.ndim == 3:
            boxes = boxes[0]

        # 转换边界框格式为(x, y, w, h)
        faces = []
        for box in boxes:
            if len(box) == 4:
                # 使用坐标比较判断边界框格式
                # 如果是(x1, y1, x2, y2)格式,其中x2 > x1且y2 > y1
                if box[2] > box[0] and box[3] > box[1]:
                    x1, y1, x2, y2 = box
                    w, h = x2 - x1, y2 - y1
                    faces.append((int(x1), int(y1), int(w), int(h)))
                else:
                    # 可能已经是(x, y, w, h)格式
                    faces.append((int(box[0]), int(box[1]), int(box[2]), int(box[3])))
            elif len(box) == 5:
                # 有些版本可能返回5个值,前4个是边界框
                x1, y1, x2_or_w, y2_or_h = box[:4]
                # 使用同样的判断逻辑
                if x2_or_w > x1 and y2_or_h > y1:
                    w, h = x2_or_w - x1, y2_or_h - y1
                    faces.append((int(x1), int(y1), int(w), int(h)))
                else:
                    faces.append((int(x1), int(y1), int(x2_or_w), int(y2_or_h)))

        return faces
    except Exception as e:
        print(f"人脸检测出错: {e}")
        return []

def get_user_input():
    """
    获取用户输入的姓名和捕获数量

    Returns:
        tuple: (姓名, 数量) 或 (None, None)(输入格式错误时)
    """
    # 提示用户输入姓名和数量
    user_input = input("请输入姓名,并指定捕获数量。示例格式:GUO+50\n")
    try:
        # 解析用户输入,按"+"分割姓名和数量
        name, count_str = user_input.split('+')
        count = int(count_str)
        return name.strip(), count
    except ValueError:
        # 处理输入格式错误的情况
        print("输入格式错误,请使用格式:姓名+数量,例如:GUO+50")
        return None, None

def main():
    """
    主函数:获取用户输入并调用捕获人脸图像功能
    """
    print("人脸图像捕获工具 (MTCNN版本-中心区域检测)")
    print("=" * 40)

    # 获取用户输入的姓名和数量
    name, count = get_user_input()
    if name is None or count is None:
        return

    # 设置输出目录为 data/name_face 格式,如 data/GUO_face/
    output_dir = os.path.join("data", f"{name}_face")
    # 创建输出目录,如果目录不存在则创建
    if not os.path.exists(output_dir):
        os.makedirs(output_dir)
        print(f"创建目录: {output_dir}")

    # 调用捕获人脸图像的函数
    capture_faces(name, count, 0, output_dir)

if __name__ == "__main__":
    # 程序入口点
    main()


 815
815

 被折叠的 条评论
为什么被折叠?
被折叠的 条评论
为什么被折叠?
 到【灌水乐园】发言


