


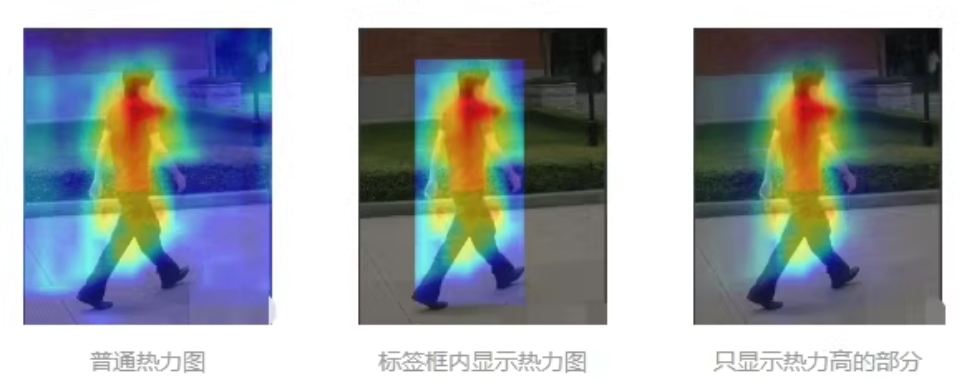
使用Grad-CAM方法建立YOLOv5中实现三种不同的热力图可视化(普通热力图、仅标签框内的热力图、去除红色以外区域的热力图
参考以下呗。
文章目录
YOLOv5热力图grad-cam
建立目标:3种热力图可视化:普通的,仅标签框内的,去除红色以外区域的
用于YOLOv5添加注意力机制、改进模型等
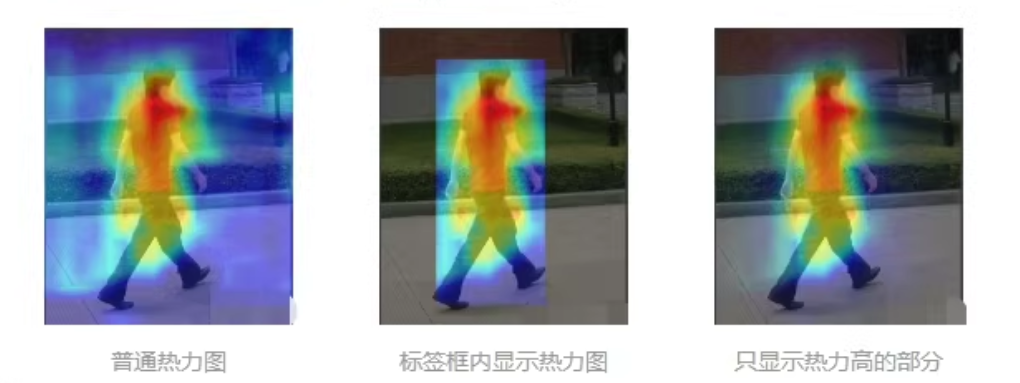
YOLOv5中实现三种不同的热力图可视化(普通热力图、仅标签框内的热力图、去除红色以外区域的热力图),我们可以使用Grad-CAM方法。
代码示例,仅供参考。
如何加载模型、处理图像、生成热力图以及展示结果。
步骤 1: 导入必要的库
import cv2
import numpy as np
import torch
from torchvision.transforms import functional as F
from pytorch_grad_cam import GradCAM, ScoreCAM, GradCAMPlusPlus, AblationCAM, XGradCAM, EigenCAM, EigenGradCAM, LayerCAM
from pytorch_grad_cam.utils.image import show_cam_on_image
from models.experimental import attempt_load  # 假设这是加载YOLOv5模型的方式
步骤 2: 加载YOLOv5模型
model = attempt_load('yolov5_weights.pt', map_location='cpu')  # 或 'cuda' 如果有GPU的话
model.eval()
步骤 3: 定义Grad-CAM类
target_layer = model.model[-1]  # 这里假设目标层是最后一个层
cam = GradCAM(model=model, target_layer=target_layer, use_cuda=True if torch.cuda.is_available() else False)
步骤 4: 处理输入图像
def preprocess_image(img_path):
    img = cv2.imread(img_path)
    img = cv2.cvtColor(img, cv2.COLOR_BGR2RGB)
    img_tensor = F.to_tensor(img).unsqueeze(0)  # 添加batch维度
    return img, img_tensor
步骤 5: 获取热力图
def get_gradcam_visualization(model, img_tensor, cam_method, target_category=None):
    grayscale_cam = cam_method(input_tensor=img_tensor, target_category=target_category)
    grayscale_cam = grayscale_cam[0, :]
    visualization = show_cam_on_image(img / 255.0, grayscale_cam, use_rgb=True)
    return visualization

# 普通热力图
img, img_tensor = preprocess_image('path_to_your_image.jpg')
visualization = get_gradcam_visualization(model, img_tensor, cam)

# 显示结果
import matplotlib.pyplot as plt
plt.imshow(visualization)
plt.show()
特定区域热力图
仅标签框内的热力图
def get_bounding_boxes(model, img_tensor):
    with torch.no_grad():
        output = model(img_tensor)
    boxes = output.xyxy[0].tolist()
    return boxes

def visualize_bounding_box_heatmap(img, boxes, visualization):
    for box in boxes:
        x1, y1, x2, y2 = int(box[0]), int(box[1]), int(box[2]), int(box[3])
        cropped_img = img[y1:y2, x1:x2]
        cropped_tensor = F.to_tensor(cropped_img).unsqueeze(0)
        cropped_visualization = get_gradcam_visualization(model, cropped_tensor, cam)
        img[y1:y2, x1:x2] = cropped_visualization
    return img

boxes = get_bounding_boxes(model, img_tensor)
heatmap_with_boxes = visualize_bounding_box_heatmap(img, boxes, visualization)
plt.imshow(heatmap_with_boxes)
plt.show()
去除红色以外区域的热力图
def remove_non_red_regions(visualization):
    lower_red = np.array([200, 0, 0], dtype="uint8")
    upper_red = np.array([255, 100, 100], dtype="uint8")
    mask = cv2.inRange(visualization, lower_red, upper_red)
    visualization[mask == 0] = [255, 255, 255]  # 将非红色区域变白或其他颜色
    return visualization

heatmap_without_non_red = remove_non_red_regions(visualization)
plt.imshow(heatmap_without_non_red)
plt.show()
完整代码
import cv2
import numpy as np
import torch
from torchvision.transforms import functional as F
from pytorch_grad_cam import GradCAM, ScoreCAM, GradCAMPlusPlus, AblationCAM, XGradCAM, EigenCAM, EigenGradCAM, LayerCAM
from pytorch_grad_cam.utils.image import show_cam_on_image
from models.experimental import attempt_load

# 加载YOLOv5模型
model = attempt_load('yolov5_weights.pt', map_location='cpu')
model.eval()

# 定义Grad-CAM类
target_layer = model.model[-1]
cam = GradCAM(model=model, target_layer=target_layer, use_cuda=True if torch.cuda.is_available() else False)

# 处理输入图像
def preprocess_image(img_path):
    img = cv2.imread(img_path)
    img = cv2.cvtColor(img, cv2.COLOR_BGR2RGB)
    img_tensor = F.to_tensor(img).unsqueeze(0)
    return img, img_tensor

# 获取热力图
def get_gradcam_visualization(model, img_tensor, cam_method, target_category=None):
    grayscale_cam = cam_method(input_tensor=img_tensor, target_category=target_category)
    grayscale_cam = grayscale_cam[0, :]
    visualization = show_cam_on_image(img / 255.0, grayscale_cam, use_rgb=True)
    return visualization

# 获取边界框
def get_bounding_boxes(model, img_tensor):
    with torch.no_grad():
        output = model(img_tensor)
    boxes = output.xyxy[0].tolist()
    return boxes

# 可视化边界框内的热力图
def visualize_bounding_box_heatmap(img, boxes, visualization):
    for box in boxes:
        x1, y1, x2, y2 = int(box[0]), int(box[1]), int(box[2]), int(box[3])
        cropped_img = img[y1:y2, x1:x2]
        cropped_tensor = F.to_tensor(cropped_img).unsqueeze(0)
        cropped_visualization = get_gradcam_visualization(model, cropped_tensor, cam)
        img[y1:y2, x1:x2] = cropped_visualization
    return img

# 去除非红色区域
def remove_non_red_regions(visualization):
    lower_red = np.array([200, 0, 0], dtype="uint8")
    upper_red = np.array([255, 100, 100], dtype="uint8")
    mask = cv2.inRange(visualization, lower_red, upper_red)
    visualization[mask == 0] = [255, 255, 255]
    return visualization

# 主程序
if __name__ == "__main__":
    img_path = 'path_to_your_image.jpg'
    img, img_tensor = preprocess_image(img_path)

    # 普通热力图
    visualization = get_gradcam_visualization(model, img_tensor, cam)
    plt.imshow(visualization)
    plt.show()

    # 仅标签框内的热力图
    boxes = get_bounding_boxes(model, img_tensor)
    heatmap_with_boxes = visualize_bounding_box_heatmap(img, boxes, visualization)
    plt.imshow(heatmap_with_boxes)
    plt.show()

    # 去除红色以外区域的热力图
    heatmap_without_non_red = remove_non_red_regions(visualization)
    plt.imshow(heatmap_without_non_red)
    plt.show()
展示了如何在YOLOv5中实现三种不同的热力图可视化,并且可以用于各种 YOLOv5模型以添加注意力机制和改进模型。
仅供参考。


 1648
1648

 被折叠的 条评论
为什么被折叠?
被折叠的 条评论
为什么被折叠?
 到【灌水乐园】发言


