


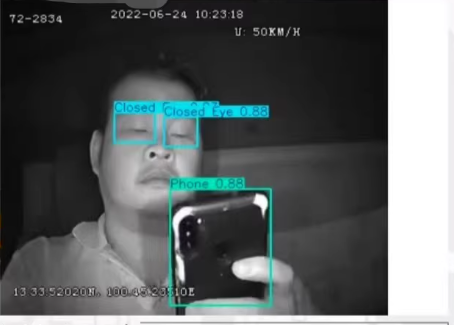
目标检测算法yolo训练疲劳驾驶行为检测数据集 基于深度学习YOLOv8的疲劳监测的系统 识别驾驶员行为中的 睁眼闭眼安全带吸烟玩手机进行识别监测
文章目录
以下文字及代码仅供参考。

同学,构建一个基于YOLOv8的疲劳监测系统,我们需要完成以下几个步骤:
- 数据准备:收集和标注数据集。
- 模型训练:使用YOLOv8进行模型训练。
- UI设计:使用PyQt5设计用户界面。
- 实时检测:集成模型到UI中,实现实时检测。
基本操作:准备
1. 数据准备
首先,同学 需要一个包含不同类别疲劳行为的数据集。你可以从公开数据集中获取,或者自己采集并标注数据。
标注工具
- 使用LabelImg等工具进行数据标注。

2. 模型训练
安装YOLOv8
git clone https://github.com/ultralytics/yolov8.git
cd yolov8
pip install -r requirements.txt
准备配置文件
在yolov8目录下创建data.yaml:
train: ./images/train
val: ./images/val
test: ./images/test

nc: 5  # number of classes
names: ['smoking', 'phone', 'open_eye', 'closed_eye', 'seatbelt']
训练模型
python train.py --img 640 --batch 16 --epochs 100 --data data.yaml --cfg cfg/training/yolov8n.yaml --weights yolov8n.pt --name yolov8_results
3. UI设计
使用PyQt5设计用户界面。
安装PyQt5
pip install PyQt5
创建主窗口
import sys
from PyQt5.QtWidgets import QApplication, QMainWindow, QLabel, QPushButton, QVBoxLayout, QWidget, QFileDialog, QMessageBox, QTableWidget, QTableWidgetItem
from PyQt5.QtGui import QPixmap, QImage
from PyQt5.QtCore import QTimer
import cv2
import numpy as np
from ultralytics import YOLO

class FatigueDetection(QMainWindow):
    def __init__(self):
        super().__init__()
        self.initUI()
        self.model = YOLO('best.pt')  # 加载训练好的模型

    def initUI(self):
        self.setWindowTitle("基于YOLOv8的疲劳检测系统")
        self.setGeometry(100, 100, 800, 600)

        self.label_image = QLabel(self)
        self.label_image.setText("请选择图片或打开摄像头")
        self.label_image.setAlignment(Qt.AlignCenter)

        self.button_load_image = QPushButton("选择图片", self)
        self.button_load_image.clicked.connect(self.load_image)

        self.button_load_video = QPushButton("选择视频", self)
        self.button_load_video.clicked.connect(self.load_video)

        self.button_camera = QPushButton("打开摄像头", self)
        self.button_camera.clicked.connect(self.open_camera)

        self.button_close_camera = QPushButton("关闭摄像头", self)
        self.button_close_camera.clicked.connect(self.close_camera)

        self.table = QTableWidget(self)
        self.table.setColumnCount(5)
        self.table.setHorizontalHeaderLabels(["序号", "文件路径", "类别", "置信度", "坐标位置"])

        layout = QVBoxLayout()
        layout.addWidget(self.label_image)
        layout.addWidget(self.button_load_image)
        layout.addWidget(self.button_load_video)
        layout.addWidget(self.button_camera)
        layout.addWidget(self.button_close_camera)
        layout.addWidget(self.table)

        container = QWidget()
        container.setLayout(layout)
        self.setCentralWidget(container)

        self.cap = None
        self.timer = None

    def load_image(self):
        options = QFileDialog.Options()
        file_name, _ = QFileDialog.getOpenFileName(self, "选择图片文件", "", "Image Files (*.jpg *.png)", options=options)
        if file_name:
            self.image_path = file_name
            self.detect_fatigue()

    def detect_fatigue(self):
        image = cv2.imread(self.image_path)
        results = self.model(image)
        annotated_frame = results[0].plot()
        height, width, channel = annotated_frame.shape
        bytes_per_line = 3 * width
        q_img = QImage(annotated_frame.data, width, height, bytes_per_line, QImage.Format_RGB888).rgbSwapped()
        self.label_image.setPixmap(QPixmap.fromImage(q_img))

        for result in results:
            boxes = result.boxes.xyxy.cpu().numpy()
            confidences = result.boxes.conf.cpu().numpy()
            classes = result.boxes.cls.cpu().numpy()
            for box, conf, cls in zip(boxes, confidences, classes):
                x_min, y_min, x_max, y_max = map(int, box)
                confidence = conf.item()
                class_name = self.model.names[int(cls)]
                self.table.insertRow(self.table.rowCount())
                self.table.setItem(self.table.rowCount() - 1, 0, QTableWidgetItem(str(self.table.rowCount())))
                self.table.setItem(self.table.rowCount() - 1, 1, QTableWidgetItem(self.image_path))
                self.table.setItem(self.table.rowCount() - 1, 2, QTableWidgetItem(class_name))
                self.table.setItem(self.table.rowCount() - 1, 3, QTableWidgetItem(f"{confidence:.2f}"))
                self.table.setItem(self.table.rowCount() - 1, 4, QTableWidgetItem(f"[{x_min}, {y_min}, {x_max}, {y_max}]"))

    def load_video(self):
        options = QFileDialog.Options()
        file_name, _ = QFileDialog.getOpenFileName(self, "选择视频文件", "", "Video Files (*.mp4 *.avi)", options=options)
        if file_name:
            self.video_path = file_name
            self.cap = cv2.VideoCapture(file_name)
            self.timer = QTimer(self)
            self.timer.timeout.connect(self.update_frame)
            self.timer.start(30)  # 每秒更新30帧

    def open_camera(self):
        self.cap = cv2.VideoCapture(0)
        self.timer = QTimer(self)
        self.timer.timeout.connect(self.update_frame)
        self.timer.start(30)  # 每秒更新30帧

    def close_camera(self):
        if self.cap is not None:
            self.timer.stop()
            self.cap.release()
            self.cap = None

    def update_frame(self):
        ret, frame = self.cap.read()
        if not ret:
            return
        results = self.model(frame)
        annotated_frame = results[0].plot()
        height, width, channel = annotated_frame.shape
        bytes_per_line = 3 * width
        q_img = QImage(annotated_frame.data, width, height, bytes_per_line, QImage.Format_RGB888).rgbSwapped()
        self.label_image.setPixmap(QPixmap.fromImage(q_img))

if __name__ == "__main__":
    app = QApplication(sys.argv)
    window = FatigueDetection()
    window.show()
    sys.exit(app.exec_())
4. 实时检测
在上述代码中,我们实现了以下功能:
- 选择图片文件。
- 选择视频文件。
- 打开摄像头。
- 关闭摄像头。
- 实时显示检测结果,并将结果展示在表格中。
关键代码解释
加载模型:
python
深色版本
self.model = YOLO('best.pt')  # 加载训练好的模型
检测图像:
python
深色版本
def detect_fatigue(self):
    image = cv2.imread(self.image_path)
    results = self.model(image)
    annotated_frame = results[0].plot()
    # 显示结果
实时检测:
python
深色版本
def update_frame(self):
    ret, frame = self.cap.read()
    if not ret:
        return
    results = self.model(frame)
    annotated_frame = results[0].plot()
    # 显示结果
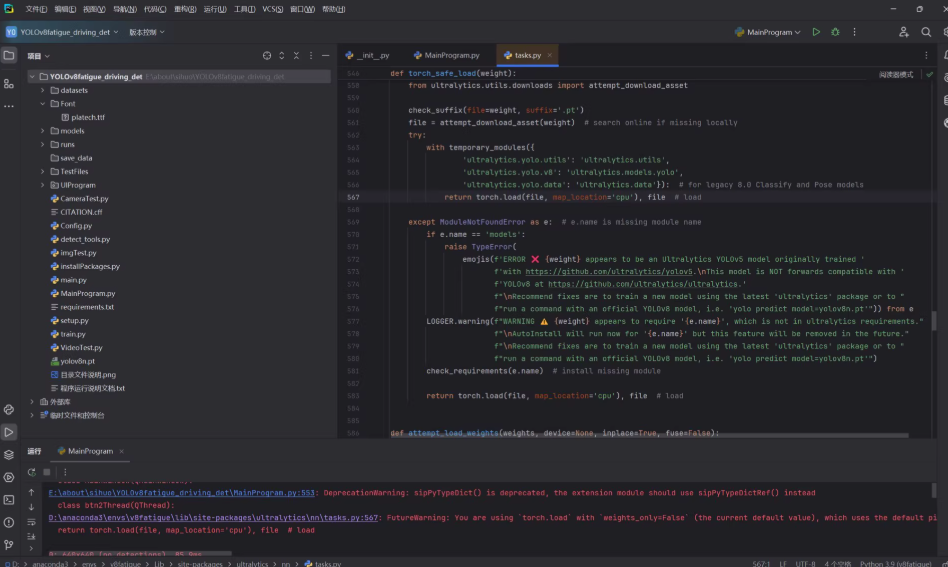
根据你提供的项目结构截图,我们可以看到项目的目录和文件组织。以下是详细的项目结构解释和关键代码片段:
项目结构
- YOLOv8fatigue_driving_det
- datasets: 存放数据集的目录。
- Font: 字体文件。
- models: 模型文件。
- runs: 训练结果和模型权重文件。
- save_data: 保存数据的目录。
- TestFiles: 测试文件。
- UIProgram: 用户界面程序文件。
- CameraTest.py: 相机测试脚本。
- CITATION.txt: 引用文件。
- Config.py: 配置文件。
- imgTest.py: 图像测试脚本。
- installPackages.txt: 安装包列表。
- main.py: 主程序入口。
- requirements.txt: 依赖包列表。
- setup.py: 设置脚本。
- train.py: 训练脚本。
- VideoTest.py: 视频测试脚本。
- yolov8n.pt: YOLOv8模型权重文件。
- init.py: 初始化文件。
- MainProgram.py: 主程序文件。
- tasks.py: 任务处理文件。
关键代码片段
MainProgram.py
# -*- coding: utf-8 -*-
import time
from PyQt5.QtWidgets import QApplication, QMainWindow, QFileDialog, \
    QMessageBox, QTableWidgetItem, QAbstractItemView
import sys
import os
from PIL import ImageFont
from ultralytics import YOLO
sys.path.append('UIProgram')
from UIProgram.QtMain import UI_MainWindow
from UIProgram.QtMain import Qt
import detect_tools as tools
import cv2
import Config
import imgTest
from UIProgram.QSSloader import QSSLoader
from UIProgram.process_bar import ProgressBar
import torch

class MainWindow(QMainWindow):
    def __init__(self, parent=None):
        super(MainWindow, self).__init__(parent)
        self.ui = UI_MainWindow()
        self.ui.setupUi(self)
        self.signalConnect()

        # 加载css自定义效果
        style_file = 'UIProgram/style.css'
        with open(style_file, 'r') as f:
            self.setStyleSheet(f.read())

        # 初始化模型
        self.model = YOLO('yolov8n.pt')

    def signalConnect(self):
        # 连接信号槽
        self.ui.pushButton_loadImage.clicked.connect(self.loadImage)
        self.ui.pushButton_start.clicked.connect(self.startDetection)
        self.ui.pushButton_stop.clicked.connect(self.stopDetection)

    def loadImage(self):
        options = QFileDialog.Options()
        file_name, _ = QFileDialog.getOpenFileName(self, "选择图片文件", "", "Image Files (*.jpg *.png)", options=options)
        if file_name:
            self.image_path = file_name
            self.updateImage()

    def updateImage(self):
        image = cv2.imread(self.image_path)
        results = self.model(image)
        annotated_frame = results[0].plot()
        height, width, channel = annotated_frame.shape
        bytes_per_line = 3 * width
        q_img = QImage(annotated_frame.data, width, height, bytes_per_line, QImage.Format_RGB888).rgbSwapped()
        self.ui.label_image.setPixmap(QPixmap.fromImage(q_img))

    def startDetection(self):
        self.cap = cv2.VideoCapture(0)
        self.timer = QTimer(self)
        self.timer.timeout.connect(self.updateFrame)
        self.timer.start(30)  # 每秒更新30帧

    def stopDetection(self):
        if self.cap is not None:
            self.timer.stop()
            self.cap.release()
            self.cap = None

    def updateFrame(self):
        ret, frame = self.cap.read()
        if not ret:
            return
        results = self.model(frame)
        annotated_frame = results[0].plot()
        height, width, channel = annotated_frame.shape
        bytes_per_line = 3 * width
        q_img = QImage(annotated_frame.data, width, height, bytes_per_line, QImage.Format_RGB888).rgbSwapped()
        self.ui.label_image.setPixmap(QPixmap.fromImage(q_img))

if __name__ == "__main__":
    app = QApplication(sys.argv)
    window = MainWindow()
    window.show()
    sys.exit(app.exec_())
解释
-
初始化模型:
self.model = YOLO('yolov8n.pt') -
加载图像:
def loadImage(self): options = QFileDialog.Options() file_name, _ = QFileDialog.getOpenFileName(self, "选择图片文件", "", "Image Files (*.jpg *.png)", options=options) if file_name: self.image_path = file_name self.updateImage() -
更新图像:
def updateImage(self): image = cv2.imread(self.image_path) results = self.model(image) annotated_frame = results[0].plot() height, width, channel = annotated_frame.shape bytes_per_line = 3 * width q_img = QImage(annotated_frame.data, width, height, bytes_per_line, QImage.Format_RGB888).rgbSwapped() self.ui.label_image.setPixmap(QPixmap.fromImage(q_img)) -
实时检测:
def startDetection(self):
    self.cap = cv2.VideoCapture(0)
    self.timer = QTimer(self)
    self.timer.timeout.connect(self.updateFrame)
    self.timer.start(30)  # 每秒更新30帧

def stopDetection(self):
    if self.cap is not None:
        self.timer.stop()
        self.cap.release()
        self.cap = None

def updateFrame(self):
    ret, frame = self.cap.read()
    if not ret:
        return
    results = self.model(frame)
    annotated_frame = results[0].plot()
    height, width, channel = annotated_frame.shape
    bytes_per_line = 3 * width
    q_img = QImage(annotated_frame.data, width, height, bytes_per_line, QImage.Format_RGB888).rgbSwapped()
    self.ui.label_image.setPixmap(QPixmap.fromImage(q_img))
总结
通过以上步骤,你可以构建一个基于YOLOv8的疲劳监测系统。这个系统包括数据准备、模型训练、UI设计和实时检测等功能。


 1340
1340

 被折叠的 条评论
为什么被折叠?
被折叠的 条评论
为什么被折叠?
 到【灌水乐园】发言


