


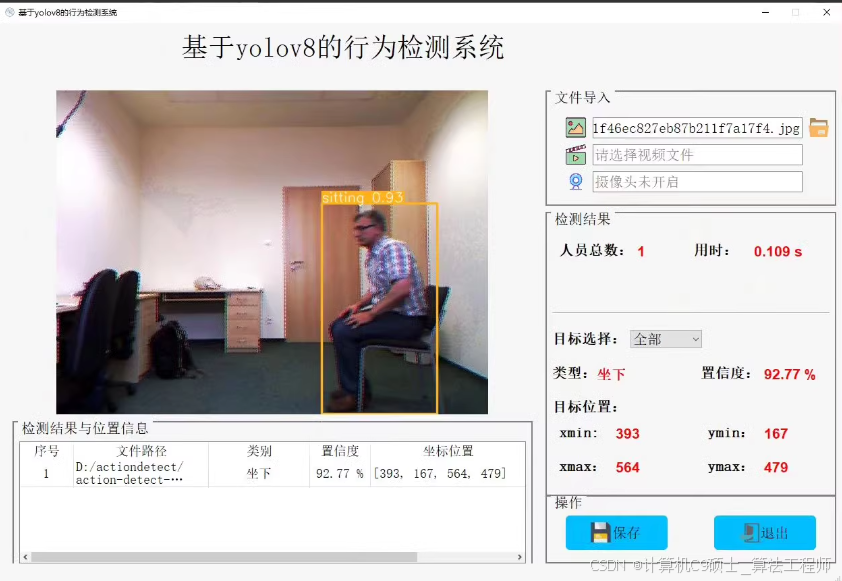
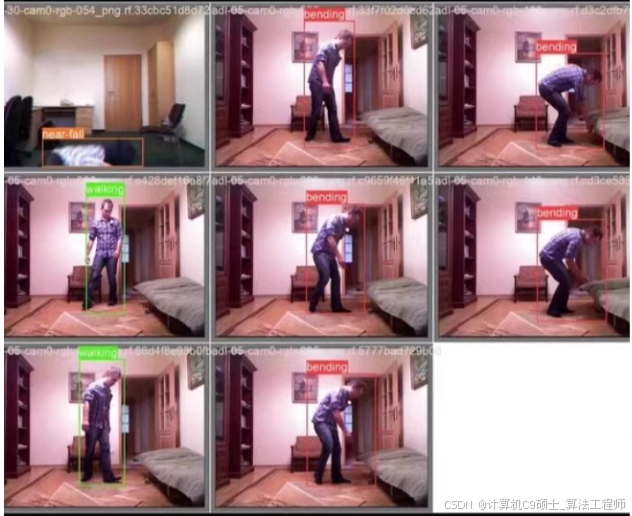
站立,行走,摔倒,弯腰,坐立进行识别
构建一个基于YOLOv8的人体动作识别系统,该系统能够通过GUI界面支持图片、视频和摄像头输入,并提供如打开摄像头、关闭摄像头、上传图片、开始识别等功能。以下是实现这个系统的步骤和代码示例。
1. 环境配置
首先,确保安装了必要的库:
pip install ultralytics opencv-python-headless streamlit torch torchvision
2. 数据准备与模型训练
识别6种人体动作(站立、行走、摔倒等)的预训练YOLOv8模型。,需要先准备数据集并进行模型训练。于如何使用已训练好的模型。
3. 构建GUI界面
我们将使用Streamlit来创建一个简单的Web应用作为我们的GUI界面。完整的示例代码,包括了打开摄像头、关闭摄像头、上传图片、开始识别、保存预测结果等功能。
Streamlit应用代码
import streamlit as st
from ultralytics import YOLO
import cv2
import numpy as np
from PIL import Image
import tempfile

# 加载YOLOv8模型
model = YOLO('yolov8n-pose.pt')  # 假设已经有一个针对人体动作识别微调过的模型

def process_image(image):
    results = model(image)
    for result in results:
        boxes = result.boxes.cpu().numpy()
        for box in boxes:
            r = box.xyxy[0].astype(int)
            conf = box.conf
            cls = int(box.cls)
            label = f'{model.names[cls]} {conf:.2f}'
            cv2.rectangle(image, (r[0], r[1]), (r[2], r[3]), (255, 0, 0), 2)
            cv2.putText(image, label, (r[0], r[1] - 10), cv2.FONT_HERSHEY_SIMPLEX, 0.5, (255, 0, 0), 2)
    return image

st.title("Human Action Recognition System")

option = st.sidebar.selectbox("Choose Input Type", ("Image", "Video", "Camera"))

if option == "Image":
    uploaded_file = st.file_uploader("Upload an image", type=['png', 'jpg'])
    if uploaded_file is not None:
        image = Image.open(uploaded_file)
        image = np.array(image)
        processed_image = process_image(image)
        st.image(processed_image, caption="Processed Image")
        if st.button('Save Result'):
            with tempfile.NamedTemporaryFile(delete=False, suffix=".jpg") as tmp_file:
                Image.fromarray(processed_image).save(tmp_file.name)
                st.write(f"Saved to {tmp_file.name}")

elif option == "Camera":
    run = st.checkbox('Open/Close Camera')
    FRAME_WINDOW = st.image([])
    camera = cv2.VideoCapture(0)

    while run:
        _, frame = camera.read()
        frame = cv2.cvtColor(frame, cv2.COLOR_BGR2RGB)
        processed_frame = process_image(frame)
        FRAME_WINDOW.image(processed_frame)
        if any([result.boxes.shape[0] > 0 for result in model(frame)]):
            with tempfile.NamedTemporaryFile(delete=False, suffix=".jpg") as tmp_file:
                Image.fromarray(processed_frame).save(tmp_file.name)
                st.write(f"Screenshot saved to {tmp_file.name}")
    else:
        camera.release()

elif option == "Video":
    uploaded_video = st.file_uploader("Upload a video", type=['mp4'])
    if uploaded_video is not None:
        tfile = tempfile.NamedTemporaryFile(delete=False)
        tfile.write(uploaded_video.read())
        cap = cv2.VideoCapture(tfile.name)

        while cap.isOpened():
            ret, frame = cap.read()
            if not ret:
                break
            frame = cv2.cvtColor(frame, cv2.COLOR_BGR2RGB)
            processed_frame = process_image(frame)
            st.video(processed_frame)
            if st.button('Save Video Result'):
                # 这里添加保存处理后视频的逻辑
                pass
        cap.release()
注意事项
- 上述代码中,
process_image函数用于处理输入图像或视频帧,并在图像上绘制检测到的目标及其标签。 - 对于视频和摄像头输入,由于Streamlit本身的限制,直接显示处理后的视频流可能会遇到性能问题。考虑使用其他框架(如Flask结合前端技术)可能更合适。
- 在实际部署时,可能需要根据具体需求调整UI设计和功能细节。
以上就是一个基本的基于YOLOv8的人体动作识别系统的设计思路及其实现代码。根据您的具体需求,您可以进一步扩展和优化这个系统。 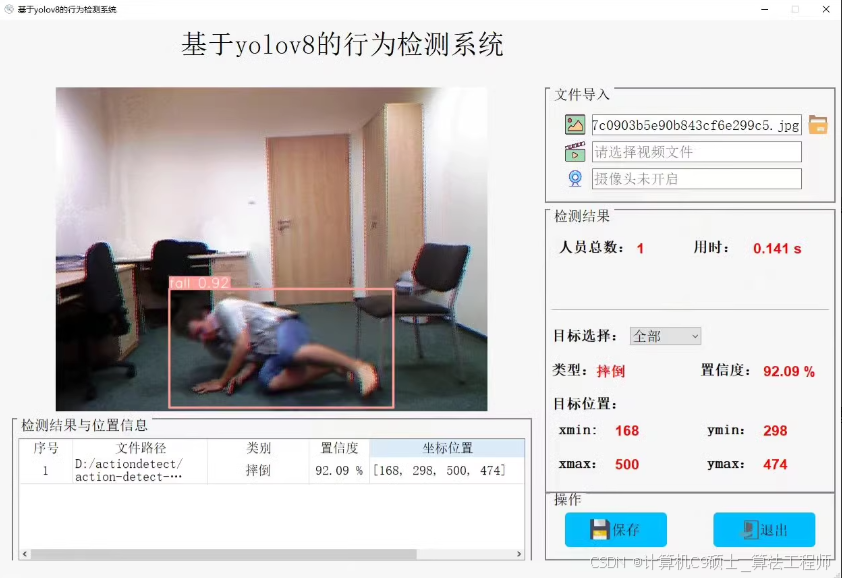 1
1
1

构建一个基于YOLOv8的人体动作识别系统,该系统能够通过GUI界面支持图片、视频和摄像头输入,并提供如打开摄像头、关闭摄像头、上传图片、开始识别等功能。以下是实现这个系统的步骤和代码示例。
1. 环境配置
首先,确保安装了必要的库:
pip install ultralytics opencv-python-headless streamlit torch torchvision
2. 数据准备与模型训练
假设您已经有了一个可以识别6种人体动作(站立、行走、摔倒等)的预训练YOLOv8模型。如果没有,需要先准备数据集并进行模型训练。这里不详细展开模型训练过程,重点在于如何使用已训练好的模型。
3. 构建GUI界面
我们将使用Streamlit来创建一个简单的Web应用作为我们的GUI界面。下面是一个完整的示例代码,包括了打开摄像头、关闭摄像头、上传图片、开始识别、保存预测结果等功能。
Streamlit应用代码
import streamlit as st
from ultralytics import YOLO
import cv2
import numpy as np
from PIL import Image
import tempfile

# 加载YOLOv8模型
model = YOLO('yolov8n-pose.pt')  # 假设已经有一个针对人体动作识别微调过的模型

def process_image(image):
    results = model(image)
    for result in results:
        boxes = result.boxes.cpu().numpy()
        for box in boxes:
            r = box.xyxy[0].astype(int)
            conf = box.conf
            cls = int(box.cls)
            label = f'{model.names[cls]} {conf:.2f}'
            cv2.rectangle(image, (r[0], r[1]), (r[2], r[3]), (255, 0, 0), 2)
            cv2.putText(image, label, (r[0], r[1] - 10), cv2.FONT_HERSHEY_SIMPLEX, 0.5, (255, 0, 0), 2)
    return image

st.title("Human Action Recognition System")

option = st.sidebar.selectbox("Choose Input Type", ("Image", "Video", "Camera"))

if option == "Image":
    uploaded_file = st.file_uploader("Upload an image", type=['png', 'jpg'])
    if uploaded_file is not None:
        image = Image.open(uploaded_file)
        image = np.array(image)
        processed_image = process_image(image)
        st.image(processed_image, caption="Processed Image")
        if st.button('Save Result'):
            with tempfile.NamedTemporaryFile(delete=False, suffix=".jpg") as tmp_file:
                Image.fromarray(processed_image).save(tmp_file.name)
                st.write(f"Saved to {tmp_file.name}")

elif option == "Camera":
    run = st.checkbox('Open/Close Camera')
    FRAME_WINDOW = st.image([])
    camera = cv2.VideoCapture(0)

    while run:
        _, frame = camera.read()
        frame = cv2.cvtColor(frame, cv2.COLOR_BGR2RGB)
        processed_frame = process_image(frame)
        FRAME_WINDOW.image(processed_frame)
        if any([result.boxes.shape[0] > 0 for result in model(frame)]):
            with tempfile.NamedTemporaryFile(delete=False, suffix=".jpg") as tmp_file:
                Image.fromarray(processed_frame).save(tmp_file.name)
                st.write(f"Screenshot saved to {tmp_file.name}")
    else:
        camera.release()

elif option == "Video":
    uploaded_video = st.file_uploader("Upload a video", type=['mp4'])
    if uploaded_video is not None:
        tfile = tempfile.NamedTemporaryFile(delete=False)
        tfile.write(uploaded_video.read())
        cap = cv2.VideoCapture(tfile.name)

        while cap.isOpened():
            ret, frame = cap.read()
            if not ret:
                break
            frame = cv2.cvtColor(frame, cv2.COLOR_BGR2RGB)
            processed_frame = process_image(frame)
            st.video(processed_frame)
            if st.button('Save Video Result'):
                # 这里添加保存处理后视频的逻辑
                pass
        cap.release()
注意事项
- 上述代码中,
process_image函数用于处理输入图像或视频帧,并在图像上绘制检测到的目标及其标签。 - 对于视频和摄像头输入,由于Streamlit本身的限制,直接显示处理后的视频流可能会遇到性能问题。考虑使用其他框架(如Flask结合前端技术)可能更合适。
- 在实际部署时,可能需要根据具体需求调整UI设计和功能细节。
以上就是一个基本的基于YOLOv8的人体动作识别系统的设计思路及其实现代码。根据您的具体需求,您可以进一步扩展和优化这个系统。


 5243
5243

 被折叠的 条评论
为什么被折叠?
被折叠的 条评论
为什么被折叠?
 到【灌水乐园】发言


