


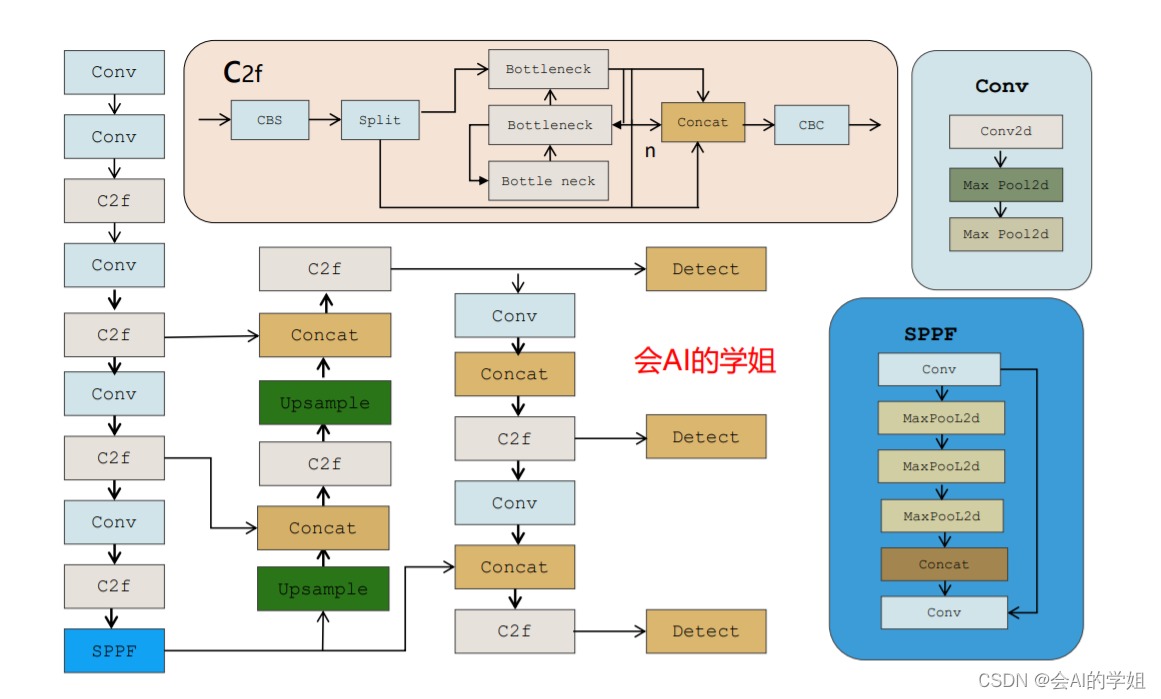
🚀🚀🚀本文改进:CBAM注意力,引入到YOLOv8,多种实现方式
🚀🚀🚀CBAM在不同检测领域中应用广泛
🚀🚀🚀YOLOv8改进专栏:http://t.csdnimg.cn/hGhVK
学姐带你学习YOLOv8,从入门到创新,轻轻松松搞定科研;
1.CBAM注意力介绍
论文地址:https://arxiv.org/pdf/1807.06521.pdf
摘要:我们提出了卷积块注意力模块(CBAM),这是一种用于前馈卷积神经网络的简单而有效的注意力模块。 给定中间特征图,我们的模块沿着两个独立的维度(通道和空间)顺序推断注意力图,然后将注意力图乘以输入特征图以进行自适应特征细化。 由于 CBAM 是一个轻量级通用模块,因此它可以无缝集成到任何 CNN 架构中,且开销可以忽略不计,并且可以与基础 CNN 一起进行端到端训练。 我们通过在 ImageNet-1K、MS COCO 检测和 VOC 2007 检测数据集上进行大量实验来验证我们的 CBAM。我们的实验显示各种模型在分类和检测性能方面的持续改进,证明了 CBAM 的广泛适用性。 代码和模型将公开。
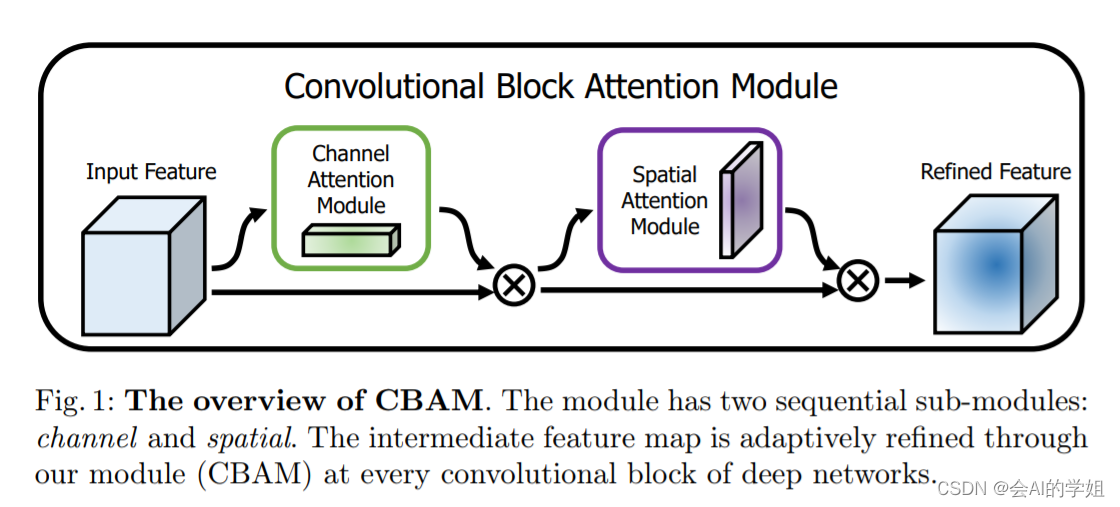
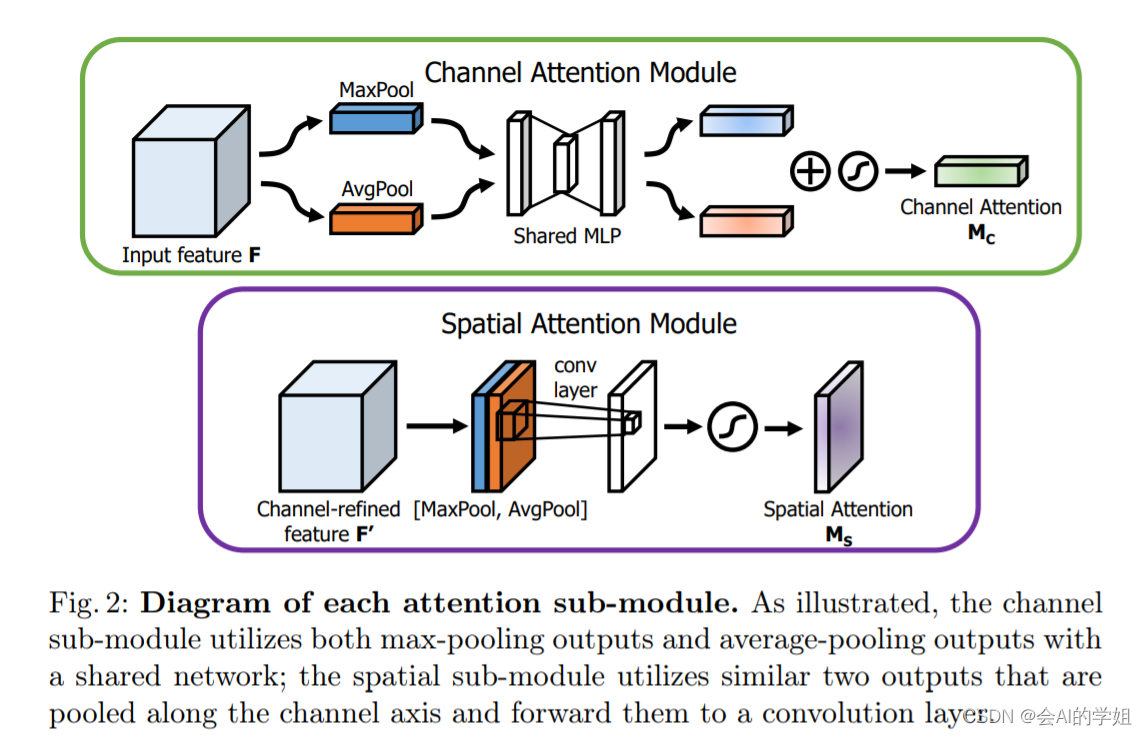
上图可以看到,CBAM包含CAM(Channel Attention Module)和SAM(Spartial Attention Module)两个子模块,分别进行通道和空间上的Attention。这样不只能够节约参数和计算力,并且保证了其能够做为即插即用的模块集成到现有的网络架构中去。
2.CBAM加入YOLOv8
2.1加入ultralytics/nn/attention/attention.py
###################### CBAM     ####     start    ###############################

import torch
import torch.nn as nn
from torch.nn import functional as F

class ChannelAttention(nn.Module):
    # Channel-attention module https://github.com/open-mmlab/mmdetection/tree/v3.0.0rc1/configs/rtmdet
    def __init__(self, channels: int) -> None:
        super().__init__()
        self.pool = nn.AdaptiveAvgPool2d(1)
        self.fc = nn.Conv2d(channels, channels, 1, 1, 0, bias=True)
        self.act = nn.Sigmoid()

    def forward(self, x: torch.Tensor) -> torch.Tensor:
        return x * self.act(self.fc(self.pool(x)))


class SpatialAttention(nn.Module):
    # Spatial-attention module
    def __init__(self, kernel_size=7):
        super().__init__()
        assert kernel_size in (3, 7), 'kernel size must be 3 or 7'
        padding = 3 if kernel_size == 7 else 1
        self.cv1 = nn.Conv2d(2, 1, kernel_size, padding=padding, bias=False)
        self.act = nn.Sigmoid()

    def forward(self, x):
        return x * self.act(self.cv1(torch.cat([torch.mean(x, 1, keepdim=True), torch.max(x, 1, keepdim=True)[0]], 1)))


class CBAM(nn.Module):
    # Convolutional Block Attention Module
    def __init__(self, c1, kernel_size=7):  # ch_in, kernels
        super().__init__()
        self.channel_attention = ChannelAttention(c1)
        self.spatial_attention = SpatialAttention(kernel_size)

    def forward(self, x):
        return self.spatial_attention(self.channel_attention(x))

###################### CBAM     ####     end    ###############################
2.2 修改tasks.py
首先CBAM进行注册
from ultralytics.nn.attention.attention import *函数def parse_model(d, ch, verbose=True): # model_dict, input_channels(3)进行修改
        #####attention  ####
        elif m in (CBAM,SimAM,MHSA,ECAAttention,TripletAttention,BAM,CoTAttention,PolarizedSelfAttention):
            c1, c2 = ch[f], args[0]
            if c2 != nc:
                c2 = make_divisible(min(c2, max_channels) * width, 8)
            args = [c1, *args[1:]]

        #####attention  ####
2.3 yaml实现
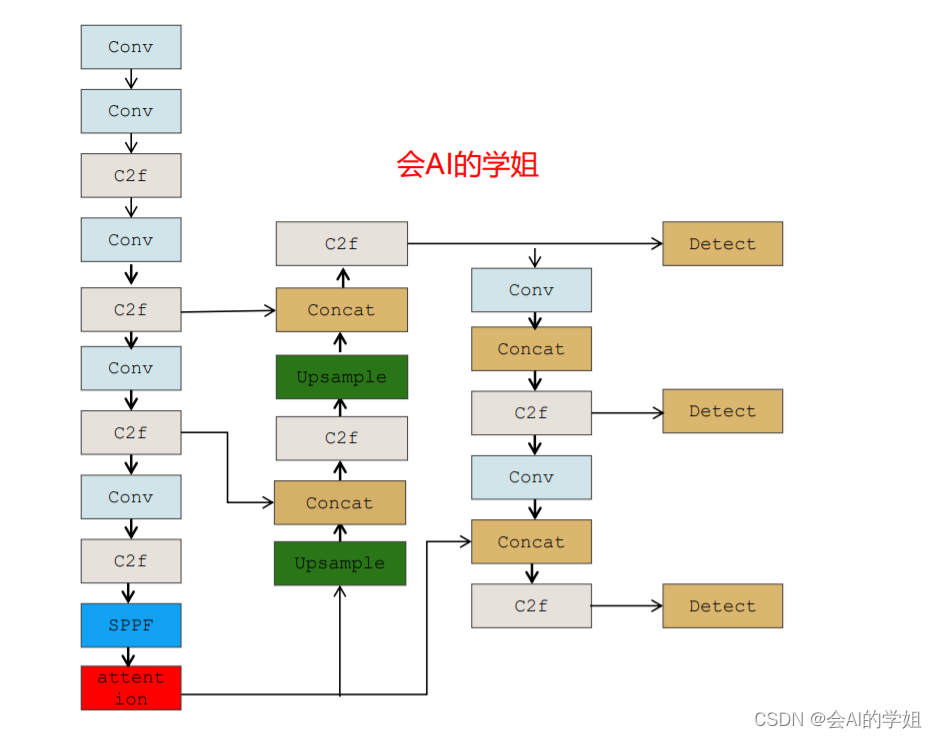
2.3.1 yolov8_CBAM.yaml
加入backbone SPPF后
# Ultralytics YOLO 🚀, AGPL-3.0 license
# YOLOv8 object detection model with P3-P5 outputs. For Usage examples see https://docs.ultralytics.com/tasks/detect

# Parameters
nc: 80  # number of classes
scales: # model compound scaling constants, i.e. 'model=yolov8n.yaml' will call yolov8.yaml with scale 'n'
  # [depth, width, max_channels]
  n: [0.33, 0.25, 1024]  # YOLOv8n summary: 225 layers,  3157200 parameters,  3157184 gradients,   8.9 GFLOPs
  s: [0.33, 0.50, 1024]  # YOLOv8s summary: 225 layers, 11166560 parameters, 11166544 gradients,  28.8 GFLOPs
  m: [0.67, 0.75, 768]   # YOLOv8m summary: 295 layers, 25902640 parameters, 25902624 gradients,  79.3 GFLOPs
  l: [1.00, 1.00, 512]   # YOLOv8l summary: 365 layers, 43691520 parameters, 43691504 gradients, 165.7 GFLOPs
  x: [1.00, 1.25, 512]   # YOLOv8x summary: 365 layers, 68229648 parameters, 68229632 gradients, 258.5 GFLOPs

# YOLOv8.0n backbone
backbone:
  # [from, repeats, module, args]
  - [-1, 1, Conv, [64, 3, 2]]  # 0-P1/2
  - [-1, 1, Conv, [128, 3, 2]]  # 1-P2/4
  - [-1, 3, C2f, [128, True]]
  - [-1, 1, Conv, [256, 3, 2]]  # 3-P3/8
  - [-1, 6, C2f, [256, True]]
  - [-1, 1, Conv, [512, 3, 2]]  # 5-P4/16
  - [-1, 6, C2f, [512, True]]
  - [-1, 1, Conv, [1024, 3, 2]]  # 7-P5/32
  - [-1, 3, C2f, [1024, True]]
  - [-1, 1, SPPF, [1024, 5]]  # 9
  - [-1, 1, CBAM, [1024]]  # 10

# YOLOv8.0n head
head:
  - [-1, 1, nn.Upsample, [None, 2, 'nearest']]
  - [[-1, 6], 1, Concat, [1]]  # cat backbone P4
  - [-1, 3, C2f, [512]]  # 13

  - [-1, 1, nn.Upsample, [None, 2, 'nearest']]
  - [[-1, 4], 1, Concat, [1]]  # cat backbone P3
  - [-1, 3, C2f, [256]]  # 16 (P3/8-small)

  - [-1, 1, Conv, [256, 3, 2]]
  - [[-1, 13], 1, Concat, [1]]  # cat head P4
  - [-1, 3, C2f, [512]]  # 19 (P4/16-medium)

  - [-1, 1, Conv, [512, 3, 2]]
  - [[-1, 10], 1, Concat, [1]]  # cat head P5
  - [-1, 3, C2f, [1024]]  # 22 (P5/32-large)

  - [[16, 19, 22], 1, Detect, [nc]]  # Detect(P3, P4, P5)
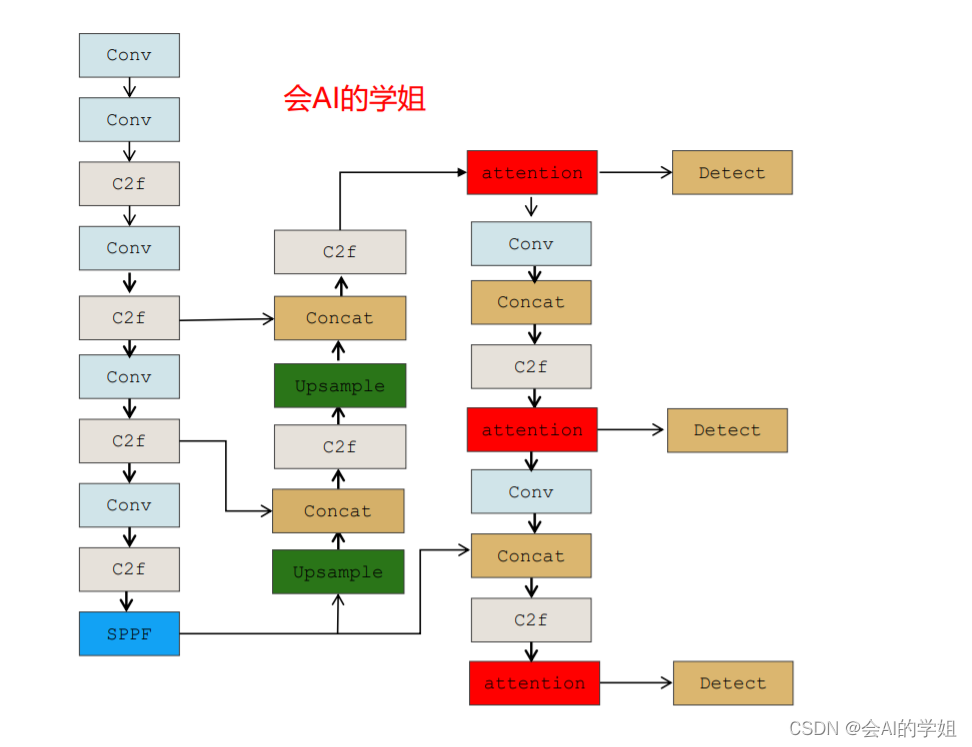
2.3.2 yolov8_CBAM2.yaml
neck里的连接Detect的3个C2f结合
# Ultralytics YOLO 🚀, AGPL-3.0 license
# YOLOv8 object detection model with P3-P5 outputs. For Usage examples see https://docs.ultralytics.com/tasks/detect

# Parameters
nc: 80  # number of classes
scales: # model compound scaling constants, i.e. 'model=yolov8n.yaml' will call yolov8.yaml with scale 'n'
  # [depth, width, max_channels]
  n: [0.33, 0.25, 1024]  # YOLOv8n summary: 225 layers,  3157200 parameters,  3157184 gradients,   8.9 GFLOPs
  s: [0.33, 0.50, 1024]  # YOLOv8s summary: 225 layers, 11166560 parameters, 11166544 gradients,  28.8 GFLOPs
  m: [0.67, 0.75, 768]   # YOLOv8m summary: 295 layers, 25902640 parameters, 25902624 gradients,  79.3 GFLOPs
  l: [1.00, 1.00, 512]   # YOLOv8l summary: 365 layers, 43691520 parameters, 43691504 gradients, 165.7 GFLOPs
  x: [1.00, 1.25, 512]   # YOLOv8x summary: 365 layers, 68229648 parameters, 68229632 gradients, 258.5 GFLOPs

# YOLOv8.0n backbone
backbone:
  # [from, repeats, module, args]
  - [-1, 1, Conv, [64, 3, 2]]  # 0-P1/2
  - [-1, 1, Conv, [128, 3, 2]]  # 1-P2/4
  - [-1, 3, C2f, [128, True]]
  - [-1, 1, Conv, [256, 3, 2]]  # 3-P3/8
  - [-1, 6, C2f, [256, True]]
  - [-1, 1, Conv, [512, 3, 2]]  # 5-P4/16
  - [-1, 6, C2f, [512, True]]
  - [-1, 1, Conv, [1024, 3, 2]]  # 7-P5/32
  - [-1, 3, C2f, [1024, True]]
  - [-1, 1, SPPF, [1024, 5]]  # 9

# YOLOv8.0n head
head:
  - [-1, 1, nn.Upsample, [None, 2, 'nearest']]
  - [[-1, 6], 1, Concat, [1]]  # cat backbone P4
  - [-1, 3, C2f, [512]]  # 12

  - [-1, 1, nn.Upsample, [None, 2, 'nearest']]
  - [[-1, 4], 1, Concat, [1]]  # cat backbone P3
  - [-1, 3, C2f, [256]]  # 15 (P3/8-small)
  - [-1, 1, CBAM, [256]]  # 16

  - [-1, 1, Conv, [256, 3, 2]]
  - [[-1, 12], 1, Concat, [1]]  # cat head P4
  - [-1, 3, C2f, [512]]  # 19 (P4/16-medium)
  - [-1, 1, CBAM, [512]]  # 20

  - [-1, 1, Conv, [512, 3, 2]]
  - [[-1, 9], 1, Concat, [1]]  # cat head P5
  - [-1, 3, C2f, [1024]]  # 23 (P5/32-large)
  - [-1, 1, CBAM, [1024]]  # 24

  - [[16, 20, 24], 1, Detect, [nc]]  # Detect(P3, P4, P5)
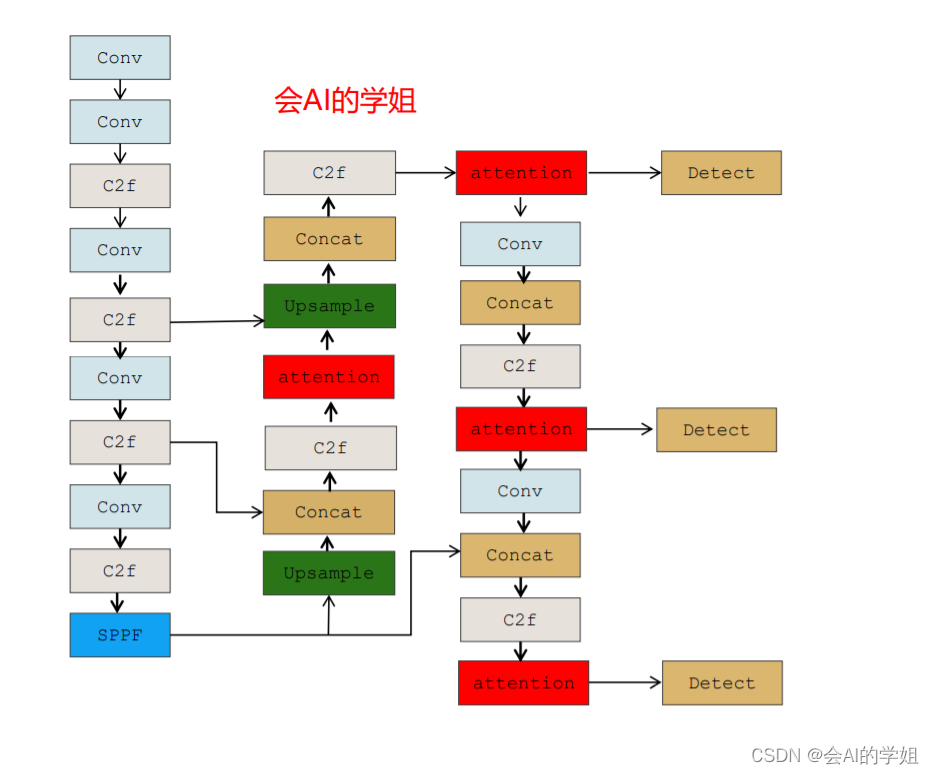
2.3.3 yolov8_CBAM3.yaml
放入neck的C2f后面
# Ultralytics YOLO 🚀, GPL-3.0 license
# YOLOv8 object detection model with P3-P5 outputs. For Usage examples see https://docs.ultralytics.com/tasks/detect

# Parameters
nc: 1  # number of classes
scales: # model compound scaling constants, i.e. 'model=yolov8n.yaml' will call yolov8.yaml with scale 'n'
  # [depth, width, max_channels]
  n: [0.33, 0.25, 1024]  # YOLOv8n summary: 225 layers,  3157200 parameters,  3157184 gradients,   8.9 GFLOPs
  s: [0.33, 0.50, 1024]  # YOLOv8s summary: 225 layers, 11166560 parameters, 11166544 gradients,  28.8 GFLOPs
  m: [0.67, 0.75, 768]   # YOLOv8m summary: 295 layers, 25902640 parameters, 25902624 gradients,  79.3 GFLOPs
  l: [1.00, 1.00, 512]   # YOLOv8l summary: 365 layers, 43691520 parameters, 43691504 gradients, 165.7 GFLOPs
  x: [1.00, 1.25, 512]   # YOLOv8x summary: 365 layers, 68229648 parameters, 68229632 gradients, 258.5 GFLOPs

# YOLOv8.0n backbone
backbone:
  # [from, repeats, module, args]
  - [-1, 1, Conv, [64, 3, 2]]  # 0-P1/2
  - [-1, 1, Conv, [128, 3, 2]]  # 1-P2/4
  - [-1, 3, C2f, [128, True]]
  - [-1, 1, Conv, [256, 3, 2]]  # 3-P3/8
  - [-1, 6, C2f, [256, True]]
  - [-1, 1, Conv, [512, 3, 2]]  # 5-P4/16
  - [-1, 6, C2f, [512, True]]
  - [-1, 1, Conv, [1024, 3, 2]]  # 7-P5/32
  - [-1, 3, C2f, [1024, True]]
  - [-1, 1, SPPF, [1024, 5]]  # 9

# YOLOv8.0n head
head:
  - [-1, 1, nn.Upsample, [None, 2, 'nearest']]
  - [[-1, 6], 1, Concat, [1]]  # cat backbone P4
  - [-1, 3, C2f, [512]]  # 12
  - [-1, 1, CBAM, [512]]  # 13

  - [-1, 1, nn.Upsample, [None, 2, 'nearest']]
  - [[-1, 4], 1, Concat, [1]]  # cat backbone P3
  - [-1, 3, C2f, [256]]  # 16 (P3/8-small)
  - [-1, 1, CBAM, [256]]  # 17 (P5/32-large)

  - [-1, 1, Conv, [256, 3, 2]]
  - [[-1, 13], 1, Concat, [1]]  # cat head P4
  - [-1, 3, C2f, [512]]  # 20 (P4/16-medium)
  - [-1, 1, CBAM, [512]]  # 21 (P5/32-large)

  - [-1, 1, Conv, [512, 3, 2]]
  - [[-1, 9], 1, Concat, [1]]  # cat head P5
  - [-1, 3, C2f, [1024]]  # 24 (P5/32-large)
  - [-1, 1, CBAM, [1024]]  # 25 (P5/32-large)

  - [[17, 21, 25], 1, Detect, [nc]]  # Detect(P3, P4, P5)


 5438
5438

 被折叠的 条评论
为什么被折叠?
被折叠的 条评论
为什么被折叠?
 到【灌水乐园】发言


