


1. CUDA中的grid和block基本的理解

Kernel: Kernel不是CPU,而是在GPU上运行的特殊函数。你可以把Kernel想象成GPU上并行执行的任务。当你从主机(CPU)调用Kernel时,它在GPU上启动,并在许多线程上并行运行。
Grid: 当你启动Kernel时,你会定义一个网格(grid)。网格是一维、二维或三维的,代表了block的集合。
Block: 每个block内部包含了许多线程。block也可以是一维、二维或三维的。
Thread: 每个线程是Kernel的单个执行实例。在一个block中的所有线程可以共享一些资源,并能够相互通信。
你正确地指出,grid、block和thread这些概念在硬件级别上并没有直接对应的实体,它们是抽象的概念,用于组织和管理GPU上的并行执行。然而,GPU硬件是专门设计来支持这种并行计算模型的,所以虽然线程在物理硬件上可能不是独立存在的,但是它们通过硬件架构和调度机制得到了有效的支持。
以上内容均出自《全搞定!基于TensorRT的CNN/Transformer/检测/BEV模型四大部署代码+CUDA加速!》


限时立减一百元!扫码加入学习,甩开差距!
另外,对于线程的管理和调度,GPU硬件有特定的线程调度单元,如NVIDIA的warp概念。线程被组织成更小的集合,称为warps(在NVIDIA硬件上),并且这些warps被调度到硬件上以供执行。
所以,虽然这些概念是逻辑和抽象的,但它们与硬件的实际执行密切相关,并由硬件特性和架构直接支持。
一般来说:
• 一个kernel对应一个grid
• 一个grid可以有多个block,一维~三维
• 一个block可以有多个thread,一维~三维
1.1. 1D traverse
void print_one_dim(){
    int inputSize = 8;
    int blockDim = 4;
    int gridDim = inputSize / blockDim; // 2

    // 定义block和grid的维度
    dim3 block(blockDim);  // 说明一个block有多少个threads
    dim3 grid(gridDim);    // 说明一个grid里面有多少个block

    /* 这里建议大家吧每一函数都试一遍*/
    print_idx_kernel<<<grid, block>>>();
    // print_dim_kernel<<<grid, block>>>();
    // print_thread_idx_per_block_kernel<<<grid, block>>>();
    // print_thread_idx_per_grid_kernel<<<grid, block>>>();

    cudaDeviceSynchronize();
}
我觉得重点在这两行
dim3 block(blockDim);: 这一行创建了一个三维向量block,用来定义每个block的大小。在这个例子中,blockDim是一个整数值4,所以每个block包含4个线程。dim3数据类型是CUDA中的一个特殊数据类型,用于表示三维向量。在这个情况下,你传递了一个整数值,所以block的其余维度将被默认设置为1。这意味着你将有一个包含4个线程的一维block。dim3 grid(gridDim);: 这一行创建了一个三维向量grid,用来定义grid的大小。gridDim的计算基于输入大小(inputSize)和每个block的大小(blockDim)。在这个例子中,inputSize是8,blockDim是4,所以gridDim会是2。这意味着整个grid将包含2个block。与block一样,你传递了一个整数值给grid,所以其余维度将被默认设置为1,得到一个一维grid。
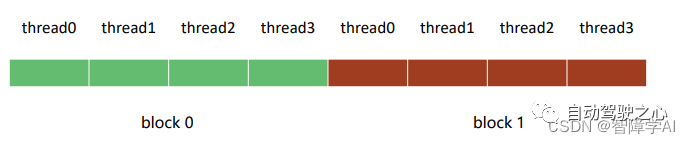
总体来说,这两行代码定义了内核的执行配置,将整个计算空间划分为2个block,每个block包含4个线程。你可以想象这个配置如下:
Block 0: 线程0, 线程1, 线程2, 线程3
Block 1: 线程4, 线程5, 线程6, 线程7
然后,当你调用内核时,这些线程将被用来执行你的代码。每个线程可以通过其线程索引和block索引来访问自己在整个grid中的唯一位置。这些索引用于确定每个线程应处理的数据部分。
block idx:   1, thread idx in block:   0, thread idx:   4
block idx:   1, thread idx in block:   1, thread idx:   5
block idx:   1, thread idx in block:   2, thread idx:   6
block idx:   1, thread idx in block:   3, thread idx:   7
block idx:   0, thread idx in block:   0, thread idx:   0
block idx:   0, thread idx in block:   1, thread idx:   1
block idx:   0, thread idx in block:   2, thread idx:   2
block idx:   0, thread idx in block:   3, thread idx:   3
1.2 2D打印
// 8个线程被分成了两个
void print_two_dim(){
    int inputWidth = 4;

    int blockDim = 2;
    int gridDim = inputWidth / blockDim;

    dim3 block(blockDim, blockDim);
    dim3 grid(gridDim, gridDim);

    /* 这里建议大家吧每一函数都试一遍*/
    // print_idx_kernel<<<grid, block>>>();
    // print_dim_kernel<<<grid, block>>>();
    // print_thread_idx_per_block_kernel<<<grid, block>>>();
    print_thread_idx_per_grid_kernel<<<grid, block>>>();

    cudaDeviceSynchronize();
}
dim3 block(blockDim, blockDim);: 这里创建了一个二维的block,每个维度的大小都是blockDim,在这个例子中是2。因此,每个block都是2x2的,包含4个线程。由于dim3定义了一个三维向量,没有指定的第三维度会默认为1。dim3 grid(gridDim, gridDim);: 同样,grid也被定义为二维的,每个维度的大小都是gridDim。由于inputWidth是4,并且blockDim是2,所以gridDim会是2。因此,整个grid是2x2的,包括4个block。第三维度同样默认为1。
因此,整个执行配置定义了2x2的grid,其中包括4个2x2的block,总共16个线程。你可以将整个grid可视化如下:
Block (0,0):
线程(0,0), 线程(0,1)
线程(1,0), 线程(1,1)
Block (0,1):
线程(2,0), 线程(2,1)
线程(3,0), 线程(3,1)
Block (1,0):
线程(4,0), 线程(4,1)
线程(5,0), 线程(5,1)
Block (1,1):
线程(6,0), 线程(6,1)
线程(7,0), 线程(7,1)
输出中的“block idx”是整个grid中block的线性索引,而“thread idx in block”是block内线程的线性索引。最后的“thread idx”是整个grid中线程的线性索引。
请注意,执行的顺序仍然是不确定的。你看到的输出顺序可能在不同的运行或不同的硬件上有所不同。
block idx:   3, thread idx in block:   0, thread idx:  12
block idx:   3, thread idx in block:   1, thread idx:  13
block idx:   3, thread idx in block:   2, thread idx:  14
block idx:   3, thread idx in block:   3, thread idx:  15
block idx:   2, thread idx in block:   0, thread idx:   8
block idx:   2, thread idx in block:   1, thread idx:   9
block idx:   2, thread idx in block:   2, thread idx:  10
block idx:   2, thread idx in block:   3, thread idx:  11
block idx:   1, thread idx in block:   0, thread idx:   4
block idx:   1, thread idx in block:   1, thread idx:   5
block idx:   1, thread idx in block:   2, thread idx:   6
block idx:   1, thread idx in block:   3, thread idx:   7
block idx:   0, thread idx in block:   0, thread idx:   0
block idx:   0, thread idx in block:   1, thread idx:   1
block idx:   0, thread idx in block:   2, thread idx:   2
block idx:   0, thread idx in block:   3, thread idx:   3
1.3 3D grid
dim3 block(3, 4, 2);
dim3 grid(2, 2, 2);
Block布局 (
dim3 block(3, 4, 2)):
这定义了每个block的大小为3x4x2,所以每个block包含24个线程。
你可以将block视为三维数组,其中
x方向有3个元素,y方向有4个元素,z方向有2个元素。
Grid布局 (dim3 grid(2, 2, 2)):
这定义了grid的大小为2x2x2,所以整个grid包含8个block。
你可以将grid视为三维数组,其中
x方向有2个元素,y方向有2个元素,z方向有2个元素。由于每个block包括24个线程,所以整个grid将包括192个线程。
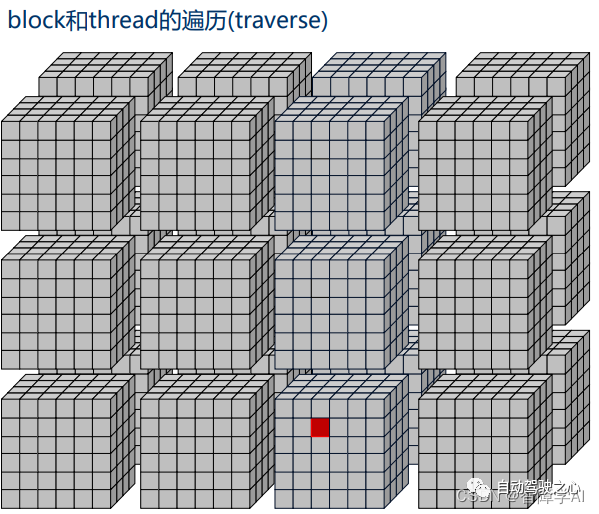
整体布局可以视为8个3x4x2的block,排列为2x2x2的grid。
如果我们想用文字来表示整个结构,可能会是这样的:
Grid[0][0][0]:
Block(3, 4, 2) -- 24个线程
Grid[0][0][1]:
Block(3, 4, 2) -- 24个线程
Grid[0][1][0]:
Block(3, 4, 2) -- 24个线程
Grid[0][1][1]:
Block(3, 4, 2) -- 24个线程
Grid[1][0][0]:
Block(3, 4, 2) -- 24个线程
Grid[1][0][1]:
Block(3, 4, 2) -- 24个线程
Grid[1][1][0]:
Block(3, 4, 2) -- 24个线程
Grid[1][1][1]:
Block(3, 4, 2) -- 24个线程
这种三维结构允许在物理空间中进行非常自然的映射,尤其是当你的问题本身就具有三维的特性时。例如,在处理三维物理模拟或体素数据时,这种映射可能非常有用。
1.4. 通过维度打印出来对应的thread
比较推荐的打印方式
__global__ void print_cord_kernel(){
    int index = threadIdx.z * blockDim.x * blockDim.y + \
              threadIdx.y * blockDim.x + \
              threadIdx.x;

    int x  = blockIdx.x * blockDim.x + threadIdx.x;
    int y  = blockIdx.y * blockDim.y + threadIdx.y;

    printf("block idx: (%3d, %3d, %3d), thread idx: %3d, cord: (%3d, %3d)\n",
         blockIdx.z, blockIdx.y, blockIdx.x,
         index, x, y);
}
index是线程索引的问题,首先,考虑z维度。对于每一层z,都有blockDim.x * blockDim.y个线程。所以threadIdx.z乘以该数量给出了前面层中的线程总数,从图上看也就是越过了多少个方块
然后,考虑y维度。对于每一行y,都有blockDim.x个线程。所以threadIdx.y乘以该数量给出了当前层中前面行的线程数,也就是在当前方块的xy面我们走了几个y, 几行
最后加上thread x完成索引的坐标
void print_cord(){
    int inputWidth = 4;

    int blockDim = 2;
    int gridDim = inputWidth / blockDim;

    dim3 block(blockDim, blockDim);
    dim3 grid(gridDim, gridDim);

    print_cord_kernel<<<grid, block>>>();
    // print_thread_idx_per_grid_kernel<<<grid, block>>>();
    cudaDeviceSynchronize();
}
block idx: ( 0, 1, 0), thread idx: 0, cord: ( 0, 2)
block idx: ( 0, 1, 0), thread idx: 1, cord: ( 1, 2)
block idx: ( 0, 1, 0), thread idx: 2, cord: ( 0, 3)
block idx: ( 0, 1, 0), thread idx: 3, cord: ( 1, 3)
block idx: ( 0, 1, 1), thread idx: 0, cord: ( 2, 2)
block idx: ( 0, 1, 1), thread idx: 1, cord: ( 3, 2)
block idx: ( 0, 1, 1), thread idx: 2, cord: ( 2, 3)
block idx: ( 0, 1, 1), thread idx: 3, cord: ( 3, 3)
block idx: ( 0, 0, 1), thread idx: 0, cord: ( 2, 0)
block idx: ( 0, 0, 1), thread idx: 1, cord: ( 3, 0)
block idx: ( 0, 0, 1), thread idx: 2, cord: ( 2, 1)
block idx: ( 0, 0, 1), thread idx: 3, cord: ( 3, 1)
block idx: ( 0, 0, 0), thread idx: 0, cord: ( 0, 0)
block idx: ( 0, 0, 0), thread idx: 1, cord: ( 1, 0)
block idx: ( 0, 0, 0), thread idx: 2, cord: ( 0, 1)
block idx: ( 0, 0, 0), thread idx: 3, cord: ( 1, 1)跟之前2D的一样, 同样看起来有点乱,是因为是异步执行的
1.5 最后看一个多个grid的案例
void print_coordinates() {
    dim3 block(3, 4, 2);
    dim3 grid(2, 2, 2);

    print_cord_kernel<<<grid, block>>>();

    cudaDeviceSynchronize(); // 确保内核完成后才继续执行主机代码
}
block idx: ( 0, 1, 0), thread idx: 0, cord: ( 0, 4)
block idx: ( 0, 1, 0), thread idx: 1, cord: ( 1, 4)
block idx: ( 0, 1, 0), thread idx: 2, cord: ( 2, 4)
block idx: ( 0, 1, 0), thread idx: 3, cord: ( 0, 5)
block idx: ( 0, 1, 0), thread idx: 4, cord: ( 1, 5)
block idx: ( 0, 1, 0), thread idx: 5, cord: ( 2, 5)
block idx: ( 0, 1, 0), thread idx: 6, cord: ( 0, 6)
block idx: ( 0, 1, 0), thread idx: 7, cord: ( 1, 6)
block idx: ( 0, 1, 0), thread idx: 8, cord: ( 2, 6)
block idx: ( 0, 1, 0), thread idx: 9, cord: ( 0, 7)
block idx: ( 0, 1, 0), thread idx: 10, cord: ( 1, 7)
block idx: ( 0, 1, 0), thread idx: 11, cord: ( 2, 7)
block idx: ( 0, 1, 0), thread idx: 12, cord: ( 0, 4)
block idx: ( 0, 1, 0), thread idx: 13, cord: ( 1, 4)
block idx: ( 0, 1, 0), thread idx: 14, cord: ( 2, 4)
block idx: ( 0, 1, 0), thread idx: 15, cord: ( 0, 5)
block idx: ( 0, 1, 0), thread idx: 16, cord: ( 1, 5)
block idx: ( 0, 1, 0), thread idx: 17, cord: ( 2, 5)
block idx: ( 0, 1, 0), thread idx: 18, cord: ( 0, 6)
block idx: ( 0, 1, 0), thread idx: 19, cord: ( 1, 6)
block idx: ( 0, 1, 0), thread idx: 20, cord: ( 2, 6)
block idx: ( 0, 1, 0), thread idx: 21, cord: ( 0, 7)
block idx: ( 0, 1, 0), thread idx: 22, cord: ( 1, 7)
block idx: ( 0, 1, 0), thread idx: 23, cord: ( 2, 7)
block idx: ( 1, 1, 1), thread idx: 0, cord: ( 3, 4)
block idx: ( 1, 1, 1), thread idx: 1, cord: ( 4, 4)
block idx: ( 1, 1, 1), thread idx: 2, cord: ( 5, 4)
block idx: ( 1, 1, 1), thread idx: 3, cord: ( 3, 5)
block idx: ( 1, 1, 1), thread idx: 4, cord: ( 4, 5)
block idx: ( 1, 1, 1), thread idx: 5, cord: ( 5, 5)
block idx: ( 1, 1, 1), thread idx: 6, cord: ( 3, 6)
block idx: ( 1, 1, 1), thread idx: 7, cord: ( 4, 6)
block idx: ( 1, 1, 1), thread idx: 8, cord: ( 5, 6)
block idx: ( 1, 1, 1), thread idx: 9, cord: ( 3, 7)
block idx: ( 1, 1, 1), thread idx: 10, cord: ( 4, 7)
block idx: ( 1, 1, 1), thread idx: 11, cord: ( 5, 7)
block idx: ( 1, 1, 1), thread idx: 12, cord: ( 3, 4)
block idx: ( 1, 1, 1), thread idx: 13, cord: ( 4, 4)
block idx: ( 1, 1, 1), thread idx: 14, cord: ( 5, 4)
block idx: ( 1, 1, 1), thread idx: 15, cord: ( 3, 5)
block idx: ( 1, 1, 1), thread idx: 16, cord: ( 4, 5)
block idx: ( 1, 1, 1), thread idx: 17, cord: ( 5, 5)
block idx: ( 1, 1, 1), thread idx: 18, cord: ( 3, 6)
block idx: ( 1, 1, 1), thread idx: 19, cord: ( 4, 6)
block idx: ( 1, 1, 1), thread idx: 20, cord: ( 5, 6)
block idx: ( 1, 1, 1), thread idx: 21, cord: ( 3, 7)
block idx: ( 1, 1, 1), thread idx: 22, cord: ( 4, 7)
block idx: ( 1, 1, 1), thread idx: 23, cord: ( 5, 7)
block idx: ( 0, 1, 1), thread idx: 0, cord: ( 3, 4)
block idx: ( 0, 1, 1), thread idx: 1, cord: ( 4, 4)
block idx: ( 0, 1, 1), thread idx: 2, cord: ( 5, 4)
block idx: ( 0, 1, 1), thread idx: 3, cord: ( 3, 5)
block idx: ( 0, 1, 1), thread idx: 4, cord: ( 4, 5)
block idx: ( 0, 1, 1), thread idx: 5, cord: ( 5, 5)
block idx: ( 0, 1, 1), thread idx: 6, cord: ( 3, 6)
block idx: ( 0, 1, 1), thread idx: 7, cord: ( 4, 6)
block idx: ( 0, 1, 1), thread idx: 8, cord: ( 5, 6)
block idx: ( 0, 1, 1), thread idx: 9, cord: ( 3, 7)
block idx: ( 0, 1, 1), thread idx: 10, cord: ( 4, 7)
block idx: ( 0, 1, 1), thread idx: 11, cord: ( 5, 7)
block idx: ( 0, 1, 1), thread idx: 12, cord: ( 3, 4)
block idx: ( 0, 1, 1), thread idx: 13, cord: ( 4, 4)
block idx: ( 0, 1, 1), thread idx: 14, cord: ( 5, 4)
block idx: ( 0, 1, 1), thread idx: 15, cord: ( 3, 5)
block idx: ( 0, 1, 1), thread idx: 16, cord: ( 4, 5)
block idx: ( 0, 1, 1), thread idx: 17, cord: ( 5, 5)
block idx: ( 0, 1, 1), thread idx: 18, cord: ( 3, 6)
block idx: ( 0, 1, 1), thread idx: 19, cord: ( 4, 6)
block idx: ( 0, 1, 1), thread idx: 20, cord: ( 5, 6)
block idx: ( 0, 1, 1), thread idx: 21, cord: ( 3, 7)
block idx: ( 0, 1, 1), thread idx: 22, cord: ( 4, 7)
block idx: ( 0, 1, 1), thread idx: 23, cord: ( 5, 7)
block idx: ( 1, 0, 0), thread idx: 0, cord: ( 0, 0)
block idx: ( 1, 0, 0), thread idx: 1, cord: ( 1, 0)
block idx: ( 1, 0, 0), thread idx: 2, cord: ( 2, 0)2. 对比GPU 和 CPU的矩阵乘法的结果
这里对比一下1024x1024的矩阵相乘的速度,下面是对main函数分段的解析
2.1 CPU上的矩阵相乘的方法
cpu的办法会简单一些
void MatmulOnHost(float *M, float *N, float *P, int width)
{
    for (int i = 0; i < width; i ++)
    {
        for (int j = 0; j < width; j++)
        {
            float sum = 0;
            for (int k = 0; k < width; k ++)
            {
                // M的行乘N的列, 这个循环M行每一个乘N的一个
                float a = M[i * width + k];
                float b = N[k * width + j];
                sum += a * b;
            }
            P[i * width + j] = sum;   //
        }
    }
}
2.2 GPU举证相乘的流程
MatmulOnDevice() 是给cpp文件调用的 MatmulKernel()用来写
看一下函数的输入, case里面width设置的是1024, M_host, h_host都是1024x1024的矩阵, 填充是0-1之前的浮点数, 这里假设矩阵相乘都是方阵的(height = width)
#ifndef MATMUL_GPU_BASIC_H
#define MATMUL_GPU_BASIC_H

// CUDA运行时库
#include "cuda_runtime.h"
#include "cuda.h"

// 函数声明

/**
 * 用于矩阵乘法的CUDA内核函数。
 *
 * @param M_device 指向设备上第一个矩阵的指针。
 * @param N_device 指向设备上第二个矩阵的指针。
 * @param P_device 指向设备上输出矩阵的指针。
 * @param width 矩阵的宽度(假设是方阵)。
 */
__global__ void MatmulKernel(float *M_device, float *N_device, float *P_device, int width);

/**
 * 在设备上执行两个矩阵相乘的主机函数。
 *
 * @param M_host 指向主机上第一个矩阵的指针。
 * @param N_host 指向主机上第二个矩阵的指针。
 * @param P_host 指向主机上输出矩阵的指针。
 * @param width 矩阵的宽度(假设是方阵)。
 * @param blockSize CUDA块的大小。
 */
void MatmulOnDevice(float *M_host, float *N_host, float* P_host, int width, int blockSize);

#endif // MATMUL_GPU_BASIC_H
MatmulOnDevice()
- 设置size, 矩阵大小, 用来分配内存
- 分配GPU内存,输入输出
-  设置grid, block的布局
在之前的Grid, Block布局分析中提到过, block和grid的布局最好跟计算的内容是一致的, 例如说图像和这里的矩阵是2D, 所以block的中的线程设置是2D, 一个block里面包含16x16=256, 32x32=1024个线程, 然后grid里面包含多少个block是基于这个计算出来的, 可以做一个向上取整确保有足够的线程计算
设计布局的时候,如果处理的是矩阵,或者是二维度的图像, 先设计好好block里面的线程规划,然后基于这个设计好grid中的block规划
这里的设计方案就是把一个矩阵切分成多个block来计算, 这里的case是1024x1024的, 用blockSize = 32 刚好够, 如果用16的话就是把1024x1024分成多个
这里其实就是计算每一个线程的计算, 之前知道, 这里会堆出一大堆线程索引例如说(0, 0, 1)....(2, 1, 2) 对应的是第2个block块, x = 1, y = 2 的线程, 这些线程会同时计算但是并不会按顺序计算, 所以后面会有一个同步等待其他的线程一次性做完这些操作
void MatmulOnDevice(float *M_host, float *N_host,
                    float* P_host, int width, int blockSize)
{
    /*
    M_host: First Matrix ptr at host
    h_host: second matrix ptr at host
    P_host: output matrix ptr at host
    */
   // 设置矩阵尺寸
    int size = width * width* sizeof(float);
    // 开辟GPU内存
    float *M_device;
    float *N_device;
    float *P_device;

    cudaMalloc(&M_device, size);
    cudaMalloc(&N_device, size);
    cudaMalloc(&P_device, size);

    // 把输入输出的矩阵信息从host搬到device
    cudaMemcpy(M_device, M_host, size, cudaMemcpyHostToDevice);
    cudaMemcpy(N_device, N_host,  size, cudaMemcpyHostToDevice);

    // 分配grid, block
    dim3 dimBlock(blockSize, blockSize);
    int gridDim = (width + blockSize - 1) / blockSize;
    dim3 dimGrid(gridDim, gridDim);

    // 调用kernel function计算
    MatmulKernel<<<dimGrid, dimBlock>>>(M_device, N_device, P_device, width);

    // 计算结果从device搬到host
    cudaMemcpy(P_host, P_device, size , cudaMemcpyDeviceToHost);

    // 等待全部线程完成计算
    cudaDeviceSynchronize();

    // Free
    cudaFree(P_device);
    cudaFree(M_device);
    cudaFree(N_device);

}
MatmulKernel()
这里的int x, int y是一个数字, 因为在GPU上的内存是连续的, 我们之前分配的block, grid就是用来管理我自己的理解是索引写完就拿一个case出来写一个线程的计算, 写完就明白了。
以这个case为例,总共有1024x1024个元素需要处理, 如果blockSize设置的是32, 每个block里面就有32x32=1024个线程处理这个项目, 根据计算就有(32, 32)个block, 也就是1024个
M_element, N_element, p_element属于是每一个线程的局部变量, P_element在每一个线程都会有0, 然后M_element, N_element, P_device的数都是通过
这里以(3, 2) 为案例, 就可以很好理解下面的M_element, N_element, p_element。
__global__ void MatmulKernel(float *M_device, float *N_device, float *P_device, int width){
    /*
        我们设定每一个thread负责P中的一个坐标的matmul
        所以一共有width * width个thread并行处理P的计算
    */
    int x = blockIdx.x * blockDim.x + threadIdx.x;
    int y = blockIdx.y * blockDim.y + threadIdx.y;

    float P_element = 0;
    for (int k = 0; k < width; k++){
        float M_element = M_device[y * width + k]; // 行
        float N_element = N_device[k * width + x]; // 列
        P_element += M_element * N_element;  // 这个结束就是行列相乘
    }

    P_device[y * width + x] = P_element; // 第几行 + 第几列
}
2.3 实验测试
我自己这边跟韩导的实验结果不一样,他的卡上面实现了一个1500倍的加速但是我这边实现的是414倍的加速,在blockSize = 16的情况下实现的, 这里也说明了blockSize不是越大越好的
matmul in cpu                  uses 4149.35 ms
matmul in GPU Warmup           uses 173.9 ms
matmul in GPU blockSize = 16   uses 9.90609 ms
matmul in GPU blockSize = 32   uses 13.2933 ms
Matmul result is same, precision is 1.0E-4
3. CUDA Error Handle和获取信息
一个良好的cuda编程习惯里,我们习惯在调用一个cuda runtime api时,例如cudaMalloc() cudaMemcpy()我们就用error handler进行包装。这样 可以方便我们排查错误的来源
具体来说,CUDA的runtime API都会返回一个cudaError(枚举类), 可以通过枚举类来查看到它里面要么是成功了要么就是各种错误
__FILE__, __LINE__这两个指的是当前文件,下面的行和文件名就是这里来的
ERROR: src/matmul_gpu_basic.cu:62, CODE:cudaErrorInvalidConfiguration, DETAIL:invalid configuration argument至于这里两个,宏定义, 一个是用来检查CUDA Runtime API, 一个是检查核函数的。检查kernel function的时候,用LAST_KERNEL_CHECK(), 这个放在同步后面, 确保之前的所有CUDA操作(包括kernel的执行)都已经完成,Z再来检查
有cudaPeekAtLastError或者cudaGetLastError, 区别是是否传播错误
kernelFunction<<<numBlocks, numThreads>>>();
cudaError_t err1 = cudaPeekAtLastError();  // 只查看,不清除错误状态
cudaError_t err2 = cudaGetLastError();  // 查看并清除错误状态
#include <cuda_runtime.h>
#include <system_error>
#define CUDA_CHECK(call) __cudaCheck(call, __FILE__, __LINE__)
#define LAST_KERNEL_CHECK() __kernelCheck(__FILE__, __LINE__)
#define BLOCKSIZE 16
inline static void __cudaCheck(cudaError_t err, const char* file, const int line) {
if (err != cudaSuccess) {
printf("ERROR: %s:%d, ", file, line);
printf("CODE:%s, DETAIL:%s\n", cudaGetErrorName(err), cudaGetErrorString(err));
exit(1);
}
}
inline static void __kernelCheck(const char* file, const int line) {
/*
* 在编写CUDA是,错误排查非常重要,默认的cuda runtime API中的函数都会返回cudaError_t类型的结果,
* 但是在写kernel函数的时候,需要通过cudaPeekAtLastError或者cudaGetLastError来获取错误
*/
cudaError_t err = cudaPeekAtLastError();
if (err != cudaSuccess) {
printf("ERROR: %s:%d, ", file, line);
printf("CODE:%s, DETAIL:%s\n", cudaGetErrorName(err), cudaGetErrorString(err));
exit(1);
}
}3.1 两个错误案例
EX1:
这里分配之前矩阵乘法的blockSize = 64, 那么一个线程块里面有64x64=4096个线程,超出了1024的限制, 下面是不用KernelCheck()和用了的区别
不加是不会报错的
matmul in cpu                  uses 4092.84 ms
matmul in GPU Warmup           uses 199.453 ms
matmul in GPU blockSize = 1    uses 13.1558 ms
matmul in GPU blockSize = 16   uses 13.0716 ms
matmul in GPU blockSize = 32   uses 13.0694 ms
matmul in GPU blockSize = 64   uses 2.00626 ms
res is different in 0, cpu: 260.89050293, gpu: 0.00000000
Matmul result is different加了会出现报错, 这个错误 cudaErrorInvalidConfiguration 表示在执行CUDA kernel时,传递给 kernel 的配置参数无效。具体来说,CUDA kernel的配置包括线程块的数量、线程块内线程的数量等。
matmul in cpu                  uses 4115.42 ms
matmul in GPU Warmup           uses 201.464 ms
matmul in GPU blockSize = 1    uses 13.1182 ms
matmul in GPU blockSize = 16   uses 13.0607 ms
matmul in GPU blockSize = 32   uses 13.0602 ms
ERROR: src/matmul_gpu_basic.cu:69, CODE:cudaErrorInvalidConfiguration, DETAIL:invalid configuration argument
EX2:
// 分配grid, block
    dim3 dimBlock(blockSize, blockSize);
    int gridDim = (width + blockSize - 1) / blockSize;
    dim3 dimGrid(gridDim, gridDim);
写成了
// 分配grid, block
    dim3 dimBlock(blockSize, blockSize);
    int gridDim = (width + blockSize - 1) / blockSize;
    dim3 dimGrid(gridDim);
matmul in cpu uses 4152.26 ms
matmul in GPU Warmup uses 189.667 ms
matmul in GPU blockSize = 1 uses 2.92747 ms
matmul in GPU blockSize = 16 uses 2.85372 ms
matmul in GPU blockSize = 32 uses 2.86483 ms
res is different in 32768, cpu: 260.76977539, gpu: 0.00000000这个没有报错, 这里grid(网格)只有一个, 然后这里不够块去计算了, 所以计算了一部分他就不计算了, 所以运行的速度快了很多, 以后如果CUDA编程中速度快了很多,要参考是否是没有完整的计算。
3.4 为什么要获取硬件信息
当进行CUDA编程时,了解硬件规格是非常重要的,因为这些规格限制了你可以使用的并行策略和优化方式。
*********************Architecture related**********************
Device id:                              7
Device name:                            NVIDIA GeForce RTX 3090
Device compute capability:              8.6
GPU global meory size:                  23.70GB
L2 cache size:                          6.00MB
Shared memory per block:                48.00KB
Shared memory per SM:                   100.00KB
Device clock rate:                      1.69GHz
Device memory clock rate:               9.75Ghz
Number of SM:                           82
Warp size:                              32
*********************Parameter related************************
Max block numbers:                      16
Max threads per block:                  1024
Max block dimension size:               1024:1024:64
Max grid dimension size:                2147483647:65535:65535
3.5 代码
#include <cuda_runtime.h>
#include <system_error>
#include <stdarg.h>

#define CUDA_CHECK(call)             __cudaCheck(call, __FILE__, __LINE__)
#define LAST_KERNEL_CHECK(call)      __kernelCheck(__FILE__, __LINE__)
#define LOG(...)                     __log_info(__VA_ARGS__)

#define BLOCKSIZE 16

static void __cudaCheck(cudaError_t err, const char* file, const int line) {
    if (err != cudaSuccess) {
        printf("ERROR: %s:%d, ", file, line);
        printf("CODE:%s, DETAIL:%s\n", cudaGetErrorName(err), cudaGetErrorString(err));
        exit(1);
    }
}

static void __kernelCheck(const char* file, const int line) {
    cudaError_t err = cudaPeekAtLastError();
    if (err != cudaSuccess) {
        printf("ERROR: %s:%d, ", file, line);
        printf("CODE:%s, DETAIL:%s\n", cudaGetErrorName(err), cudaGetErrorString(err));
        exit(1);
    }
}

// 使用变参进行LOG的打印。比较推荐的打印log的写法
static void __log_info(const char* format, ...) {
    char msg[1000];
    va_list args;
    va_start(args, format);

    vsnprintf(msg, sizeof(msg), format, args);

    fprintf(stdout, "%s\n", msg);
    va_end(args);
}
#include <stdio.h>
#include <cuda_runtime.h>
#include <string>
#include "utils.hpp"
int main(){
int count;
int index = 0;
cudaGetDeviceCount(&count);
while (index < count) {
cudaSetDevice(index);
cudaDeviceProp prop;
cudaGetDeviceProperties(&prop, index);
LOG("%-40s", "*********************Architecture related**********************");
LOG("%-40s%d%s", "Device id: ", index, "");
LOG("%-40s%s%s", "Device name: ", prop.name, "");
LOG("%-40s%.1f%s", "Device compute capability: ", prop.major + (float)prop.minor / 10, "");
LOG("%-40s%.2f%s", "GPU global meory size: ", (float)prop.totalGlobalMem / (1<<30), "GB");
LOG("%-40s%.2f%s", "L2 cache size: ", (float)prop.l2CacheSize / (1<<20), "MB");
LOG("%-40s%.2f%s", "Shared memory per block: ", (float)prop.sharedMemPerBlock / (1<<10), "KB");
LOG("%-40s%.2f%s", "Shared memory per SM: ", (float)prop.sharedMemPerMultiprocessor / (1<<10), "KB");
LOG("%-40s%.2f%s", "Device clock rate: ", prop.clockRate*1E-6, "GHz");
LOG("%-40s%.2f%s", "Device memory clock rate: ", prop.memoryClockRate*1E-6, "Ghz");
LOG("%-40s%d%s", "Number of SM: ", prop.multiProcessorCount, "");
LOG("%-40s%d%s", "Warp size: ", prop.warpSize, "");
LOG("%-40s", "*********************Parameter related************************");
LOG("%-40s%d%s", "Max block numbers: ", prop.maxBlocksPerMultiProcessor, "");
LOG("%-40s%d%s", "Max threads per block: ", prop.maxThreadsPerBlock, "");
LOG("%-40s%d:%d:%d%s", "Max block dimension size:", prop.maxThreadsDim[0], prop.maxThreadsDim[1], prop.maxThreadsDim[2], "");
LOG("%-40s%d:%d:%d%s", "Max grid dimension size: ", prop.maxGridSize[0], prop.maxGridSize[1], prop.maxGridSize[2], "");
index ++;
printf("\n");
}
return 0;
}4. Nsight System 和 Nsight Compute
我自己是使用windows端SSH连接远程服务器(Ubuntu 20.04), 然后访问服务器上的容器, 所以就没有办法直接使用, 这个时候就可以在容器用指令生成report, 然后下载下来用windows打开
Nsight Systems
Nsight Systems偏向于可视化整个应用程序的性能分析,它关注多个系统层面的性能指标,包括但不限于:
PCIe带宽
DRAM带宽
SM Warp占用率
核函数(Kernel)的调度和执行时间
多个Stream和队列之间的调度信息
CPU和GPU间的数据传输时间
整体应用程序的时间消耗排序
这样全面的信息可以帮助开发者从宏观的角度理解应用程序的性能瓶颈,并据此进行相应的优化。
4.1 Nsight Compute
与Nsight Systems相比,Nsight Compute则更加专注于单个CUDA核函数的性能分析。它能提供非常细致的信息,例如:
SM中的计算吞吐量
L1和L2缓存的数据传输吞吐量
DRAM数据传输吞吐量
核函数是计算密集型还是内存访问密集型
Roofline model分析
L1缓存的命中率和失效率
核函数中各代码部分的延迟
内存访问的调度信息
这些信息可以让开发者针对特定的CUDA核函数进行深度优化。
4.2 区别和应用场景
总结一下,两者的主要区别在于它们的焦点和应用场景:
Nsight Systems:更多用于初步诊断和宏观优化,当你需要了解整个系统或应用程序的性能瓶颈时,这是一个很好的起点。
Nsight Compute:当你需要深入到特定的CUDA核函数进行细粒度的分析和优化时,这是一个更适合的工具。
通常,开发者会先使用Nsight Systems进行初步的性能分析,找出可能存在的瓶颈,然后再针对这些瓶颈使用Nsight Compute进行深入的优化。这两个工具往往是相互补充的。
# 打开容器的指令加一个--cap-add=SYS_ADMIN才能跑nsight compute
docker run --cap-add=SYS_ADMIN --gpus all -it --name easonbob_trt -v $(pwd):/app easonbob/my_trt-tensorrt:nsight_system

# nsight system
nsys profile --trace=cuda,nvtx -o nsight_systems_report ./trt-cuda

# nsight compute
nv-nsight-cu-cli -o nsight_compute_report ./trt-cuda
然后下载下来就可以直接在最新版本的nsight system和nsight compute里面打开(我自己测试过), 使用File->open, 这里下载的是windows的版本就好, 这里也附上NVIDIA的Download Center(https://developer.nvidia.com/gameworksdownload#?dn=nsight-systems-2023-3)
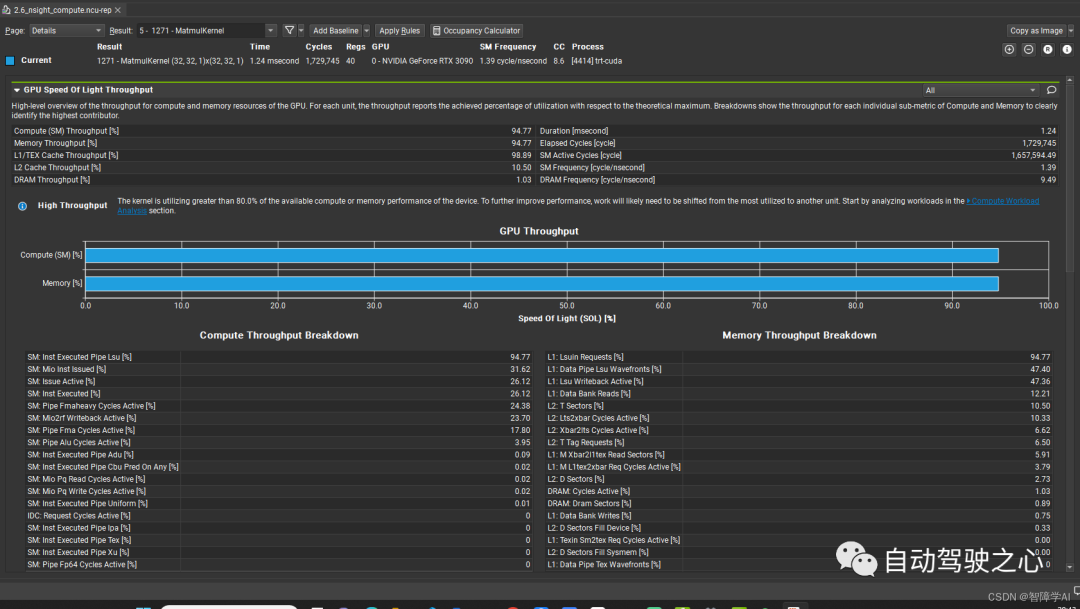
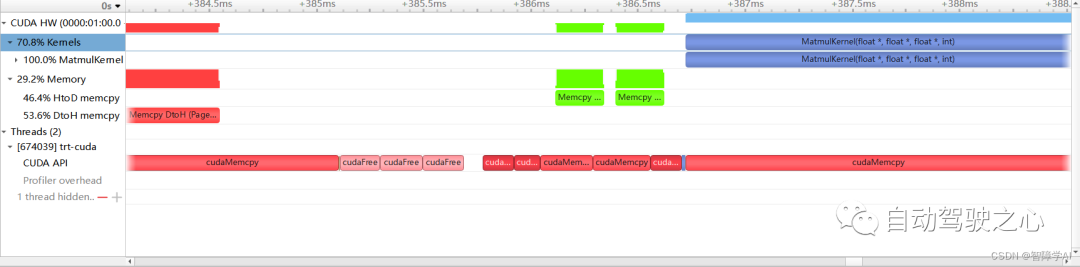
上图是nsight compute, 下图是nsight system。
限时立减一百元!扫码加入学习,甩开差距!

扫码添加助理咨询课程!
(微信:AIDriver004)


 2493
2493

 被折叠的 条评论
为什么被折叠?
被折叠的 条评论
为什么被折叠?
 到【灌水乐园】发言


