


如何使用labelme标注语义分割数据集
labelme在实例分割和语义分割任务中经常用到,很多小伙伴完成ai的任务的时候,有的时候不只需要找到对应物体的边界框,对物体的整体的轮廓信息也有比较严格的要求,比如通过物体的mask来计算出对应物体的面积。所以,今天这期,我们来说一下labelme软件如何进行使用,以及根据这一期的内容来完成后面的语义分割的任务。
labelme的安装
labelme的安装之前还是需要您已经完成了这些准备工作:Python项目配置前的准备工作_pyenv设置镜像-CSDN博客
安装了miniconda和pycharm之后,首先需要创建一个虚拟环境,我们本次创建的虚拟环境的名称为:yolo_py310_torch210
conda create -n yolo_py310_torch210 python==3.10.0
conda activate yolo_py310_torch210
接下来通过pip指令完成安装,为了保证后续的小伙伴都能按照这个教程进行操作,我们固定labelme的版本。
pip install labelme==5.6.1

数据集的标注
教程地址:labelme/examples/tutorial at main · wkentaro/labelme
我们在命令行中输入指令:labelme
即可启动labelme的标注软件,如下图所示。
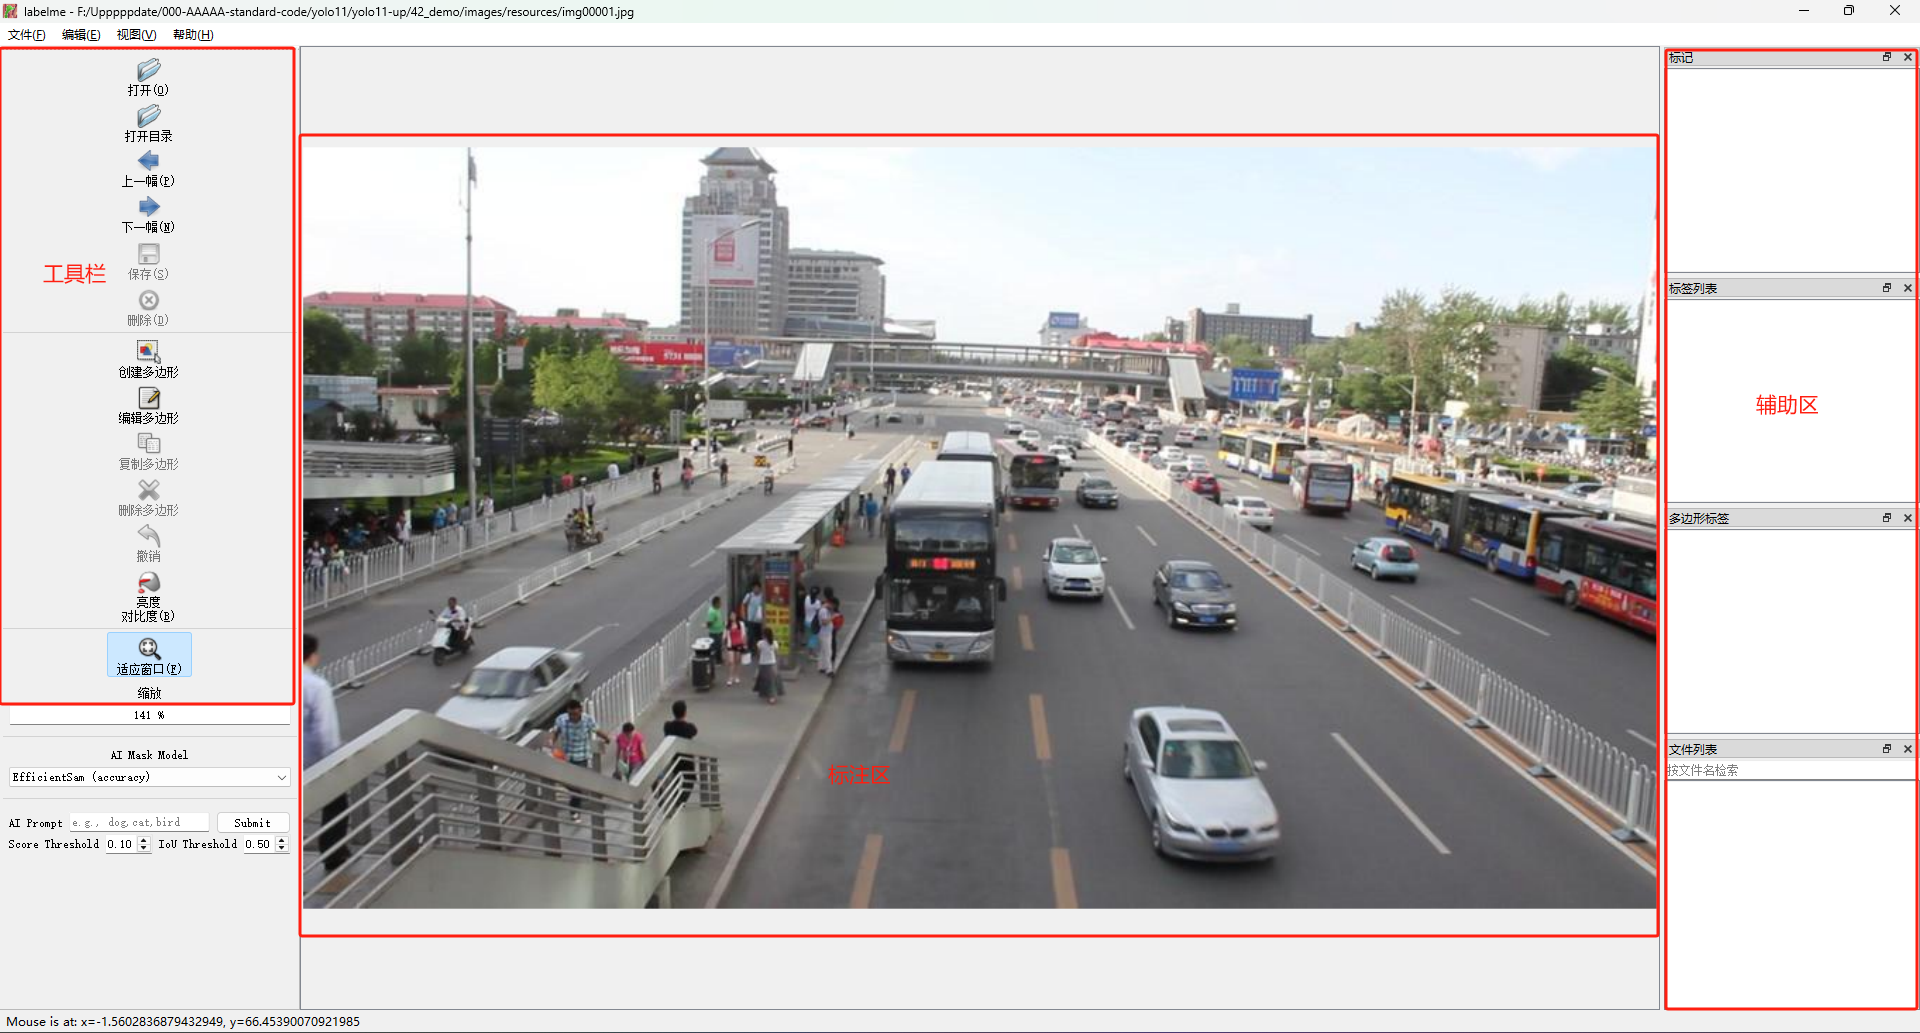
一般情况下,我们会搜集一堆图像,图像可能来自于网络,也可能来自于你的课题,这些图像最好命名中只有数字英文和下划线,最好不要包含太多的其他字符,如下图所示,我在这里放了一些猫狗的图像,我们将会对下面的图像进行标注。标注的时候需要打开自动保存,并且选好标注文件保存的路径。
标注完成之后,将会在对应的标签保存目录下面生成一系列的json文件,一张图像将会对应一张json图像。
使用AI辅助标注
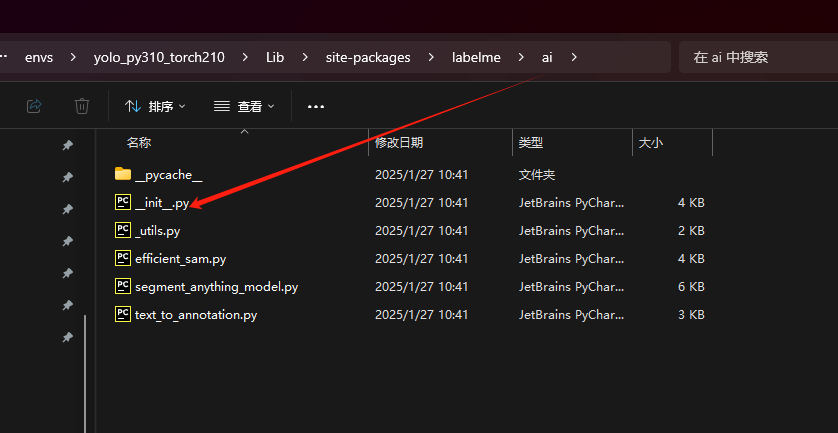
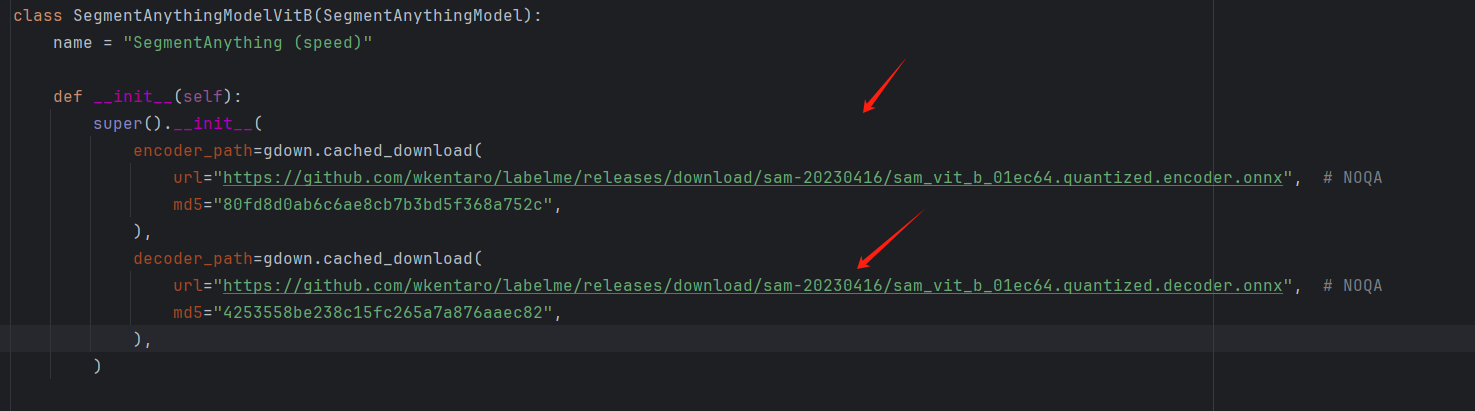
在新版本的labelme中,提供了ai辅助的标注,可以在区域的周围直接生成对应的标注mask。但是如果我们直接使用的话,可能会遇到模型下载不下来的问题,为了解决这个问题,我们的第一个步骤是需要将预训练的模型下载到对应的labelme的安装目录下,以我这里为例,我这里使用conda创建了一个名字为yolo_py310_torch210的环境,所以直接在conda的envs目录下寻找到labelme的路径,从其中的ai目录中找到下方所示的文件然后进行编辑。
模型需要提前从下列的地址中进行下载,需要使用科学上网,我这里会提前下载好放在本文的资源文件中。
# 这里是这些模型的下载路径
https://github.com/wkentaro/labelme/releases/download/sam-20230416/sam_vit_b_01ec64.quantized.encoder.onnx
https://github.com/wkentaro/labelme/releases/download/sam-20230416/sam_vit_b_01ec64.quantized.decoder.onnx
https://github.com/wkentaro/labelme/releases/download/sam-20230416/sam_vit_l_0b3195.quantized.encoder.onnx
https://github.com/wkentaro/labelme/releases/download/sam-20230416/sam_vit_l_0b3195.quantized.decoder.onnx
https://github.com/wkentaro/labelme/releases/download/sam-20230416/sam_vit_h_4b8939.quantized.encoder.onnx
https://github.com/wkentaro/labelme/releases/download/sam-20230416/sam_vit_h_4b8939.quantized.decoder.onnx
https://github.com/labelmeai/efficient-sam/releases/download/onnx-models-20231225/efficient_sam_vitt_encoder.onnx
https://github.com/labelmeai/efficient-sam/releases/download/onnx-models-20231225/efficient_sam_vitt_decoder.onnx
https://github.com/labelmeai/efficient-sam/releases/download/onnx-models-20231225/efficient_sam_vits_encoder.onnx
https://github.com/labelmeai/efficient-sam/releases/download/onnx-models-20231225/efficient_sam_vits_decoder.onnx
将模型的路径按照下列的代码改为你本地模型的路径即可,其中MODEL_DIR改为你本地模型存放的路径。
import os.path as osp
MODEL_DIR = "E:/miniii/envs/yolo_py310_torch210/Lib/site-packages/labelme/models/"

class SegmentAnythingModelVitB(SegmentAnythingModel):
    name = "SegmentAnything (speed)"

    def __init__(self):
        super().__init__(
            encoder_path=osp.join(MODEL_DIR, "sam_vit_b_01ec64.quantized.encoder.onnx"),  # NOQA
            decoder_path=osp.join(MODEL_DIR, "sam_vit_b_01ec64.quantized.decoder.onnx")
        )


class SegmentAnythingModelVitL(SegmentAnythingModel):
    name = "SegmentAnything (balanced)"

    def __init__(self):
        super().__init__(
            encoder_path=osp.join(MODEL_DIR,"sam_vit_l_0b3195.quantized.encoder.onnx"),  # NOQA

            decoder_path=osp.join(MODEL_DIR,"sam_vit_l_0b3195.quantized.decoder.onnx"),  # NOQA

        )

class SegmentAnythingModelVitH(SegmentAnythingModel):
    name = "SegmentAnything (accuracy)"

    def __init__(self):
        super().__init__(
            encoder_path=osp.join(MODEL_DIR,"sam_vit_h_4b8939.quantized.encoder.onnx"),  # NOQA

            decoder_path=osp.join(MODEL_DIR,"sam_vit_h_4b8939.quantized.decoder.onnx"))


class EfficientSamVitT(EfficientSam):
    name = "EfficientSam (speed)"

    def __init__(self):
        super().__init__(
            encoder_path=
               osp.join(MODEL_DIR,"efficient_sam_vitt_encoder.onnx"),  # NOQA

            decoder_path=
                osp.join(MODEL_DIR,"efficient_sam_vitt_decoder.onnx"),  # NOQA
        )


class EfficientSamVitS(EfficientSam):
    name = "EfficientSam (accuracy)"

    def __init__(self):
        super().__init__(
            encoder_path=osp.join(MODEL_DIR,"efficient_sam_vits_encoder.onnx"),  # NOQA


            decoder_path=osp.join(MODEL_DIR,"efficient_sam_vits_decoder.onnx"),  # NOQA

        )
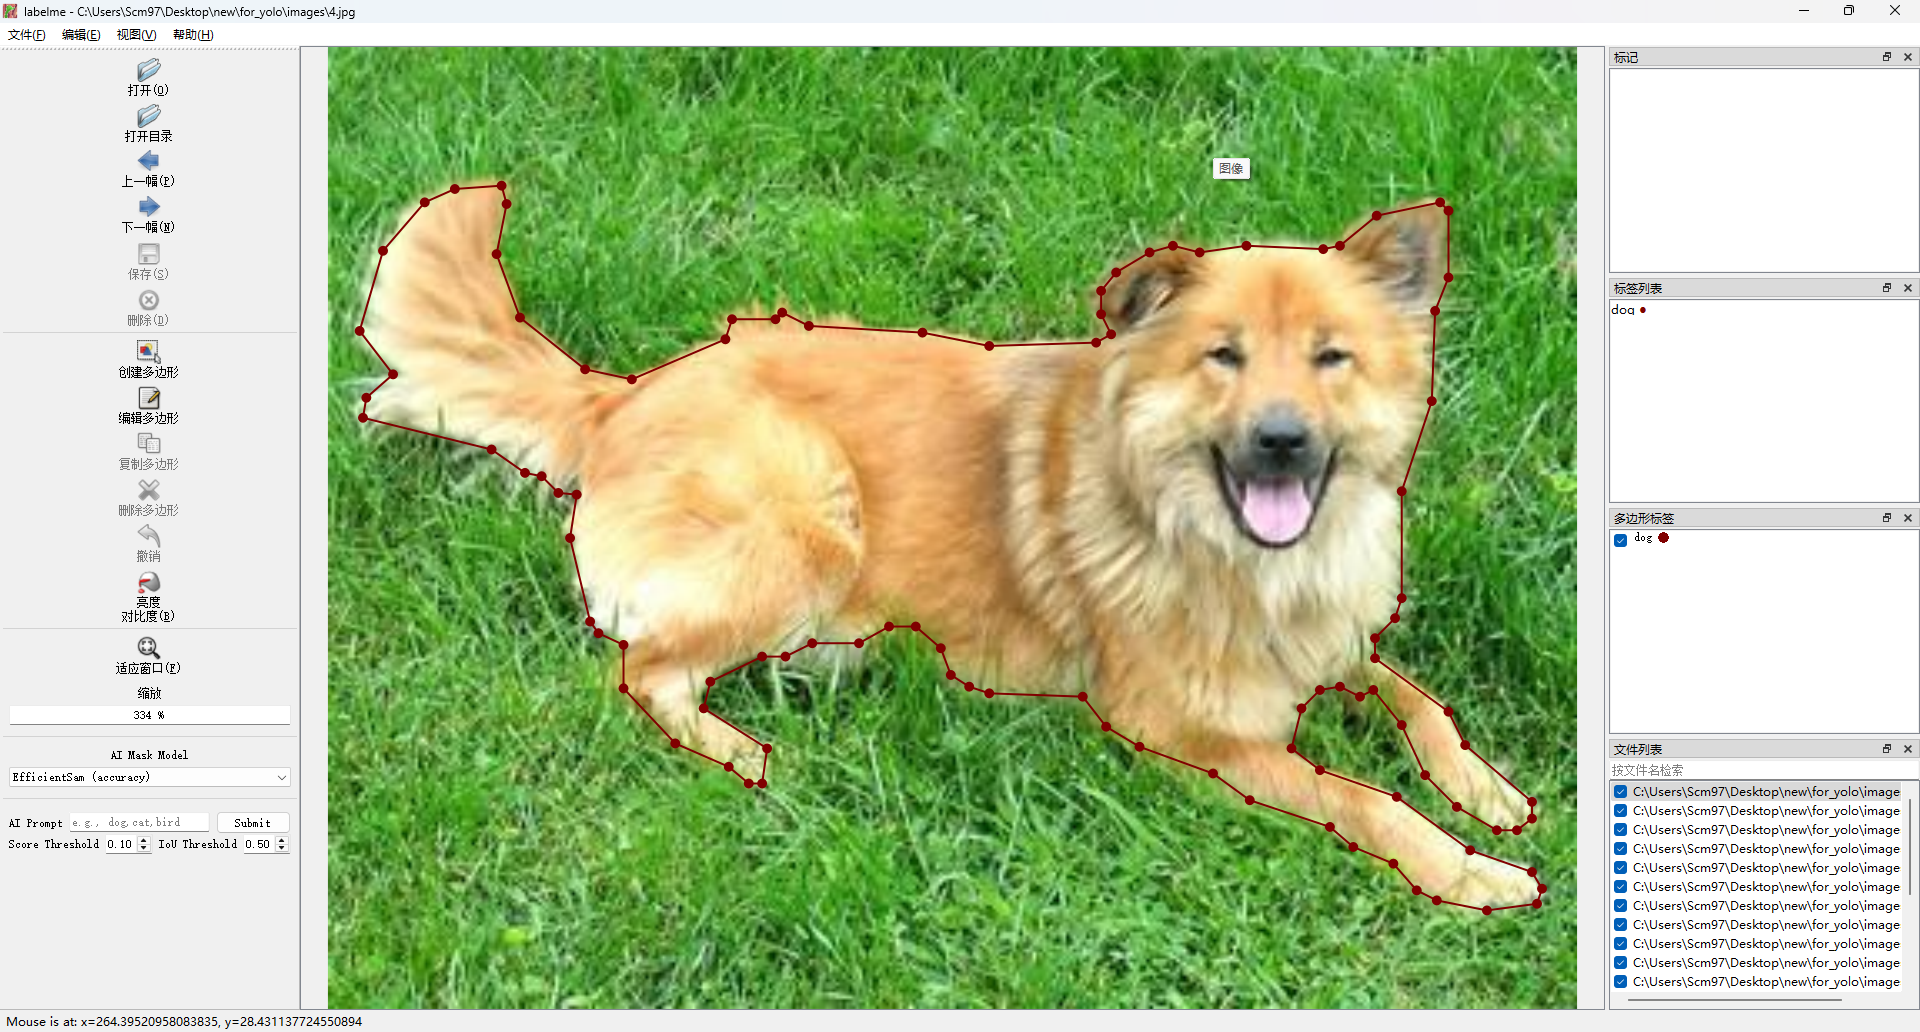
之后再次启动labelme软件,即可使用ai标注的功能,你可以在软件的左侧选择对应的模型,右键创建ai的多边形或者是ai的蒙版,即可快速完成标注,比如下面这个图你点击一个点就能生成这个人头的准确的mask区域,标注一些常规事物的时候会非常好用。当你选择创建多边形的时候创建的是分割的标签,当年选择创建ai蒙版的时候,创建出来的则是矩形的标签。大概的使用方法就是左键选择你想要的区域,然后shift+左键选择你不要的区域,然后双击完成标注。

- Select “Create AI-Polygon”
- Do
clickfor the region you want to include - Do
shift+clickfor the region you want to exclude - Do
ctrl/cmd+clickorctrl/cmd+shift+clickor double-click to finish - Press
escto go back and continue clicking
实测有的时候不是很稳定,所以最好还是作为辅助工具来使用,正儿八经还是感觉自己标注质量高一些。
数据集的转化
数据集的转化分为两种,一种方式是转化为txt文件,转化为txt文件的时候使用一系列的点来表示语义分割的结果图像,这种方式比较适合在yolo系列的分割模型上进行训练。另一种方式使用分割的伪彩图来表示,这种方式比较适合在一些专门的分割网络上来进行训练,比如mmseg、unet以及deeplab等模型。
YOLO分割数据集的转化
现在的yolo是支持进行分割任务的,对于分割任务而言,此时yolo的txt文件保存为多边形的点的坐标,同样是进行了归一化的处理。
我们只需要提前准备好原始的图片文件和json文件,使用下列的脚本即可完成yolo分割数据集的转化。
#!/usr/bin/env python
# -*- coding: UTF-8 -*-
'''
@Project :new
@File    :labelme2yolo.py
@IDE     :PyCharm
@Author  :肆十二(付费咨询QQ: 3045834499) 粉丝可享受99元调试服务
@Description  :TODO 添加文件描述
@Date    :2025/1/30 10:05
'''
import os
import json
import shutil
from sklearn.model_selection import train_test_split
import glob
import yaml

################################### 可选配置项 ###################################################
# 定义原始数据集路径
original_dataset_dir = r"C:\Users\Scm97\Desktop\new\for_yolo" # 原始数据集的目录
annotations_dir = os.path.join(original_dataset_dir, 'jsons')   # 标注文件annotations 目录
images_dir = os.path.join(original_dataset_dir, 'images')       # 图片所在目录
coverted_dataset_dir = '../animal_new'  # 转换过后的数据集

# 类别到ID的映射,根据实际情况修改
class_map = {
    "cat": 0,
    "dog": 1,
}


################################### 可选配置项 ###################################################

def convert_labelme_to_yolo(json_file, output_label_file):
    # json_str = json_str.replace('\\', '\\\\')
    # db = json.loads(json_str)
    with open(json_file, encoding="utf-8") as f:
        data = json.load(f)

    image_width = data['imageWidth']
    image_height = data['imageHeight']

    with open(output_label_file, 'w') as label_f:
        for shape in data['shapes']:
            label = shape['label']
            points = shape['points']

            # 根据类别名获取类别ID
            class_id = class_map.get(label)
            if class_id is None:
                print(f"警告: 未知类别 {label} 在文件 {json_file}")
                continue

            # YOLO格式要求:class x_center y_center width height
            # 这里的值都是相对于图像宽度和高度的归一化值
            label_line = f"{class_id}"
            # 遍历分割的点,将分割的点加入数据集中
            for point in shape["points"]:
                x = point[0] / image_width  # mask轮廓中一点的X坐标
                y = point[1] / image_height
                label_line = label_line + f" {x:.6f} {y:.6f}"

            # 写入YOLO格式的标签文件 分割
            label_f.write(label_line + "\n")


def copy_and_convert(json_files, phase):
    supported_extensions = ['.jpg', '.png']  # 支持的图像格式

    for json_file in json_files:
        base_name = os.path.splitext(os.path.basename(json_file))[0]
        image_copied = False

        for ext in supported_extensions:
            image_file = os.path.join(images_dir, base_name + ext)
            if os.path.isfile(image_file):
                target_image_dir = os.path.join(coverted_dataset_dir, phase, 'images')
                os.makedirs(target_image_dir, exist_ok=True)
                shutil.copy(image_file, target_image_dir)
                image_copied = True
                break

        if not image_copied:
            print(f"警告: 没有找到与 {json_file} 对应的图片文件")
            continue

        target_labels_dir = os.path.join(coverted_dataset_dir, phase, 'labels')
        os.makedirs(target_labels_dir, exist_ok=True)

        output_label_file = os.path.join(target_labels_dir, base_name + '.txt')
        convert_labelme_to_yolo(json_file, output_label_file)

# 将labelme文件转化为yolo对应的txt格式的文件
if __name__ == "__main__":
    # 创建转换数据集目录
    if not os.path.exists(coverted_dataset_dir):
        os.mkdir(coverted_dataset_dir)

    # 创建转换数据集目录结构
    for phase in ['train', 'val']:
        for folder in ['images', 'labels']:
            os.makedirs(os.path.join(coverted_dataset_dir, phase, folder), exist_ok=True)

    # 获取所有的json文件
    json_files = glob.glob(os.path.join(annotations_dir, '*.json'))

    # 将数据划分为训练集和验证集
    train_files, val_files = train_test_split(json_files, test_size=0.2, random_state=42)

    # 执行数据集划分与转换
    copy_and_convert(train_files, 'train')
    copy_and_convert(val_files, 'val')

    # 数据集配置信息,相对于 YOLOv5 目录
    data_yaml = {
        'yaml_file_path': os.path.join(coverted_dataset_dir, 'data.yaml'),
        'train': os.path.join('../..', coverted_dataset_dir, 'train', 'images'),
        'val': os.path.join('../..', coverted_dataset_dir, 'val', 'images'),
        'nc': len(class_map),  # 类别数量
        'names': list(class_map.keys())  # 类别名称列表
    }

    # 写入 YAML 文件
    with open(data_yaml['yaml_file_path'], 'w') as f:
        yaml.safe_dump(data_yaml, f, default_flow_style=False, allow_unicode=True)

    print(f"YAML 文件已创建:{data_yaml['yaml_file_path']}")
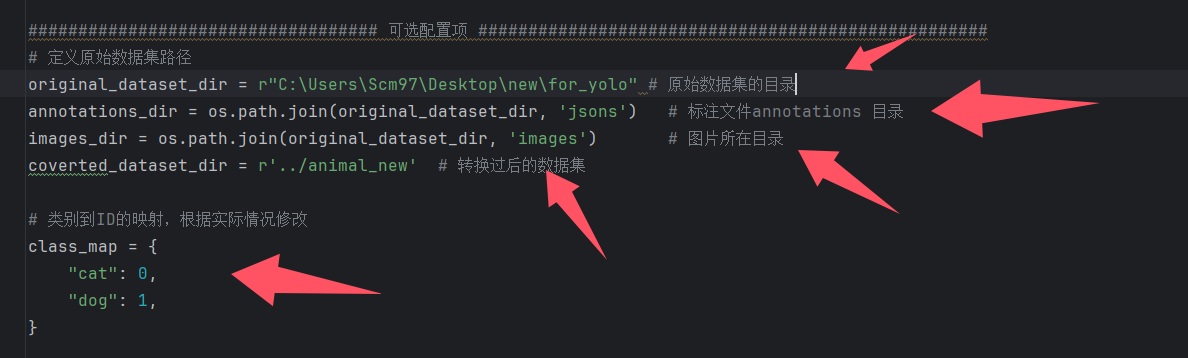
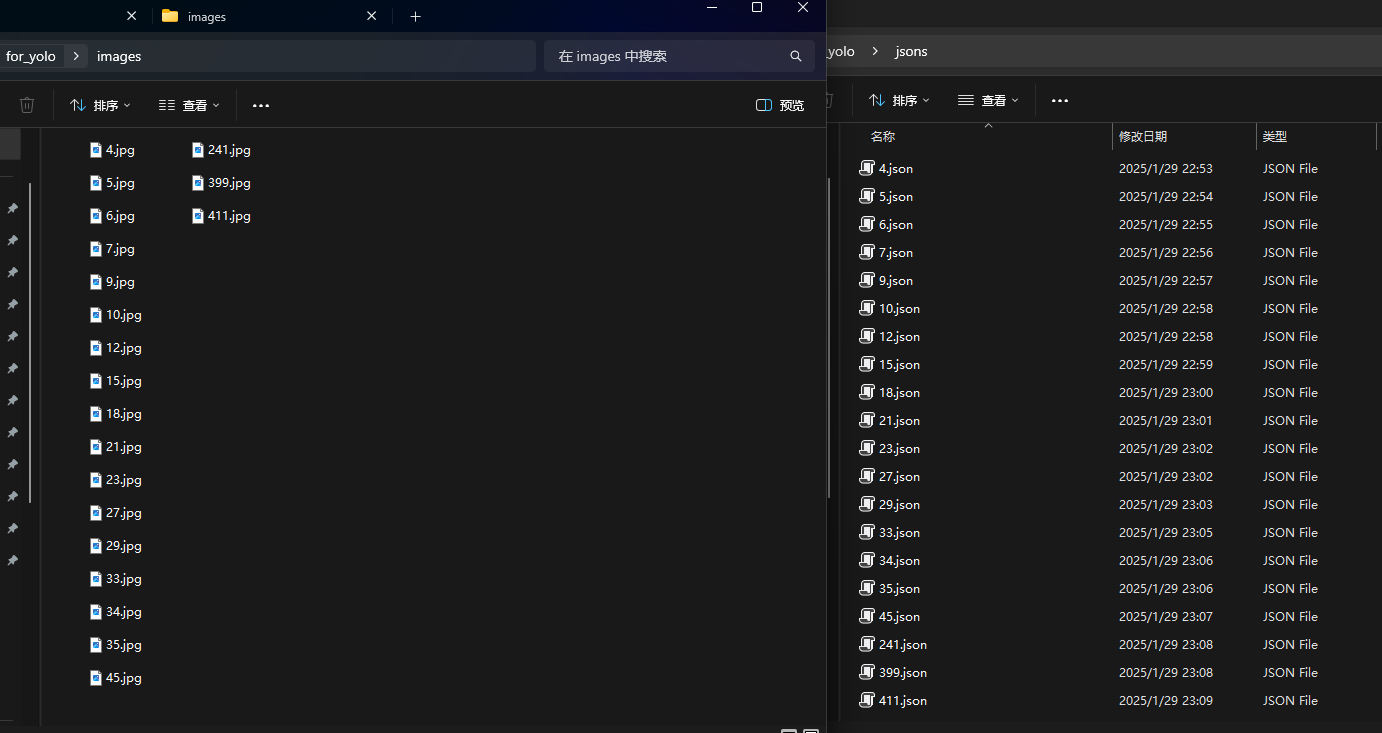
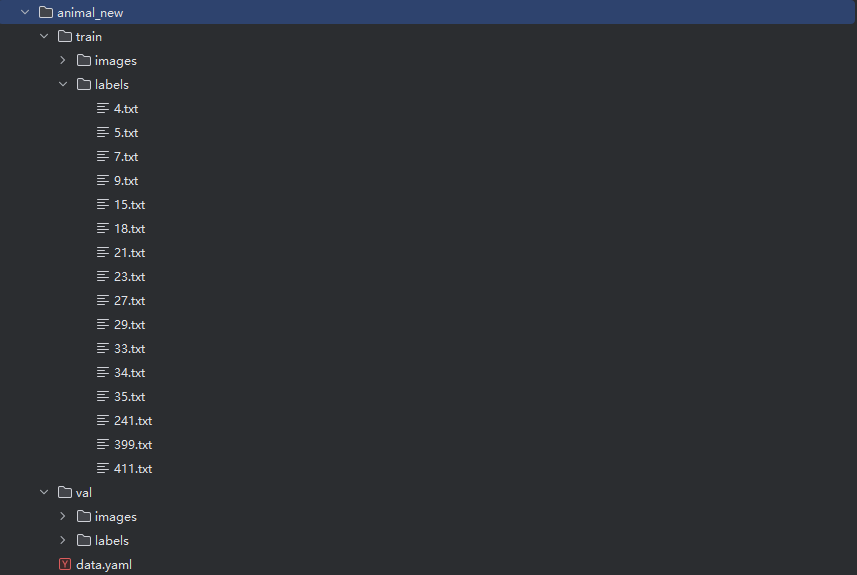
如果是你自己的数据集,则需要修改这里的几处位置,比如我们刚才标注了20张的图像数据集,使用这个脚本将会自动按照yolo分割数据集的格式来进行处理,处理的结果如下。
接下来大家只需要改一下数据集的配置文件,就能完成yolo分割模型的训练了。
MMSEG分割数据集的转化
mmseg包含了大量的用于语义分割的模型,如果你对分割这个方向需要有比较深入的研究,你可以考虑是用mmseg框架来进行开发。mmseg专注于语义分割的任务,需要使用伪彩图像作为标签进行模型的开发。labelme的官方提供了转化的训练脚本, 大家可以使用这个转化脚本来完成json文件的转化。
labelme_export_json apc2016_obj3.json -o apc2016_obj3_json
经过转化之后将会产生下面的文件夹。
- img.png: Image file. 图片文件
- label.png: uint8 label file. 标签文件
- label_viz.png: Visualization of
label.png. 标签的可视化文件 - label_names.txt: Label names for values in
label.png. 标签的名称文件
一般情况下,你会有一堆的图像文件,所以这个时候如果你单张进行转化是比较费时的,我这边提供了一个批量的脚本,可以将json文件批量转化为标签文件来进行使用。
# -*- coding: utf-8 -*-
# @Time    : 2023/5/13 1:20
# @Author  : 肆十二
# @Email   : 3048534499@qq.com
# @File    : label2seg
# @Software: PyCharm
import argparse
import glob
import math
import json
import os
import os.path as osp
import shutil
import numpy as np
import PIL.Image
import PIL.ImageDraw
import cv2
from PIL import  Image
# 注意,伪彩图像是可以直接读取的,不需要进行复杂的公式转化,使用pillow读取,然后转化为numpy即可
def json2png(json_folder, png_save_folder, src_save_folder):
    if osp.isdir(png_save_folder):
        shutil.rmtree(png_save_folder)

    if osp.isdir(src_save_folder):
        shutil.rmtree(src_save_folder)

    os.makedirs(png_save_folder)
    os.makedirs(src_save_folder)

    json_files = os.listdir(json_folder)
    for json_file in json_files:
        if ".json" in json_file:
            json_path = osp.join(json_folder, json_file)
            os.system("labelme_json_to_dataset {}".format(json_path))
            label_path = osp.join(json_folder, json_file.split(".")[0] + "_json/label.png") # 标签图像保存的目录
            png_save_path = osp.join(png_save_folder, json_file.split(".")[0] + ".png")
            src_path = osp.join(json_folder, json_file.split(".")[0] + "_json/img.png")
            src_save_path = osp.join(src_save_folder, json_file.split(".")[0] + ".png")
            shutil.copy(src_path, src_save_path)

            label_pil = Image.open(label_path)
            label_png = np.array(label_pil)
            cv2.imwrite(png_save_path, label_png)


if __name__ == '__main__':
    # !!!!你的json文件夹下只能有json文件不能有其他文件
    json2png(json_folder="jsons",
             png_save_folder="convert_data/labels",
             src_save_folder="convert_data/src_imgs")
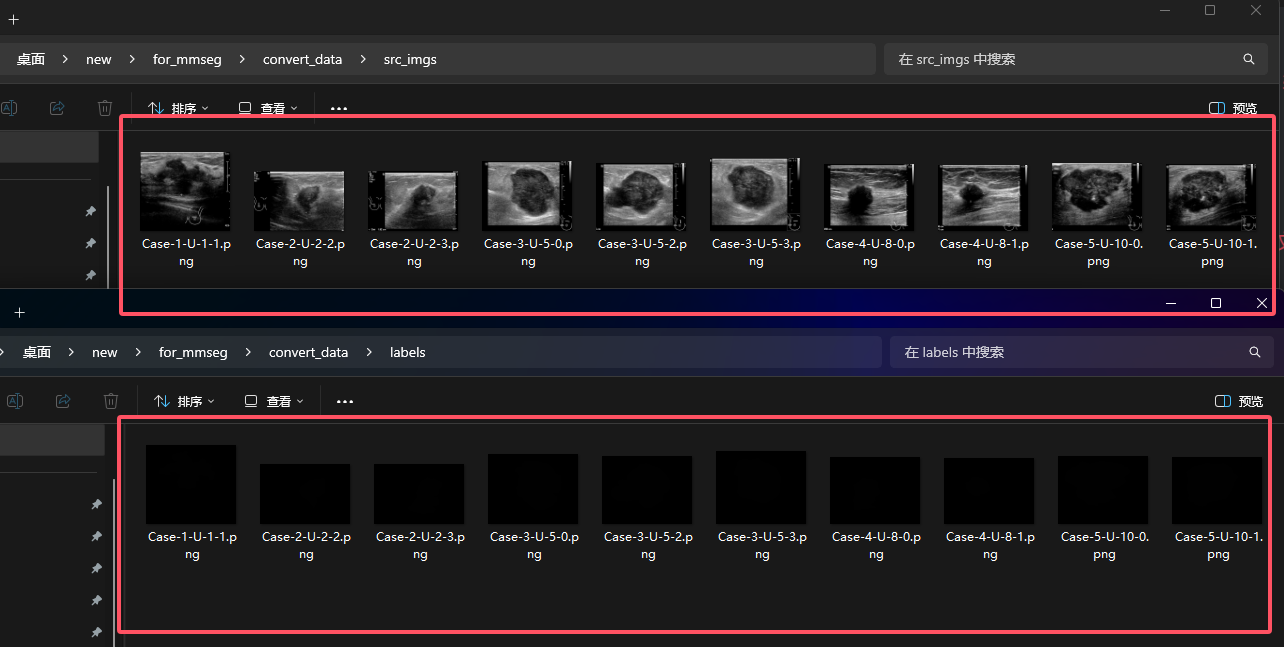
如下图所示,就是使用批量脚本转化之后的结果了,首先你有一堆json文件,然后每个json文件都可以解析为4个文件。

之后将图片文件和标注文件分别放置在不同的目录下面,如下图所示。
另外,在高类别的转换过程中,需要将标签信息进行单独的定位,否则会进行标签错误的问题。比如在第一张图像中你标注了猫和狗,其中猫的id是1,狗的id是2。但是对于第二张图像来说,你只标注了狗,那狗子的id就变成了1。这就比较致命了,所以在这里我也放置了标签转化的的源码,大家需要根据自己的数据集来进行对文件中的标签字典进行修改。
import argparse
import base64
import json
import os
import os.path as osp

import imgviz
import PIL.Image
from loguru import logger

from labelme import utils


def main():
    logger.warning(
        "DEPRECATED: This script will be removed in the near future. "
        "Please use `labelme_export_json` instead."
    )
    logger.warning(
        "NOTE: This script is aimed to demonstrate how to convert a JSON file "
        "to a single image dataset. so it won't handle multiple JSON files to "
        "generate a real-use dataset."
    )

    parser = argparse.ArgumentParser()
    parser.add_argument("json_file")
    parser.add_argument("-o", "--out", default=None)
    args = parser.parse_args()

    json_file = args.json_file

    if args.out is None:
        out_dir = osp.basename(json_file).replace(".", "_")
        out_dir = osp.join(osp.dirname(json_file), out_dir)
    else:
        out_dir = args.out
    if not osp.exists(out_dir):
        os.mkdir(out_dir)

    data = json.load(open(json_file))
    imageData = data.get("imageData")

    if not imageData:
        imagePath = os.path.join(os.path.dirname(json_file), data["imagePath"])
        with open(imagePath, "rb") as f:
            imageData = f.read()
            imageData = base64.b64encode(imageData).decode("utf-8")
    img = utils.img_b64_to_arr(imageData)

    label_name_to_value = {"_background_": 0}
    for shape in sorted(data["shapes"], key=lambda x: x["label"]):
        label_name = shape["label"]
        if label_name in label_name_to_value:
            label_value = label_name_to_value[label_name]
        else:
            label_value = len(label_name_to_value)
            label_name_to_value[label_name] = label_value
    lbl, _ = utils.shapes_to_label(img.shape, data["shapes"], label_name_to_value)

    label_names = [None] * (max(label_name_to_value.values()) + 1)
    for name, value in label_name_to_value.items():
        label_names[value] = name

    lbl_viz = imgviz.label2rgb(
        lbl, imgviz.asgray(img), label_names=label_names, loc="rb"
    )

    PIL.Image.fromarray(img).save(osp.join(out_dir, "img.png"))
    utils.lblsave(osp.join(out_dir, "label.png"), lbl)
    PIL.Image.fromarray(lbl_viz).save(osp.join(out_dir, "label_viz.png"))

    with open(osp.join(out_dir, "label_names.txt"), "w") as f:
        for lbl_name in label_names:
            f.write(lbl_name + "\n")

    logger.info("Saved to: {}".format(out_dir))


if __name__ == "__main__":
    main()
注,这里的用法已经比较深入了,在mmseg训练的过程中,需要将标签图像按照012的方式进行存储,这样其实会导致图像看起来是漆黑一片,这个时候图像其实是有标签值的。所以你也可以使用下面的方式来加载伪彩色图像。
# see load_label_png.py also.
>>> import numpy as np
>>> import PIL.Image

>>> label_png = 'apc2016_obj3_json/label.png'
>>> lbl = np.asarray(PIL.Image.open(label_png))
>>> print(lbl.dtype)
dtype('uint8')
>>> np.unique(lbl)
array([0, 1, 2, 3], dtype=uint8)
>>> lbl.shape
(907, 1210)


 487
487

 被折叠的 条评论
为什么被折叠?
被折叠的 条评论
为什么被折叠?
 到【灌水乐园】发言


