


周六周日在家倒腾了两天,总算稍微了解点pycaffe的一些接口和api设置了,但是针对不同层,还是有很多注意的细节的,所以也准备写个博客专门总结pycaffe的常见层参数设置,(LZ这个蠢啊,之前居然手写prototxt,一把辛酸泪,太傻了/(ㄒoㄒ)/~~)
之前已经写过用Anaconda直接安装caffe,这样安装caffe不香嘛,为啥非得源码再来安装一次呢?
1.项目里后端是用的tensorflow的接口,前端是要用caffe的接口,caffe的有些参数设置还是源码查询比较方便
2.有一些层是比较特殊的,这种定制化的层可能需要使用c写完之后,再进行源码编译
不过源码编译还是有很多坑的,且听LZ一一道来:
首先下载源码,https://github.com/weiliu89/caffe
按照tutorial安装依赖项:http://caffe.berkeleyvision.org/installation.html
LZ的小小笔记本是Ubuntu16.04
- 所以需要先安装对应的依赖库
sudo apt-get install libprotobuf-dev libleveldb-dev libsnappy-dev libopencv-dev libhdf5-serial-dev protobuf-compiler
sudo apt-get install --no-install-recommends libboost-all-dev
- 然后LZ使用的是CMake编译的,It requires CMake version >= 2.8.7. The basic steps are as follows:
mkdir build
cd build
cmake ..
make all
make install
make runtest
按照教程,好像简简单单,10分钟就能搞定,但是事实却不是如此。
- 当然你得设置下CUDA
# ---[ Options
caffe_option(CPU_ONLY  "Build Caffe without CUDA support" OFF) # TODO: rename to USE_CUDA
caffe_option(USE_CUDNN "Build Caffe with cuDNN library support" ON IF NOT CPU_ONLY)
caffe_option(USE_NCCL "Build Caffe with NCCL library support" OFF)
caffe_option(BUILD_SHARED_LIBS "Build shared libraries" ON)
caffe_option(BUILD_python "Build Python wrapper" ON)
set(python_version "2" CACHE STRING "Specify which Python version to use")
caffe_option(BUILD_matlab "Build Matlab wrapper" OFF IF UNIX OR APPLE)
caffe_option(BUILD_docs   "Build documentation" ON IF UNIX OR APPLE)
caffe_option(BUILD_python_layer "Build the Caffe Python layer" ON)
caffe_option(USE_OPENCV "Build with OpenCV support" ON)
caffe_option(USE_LEVELDB "Build with levelDB" ON)
caffe_option(USE_LMDB "Build with lmdb" ON)
caffe_option(ALLOW_LMDB_NOLOCK "Allow MDB_NOLOCK when reading LMDB files (only if necessary)" OFF)
caffe_option(USE_OPENMP "Link with OpenMP (when your BLAS wants OpenMP and you get linker errors)" OFF)
- 首先正常操作:
cmake ..
注意前方高能(ERROR来袭)
- 首先第一个坑就到来了,LZ之前为了编译tensorflow源码,已经源码安装过protobuf了,也是用了-std=c++11这个标准
所以在cmake报了一些类似如下的错误
error: #error This file requires compiler and library support for the ISO C++ 2011 standard.
This support is currently experimental, and must be enabled with the -std=c++11 or
 -std=gnu++11 compiler options
error: 'nullptr' was not declared in this scope 这种一长串
所以第一步要添加-std=c++11, cmakel
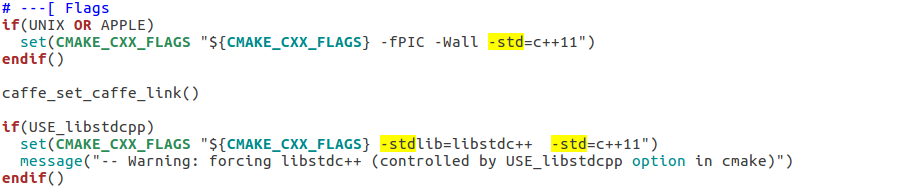
makefile得这么改,不过makefile中LZ没有尝试,如果尝试过的小伙伴欢迎指导
CXXFLAGS += -pthread -fPIC $(COMMON_FLAGS) $(WARNINGS) -std=c++11
NVCCFLAGS += -D_FORCE_INLINES -ccbin=$(CXX) -Xcompiler -fPIC $(COMMON_FLAGS) -std=c++11
LINKFLAGS += -pthread -fPIC $(COMMON_FLAGS) $(WARNINGS) -std=c++11
- 第二个可能遇到的错误:
nvcc fatal : Unsupported gpu architecture 'compute_20'
这个是CUDA版本决定的,LZ的版本是10.1, 这个文件是在makefile.config里面的,就顺带说一下
# CUDA architecture setting: going with all of them.
# For CUDA < 6.0, comment the *_50 through *_61 lines for compatibility.
# For CUDA < 8.0, comment the *_60 and *_61 lines for compatibility.
# For CUDA >= 9.0, comment the *_20 and *_21 lines for compatibility.
CUDA_ARCH := -gencode arch=compute_20,code=sm_20 \
                -gencode arch=compute_20,code=sm_21 \
                -gencode arch=compute_30,code=sm_30 \
                -gencode arch=compute_35,code=sm_35 \
                -gencode arch=compute_50,code=sm_50 \
                -gencode arch=compute_52,code=sm_52 \
                -gencode arch=compute_60,code=sm_60 \
                -gencode arch=compute_61,code=sm_61 \
                -gencode arch=compute_61,code=compute_61
//注释掉这两句:
 -gencode arch=compute_20,code=sm_20 \
 -gencode arch=compute_20,code=sm_21 \
- 第三个可能遇到的错误:
fatal error: hdf5.h: No such file or directory compilation terminated.
用locate定位你的hdf5.h的位置,在makefile中添加对应的路径
# Whatever else you find you need goes here.
INCLUDE_DIRS := $(PYTHON_INCLUDE) /usr/local/include /usr/local/include /usr/include/hdf5/serial/
LIBRARY_DIRS := $(PYTHON_LIB) /usr/local/lib /usr/lib  /usr/lib/x86_64-linux-gnu /usr/lib/x86_64-linux-gnu/hdf5/serial
修改library
LIBRARIES += glog gflags protobuf boost_system boost_filesystem m hdf5_serial_hl hdf5_serial
- 第四个可能遇到的错误:
这个问题就是OpenCV 4版本接口改变导致的,这个改的就有点多了,需要把caffe源码涉及到这个 CV_LOAD_IMAGE_COLOR都换掉。
../caffe/src/caffe/layers/window_data_layer.cpp:293:42: error: ‘CV_LOAD_IMAGE_COLOR’ was not declared in this scope
         cv_img = cv::imread(image.first, CV_LOAD_IMAGE_COLOR);
src/caffe/layers/window_data_layer.cpp
          image_database_cache_[window[WindowDataLayer<Dtype>::IMAGE_INDEX]];
        cv_img = DecodeDatumToCVMat(image_cached.second, true);
      } else {
        //cv_img = cv::imread(image.first, CV_LOAD_IMAGE_COLOR);
        cv_img = cv::imread(image.first, cv::IMREAD_COLOR);
        if (!cv_img.data) {
          LOG(ERROR) << "Could not open or find file " << image.first;
          return;
src/caffe/test/test_io.cpp
bool ReadImageToDatumReference(const string& filename, const int label,
    const int height, const int width, const bool is_color, Datum* datum) {
  cv::Mat cv_img;
  //int cv_read_flag = (is_color ? CV_LOAD_IMAGE_COLOR :
    //CV_LOAD_IMAGE_GRAYSCALE);
  int cv_read_flag = (is_color ? cv::IMREAD_COLOR :
    cv::IMREAD_GRAYSCALE);

  cv::Mat cv_img_origin = cv::imread(filename, cv_read_flag);
  if (!cv_img_origin.data) {
src/caffe/util/io.cpp
void WriteProtoToBinaryFile(const Message& proto, const char* filename) {
cv::Mat ReadImageToCVMat(const string& filename,
   const int height, const int width, const bool is_color) {
 cv::Mat cv_img;
// int cv_read_flag = (is_color ? CV_LOAD_IMAGE_COLOR :
  // CV_LOAD_IMAGE_GRAYSCALE);
 int cv_read_flag = (is_color ? cv::IMREAD_COLOR :
   cv::IMREAD_GRAYSCALE);
 cv::Mat cv_img_origin = cv::imread(filename, cv_read_flag);
 if (!cv_img_origin.data) {
   LOG(ERROR) << "Could not open or find file " << filename;


cv::Mat DecodeDatumToCVMat(const Datum& datum, bool is_color) {
 CHECK(datum.encoded()) << "Datum not encoded";
 const string& data = datum.data();
 std::vector<char> vec_data(data.c_str(), data.c_str() + data.size());
// int cv_read_flag = (is_color ? CV_LOAD_IMAGE_COLOR :
  // CV_LOAD_IMAGE_GRAYSCALE);
 int cv_read_flag = (is_color ? cv::IMREAD_COLOR :
   cv::IMREAD_GRAYSCALE);
 cv_img = cv::imdecode(vec_data, cv_read_flag);
 if (!cv_img.data) {
   LOG(ERROR) << "Could not decode datum ";
- 第五个可能遇到的错误:
Anaconda的三方库和本地库冲突了,那就把Anaconda的环境变量先注释掉,编译好了再放出来就好了
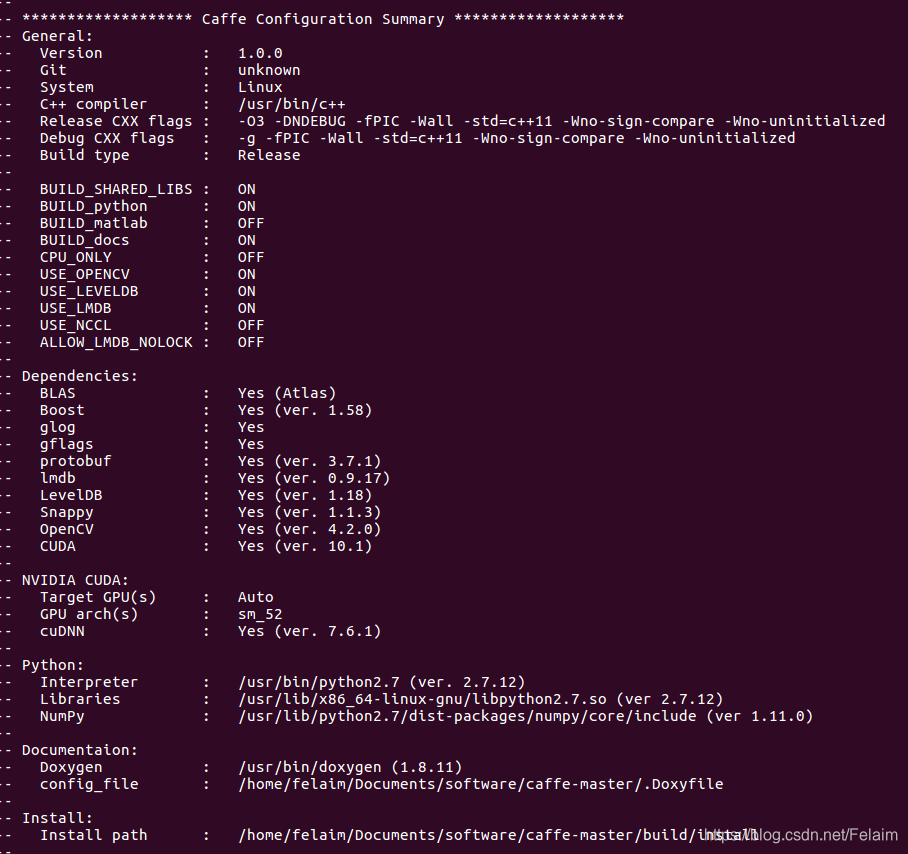
最后放张编译成功的图。。。

自己踩坑千千万,跳出一坑,又进了一坑!
据说OpenCV4.1版本之前存在安全隐患问题,所以现在LZ的公司都换成OpenCV4.2版本了。。。
参考地址:
1.https://blog.csdn.net/m_buddy/article/details/88085425
2.https://blog.csdn.net/qq_18649781/article/details/89047437
3.https://github.com/BVLC/caffe/issues/6680
4.https://github.com/BVLC/caffe/pull/6625/files/7f503bd9a19758a173064e299ab9d4cac65ed60f
PS:
LZ已经在自己家隔离20多天了,到工作的地方还得隔离14天,大门不出二门不卖,真希望能够肆无忌惮的在一个阳关明媚的午后压马路O(∩_∩)O~
现在是关键时刻,还不能放松,越到紧要关头,越要能忍住!


 3008
3008


 被折叠的 条评论
为什么被折叠?
被折叠的 条评论
为什么被折叠?
 到【灌水乐园】发言


