


方法来源
CutMix: Regularization Strategy to Train Strong Classifiers with Localizable Features
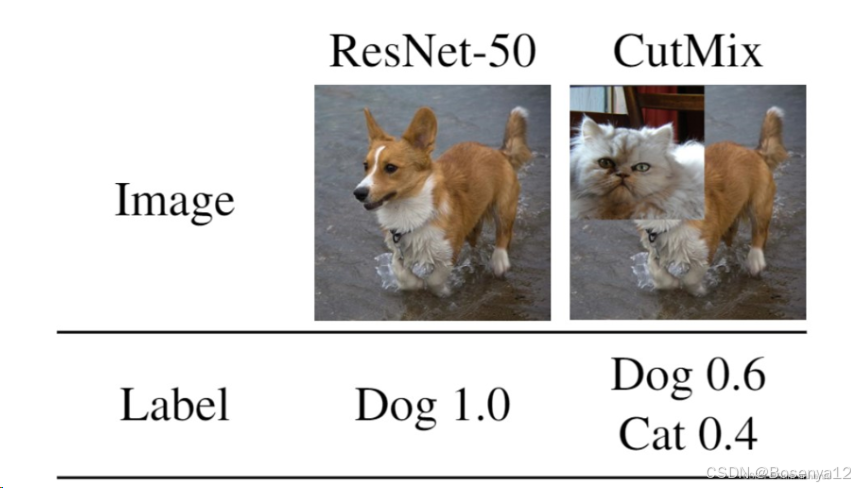
简单来说cutmix相当于cutout+mixup的结合,可以应用于各种任务中。
参考代码
import numpy as np
import torch

def rand_bbox(size, lam):
    """生成 CutMix 的随机边界框。"""
    W = size[2]
    H = size[3]
    cut_w = int(W * np.sqrt(1 - lam))
    cut_h = int(H * np.sqrt(1 - lam))

    # 为边界框生成随机中心
    cx = np.random.randint(W)
    cy = np.random.randint(H)

    # 确保边界框在图像范围内
    bbx1 = np.clip(cx - cut_w // 2, 0, W)
    bby1 = np.clip(cy - cut_h // 2, 0, H)
    bbx2 = np.clip(cx + cut_w // 2, 0, W)
    bby2 = np.clip(cy + cut_h // 2, 0, H)

    return bbx1, bby1, bbx2, bby2

def cumix_datas(datas, labels, alpha):
    """应用 CutMix 数据增强。"""
    lam = np.random.beta(alpha, alpha)
    rand_idx = torch.randperm(datas.size(0))  # 随机打乱索引
    bbx1, bby1, bbx2, bby2 = rand_bbox(datas.size(), lam)

    shuffle_datas = datas[rand_idx]  # 打乱数据
    # 正确引用打乱的标签
    shuffle_labels = labels[rand_idx]  # 打乱标签

    # 混合图像
    datas[:, :, bbx1:bbx2, bby1:bby2] = shuffle_datas[:, :, bbx1:bbx2, bby1:bby2]

    # 计算用于损失计算的调整 lambda
    lam = 1 - (bbx2 - bbx1) * (bby2 - bby1) / (datas.size(2) * datas.size(3))

    labels_a = labels
    labels_b = shuffle_labels
    return datas, labels_a, labels_b, lam
参考文章
【论文阅读笔记】CutMix:数据增强
CutMix&Mixup详解与代码实战
高阶数据增强:Cutmix 原理讲解&零基础程序实现


 913
913

 被折叠的 条评论
为什么被折叠?
被折叠的 条评论
为什么被折叠?
 到【灌水乐园】发言


