


1.场景介绍
3D人脸点云不容易直接训练,需要将其转化为二维图片。大部分论文是这样做的:首先求出每个点所在平面的法向量,发向量与水平面和竖直平面的夹角组成两个通道,深度图是一个通道。然后,将这三个通道归一到[0~255],形成我们人眼可见的图片。最后,就可以像训练图片一样训练人脸识别了。
2. 原始的点云
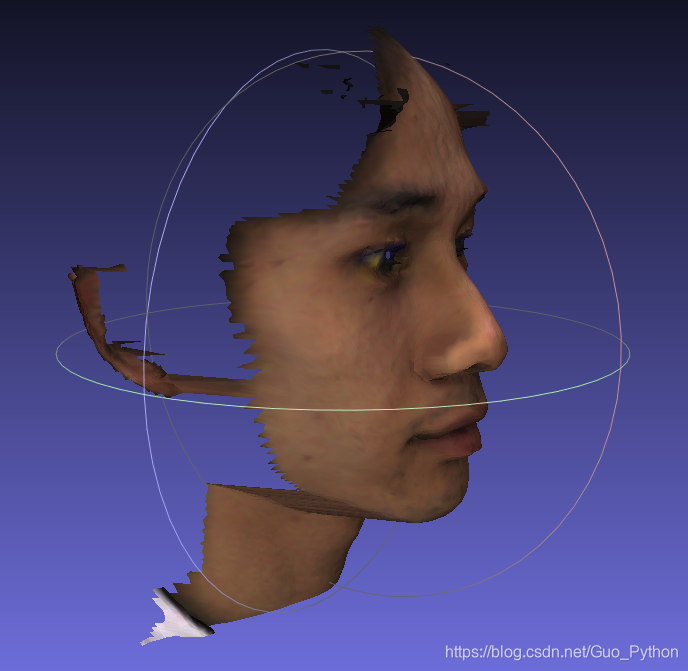
将点云MashLab中打开,如下图所示:
如果你没有安装MeshLab,也可用代码打开,更加直观的查看点云,代码如下:
#coding:UTF-8
import os
import sys
reload(sys)
sys.setdefaultencoding("utf-8")
import numpy as np
import matplotlib.pyplot as plt
from mpl_toolkits.mplot3d import Axes3D

def ply_reader(ply_file):
    with open(ply_file, "r") as f:
        lines = f.readlines()
        lines = lines[12:-3]
    x = []
    y = []
    z = []
    for line in lines:
        parts = line.split(" ")
        x.append(float(parts[0]))
        y.append(float(parts[1]))
        z.append(float(parts[2]))
    return x, y, z

def obj_reader(obj_file):
    alpha, beta, theta, x, y, z = [], [], [], [], [], []
    with open(obj_file, "r") as f:
        lines = f.readlines()
        lines = [i for i in lines if i[0]=="v"]
    for line in lines:
        if line[:2] == "vn":
            parts = line.rstrip("\n").split(" ")
            alpha.append(float(parts[1]))
            beta.append(float(parts[2]))
            theta.append(float(parts[3]))
        else:
            parts = line.rstrip("\n").split(" ")
            x.append(float(parts[1]))
            y.append(float(parts[2]))
            z.append(float(parts[3]))
    return x, y, z, alpha, beta, theta

def points_show(x, y, z):
    fig = plt.figure()
    ax = Axes3D(fig)
    ax.set_xlabel('X label',color='r')
    ax.set_ylabel('Y label',color='r')
    ax.set_zlabel('Z label')
    ax.scatter(x,y,z,c='b',marker='.',s=2,linewidth=0,alpha=1,cmap='spectral')
    plt.show()


if __name__ == "__main__":
    x, y, z, alpha, beta, theta = obj_reader("60.obj")
    points_show(x,y,z)
打开的点云如下:
3. 点云法向量三个分和深度分量四个通道的图片如图所示
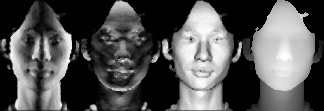
四张图片从左到右分别是法向量与三维空间三个平面夹角的余弦值,最后一张图是深度值。
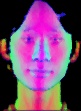
将第一张图、第三张图、第四张图三个通道叠加起来,形成训练的彩色图,如下图所示:
代码实现如下:
#coding:UTF-8
import sys
reload(sys)
sys.setdefaultencoding("utf-8")
import numpy as np
import cv2
import math


def obj_reader(obj_file):
    alpha, beta, theta, x, y, z = [], [], [], [], [], []
    with open(obj_file, "r") as f:
        lines = f.readlines()
        lines = [i for i in lines if i[0]=="v"]
    for line in lines:
        if line[:2] == "vn":
            parts = line.rstrip("\n").split(" ")
            alpha.append(float(parts[1]))
            beta.append(float(parts[2]))
            theta.append(float(parts[3]))
        else:
            parts = line.rstrip("\n").split(" ")
            x.append(float(parts[1]))
            y.append(float(parts[2]))
            z.append(float(parts[3]))
    return x, y, z, alpha, beta, theta


def img_norm(img):
    img_max = (img[img != 0]).max()
    img_min = (img[img != 0]).min()
    img_new = (img-img_min)*255.0/(img_max-img_min)
    th = (0-img_min)*255.0/(img_max - img_min)
    img_new[img_new==th] = 0
    img_new = cv2.medianBlur(img_new.astype(np.float32), 3)
    return img_new


def point2gray(x, y, z, alpha, beta, theta):
    u_list, v_list, z_list = [], [], []
    for i, j, k in zip(x, y, z):
        u_list.append((i*616.009)/k)
        v_list.append((j*614.024)/k)
        z_list.append(k/1000)
    width = int(max(u_list) - min(u_list))
    height = int(max(v_list) - min(v_list))
    gray_img = np.zeros((width+1, height+1, 1))
    alpha_img = np.zeros((width+1, height+1, 1))
    beta_img = np.zeros((width+1, height+1, 1))
    theta_img = np.zeros((width+1, height+1, 1))
    rst_img = np.zeros((width+1, height+1, 3))
    u_min = min(u_list)
    v_min = min(v_list)
    u_list = [int(i-u_min) for i in u_list]
    v_list = [int(i-v_min) for i in v_list]

    for u, v, z, al, be, th in zip(u_list, v_list, z_list, alpha, beta, theta):
        gray_img[u,v] = z
        # al,be,th are angles
        alpha_img[u,v] = abs(al)
        beta_img[u,v] = abs(be)
        theta_img[u,v] = abs(th)

    img_gray = img_norm(gray_img)
    cv2.imwrite("gray.jpg", img_gray)

    alpha_img = img_norm(alpha_img)
    cv2.imwrite("alpha.jpg", alpha_img)

    beta_img = img_norm(beta_img)
    cv2.imwrite("beta.jpg", beta_img)

    theta_img = img_norm(theta_img)
    cv2.imwrite("theta.jpg", theta_img)

    rst_img[:,:,0] = img_gray
    rst_img[:,:,1] = alpha_img
    rst_img[:,:,2] = theta_img
    cv2.imwrite("rst.jpg", rst_img)

if __name__ == "__main__":
    x, y, z, alpha, beta, theta = obj_reader("60.obj")
    point2gray(y,x,z, alpha, beta, theta)
注:将人脸点云转化为上述图片,就可以进行3D人脸识别了。
RGBD人脸数据的处理,请参考我的博客:https://blog.csdn.net/Guo_Python/article/details/115080436。
如需技术交流,请留言,或添加作者微信(下面二维码)。


 1942
1942

 被折叠的 条评论
为什么被折叠?
被折叠的 条评论
为什么被折叠?
 到【灌水乐园】发言


