


理论部分可参考我的上篇博客:视觉-语言大模型VLM理论——保姆级教程
1. 多模态大模型Qwen2.5-VL本地部署指南
Qwen2.5-VL 是通义千问系列的最新多模态大模型,具备图文理解、视觉推理、文档解析等强大能力,广泛应用于智能搜索、内容生成、企业文档处理等领域。
🔹 主要功能
✅ 多模态问答:解析图片、图表、文档,回答问题,支持 OCR 识别。
✅ 复杂文档解析:提取发票、合同、PPT、表格等文件中的结构化信息。
✅ 高级视觉推理:理解图像中的关系,如因果推理、数据分析。
✅ 智能摘要与生成:自动生成图片描述、文档摘要,提高信息获取效率。
✅ 代码与 UI 解析:识别截图中的代码/UI 设计,生成可执行代码或交互说明。
1.1 环境准备
机器:4090
python: 3.10
cuda: 12.2
# 网络不好,可能需要尝试几次
pip install git+https://github.com/huggingface/transformers accelerate
pip install qwen-vl-utils[decord]

# 跑代码时缺少包
pip install torchvision==0.19.0
1.2 下载模型与代码封装
模型下载
from modelscope import snapshot_download
model_dir = snapshot_download('Qwen/Qwen2.5-VL-7B')
推理代码封装
from transformers import Qwen2_5_VLForConditionalGeneration, AutoProcessor
from qwen_vl_utils import process_vision_info
import torch


class QwenVLModel:
    def __init__(self, model_path="./Qwen2.5-VL-7B-Instruct", use_flash_attention=False):
        """
        初始化Qwen VL模型
        Args:
            model_path: 模型路径
            use_flash_attention: 是否使用flash attention加速
        """
        # 加载模型
        if use_flash_attention:
            self.model = Qwen2_5_VLForConditionalGeneration.from_pretrained(
                model_path,
                torch_dtype=torch.bfloat16,
                attn_implementation="flash_attention_2",
                device_map="auto",
            )
        else:
            self.model = Qwen2_5_VLForConditionalGeneration.from_pretrained(
                model_path, torch_dtype="auto", device_map="auto"
            )

        # 初始化处理器
        min_pixels = 256*28*28
        max_pixels = 1280*28*28
        self.processor = AutoProcessor.from_pretrained(
            model_path,
            min_pixels=min_pixels,
            max_pixels=max_pixels,
            use_fast=True
        )

    def process_image(self, image_path, prompt):
        """
        处理图片并生成输出
        Args:
            image_path: 图片路径
            prompt: 提示文本
        Returns:
            生成的文本输出
        """
        messages = [
            {
                "role": "user",
                "content": [
                    {
                        "type": "image",
                        "image": image_path,
                    },
                    {"type": "text", "text": prompt},
                ],
            }
        ]

        # 准备推理输入
        text = self.processor.apply_chat_template(
            messages, tokenize=False, add_generation_prompt=True
        )
        image_inputs, video_inputs = process_vision_info(messages)
        inputs = self.processor(
            text=[text],
            images=image_inputs,
            videos=video_inputs,
            padding=True,
            return_tensors="pt",
        )
        inputs = inputs.to(self.model.device)

        # 生成输出
        generated_ids = self.model.generate(**inputs, max_new_tokens=512)
        generated_ids_trimmed = [
            out_ids[len(in_ids) :] for in_ids, out_ids in zip(inputs.input_ids, generated_ids)
        ]
        output_text = self.processor.batch_decode(
            generated_ids_trimmed, skip_special_tokens=True, clean_up_tokenization_spaces=False
        )
        return output_text


if __name__ == "__main__":
    model = QwenVLModel()
    img_path = "https://qianwen-res.oss-cn-beijing.aliyuncs.com/Qwen-VL/assets/demo.jpeg"
    output_text = model.process_image(
        img_path,
        "请用中文描述一下这张图片"
    )
    print(f"输出信息: {output_text}")
1.3 效果测试
图片

模型输出结果:
输出信息: ['这张图片展示了一位女士和一只狗在海滩上互动的场景。女士坐在沙滩上,穿着格子衬衫和黑色裤子,面带微笑,似乎在与狗进行友好互动。狗戴着彩色的项圈,正伸出前爪与女士的手相触碰,显得非常亲密和愉快。背景是广阔的海洋和天空,夕阳的余晖洒在沙滩上,营造出一种温馨和谐的氛围。整个画面给人一种轻松愉快的感觉。']
2. VLLM部署多模态大模型

2.1 vLLM简介
vLLM 是一个高效的推理和部署框架,专为大规模语言模型(LLM)优化。它采用 PagedAttention 技术,显著提高 GPU 显存利用率,支持高吞吐量推理。vLLM 兼容 Hugging Face Transformers 和 OpenAI API 接口,便于集成现有模型。其高效的 KV 缓存管理减少重复计算,适用于流式生成、批量处理和多用户推理场景。vLLM 还支持 FlashAttention,可进一步提升推理速度。相比传统推理框架,vLLM 具备更低的延迟和更高的并发能力,适用于部署 GPT-4 级别的大模型。
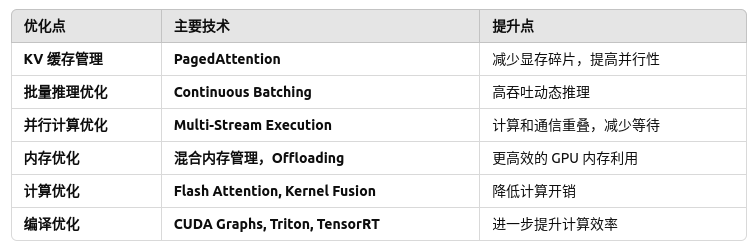
vLLM 通过这些优化,实现了 高吞吐量、低延迟、大模型推理加速,尤其适用于 多用户并发推理 和 大模型部署。
2.2 vLLM部署Qwen2.5 vl多模态大模型实战
环境准备
pip install git+https://github.com/huggingface/transformers accelerate
pip install qwen-vl-utils[decord]

# 跑代码时缺少包
pip install torchvision==0.19.0
pip install vllm==0.7.3
2.3 测试代码封装
from transformers import AutoProcessor
from vllm import LLM, SamplingParams
from qwen_vl_utils import process_vision_info


class QwenVLModel:
    def __init__(self, model_path="./Qwen2.5-VL-7B-Instruct"):
        self.model_path = model_path

        self.llm = LLM(
            model=self.model_path,
            limit_mm_per_prompt={"image": 1, "video": 1},
            tensor_parallel_size=1,      # 设置为1以减少GPU内存使用
            gpu_memory_utilization=0.9,  # 控制GPU内存使用率
            max_model_len=2048,          # 限制最大序列长度
            # quantization="awq",        # 使用AWQ量化来减少内存使用
        )

        self.sampling_params = SamplingParams(
            temperature=0.1,
            top_p=0.001,
            repetition_penalty=1.05,
            max_tokens=512,
            stop_token_ids=[],
        )

        self.processor = AutoProcessor.from_pretrained(self.model_path)

    def generate(self, messages):
        prompt = self.processor.apply_chat_template(
            messages,
            tokenize=False,
            add_generation_prompt=True,
        )
        image_inputs, video_inputs = process_vision_info(messages)

        mm_data = {}
        if image_inputs is not None:
            mm_data["image"] = image_inputs
        if video_inputs is not None:
            mm_data["video"] = video_inputs

        llm_inputs = {
            "prompt": prompt,
            "multi_modal_data": mm_data,
        }

        outputs = self.llm.generate([llm_inputs], sampling_params=self.sampling_params)
        return outputs[0].outputs[0].text


if __name__ == "__main__":
    from tqdm import tqdm
    img_path = "/home/xxx/xxx/workspace/Qwen2.5/test.jpg"
    prompt_str = "提取图片中的关键信息(包含身份证号码),输出的键值对尽量用中文输出,并以json形式输出"
    image_messages = [
        {"role": "system", "content": "You are a helpful assistant."},
        {
            "role": "user",
            "content": [
                {
                    "type": "image",
                    "image": img_path,
                    "min_pixels": 256 * 28 * 28,
                    "max_pixels": 1280 * 28 * 28,
                },
                {"type": "text", "text": prompt_str},
            ],
        },
    ]
    model = QwenVLModel()
    output_text = model.generate(image_messages)
    print(output_text)
输出结果:
{
    "银行名称": "招商银行",
    "卡号": "5236498888888888",
    "持卡人姓名": "XIAO ZHAO",
    "银行卡类型": "MasterCard"
}
3. Swift实战(微调多模态模型Qwen2.5 vl 7B)

本教程利用Swift框架微调Qwen2.5 vl 7B模型,是用的数据集是OCR识别数据集,一共10万张图片。
3.1 环境安装
尤其注意cuda版本,否则有些包安装不了
conda create -n swift3 python==3.10
# flash-attn对cuda版本有要求
# pip install flash-attn
CFLAGS="-lineinfo" pip install flash-attn --no-build-isolation
pip install auto_gptq optimum bitsandbytes timm
git clone https://github.com/modelscope/ms-swift.git
cd ms-swift
pip install -e .

# 如果有需要,安装vllm ,对cuda版本有要求
pip install vllm

## 如果是qwen2.5-vl
pip install git+https://github.com/huggingface/transformers.git@9985d06add07a4cc691dc54a7e34f54205c04d40
pip install qwen_vl_utils
3.2 数据准备
import os
import json


# 写入jsonl文件
def write_jsonl(data_list, filename):
    with open(filename, 'w', encoding='utf-8') as f:
        for item in data_list:
            # 将Python对象转换为JSON格式的字符串
            json_str = json.dumps(item, ensure_ascii=False)
            f.write(json_str + '\n')


if __name__ == "__main__":
    img_dir = "/home/kas/guopei/dataset/ocr_reg_small_dataset/data/TrainImages"
    with open("LabelTrain.txt", "r") as f:
        data_list = []
        lines = f.readlines()
        for line in lines[:90000]:
            img_name, text = line.rstrip().split("\t")
            img_path = os.path.join(img_dir, img_name)
            data = {}
            data["query"] = "请识别图片中的文字"
            data["response"] = text
            data["image_path"] = img_path
            data_list.append(data)
        write_jsonl(data_list, "train.jsonl")

        data_list = []
        for line in lines[90000:]:
            img_name, text = line.rstrip().split("\t")
            img_path = os.path.join(img_dir, img_name)
            data = {}
            data["query"] = "请识别图片中的文字"
            data["response"] = text
            data["image_path"] = img_path
            data_list.append(data)
        write_jsonl(data_list, "val.jsonl")
        print("done")
处理后的数据如下,示例:
{"query": "请识别图片中的文字", "response": "在2日内到有效", "image_path": "/home/kas/guopei/dataset/ocr_reg_small_dataset/data/TrainImages/Train_090008.jpg"}
{"query": "请识别图片中的文字", "response": "车服务公司", "image_path": "/home/kas/guopei/dataset/ocr_reg_small_dataset/data/TrainImages/Train_090009.jpg"}
{"query": "请识别图片中的文字", "response": "宗派排次", "image_path": "/home/kas/guopei/dataset/ocr_reg_small_dataset/data/TrainImages/Train_090010.jpg"}
{"query": "请识别图片中的文字", "response": "增加金属蛋白酶,有助于异位组织的侵蚀", "image_path": "/home/kas/guopei/dataset/ocr_reg_small_dataset/data/TrainImages/Train_090011.jpg"}
{"query": "请识别图片中的文字", "response": "学历要求", "image_path": "/home/kas/guopei/dataset/ocr_reg_small_dataset/data/TrainImages/Train_090012.jpg"}
{"query": "请识别图片中的文字", "response": "防御", "image_path": "/home/kas/guopei/dataset/ocr_reg_small_dataset/data/TrainImages/Train_090013.jpg"}
{"query": "请识别图片中的文字", "response": "等:¥476.0", "image_path": "/home/kas/guopei/dataset/ocr_reg_small_dataset/data/TrainImages/Train_090014.jpg"}
{"query": "请识别图片中的文字", "response": "余443张", "image_path": "/home/kas/guopei/dataset/ocr_reg_small_dataset/data/TrainImages/Train_090015.jpg"}
{"query": "请识别图片中的文字", "response": "中国", "image_path": "/home/kas/guopei/dataset/ocr_reg_small_dataset/data/TrainImages/Train_090016.jpg"}
{"query": "请识别图片中的文字", "response": "般10%以下", "image_path": "/home/kas/guopei/dataset/ocr_reg_small_dataset/data/TrainImages/Train_090017.jpg"}
3.3 模型微调
MAX_PIXELS=1003520 \
CUDA_VISIBLE_DEVICES=0 \
swift sft \
    --model Qwen/Qwen2.5-VL-7B-Instruct \
    --dataset /home/kas/guopei/dataset/ocr_reg_small_dataset/data/train.jsonl \
    --train_type lora \
    --torch_dtype bfloat16 \
    --num_train_epochs 1 \
    --per_device_train_batch_size 1 \
    --per_device_eval_batch_size 1 \
    --learning_rate 1e-4 \
    --lora_rank 8 \
    --lora_alpha 32 \
    --target_modules all-linear \
    --freeze_vit true \
    --gradient_accumulation_steps 16 \
    --eval_steps 50 \
    --save_steps 50 \
    --save_total_limit 5 \
    --logging_steps 5 \
    --max_length 2048 \
    --output_dir output_ocr \
    --warmup_ratio 0.05 \
    --dataloader_num_workers 4
模型训练中,正常收敛,如下图所示,内存占用18G左右:
{'loss': 4.36318054, 'token_acc': 0.32325581, 'grad_norm': 5.01398468, 'learning_rate': 9.725e-05, 'memory(GiB)': 16.51, 'train_speed(iter/s)': 0.178871, 'epoch': 0.15, 'global_step/max_steps': '840/5568', 'percentage': '15.09%', 'elapsed_time': '1h 18m 15s', 'remaining_time': '7h 20m 31s'}
{'loss': 4.03473396, 'token_acc': 0.34009009, 'grad_norm': 4.07742596, 'learning_rate': 9.72e-05, 'memory(GiB)': 16.51, 'train_speed(iter/s)': 0.179055, 'epoch': 0.15, 'global_step/max_steps': '845/5568', 'percentage': '15.18%', 'elapsed_time': '1h 18m 38s', 'remaining_time': '7h 19m 35s'}
{'loss': 4.13988152, 'token_acc': 0.3490566, 'grad_norm': 3.48686051, 'learning_rate': 9.715e-05, 'memory(GiB)': 16.51, 'train_speed(iter/s)': 0.179242, 'epoch': 0.15, 'global_step/max_steps': '850/5568', 'percentage': '15.27%', 'elapsed_time': '1h 19m 1s', 'remaining_time': '7h 18m 40s'}
Train:  15%|███████████████████████▏                                                                                                                                | 850/5568 [1:19:01<5:59:45,  4.58s/it]
将训练好的模型与loar融合
# checkpoint-5568-merged  融合会生成这样一个文件夹,和Qwen2.5-vl-7b的使用方式完全相同
# 这里`--adapters`需要替换生成训练生成的最后一个检查点文件夹。 由于adapters文件夹中包含了训练的参数文件因此,不需要额外指定`--model`:
CUDA_VISIBLE_DEVICES=0 swift export \
      --adapters  ./output_ocr/vx-xxx/checkpoint-5568 \
      --merge_lora true
3.4 模型测试
# pt推理
NPROC_PER_NODE=1 MAX_PIXELS=1003520 swift infer \
    --ckpt_dir ./output_ocr/vx-xxx/checkpoint-5568-merged \
    --max_new_tokens 300 \
    --temperature 0 \
    --val_dataset val_dataset.jsonl \
    --result_path output_5568.jsonl \
    --max_batch_size 1 \
4. 强化学习从理论到实践
学习目标:
- 简单介绍强化学习的基本理论;
- 用自己的数据跑通强化学习在多模态大模型上的应用;
- 用一个实际的例子给大家展示,利用强化学习微调Qwen2.5 VL多模态模型,用于OCR识别或者信息抽取。
4.1 强化学习简介
强化学习 (RL) 是一种机器学习范式,其中智能体通过与环境交互来学习最优行为,以最大化累积奖励 。与监督学习不同,强化学习不是从显式标签中学习,而是通过反馈(奖励)来指导学习过程。这种学习方式的核心在于通过试错来发现最佳策略,这与监督学习中直接将输入映射到输出有着本质的区别。策略优化是强化学习中的一类算法,其直接目标是找到智能体在环境中采取行动的最佳策略 。策略代表了智能体在给定状态下选择行动的方式,它定义了从状态到行动的映射 。策略优化的重点在于如何行动,而不是评估状态或行动的价值,这与基于价值的方法形成了对比。在基于价值的方法中,智能体学习的是状态或行动的价值,然后根据这些价值来选择行动;而策略优化则直接调整智能体的决策过程,使其能够采取更优的行动。
策略优化在训练大型语言模型 (LLM) 执行复杂的任务(如推理和代码生成)方面发挥着关键作用 。强化学习被用于微调大型语言模型,使其能够更好地符合人类偏好,并提升在特定任务上的性能 。尽管大型语言模型功能强大,但它们在经过初始的预训练和监督微调后,可能仍然无法完全满足特定的用户偏好或复杂的任务要求。强化学习提供了一种机制,可以超越这些初始阶段,根据期望的结果进一步优化语言模型的行为。通过强化学习,可以引导语言模型生成更符合人类价值观、更准确、更具创造性的文本。因此,强化学习在提升大型语言模型的实用性和可靠性方面扮演着至关重要的角色。
DeepseekR1的推理能力,是从强化学习GRPO进行冷启动的,没有采用大量的标注数据,直接通过强化学习就让模型有了很强的推理能力。那GRPO到底是个什么呢。如下图所示, 在传统的近端策略优化算法(PPO)中,通常需要同时训练策略模型和价值模型,后者用于估计每个状态的期望回报,并以此作为优势函数的基线。对于大型语言模型来说,训练与策略模型规模相当的价值网络不仅增加了计算量,还会带来显著的内存开销。为了解决这一问题,GRPO 提出了利用“组内”生成数据的思路:
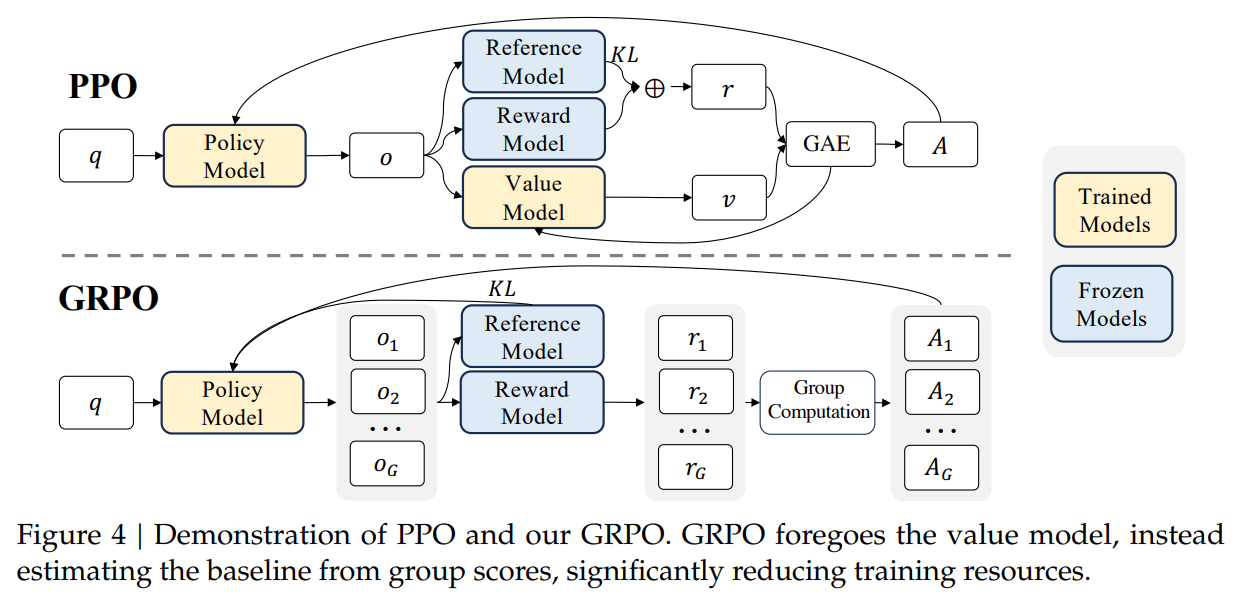
多样本生成: 对于每个输入(例如一个问题),模型根据旧策略生成多个候选输出。
奖励评估: 对每个候选输出采用特定的奖励函数进行评估,奖励可以包括答案正确性、格式符合要求、推理过程合理等指标(例如 DeepSeek 系列中常用的准确性奖励和格式奖励)
组内优势计算: 将这组输出的奖励视为一个样本集,直接计算其均值和标准差,并将每个输出的奖励进行标准化(即减去均值、除以标准差),从而获得组内相对优势。这种方式能够反映出同一问题下各个候选答案的“相对好坏”,而不需要单独训练一个价值模型。
其优势省去价值网络,占用资源少,同时训练稳定性较PPO要高。
4.2 环境配置,模型下载,数据准备
与Swifts实战中完全相同,只是模型用Qwen2.5-VL-3B
4.3 注册自己的数据集
路径:./ms-swift/swift/llm/dataset/dataset/llm.py
# 在代码末尾添加,数据路径最好写绝对路径确保不会出问题
class MyDataPreprocessor(ResponsePreprocessor):

    def preprocess(self, row: Dict[str, Any]) -> Dict[str, Any]:
        query = row.get('query', '')
        solution = row.get('response', '')
        query = (f'{query} Output the thinking process in <think> </think> and '
                 'final answer (number) in <answer> </answer> tags.')
        row.update({'query': query, "solution": solution})
        return super().preprocess(row)


register_dataset(
    DatasetMeta(
        dataset_path="/home/kas/guopei/dataset/ocr_reg_small_dataset/data/train.jsonl",
        preprocess_func=MyDataPreprocessor(),
        tags=['qa', 'math', 'vision', 'grpo']))
- dataset_path:设置自己本地的数据路径。
- MyDataPreprocessor:表示对自己数据集的每一行(每一条)做预处理。
4.4 修改损失奖励函数
路径:./ms-swift/examples/train/grpo/plugin/plugin.py
# 放在代码末尾,内容可以参考其他代码。
class MyAccuracy(ORM):
    def __call__(self, completions, solution,**kwargs) -> List[float]:
        rewards = xxxxx
        return rewards
orms['external_my_acc'] = MyAccuracy
注意:completions和solution是list。
下面是我写的奖励函数,是基于deepseek R1奖励函数的改进版本,专门用来训练OCR的
# 放在代码末尾
class MultiModalAccuracyORMGuopei(ORM):

    def __init__(self, important_chars="0123456789¥$", important_weight=2.0):
        """
        初始化奖励计算类

        Args:
            important_chars (str): 重要字符集合,错误会被加权惩罚
            important_weight (float): 重要字符的错误权重
        """
        self.important_chars = set(important_chars)
        self.important_weight = important_weight

    def calculate_cer(self, reference, hypothesis):
        """
        计算字符错误率(Character Error Rate)

        Args:
            reference (str): 参考文本
            hypothesis (str): 预测文本

        Returns:
            float: 字符错误率
        """
        if not reference:
            return 1.0 if hypothesis else 0.0

        # 创建编辑距离矩阵
        dp = [[0] * (len(hypothesis) + 1) for _ in range(len(reference) + 1)]

        # 初始化第一行和第一列
        for i in range(len(reference) + 1):
            dp[i][0] = i
        for j in range(len(hypothesis) + 1):
            dp[0][j] = j

        # 计算编辑距离,考虑重要字符的加权
        operations = []  # 存储每个操作:(操作类型, 字符, 位置)

        for i in range(1, len(reference) + 1):
            for j in range(1, len(hypothesis) + 1):
                if reference[i-1] == hypothesis[j-1]:
                    dp[i][j] = dp[i-1][j-1]
                else:
                    # 找出最小操作
                    deletion = dp[i-1][j] + 1
                    insertion = dp[i][j-1] + 1
                    substitution = dp[i-1][j-1] + 1

                    min_op = min(deletion, insertion, substitution)
                    dp[i][j] = min_op

                    # 记录操作类型
                    if min_op == deletion:
                        operations.append(("delete", reference[i-1], i-1))
                    elif min_op == insertion:
                        operations.append(("insert", hypothesis[j-1], j-1))
                    else:
                        operations.append(("substitute", reference[i-1], i-1))

        # 计算加权错误
        weighted_errors = 0
        for op, char, _ in operations:
            if char in self.important_chars:
                weighted_errors += self.important_weight
            else:
                weighted_errors += 1

        # 计算加权错误率
        total_chars = len(reference)
        return weighted_errors / total_chars if total_chars > 0 else 0.0

    def extract_confidence(self, content):
        """
        从内容中提取置信度信息

        Args:
            content (str): 可能包含置信度信息的文本

        Returns:
            float: 平均置信度,默认为1.0
        """
        # 尝试从JSON格式中提取置信度
        try:
            # 查找JSON格式的置信度信息
            confidence_pattern = r'"confidence"\s*:\s*(\d+\.\d+|\d+)'
            confidence_matches = re.findall(confidence_pattern, content)

            if confidence_matches:
                # 计算平均置信度
                confidences = [float(match) for match in confidence_matches]
                return sum(confidences) / len(confidences)

            # 查找直接的置信度表示,如 "置信度: 0.95" 或 "confidence: 0.95"
            alt_pattern = r'(?:置信度|confidence)\s*(?::|:)\s*(\d+\.\d+|\d+)'
            alt_matches = re.findall(alt_pattern, content, re.IGNORECASE)

            if alt_matches:
                confidences = [float(match) for match in alt_matches]
                return sum(confidences) / len(confidences)
        except Exception:
            pass

        # 默认返回1.0(完全置信)
        return 1.0

    def __call__(self, completions, solution, **kwargs) -> List[float]:
        """
        奖励函数,检查完成度并计算奖励分数

        Args:
            completions (list[str]): 生成的输出
            solution (list[str]): 标准答案

        Returns:
            list[float]: 奖励分数列表
        """
        rewards = []
        from math_verify import parse, verify

        for content, sol in zip(completions, solution):
            reward = 0.0

            # 尝试符号验证(适用于数学表达式)
            try:
                answer = parse(content)
                if float(verify(answer, parse(sol))) > 0:
                    reward = 1.0
            except Exception:
                pass  # 如果符号验证失败,继续下一种验证方法

            # 如果符号验证失败,尝试基于CER的评估
            if reward == 0.0:
                try:
                    # 从答案和生成内容中提取文本
                    sol_match = re.search(r'<answer>(.*?)</answer>', sol)
                    ground_truth = sol_match.group(1).strip() if sol_match else sol.strip()

                    content_match = re.search(r'<answer>(.*?)</answer>', content)
                    student_answer = content_match.group(1).strip() if content_match else content.strip()

                    # 提取置信度信息
                    confidence = self.extract_confidence(content)

                    # 计算加权字符错误率
                    cer = self.calculate_cer(ground_truth, student_answer)

                    # 计算最终奖励:正确率 * 置信度
                    reward = max(0.0, (1.0 - cer) * confidence)

                except Exception as e:
                    # 保持奖励为0.0,如果出现任何错误
                    pass

            rewards.append(reward)

        return rewards

orms['external_ocr_format'] = MultiModalAccuracyORMGuopei
4.5 训练模型
MASTER_PORT=29501 \
CUDA_VISIBLE_DEVICES=0 \
swift rlhf \
    --rlhf_type grpo \
    --model Qwen/Qwen2.5-VL-3B-Instruct \
    --external_plugins ms-swift/examples/train/grpo/plugin/plugin.py \
    --reward_funcs external_ocr_format format \
    --train_type lora \
    --use_vllm true \
    --vllm_device auto \
    --vllm_gpu_memory_utilization 0.5 \
    --vllm_max_model_len 1024 \
    --lora_rank 8 \
    --lora_alpha 32 \
    --target_modules all-linear \
    --torch_dtype bfloat16 \
    --dataset /home/kas/guopei/dataset/ocr_reg_small_dataset/data/train.jsonl \
    --max_completion_length 1024 \
    --num_train_epochs 1 \
    --per_device_train_batch_size 2 \
    --per_device_eval_batch_size 2 \
    --learning_rate 1e-5 \
    --gradient_accumulation_steps 1 \
    --eval_steps 100 \
    --save_steps 100 \
    --save_total_limit 2 \
    --logging_steps 5 \
    --max_length 2048 \
    --output_dir output_GRPO \
    --warmup_ratio 0.05 \
    --dataloader_num_workers 4 \
    --dataset_num_proc 4 \
    --num_generations 2 \
    --temperature 0.9 \
    --deepspeed zero2 \
    --system 'ms-swift/examples/train/grpo/prompt.txt' \
    --log_completions true
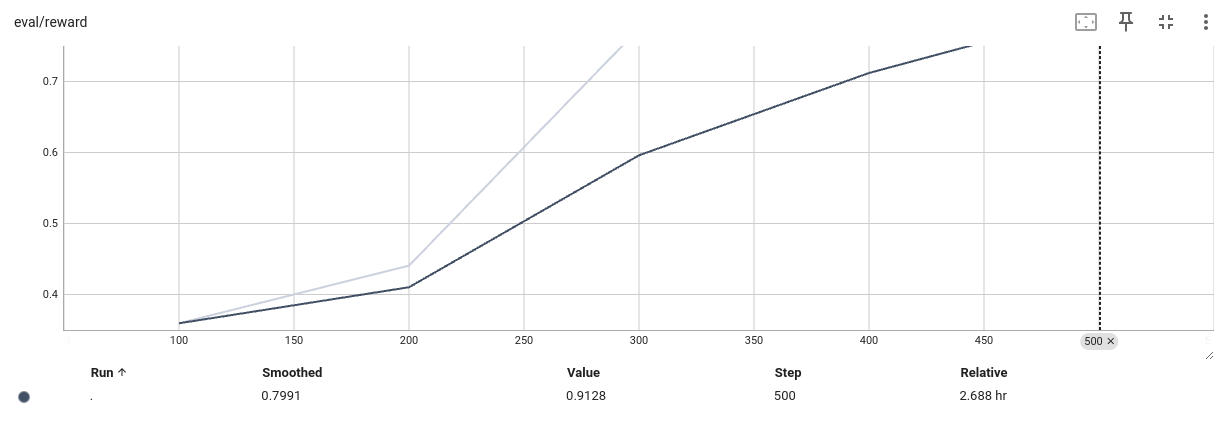
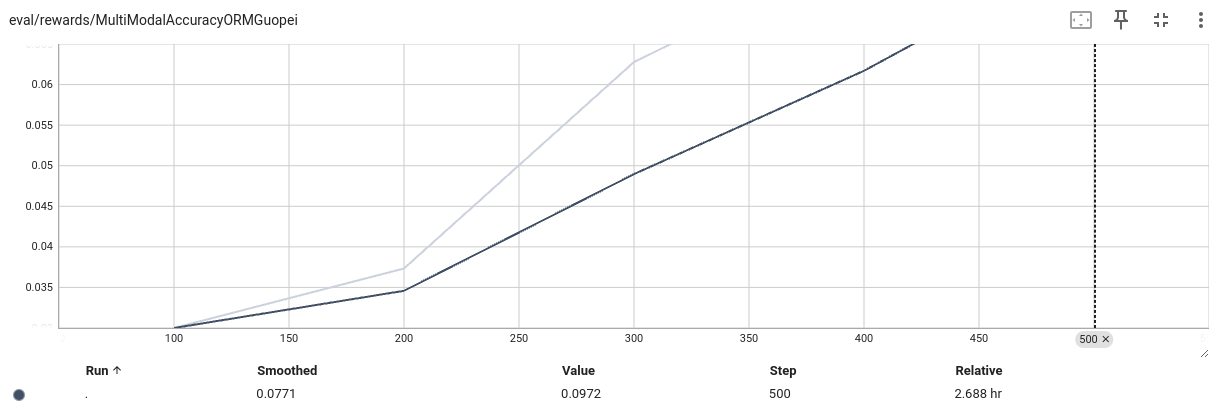
不出意外,你的模型就这样训练起来了,训练日志如下:
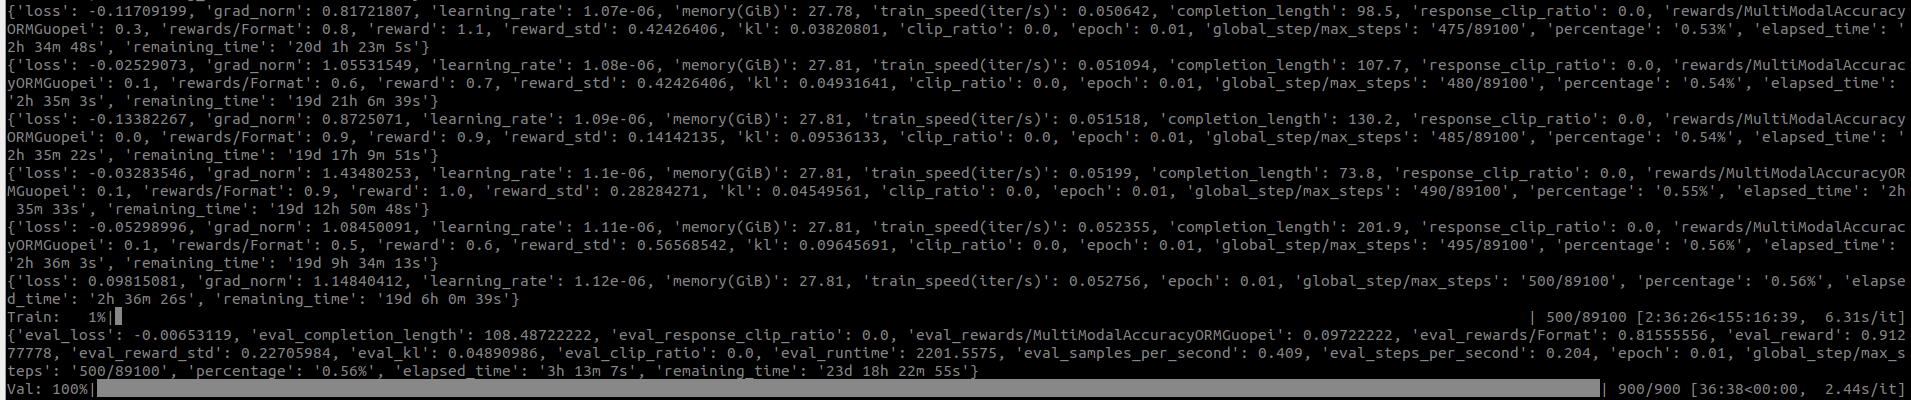
可视化奖励值,说明模型正常收敛。
4.6 模型融合与模型测试
模型融合
# checkpoint-xxx-merged  融合会生成这样一个文件夹,和Qwen2.5-vl-3b的使用方式完全相同
# 这里`--adapters`需要替换生成训练生成的最后一个检查点文件夹。 由于adapters文件夹中包含了训练的参数文件因此,不需要额外指定`--model`:
CUDA_VISIBLE_DEVICES=0 swift export \
      --adapters  ./output_GRPO/vx-xxx/checkpoint-xxx \
      --merge_lora true
模型测试
from transformers import Qwen2_5_VLForConditionalGeneration, AutoProcessor
from qwen_vl_utils import process_vision_info
import torch


class QwenVLModel:
    def __init__(self, model_path="Qwen/Qwen2.5-VL-3B-Instruct", use_flash_attention=True):
        """
        初始化Qwen VL模型
        Args:
            model_path: 模型路径
            use_flash_attention: 是否使用flash attention加速
        """
        # 加载模型
        if use_flash_attention:
            self.model = Qwen2_5_VLForConditionalGeneration.from_pretrained(
                model_path,
                torch_dtype=torch.bfloat16,
                attn_implementation="flash_attention_2",
                device_map="auto",
            )
            print("use_flash_attention")
        else:
            self.model = Qwen2_5_VLForConditionalGeneration.from_pretrained(
                model_path, torch_dtype="auto", device_map="auto"
            )

        # 初始化处理器
        min_pixels = 256 * 28 * 28
        max_pixels = 1280 * 28 * 28
        self.processor = AutoProcessor.from_pretrained(
            model_path,
            min_pixels=min_pixels,
            max_pixels=max_pixels,
            use_fast=True
        )

    def process_image(self, image_path, prompt):
        """
        处理图片并生成输出
        Args:
            image_path: 图片路径
            prompt: 提示文本
        Returns:
            生成的文本输出
        """
        messages = [
            {
                "role": "user",
                "content": [
                    {
                        "type": "image",
                        "image": image_path,
                    },
                    {"type": "text", "text": prompt},
                ],
            }
        ]

        # 准备推理输入
        text = self.processor.apply_chat_template(
            messages, tokenize=False, add_generation_prompt=True
        )
        image_inputs, video_inputs = process_vision_info(messages)
        inputs = self.processor(
            text=[text],
            images=image_inputs,
            videos=video_inputs,
            padding=True,
            return_tensors="pt",
        )
        inputs = inputs.to(self.model.device)

        # 生成输出
        generated_ids = self.model.generate(**inputs, max_new_tokens=512)
        generated_ids_trimmed = [
            out_ids[len(in_ids) :] for in_ids, out_ids in zip(inputs.input_ids, generated_ids)
        ]
        output_text = self.processor.batch_decode(
            generated_ids_trimmed, skip_special_tokens=True, clean_up_tokenization_spaces=False
        )
        return output_text


def jsonl_reader(jsonl_path):
    """
    读取jsonl文件并提取image_path和solution字段

    Args:
        jsonl_path: jsonl文件路径

    Returns:
        tuple: (image_paths, solutions) 两个列表,分别包含所有的image_path和solution
    """
    import json

    image_paths = []
    solutions = []

    try:
        with open(jsonl_path, 'r', encoding='utf-8') as f:
            for line in f:
                try:
                    # 解析每一行的JSON
                    data = json.loads(line.strip())

                    # 提取image_path和solution字段
                    if 'image_path' in data and 'solution' in data:
                        image_paths.append(data['image_path'])
                        solutions.append(data['solution'])
                except json.JSONDecodeError:
                    # 处理非法JSON行
                    print(f"错误:无法解析以下行为JSON: {line[:50]}...")
                except KeyError as e:
                    # 处理缺少必要字段的情况
                    print(f"错误:缺少必要字段 {e} 在行: {line[:50]}...")
    except Exception as e:
        print(f"读取文件时出错: {e}")

    print(f"成功读取 {len(image_paths)} 条数据")
    return image_paths, solutions


def cal_edit_distance(str1, str2):
    if not str1:
        return len(str2) if str2 else 0

    # 创建编辑距离矩阵
    dp = [[0] * (len(str2) + 1) for _ in range(len(str1) + 1)]

    # 初始化第一行和第一列
    for i in range(len(str1) + 1):
        dp[i][0] = i
    for j in range(len(str2) + 1):
        dp[0][j] = j

    # 计算编辑距离
    for i in range(1, len(str1) + 1):
        for j in range(1, len(str2) + 1):
            if str1[i-1] == str2[j-1]:
                dp[i][j] = dp[i-1][j-1]
            else:
                # 找出最小操作
                deletion = dp[i-1][j] + 1
                insertion = dp[i][j-1] + 1
                substitution = dp[i-1][j-1] + 1
                dp[i][j] = min(deletion, insertion, substitution)

    dis = dp[len(str1)][len(str2)]
    return dis


if __name__ == "__main__":
    # 读取JSONL文件
    val_json = "/home/xxx/xxx/workspace/swift/output_GRPO/vxxx-xxx/val_dataset.jsonl"
    image_paths, solutions = jsonl_reader(val_json)

    model = QwenVLModel(model_path="/home/xxx/xxx/workspace/swift/output_GRPO/vxxx-xxx/checkpoint-2800-merged")
    right_ratio = 0
    for i in range(200):
        image_path, label = image_paths[i], solutions[i]
        output_text = model.process_image(image_path, "请识别图片中的文字, 不需要输出无关内容,例如:“图片中的文字是”")
        output_text = output_text[0]
        print(output_text, label)
        dis = cal_edit_distance(output_text, label)
        ratio = dis*1.0/max(len(output_text), len(label))
        ratio = 1 - ratio
        print(ratio)
        right_ratio += ratio

    print("text_acc:", right_ratio*1.0/200)
代码采用平均编辑距离作为指标进行评价,模型经过微调后有5%的提升。
推荐阅读上一篇:视觉-语言大模型VLM理论——保姆级教程
如果喜欢,可以关注作者的微信公众号:AIWorkshopLab


 1201
1201

 被折叠的 条评论
为什么被折叠?
被折叠的 条评论
为什么被折叠?
 到【灌水乐园】发言


