


今天开始学习Cocos2dx游戏引擎,解析HelloWorld应用程序.理解HelloWorld应用的生命周期,掌握游戏开发、编译、运行的原理。
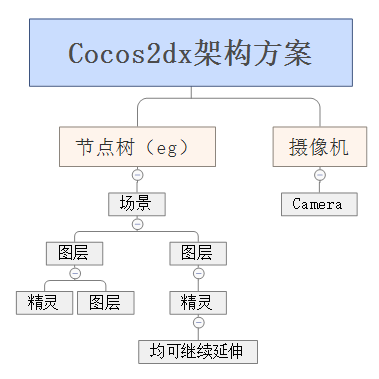
简单的理解,一个游戏类似于一部电影,由导演来控制整个流程,其中包括场景的布置及角色的动作等。这也是Cocos2dx的主要设计思想:

1.AppDelegate类概括了游戏整个生命周期:
#include "AppDelegate.h"
#include "HelloWorldScene.h"
//cocos命名空间
USING_NS_CC;
AppDelegate::AppDelegate() {

}
AppDelegate::~AppDelegate() {

}
//初始化OpenGL上下文环境属性
void AppDelegate::initGLContextAttrs()
{
    //初始化red,green,blue,alpha,depth,stencil
    GLContextAttrs glContextAttrs = {8, 8, 8, 8, 24, 8};
    //传入参数进行设置
    GLView::setGLContextAttrs(glContextAttrs);
}
//应用程序启动时执行此函数
bool AppDelegate::applicationDidFinishLaunching() {
    // 初始化导演类,单例模式,只进行一次init
    auto director = Director::getInstance();
    //设置OpenGL窗口
    auto glview = director->getOpenGLView();
    if(!glview) {
        glview = GLViewImpl::createWithRect("CocosTest", Rect(0, 0, 960, 640));
        director->setOpenGLView(glview);
    }
    //解决方案窗口大小及布局,几种布局方案:EXACT_FIT, NO_BORDER, SHOW_ALL, FIXED_HEIGHT, FIXED_WIDTH, UNKNOWN。
    director->getOpenGLView()->setDesignResolutionSize(960, 640, ResolutionPolicy::SHOW_ALL);
    //是否开启FPS
    director->setDisplayStats(true);
    // 默认FPS
    director->setAnimationInterval(1.0 / 60);
    //增加搜索路径
    FileUtils::getInstance()->addSearchPath("res");
    // 创建一个自动释放的场景对象,调用静态函数创建
    auto scene = HelloWorld::createScene();
    // 运行场景
    director->runWithScene(scene);
    return true;
}

// 当程序未运行时,程序进入后台的操作。如手机来电话。
void AppDelegate::applicationDidEnterBackground() {
     //暂停动画
    Director::getInstance()->stopAnimation();
    // 如果使用了音频引擎,使用此方法音乐将会暂停
    // SimpleAudioEngine::getInstance()->pauseBackgroundMusic();
}

// 应用程序恢复运行
void AppDelegate::applicationWillEnterForeground() {
    //动画开始
    Director::getInstance()->startAnimation();
    //如果使用了音频引擎,调用此方法音乐将恢复
    // SimpleAudioEngine::getInstance()->resumeBackgroundMusic();
}
2.HelloWorld类包括场景、图层、精灵、动作等节点的创建,是程序的核心部分。
#ifndef __HELLOWORLD_SCENE_H__
#define __HELLOWORLD_SCENE_H__
#include "cocos2d.h"
//继承自Layer
class HelloWorld : public cocos2d::Layer
{
public:
    //静态函数创建场景
    static cocos2d::Scene* createScene();
    // 初始化函数
    virtual bool init();
    // 执行静态方法创建类型
    CREATE_FUNC(HelloWorld);
    //关闭按钮的回调函数
    void menuCloseCallback(Ref *pSender);
};
#endif // __HELLOWORLD_SCENE_H__
核心代码:
#include "HelloWorldScene.h"
#include "cocostudio/CocoStudio.h"
#include "ui/CocosGUI.h"

USING_NS_CC;

using namespace cocostudio::timeline;
//静态函数实现
Scene* HelloWorld::createScene()
{
    //创建场景,它是一个自动释放对象(autorelease)
    auto scene = Scene::create();
    //创建图层,autorelease
    auto layer = HelloWorld::create();
    // 将图层添加至场景。因为场景是一个虚拟的对象,必须由图层来填充
    scene->addChild(layer);
    // return the scene
    return scene;
}

// 在init函数中初始化实例对象
bool HelloWorld::init()
{
    //使用csb文件直接创建运行
    /***auto rootNode = CSLoader::createNode("MainScene.csb");
    //将节点加入到场景
    addChild(rootNode);
    ***/
    // 1. super init first
    if ( !Layer::init() )
    {
        return false;
    }
    //使用导演类得到当前可见区域大小
    Size visibleSize = Director::getInstance()->getVisibleSize();
    //可见逻辑区域大小
    Vec2 origin = Director::getInstance()->getVisibleOrigin();
    // 通过图片的形式增加一个关闭按钮图标,它为自动释放对象。传入的第一个参数为点击前图标,第二个参数为点击后图标,第三个参数为点击后执行的回调函数
    auto closeItem = MenuItemImage::create(
                                           "CloseNormal.png",
                                           "CloseSelected.png",
                                           CC_CALLBACK_1(HelloWorld::menuCloseCallback, this));

    closeItem->setPosition(Vec2(origin.x + visibleSize.width - closeItem->getContentSize().width/2 ,
                                origin.y + closeItem->getContentSize().height/2));

    // 创建一个菜单,将使用图片创建的按钮加入进来。
    auto menu = Menu::create(closeItem, NULL);
    menu->setPosition(Vec2::ZERO);
    this->addChild(menu, 1);
    //创建一个标签,标签名为Hello World, 字体为微软雅黑,字号为24
    auto label = Label::create("Hello World", "微软雅黑", 24);

    // 设置在屏幕中心靠上的位置
    label->setPosition(Vec2(origin.x + visibleSize.width/2,
                            origin.y + visibleSize.height - label->getContentSize().height));

    // 将标签加入图层
    this->addChild(label, 1);

    // 将图片以精灵的方式创建并且加入到图层
    auto sprite = Sprite::create("HelloWorld.png");

    sprite->setPosition(Vec2(visibleSize.width/2 + origin.x, visibleSize.height/2 + origin.y));

    this->addChild(sprite, 0);

    return true;
}

void HelloWorld::menuCloseCallback(Ref *pSender) {
    //点击关闭按钮时,调用此回调函数,结束应用程序
    Director::getInstance()->end();
}
总结:HelloWorld应用程序虽然简单,却涵盖了Cocos2dx引擎框架的整体思路,阐述了应用的开发过程。结合各元素API,便可实现应用需求。


 2350
2350

 被折叠的 条评论
为什么被折叠?
被折叠的 条评论
为什么被折叠?
 到【灌水乐园】发言


