


一、简述

MMRotate 是一款基于 PyTorch 的旋转框检测的开源工具箱,是 OpenMMLab 项目的成员之一。里面包含了rcnn、faster rcnn、r3det等各种旋转目标的检测模型,适合于遥感图像领域的目标检测。
基础知识:什么是旋转目标检测
二、MMRotate下载安装
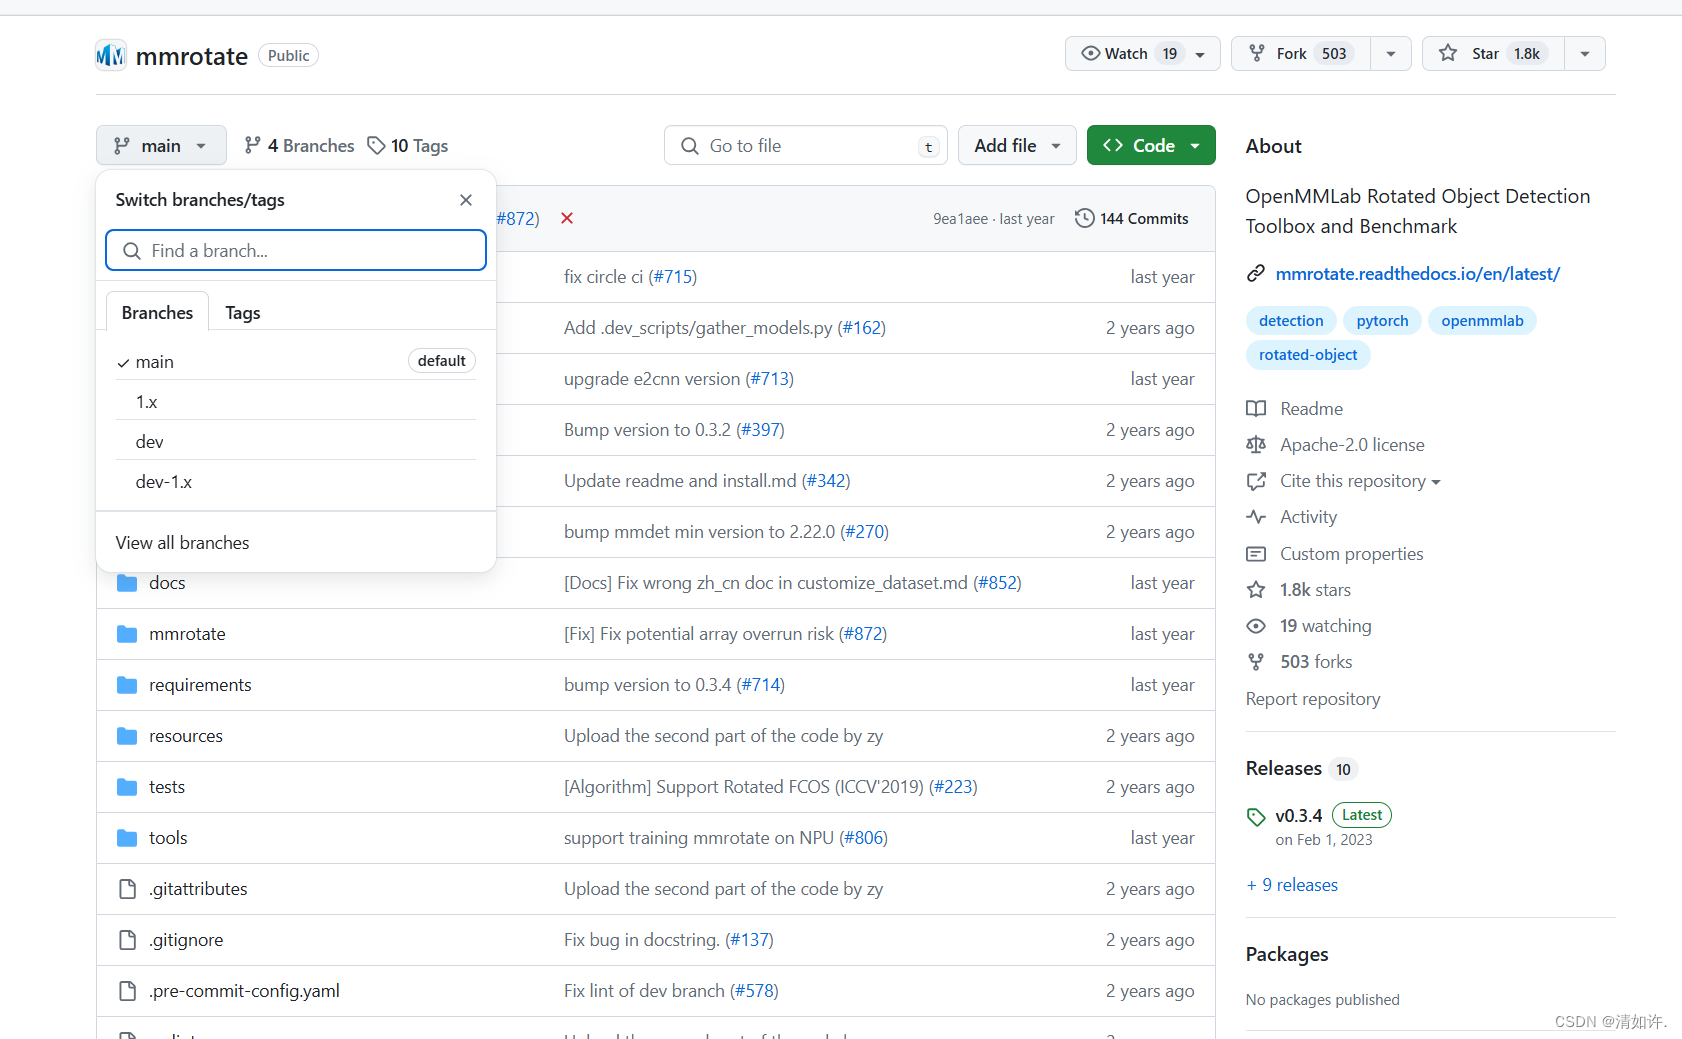
下载地址:https://github.com/open-mmlab/mmrotate/tree/main
官方提供了好几个分支,默认下载main分支,常用模型main分支都有提供,1.x有更多模型可能还没有合并到mian分支,有兴趣的可以看下1.x分支源码,本文以main分支进行训练
2.1 基础环境
操作系统: Ubuntu 20.04.6 LTS
GPU: RTX A5500
MMRotate: 0.3.4
Anaconda
python:3.8
Pytorch:1.9.0
CUDA:11.1
mmcv-full:1.6.0
mmdet:2.25
以上版本亲测不会产生版本冲突!!!
2.2 安装流程
官方安装文档:https://github.com/open-mmlab/mmrotate/blob/main/docs/zh_cn/install.md
2.2.1 CUDA 版本
安装 PyTorch 时,需要指定 CUDA 的版本。如果您不清楚选择哪一个,请遵循我们的建议:
-
对于基于安培架构的 NVIDIA GPU,如 GeForce 30 系列和 NVIDIA A100,必须使用 CUDA 11。(参考本文给出的安装版本)
-
对于较旧的 NVIDIA GPU,CUDA 11 向后兼容,但 CUDA 10.2 更轻量并且具有更好的兼容性。(参考官网提供的安装版本)
在官方文档中使用的 cudatoolkit=10.2 ,因为我GPU型号问题,太低版本的CUDA不支持,按照官方文档安装之后运行验证会报错,出现一系列版本问题
ImportError: undefined symbol: _ZN2at4_ops10zeros_like4callERKNS_6TensorEN3c108optionalINS5_10ScalarTypeEEENS6_INS5_6LayoutEEENS6_INS5_6DeviceEEENS6_IbEENS6_INS5_12MemoryFormatEEE
如果你不想受版本问题困扰,可以按照以下我安装成功的版本进行,步骤如下:
# 创建conda环境
conda create -n mmrotate python=3.8

# 激活环境
conda activate mmrotate

# 安装 PyTorch
pip install torch==1.13.1+cu117 torchvision==0.14.1+cu117 torchaudio==0.13.1 --extra-index-url https://download.pytorch.org/whl/cu117


#  使用 MIM 安装 MMCV 和 MMDetection
pip install mmcv==2.0.0rc4 -f https://download.openmmlab.com/mmcv/dist/cu117/torch1.13/index.html

# 安装mmdet
pip install mmdet==3.0.0rc6  -i https://pypi.tuna.tsinghua.edu.cn/simple


 # 拉取源码
git clone https://github.com/open-mmlab/mmrotate.git

cd mmrotate
# "-v" 表示详细或更多输出
# "-e" 表示以可编辑模式安装项目,
# 因此,对代码进行的任何本地修改都将在不重新安装的情况下生效。
pip install -v -e . -i  https://pypi.tuna.tsinghua.edu.cn/simple
如果遇到版本问题报错,请参考表格修改对应版本信息:AssertionError: MMCV==1.7.1 is used but incompatible. Please install mmcv>=2.0.0rc4, <2.1.0.
如果你用的pytorch版本和我的不一样,没关系,你可以在下面官网查询对应的mmcv版本。
mmcv版本和pytotch版本对应关系查询:https://mmcv.readthedocs.io/zh-cn/latest/get_started/installation.html#pip
2.3 验证安装
为了验证是否正确安装了 MMRotate,我们提供了一些示例代码来运行推理演示。
2.3.1 下载配置文件和检查点文件
第1步: 我们需要下载配置文件和检查点文件。
mim download mmrotate --config oriented_rcnn_r50_fpn_1x_dota_le90 --dest .
下载需要几秒钟或更长时间,具体取决于您的网络环境。当下载完成之后,您将会在当前文件夹下找到 oriented_rcnn_r50_fpn_1x_dota_le90.py 和 oriented_rcnn_r50_fpn_1x_dota_le90-6d2b2ce0.pth 这两个文件。
2.3.4 验证推理演示
第2步: 验证推理演示
python demo/image_demo.py demo/demo.jpg oriented_rcnn_r50_fpn_1x_dota_le90.py oriented_rcnn_r50_fpn_1x_dota_le90-6d2b2ce0.pth --out-file result.jpg
您将在当前目录下看到一张名为 result.jpg 的新图片,其中旋转边界框绘制在汽车、公共汽车等目标上。
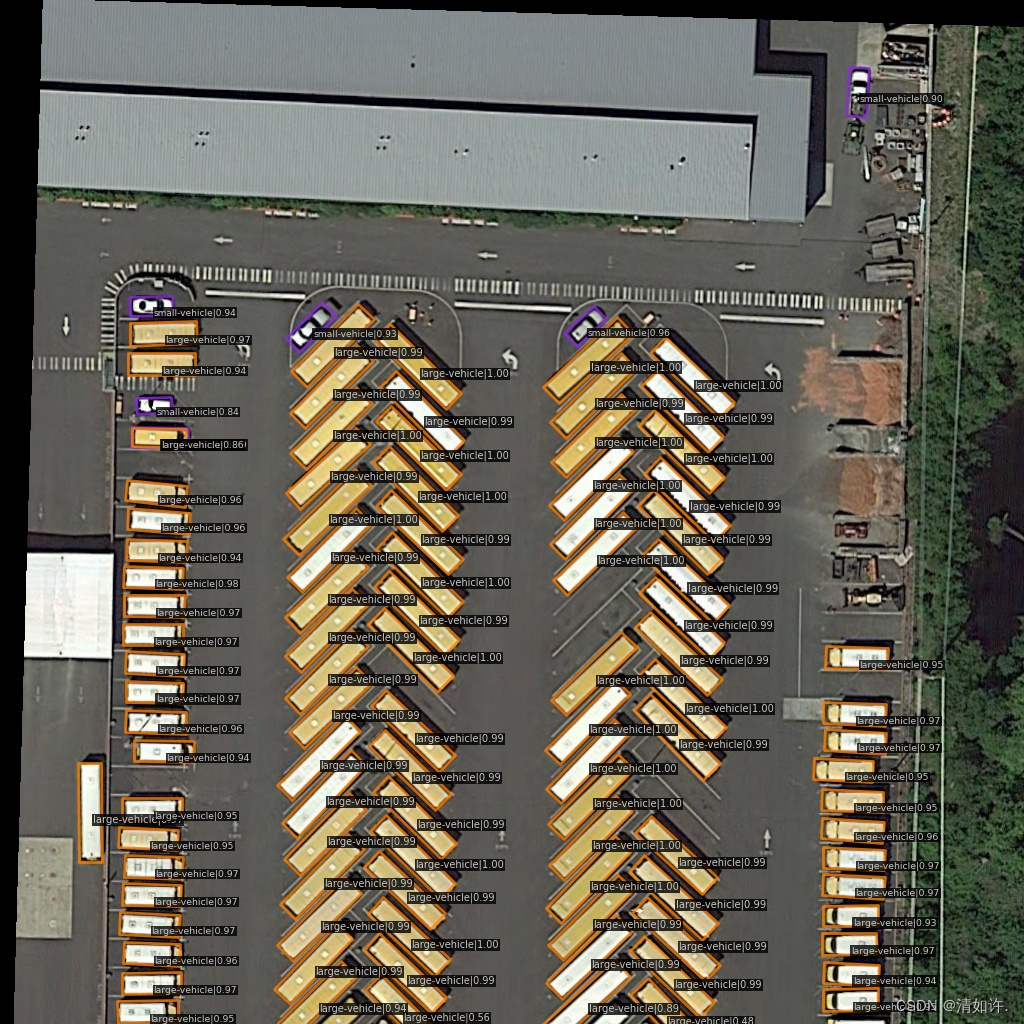
看到生成该图片,表示安装完成。
出现警告信息说是什么什么已经过时了,只要不是错误信息,都不影响,可以忽略。
三、创建训练数据集
要训练自己的模型,自定义数据集制作这部分其实是最麻烦的。MMrotate所使用的数据集格式是DOTA类型的,图片为.png格式且尺寸是 n×n 的(方形),不过不用担心,该项目中有相应的工具包可自动转换.
3.1 DOTA的标签格式
x1, y1, x2, y2, x3, y3, x4, y4, category: 目标名字 difficult:表示标签检测的难易程度 (1表示困难,0表示不困难)
例如:
1868 2186 1843 2147 1892 2116 1917 2156 B 0
1671 2410 1647 2374 1700 2339 1724 2376 B 0
1915 2235 1900 2210 1947 2180 1963 2204 B 0
2028 2021 2054 2062 2005 2092 1979 2051 B 0
2068 2085 2095 2126 2047 2157 2021 2115 B 0
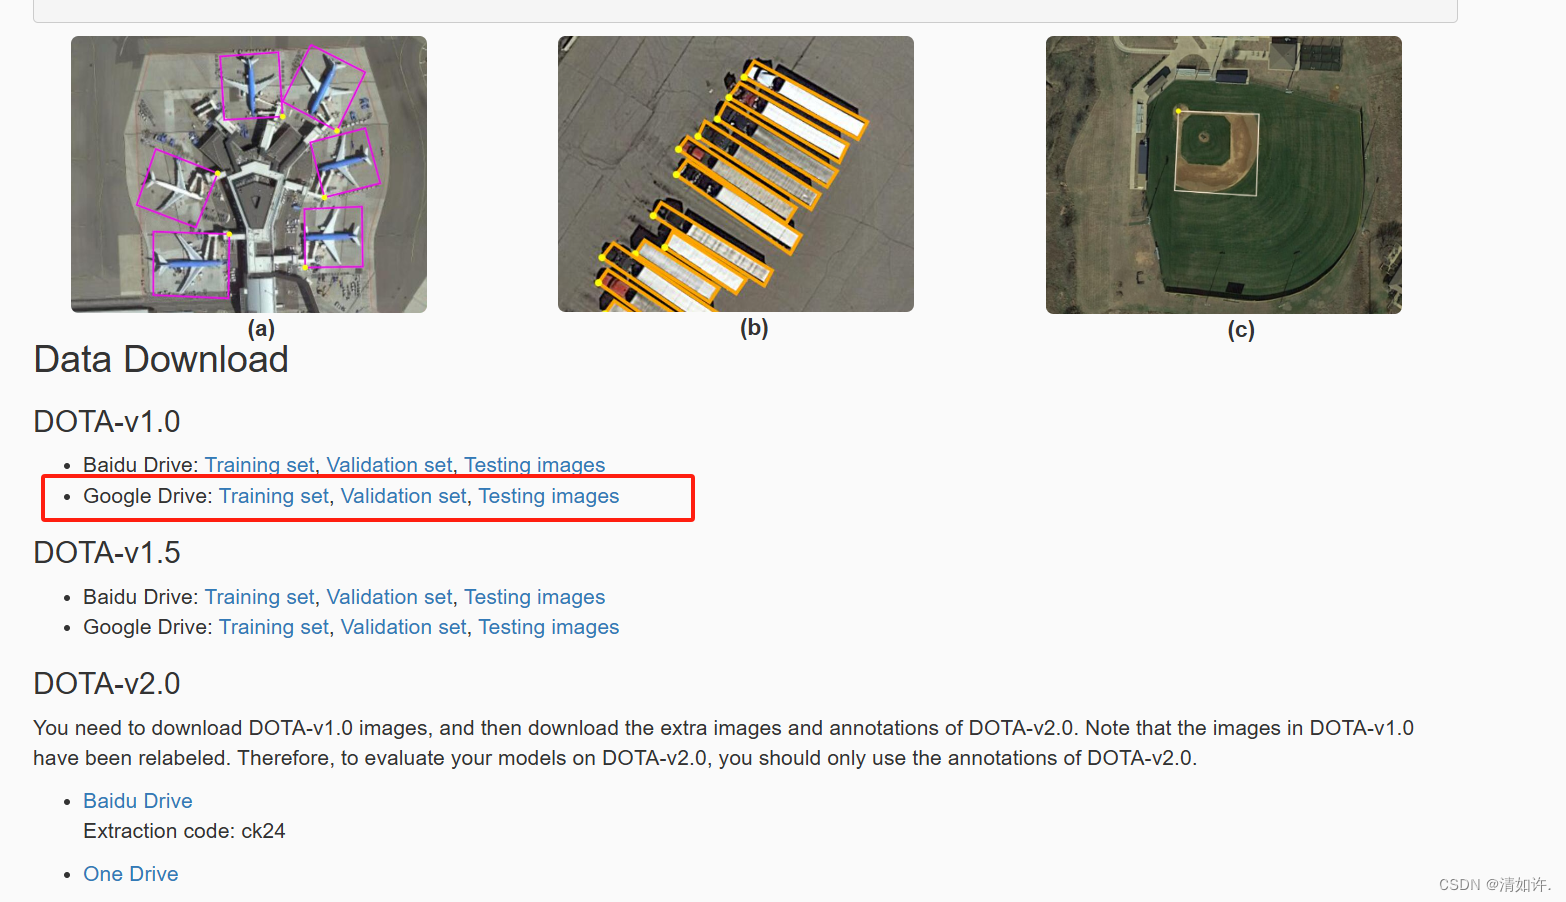
3.2 DOTA数据集地址
地址:https://captain-whu.github.io/DOTA/index.html
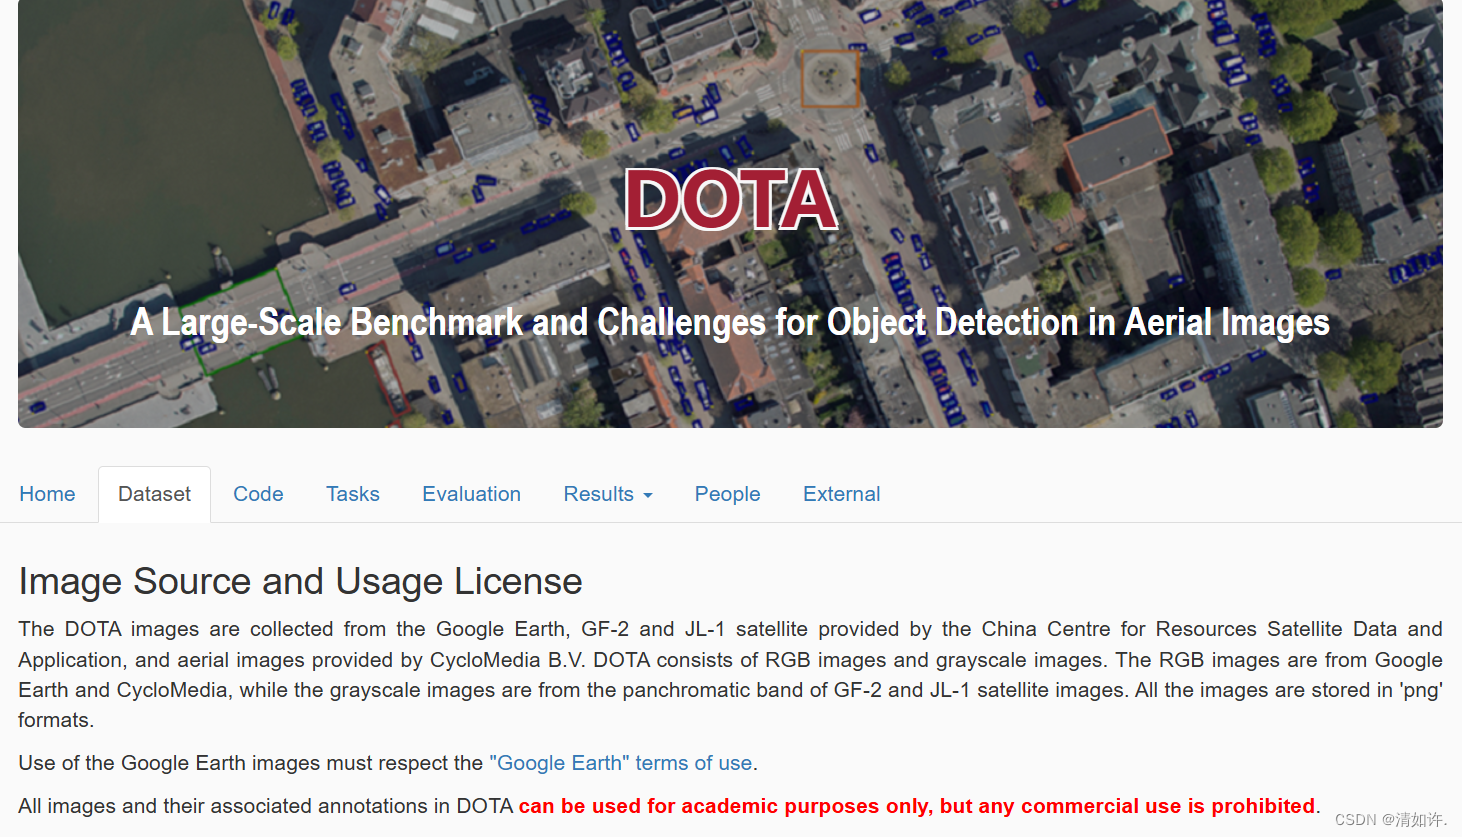
下载1.0模型进行训练演示,推荐使用Google Drive下载
3.3 数据结构格式
新创建一个文件夹,保存训练数据
mkdir /home/ma/dataset/Opt_plane
保存文件位置如下图所示:
(base) root@cw:/home/ma/dataset/Opt_plane# tree -L 2
.
├── check_images.py
├── train
│ ├── images
│ ├──│ ──1.png
│ ├──│ ──2.png
│ └── labelTxt
│ ├──│ ──1.txt
│ ├──│ ──2.txt
├── val
│ ├── images
│ ├──│ ──1.png
│ ├──│ ──2.png
│ └── labelTxt
│ ├──│ ──1.txt
│ ├──│ ──2.txt
第一个check_images.py是检查图像文件有没有损坏,有损坏的话会影响后面的训练,详见:MMrotate报错AttributeError: ‘NoneType‘ object has no attribute ‘shape‘,文件内容如下:
import os
from PIL import Image

def check_images_in_directory(directory):
    # 记录损坏的图像文件
    corrupted_files = []
    # 遍历目录中的所有文件
    for root, _, files in os.walk(directory):
        for file in files:
            # 生成文件的完整路径
            file_path = os.path.join(root, file)
            try:
                # 尝试打开图像文件
                with Image.open(file_path) as img:
                    # 尝试加载图像内容
                    img.verify()
            except (IOError, SyntaxError) as e:
                # 如果图像损坏或无法读取,则记录文件路径
                corrupted_files.append(file_path)
                print(f"Corrupted image file: {file_path}, error: {e}")

    return corrupted_files

def main():
    train_images_dir = "/home/ma/dataset/Opt_plane/train/images"
    val_images_dir = "/home/ma/dataset/Opt_plane/val/images"

    print("Checking training images...")
    corrupted_train_images = check_images_in_directory(train_images_dir)
    print("Checking validation images...")
    corrupted_val_images = check_images_in_directory(val_images_dir)

    # 输出损坏的图像文件列表
    if corrupted_train_images:
        print("\nCorrupted training images:")
        for img in corrupted_train_images:
            print(img)
    else:
        print("\nNo corrupted training images found.")

    if corrupted_val_images:
        print("\nCorrupted validation images:")
        for img in corrupted_val_images:
            print(img)
    else:
        print("\nNo corrupted validation images found.")

if __name__ == "__main__":
    main()
3.4 分割数据集
因为下载下来的数据集尺寸为4096*4096,比较大,而我们训练时统一采用的尺寸为1024-1024,所以这里我们要转化一下,幸运的是官方已经提供了转换文件。我们只需要修改一下数据集路径然后去执行就可以。
查询转换之前的图像尺寸
(base) root@cw:/home/ma/dataset/Opt_plane/train/images# identify 102.png
102.png PNG 4096x4096 4096x4096+0+0 8-bit sRGB 23726700B 0.000u 0:00.000
官方裁剪地址说明:split dota dataset
请将原始图像裁剪成 1024×1024 个补丁,按运行重叠 200 个
运行以下命令前还需要修改一下数据集地址,执行
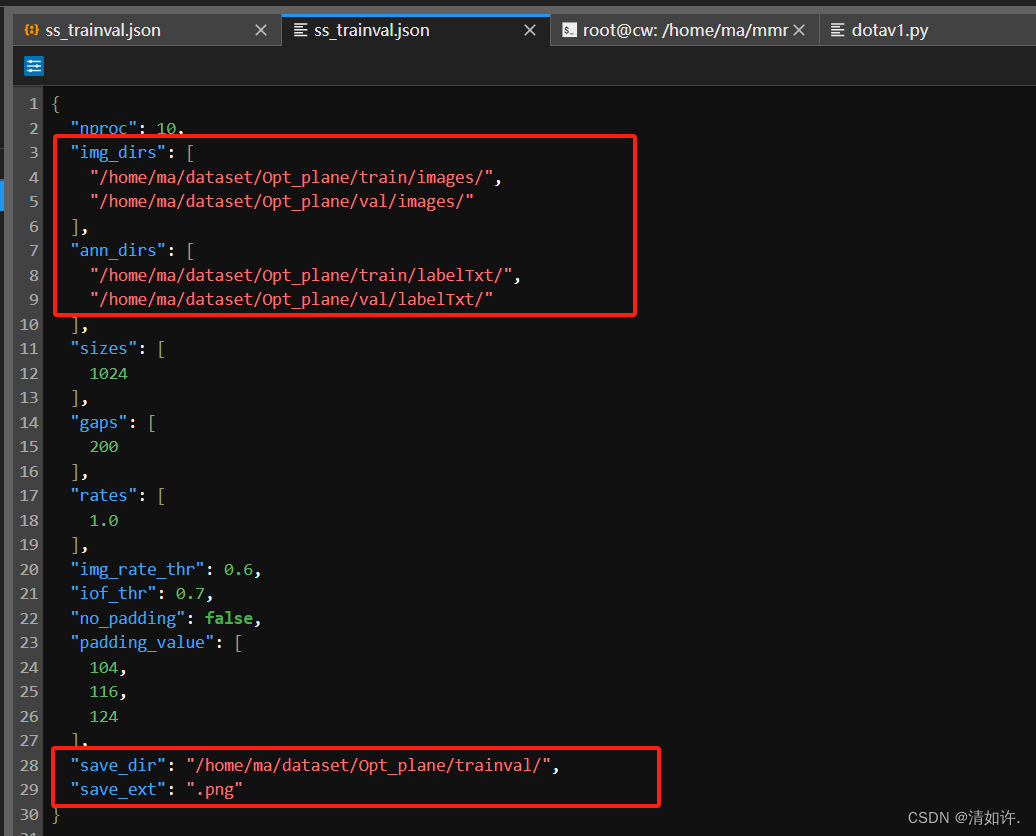
# 修改json分割配置文件
vim tools/data/dota/split/split_configs/ss_trainval.json
将以下几个位置修改为你的数据集存储路径就可以了。
trainval为输出目录。
然后执行以下命令,生成转换后的trainval文件信息。
python tools/data/dota/split/img_split.py --base-json \
  tools/data/dota/split/split_configs/ss_trainval.json
为什么要转换成1024*1024,因为我亲测,转换之前使用4096的图像去训练,mAP值会一直为0,使用rotated faster_rcnn模型也才勉强提升到0.5多,就提升不上去了。纠其原因,是因为卷积神经网络的一个重要特性是感受野(receptive field),即一个输出像素对应的输入区域大小。较小的输入图像尺寸可以更好地利用感受野,提高特征提取的有效性。对于非常大的图像,网络可能无法有效捕捉到全局特征,而缩小图像尺寸可以增强网络对关键特征的捕捉能力。
分割之后的模型结构如下:
├── Opt_plane
│ ├── check_images.py
│ ├── train
│ │ ├── images
│ ├──│──│ ──1.png
│ ├──│──│ ──2.png
│ │ └── labelTxt
│ ├──│──│ ──1.txt
│ ├──│──│ ──2.txt
│ ├── trainval
│ │ ├── 20240604_194329.log
│ │ ├── annfiles
│ ├──│──├── 100__1024__0___0.txt
│ ├──│──├── 100__1024__0___1648.txt
│ │ └── images
│ ├──│──├── 100__1024__0___0.png
│ ├──│──├── 100__1024__0___1648.png
│ ├── val
│ │ ├── images
│ │ └── labelTxt
以上,数据集就准备好了!
如果你嫌以上步骤麻烦,那么你也可以下载我设置好的数据集,下载地址:百度网盘
通过网盘分享的文件:Opt_plane1.zip
链接: https://pan.baidu.com/s/1BZ-5acg9bS1EFEwNzsTFUw 提取码: wnib
四、训练设置
4.1 更改数据集基础路径及训练、验证和测试路径
以下所有命令都是基于在mmrotate安装目录下执行,如:
(mmrotate) root@cw:/home/ma/mmrotate# vim configs/_base_/datasets/dotav1.py
修改为如下所示,
主要修改
data_root = '/home/ma/dataset/Opt_plane/',为你的数据集所在目录samples_per_gpu:这个参数定义了每个 GPU 上处理的样本数,即每个批次中每个 GPU 上的样本数量。它直接影响到模型的批处理大小(batch size),默认为2,我这里改成了4。workers_per_gpu:这个参数定义了每个 GPU 上的数据加载进程数(workers 数量)。它影响数据加载的速度和效率。例如,假设你有 2 个 GPU,并且 workers_per_gpu 设置为 2,那么总共会有 2 * 2 = 4 个数据加载进程在运行。
# dataset settings
dataset_type = 'DOTADataset'
# 修改数据集根目录,为你的数据集所在目录
data_root = '/home/ma/dataset/Opt_plane/'
img_norm_cfg = dict(
    mean=[123.675, 116.28, 103.53], std=[58.395, 57.12, 57.375], to_rgb=True)
train_pipeline = [
    dict(type='LoadImageFromFile'),
    dict(type='LoadAnnotations', with_bbox=True),
    dict(type='RResize', img_scale=(1024, 1024)),
    dict(type='RRandomFlip', flip_ratio=0.5),
    dict(type='Normalize', **img_norm_cfg),
    dict(type='Pad', size_divisor=32),
    dict(type='DefaultFormatBundle'),
    dict(type='Collect', keys=['img', 'gt_bboxes', 'gt_labels'])
]
test_pipeline = [
    dict(type='LoadImageFromFile'),
    dict(
        type='MultiScaleFlipAug',
        img_scale=(1024, 1024),
        flip=False,
        transforms=[
            dict(type='RResize'),
            dict(type='Normalize', **img_norm_cfg),
            dict(type='Pad', size_divisor=32),
            dict(type='DefaultFormatBundle'),
            dict(type='Collect', keys=['img'])
        ])
]
data = dict(
    samples_per_gpu=4, #表示每张GPU的样本数,可以简单理解为batch_size
    workers_per_gpu=4, # 表示多线程数.
    train=dict(
        type=dataset_type,
         # 根据你的实际路径文件修改路径,按照上文数据结构下不用改
        ann_file=data_root + 'trainval/annfiles/',
        img_prefix=data_root + 'trainval/images/',
        pipeline=train_pipeline),
    val=dict(
        type=dataset_type,
        ann_file=data_root + 'trainval/annfiles/',
        img_prefix=data_root + 'trainval/images/',
        pipeline=test_pipeline),
    test=dict(
        type=dataset_type,
        ann_file=data_root + 'test_annfile/',
        img_prefix=data_root + 'source/',
        pipeline=test_pipeline))
4.2 下载预训练模型权重文件
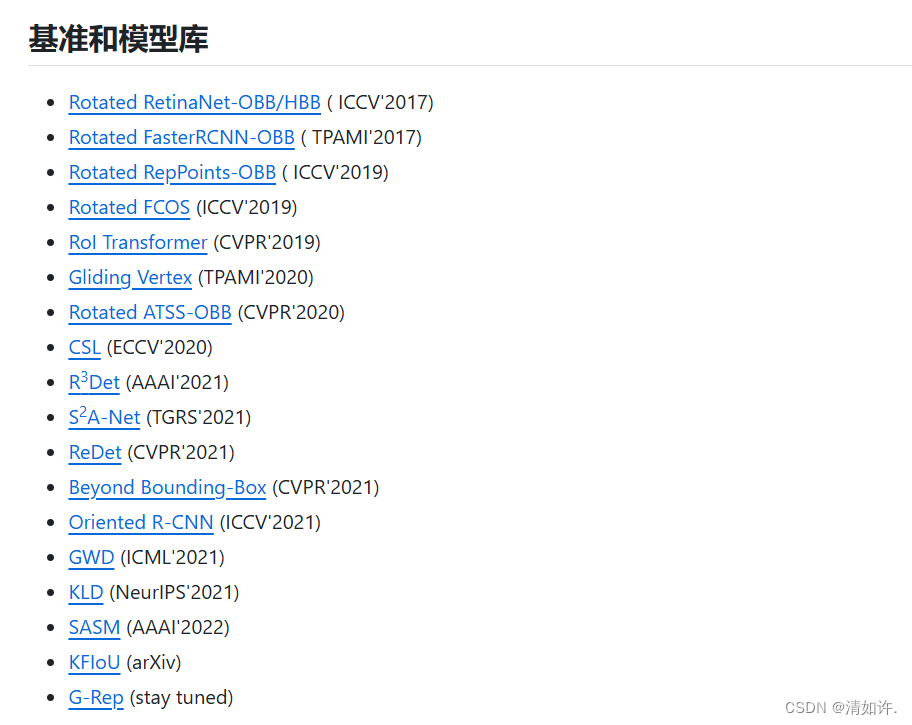
MMrotate支持以下基准模型库,不过这里一般情况下我们不用提前下载,可以修改模型配置文件自动下载
各模型在DOTA v1.0 数据集上的结果:基准和模型库在DOTA v1.0 数据集上的结果
4.3 编辑模型配置文件
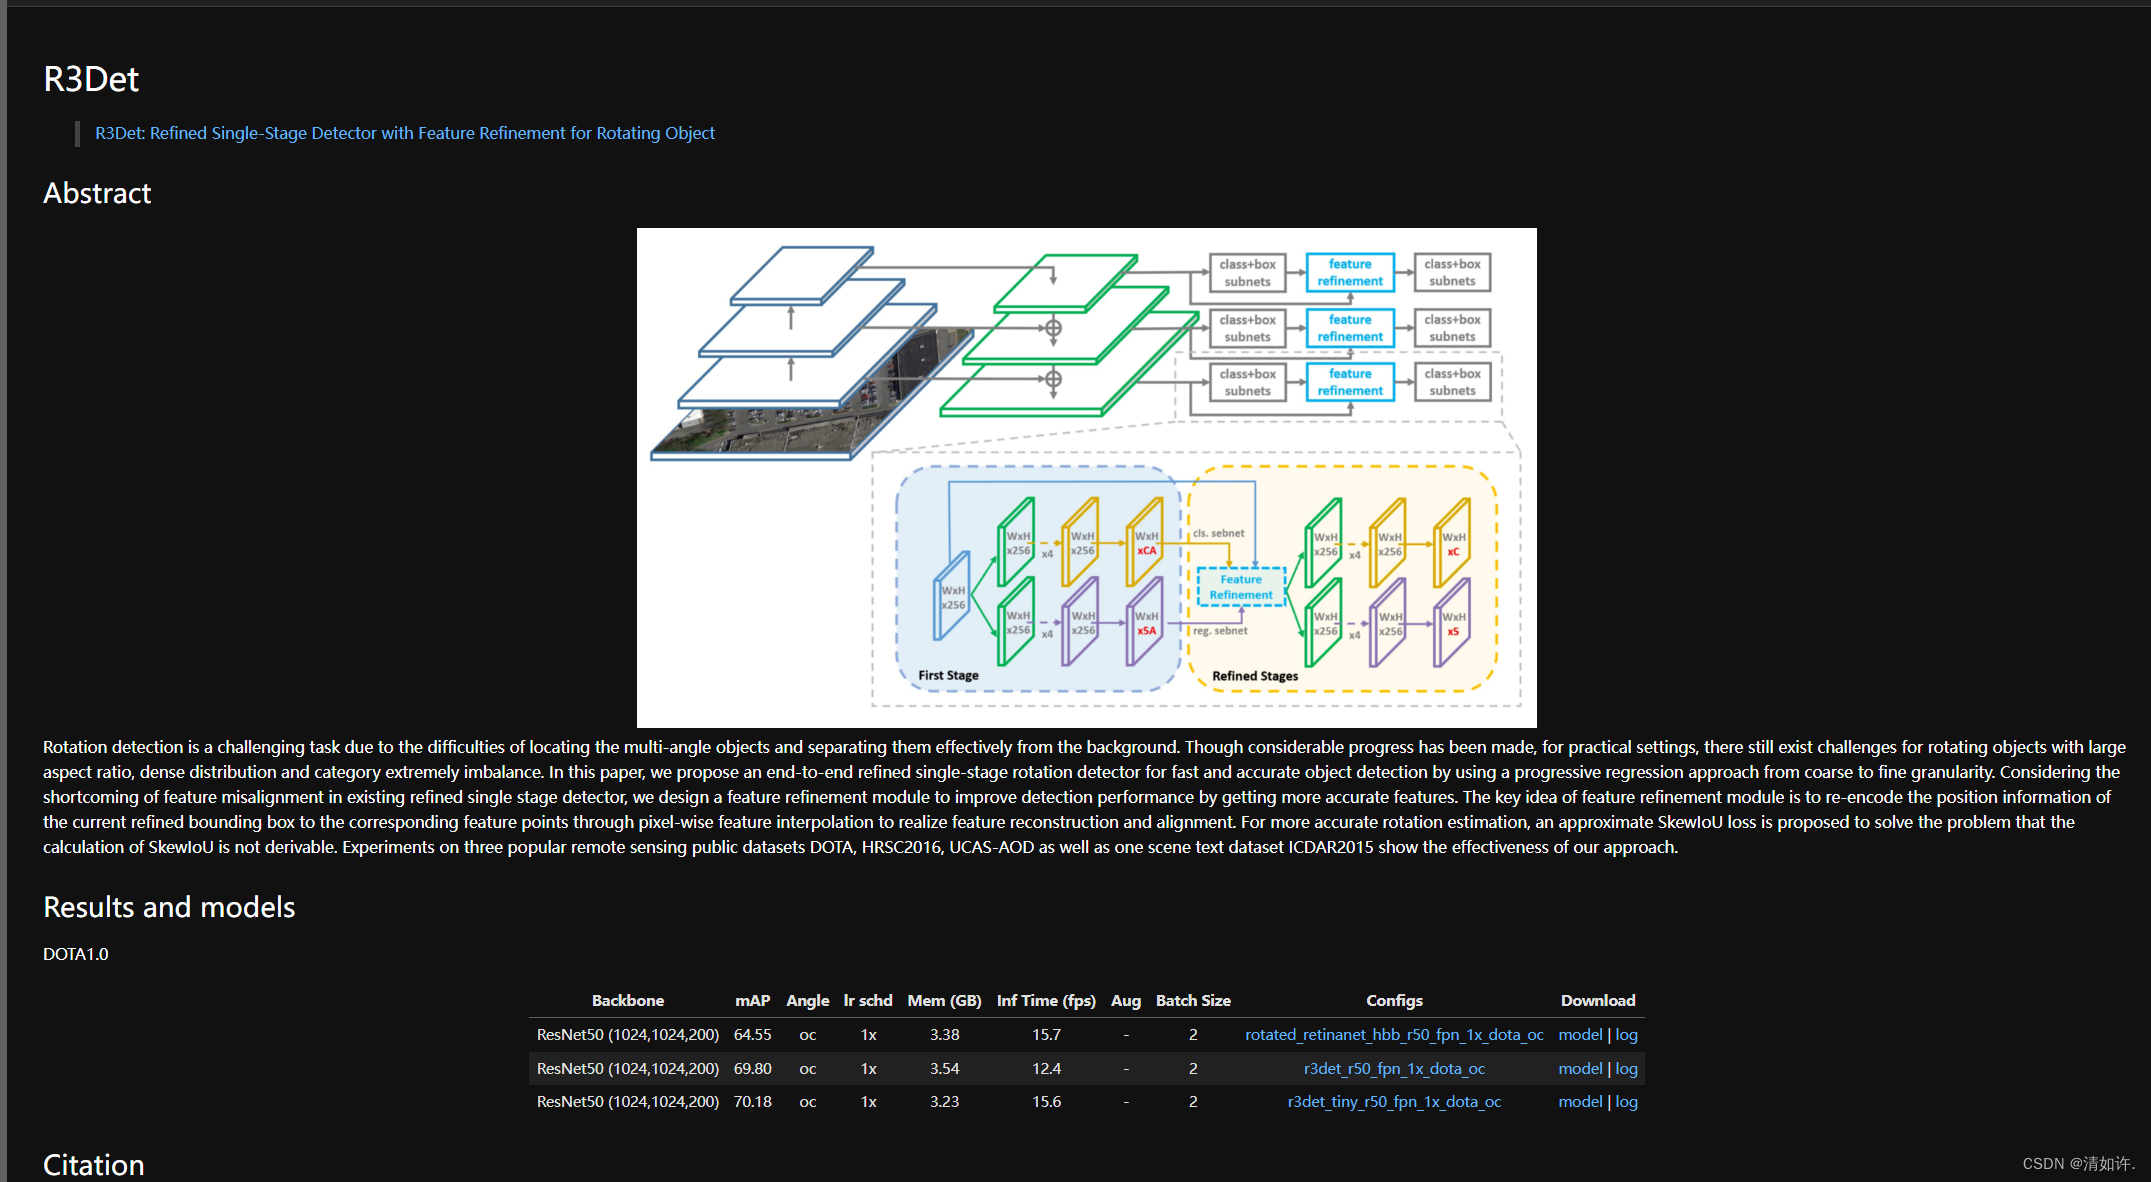
这里我选择的模型是r3det
论文地址:R3Det: Refined Single-Stage Detector with Feature Refinement for Rotating Object
修改模型配置文件:
(mmrotate) root@cw:/home/ma/mmrotate# vim configs/r3det/r3det_tiny_r50_fpn_1x_dota_oc.py
主要修改 num_classes=11,有2处地方,都要改成11
使用vim编辑器打开文件,输入/num_classes 按回车开始查找,再输入n向下查找,输入N向上查找,找到两处num_classes的地方都改为我们的分类数量,11
如果使用其他模型也同理,仅需修改模型分类数量num_classes即可。
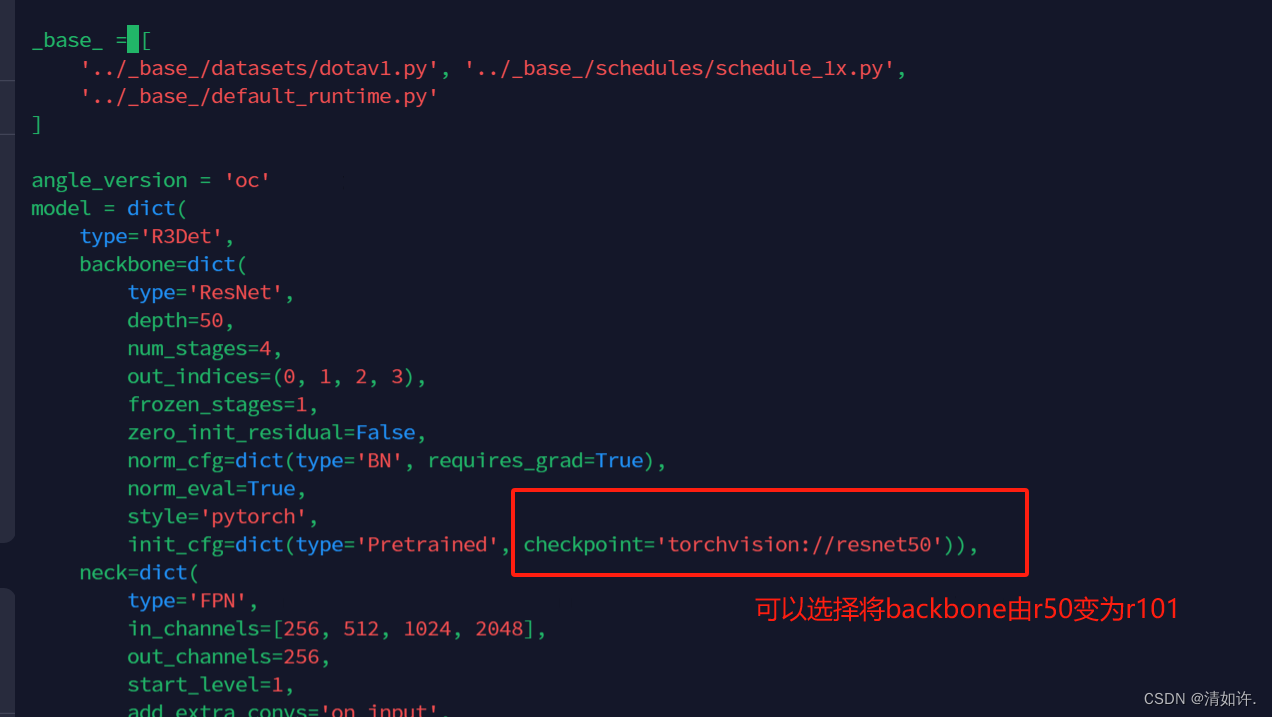
修改后的配置文件如下所示:
_base_ = [
    '../_base_/datasets/dotav1.py', '../_base_/schedules/schedule_1x.py',
    '../_base_/default_runtime.py'
]

angle_version = 'oc'
model = dict(
    type='R3Det',
    backbone=dict(
        type='ResNet',
        depth=50,
        num_stages=4,
        out_indices=(0, 1, 2, 3),
        frozen_stages=1,
        zero_init_residual=False,
        norm_cfg=dict(type='BN', requires_grad=True),
        norm_eval=True,
        style='pytorch',
        init_cfg=dict(type='Pretrained', checkpoint='torchvision://resnet50')),
    neck=dict(
        type='FPN',
        in_channels=[256, 512, 1024, 2048],
        out_channels=256,
        start_level=1,
        add_extra_convs='on_input',
        num_outs=5),
    bbox_head=dict(
        type='RotatedRetinaHead',
        num_classes=11, #按照数据的数据类别数修改
        in_channels=256,
        stacked_convs=2,
        feat_channels=256,
        anchor_generator=dict(
            type='RotatedAnchorGenerator',
            octave_base_scale=4,
            scales_per_octave=3,
            ratios=[1.0, 0.5, 2.0],
            strides=[8, 16, 32, 64, 128]),
        bbox_coder=dict(
            type='DeltaXYWHAOBBoxCoder',
            angle_range=angle_version,
            norm_factor=None,
            edge_swap=False,
            proj_xy=False,
            target_means=(.0, .0, .0, .0, .0),
            target_stds=(1.0, 1.0, 1.0, 1.0, 1.0)),
        loss_cls=dict(
            type='FocalLoss',
            use_sigmoid=True,
            gamma=2.0,
            alpha=0.25,
            loss_weight=1.0),
        loss_bbox=dict(type='SmoothL1Loss', beta=0.11, loss_weight=1.0)),
    frm_cfgs=[dict(in_channels=256, featmap_strides=[8, 16, 32, 64, 128])],
    num_refine_stages=1,
    refine_heads=[
        dict(
            type='RotatedRetinaRefineHead',
            num_classes=11, #按照数据的数据类别数修改
            in_channels=256,
            stacked_convs=2,
            feat_channels=256,
            assign_by_circumhbbox=None,
            anchor_generator=dict(
                type='PseudoAnchorGenerator', strides=[8, 16, 32, 64, 128]),
            bbox_coder=dict(
                type='DeltaXYWHAOBBoxCoder',
                angle_range=angle_version,
                norm_factor=None,
                edge_swap=False,
                proj_xy=False,
                target_means=(0.0, 0.0, 0.0, 0.0, 0.0),
                target_stds=(1.0, 1.0, 1.0, 1.0, 1.0)),
            loss_cls=dict(
                type='FocalLoss',
                use_sigmoid=True,
                gamma=2.0,
                alpha=0.25,
                loss_weight=1.0),
            loss_bbox=dict(type='SmoothL1Loss', beta=0.11, loss_weight=1.0))
    ],
    train_cfg=dict(
        s0=dict(
            assigner=dict(
                type='MaxIoUAssigner',
                pos_iou_thr=0.5,
                neg_iou_thr=0.4,
                min_pos_iou=0,
                ignore_iof_thr=-1,
                iou_calculator=dict(type='RBboxOverlaps2D')),
            allowed_border=-1,
            pos_weight=-1,
             debug=False),
        sr=[
            dict(
                assigner=dict(
                    type='MaxIoUAssigner',
                    pos_iou_thr=0.6,
                    neg_iou_thr=0.5,
                    min_pos_iou=0,
                    ignore_iof_thr=-1,
                    iou_calculator=dict(type='RBboxOverlaps2D')),
                allowed_border=-1,
                pos_weight=-1,
                debug=False)
        ],
        stage_loss_weights=[1.0]),
    test_cfg=dict(
        nms_pre=2000,
        min_bbox_size=0,
        score_thr=0.05,
        nms=dict(iou_thr=0.1),
        max_per_img=2000))

img_norm_cfg = dict(
    mean=[123.675, 116.28, 103.53], std=[58.395, 57.12, 57.375], to_rgb=True)
train_pipeline = [
    dict(type='LoadImageFromFile'),
    dict(type='LoadAnnotations', with_bbox=True),
    dict(type='RResize', img_scale=(1024, 1024)),
    dict(
        type='RRandomFlip',
        flip_ratio=[0.25, 0.25, 0.25],
        direction=['horizontal', 'vertical', 'diagonal'],
        version=angle_version),
    dict(type='Normalize', **img_norm_cfg),
    dict(type='Pad', size_divisor=32),
    dict(type='DefaultFormatBundle'),
    dict(type='Collect', keys=['img', 'gt_bboxes', 'gt_labels'])
]
data = dict(
    train=dict(pipeline=train_pipeline, version=angle_version),
    val=dict(version=angle_version),
    test=dict(version=angle_version))
4.4 修改训练epoches(configs_base_\schedules)
(mmrotate) root@cw:/home/ma/mmrotate# vim configs/_base_/schedules/schedule_1x.py
默认训练12轮,我这里改成了200轮,建议刚开始测试训练的时候不要改,使用默认的12轮次就可以。
# evaluation
evaluation = dict(interval=1, metric='mAP')
# optimizer
optimizer = dict(type='SGD', lr=0.0025, momentum=0.9, weight_decay=0.0001)
optimizer_config = dict(grad_clip=dict(max_norm=35, norm_type=2))
# learning policy
lr_config = dict(
    policy='step',
    warmup='linear',
    warmup_iters=500,
    warmup_ratio=1.0 / 3,
   # step=[8, 11])
    step=[130, 180])    #  在第130轮降低一次学习率,在第180轮再降低一次学习率
runner = dict(type='EpochBasedRunner', max_epochs=200) # 训练200轮
checkpoint_config = dict(interval=10) # 模型每10轮保存一次
4.5 修改数据集的类别名称(mmrotate\datasets\dota.py)
(mmrotate) root@cw:/home/ma/mmrotate# vim mmrotate/datasets/dota.py
修改CLASSES类别名称,如果只要一个分类需要在分类名称后面加个逗号。
PALETTE字段是和你的类别是对应的调色板,修改为和您的分类对应的数量就可以了。
修改后如下所示:
# Copyright (c) OpenMMLab. All rights reserved.
import glob
import os
import os.path as osp
import re
import tempfile
import time
import warnings
import zipfile
from collections import defaultdict
from functools import partial

import mmcv
import numpy as np
import torch
from mmcv.ops import nms_rotated
from mmdet.datasets.custom import CustomDataset

from mmrotate.core import eval_rbbox_map, obb2poly_np, poly2obb_np
from .builder import ROTATED_DATASETS


@ROTATED_DATASETS.register_module()
class DOTADataset(CustomDataset):
    """DOTA dataset for detection.

    Args:
        ann_file (str): Annotation file path.
        pipeline (list[dict]): Processing pipeline.
        version (str, optional): Angle representations. Defaults to 'oc'.
        difficulty (bool, optional): The difficulty threshold of GT.
    """
  #  CLASSES = ('plane', 'baseball-diamond', 'bridge', 'ground-track-field',
   #            'small-vehicle', 'large-vehicle', 'ship', 'tennis-court',
    #           'basketball-court', 'storage-tank', 'soccer-ball-field',
     #          'roundabout', 'harbor', 'swimming-pool', 'helicopter')
     # 修改为自己的分类名称
    CLASSES = ('A','B','C','D','E','F','G','H','I','J','K')
	# 和你的类别是对应的调色板
    PALETTE = [(165, 42, 42), (189, 183, 107), (0, 255, 0), (255, 0, 0),
               (138, 43, 226), (255, 128, 0), (255, 0, 255), (0, 255, 255),
              # (255, 193, 193), (0, 51, 153), (255, 250, 205), (0, 139, 139),
               (255, 255, 0), (147, 116, 116), (0, 0, 255)]

。。。后面的省略,不用修改
4.6 修改模型的骨架网络backbone(可选)
(mmrotate) root@cw:/home/ma/mmrotate# vim configs/r3det/r3det_tiny_r50_fpn_1x_dota_oc.py
4.7 启动tensorboad查看模型训练
(mmrotate) root@cw:/home/ma/mmrotate# vim configs/_base_/default_runtime.py
# yapf:disable
log_config = dict(
    interval=50,
    hooks=[
        dict(type='TextLoggerHook'),
        #解除注释tensorboard,键入下面的命令可以开启实时更新的tensorboard可视化模块。
        dict(type='TensorboardLoggerHook') # #生成Tensorboard 日志
    ])
# yapf:enable

dist_params = dict(backend='nccl')
log_level = 'INFO'
load_from = None
resume_from = None
workflow = [('train', 1)]

# disable opencv multithreading to avoid system being overloaded
opencv_num_threads = 0
# set multi-process start method as `fork` to speed up the training
mp_start_method = 'fork'
设置之后,会在work_dir目录下生成一个tf_logs目录,使用Tensorboard打开日志
cd /path/to/tf_logs
tensorboard --logdir . --host 服务器IP地址 --port 6006
tensorboard 默认端口号是6006,在浏览器中输入http://:6006即可打开tensorboard界面
五、模型训练
5.1 单 GPU 训练
如果您想在命令行中指定工作路径,您可以增加参数 --work_dir ${YOUR_WORK_DIR}。
python tools/train.py ${CONFIG_FILE} [optional arguments]
5.2 多 GPU 训练
可选参数包括:
- –no-validate (不建议): 默认情况下代码将在训练期间进行评估。通过设置 --no-validate 关闭训练期间进行评估。
- –work-dir ${WORK_DIR}: 覆盖配置文件中指定的工作目录。
- –resume-from ${CHECKPOINT_FILE}: 从以前的检查点恢复训练。
./tools/dist_train.sh ${CONFIG_FILE} ${GPU_NUM} [optional arguments]
5.2 开始训练
本文使用单GPU训练,首先创建模型输出文件夹
mkdir runs
训练命令:
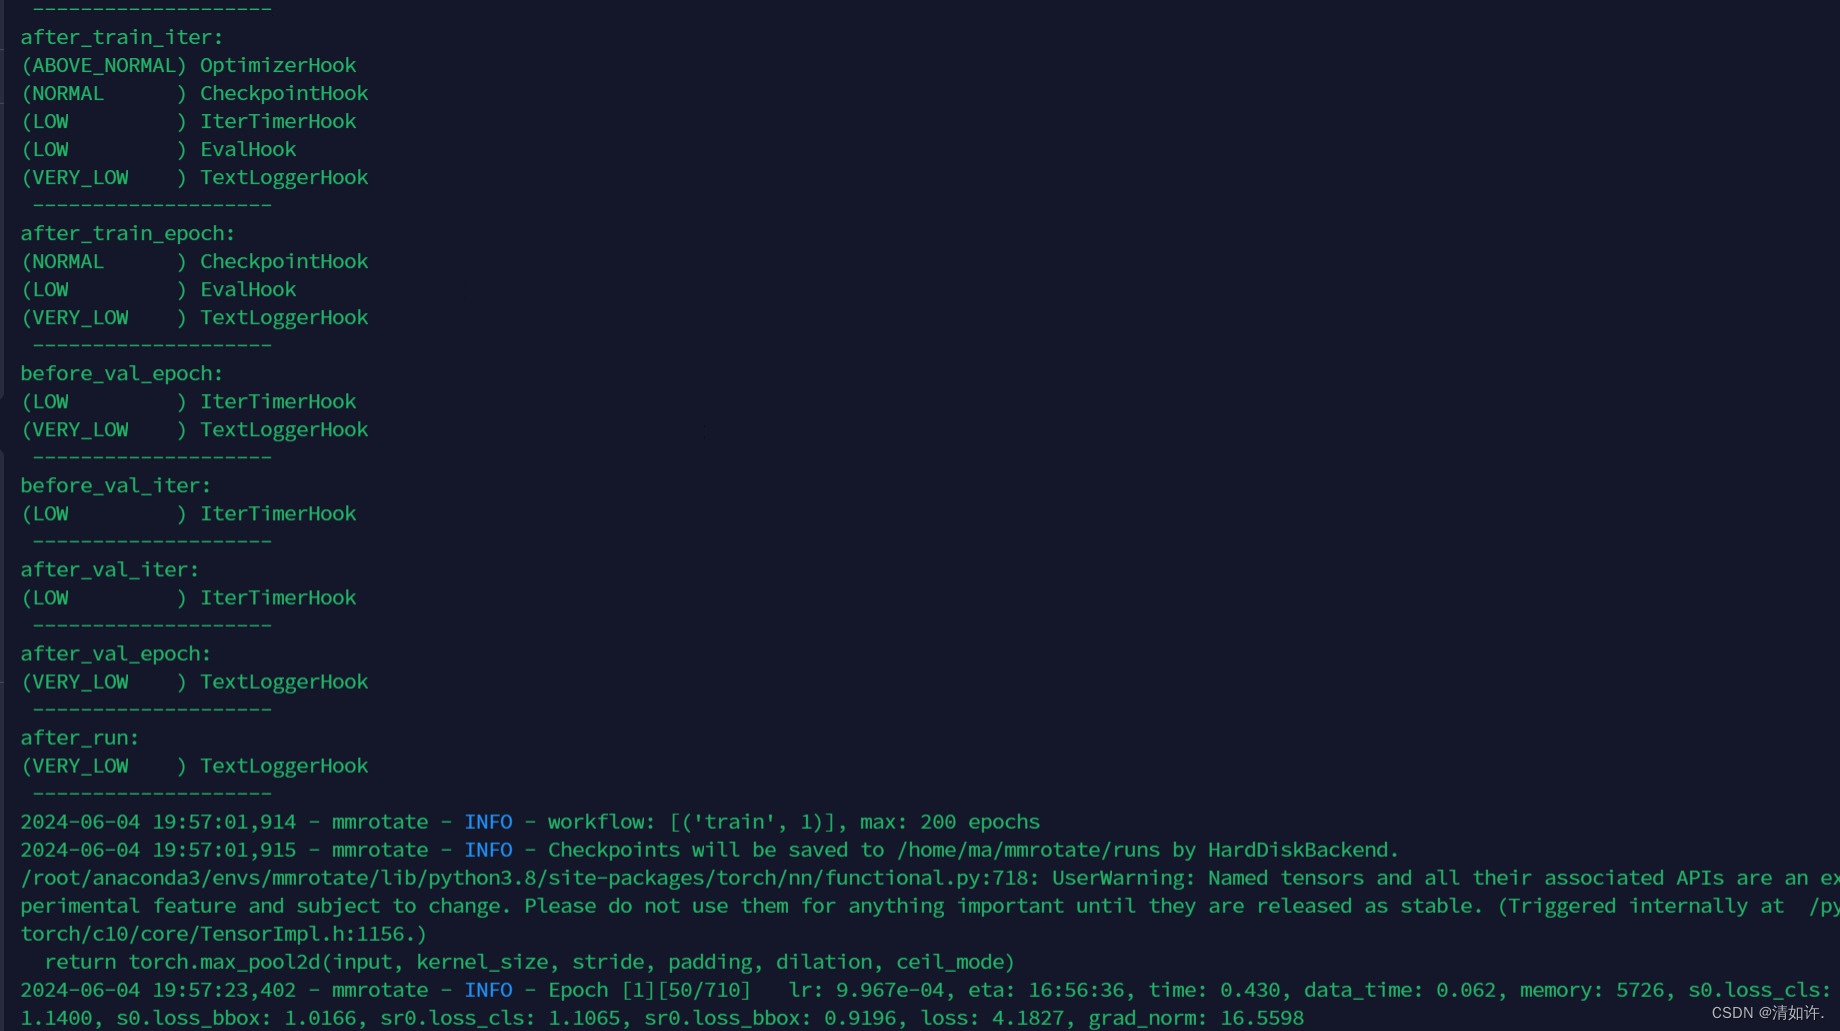
python tools/train.py configs/r3det/r3det_tiny_r50_fpn_1x_dota_oc.py --work-dir=runs
说明:
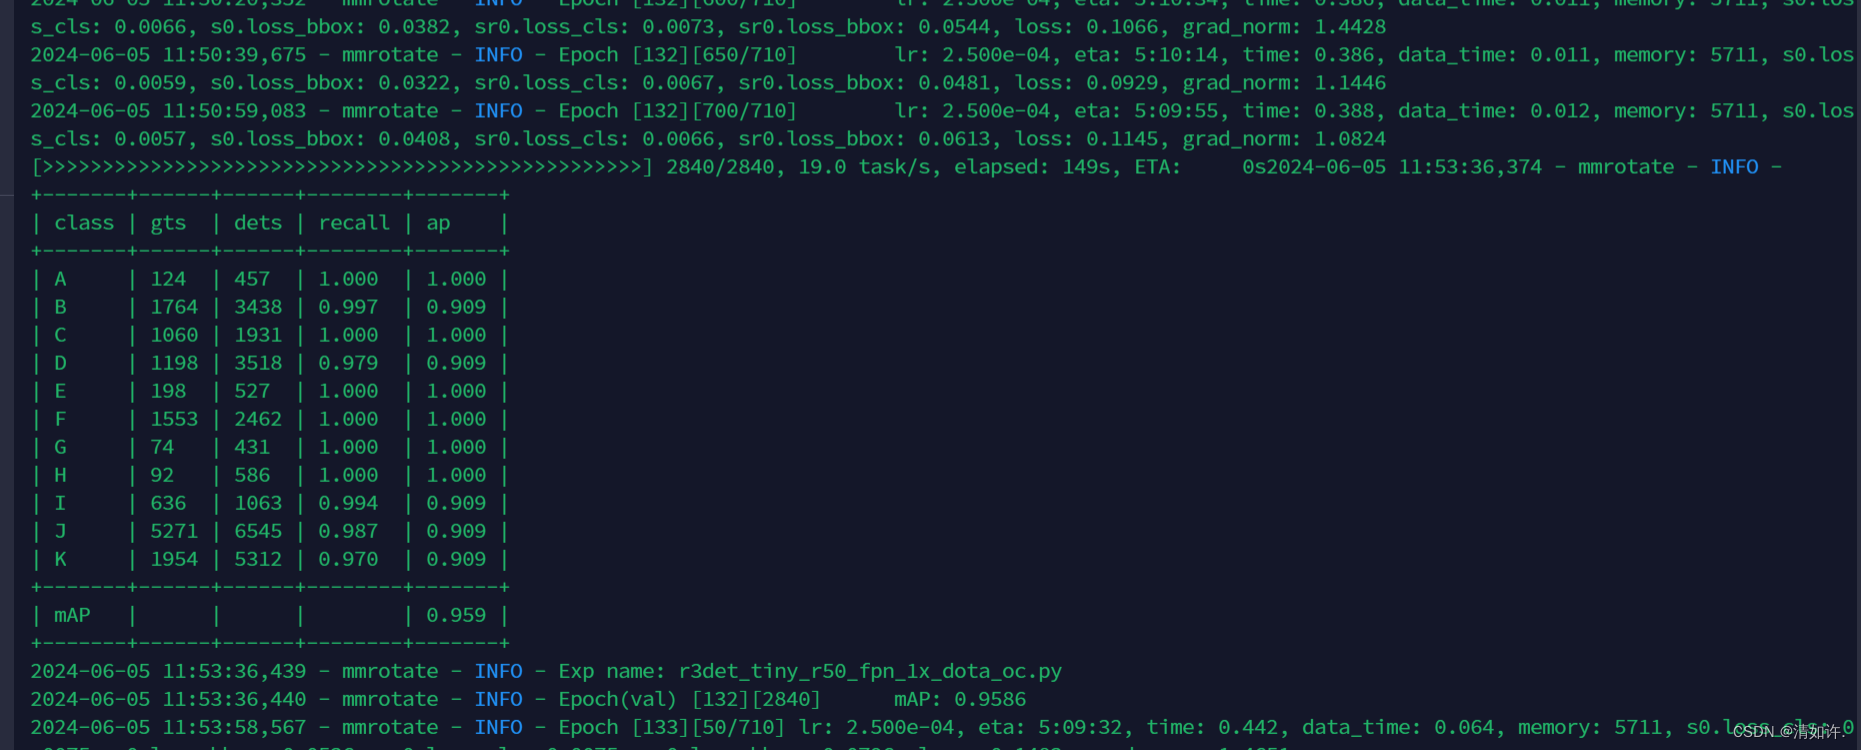
- class: 类别名称,每一行代表一个检测类别。如各个类别的名称(A, B, C, …)。
- gts: Ground Truths,即真实的标注框数量。表示该类别在验证数据集中共有多少个真实标注的目标。。例如,类别 A 有 124 个真实目标。
- dets: Detections,即检测框数量。表示模型在验证数据集中检测到的该类别的目标数量。例如,模型检测出类别 A 的目标数为 457。
- recall: 召回率。表示模型检测到的正确目标(真阳性)的比例,计算公式为 召回率 = 检测到的真阳性数 / 真实标注的目标数。例如,类别 B 的召回率为 0.997,即 99.7% 的真实目标被检测到了。
- ap: Average Precision,即平均精度。表示模型在不同阈值下的检测精度的平均值,是衡量模型检测效果的重要指标。例如,类别 B 的平均精度为 0.909,即 90.9%。
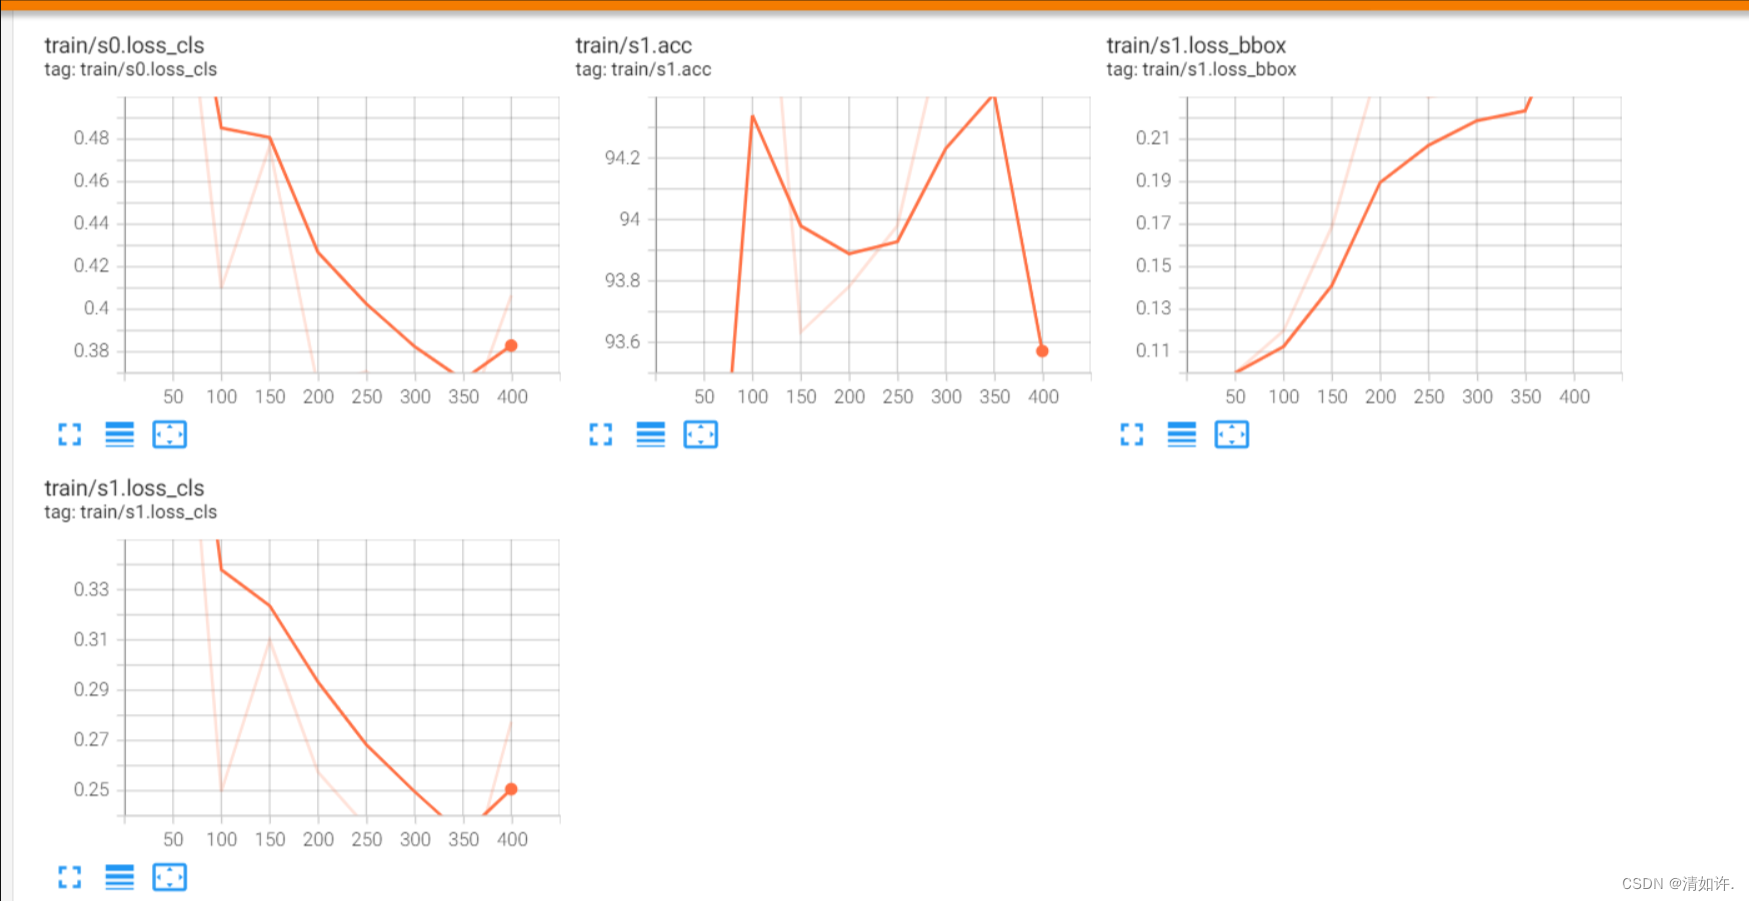
5.3 tensorboad查看模型训练
如果在4.7步骤中打开了tensorboad设置,可以访问IP:6006查看训练日志
6 测试模型
7 部署模型
篇幅限制写不下了,可见我的另一篇文章:
二、MMRotate旋转框目标检测训练DOTA数据集(模型推理与部署,保存推理结果为xml文件并构建镜像)
8 常见问题
8.1 MMrotate报错AttributeError: ‘NoneType‘ object has no attribute ‘shape‘
解决办法:MMrotate报错AttributeError: ‘NoneType‘ object has no attribute ‘shape‘
8.2 IndexError: tuple index out of range
  File "/home/wd337/projects/mmrotate/mmrotate/datasets/dota.py", line 199, in evaluate
    mean_ap, _ = eval_map(
  File "/home/wd337/projects/mmrotate/mmrotate/datasets/dota.py", line 454, in eval_map
    print_map_summary(
  File "/home/wd337/projects/mmrotate/mmrotate/datasets/dota.py", line 516, in print_map_summary
    label_names[j], num_gts[i, j], results[j]['num_dets'],
IndexError: tuple index out of range
模型配置文件中的class没有改完全,使用的r3det配置文件中在model中的refine_heads中也有num_class参数,修改为自己的class数即可
8.3 ValueError: need at least one array to concatenate
    indices = np.concatenate(indices)
  File "<__array_function__ internals>", line 180, in concatenate
ValueError: need at least one array to concatenate
数据集配置文件路径写错了,
或者数据集本身就有问题,我是在数据集转换的时候发现的错误,发现数据集标签缺失,纠正之后就好了,这个问题也困扰我好几天。
8.4 mAP值一直为0
这种情况多半还是数据集的问题,检测数据集有没有进行裁剪为1024*1024,数据集标注是不是有问题。
8.5 ValueError: could not convert string to float: ‘imagesource:null’
原因:由于在查看DOTA数据集的时候发现有标注文件都有imagesource和gsd信息,在转换时加上了这两行信息,去掉即可
写一个python文件,批量删除掉每一个txt文件的前两行就可以,文件如下:
import os

# 定义目录路径
dir_path = '/home/ma/dataset/Opt_plane/train/labelTxt'

# 遍历目录中的所有txt文件
for filename in os.listdir(dir_path):
    if filename.endswith('.txt'):
        file_path = os.path.join(dir_path, filename)

        # 读取文件内容
        with open(file_path, 'r') as file:
            lines = file.readlines()

        # 删除前两行
        new_lines = lines[2:]

        # 写回文件
        with open(file_path, 'w') as file:
            file.writelines(new_lines)

print("处理完成")
8.6 报错 TypeError: FormatCode() got an unexpected keyword argument ‘verify‘
训练的时候报错 TypeError: FormatCode() got an unexpected keyword argument ‘verify‘。
原因: yapf版本过高,目前版本为 0.40.2
解决方法:重装低版本yapf即可
pip uninstall yapf
pip install yapf==0.40.1


 7262
7262

 被折叠的 条评论
为什么被折叠?
被折叠的 条评论
为什么被折叠?
 到【灌水乐园】发言


