Unity 自带的 GlobalFog 通过一个屏幕特效实现了全局雾效,之前一直没太留意,最近正好有时间就把它的代码看了一遍顺便自己改了改玩,嗯,所以取了这么个标题。
1、代码分析
            Camera cam = GetComponent<Camera>();
            Transform camtr = cam.transform;
            float camNear = cam.nearClipPlane;
            float camFar = cam.farClipPlane;
            float camFov = cam.fieldOfView;
            float camAspect = cam.aspect;

            Matrix4x4 frustumCorners = Matrix4x4.identity;

            float fovWHalf = camFov * 0.5f;

            Vector3 toRight = camtr.right * camNear * Mathf.Tan (fovWHalf * Mathf.Deg2Rad) * camAspect;
            Vector3 toTop = camtr.up * camNear * Mathf.Tan (fovWHalf * Mathf.Deg2Rad);

            Vector3 topLeft = (camtr.forward * camNear - toRight + toTop);
            float camScale = topLeft.magnitude * camFar/camNear;

            topLeft.Normalize();
            topLeft *= camScale;

            Vector3 topRight = (camtr.forward * camNear + toRight + toTop);
            topRight.Normalize();
            topRight *= camScale;

            Vector3 bottomRight = (camtr.forward * camNear + toRight - toTop);
            bottomRight.Normalize();
            bottomRight *= camScale;

            Vector3 bottomLeft = (camtr.forward * camNear - toRight - toTop);
            bottomLeft.Normalize();
            bottomLeft *= camScale;

            frustumCorners.SetRow (0, topLeft);
            frustumCorners.SetRow (1, topRight);
            frustumCorners.SetRow (2, bottomRight);
            frustumCorners.SetRow (3, bottomLeft);
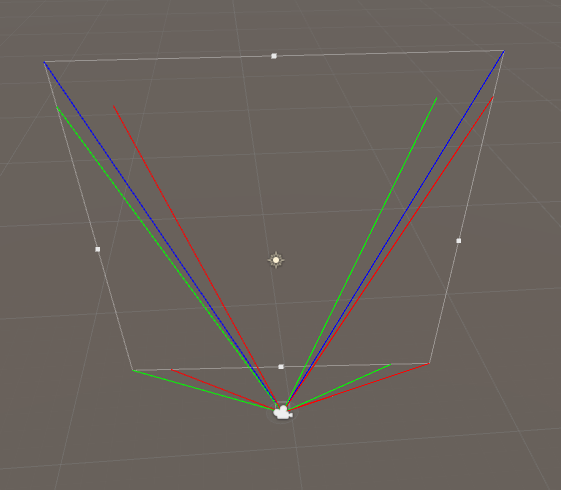
首先 Unity 通过上面一大堆代码算出了相机在远截面的四个角的位置,实际上用下面的函数可以代替:
Vector3[] corners = new Vector3[4];
cam.CalculateFrustumCorners(new Rect(0, 0, 1, 1),cam.farClipPlane , Camera.MonoOrStereoscopicEye.Mono, corners);
接下来的 CustomGraphicsBlit 函数就是核心所在
static void CustomGraphicsBlit (RenderTexture source, RenderTexture dest, Material fxMaterial, int passNr)
        {
            RenderTexture.active = dest;

            fxMaterial.SetTexture ("_MainTex", source);

            GL.PushMatrix ();
            GL.LoadOrtho ();

            fxMaterial.SetPass (passNr);

            GL.Begin (GL.QUADS);

            GL.MultiTexCoord2 (0, 0.0f, 0.0f);
            GL.Vertex3 (0.0f, 0.0f, 3.0f); // BL

            GL.MultiTexCoord2 (0, 1.0f, 0.0f);
            GL.Vertex3 (1.0f, 0.0f, 2.0f); // BR

            GL.MultiTexCoord2 (0, 1.0f, 1.0f);
            GL.Vertex3 (1.0f, 1.0f, 1.0f); // TR

            GL.MultiTexCoord2 (0, 0.0f, 1.0f);
            GL.Vertex3 (0.0f, 1.0f, 0.0f); // TL

            GL.End ();
            GL.PopMatrix ();
        }
利用 GL 库绘制了一个四边形,在 XY 平面,四边形刚好覆盖整个屏幕,Z 坐标则对应了 frustumCorners 矩阵中的行,并在 vertex shader 中赋值
o.interpolatedRay = _FrustumCornersWS[(int)index];
o.interpolatedRay.w = index;
于是,经过光栅化的插值以后 interpolatedRay 则是由相机出发射向远截面的每一像素的向量,乘上深度纹理的值后,通过脚本传入的相机世界坐标,便可得到屏幕上每个像素点的世界坐标
float rawDepth = SAMPLE_DEPTH_TEXTURE(_CameraDepthTexture, UnityStereoTransformScreenSpaceTex(i.uv_depth));
float dpth = Linear01Depth(rawDepth);
float4 wsDir = dpth * i.interpolatedRay;
float4 wsPos = _CameraWS + wsDir;
至此,该有的条件都有了,便可以计算雾了,距离雾的计算较为简单,高度雾的计算则完全采用了 论文 中的方法,连变量名都没改。
2、修改
根据论文的计算方法,在高度计算中加入了噪声,这里就没有考虑效率了,并且只是简单的将原本高度替换为交电处的噪声采样高度
//custom
        if(FdotC * FdotP < 0.0)
        {
            float x = FdotC/V.y * V.x;
            float z = FdotC/V.y * V.z;
            float2 spos = C.xz + float2(x,z);
            spos *= 0.1;
            float NH = tex2D(_NoiseTex, spos + float2(_Time.x,0.0)).r * _NoiseScale;
            float differ = NH - FH;
            FdotC += differ;
            FdotP += differ;
            if(FdotC <= 0.0)
                k = 1.0;
            else
                k = 0.0;
        }
效果如下:

同样的在距离雾中加入了噪声
        float3 wpos = camDir/dist;
        float ND = tex2D(_NoiseTex, wpos.xy + float2(_Time.x,0.0)).r;
        dist -= pow(ND,5) * _NoiseScaleDis;
        return max(dist,0.0);
效果如下:

两者一起效果如下:

3、天空盒 Blend

图片是 Github 上某大佬改进的全局雾效果,留着接下来有时间再补吧。
to be continue…


 799
799

 被折叠的 条评论
为什么被折叠?


