


Ray Tracing in One Weekend【实现记录】
- 0 前言
- 1 Overview
- 2 Output an Image
- 3 The vec3 Class
- 4 Rays, a Simple Camera, and Background
- 5 Adding a Sphere
- 6 Surface Normals and Multiple Objects (表面法线和多个对象)
- 7 Antialiasing
- 8. Diffuse Materials (漫反射材质)
- 9. Metal
- 10. Dielectrics (电介质)
- 11. Positionable Camera (可移动相机)
- 12. Defocus Blur (离焦模糊)
- 13. Where Next?
- 总结
- 参考资料
0 前言
本文用于记录实现 Ray Tracing in One Weekend 一文的过程,用于回顾以及记录所遇到的问题。
如文中有错误还请批评指正。
原文链接:https://raytracing.github.io/books/RayTracingInOneWeekend.html#overview
1 Overview
使用C++实现一个简单的光线追踪项目,光线追踪向下有多种分类,本文实现其中的路径追踪(Path Tracing)。
作者源码地址:https://github.com/RayTracing/raytracing.github.io/
2 Output an Image
2.1 The PPM Image Format
PPM是通过RGB三种颜色显现的图像(pixmaps),包括头部分和图像数据部分。
其他还有PBM (bitmap)——位图,仅有黑白;PGM (grayscale)——灰度图。
- 头部分:
编码格式:P1(Bitmap ASCII),P2 (Graymap ASCII),P3 (Pixmap ASCII),P4 (Bitmap Binary),P5 (Graymap Binary),P6 (Pixmap Binary);
图像宽高
最大像素 - 图像数据:
ASCII格式:按RGB的顺序排列,RGB中间用空格隔开,图片每一行用回车隔开。
Binary格式:PPM用24bits代表每一个像素,红绿蓝分别占用8bits。
生成一副PPM格式的彩色图像
#include <iostream>

int main() {

    // Image

    const int image_width = 256;
    const int image_height = 256;

    // Render

    std::cout << "P3\n" << image_width << ' ' << image_height << "\n255\n";

    for (int j = image_height-1; j >= 0; --j) {
        for (int i = 0; i < image_width; ++i) {
            auto r = double(i) / (image_width-1);
            auto g = double(j) / (image_height-1);
            auto b = 0.25;

            int ir = static_cast<int>(255.999 * r);
            int ig = static_cast<int>(255.999 * g);
            int ib = static_cast<int>(255.999 * b);

            std::cout << ir << ' ' << ig << ' ' << ib << '\n';
        }
    }
}
注意:行_从上到下,行内_从左到右;
2.2 Creating an Image File
因为上述代码只是程序输出,需要将输出重定向至PPM文件
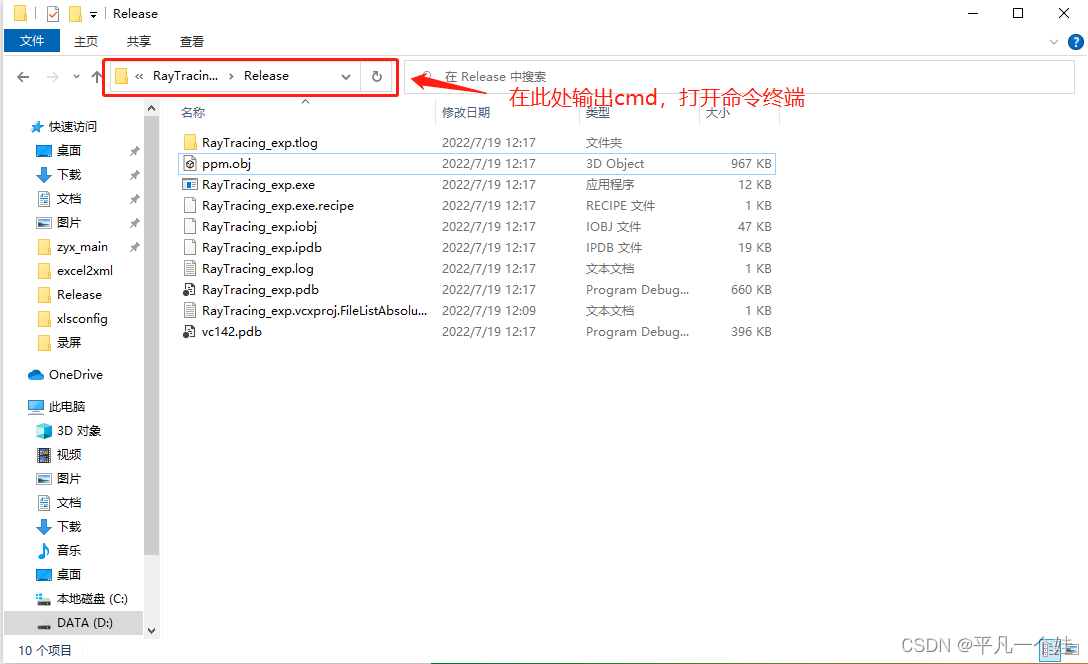
使用 > 重定向操作符如下所示:
*\RayTracing_exp.exe > image.ppm
注意:* 代表.exe文件所在的路径,按上述流程默认打开路径就是
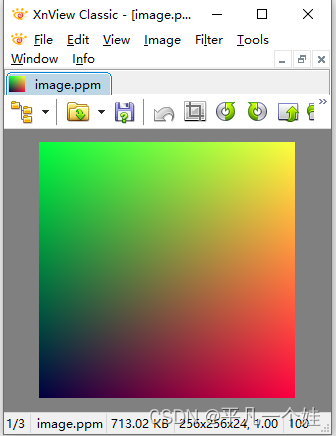
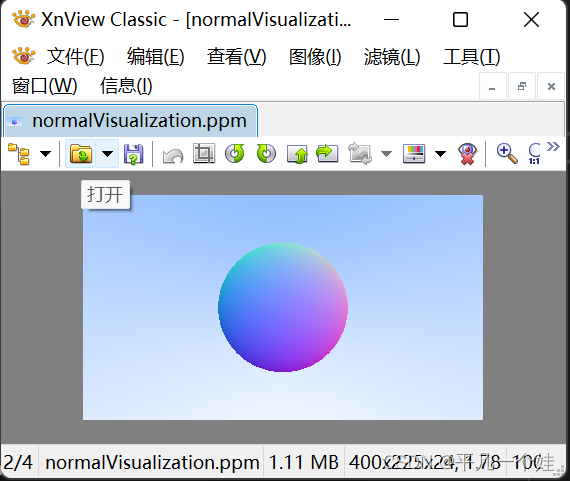
Windows下可使用XnView打开文件(Mac下可以使用 ToyViewer)
2.3 Adding a Progress Indicator
    for (int j = image_height-1; j >= 0; --j) {
        std::cerr << "\rScanlines remaining: " << j << ' ' << std::flush;
        for (int i = 0; i < image_width; ++i) {
            auto r = double(i) / (image_width-1);
            auto g = double(j) / (image_height-1);
            auto b = 0.25;

            int ir = static_cast<int>(255.999 * r);
            int ig = static_cast<int>(255.999 * g);
            int ib = static_cast<int>(255.999 * b);

            std::cout << ir << ' ' << ig << ' ' << ib << '\n';
        }
    }

    std::cerr << "\nDone.\n";
3 The vec3 Class
在大多数图形编程中都有用于存放颜色或几何向量的类,通常是4维(几何:3维加上齐次坐标;颜色:RGB加上alpha transparency channel)。本文创建一个类似的类,完成本文内容使用3维就足够。
创建一个class,包含三位数据,可用于表示颜色、位置、方向等。命名为vec3,别名(aliase)point3和color.
3.1 Variables and Methods
创建vec3.h
#ifndef VEC3_H
#define VEC3_H

#include <cmath>
#include <iostream>

using std::sqrt;

class vec3 {
    public:
    	// 构造函数
        vec3() : e{0,0,0} {}
        vec3(double e0, double e1, double e2) : e{e0, e1, e2} {}

        double x() const { return e[0]; }
        double y() const { return e[1]; }
        double z() const { return e[2]; }

		// 操作符重载
        vec3 operator-() const { return vec3(-e[0], -e[1], -e[2]); }
        double operator[](int i) const { return e[i]; }
        double& operator[](int i) { return e[i]; }

        vec3& operator+=(const vec3 &v) {
            e[0] += v.e[0];
            e[1] += v.e[1];
            e[2] += v.e[2];
            return *this;
        }

        vec3& operator*=(const double t) {
            e[0] *= t;
            e[1] *= t;
            e[2] *= t;
            return *this;
        }

        vec3& operator/=(const double t) {
            return *this *= 1/t;
        }

        double length() const {
            return sqrt(length_squared());
        }

        double length_squared() const {
            return e[0]*e[0] + e[1]*e[1] + e[2]*e[2];
        }

    public:
        double e[3];
};

// Type aliases for vec3
using point3 = vec3;   // 3D point
using color = vec3;    // RGB color

#endif
注意:
-
函数重载时,仅仅返回类型不同时,不可以重载!
-
函数const和非const可以用于函数重载,用于修饰this指针,相当于形参列表不同而产生的函数重载。
3.2 vec3 Utility Functions
各种工具函数
// vec3 Utility Functions

inline std::ostream& operator<<(std::ostream &out, const vec3 &v) {
    return out << v.e[0] << ' ' << v.e[1] << ' ' << v.e[2];
}

inline vec3 operator+(const vec3 &u, const vec3 &v) {
    return vec3(u.e[0] + v.e[0], u.e[1] + v.e[1], u.e[2] + v.e[2]);
}

inline vec3 operator-(const vec3 &u, const vec3 &v) {
    return vec3(u.e[0] - v.e[0], u.e[1] - v.e[1], u.e[2] - v.e[2]);
}

inline vec3 operator*(const vec3 &u, const vec3 &v) {
    return vec3(u.e[0] * v.e[0], u.e[1] * v.e[1], u.e[2] * v.e[2]);
}

inline vec3 operator*(double t, const vec3 &v) {
    return vec3(t*v.e[0], t*v.e[1], t*v.e[2]);
}

inline vec3 operator*(const vec3 &v, double t) {
    return t * v;
}

inline vec3 operator/(vec3 v, double t) {
    return (1/t) * v;
}

inline double dot(const vec3 &u, const vec3 &v) {
    return u.e[0] * v.e[0]
         + u.e[1] * v.e[1]
         + u.e[2] * v.e[2];
}

inline vec3 cross(const vec3 &u, const vec3 &v) {
    return vec3(u.e[1] * v.e[2] - u.e[2] * v.e[1],
                u.e[2] * v.e[0] - u.e[0] * v.e[2],
                u.e[0] * v.e[1] - u.e[1] * v.e[0]);
}

inline vec3 unit_vector(vec3 v) {
    return v / v.length();
}
3.3 Color Utility Functions
创建color.h文件:
#ifndef COLOR_H
#define COLOR_H

#include "vec3.h"

#include <iostream>

void write_color(std::ostream &out, color pixel_color) {
    // Write the translated [0,255] value of each color component.
    out << static_cast<int>(255.999 * pixel_color.x()) << ' '
        << static_cast<int>(255.999 * pixel_color.y()) << ' '
        << static_cast<int>(255.999 * pixel_color.z()) << '\n';
}

#endif
color 是 vec3 的一个别名。这里是定义了一个输出像素RGB数值的函数。
将之前main()函数中的输出替换成我们所写的函数:
#include "color.h"
#include "vec3.h"

#include <iostream>

int main() {

    // Image

    const int image_width = 256;
    const int image_height = 256;

    // Render

    std::cout << "P3\n" << image_width << ' ' << image_height << "\n255\n";

    for (int j = image_height-1; j >= 0; --j) {
        std::cerr << "\rScanlines remaining: " << j << ' ' << std::flush;
        for (int i = 0; i < image_width; ++i) {
            color pixel_color(double(i)/(image_width-1), double(j)/(image_height-1), 0.25);
            write_color(std::cout, pixel_color);
        }
    }

    std::cerr << "\nDone.\n";
}
4 Rays, a Simple Camera, and Background
4.1 The ray Class
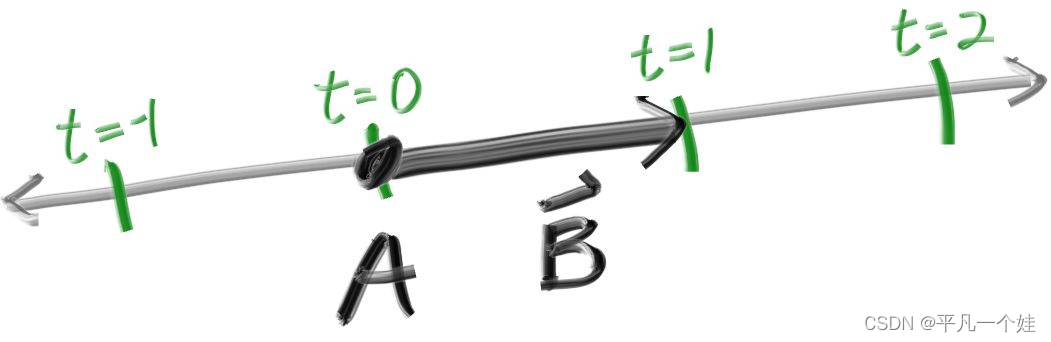
定义一个用于表示光线的类,光线上的每个点都可以通过函数
P
(
t
)
=
A
+
t
b
\mathbf{P}(t)=\mathbf{A}+t \mathbf{b}
P(t)=A+tb获得,其意义是从光源 A 出发沿着射线方向 b 移动 t 个单位后所到达的点坐标。
创建ray.h文件
#ifndef RAY_H
#define RAY_H

#include "vec3.h"

class ray {
    public:
        ray() {}
        ray(const point3& origin, const vec3& direction)
            : orig(origin), dir(direction)
        {}

        point3 origin() const  { return orig; }
        vec3 direction() const { return dir; }

        point3 at(double t) const {
            return orig + t*dir;
        }

    public:
        point3 orig;
        vec3 dir;
};

#endif
4.2 Sending Rays Into the Scene
光线追踪核心思想是让光线从相机(人眼)出发寻找光源。此处暂时不考虑光的折射以及光源,而是给定一个获取特定光线所呈现的颜色的 ray_color(ray) 函数用于获取光线与物体相交点的颜色。
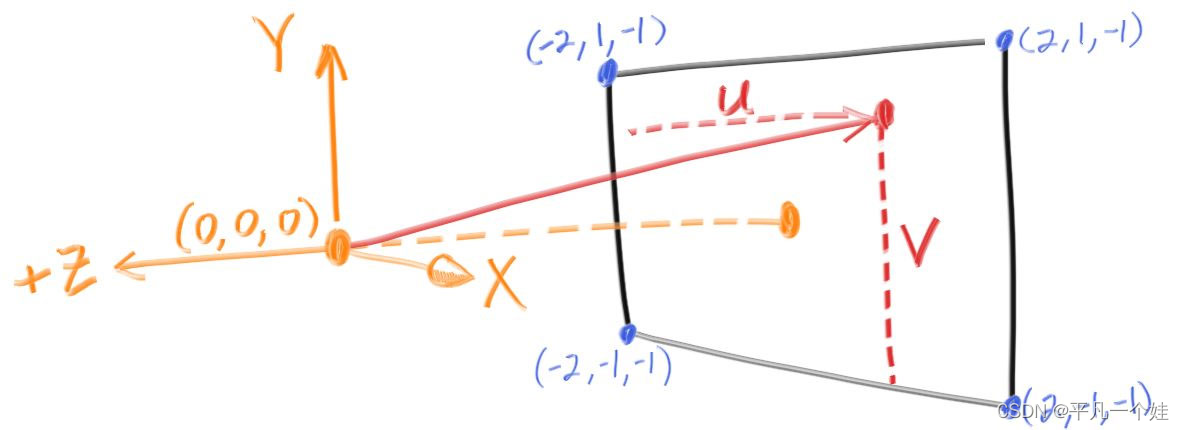
右手系坐标系下,X向右,Y向上,Z向后,投影面(虚拟视口)位于Z轴的负方向。相机(人眼)放置于(0,0,0)位置,投影面距离相机的一个单位,投影面高度两个单位,满足与成像相同的高宽比。
从投影面左下角开始采样,使用沿x,y方向的偏置移动采样点,一个像素采样一次,即从相机(人眼)射出指向当前采样点的一道射线,计算射线返回的颜色。
#include "color.h"
#include "ray.h"
#include "vec3.h"

#include <iostream>

color ray_color(const ray& r) {
    vec3 unit_direction = unit_vector(r.direction());
    auto t = 0.5*(unit_direction.y() + 1.0);
    return (1.0-t)*color(1.0, 1.0, 1.0) + t*color(0.5, 0.7, 1.0);
}

int main() {

    // Image
    const auto aspect_ratio = 16.0 / 9.0;
    const int image_width = 400;
    const int image_height = static_cast<int>(image_width / aspect_ratio);

    // Camera

    auto viewport_height = 2.0;
    auto viewport_width = aspect_ratio * viewport_height;
    auto focal_length = 1.0;

    auto origin = point3(0, 0, 0);
    auto horizontal = vec3(viewport_width, 0, 0);
    auto vertical = vec3(0, viewport_height, 0);
    auto lower_left_corner = origin - horizontal/2 - vertical/2 - vec3(0, 0, focal_length);

    // Render

    std::cout << "P3\n" << image_width << " " << image_height << "\n255\n";

    for (int j = image_height-1; j >= 0; --j) {
        std::cerr << "\rScanlines remaining: " << j << ' ' << std::flush;
        for (int i = 0; i < image_width; ++i) {
            auto u = double(i) / (image_width-1);
            auto v = double(j) / (image_height-1);
            ray r(origin, lower_left_corner + u*horizontal + v*vertical - origin);
            color pixel_color = ray_color(r);
            write_color(std::cout, pixel_color);
        }
    }

    std::cerr << "\nDone.\n";
}
生成的结果图如下

5 Adding a Sphere
为场景添加一个球体
5.1 Ray-Sphere Intersection
利用向量形式判断一个点是否在一个球上:

其中 P 和 C 都是用vec3表示的点。代入
P
(
t
)
=
A
+
t
b
\mathbf{P}(t)=\mathbf{A}+t \mathbf{b}
P(t)=A+tb得到关于t的二次函数:


根的情况如下所示:

5.2 Creating Our First Raytraced Image
模拟一个球在眼睛和屏幕中间,之前投影面上的结果因为球的遮挡会产生不一样的结果。
将小球放置在 (0, 0, -1)处,根据上述方程在main.cpp写出如下代码:
bool hit_sphere(const point3& center, double radius, const ray& r) {
    vec3 oc = r.origin() - center;
    auto a = dot(r.direction(), r.direction());
    auto b = 2.0 * dot(oc, r.direction());
    auto c = dot(oc, oc) - radius*radius;
    auto discriminant = b*b - 4*a*c;
    return (discriminant > 0);
}

color ray_color(const ray& r) {
    if (hit_sphere(point3(0,0,-1), 0.5, r))
        return color(1, 0, 0);
    vec3 unit_direction = unit_vector(r.direction());
    auto t = 0.5*(unit_direction.y() + 1.0);
    return (1.0-t)*color(1.0, 1.0, 1.0) + t*color(0.5, 0.7, 1.0);
}
根据一元二次方程的求根公式, Δ = b 2 − 4 a c ≥ 0 \Delta = b^{2} - 4 ac \ge 0 Δ=b2−4ac≥0 时,射线会和球体相交,main.cpp如下:
#include "color.h"
#include "ray.h"
#include "vec3.h"

#include <iostream>

bool hit_sphere(const point3& center, double radius, const ray& r) {
    auto oc = r.origin() - center;
    const double a = dot(r.direction(), r.direction());
    const double b = 2 * dot(r.direction(), oc);
    const double c = dot(oc, oc) - radius * radius;
    const double delta = b * b - 4 * a * c;
    return delta > 0;
}

color ray_color(const ray& r) {
    if (hit_sphere(point3(0, 0, -1), 0.5, r)) {
        return color(1, 0, 0);
    }

    vec3 unit_direction = unit_vector(r.direction());
    auto t = 0.5 * (unit_direction.y() + 1.0);
    return (1.0 - t) * color(1.0, 1.0, 1.0) + t * color(0.5, 0.7, 1.0);
}

int main() {

    // Image
    const auto aspect_ratio = 16.0 / 9.0;
    const int image_width = 400;
    const int image_height = static_cast<int>(image_width / aspect_ratio);

    // Camera

    auto viewport_height = 2.0;
    auto viewport_width = aspect_ratio * viewport_height;
    auto focal_length = 1.0;

    auto origin = point3(0, 0, 0);
    auto horizontal = vec3(viewport_width, 0, 0);
    auto vertical = vec3(0, viewport_height, 0);
    auto lower_left_corner = origin - horizontal / 2 - vertical / 2 - vec3(0, 0, focal_length);

    // Render

    std::cout << "P3\n" << image_width << " " << image_height << "\n255\n";

    for (int j = image_height - 1; j >= 0; --j) {
        std::cerr << "\rScanlines remaining: " << j << ' ' << std::flush;
        for (int i = 0; i < image_width; ++i) {
            auto u = double(i) / (image_width - 1);
            auto v = double(j) / (image_height - 1);
            ray r(origin, lower_left_corner + u * horizontal + v * vertical - origin);
            color pixel_color = ray_color(r);
            write_color(std::cout, pixel_color);
        }
    }

    std::cerr << "\nDone.\n";
}
结果图:

注意,按照现在的计算策略,把球放置在 (0, 0, 1) 处我们仍然会得到和上述一样的结果,但按常理分析,此时球在我们的眼睛后方,投影面上不应该出现球的投影结果。这是因为我们计算的是直线与球相交的解,而不是从眼睛 (0, 0, 0) 发出的射线。接下来着手解决这个问题。
6 Surface Normals and Multiple Objects (表面法线和多个对象)
6.1 Shading with Surface Normals (表面法线与着色)
法线:是垂直于面的向量。对于球体来说,球表面某点的法线方向相当于球心到秋表面该点的连线。

- 假定法线是一个单位向量;
- 将其沿着x/y/z拆分
- 将x/y/z的分量映射到r/g/b上的0~1范围上
求法线只知道是否和球相交是不够的,还需知道相交时点的坐标,当射线与球体有两个交点时,取t小的,即靠近眼睛的面,代码如下:
#include "color.h"
#include "ray.h"
#include "vec3.h"

#include <iostream>

double hit_sphere(const point3& center, double radius, const ray& r) {
    auto oc = r.origin() - center;
    const double a = dot(r.direction(), r.direction());
    const double b = 2 * dot(r.direction(), oc);
    const double c = dot(oc, oc) - radius * radius;
    const double delta = b * b - 4 * a * c;
    if (delta < 0) {
        return -1;
    }
    else {
        return (-b - sqrt(delta)) / (2.0 * a);
    }
}

color ray_color(const ray& r) {
    point3 center(0, 0, -1);
    double t = hit_sphere(center, 0.5, r);
    if (t > 0) {
        vec3 normal = unit_vector(r.at(t) - center);  // 单位向量,范围[-1, 1]
        return 0.5 * color(normal.x() + 1.0, normal.y() + 1.0, normal.z() + 1.0);
    }

    vec3 unit_direction = unit_vector(r.direction());
    t = 0.5 * (unit_direction.y() + 1.0);
    return (1.0 - t) * color(1.0, 1.0, 1.0) + t * color(0.5, 0.7, 1.0);  // 映射到rgb的[0, 1]范围
}

int main() {

    // Image
    const auto aspect_ratio = 16.0 / 9.0;
    const int image_width = 400;
    const int image_height = static_cast<int>(image_width / aspect_ratio);

    // Camera

    auto viewport_height = 2.0;
    auto viewport_width = aspect_ratio * viewport_height;
    auto focal_length = 1.0;

    auto origin = point3(0, 0, 0);
    auto horizontal = vec3(viewport_width, 0, 0);
    auto vertical = vec3(0, viewport_height, 0);
    auto lower_left_corner = origin - horizontal / 2 - vertical / 2 - vec3(0, 0, focal_length);

    // Render

    std::cout << "P3\n" << image_width << " " << image_height << "\n255\n";

    for (int j = image_height - 1; j >= 0; --j) {
        std::cerr << "\rScanlines remaining: " << j << ' ' << std::flush;
        for (int i = 0; i < image_width; ++i) {
            auto u = double(i) / (image_width - 1);
            auto v = double(j) / (image_height - 1);
            ray r(origin, lower_left_corner + u * horizontal + v * vertical - origin);
            color pixel_color = ray_color(r);
            write_color(std::cout, pixel_color);
        }
    }

    std::cerr << "\nDone.\n";
}
6.2 Simplifying the Ray-Sphere Intersection Code
一些简单的化简,证明可看原文,化简公式如下:
double hit_sphere(const point3& center, double radius, const ray& r) {
    auto oc = r.origin() - center;
    const double a = r.direction().length_squared();
    const double half_b = dot(r.direction(), oc);
    const double c = oc.length_squared() - radius * radius;
    const double delta = half_b * half_b - a * c;
    if (delta < 0) {
        return -1.0;
    }
    else {
        return (-half_b - sqrt(delta)) / a;
    }
}
6.3 An Abstraction for Hittable Objects
构造一个抽象类 ,所有能与光线相交的物体都可以继承这一抽象类,起名为"Hittable",创建hittable.h,代码如下:
#ifndef HITTABLE_H
#define HITTABLE_H

#include "ray.h"

struct hit_record
{
	point3 p;
	vec3 normal;
	double t;
};

class hittable
{
public:
	virtual bool hit(const ray& r, double t_min, double t_max, hit_record& rec) const = 0;

};

#endif // !HITTABLE
抽象类:包含纯虚函数的类,不定义对象而作为一种基本类型用作继承,相当于声明出一些公共的接口以供调用,而子类负责实现具体的接口实现。
接下来定义继承自hittable的sphere类,代码如下:
#ifndef SPHERE_H
#define SPHERE_H

#include "hittable.h"

class sphere : public hittable {
public:
	sphere() {};
	sphere(const point3& cen, double r): center(cen), radius(r) {};

	virtual bool hit(const ray& r, double t_min, double t_max, hit_record& rec) const override;

private:
	point3 center;
	double radius;
};

bool sphere::hit(const ray& r, double t_min, double t_max, hit_record& rec) const {
	vec3 oc = r.origin() - center;
	const double a = r.direction().length_squared();
	const double half_b = dot(oc, r.direction());
	const double c = oc.length_squared() - radius * radius;
	const double delta = half_b * half_b - a * c;

	if (delta < 0) return false;

	// delta >= 0 时,判断t是否在限定范围内,取最靠近眼睛的面
	double root = (-half_b - sqrt(delta)) / a;
	if (root < t_min || root > t_max) {
		root = (-half_b + sqrt(delta)) / a;
		if (root < t_min || root > t_max) return false;
	}

	// 保存光线与球体相交点的信息
	rec.t = root;
	rec.p = r.at(root);
	rec.normal = (rec.p - center) / radius;  // 圆心指向球面某一点除以半径,得到该点的单位法线
	return true;
}

#endif // !SPHERE_H
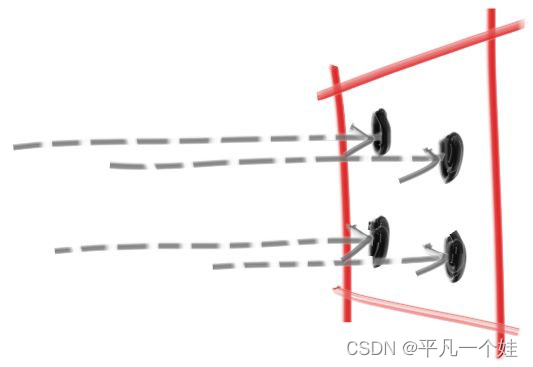
6.4 Front Faces Versus Back Faces
之前确定面法相方向时永远都是从圆心指向相交点,即指向球的外侧。但这并不是确定的 (光线有可能从球体内部出发击中球面),确定的是,法线与光线夹角永远是钝角 (点乘结果小于零)。
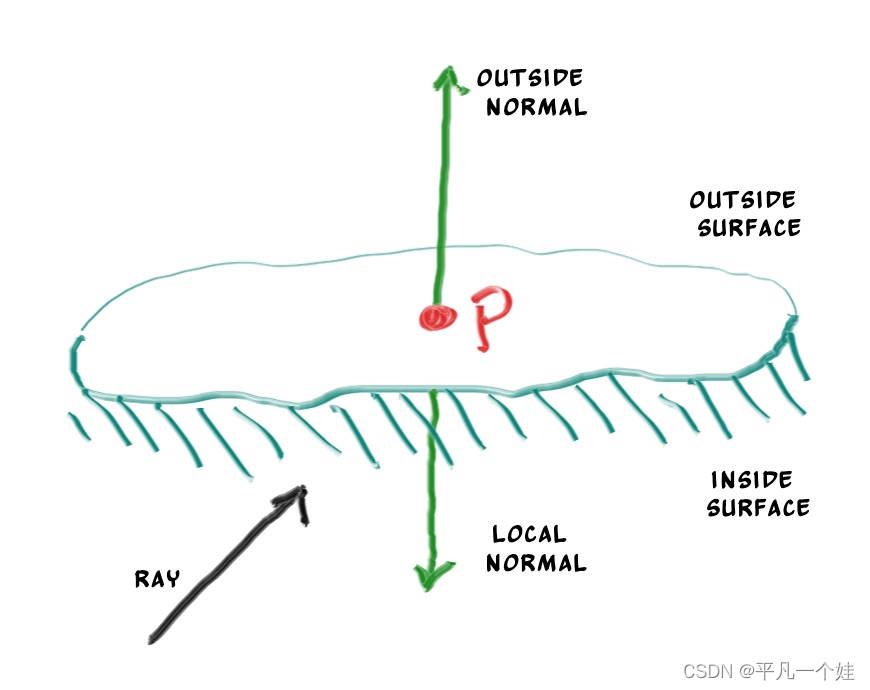
明确法线方向或者说明确光线从哪个方向射向物体是十分重要的,因为物体不同面渲染出来的结果可能会有所区别,例如书本某一页正反的文字不同,玻璃球等。原文介绍两种处理法线方向的方法:
- (着色时判断)永远令其指向球体外侧,在着色时,判断射线与法线的点乘结果——大于:射线在球内侧;小于:射线在球外侧;
- (几何时判断)在相交时直接判断,保存光线是否在外侧。
作者采用第二种策略,因为材质类型多于几何类型,代码如下:
struct hit_record
{
	point3 p;
	vec3 normal;
	double t;

	// 保存光线是否在外侧
	bool front_face;

	inline void set_face_normal(const ray& r, const vec3& outward_normal) {
		front_face = dot(r.direction(), outward_normal) < 0;
		normal = front_face ? outward_normal : -outward_normal;
	}
};
修改sphere.h中相关代码:
	// 保存光线与球体相交点的信息
	rec.t = root;
	rec.p = r.at(root);
	vec3 outward_normal = (rec.p - center) / radius;  // 圆心指向球面某一点除以半径,得到该点的单位法线
	rec.set_face_normal(r, outward_normal);
6.5 A List of Hittable Objects
添加一个保存hittable对象的list类,使用了C++中的vector实现,智能指针shared_ptr管理内存。
#ifndef HITTABLE_LIST_H
#define HITTABLE_LIST_H

#include "hittable.h"

#include <vector>
#include <memory>

using std::shared_ptr;
using std::make_shared;

class hittable_list : public hittable
{
public:
	hittable_list() {};
	hittable_list(shared_ptr<hittable> object) { add(object); }

	void clear() { objects.clear(); }
	void add(shared_ptr<hittable> object) { objects.push_back(object); }

	virtual bool hit(const ray& r, double t_min, double t_max, hit_record& rec) const override;
private:
	std::vector<shared_ptr<hittable>> objects;
};

bool hittable_list::hit(const ray& r, double t_min, double t_max, hit_record& rec) const {
    hit_record temp_rec;
    bool hit_anything = false;
    auto closest_so_far = t_max;  // 记录目前最近的面对应的t

    for (const auto& object : objects) {
        if (object->hit(r, t_min, closest_so_far, temp_rec)) {
            hit_anything = true;
            closest_so_far = temp_rec.t;
            rec = temp_rec;
        }
    }

    return hit_anything;
}
#endif // !HITTABLE_LIST_H
6.6 Some New C++ Features
对shared_ptr以及vector特性的介绍。
6.7 Common Constans and Utility Functions
定义一些常用的常量和函数,为了简便命名为utils.h
#ifndef UTILS_H
#define UTILS_H

#include <cmath>
#include <memory>
#include <limits>

using std::shared_ptr;
using std::make_shared;
using std::sqrt;

const double infinity = std::numeric_limits<double>::infinity();  // 取doulbe最大值
const double pi = 3.1415926535897932385;

inline double degrees_to_radians(double degrees) {
	return degrees * pi / 180.0;
}

// 引入一些常用的头文件
#include "ray.h"
#include "vec3.h"
#endif // !UTILS_H
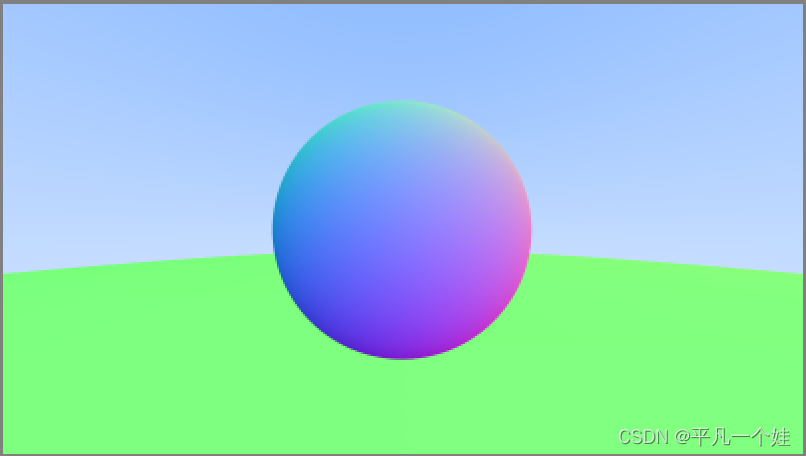
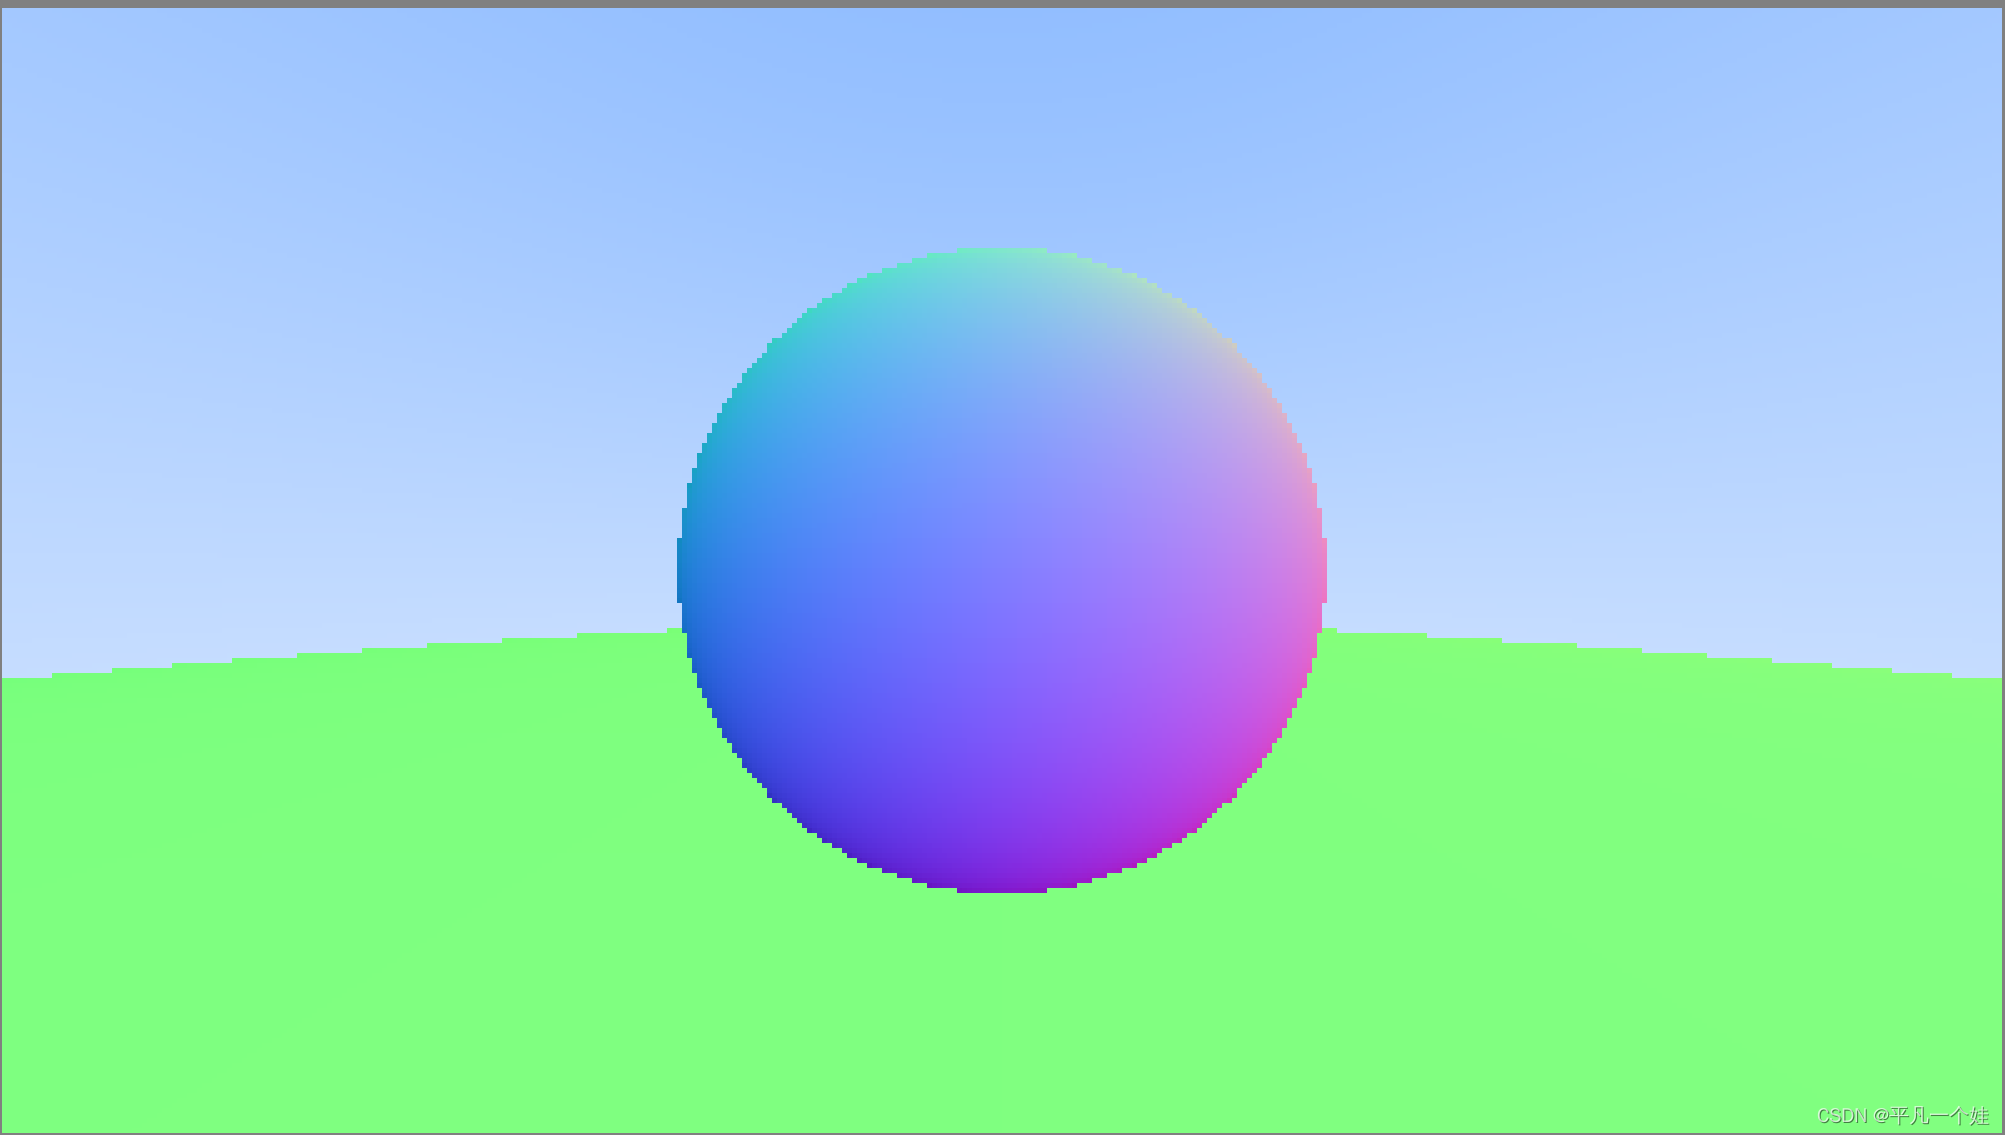
接下来为我们的世界添加两个球体,并生成球体法线的可视化图像,代码如下:
#include "utils.h"

#include "color.h"
#include "hittable_list.h"
#include "sphere.h"

#include <iostream>

color ray_color(const ray& r, const hittable_list& world) {
    hit_record rec;
    if (world.hit(r, 0, infinity, rec)) {
        return 0.5 * (rec.normal + color(1, 1, 1));   // 法线xyz分量映射到rgb的[0, 1]范围
    }

    vec3 unit_direction = unit_vector(r.direction());
    double t = 0.5 * (unit_direction.y() + 1.0);
    return (1.0 - t) * color(1.0, 1.0, 1.0) + t * color(0.5, 0.7, 1.0);
}

int main() {

    // Image
    const auto aspect_ratio = 16.0 / 9.0;
    const int image_width = 400;
    const int image_height = static_cast<int>(image_width / aspect_ratio);

    // World
    hittable_list world;
    world.add(make_shared<sphere>(point3(0, 0, -1), 0.5));
    world.add(make_shared<sphere>(point3(0, -100.5, -1), 100));

    // Camera

    auto viewport_height = 2.0;
    auto viewport_width = aspect_ratio * viewport_height;
    auto focal_length = 1.0;

    auto origin = point3(0, 0, 0);
    auto horizontal = vec3(viewport_width, 0, 0);
    auto vertical = vec3(0, viewport_height, 0);
    auto lower_left_corner = origin - horizontal / 2 - vertical / 2 - vec3(0, 0, focal_length);

    // Render

    std::cout << "P3\n" << image_width << " " << image_height << "\n255\n";

    for (int j = image_height - 1; j >= 0; --j) {
        std::cerr << "\rScanlines remaining: " << j << ' ' << std::flush;
        for (int i = 0; i < image_width; ++i) {
            auto u = double(i) / (image_width - 1);
            auto v = double(j) / (image_height - 1);
            ray r(origin, lower_left_corner + u * horizontal + v * vertical - origin);
            color pixel_color = ray_color(r, world);
            write_color(std::cout, pixel_color);
        }
    }

    std::cerr << "\nDone.\n";
}
结果图:

7 Antialiasing
抗锯齿,同时创建一个相机的抽象类
7.1 Some Random Number Utilities
rand()函数返回[0, RAND_MAX]之间的随机数
inline double random_double() {
	// 返回[0, 1)之间的随机数double类型, 注意左闭右开
	return rand() / (RAND_MAX + 1.0);
}

// 函数重载,返回[min, max) 范围内的随机数
inline double random_double(double min, double max) {
	return min + (max - min) * random_double();
}
7.2 Generating Pixels with Multiple Samples
每个像素多次采样,即射出多条射线,最终像素颜色取所有射线所得颜色的平均值
#ifndef CAMERA_H
#define CAMERA_H

#include "utils.h"

class camera {
public:
	camera() {
		// 视口设置 (屏幕)
		double aspect_ratio = 16.0 / 9.0;
		double viewport_height = 2.0;
		double viewport_width = aspect_ratio * viewport_height;
		double focal_lenght = 1.0;

		// 初始化
		origin = point3(0, 0, 0);
		horizontal = vec3(viewport_width, 0, 0);
		vertival = vec3(0, viewport_height, 0);
		lower_left_corner = origin - horizontal / 2 - vertival / 2 - vec3(0, 0, focal_lenght);
	}

	ray get_ray(double u, double v) {
		return ray(origin, lower_left_corner + u * horizontal + v * vertival - origin);
	}

private:
	point3 origin;
	point3 lower_left_corner;
	vec3 horizontal;
	vec3 vertival;
};

#endif // !CAMERA_H
修改color::write_color,处理像素颜色平均:
void write_color(std::ostream& out, color pixel_color, int samples_per_pixel) {
    double r = pixel_color.x();
    double g = pixel_color.y();
    double b = pixel_color.z();

    // 计算平均
    double scale = 1.0 / samples_per_pixel;
    r *= scale;
    g *= scale;
    b *= scale;


    // Write the translated [0,255] value of each color component.
    out << static_cast<int>(256 * clamp(r, 0.0, 0.999)) << ' '
        << static_cast<int>(256 * clamp(g, 0.0, 0.999)) << ' '
        << static_cast<int>(256 * clamp(b, 0.0, 0.999)) << '\n';
}
clamp函数:
inline double clamp(double x, double min, double max) {
	if (x > max) return max;
	else if (x < min) return min;
	return x;
}
尝试优化一下之前的渲染图:
samples_per_pixel = 1000
不做抗锯齿:
#include "utils.h"
#include "camera.h"
#include "color.h"
#include "hittable_list.h"
#include "sphere.h"

#include <iostream>

color ray_color(const ray& r, const hittable_list& world) {
    hit_record rec;
    if (world.hit(r, 0, infinity, rec)) {
        return 0.5 * (rec.normal + color(1, 1, 1));   // 法线xyz分量映射到rgb的[0, 1]范围
    }

    vec3 unit_direction = unit_vector(r.direction());
    double t = 0.5 * (unit_direction.y() + 1.0);
    return (1.0 - t) * color(1.0, 1.0, 1.0) + t * color(0.5, 0.7, 1.0);
}

int main() {

    // Image
    const auto aspect_ratio = 16.0 / 9.0;
    const int image_width = 400;
    const int image_height = static_cast<int>(image_width / aspect_ratio);
    const int samples_per_pixel = 1000;

    // World
    hittable_list world;
    world.add(make_shared<sphere>(point3(0, 0, -1), 0.5));
    world.add(make_shared<sphere>(point3(0, -100.5, -1), 100));

    // Camera
    camera cam;

    // Render

    std::cout << "P3\n" << image_width << " " << image_height << "\n255\n";

    for (int j = image_height - 1; j >= 0; --j) {
        std::cerr << "\rScanlines remaining: " << j << ' ' << std::flush;
        for (int i = 0; i < image_width; ++i) {
            color pixel_color(0, 0, 0);
            for (int s = 0; s < samples_per_pixel; ++s) {
                auto u = (double(i) + random_double()) / (image_width - 1);
                auto v = (double(j) + random_double()) / (image_height - 1);
                ray r = cam.get_ray(u, v);
                //ray r(origin, lower_left_corner + u * horizontal + v * vertical - origin);
                pixel_color += ray_color(r, world);
            }
            write_color(std::cout, pixel_color, samples_per_pixel);
        }
    }

    std::cerr << "\nDone.\n";
}
8. Diffuse Materials (漫反射材质)
材质和几何有两种设计方法
- 材质和几何物理设计成分开的两个
- 材质和几何物体紧密结合
这里采用分开的做法
8.1 A Simple Diffuse Material
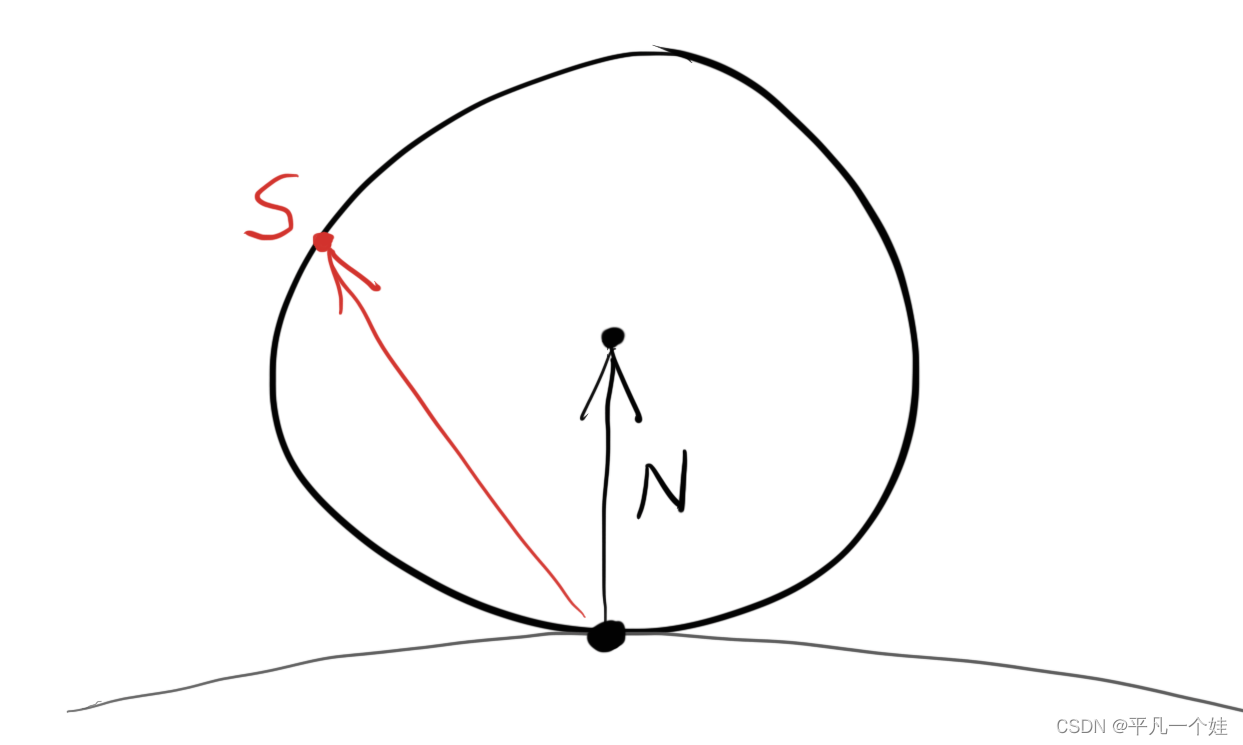
漫反射物体接受周围环境光线,散射时呈现自己本身的颜色(物体本身的颜色源于物体对光的选择性吸收)。漫反射表面反射光线的方向是随机的,如下图所示:
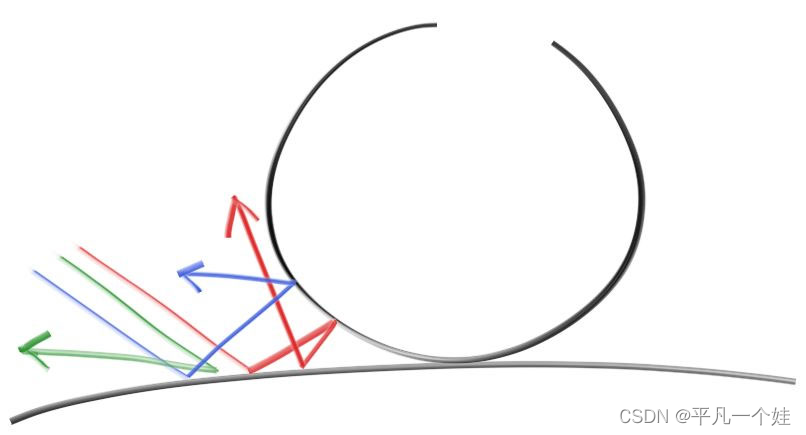
采用任意的随机算法生成反射方向,就能让其看上去像一个粗糙不平的漫反射材质。作者提到精确意义上的漫反射Lambertian,这个稍后再提。
Lambertian reflectance is the property that defines an ideal “matte” or diffusely reflecting surface.
书中的随机算法如上图所示,简单来说:
假设光线打在漫反射物体表面 P 处,P 点的单位法线为 N (粗体代表向量),以 (P + N)点为球心,生成一个单位球 Sphere_uint,在球体中随机选取一点 S,则向量 (S - P) 即为一个随机的反射方向。
实现:
找到球体中的随机一点想来是有些麻烦,但是找到单位正方体中随机一点的方法却是十分容易,因此使用否定法 (Rejection method),在xyz取值范围为 -1 到 1 的单位正方体内随机取一点,然后再判断该点是否在球体内,不在则继续生成尝试。
为vec3.h添加生成随机点的函数:
class vec3 {
public:
	...
    inline static vec3 random() {
        return vec3(random_double(), random_double(), random_double());
    }

    inline static vec3 random(double min, double max) {
        return vec3(random_double(min, max), random_double(min, max), random_double(min, max));
    }

    vec3 random_in_unit_sphere() {
        while (true) {
            point3 p = random(-1, 1);
            if (p.length_squared() >= 1) continue;
            return p;
        }
    }
}
用递归写法模拟漫反射物体反射过程:
color ray_color(const ray& r, const hittable_list& world) {
    hit_record rec;
    if (world.hit(r, 0, infinity, rec)) {
        point3 target = rec.p + rec.normal + random_in_unit_sphere();
        return 0.5 * ray_color(ray(rec.p, target - rec.p), world);
    }

    vec3 unit_direction = unit_vector(r.direction());
    double t = 0.5 * (unit_direction.y() + 1.0);
    return (1.0 - t) * color(1.0, 1.0, 1.0) + t * color(0.5, 0.7, 1.0);
}
注意此时递归只有在没有碰撞到任何物体时才会终止,有可能会陷入死循环。
8.2 Limiting the NUmber of Child Rays
本节限制反射也即递归次数,当达到最大反射次数时终止递归,返回黑色。

【。。。不知道怎么比原文中黑这么多,/(ㄒoㄒ)/~~】
#include "utils.h"
#include "camera.h"
#include "color.h"
#include "hittable_list.h"
#include "sphere.h"

#include <iostream>

color ray_color(const ray& r, const hittable_list& world, int depth) {
    hit_record rec;

    if (depth <= 0) {
        return color(0, 0, 0);
    }

    if (world.hit(r, 0, infinity, rec)) {
        point3 target = rec.p + rec.normal + random_in_unit_sphere();
        return 0.5 * ray_color(ray(rec.p, target - rec.p), world, depth - 1);
    }

    vec3 unit_direction = unit_vector(r.direction());
    double t = 0.5 * (unit_direction.y() + 1.0);
    return (1.0 - t) * color(1.0, 1.0, 1.0) + t * color(0.5, 0.7, 1.0);
}

int main() {

    // Image
    const auto aspect_ratio = 16.0 / 9.0;
    const int image_width = 400;
    const int image_height = static_cast<int>(image_width / aspect_ratio);
    const int samples_per_pixel = 100;
    const int max_depth = 50;

    // World
    hittable_list world;
    world.add(make_shared<sphere>(point3(0, 0, -1), 0.5));
    world.add(make_shared<sphere>(point3(0, -100.5, -1), 100));

    // Camera
    camera cam;

    // Render

    std::cout << "P3\n" << image_width << " " << image_height << "\n255\n";

    for (int j = image_height - 1; j >= 0; --j) {
        std::cerr << "\rScanlines remaining: " << j << ' ' << std::flush;
        for (int i = 0; i < image_width; ++i) {
            color pixel_color(0, 0, 0);
            for (int s = 0; s < samples_per_pixel; ++s) {
                auto u = (double(i) + random_double()) / (image_width - 1);
                auto v = (double(j) + random_double()) / (image_height - 1);
                ray r = cam.get_ray(u, v);
                //ray r(origin, lower_left_corner + u * horizontal + v * vertical - origin);
                pixel_color += ray_color(r, world, max_depth);
            }
            write_color(std::cout, pixel_color, samples_per_pixel);
        }
    }

    std::cerr << "\nDone.\n";
}
8.3 Using Gamma Correction for Accurate Color Intensity
伽马矫正后,即扩大为原来的 1 g a m m a \frac{1}{gamma} gamma1 倍
void write_color(std::ostream& out, color pixel_color, int samples_per_pixel) {
    double r = pixel_color.x();
    double g = pixel_color.y();
    double b = pixel_color.z();

    // 计算平均,并进行伽马矫正 gamma = 2
    double scale = 1.0 / samples_per_pixel;
    r = sqrt(scale * r);
    g = sqrt(scale * g);
    b = sqrt(scale * b);


    // Write the translated [0,255] value of each color component.
    out << static_cast<int>(256 * clamp(r, 0.0, 0.999)) << ' '
        << static_cast<int>(256 * clamp(g, 0.0, 0.999)) << ' '
        << static_cast<int>(256 * clamp(b, 0.0, 0.999)) << '\n';
}
【还是比原文黑。。。先按下不表,之后思考一下吧】

8.4 Fixing Shadow Acne (修复阴影痤疮)
去除物体反射光线在 t = 0 时击中自己的bug
if (world.hit(r, 0.001, infinity, rec)) { ...
事情好起来了~
8.5 True Lambertian Reflection
Lambertian 分布:
cos
(
ϕ
)
\cos(\phi)
cos(ϕ),沿着单位球体表面取随机点
vec3 random_unit_vector() {
	// unit_vector -> 单位化
    return unit_vector(random_in_unit_sphere());
}
[main.cpp]
color ray_color(const ray& r, const hittable& world, int depth) {
    hit_record rec;

    if (depth <= 0)
        return color(0,0,0);

    if (world.hit(r, 0.001, infinity, rec)) {
        point3 target = rec.p + rec.normal + random_unit_vector();
        return 0.5 * ray_color(ray(rec.p, target - rec.p), world, depth-1);
    }

    vec3 unit_direction = unit_vector(r.direction());
    auto t = 0.5*(unit_direction.y() + 1.0);
    return (1.0-t)*color(1.0, 1.0, 1.0) + t*color(0.5, 0.7, 1.0);
}
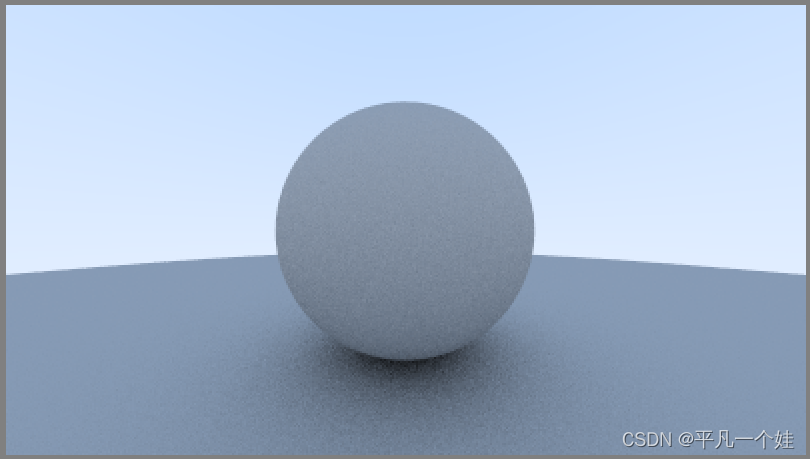
渲染结果:
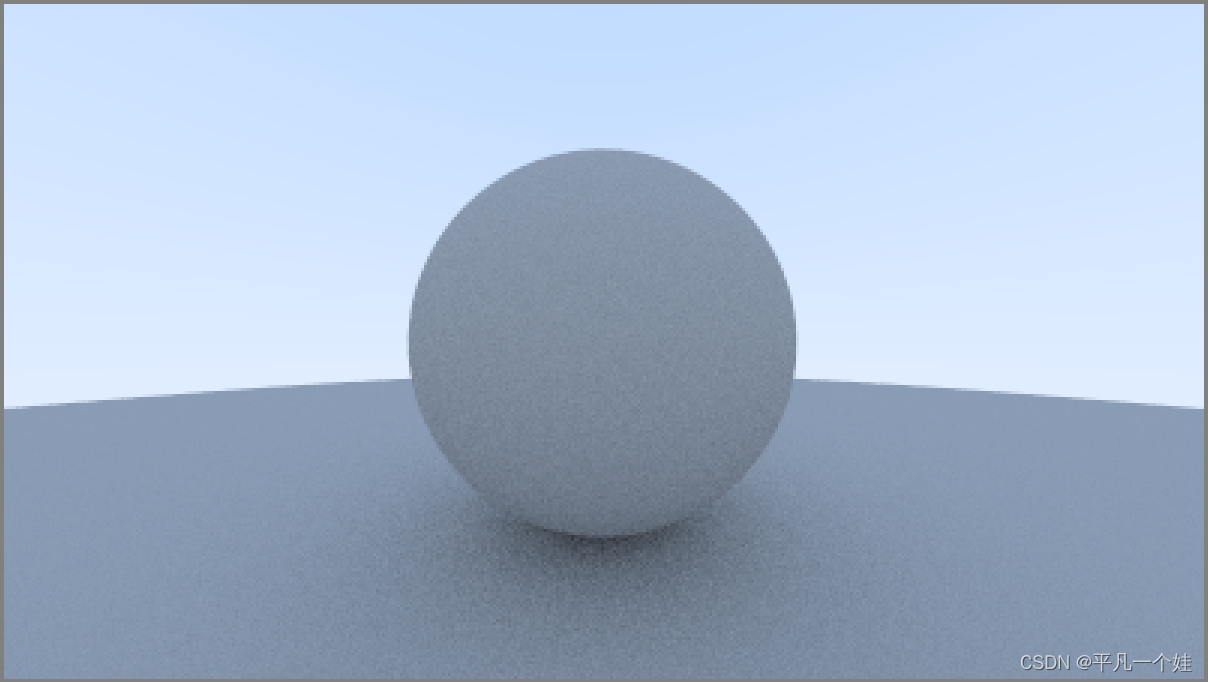
因为目前场景过于简单,两个方法产生的结果区别不大,但是还是要注意两个重要的视觉差异:
- Lambertian 的阴影较不明显;
- Lambertian 两个球体相对更亮。
这都是源于Lambertian漫反射模型下,光线的散射方向更加均匀,沿着法线方向的反射光线少一些。对于阴影部分来说,更少的光线朝上反射,所以小球向下方的大球区域会变得更加明亮。
8.6 An Alternative Diffuse Formulation
另一种漫反射模型,不借助法线偏移产生反射方向,而是直接判断产生的随机点是否与法线在同一半球。
[vec3.h]
vec3 random_in_hemisphere(const vec3& normal) {
    vec3 in_unit_sphere = random_in_unit_sphere();
    if (dot(in_unit_sphere, normal) > 0)
        return in_unit_sphere;
    else
        return -in_unit_sphere;
}
[main.cpp]
color ray_color(const ray& r, const hittable_list& world, int depth) {
    hit_record rec;

    if (depth <= 0) {
        return color(0, 0, 0);
    }

    if (world.hit(r, 0.001, infinity, rec)) {
        point3 target = rec.p + random_in_hemisphere(rec.normal);  // 修改
        return 0.5 * ray_color(ray(rec.p, target - rec.p), world, depth - 1);
    }

    vec3 unit_direction = unit_vector(r.direction());
    double t = 0.5 * (unit_direction.y() + 1.0);
    return (1.0 - t) * color(1.0, 1.0, 1.0) + t * color(0.5, 0.7, 1.0);
}

多多切换不同的漫反射渲染方式,感受不同渲染之间的差别。
9. Metal
9.1 An Abstract Class for Materials
设计一个通用的材料类,需要完成的功能:
- 产生散射后的光线(或者吸收入射光线)
- 如果发生散射,需要附加一定的能量衰减
创建material.h,代码如下:
#ifndef MATERIAL_H
#define MATERIAL

#include "utils.h"

class material {
public:
	virtual bool scatter
		(const ray& r_in, const hit_record& rec, color& attenuation, ray& scattered
	) const = 0;
};

#endif // !MATERIAL_H
9.2 A Data Structure to Describe Ray-Object Intersections
之前我们用 hit_record 保存光线与物体相交的一些信息,现在引入 material ,需要先声明出 material 是一个类,修改 [hittable.h] :
#ifndef HITTABLE_H
#define HITTABLE_H

#include "utils.h"

class material;


struct hit_record
{
	point3 p;
	vec3 normal;
	shared_ptr<material> mat_ptr;
	double t;
	bool front_face;

	inline void set_face_normal(const ray& r, const vec3& outward_normal) {
		front_face = dot(r.direction(), outward_normal) < 0;
		normal = front_face ? outward_normal : -outward_normal;
	}
};

class hittable
{
public:
	virtual bool hit(const ray& r, double t_min, double t_max, hit_record& rec) const = 0;

};

#endif // !HITTABLE
以一个特定球体为例,当光线击中球体时,会记录击中时的各种信息,同时 hit_record 中的材质(mat_ptr)会设置成我们一开始启动 main() 函数程序时,设置给该球体的材质(即指向某一特定材质的指针),因此我们需要修改之前的球体类,添加材质的数据成员 (data member):
#ifndef SPHERE_H
#define SPHERE_H

#include "hittable.h"

class sphere : public hittable {
public:
	sphere() {};
	sphere(const point3& cen, double r, shared_ptr<material> m): center(cen), radius(r), mat_ptr(m) {};

	virtual bool hit(const ray& r, double t_min, double t_max, hit_record& rec) const override;

private:
	point3 center;
	double radius;
	shared_ptr<material> mat_ptr;
};

bool sphere::hit(const ray& r, double t_min, double t_max, hit_record& rec) const {
	vec3 oc = r.origin() - center;
	const double a = r.direction().length_squared();
	const double half_b = dot(oc, r.direction());
	const double c = oc.length_squared() - radius * radius;
	const double delta = half_b * half_b - a * c;

	if (delta < 0) return false;

	// delta >= 0 时,判断t是否在限定范围内,取最靠近眼睛的面
	double root = (-half_b - sqrt(delta)) / a;
	if (root < t_min || root > t_max) {
		root = (-half_b + sqrt(delta)) / a;
		if (root < t_min || root > t_max) return false;
	}

	// 保存光线与球体相交点的信息
	rec.t = root;
	rec.p = r.at(root);
	vec3 outward_normal = (rec.p - center) / radius;  // 圆心指向球面某一点除以半径,得到该点的单位法线
	rec.set_face_normal(r, outward_normal);
	rec.mat_ptr = mat_ptr;
	return true;
}

#endif // !SPHERE_H
9.3 Modeling Light Scatter and Relectance
以Lambertian 漫反射为例,有两种理解方式,(1) 经过平面的光线永远散射,强度衰减系数为 R;(2) 散射时光线强度不衰减,只是其中的 (1 - R) 被物体吸收。 当然这两种情况也可能同时存在。
Lambertian 材质类:
class lambertian : public material {
public:
	lambertian(const color& a) : albedo(a) {}

	virtual bool scatter(const ray& r_in, const hit_record& rec, color& attenuation, ray& scattered) const override {
		vec3 scatter_direction = rec.normal + random_unit_vector();
		scattered = ray(rec.p, scatter_direction);
		attenuation = albedo;
		return true;
	}

public:
	color albedo;
};
作者指出 scatter_direction 存在有可能为 (0, 0, 0)的情况,需要处理一下:
[vec3.h]
class vec3 {
    ...
    bool near_zero() const {
        // 如果向量三个维度都接近零,则返回true
        const auto s = 1e-8;
        return (fabs(e[0]) < s) && (fabs(e[1]) < s) && (fabs(e[2]) < s); // fabs(): 返回浮点数的绝对值
    }
    ...
};
[material.h]
class lambertian : public material {
public:
	lambertian(const color& a) : albedo(a) {}

	virtual bool scatter(const ray& r_in, const hit_record& rec, color& attenuation, ray& scattered) const override {
		vec3 scatter_direction = rec.normal + random_unit_vector();

		// 判断是否为零向量
		if (scatter_direction.near_zero())
			scatter_direction = rec.normal;

		scattered = ray(rec.p, scatter_direction);
		attenuation = albedo;
		return true;
	}

public:
	color albedo;
};
9.4 Mirrored Light Reflection (镜面反射)
对于光滑金属来说,光线不会随机散射,而是产生镜面反射

向量计算反射方向,入射光 V → \overrightarrow{V} V,法线方向 N → \overrightarrow{N} N,则反射方向为 V → + 2 × B → \overrightarrow{V} + 2 \times \overrightarrow{B} V+2×B,其中 B → = − V → ⋅ N → \overrightarrow{B} = -\overrightarrow{V} \cdot \overrightarrow{N} B=−V⋅N,代码如下:
[vec3.h]
vec3 reflect(const vec3& v, const vec3& n) {
    return v - 2 * dot(v, n) * n;
}
在 [material.h] 中添加金属 (metal) 材质:
class metal : public material {
public:
	metal(const color& a) : albedo(a) {}

	virtual bool scatter(const ray& r_in, const hit_record& rec, color& attenuation, ray& scattered) const override {
		vec3 reflected = reflect(unit_vector(r_in.direction()), rec.normal);
		scattered = ray(rec.p, reflected);
		attenuation = albedo;
		return (dot(reflected, rec.normal) > 0);
	}

public:
	color albedo;
};
修改[main.cpp]
color ray_color(const ray& r, const hittable_list& world, int depth) {
    hit_record rec;

    if (depth <= 0) {
        return color(0, 0, 0);
    }

    if (world.hit(r, 0.001, infinity, rec)) {
        ray scattered;
        color attenuation;
        if (rec.mat_ptr->scatter(r, rec, attenuation, scattered)) {
            return attenuation * ray_color(scattered, world, depth - 1);
        }
        return color(0, 0, 0);
    }

    vec3 unit_direction = unit_vector(r.direction());
    double t = 0.5 * (unit_direction.y() + 1.0);
    return (1.0 - t) * color(1.0, 1.0, 1.0) + t * color(0.5, 0.7, 1.0);
}
rec 在运行 world.hit 时,设置其中的各种数据,包括光线与平面的交点、交点处平面法线方向、平面材质等。
9.5 A Scene with Metal Spheres
添加一些金属球:
[main.cpp]
#include "utils.h"
#include "camera.h"
#include "color.h"
#include "hittable_list.h"
#include "sphere.h"
#include "material.h"

#include <iostream>

color ray_color(const ray& r, const hittable_list& world, int depth) {
    hit_record rec;

    if (depth <= 0) {
        return color(0, 0, 0);
    }

    if (world.hit(r, 0.001, infinity, rec)) {
        ray scattered;
        color attenuation;
        if (rec.mat_ptr->scatter(r, rec, attenuation, scattered)) {
            return attenuation * ray_color(scattered, world, depth - 1);
        }
        return color(0, 0, 0);
    }

    vec3 unit_direction = unit_vector(r.direction());
    double t = 0.5 * (unit_direction.y() + 1.0);
    return (1.0 - t) * color(1.0, 1.0, 1.0) + t * color(0.5, 0.7, 1.0);
}

int main() {

    // Image
    const auto aspect_ratio = 16.0 / 9.0;
    const int image_width = 400;
    const int image_height = static_cast<int>(image_width / aspect_ratio);
    const int samples_per_pixel = 1000;
    const int max_depth = 50;

    // World
    hittable_list world;

    auto material_ground = make_shared<lambertian>(color(0.8, 0.8, 0.0));
    auto material_center = make_shared<lambertian>(color(0.7, 0.3, 0.3));
    auto material_left = make_shared<metal>(color(0.8, 0.8, 0.8));
    auto material_right = make_shared<metal>(color(0.8, 0.6, 0.2));

    world.add(make_shared<sphere>(point3(0.0, -100.5, -1.0), 100.0, material_ground));
    world.add(make_shared<sphere>(point3(0.0, 0.0, -1.0), 0.5, material_center));
    world.add(make_shared<sphere>(point3(-1.0, 0.0, -1.0), 0.5, material_left));
    world.add(make_shared<sphere>(point3(1.0, 0.0, -1.0), 0.5, material_right));

    // Camera
    camera cam;

    // Render

    std::cout << "P3\n" << image_width << " " << image_height << "\n255\n";

    for (int j = image_height - 1; j >= 0; --j) {
        std::cerr << "\rScanlines remaining: " << j << ' ' << std::flush;
        for (int i = 0; i < image_width; ++i) {
            color pixel_color(0, 0, 0);
            for (int s = 0; s < samples_per_pixel; ++s) {
                auto u = (double(i) + random_double()) / (image_width - 1);
                auto v = (double(j) + random_double()) / (image_height - 1);
                ray r = cam.get_ray(u, v);
                //ray r(origin, lower_left_corner + u * horizontal + v * vertical - origin);
                pixel_color += ray_color(r, world, max_depth);
            }
            write_color(std::cout, pixel_color, samples_per_pixel);
        }
    }

    std::cerr << "\nDone.\n";
}
渲染结果:
samples_per_pixel = 100

samples_per_pixel = 1000
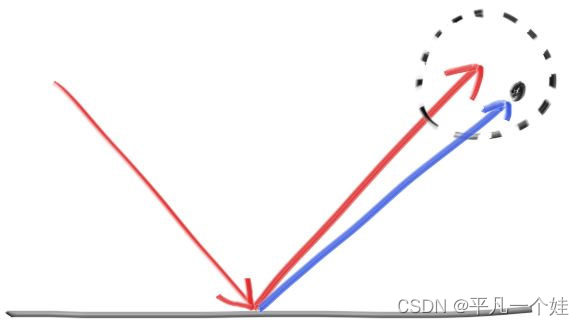
9.6 Fuzzy Reflection
可以给反射方向添加一些随机性,使得我们的金属具有一定的漫反射性质,更贴合实际。
class metal : public material {
public:
	metal(const color& a, double f) : albedo(a), fuzz(f < 1 ? f : 1) {}

	virtual bool scatter(const ray& r_in, const hit_record& rec, color& attenuation, ray& scattered) const override {
		vec3 reflected = reflect(unit_vector(r_in.direction()), rec.normal);
		scattered = ray(rec.p, reflected + fuzz * random_in_unit_sphere());
		attenuation = albedo;
		return (dot(reflected, rec.normal) > 0);
	}

public:
	color albedo;
	double fuzz;
};
修改 [main.cpp] 中球体的属性
int main() {
	...
	// World
    auto material_ground = make_shared<lambertian>(color(0.8, 0.8, 0.0));
    auto material_center = make_shared<lambertian>(color(0.7, 0.3, 0.3));
    auto material_left = make_shared<metal>(color(0.8, 0.8, 0.8), 0.3);
    auto material_right = make_shared<metal>(color(0.8, 0.6, 0.2), 1);
    ...
}
10. Dielectrics (电介质)
水、玻璃和砖石等透明材料是电介质。当光线照射它们时,它会分裂成反射光线和折射(透射)光线。
本书对这种材质的策略是:光线与物体相交时,要么反射要么折射,随机发生,并且反射时只产生一个方向的反射(这里的反射指随机方向反射)。
10.1 Refraction (折射)
折射光线是最难调试的,作者介绍了一种调试策略:
如果存在折射,一开始让所有的光线只发生折射。
先上图:

先不管如何实现(因为作者此时还没有教。。。),图上的玻璃球看起来怪怪的:(1) 玻璃球中景色应该上下翻转;(2) 黑边也不应该存在。
输出图片中心的一条光线来debug,发现它完全错了。
10.2. Snell’s Law (斯涅耳定律)
折射由 Snell (斯涅耳) 定律描述:
η
⋅
sin
θ
=
η
′
⋅
sin
θ
′
\eta \cdot \sin \theta=\eta^{\prime} \cdot \sin \theta^{\prime}
η⋅sinθ=η′⋅sinθ′

其中,
θ
\theta
θ 和
θ
′
\theta^{\prime}
θ′ 是光线与法线之间的夹角, 而
η
\eta
η 和
η
′
\eta^{\prime}
η′ 是折射率 (refractive indices) ,比如空气的折射率等于 1,玻璃为 1.3 至 1.7,砖石是 2.4。
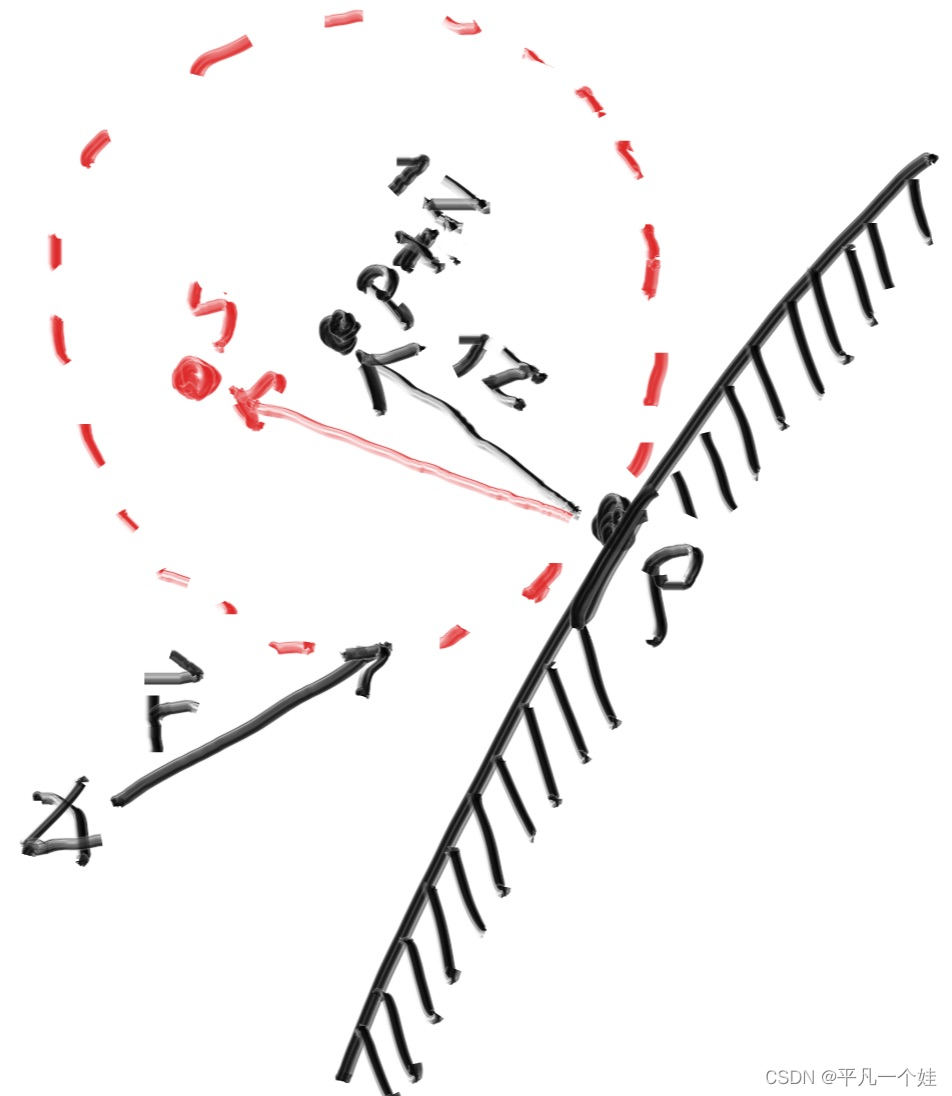
定义发生折射时产生的折射光线为 R ′ R^{\prime} R′,法线为 n ′ n^{\prime} n′,折射光线需要求其方向向量,因为我们只关注其方向,因此为了方便求解,假设入射光线 R R R,法线 n n n 都为单位向量,而折射不应改变光线的模,因此 R ′ R^{\prime} R′ 也为单位向量。
一个向量可以由相互垂直的两个向量相加表示,
R
′
R^{\prime}
R′ 可以沿着法线
n
′
n^{\prime}
n′ 方向和垂直法线方向拆分:
R
′
=
R
⊥
′
+
R
∥
′
\mathbf{R}^{\prime}=\mathbf{R}_{\perp}^{\prime}+\mathbf{R}_{\|}^{\prime}
R′=R⊥′+R∥′
求解可得:
R
⊥
′
=
η
η
′
(
R
+
cos
θ
n
)
R
∥
′
=
−
1
−
∣
R
⊥
′
∣
2
n
\begin{array}{l} \mathbf{R}_{\perp}^{\prime}=\frac{\eta}{\eta^{\prime}}(\mathbf{R}+\cos \theta \mathbf{n}) \\ \mathbf{R}_{\|}^{\prime}=-\sqrt{1-\left|\mathbf{R}_{\perp}^{\prime}\right|^{2}} \mathbf{n} \end{array}
R⊥′=η′η(R+cosθn)R∥′=−1−∣R⊥′∣2n
推导如下(自己乱推的,如果有更好的理解方式或者推导方式可以评论告诉俺一下):
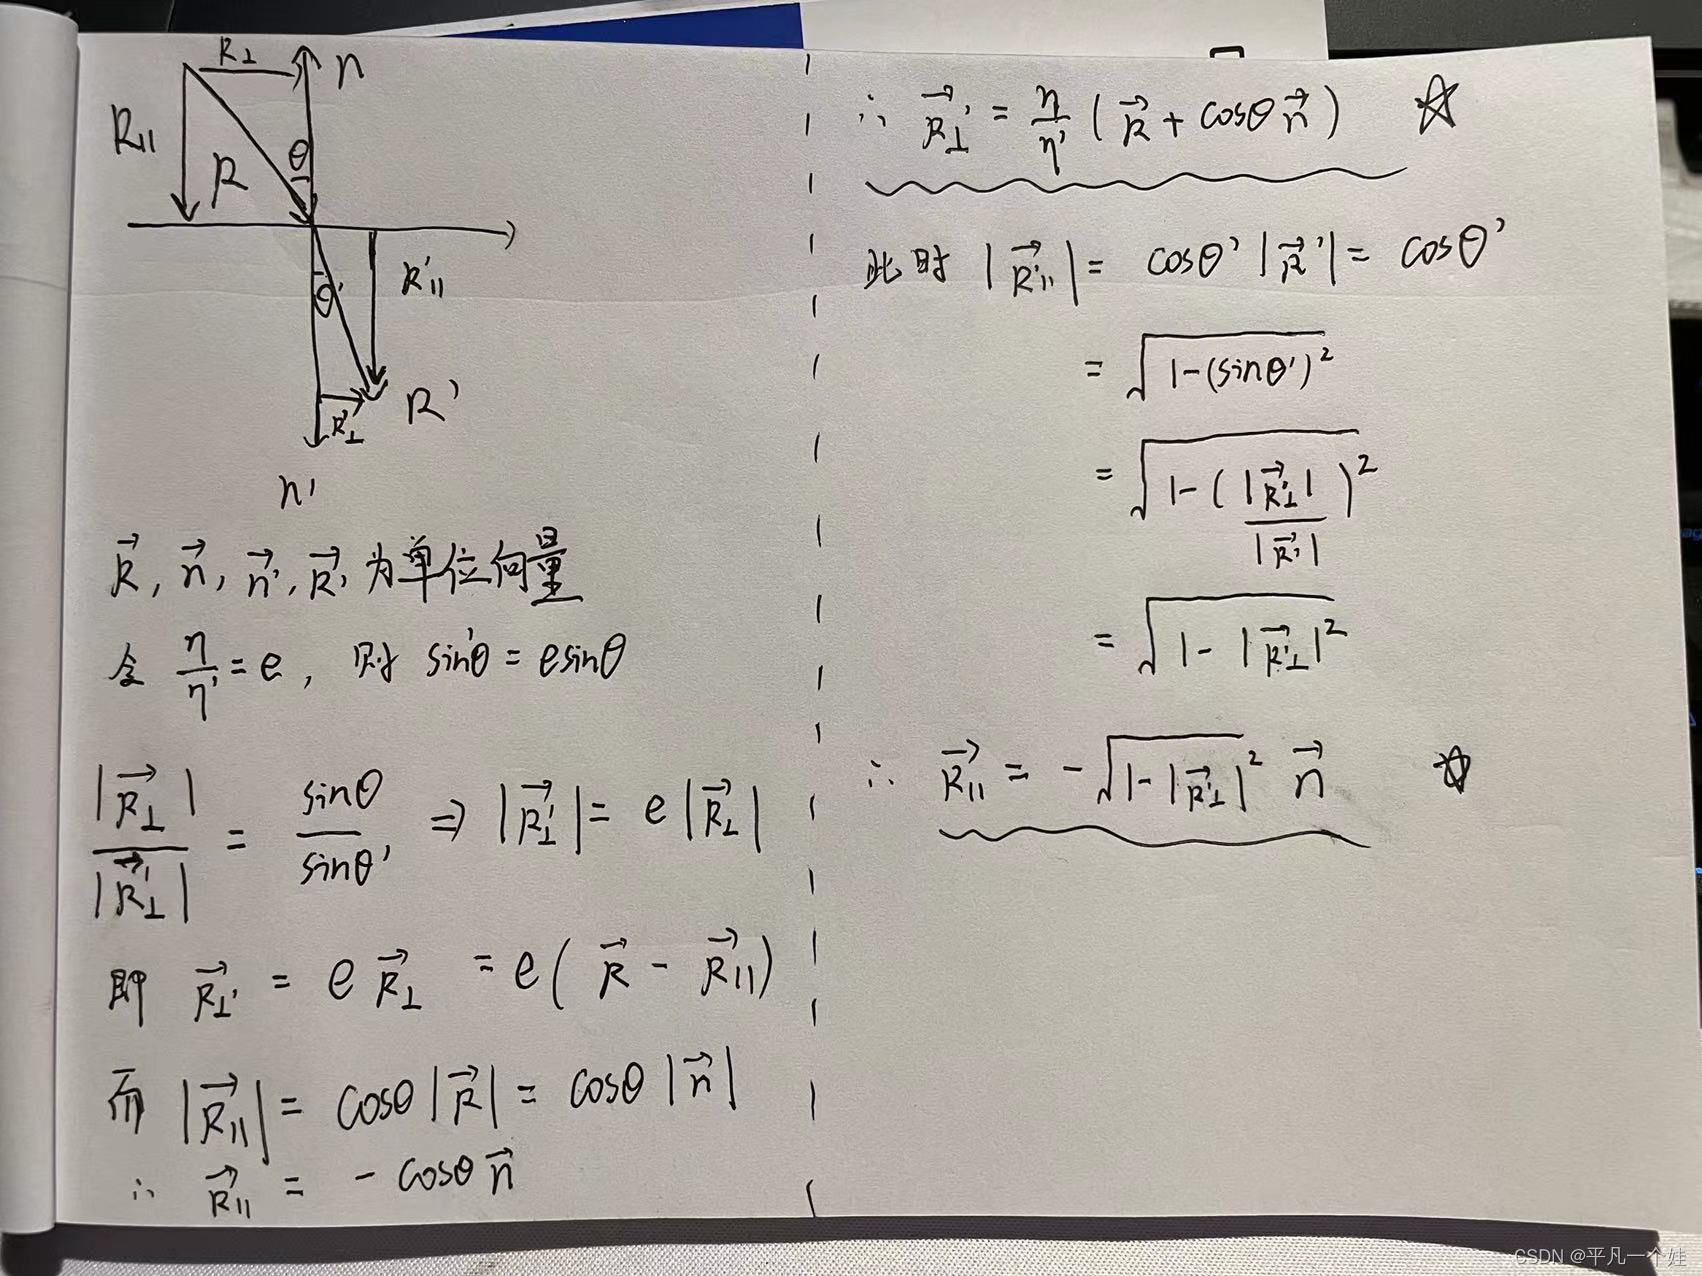
PS: 先上个照片,最近任务比较赶,后面有时间替换上latex公式。
其中
cos
(
θ
)
=
−
R
⋅
n
\cos(\theta) = -\mathbf{R}\cdot\mathbf{n}
cos(θ)=−R⋅n,因此折射函数的代码如下:
[vec3.h]
vec3 refract(const vec3& in, const vec3& normal, double e) {
    auto cos_theta = fmin(dot(-in, normal), 1.0);
    vec3 out_perp = e * (in + cos_theta * normal);
    vec3 out_parallel = -sqrt(fabs(1 - out_perp.length_squared())) * normal;
    return out_perp + out_parallel;
}
添加只发生折射的电介质材质
[material.h]
class dielectric : public material {
public:
	dielectric(double index_of_refraction) : ir(index_of_refraction) {}

	virtual bool scatter(const ray& r_in, const hit_record& rec, color& attenuation, ray& scattered) const override {
		attenuation = color(1.0, 1.0, 1.0);
		double refraction_ratio = rec.front_face ? (1.0 / ir) : ir;

		vec3 unit_direction = unit_vector(r_in.direction());
		vec3 refracted = refract(unit_direction, rec.normal, refraction_ratio);

		scattered = ray(rec.p, refracted);
		return true;
}

public:
	double ir; // index of refraction
};
[main.h] 将中间和左边的球体材质改为电介质:
    auto material_ground = make_shared<lambertian>(color(0.8, 0.8, 0.0));
    //auto material_center = make_shared<lambertian>(color(0.7, 0.3, 0.3));
    //auto material_left = make_shared<metal>(color(0.8, 0.8, 0.8), 0.3);
    auto material_center = make_shared<dielectric>(1.5);
    auto material_left = make_shared<dielectric>(1.5);
    auto material_right = make_shared<metal>(color(0.8, 0.6, 0.2), 1);
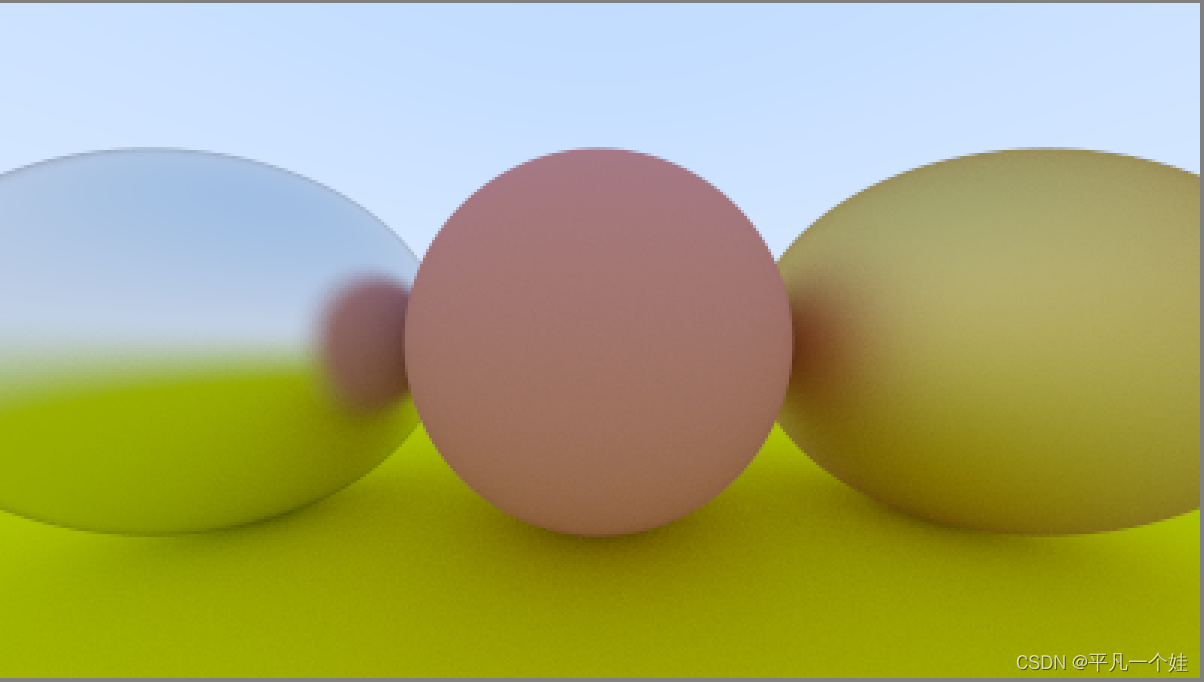
渲染结果:

10.3 Total Internal Reflection
当从较大折射率的物质射入低折射率物质时,上面的定义可能会出现问题:
sin
θ
′
=
η
η
′
⋅
sin
θ
\sin\theta^{\prime} = \frac{\eta}{\eta^{\prime}} \cdot \sin\theta
sinθ′=η′η⋅sinθ
当光线从玻璃 (
η
=
1.5
\eta = 1.5
η=1.5) 射入空气 (
η
′
=
1.0
\eta^{\prime} = 1.0
η′=1.0) 时:
sin
θ
′
=
1.5
1.0
⋅
sin
θ
\sin \theta^{\prime}=\frac{1.5}{1.0} \cdot \sin \theta
sinθ′=1.01.5⋅sinθ
等式右边有可能大于 1 ,此时无解,即不会发生折射,而是发生反射,因此需要增加判断语句:
if (refraction_ratio * sin_theta > 1.0) {
    // Must Reflect
    ...
} else {
    // Can Refract
    ...
}
其中
sin
θ
=
1
−
cos
2
θ
\sin \theta=\sqrt{1-\cos ^{2} \theta}
sinθ=1−cos2θ,
cos
θ
=
R
⋅
n
\cos \theta=\mathbf{R} \cdot \mathbf{n}
cosθ=R⋅n
修改[material.h]
class dielectric : public material {
public:
	dielectric(double index_of_refraction) : ir(index_of_refraction) {}

	virtual bool scatter(const ray& r_in, const hit_record& rec, color& attenuation, ray& scattered) const override {
		attenuation = color(1.0, 1.0, 1.0);
		double refraction_ratio = rec.front_face ? (1.0 / ir) : ir;

		vec3 unit_direction = unit_vector(r_in.direction());
		double cos_theta = fmin(dot(-unit_direction, rec.normal), 1.0);
		double sin_theta = sqrt(1.0 - cos_theta * cos_theta);

		bool cannot_refract = refraction_ratio * sin_theta > 1.0;
		vec3 direction;

		if (cannot_refract) {
			direction = reflect(unit_direction, rec.normal);
		}
		else {
			direction = refract(unit_direction, rec.normal, refraction_ratio);
		}

		scattered = ray(rec.p, direction);
		return true;
}
[main.h] 中材质修改为:
    auto material_ground = make_shared<lambertian>(color(0.8, 0.8, 0.0));
    auto material_center = make_shared<lambertian>(color(0.1, 0.2, 0.5));
    auto material_left = make_shared<dielectric>(1.5);
    auto material_right = make_shared<metal>(color(0.8, 0.6, 0.2), 0.0);
渲染结果如下:

10.4 Schlick Approximation
真实玻璃的折射率会随着入射角而改变,例如从一个小角度看玻璃窗,它就会像一个镜子一样。描述该特性的表达式很长,还好Christophe Schlick 提出了一个简单而又精确的近似表示:
class dielectric : public material {
public:
	dielectric(double index_of_refraction) : ir(index_of_refraction) {}

	virtual bool scatter(const ray& r_in, const hit_record& rec, color& attenuation, ray& scattered) const override {
		attenuation = color(1.0, 1.0, 1.0);
		double refraction_ratio = rec.front_face ? (1.0 / ir) : ir;

		vec3 unit_direction = unit_vector(r_in.direction());
		double cos_theta = fmin(dot(-unit_direction, rec.normal), 1.0);
		double sin_theta = sqrt(1.0 - cos_theta * cos_theta);

		bool cannot_refract = refraction_ratio * sin_theta > 1.0;
		vec3 direction;

		// 反射多加一个判断
		if (cannot_refract || reflectance(cos_theta, refraction_ratio) > random_double()) {
			direction = reflect(unit_direction, rec.normal);
		}
		else {
			direction = refract(unit_direction, rec.normal, refraction_ratio);
		}

		scattered = ray(rec.p, direction);
		return true;
}

public:
	double ir; // index of refraction

private:
	// Schlick Approximation
	static double reflectance(double cosine, double ref_idx) {
		auto r0 = (1 - ref_idx) / (1 + ref_idx);
		r0 = r0 * r0;
		return r0 + (1 - r0) * pow((1 - cosine), 5);
	}
};
10.5 Modeling a Hollow Glass Sphere (模拟空心玻璃球)
如果半径设置成负值,球体几何不会改变,但是球表面的法线会指向球体内部。

[main.h] 左球体内部添加一个法线向内的球体
world.add(make_shared<sphere>(point3( 0.0, -100.5, -1.0), 100.0, material_ground));
world.add(make_shared<sphere>(point3( 0.0,    0.0, -1.0),   0.5, material_center));
world.add(make_shared<sphere>(point3(-1.0,    0.0, -1.0),   0.5, material_left));
world.add(make_shared<sphere>(point3(-1.0,    0.0, -1.0),  -0.4, material_left));
world.add(make_shared<sphere>(point3( 1.0,    0.0, -1.0),   0.5, material_right));
渲染结果:

11. Positionable Camera (可移动相机)
相机和电介质一样,调试起来十分困难。因此开发时要循序渐进,一点点,一步步验证代码是否正确。首先定义一个可调节的视野范围(field of view, fov),这是从观察点可以看到的角度范围。因为图像并不是方形,因此fov在水平和竖直方向上的数值不同。作者通常使用垂直视角,用角度定义(传参),并在构造函数中将其变换成弧度。
11.1 Camera Viewing Geometry
我们的投影面在
z
=
−
1
z = -1
z=−1 处,我们也可以在任何地方,只要保证相机到投影面的距离与 h 的比例固定:

此时, h = tan ( θ 2 ) h = \tan(\frac{\theta}{2}) h=tan(2θ). 修改[camera.h] :
class camera {
public:
	camera(
		double fov, // 垂直方向上以度数表示的视野范围
		double aspect_ratio
	) {
		// 视口设置 (屏幕)
		auto theta = degrees_to_radians(fov);
		auto h = tan(theta / 2);
		double viewport_height = 2.0 * h;
		double viewport_width = aspect_ratio * viewport_height;

		double focal_lenght = 1.0;

		// 初始化
		origin = point3(0, 0, 0);
		horizontal = vec3(viewport_width, 0.0, 0.0);
		vertival = vec3(0.0, viewport_height, 0.0);
		lower_left_corner = origin - horizontal / 2 - vertival / 2 - vec3(0, 0, focal_lenght);
	}

	ray get_ray(double u, double v) {
		return ray(origin, lower_left_corner + u * horizontal + v * vertival - origin);
	}

private:
	point3 origin;
	point3 lower_left_corner;
	vec3 horizontal;
	vec3 vertival;
};
同时修改场景[main.h]:
	...
  // World
    auto R = cos(pi / 4);
    hittable_list world;

    auto material_left = make_shared<lambertian>(color(0, 0, 1));
    auto material_right = make_shared<lambertian>(color(1, 0, 0));

    world.add(make_shared<sphere>(point3(-R, 0, -1), R, material_left));
    world.add(make_shared<sphere>(point3(R, 0, -1), R, material_right));

    // Camera
    camera cam(90.0, aspect_ratio);
    ...
渲染结果:

11.2 Positioning and Orienting the Camera (相机的定位和定向)
为了实现一个可以放置在任意位置的相机,我们先要给这个放置点取个名字。和作者一样,放置相机的点称为 lookfrom ,即从该点进行观察,看向的某一个点称为 lookat . (当然,也可以用方向向量来表示向哪个地方观察)。
确定起点终点还不够,想象一下我们看某一个物体时,我们仍然可以以鼻子为圆心,旋转我们的脑袋,即沿着 lookfrom - lookat 形成的轴线旋转。确定这个旋转平面之后,"up"确定相机的正上方向,就是在该平面上正交与观察方向的向量。作者示意图:

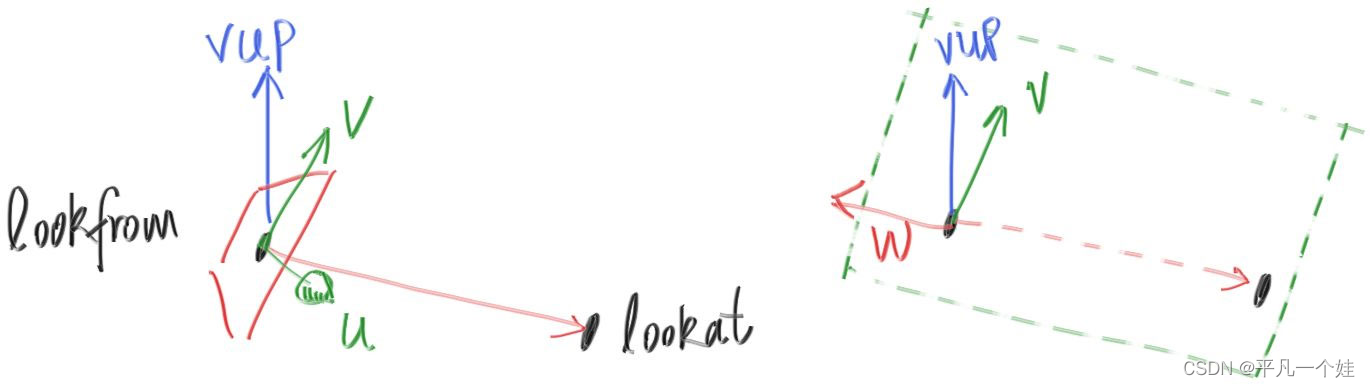
因为 vup,v,w 在同一平面,所以可以先用 w 和 vup 的叉乘获得 u 的方向。为了方便,可以使用世界坐标系的向上方向(0, 1, 0) 指定 vup (不一定必须是这个向量),这样可以保持相机镜头水平。当然可以传入其他的值来实现随心所欲的相机角度。
class camera {
public:
	camera(
		point3 lookfrom,
		point3 lookat,
		vec3 vup,  // 确定向上的正方向,不一定在相机旋转的平面上
		double fov, // 垂直方向上以度数表示的视野范围
		double aspect_ratio
	) {
		// 视口设置 (屏幕)
		auto theta = degrees_to_radians(fov);
		auto h = tan(theta / 2);
		double viewport_height = 2.0 * h;
		double viewport_width = aspect_ratio * viewport_height;

		auto w = unit_vector(lookfrom - lookat); // 保持右手系,相机朝向 -w 方向
		auto u = unit_vector(cross(vup, w));
		auto v = cross(w, u);


		// 初始化
		origin = lookfrom;
		horizontal = viewport_width * u;
		vertival = viewport_height * v;
		lower_left_corner = origin - horizontal / 2 - vertival / 2 - w;
	}

	ray get_ray(double s, double t) {
		return ray(origin, lower_left_corner + s * horizontal + t * vertival - origin);
	}

private:
	point3 origin;
	point3 lower_left_corner;
	vec3 horizontal;
	vec3 vertival;
};
回到上节的场景,使用新的观察点:
hittable_list world;

auto material_ground = make_shared<lambertian>(color(0.8, 0.8, 0.0));
auto material_center = make_shared<lambertian>(color(0.1, 0.2, 0.5));
auto material_left   = make_shared<dielectric>(1.5);
auto material_right  = make_shared<metal>(color(0.8, 0.6, 0.2), 0.0);

world.add(make_shared<sphere>(point3( 0.0, -100.5, -1.0), 100.0, material_ground));
world.add(make_shared<sphere>(point3( 0.0,    0.0, -1.0),   0.5, material_center));
world.add(make_shared<sphere>(point3(-1.0,    0.0, -1.0),   0.5, material_left));
world.add(make_shared<sphere>(point3(-1.0,    0.0, -1.0), -0.45, material_left));
world.add(make_shared<sphere>(point3( 1.0,    0.0, -1.0),   0.5, material_right));

camera cam(point3(-2,2,1), point3(0,0,-1), vec3(0,1,0), 90, aspect_ratio);
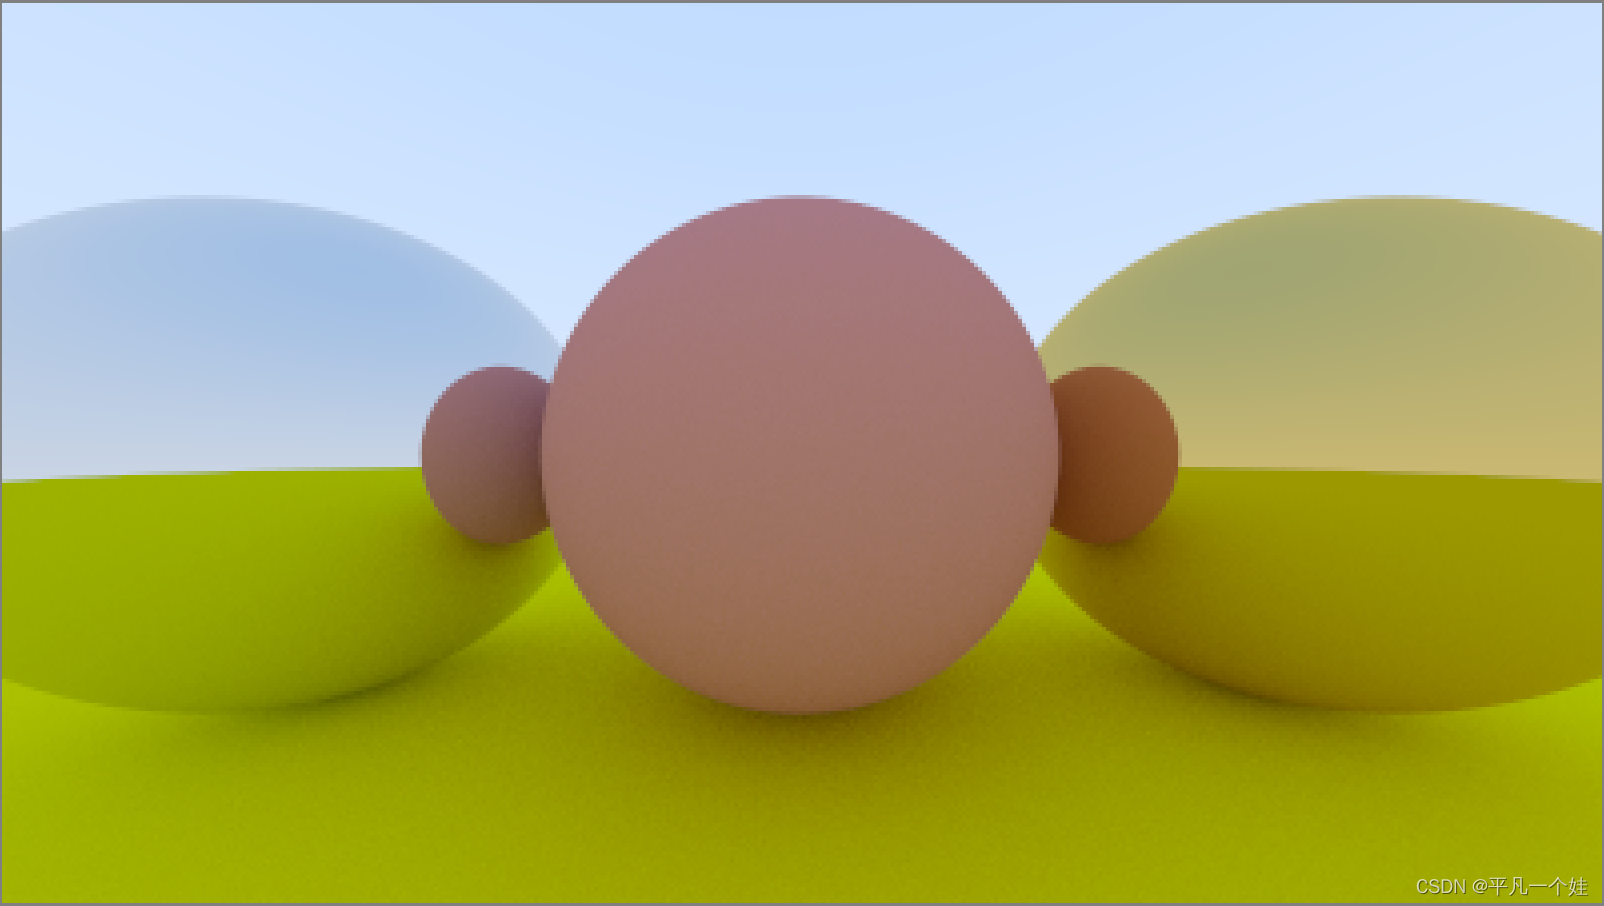
渲染结果:
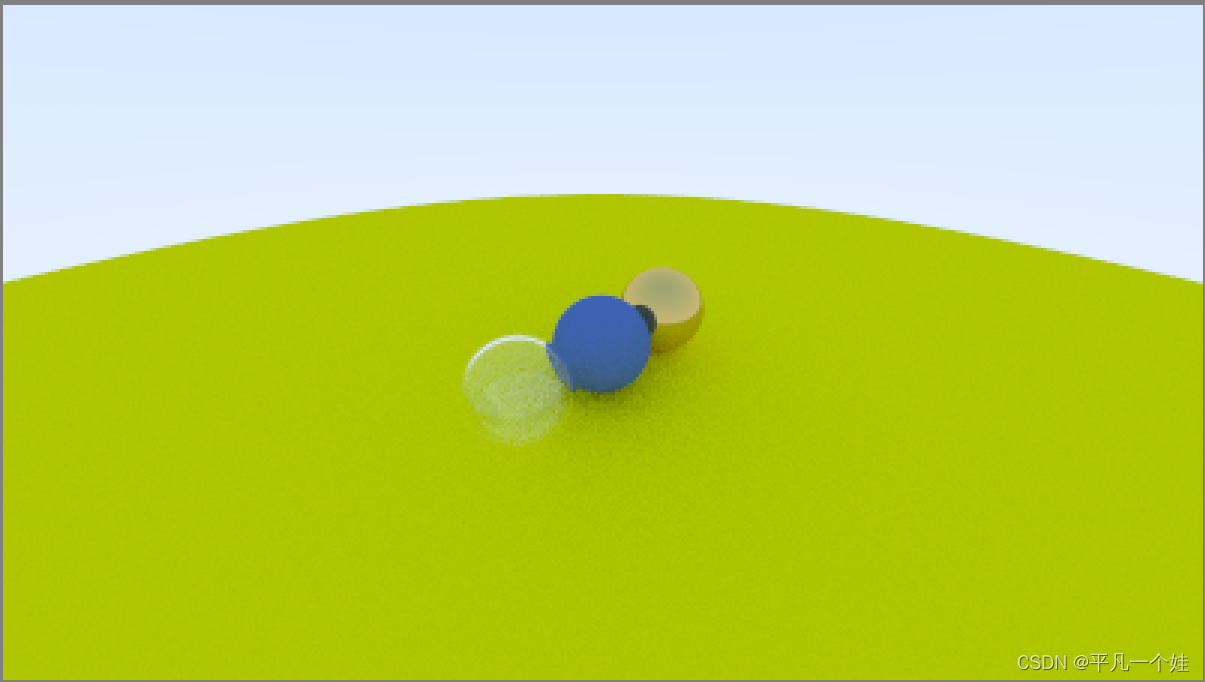
改变一下视角:
camera cam(point3(-2,2,1), point3(0,0,-1), vec3(0,1,0), 20, aspect_ratio);
结果:
12. Defocus Blur (离焦模糊)
离焦模糊,对于摄影师来说,都管它叫景深(depth of field)。
真实相机中存在景深,是因为它们需要一个大孔来获取光线(而不是我们之前虚拟相机的一个点)。这会导致所有物体散焦,但如果在孔洞中放置一个透镜,在特定距离上,所有物体都会被聚焦,这个距离称为焦距。
物理相机的焦距由透镜和胶片/传感器之间的距离控制。光圈(aperture)是控制透镜有效大小的孔,需要更多光线时,使用大光圈,景深也会增大。对于我们的虚拟相机,我们不需要收集更多光线,只有在需要景深的时候才设置光圈。
12.1 A Thin Lens Approximation
真实相机的透镜组成是很复杂的。但对于我们编程来说,只需要模拟上述顺序:图像传感器、透镜、然后光圈。然后,我们可以找出发送射线的位置,并在计算后翻转图像(图像在胶片上被颠倒投影)。图形学工作者通常使用一个透镜来近似景深模糊:

引用一下闫令琪GAMES101的课件
这部分详细知识点可以参考这篇文章
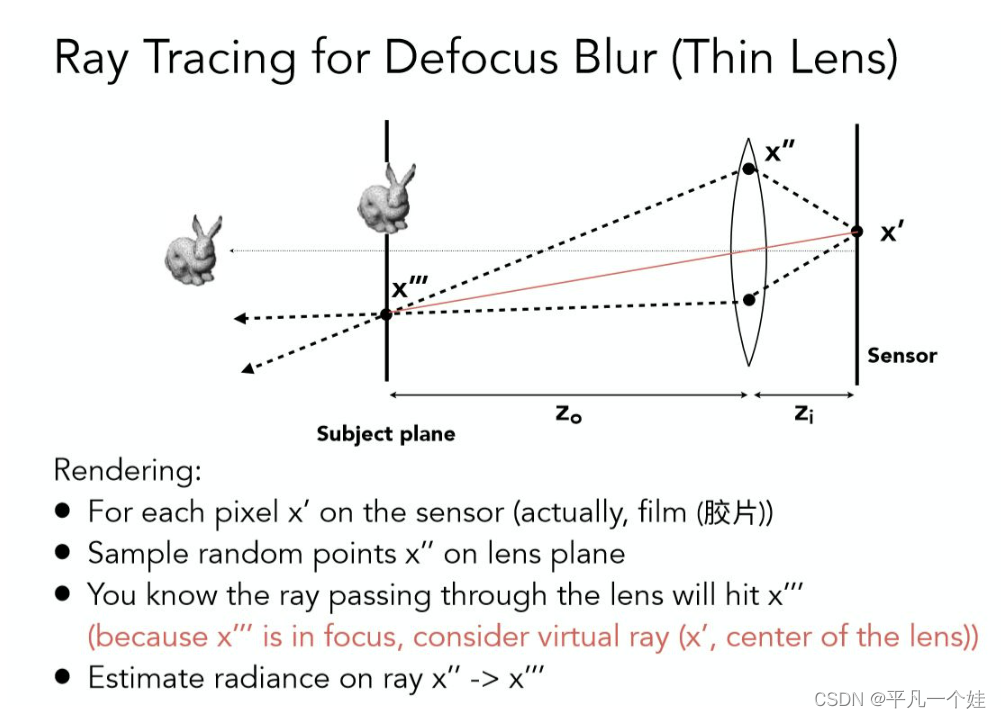
我们不需要模拟inside这部分。我们从虚拟透镜范围内发出射线,到摄像机平面,透镜与平面的距离为 focus_dist。
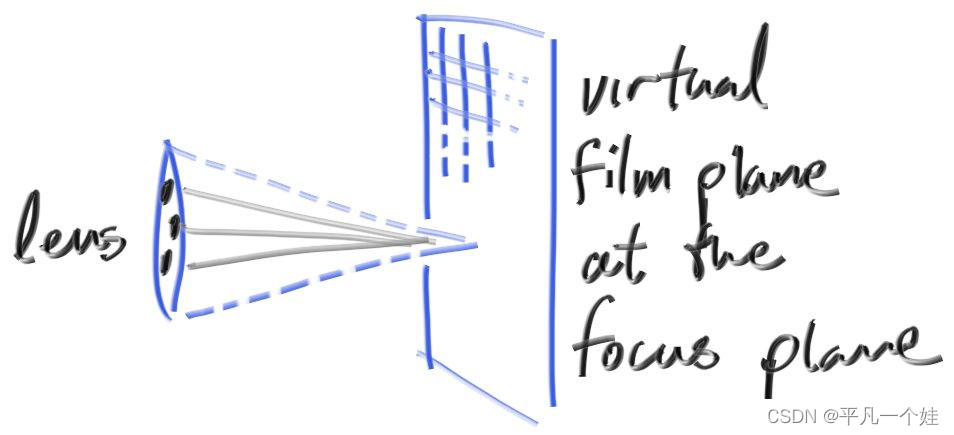
12.2. Generating Sample Rays
引入离散模糊,所有的光线都是从模拟虚拟透镜的以 lookfrom 为圆心的圆盘发出。圆盘半径越大,图像就越模糊。代码实现:
[vec3.h]
vec3 random_in_unit_disk() {
    while (true) {
        auto p = vec3(random_double(-1, 1), random_double(-1, 1), 0);
        if (p.length_squared() >= 1) continue;
        return p;
    }
}
[camera.h]
class camera {
public:
	camera(
		point3 lookfrom,
		point3 lookat,
		vec3 vup,  // 确定向上的正方向,不一定在相机旋转的平面上
		double fov, // 垂直方向上以度数表示的视野范围
		double aspect_ratio,
		double aperture, // 光圈即虚拟透镜直径
		double focus_dist // 视口距离透镜的距离
	) {
		// 视口设置 (屏幕)
		auto theta = degrees_to_radians(fov);
		auto h = tan(theta / 2); // 注意这里算h时,默认focus_dist = 1,因此后面要乘focus_dist
		double viewport_height = 2.0 * h;
		double viewport_width = aspect_ratio * viewport_height;

		w = unit_vector(lookfrom - lookat); // 保持右手系,相机朝向 -w 方向,前后
		u = unit_vector(cross(vup, w));  // x, 左右
		v = cross(w, u);  // y, 上下


		// 初始化
		origin = lookfrom;
		horizontal = focus_dist * viewport_width * u;
		vertival = focus_dist * viewport_height * v;
		lower_left_corner = origin - horizontal / 2 - vertival / 2 - focus_dist * w;

		lens_radius = aperture / 2;
	}

	ray get_ray(double s, double t) {
		vec3 rd = lens_radius * random_in_unit_disk();
		vec3 offset = rd.x() * u + rd.y() * v;
		return ray(origin + offset, lower_left_corner + s * horizontal + t * vertival - origin - offset);
	}

private:
	point3 origin;
	point3 lower_left_corner;
	vec3 horizontal;
	vec3 vertival;
	vec3 u, v, w;
	double lens_radius;
};
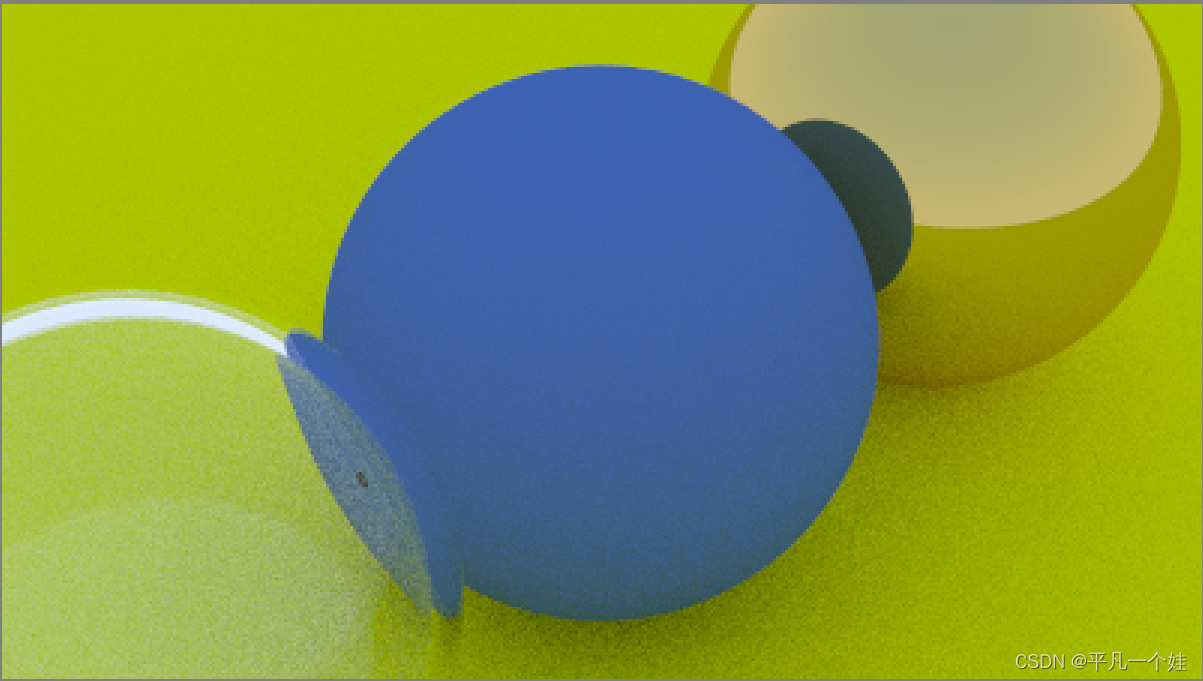
使用一个大的 aperture:
[main.cpp]
point3 lookfrom(3,3,2);
point3 lookat(0,0,-1);
vec3 vup(0,1,0);
auto dist_to_focus = (lookfrom-lookat).length();
auto aperture = 2.0;

camera cam(lookfrom, lookat, vup, 20, aspect_ratio, aperture, dist_to_focus);
渲染结果:

13. Where Next?
13.1. A Final Render
生成我们的课本封面啦!
为我们的场景添加许多球体:
[main.cpp]
#include "utils.h"
#include "camera.h"
#include "color.h"
#include "hittable_list.h"
#include "sphere.h"
#include "material.h"

#include <iostream>

hittable_list random_scene() {
    hittable_list world;

    auto ground_material = make_shared<lambertian>(color(0.5, 0.5, 0.5));
    world.add(make_shared<sphere>(point3(0, -1000, 0), 1000, ground_material));

    for (int a = -11; a < 11; a++) {
        for (int b = -11; b < 11; b++) {
            auto choose_mat = random_double();
            point3 center(a + 0.9 * random_double(), 0.2, b + 0.9 * random_double());

            if ((center - point3(4, 0.2, 0)).length() > 0.9) {
                shared_ptr<material> sphere_material;

                if (choose_mat < 0.8) {
                    // 漫反射
                    auto albedo = color::random() * color::random();
                    sphere_material = make_shared<lambertian>(albedo);
                    world.add(make_shared<sphere>(center, 0.2, sphere_material));
                }
                else if (choose_mat < 0.95) {
                    // 金属
                    auto albedo = color::random(0.5, 1);
                    auto fuzz = random_double(0, 0.5);
                    sphere_material = make_shared<metal>(albedo, fuzz);
                    world.add(make_shared<sphere>(center, 0.2, sphere_material));
                }
                else {
                    // 玻璃
                    sphere_material = make_shared<dielectric>(1.5);
                    world.add(make_shared<sphere>(center, 0.2, sphere_material));
                }
            }
        }
    }

    auto material1 = make_shared<dielectric>(1.5);
    world.add(make_shared<sphere>(point3(0, 1, 0), 1.0, material1));

    auto material2 = make_shared<lambertian>(color(0.4, 0.2, 0.1));
    world.add(make_shared<sphere>(point3(-4, 1, 0), 1.0, material2));

    auto material3 = make_shared<metal>(color(0.7, 0.6, 0.5), 0.0);
    world.add(make_shared<sphere>(point3(4, 1, 0), 1.0, material3));

    return world;
}

color ray_color(const ray& r, const hittable_list& world, int depth) {
    hit_record rec;

    if (depth <= 0) {
        //std::cout << "走这里咯" << std::endl;
        return color(0, 0, 0);
    }

    if (world.hit(r, 0.001, infinity, rec)) {
        ray scattered;
        color attenuation;
        if (rec.mat_ptr->scatter(r, rec, attenuation, scattered)) {
            return attenuation * ray_color(scattered, world, depth - 1);
        }
        return color(0, 0, 0);
    }

    vec3 unit_direction = unit_vector(r.direction());
    double t = 0.5 * (unit_direction.y() + 1.0);
    return (1.0 - t) * color(1.0, 1.0, 1.0) + t * color(0.5, 0.7, 1.0);
}

int main() {

    // Image
    const auto aspect_ratio = 16.0 / 9.0;
    const int image_width = 2560;
    const int image_height = static_cast<int>(image_width / aspect_ratio);
    const int samples_per_pixel = 500;
    const int max_depth = 50;

    // World
    hittable_list world = random_scene();


    // Camera
    point3 lookfrom(13, 2, 3);
    point3 lookat(0, 0, -1);
    vec3 vup(0, 1, 0);
    auto dist_to_focus = 10.0;
    auto aperture = 0.1;

    camera cam(lookfrom, lookat, vup, 20, aspect_ratio, aperture, dist_to_focus);

    // Render

    std::cout << "P3\n" << image_width << " " << image_height << "\n255\n";

    for (int j = image_height - 1; j >= 0; --j) {
        std::cerr << "\rScanlines remaining: " << j << ' ' << std::flush;
        for (int i = 0; i < image_width; ++i) {
            color pixel_color(0, 0, 0);
            for (int s = 0; s < samples_per_pixel; ++s) {
                auto u = (double(i) + random_double()) / (image_width - 1);
                auto v = (double(j) + random_double()) / (image_height - 1);
                ray r = cam.get_ray(u, v);
                //ray r(origin, lower_left_corner + u * horizontal + v * vertical - origin);
                pixel_color += ray_color(r, world, max_depth);
            }
            write_color(std::cout, pixel_color, samples_per_pixel);
        }
    }

    std::cerr << "\nDone.\n";
}
冲着咱电脑这2K屏幕,怎么也得渲个2K的图出来吧,不过我这个属于莽夫行为,后面再尝试并行优化吧,上图!

总结
到此为止,我的第一个图形学小项目算是完成了,虽然是极其简单,但是也学习和领悟到了图形学的神奇和魅力,还记得第一次渲染出漫反射材质时看到阴影的惊喜,口才不佳的我只能说一声牛逼来感叹前人的聪明才智。
这也是我写的第一篇长篇博客,用来记录这一过程,也希望自己未来能够一直坚持,为了中国的游戏,为了自己的游戏,努力奋斗!
不过想来从小到大做事总是三分钟热度,之后的我看到这篇文章,笑笑就好啊。
参考资料
Ray Tracing in One Weekend(中文翻译)
Ray Tracing in One Weekend V3.0中文翻译(上)
Ray Tracing in One Weekend V3.0中文翻译(下)
林兮博客:https://www.cnblogs.com/lv-anchoret/


 1万+
1万+


 被折叠的 条评论
为什么被折叠?
被折叠的 条评论
为什么被折叠?
 到【灌水乐园】发言


