


这里写目录标题
- 实现人物的移动,layers层级控制和瓦片地图绘制
- 实现摄像机跟随,为摄像机添加边界
- 添加碰撞层和景观树,并为景观树添加动画和遮挡透明效果
- 背包数据初始化
- 使用 UI Toolkit 和 UI Builder 制作物品编辑器
- 创建 InventoryManager 和 Item
- 拾取物品基本逻辑
- 背包的数据结构
- 实现背包检查和添加物品
- 制作 Action Bar UI
- 制作人物背包内的UI
- SlotUI 根据数据显示图片和数量
- 背包UI显示
- 控制背包打开和关闭
- 背包物品选择高亮显示和动画
- 创建 DragItem 实现物品拖拽跟随显示,实现拖拽物品交换数据和在地图上生成物品
- 制作 ItemTooltip 的 UI
- 实现根据物品详情显示 ItemTooltip
- 制作 Player 的动画
- 实现选中物品触发举起动画*
- 绘制房子和可以被砍伐的树
- 构建游戏的时间系统
- 时间系统 UI 制作
- 代码链接 UI 实现时间日期对应转换
- 第二场景的绘制指南
- 创建 TransitionManager 控制人物场景切换
- 实现人物跨场景移动以及场景加载前后事件
- 场景切换淡入淡出和动态 UI 显示
- 保存和加载场景中的物品
- 设置鼠标指针根据物品调整
- 构建地图信息系统
- 生成地图数据
- 设置鼠标可用状
- 实现鼠标选中物品后的场景点击事件流程
- 制作可以扔出来的物品
- 实现 挖坑 和 浇水 的地图更改变化
- 制作人物使用工具的动画和流程
- (Map)随着时间变化刷新地图显示内容
- (Crop)种子数据库制作
- (Crop)制作 CropManager 实现撒种子的事件
- (Crop)种子成长过程
- (Crop)实现菜篮子收割庄稼的行为
- (Crop)实现收割庄稼产生果实
- (Crop)实现农作物的重复收割
- (Crop)制作可砍伐的树木摇晃和倒下动画
- (Crop)实现斧子砍树的功能
- (Crop)随机生成收割物品和转化的实现
- 工具栏按钮快捷键
- 使用 Particle System 制作树叶凋落特效
- 使用 Unity 最新 ObjectPool API 制作对象池
- (Crop)实现树木、石头、稻草在场景里的预先生成方法
- (Crop)制作石头和稻草的粒子特效
- (Crop)实现割草的全部流程及稻草的互动摇晃
- (AStar)基础数据创建 Node & GridNodes
- (AStar)根据每个地图信息生成节点数据
- (AStar)核心功能评估周围节点得到最短路径
- (AStar)测试实现在真实游戏地图上显示最短路径
- 创建 NPC 基本信息并实现根据场景切换显示
- NPC 的 Schedule 数据制作和路径生成
- 利用 AStar 实现 NPC 的移动
- 加入 NPC 动画及真实的 Schedule 触发
- 跨场景路地图的径数据及生成
- 修正 CropGenerator 和 AStar 地图节点生成
- (Dialogue)制作对话的 UI
- (Dialogue)创建对话数据实现对话逻辑
- 创建 NPCFunction 和 通用 UI 实现对话后打开商店
- 创建交易窗口 UI 并实现拖拽交易打开交易窗口
- 实现买卖交易的完整流程
- 建造图纸数据及 ItemTooltip 显示资源物品
- 完成建造的流程和逻辑
- 实现切换场景保存和读取场景中的建造物品
- 实现箱子储物空间的保存和数据交换
- (2D Light)升级到 URP 并创建灯光数据结构
- (2D Light)实现跟随游戏时间触发切换场景光效(昼夜交替)
- (Audio)创建声音数据结构实现不同场景播放不同音乐和音效
- (Audio)创建 AudioMixer 实现音乐音效的控制和切换
- (Audio)利用对象池播放所有音效
- Timeline创建
- 创建 Timeline 的对话
- 控制 Timeline 的启动和暂停
- 创建主菜单 UI
- (Save)创建游戏数据存储结构框架
- (Save)实现数据存储和加载的逻辑
- (Save)实现数据读取开始新游戏和加载进度
- 制作暂停菜单和返回逻辑
- 逻辑调整及补充内容
实现人物的移动,layers层级控制和瓦片地图绘制
人物移动代码
public class Player : MonoBehaviour
{
    private Rigidbody2D rb;
    public float speed;
    private float inputX;
    private float inputY;
    private Vector2 movementInput;

    private void Awake()
    {
        rb = GetComponent<Rigidbody2D>();
    }

    private void Update()
    {
        PlayerInput();
    }

    private void FixedUpdate()
    {
        Movement();
    }

    private void PlayerInput()
    {
    //在同时按下两个方向的键时,x和y的输入值都会大于0,所以要对其进行处理,不然人物在斜方向移动时会变快
        inputX=Input.GetAxisRaw("Horizontal");
        inputY = Input.GetAxisRaw("Vertical");
        if (inputX != 0 && inputY != 0)
        {
            inputX = inputX * 0.6f;
            inputY = inputY * 0.6f;
        }
        movementInput = new Vector2(inputX, inputY);
    }

    private void Movement()
    {
        rb.MovePosition(rb.position+movementInput*speed*Time.deltaTime);
    }

}
场景中的TileMap结构

前三层Bottom,Middle,Top为地面的三层
Stuff1,Stuff2为装饰物的两层
Dig为挖坑层
Water为浇水层
Instance人物层
Front1,Front2可遮挡人物的层级
Collision碰撞关系层
每个层都有单独的一层layer
如何解决瓦片之间有缝隙的情况
Sprite Atlas
可以将所有图片素材打包成一张完整的图片,这样在调用或使用时Unity就会忽略掉他之间的缝隙

实现摄像机跟随,为摄像机添加边界
为MainCamera添加像素完美相机
添加Cinemachine,并为CMvcam添加像素完美相机拓展,调整body中的缓冲值到一个合适的位置

Pixel Perfect Camera像素完美相机
更适合像素游戏的相机
要点依旧是要把Pixel Perfect Camera设置好
可以预览相机实际效果,但是如果屏幕分辨率不符合要求就无法预览
为摄像机添加边界
添加 Cinemachine Confiner 扩展工具
添加 Bounds 并设置 Polygon Collider2D 边界
添加代码让 Cinemachine 或者跨场景的边界 Bounds
遇到问题:
运行后,当摄像机碰到边界时,且不再跟随玩家移动,但还是能拍到边界以外的区域
测试多次得出,不应该像教程那样贴着边设置,而是应该将摄像机设置在地图边界以内的一段距离,总结下来就是:地图实际边界>地图针对人物的碰撞体边界>=Polygon Collider2D 边界
回顾Rigidbody2d各刚体类型的区别

添加碰撞层和景观树,并为景观树添加动画和遮挡透明效果
树分为Top(树冠)和Trunk(树根)两部分,为树冠添加animator组件,将帧序列导入animation窗口中生成动画实现动态效果
在父物体上添加树冠部分的Box Collider碰撞体,在树根部分添加树根自身的碰撞体,为Top和Trunk分别添加ItemFader脚本,调节Alpha值实现从正常变半透明和从半透明变正常的函数方法
public class ItemFader : MonoBehaviour
{
   private SpriteRenderer spriteRenderer;


   private void Awake()
   {
      spriteRenderer = GetComponent<SpriteRenderer>();
   }
   /// <summary>
   /// 逐渐半透明
   /// </summary>
   public void FadeOut()
   {
      Color targetColor = new Color(1, 1, 1,Settings.targetAlpha);
      spriteRenderer.DOColor(targetColor, Settings.fadeDuration);

   }

   /// <summary>
   /// 逐渐恢复颜色
   /// </summary>
   public void FadeIn()
   {
      Color targetColor = new Color(1, 1, 1,1);
      spriteRenderer.DOColor(targetColor, Settings.fadeDuration);

   }


}
在人物身上添加TriggerItemFader组件,实现人物触发树冠变透明的方法
人物碰撞到父物体时,会调用父物体的子物体中的ItemFader组件,实现树冠透明度改变的方法
public class TriggerItemFader : MonoBehaviour
{
    private void OnTriggerEnter2D(Collider2D other)
    {
        ItemFader[] faders = other.GetComponentsInChildren<ItemFader>();
        if (faders.Length > 0)
        {
            foreach (var item in faders)
            {
                item.FadeOut();
            }
        }
    }

    private void OnTriggerExit2D(Collider2D other)
    {
        ItemFader []faders = other.GetComponentsInChildren<ItemFader>();
        if (faders.Length > 0)
        {
            foreach (var item in faders)
            {
                item.FadeIn();
            }
        }
    }
}
背包数据初始化
创建ItemDetails 类显示物品的详情信息
Enums 创建 ItemType 各种物品类型
public enum ItemType
{
    Seed,Commodity,Furniture,
    HoeTool,ChopTool,BreakTool,ReapTool,WaterTool,CollectTool,
    ReapableScenery
}
[System.Serializable]
public class ItemDetails
{
    public int itemID;//id
    public string name;//名称
    public ItemType itemType;//类型
    public Sprite itemIcon;//背包中的图标
    public Sprite itemOnWorldSprite;//世界上的图标
    public string itemDescription;//描述
    public int itemUseRadius;//使用范围
    public bool canPickedup;
    public bool canDropped;
    public bool canCarried;
    public int itemPrice;//价格
    [Range(0, 1)]
    public float sellPercentage;//折扣
}
生成 ItemDetailsList_SO 文件做为整个游戏的物品管理数据库
效果如下

使用 UI Toolkit 和 UI Builder 制作物品编辑器
(写到另一篇里了,这里就不写了)
创建 InventoryManager 和 Item
InventoryManager 管理所有物品数据
namespace MFarm.Inventory
{
    public class InventoryManager : Singleton<InventoryManager>
    {
        public ItemDataList_SO itemDataListSo;
        /// <summary>
        /// 通过ID返回物品信息
        /// </summary>
        /// <param name="ID"></param>
        /// <returns></returns>
        public ItemDetails GetItemDetails(int ID)
        {
            return itemDataListSo.itemDetailsList.Find((i => i.itemID == ID));
        }
    }

}
创建Item通过itemId获取到相关信息,并使其生成到地图上
namespace MFarm.Inventory
{
    public class Item : MonoBehaviour
    {
        public int itemID;

        private SpriteRenderer spriteRenderer;
        private ItemDetails itemDetails;
        private BoxCollider2D coll;
        private void Awake()
        {
            spriteRenderer = GetComponentInChildren<SpriteRenderer>();
            coll = GetComponent<BoxCollider2D>();
        }
        private void Start()
        {
            if (itemID != 0)
            {
                Init(itemID);
            }
        }
        public void Init(int ID)
        {
            itemID = ID;
            itemDetails = InventoryManager.Instance.GetItemDetails(itemID);
            if (itemDetails != null)
            {
                spriteRenderer.sprite=itemDetails.itemOnWorldSprite==null?itemDetails.itemIcon:itemDetails.itemOnWorldSprite;
                //生成物品时根据图片实际大小修改boxcollider的尺寸
                Vector2 newSize = new Vector2(spriteRenderer.sprite.bounds.size.x, spriteRenderer.sprite.bounds.size.y);
                coll.size = newSize;
                coll.offset = new Vector2(0, spriteRenderer.bounds.center.y);
            }
        }
    }
}
拾取物品基本逻辑
在人物身上添加碰撞体,在碰撞到物体时将其添加到背包中
namespace MFarm.Inventory
{
    public class ItemPickUp : MonoBehaviour
    {
        private void OnTriggerEnter2D(Collider2D other)
        {
            Item item = other.GetComponent<Item>();
            if (item!= null)
            {
                if (item.itemDetails.canPickedup)
                {
                    InventoryManager.Instance.AddItem(item,true);
                }
            }
        }
    }
}
背包的数据结构
创建背包的结构体
public struct InventoryItem
{//使用struct的理由是struct是值类型,所以创建一个副本时不会引用同一个内存地址
 //struct创建时会有默认值,不会出现为空的现象
    //而class是引用类型,创建一个副本时会引用同一个内存地址,如果对一个副本进行修改,那么会影响到原值。
    //会出现为空的现象,对于背包来说比较麻烦
    public int itemID;
    public int itemAmount;
}
[CreateAssetMenu(fileName = "InventoryBag_SO",menuName = "Inventory/InventoryBag_SO")]
public class InventoryBag_SO : ScriptableObject
{
    public List<InventoryItem> itemList;
}
实现背包检查和添加物品
/// <summary>
/// 添加物品到Player背包里
/// </summary>
/// <param name="item"></param>
/// <param name="toDestory"></param>
        public void AddItem(Item item,bool toDestory)
        {
            var index = GetItemIndexInBag(item.itemID);
            AddItemAtIndex(item.itemID,index,1);

            Debug.Log(GetItemDetails(item.itemID).itemID+"Name"+GetItemDetails(item.itemID).itemName);
            if (toDestory)
            {
                Destroy(item.gameObject);
            }
        }
/// <summary>
/// 判断包是否为空
/// </summary>
/// <returns></returns>
        private bool CheckBagCapacity()
        {
            for (int i = 0; i < playerBag.itemList.Count; i++)
            {
                if (playerBag.itemList[i].itemID==0)
                {
                    return true;
                }
            }
            return false;
        }
/// <summary>
/// 判断包中是否有物品
/// </summary>
/// <param name="itemID"></param>
/// <returns></returns>
        private int GetItemIndexInBag(int itemID)
        {
            for (int i = 0; i < playerBag.itemList.Count; i++)
            {
                if (playerBag.itemList[i].itemID==itemID)
                {
                    return i;
                }
            }
            return -1;
        }
/// <summary>
/// 在指定位置添加物品
/// </summary>
/// <param name="物品ID"></param>
/// <param name="序号"></param>
/// <param name="数量"></param>
private void AddItemAtIndex(int ID,int index,int amount)
{
    if (index == -1&&CheckBagCapacity())
    {
        var item = new InventoryItem { itemID = ID, itemAmount = amount };
        for (int i = 0; i < playerBag.itemList.Count; i++)
        {
            if (playerBag.itemList[i].itemID == 0)
            {
                playerBag.itemList[i] = item;
                break;
            }
        }
    }
    else
    {
        int currentAmount = playerBag.itemList[index].itemAmount + amount;
        var item = new InventoryItem { itemID = ID, itemAmount = currentAmount };
        playerBag.itemList[index] = item;
    }
}
    }
制作 Action Bar UI

制作人物背包内的UI

SlotUI 根据数据显示图片和数量
using System;
using System.Collections;
using System.Collections.Generic;
using UnityEngine;
using TMPro;
using UnityEngine.UI;
public class SlotUI : MonoBehaviour
{
    [Header("组件获取")]
    [SerializeField]
    private Image slotImage;
    [SerializeField]
    private TextMeshProUGUI amountText;
    [SerializeField]
    private Image slotHighlight;
    [SerializeField]
    private Button button;

    [Header("格子类型")]
    public SlotType slotType;
    public bool isSelected;
    public int slotIndex;
    public ItemDetails itemDetails;
    public int itemAmount;

    private void Start()
    {
        isSelected = false;
        if (itemDetails.itemID == 0)
        {
            UpdateEmptySlot();
        }
    }

    public void UpdateSlot(ItemDetails item,int amount)
    {
        itemDetails = item;
        slotImage.sprite = item.itemIcon;
        itemAmount = amount;
        amountText.text = itemAmount.ToString();
        slotImage.enabled = true;
        button.interactable = true;
    }
/// <summary>
/// 将Slot更新为空
/// </summary>
    public void UpdateEmptySlot()
    {
        if (isSelected)
        {
            isSelected = false;
        }
        slotImage.enabled = false;
        amountText.text = string.Empty;
        button.interactable = false;
    }
}
背包UI显示
每当背包中的物品位置更换数据更换的时候,更新对应的UI
当UI需要更新时,通过CallUpdateInventoryUI调用UpdateInventoryUI事件
UpdateInventoryUI事件订阅了OnUpdateInventory函数方法,每当调用UpdateInventory事件时就会执行这个方法
public static class EventHandler
{
    public static event Action<InventoryLocation, List<InventoryItem>> UpdateInventoryUI;

    public static void CallUpdateInventoryUI(InventoryLocation location, List<InventoryItem> list)
    {
        UpdateInventoryUI?.Invoke(location,list);
    }
}
事件声明 (UpdateInventoryUI):
UpdateInventoryUI 是一个静态事件,类型为 Action<InventoryLocation, List>。这意味着它可以持有符合 Action<InventoryLocation, List> 签名的方法(委托),这些方法接受这两个参数并返回 void。
事件调用 (CallUpdateInventoryUI):
CallUpdateInventoryUI 是一个静态方法,用于调用 UpdateInventoryUI 事件。在调用之前会检查 UpdateInventoryUI 是否为 null UpdateInventoryUI?.Invoke(location, list);,以避免空引用异常。
private void OnEnable()
{
    EventHandler.UpdateInventoryUI += OnUpdateInventory;
}

private void OnDisable()
{
    EventHandler.UpdateInventoryUI -= OnUpdateInventory;
}

private void OnUpdateInventory(InventoryLocation location, List<InventoryItem> list)
{
    // 根据库存变化更新 UI 的具体实现细节
    switch (location)
    {
        case InventoryLocation.Player:
            for (int i = 0; i < playerSlots.Length; i++)
            {
                if (list[i].itemAmount > 0)
                {
                    var item = InventoryManager.Instance.GetItemDetails(list[i].itemID);
                    playerSlots[i].UpdateSlot(item, list[i].itemAmount);
                }
                else
                {
                    playerSlots[i].UpdateEmptySlot();
                }
            }
            break;
    }
}
订阅 (OnEnable):
在 OnEnable 方法中,通过 EventHandler.UpdateInventoryUI += OnUpdateInventory; 将 OnUpdateInventory 方法订阅到 EventHandler 类的 UpdateInventoryUI 事件。这意味着每当 UpdateInventoryUI 被触发时,OnUpdateInventory 方法将被调用。
取消订阅 (OnDisable):
在 OnDisable 方法中,使用 EventHandler.UpdateInventoryUI -= OnUpdateInventory; 取消订阅。这确保了在脚本禁用后,当 UpdateInventoryUI 被触发时,OnUpdateInventory 方法将不再被调用。
事件委托的解释
事件委托:
目的: C# 中的事件允许实现观察者模式,允许对象订阅(注册兴趣)和取消订阅(移除兴趣)某些事件发生的通知。
用法: 这里的 UpdateInventoryUI 事件允许程序的其他部分(比如 UI 元素)订阅(+=)和取消订阅(-=)希望在库存更新发生时调用的方法(如 OnUpdateInventory)。
灵活性: 通过使用事件,EventHandler 类可以在需要更新库存 UI 时,通知多个订阅者(如不同的 UI 元素),而这些订阅者无需直接引用 EventHandler 类或彼此。
控制背包打开和关闭
打开背包UI的函数,并在Update中调用
public void OpenBagUI()
        {
            bagOpened = !bagOpened;
            bagUI.SetActive(bagOpened);
        }
        private void Update()
        {
            if (Input.GetKeyDown(KeyCode.B))
            {
                OpenBagUI();
            }
        }
背包物品选择高亮显示和动画
创建更新高亮显示的函数,保证列表中只有一个格子保持被选中的状态
public void UpdateSlotHightlight(int index)
        {
            foreach (var slot in playerSlots)
            {
                if (slot.isSelected && slot.slotIndex == index)
                {
                    slot.slotHighlight.gameObject.SetActive(true);
                }
                else
                {
                    slot.isSelected = false;
                    slot.slotHighlight.gameObject.SetActive(false);
                }
            }
        }
在点击方法中调用,实现当点击背包格子的时候出现高亮的功能
public void OnPointerClick(PointerEventData eventData)
        {
            if (itemAmount == 0)
            {
                return;
            }
            isSelected = !isSelected;
            inventoryUI.UpdateSlotHightlight(slotIndex);
        }
创建 DragItem 实现物品拖拽跟随显示,实现拖拽物品交换数据和在地图上生成物品
在EventHandler中创建在地图上生成物品的事件和事件函数
public static event Action<int, Vector3> InstantiateItemInScene;
    public static void CallInstantiateItemInScene(int ID, Vector3 pos)
    {
        InstantiateItemInScene?.Invoke(ID,pos);
    }
在InventoryManger中添加交换物品信息并更新的代码
public void SwapItem(int formIndex, int targetIndex)
        {
            InventoryItem currentItem = playerBag.itemList[formIndex];
            InventoryItem targetItem = playerBag.itemList[targetIndex];
            if (targetItem.itemID != 0)
            {
                playerBag.itemList[formIndex] = targetItem;
                playerBag.itemList[targetIndex] = currentItem;
            }
            else
            {
                playerBag.itemList[targetIndex] = currentItem;
                playerBag.itemList[formIndex] = new InventoryItem();
            }
            EventHandler.CallUpdateInventoryUI(InventoryLocation.Player,playerBag.itemList);
        }
在SlotUI脚本中添加拖拽物品,交换物品的代码
		public void OnBeginDrag(PointerEventData eventData)
        {
            if (itemAmount > 0)
            {
                inventoryUI.dragItem.enabled = true;
                inventoryUI.dragItem.sprite = slotImage.sprite;
                inventoryUI.dragItem.SetNativeSize();

                isSelected = true;
                inventoryUI.UpdateSlotHightlight(slotIndex);
            }
        }

        public void OnDrag(PointerEventData eventData)
        {
            inventoryUI.dragItem.transform.position = Input.mousePosition;
        }

        public void OnEndDrag(PointerEventData eventData)
        {
            inventoryUI.dragItem.enabled = false;
            if (eventData.pointerCurrentRaycast.gameObject != null)
            {
                if (eventData.pointerCurrentRaycast.gameObject.GetComponent<SlotUI>() == null)
                {
                    return;
                }
                var targetSlot = eventData.pointerCurrentRaycast.gameObject.GetComponent<SlotUI>();
                int targetIndex = targetSlot.slotIndex;
                //在Player自身背包范围内交换
                if (slotType == SlotType.Bag && targetSlot.slotType == SlotType.Bag)
                {
                    InventoryManager.Instance.SwapItem(slotIndex,targetIndex);
                }
                inventoryUI.UpdateSlotHightlight(-1);
            }
            else
            {
                if (itemDetails.canDropped)
                {
                    //鼠标对应世界坐标
                    var pos = Camera.main.ScreenToWorldPoint(new Vector3(Input.mousePosition.x, Input.mousePosition.y,
                        -Camera.main.transform.position.z));
                    EventHandler.CallInstantiateItemInScene(itemDetails.itemID, pos);
                }
            }
        }
制作 ItemTooltip 的 UI

实现根据物品详情显示 ItemTooltip
public class ItemTooltip : MonoBehaviour
{
    [SerializeField]
    private TextMeshProUGUI nameText;
    [SerializeField]
    private TextMeshProUGUI typeText;
    [SerializeField]
    private TextMeshProUGUI descriptionText;
    [SerializeField]
    private Text valueText;
    [SerializeField]
    private GameObject bottomPart;

    public void SetupTooltip(ItemDetails itemDetails, SlotType slotType)
    {
        nameText.text = itemDetails.itemName;
        typeText.text = GetItemType(itemDetails.itemType);
        descriptionText.text = itemDetails.itemDescription;
        if (itemDetails.itemType == ItemType.Seed || itemDetails.itemType == ItemType.Commodity ||
            itemDetails.itemType == ItemType.Furniture)
        {
            bottomPart.SetActive(true);

            var price = itemDetails.itemPrice;
            if (slotType == SlotType.Bag)
            {
                price = (int)(price * itemDetails.sellPercentage);
            }

            valueText.text = price.ToString();
        }
        else
        {
            bottomPart.SetActive(false);
        }
        LayoutRebuilder.ForceRebuildLayoutImmediate(GetComponent<RectTransform>());
    }
    /// <summary>
    /// 手动汉化
    /// </summary>
    /// <param name="itemType"></param>
    /// <returns></returns>
    private string GetItemType(ItemType itemType)
    {
        return itemType switch
        {
            ItemType.Seed=>"种子",
            ItemType.Commodity=>"商品",
            ItemType.Furniture=>"家具",
            ItemType.CollectTool=>"工具",
            ItemType.BreakTool=>"工具",
            ItemType.ChopTool=>"工具",
            ItemType.HoeTool=>"工具",
            ItemType.ReapTool=>"工具",
            ItemType.WaterTool=>"工具",
            _=>"无"
        };
    }
}
制作 Player 的动画
创建人物各个部位的动画控制器和相应的动画

通过脚本根据输入的速度切换对应的Walk,Run动画
private void PlayerInput()
    {
        inputX=Input.GetAxisRaw("Horizontal");
        inputY = Input.GetAxisRaw("Vertical");
        if (inputX != 0 && inputY != 0)
        {
            //在同时按下两个方向的键时,x和y的输入值都会大于0,所以要对其进行处理,不然人物在斜方向移动时会变快
            inputX = inputX * 0.6f;
            inputY = inputY * 0.6f;
        }

        if (Input.GetKey(KeyCode.LeftShift))
        {
            inputX = inputX * 0.5f;
            inputY = inputY * 0.5f;
        }
        movementInput = new Vector2(inputX, inputY);
        isMoving=movementInput != Vector2.zero;
    }

    private void Movement()
    {
        rb.MovePosition(rb.position+movementInput*speed*Time.deltaTime);
    }

    private void SwitchAnimation()
    {
        foreach (var anim in animators)
        {
            anim.SetBool("isMoving",isMoving);
            if (isMoving)
            {
                anim.SetFloat("InputX",inputX);
                anim.SetFloat("InputY",inputY);
            }
        }
    }
实现选中物品触发举起动画*
新建枚举类型
public enum PartType
{//物品类型对应的动画
    None,Carry,Hoe,Break,
}

public enum PartName
{//人物各部分的动画
    Body,Hair,Arm,Tool
}
创建事件,传入被选中的物品的信息
public static event Action<ItemDetails, bool> ItemSelectedEvent;

    public static void CallItemSelectedEvent(ItemDetails itemDetails, bool isSelected)
    {
       ItemSelectedEvent?.Invoke(itemDetails,isSelected);
    }
根据获得的物品信息判断当前人物应该切换什么动画
public class AnimatorOverride : MonoBehaviour
{
    private Animator[] animators;
    public SpriteRenderer holdItem;
    [Header("各部分动画列表")]
    public List<AnimatorType> animatorTypes;

    private Dictionary<string, Animator> animatorNameDict = new Dictionary<string, Animator>();

    private void Awake()
    {
        animators = GetComponentsInChildren<Animator>();
        foreach (var anim in animators)
        {
            animatorNameDict.Add(anim.name,anim);
        }
    }

    private void OnEnable()
    {
        EventHandler.ItemSelectedEvent+=OnItemSelectedEvent;
    }

    private void OnDisable()
    {
        EventHandler.ItemSelectedEvent-=OnItemSelectedEvent;
    }
    /// <summary>
    /// 根据选中的物品来播放人物对应动画
    /// </summary>
    /// <param name="itemDetails"></param>
    /// <param name="isSelect"></param>
    private void OnItemSelectedEvent(ItemDetails itemDetails, bool isSelect)
    {
        PartType currentType = itemDetails.itemType switch
        {
            //WORKFLOW:不同的工具返回不同的动画在这里补全
            ItemType.Seed=>PartType.Carry,
            ItemType.Commodity=>PartType.Carry,
            _=>PartType.None
        };
        if (isSelect == false)
        {
            currentType = PartType.None;
            holdItem.enabled = false;
        }
        else
        {
            if (currentType == PartType.Carry)
            {
                holdItem.sprite = itemDetails.itemOnWorldSprite;
                holdItem.enabled = true;
            }
        }
        SwitchAnimator(currentType);
    }
/// <summary>
/// 根据现在的状态从字典中查找对应的动画
/// </summary>
/// <param name="partType"></param>
    private void SwitchAnimator(PartType partType)
    {
        foreach (var item in animatorTypes)
        {
            if (item.partType == partType)
            {
                animatorNameDict[item.partName.ToString()].runtimeAnimatorController = item.overrideController;
            }
        }
    }
}
绘制房子和可以被砍伐的树
房子就是普通的瓦片地图绘制,注意要将房子底部和顶部绘制到不同层,这样房子顶部才能遮挡住人物
树分为树干和树冠两部分,添加ItemFader组件实现人物走过时变透明的效果

构建游戏的时间系统
设置时间相关的数据
//时间相关
    public const float secondThreshold = 0.1f;
    public const int secondHold = 59;
    public const int minuteHold = 59;
    public const int hourHold = 23;
    public const int dayHold = 10;
    public const int seasonHold = 3;
创建TimeManager脚本,在游戏开始时初始化时间,完成随着时间流逝分钟,小时,天,月,季节和年的切换
public class TimeManager : MonoBehaviour
{
    private int gameSecond, gameMinute, gameHour, gameDay, gameMonth, gameYear;
    private Season gameSeason = Season.春天;
    private int monthInSeason = 3;
    public bool gameClockPause;
    private float tikTime;

    private void Awake()
    {
        NewGameTime();
    }

    private void Update()
    {
        if (!gameClockPause)
        {
            tikTime += Time.deltaTime;
            if (tikTime >= Settings.secondThreshold)
            {
                tikTime -= Settings.secondThreshold;
                UpdateGameTime();
            }
        }
    }

    private void NewGameTime()
    {
        gameSecond = 0;
        gameMinute = 0;
        gameHour = 7;
        gameDay = 1;
        gameMonth = 1;
        gameYear = 2022;
        gameSeason = Season.春天;
    }

    private void UpdateGameTime()
    {
        gameSecond++;
        if (gameSecond > Settings.secondHold)
        {
            gameMinute++;
            gameSecond = 0;
            if (gameMinute > Settings.minuteHold)
            {
                gameHour++;
                gameMinute = 0;
                if (gameHour > Settings.hourHold)
                {
                    gameDay++;
                    gameHour = 0;
                    if (gameDay > Settings.dayHold)
                    {
                        gameDay = 1;
                        gameMonth++;
                        if (gameMonth > 12)
                        {
                            gameMonth = 1;
                            monthInSeason--;
                            if (monthInSeason == 0)
                            {
                                monthInSeason = 3;
                                int seasonNumber = (int)gameSeason;
                                seasonNumber++;

                                if (seasonNumber > Settings.secondHold)
                                {
                                    seasonNumber = 0;
                                    gameYear++;
                                }

                                gameSeason = (Season)seasonNumber;
                            }
                        }
                    }
                }
            }
        }
    }
}
时间系统 UI 制作

代码链接 UI 实现时间日期对应转换
在事件管理中注册改变游戏时间和日期的事件
public static event Action<int, int> GameMinuteEvent;
    public static void CallGameMinuteEvent(int minute, int hour)
    {
        GameMinuteEvent?.Invoke(minute,hour);
    }

public static event Action<int, int, int, int, Season> GameDateEvent;
    public static void CallGameDateEvent(int hour, int day, int month, int year, Season season)
    {
        GameDateEvent?.Invoke(hour,day,month,year,season);
    }
在事件中添加随时间改变UI变化的函数
public class TimeUI : MonoBehaviour
{
    public RectTransform dayNightImage;
    public RectTransform clockParent;
    public Image seasonImage;
    public TextMeshProUGUI dateText;
    public TextMeshProUGUI timeText;
    public Sprite[] seasonSprites;
    private List<GameObject> clockBlocks = new List<GameObject>();
    private void Awake()
    {
        for (int i = 0; i < clockParent.childCount; i++)
        {
            clockBlocks.Add(clockParent.GetChild(i).gameObject);
            clockParent.GetChild(i).gameObject.SetActive(false);
        }
    }
    private void OnEnable()
    {
        EventHandler.GameMinuteEvent += OnGameMinuteEvent;
        EventHandler.GameDateEvent += OnGameDateEvent;
    }
    private void OnDisable()
    {
        EventHandler.GameMinuteEvent -= OnGameMinuteEvent;
        EventHandler.GameDateEvent -= OnGameDateEvent;
    }
    //更新UI时间的函数方法
    private void OnGameMinuteEvent(int minute, int hour)
    {
        timeText.text = hour.ToString("00") + ":" + minute.ToString("00");
    }
    //更新UI日期的函数方法
    private void OnGameDateEvent(int hour, int day, int month, int year, Season season)
    {
        dateText.text = year + "年" + month.ToString("00") + "月" + day.ToString("00") + "日";
        seasonImage.sprite = seasonSprites[(int)season];
        SwitchHourImage(hour);
        DayNightImageRotate(hour);
    }
    //随时间旋转切换图片
    private void DayNightImageRotate(int hour)
    {
        var target = new Vector3(0, 0, hour * 15-90);
        dayNightImage.DORotate(target, 1f, RotateMode.Fast);
    }
/// <summary>
/// 根据小时切换时间块显示
/// </summary>
/// <param name="hour"></param>
    private void SwitchHourImage(int hour)
    {
        int index = hour / 4;
        if (index == 0)
        {
            foreach (var clockBlock in clockBlocks)
            {
                clockBlock.SetActive(false);
            }
        }
        else
        {
            for (int i = 0; i < clockBlocks.Count; i++)
            {
                if (i < index+1)
                {
                    clockBlocks[i].SetActive(true);
                }
                else
                {
                    clockBlocks[i].SetActive(false);
                }

            }
        }
    }

}
在游戏一开始时和时间日期的UI需要改变时调用时间和日期事件函数
private void Start()
    {
        EventHandler.CallGameDateEvent(gameHour,gameDay,gameMonth,gameYear,gameSeason);
        EventHandler.CallGameMinuteEvent(gameMinute,gameHour);
    }
这里教程上有一个问题,如果按教程的方法来时间格的第一格和第二格会同时出现,第一格无法独立出现
第二场景的绘制指南

创建 TransitionManager 控制人物场景切换
在TransitionManager中实现加载场景和切换场景的功能
/// <summary>
/// 场景切换
/// </summary>
/// <param name="sceneName"></param>
/// <param name="targetPosition"></param>
/// <returns></returns>
    private IEnumerator Transition(string sceneName,Vector3 targetPosition)
    {
        yield return SceneManager.UnloadSceneAsync(SceneManager.GetActiveScene());
        yield return LoadSceneSetActive(sceneName);
    }

    /// <summary>
/// 加载场景并设置为激活
/// </summary>
/// <param name="sceneName"></param>
/// <returns></returns>
    private IEnumerator LoadSceneSetActive(string sceneName)
    {
        yield return SceneManager.LoadSceneAsync(sceneName, LoadSceneMode.Additive);
        Scene newScene = SceneManager.GetSceneAt(SceneManager.sceneCount - 1);
        SceneManager.SetActiveScene(newScene);
    }
创建加载场景的事件,在场景切换时传入目标场景和位置
public static event Action<string, Vector3> TransitionEvent;
    public static void CallTransitionEvent(string sceneName, Vector3 pos)
    {
        TransitionEvent?.Invoke(sceneName,pos);
    }
切换场景时需要目标场景加载后人物出现的位置,在场景中创建场景转换碰撞体
public class TelePort : MonoBehaviour
    {
        public string sceneToGo;//要去的场景
        public Vector3 positionToGO;//要去的位置

        private void OnTriggerEnter2D(Collider2D other)
        {
            if (other.CompareTag("Player"))
            {
                EventHandler.CallTransitionEvent(sceneToGo,positionToGO);
            }
        }
    }
在TransitionManager中为事件添加函数, 启动场景切换
public string startSceneName = string.Empty;

    private void OnEnable()
    {
        EventHandler.TransitionEvent+=OnTransitionEvent;
    }
    private void OnDisable()
    {
        EventHandler.TransitionEvent-=OnTransitionEvent;
    }
    private void OnTransitionEvent(string sceneToGo, Vector3 positionToGo)
    {
        StartCoroutine(sceneToGo, positionToGo);
    }

    private void Start()
    {
        StartCoroutine(LoadSceneSetActive(startSceneName));
    }
实现人物跨场景移动以及场景加载前后事件
创建场景加载前后对应的事件和人物加载场景后移动的事件
public static event Action BeforeSceneUnLoadedEvent;
    public static void CallBeforeSceneUnLoadedEvent()
    {
        BeforeSceneUnLoadedEvent?.Invoke();
    }

    public static event Action AfterSceneLoadedEvent;
    public static void CallAfterSceneLoadedEvent()
    {
        AfterSceneLoadedEvent.Invoke();
    }

    public static event Action<Vector3> MoveToPosition;

    public static void CallMoveToPosition(Vector3 targetPosition)
    {
        MoveToPosition?.Invoke(targetPosition);
    }
在人物移动方法中为事件添加函数,实现场景加载时禁止键盘输入使人物移动的方法,并使人物走到对应的位置
private void OnEnable()
    {
        EventHandler.BeforeSceneUnLoadedEvent += OnBeforeSceneUnloadEvent;
        EventHandler.AfterSceneLoadedEvent+=OnAfterSceneLoadedEvent;
        EventHandler.MoveToPosition+=OnMoveToPosition;
    }

    private void OnMoveToPosition(Vector3 targetPosition)
    {
        transform.position = targetPosition;
    }

    private void OnAfterSceneLoadedEvent()
    {
        inputDisable = false;
    }

    private void OnBeforeSceneUnloadEvent()
    {
        inputDisable = true;
    }
在人物动画控制组件中为事件添加函数,实现场景加载前让人物恢复正常动作的方法
    private void OnEnable()
    {
        EventHandler.ItemSelectedEvent+=OnItemSelectedEvent;
        EventHandler.BeforeSceneUnLoadedEvent+= OnBeforeSceneUnLoadedEvent;
    }

    private void OnBeforeSceneUnLoadedEvent()
    {
        holdItem.enabled = false;
        SwitchAnimator(PartType.None);
    }

    private void OnDisable()
    {
        EventHandler.ItemSelectedEvent-=OnItemSelectedEvent;
        EventHandler.BeforeSceneUnLoadedEvent-= OnBeforeSceneUnLoadedEvent;
    }
在InventoryUI组件中为事件添加方法,实现场景转换前关闭单元格高亮效果
private void OnEnable()
        {
            EventHandler.UpdateInventoryUI += OnUpdateInventory;
            EventHandler.BeforeSceneUnLoadedEvent+= OnBeforeSceneUnLoaded;
        }
        private void OnDisable()
        {
            EventHandler.UpdateInventoryUI -= OnUpdateInventory;
            EventHandler.BeforeSceneUnLoadedEvent-= OnBeforeSceneUnLoaded;
        }
为事件添加方法,实现在场景加载后定位摄像机边界的方法
    private void OnEnable()
    {
        EventHandler.AfterSceneLoadedEvent += SwitchConfinerShape;
    }

    private void OnDisable()
    {
        EventHandler.AfterSceneLoadedEvent -= SwitchConfinerShape;
    }
在ItemManger中为事件添加函数方法,在场景加载后根据标签寻找ItemParent的位置
      private void OnEnable()
      {
         EventHandler.InstantiateItemInScene += OnInstantiateItemInScene;
         EventHandler.AfterSceneLoadedEvent+=OnAfterSceneLoadedEvent;
      }

      private void OnDisable()
      {
         EventHandler.InstantiateItemInScene -= OnInstantiateItemInScene;
         EventHandler.AfterSceneLoadedEvent-=OnAfterSceneLoadedEvent;
      }

      private void OnAfterSceneLoadedEvent()
      {
         itemParent = GameObject.FindWithTag("ItemParent").transform;
      }
场景切换淡入淡出和动态 UI 显示
创建加载场景,并通过协程实现场景的淡入淡出
/// <summary>
/// 淡入淡出场景
/// </summary>
/// <param name="targetAlpha"1是黑,0是透明></param>
/// <returns></returns>
        private IEnumerator Fade(float targetAlpha)
        {
            isFade = true;
            fadeCanvasGroup.blocksRaycasts = true;
            float speed = Mathf.Abs(fadeCanvasGroup.alpha - targetAlpha) / Settings.fadeDuration;
            while (!Mathf.Approximately(fadeCanvasGroup.alpha, targetAlpha))
            {
                fadeCanvasGroup.alpha = Mathf.MoveTowards(fadeCanvasGroup.alpha, targetAlpha, speed * Time.deltaTime);
                yield return null;
            }
            fadeCanvasGroup.blocksRaycasts = false;
            isFade = false;
        }
遇到一个问题,游戏一开始的场景加载后背包里的物品无法点选,但是进行场景切换后就可以了
解决:FadePanel勾选了BlockRaycasts,取消勾选了就没问题了,但是不知道为什么加载初始场景的时候就不行,场景切换后就可以了
保存和加载场景中的物品
在DataCollection建立坐标相关的类和场景物品类
[System.Serializable]
public class SerializableVector3//序列化坐标存储
{
    public float x, y, z;

    public SerializableVector3(Vector3 pos)
    {
        this.x = pos.x;
        this.y = pos.y;
        this.z = pos.z;
    }
    public Vector3 ToVector3()
    {
        return new Vector3(x, y, z);
    }

    public Vector2Int ToVector2Int()
    {
        return new Vector2Int((int)x, (int)y);
    }
}

[System.Serializable]
public class SceneItem
{
    public int itemID;
    public SerializableVector3 position;
}
在每次进行场景切换前在字典中保存对应场景中的物体,并在再次切换到该场景时加载存储在字典中的物品
public class ItemManger : MonoBehaviour
   {
      public Item itemPrefab;
      private Transform itemParent;

      public Dictionary<string, List<SceneItem>> sceneItemDict = new Dictionary<string, List<SceneItem>>();//key场景名,value场景中所有物品

      private void OnEnable()
      {
         EventHandler.InstantiateItemInScene += OnInstantiateItemInScene;
         EventHandler.BeforeSceneUnLoadedEvent+=OnBeforeSceneUnLoadedEvent;
         EventHandler.AfterSceneLoadedEvent+=OnAfterSceneLoadedEvent;
      }

      private void OnDisable()
      {
         EventHandler.InstantiateItemInScene -= OnInstantiateItemInScene;
         EventHandler.BeforeSceneUnLoadedEvent-=OnBeforeSceneUnLoadedEvent;
         EventHandler.AfterSceneLoadedEvent-=OnAfterSceneLoadedEvent;
      }

      private void OnBeforeSceneUnLoadedEvent()
      {
         GetAllSceneItems();
      }

      private void OnAfterSceneLoadedEvent()
      {
         itemParent = GameObject.FindWithTag("ItemParent").transform;
         RecreateAllItems();
      }

      private void OnInstantiateItemInScene(int ID, Vector3 pos)
      {
         var item = Instantiate(itemPrefab, pos, Quaternion.identity, itemParent);
         item.itemID = ID;
      }
/// <summary>
/// 获取每个场景中所有的物品并将其存储或更新在字典中
/// </summary>
      private void GetAllSceneItems()
      {
         List<SceneItem> currentSceneItems = new List<SceneItem>();
         foreach (var item in FindObjectsOfType<Item>())
         {
            SceneItem sceneItem = new SceneItem
            {
               itemID = item.itemID,
               position = new SerializableVector3(item.transform.position),
            };
            currentSceneItems.Add(sceneItem);
         }
         if (sceneItemDict.ContainsKey(SceneManager.GetActiveScene().name))
         {
            // 更新当前场景的物品列表
            sceneItemDict[SceneManager.GetActiveScene().name] = currentSceneItems;
         }
         else
         {
            // 添加新的场景和物品列表
            sceneItemDict.Add(SceneManager.GetActiveScene().name,currentSceneItems);
         }
      }
/// <summary>
/// 刷新重建当前场景物品
/// </summary>
private void RecreateAllItems()
{
   List<SceneItem> currentSceneItems = new List<SceneItem>();
   if (sceneItemDict.TryGetValue(SceneManager.GetActiveScene().name, out currentSceneItems))
   {
      if (currentSceneItems != null)
      {
         //清场
         foreach (var item in FindObjectsOfType<Item>())
         {
            Destroy(item.gameObject);
         }
         foreach (var item in currentSceneItems)
         {
            Item newItem = Instantiate(itemPrefab, item.position.ToVector3(), Quaternion.identity, itemParent);
            newItem.Init(item.itemID);
         }
      }
   }
}

   }

}
设置鼠标指针根据物品调整
在Canvas下创建Image使他跟随鼠标移动,并根据背包中的物品切换鼠标的对应样式
public class CursorManager : MonoBehaviour
{
   public Sprite normal, tool, seed,item;

   private Sprite currentSprite;//存储当前的鼠标图片
   private Image cursorImage;
   private RectTransform cursorCanvas;

   private void OnEnable()
   {
      EventHandler.ItemSelectedEvent += OnItemSelectedEvent;
   }
   private void OnDisable()
   {
      EventHandler.ItemSelectedEvent-=OnItemSelectedEvent;
   }
   private void Start()
   {
      cursorCanvas = GameObject.FindGameObjectWithTag("CursorCanvas").GetComponent<RectTransform>();
      cursorImage = cursorCanvas.GetChild(0).GetComponent<Image>();
      currentSprite = normal;
      SetCursorImage(normal);
   }

   private void Update()
   {
      //让图片跟随鼠标移动
      if (cursorCanvas == null)
      {
         return;
      }
      cursorImage.transform.position = Input.mousePosition;
      if (!InteractWithUI())
      {
         SetCursorImage(currentSprite);
      }
      else
      {
         SetCursorImage(normal);
      }

   }
   /// <summary>
   /// 设置鼠标图片
   /// </summary>
   /// <param name="sprite"></param>
   private void SetCursorImage(Sprite sprite)
   {
      cursorImage.sprite = sprite;
      cursorImage.color = new Color(1, 1, 1, 1);
   }
   // 当选中物品时,设置鼠标图片
   private void OnItemSelectedEvent(ItemDetails itemDetails, bool isSelected)
   {
      if (!isSelected)
      {
         currentSprite = normal;
      }
      else
      {
         //TODO:添加所有类型对应图片
         currentSprite = itemDetails.itemType switch
         {
            ItemType.Seed => seed,
            ItemType.Commodity => item,
            ItemType.ChopTool => tool,
            ItemType.HoeTool => tool,
            ItemType.WaterTool => tool,
            ItemType.BreakTool => tool,
            ItemType.ReapTool => tool,
            ItemType.Furniture => tool,
            _ => normal,
         };
      }
   }
/// <summary>
/// 鼠标指在UI上时切换为默认的鼠标样式
/// </summary>
/// <returns></returns>
   private bool InteractWithUI()
   {
      if (EventSystem.current != null && EventSystem.current.IsPointerOverGameObject())
      {
         return true;
      }
      return false;
   }


}
构建地图信息系统
Grid Information可以设置每一个确定坐标的属性
手动写一个系统,让该系统能挂载在TileMap的地图上,然后像绘制Collision一样在瓦片地图上绘制信息
通过另一个代码拿到当前瓦片地图上绘制的信息,传递给一个ScriptObject,用来存储当前坐标的对应属性,再将这些属性与每一张地图连接起来
创建瓦片属性
[System.Serializable]
//瓦片的属性
public class TileProperty
{
    public Vector2Int tileCoordinate;
    public GridType gridType;
    public bool boolTypeValue;
}
在Unity上读取到瓦片实际绘制的范围,根据实际绘制的范围访问对应的坐标,将坐标值对应存储到SO文件中
[CreateAssetMenu(fileName = "MapData_SO", menuName = "Map/MapData")]
public class MapData_SO : ScriptableObject
{
    [SceneName]
    public string sceneName;
    public List<TileProperty> tileProperties;
}
[ExecuteInEditMode]
//在编辑的模式下进行
public class GridMap : MonoBehaviour
{
    public MapData_SO mapData;
    public GridType gridType;
    private Tilemap currentTileMap;
    //地图关闭的时候存储所有数据并将其存储到瓦片地图当中
    private void OnEnable()
    {
        if (!Application.IsPlaying(this))
        {
            currentTileMap = GetComponent<Tilemap>();
            if (mapData != null)
            {
                mapData.tileProperties.Clear();//清除数据
            }
        }
    }

    private void OnDisable()
    {
        if (!Application.IsPlaying(this))
        {
            currentTileMap = GetComponent<Tilemap>();
           UpdateTileProperties();
           #if UNITY_EDITOR
           if (mapData != null)
           {
               //将ScriptObject保存为Dirty才能进行实时的保存和修改
               EditorUtility.SetDirty(mapData);
           }
           #endif
        }
    }

    private void UpdateTileProperties()//数据清除后重新读取(更新数据)
    {
        currentTileMap.CompressBounds();
        if (!Application.IsPlaying(this))
        {
            if (mapData != null)
            {
                //已绘制范围的左下角坐标
                Vector3Int startPos = currentTileMap.cellBounds.min;
                //已绘制范围的右上角坐标
                Vector3Int endPos = currentTileMap.cellBounds.max;
                for (int x = startPos.x; x < endPos.x; x++)
                {
                    for (int y = startPos.y; y < endPos.y; y++)
                    {
                        TileBase tile = currentTileMap.GetTile(new Vector3Int(x, y, 0));
                        if (tile != null)
                        {
                            TileProperty newTile = new TileProperty()
                            {
                                tileCoordinate = new Vector2Int(x, y),
                                gridType = this.gridType,
                                boolTypeValue = true,
                            };
                            mapData.tileProperties.Add(newTile);
                        }
                    }
                }
            }
        }
    }
}
生成地图数据
创建瓦片信息的类
[System.Serializable]
//瓦片的信息
public class TileDetails
{
    public int gridX, gridY;
    public bool canDig;
    public bool canDropItem;
    public bool canPlaceFurniture;
    public bool isNPCObstacle;
    public int daySinceWatered = -1;
    public int daySinceDig = -1;
    public int seedItemID = -1;
    public int growthDays = -1;
    public int daySinceLastHarvest = -1;

}
用列表管理每个场景中的MapData_SO文件
将地图信息中的场景名字,坐标位置,属性一一保存在字典中方便查找
namespace MFarm.Map
{
    public class GridMapManager : MonoBehaviour
    {
        [Header("地图信息")]
        public List<MapData_SO> mapDataList;

        private Dictionary<string, TileDetails> tileDetailsDict = new Dictionary<string, TileDetails>();

        private void Start()
        {
            foreach (var mapData in mapDataList)
            {
                InitTileDetailsDict(mapData);
            }
        }
        /// <summary>
        /// 初始化地图信息
        /// </summary>
        /// <param name="mapData"></param>
        private void InitTileDetailsDict(MapData_SO mapData)
        {
            foreach (TileProperty tileProperty in mapData.tileProperties)
            {
                TileDetails tileDetails = new TileDetails
                {
                    gridX = tileProperty.tileCoordinate.x,
                    gridY = tileProperty.tileCoordinate.y,
                };

                string key = tileDetails.gridX + "x" + tileDetails.gridY + "y" + mapData.sceneName;

                if (GetTileDetails(key) != null)
                {
                    tileDetails = GetTileDetails(key);
                }
                switch (tileProperty.gridType)
                {
                    case GridType.Diggable:
                        tileDetails.canDig = tileProperty.boolTypeValue;
                        break;
                    case GridType.DropItem:
                        tileDetails.canDropItem = tileProperty.boolTypeValue;
                        break;
                    case GridType.PlaceFurniture:
                        tileDetails.canPlaceFurniture = tileProperty.boolTypeValue;
                        break;
                    case GridType.NPCObstacle:
                        tileDetails.isNPCObstacle = tileProperty.boolTypeValue;
                        break;
                }
                if (GetTileDetails(key) != null)
                {
                    tileDetailsDict[key] = tileDetails;
                }
                else
                {
                    tileDetailsDict.Add(key,tileDetails);
                }
            }
        }
/// <summary>
/// 根据key返回瓦片信息
/// </summary>
/// <param name="x+y+地图名"></param>
/// <returns></returns>
        private TileDetails GetTileDetails(string key)
        {
            if (tileDetailsDict.ContainsKey(key))
            {
                return tileDetailsDict[key];
            }
            return null;
        }
    }
}
设置鼠标可用状
分别设置鼠标可用和不可用的样式
/// <summary>
/// 设置鼠标可用
/// </summary>
 private void SetCursorValid()
   {
      cursorPositionValid = true;
      cursorImage.color = new Color(1, 1, 1, 1);
   }
/// <summary>
/// 设置鼠标不可用
/// </summary>
   private void SetCursorInValid()
   {
      cursorPositionValid = false;
      cursorImage.color = new Color(1, 0, 0, 0.4f);
   }
实现根据鼠标网格坐标返回瓦片地图信息
/// <summary>
/// 根据鼠标网格坐标返回瓦片地图信息
/// </summary>
/// <param name="mouseGridPos">鼠标网格坐标</param>
/// <returns></returns>
        public TileDetails GetTileDetailsOnMousePosition(Vector3Int mouseGridPos)
        {
            string key = mouseGridPos.x + "x" + mouseGridPos.y + "y" + SceneManager.GetActiveScene().name;
            return GetTileDetails(key);
        }
根据当前返回的瓦片地图信息判断当前选中的物品能否在当前地块上使用,根据判断结果改变鼠标样式
//获取到鼠标当前的世界坐标和格子坐标
private void CheckCursorValid()
{
mouseWorldPos = mainCamera.ScreenToWorldPoint(new Vector3(Input.mousePosition.x,Input.mousePosition.y,-mainCamera.transform.position.z));
mouseGridPos = currentGrid.WorldToCell(mouseWorldPos);
var playerGridPos = currentGrid.WorldToCell(playerTransform.position);
if (Mathf.Abs(mouseGridPos.x - playerGridPos.x) > currentItem.itemUseRadius ||
Mathf.Abs(mouseGridPos.y - playerGridPos.y) > currentItem.itemUseRadius)
{
SetCursorInValid();
return;
}
TileDetails currentTile = GridMapManager.Instance.GetTileDetailsOnMousePosition(mouseGridPos);
if (currentTile != null)
{
switch (currentItem.itemType)
{
case ItemType.Commodity:
if (currentTile.canDropItem&¤tItem.canDropped)
{
SetCursorValid();
}
else
{
SetCursorValid();
}
break;
}
}
else
{
SetCursorInValid();
}
}
实现鼠标选中物品后的场景点击事件流程
实现鼠标点选物品之后,鼠标获得该物品和使用地块的信息,点击鼠标执行事件
新建鼠标点击事件和在动画执行之后实际执行的事件
public static event Action<Vector3, ItemDetails> MouseClickedEvent;
    public static void CallMouseClickedEvent(Vector3 pos,ItemDetails itemDetails)
    {
        MouseClickedEvent?.Invoke(pos,itemDetails);
    }

    public static event Action<Vector3, ItemDetails> ExecuteActionAfterAnimation;//在动画执行之后实际执行的事件
    public static void CallExecuteActionAfterAnimation(Vector3 pos, ItemDetails itemDetails)
    {
        ExecuteActionAfterAnimation.Invoke(pos,itemDetails);
    }
为点按事件添加函数
 private void OnMouseClickedEvent(Vector3 pos, ItemDetails itemDetails)
    {
        //TODO:执行动画
        EventHandler.CallExecuteActionAfterAnimation(pos,itemDetails);
    }
确保鼠标所在位置可以执行事件后点击鼠标执行事件内的所有函数
//鼠标点击执行物品方法
private void CheckPlayerInput()
   {
      if (Input.GetMouseButtonDown(0) && cursorPositionValid)
      {
         //执行方法
         EventHandler.CallMouseClickedEvent(mouseWorldPos,currentItem);
      }
   }
实现人物动画执行结束后应该执行的物品功能
/// <summary>
/// 执行实际工具或物品功能
/// </summary>
/// <param name="mouseWorldPos">鼠标坐标</param>
/// <param name="itemDetails">物品信息</param>
        private void OnExecuteActionAfterAnimation(Vector3 mouseWorldPos, ItemDetails itemDetails)
        {
            var mouseGridPos = currentGrid.WorldToCell(mouseWorldPos);
            var currentTile = GetTileDetailsOnMousePosition(mouseGridPos);

            if (currentTile != null)
            {
                //物品使用实际功能
                switch (itemDetails.itemType)
                {
                    case ItemType.Commodity:
                        EventHandler.CallDropItemEvent(itemDetails.itemID,mouseGridPos);
                        break;
                }
            }
        }
注册将背包中的物品丢出时的事件
 public static event Action<int, Vector3> DropItemEvent;
    public static void CallDropItemEvent(int ID, Vector3 pos)
    {
        DropItemEvent?.Invoke(ID,pos);
    }
在Item Manager中为事件添加将物品扔出的方法
      private void OnDropItemEvent(int ID, Vector3 pos)
      {
         //TODO:扔东西的效果
         var item = Instantiate(itemPrefab, pos, Quaternion.identity, itemParent);
         item.itemID = ID;
      }
在InventoryManager中实现将东西扔出时背包物品减少的效果
private void RemoveItem(int ID, int removeAmount)
        {
            var index = GetItemIndexInBag(ID);
            if (playerBag.itemList[index].itemAmount > removeAmount)
            {
                var amount = playerBag.itemList[index].itemAmount - removeAmount;
                var item = new InventoryItem { itemID = ID, itemAmount = amount };
                playerBag.itemList[index] = item;
            }else if (playerBag.itemList[index].itemAmount == removeAmount)
            {
                var item = new InventoryItem();
                playerBag.itemList[index] = item;
            }
            EventHandler.CallUpdateInventoryUI(InventoryLocation.Player,playerBag.itemList);
        }
制作可以扔出来的物品
让物品有飞出去的效果
首先为阴影添加获取物品图片的脚本
namespace MFarm.Inventory
{
    [RequireComponent(typeof(SpriteRenderer))]
    public class ItemShadow : MonoBehaviour
    {
        public SpriteRenderer itemSprite;
        private SpriteRenderer shadowSprite;

        private void Awake()
        {
            shadowSprite = GetComponent<SpriteRenderer>();
        }

        private void Start()
        {
            shadowSprite.sprite = itemSprite.sprite;
            shadowSprite.color = new Color(0, 0, 0, 0.3f);
        }
    }
}
将物品丢到鼠标指定的位置
影子与物体分开移动,物体初始位置比影子高1.5f
transform是影子的transform,spriteTrans是物体的transform
namespace MFarm.Inventory
{
    public class ItemBounce : MonoBehaviour
    {
        private Transform spriteTrans;//图片的transform
        private BoxCollider2D coll;
        public float gravity = -3.5f;
        private bool isGround;
        private float distance;
        private Vector2 direation;
        private Vector3 targetPos;

        private void Awake()
        {
            spriteTrans = transform.GetChild(0);
            coll = GetComponent<BoxCollider2D>();
            //关闭碰撞体,防止飞的过程中被人物碰撞剪起来
            coll.enabled = false;
        }

        private void Update()
        {
            Bounce();
        }
        public void InitBounceItem(Vector3 target, Vector2 dir)
        {
            coll.enabled = false;
            targetPos = target;
            direation = dir;
            distance = Vector3.Distance(targetPos, transform.position);

            spriteTrans.position += Vector3.up * 1.5f;
        }
/// <summary>
/// 影子与物体分开移动,物体初始位置比影子高1.5f
/// transform是影子的transform,spriteTrans是物体的transform
/// </summary>
        private void Bounce()
        {
            isGround = spriteTrans.position.y <= transform.position.y;//图片和坐标值的y轴保持一致说明到了
            if (Vector3.Distance(transform.position, targetPos) > 0.1f)
            {
                transform.position += (Vector3)direation * Time.deltaTime * distance * -gravity;
            }

            if (!isGround)
            {
                spriteTrans.position += Vector3.up * gravity*Time.deltaTime;
            }
            else
            {
                spriteTrans.position = transform.position;
                coll.enabled = true;
            }
        }
    }
}
实现 挖坑 和 浇水 的地图更改变化
鼠标点击对应工具让其在地图上实现挖坑浇水的效果
创建对应的规则瓦片和瓦片地图
[Header("种地瓦片切换信息")]
        public RuleTile digTile;
        public RuleTile waterTile;
        private Tilemap digTileMap;
        private Tilemap waterTileMap;
创建在对应的地图上显示对应规则瓦片的方法
/// <summary>
        /// 显示挖坑瓦片
        /// </summary>
        /// <param name="tile"></param>
        private void SetDigGround(TileDetails tile)
        {
            Vector3Int pos = new Vector3Int(tile.gridX, tile.gridY, 0);
            if (digTileMap != null)
            {
                digTileMap.SetTile(pos, digTile);
            }
        }

        /// <summary>
        /// 显示浇水瓦片
        /// </summary>
        /// <param name="tile"></param>
        private void SetWaterGround(TileDetails tile)
        {
            Vector3Int pos = new Vector3Int(tile.gridX, tile.gridY, 0);
            if (waterTileMap != null)
            {
                waterTileMap.SetTile(pos, waterTile);
            }
        }
为对应工具添加方法实现挖坑和浇水效果
					case ItemType.HoeTool:
                        SetDigGround(currentTile);
                        currentTile.daySinceDig = 0;
                        currentTile.canDig = false;
                        currentTile.canDropItem = false;
                        //音效
                        break;
                    case ItemType.WaterTool:
                        SetWaterGround(currentTile);
                        currentTile.daySinceWatered = 0;
                        break;
制作人物使用工具的动画和流程
为动画基类添加使用工具的动画。并完善各个部位选择不同工具时的动画


通过协程控制人物动画和工具效果的执行顺序
private IEnumerator UseToolRoutine(Vector3 mouseWorldPos, ItemDetails itemDetails)
    {
        useTool = true;
        inputDisable = true;
        yield return null;
        foreach (var anim in animators)
        {
            anim.SetTrigger("useTool");
            //人物各个部位的面朝方向
            anim.SetFloat("InputX",mouseX);
            anim.SetFloat("InputY",mouseY);
        }

        yield return new WaitForSeconds(0.45f);
        EventHandler.CallExecuteActionAfterAnimation(mouseWorldPos,itemDetails);
        yield return new WaitForSeconds(0.25f);
        //等待动画结束
        useTool = false;
        inputDisable = false;
    }
完善鼠标点击时的函数方法,当选中物品为工具时执行相应的动画及逻辑
 private void OnMouseClickedEvent(Vector3 mouseWordpos, ItemDetails itemDetails)
    {
        //TODO:执行动画
        if (itemDetails.itemType != ItemType.Commodity && itemDetails.itemType != ItemType.Furniture &&
            itemDetails.itemType != ItemType.Seed)
        {
            mouseX = mouseWordpos.x - transform.position.x;
            mouseY = mouseWordpos.y - transform.position.y;
            if (Mathf.Abs(mouseX) > Mathf.Abs(mouseY))
            {
                mouseY = 0;
            }
            else
            {
                mouseX = 0;
            }

            StartCoroutine(UseToolRoutine(mouseWordpos, itemDetails));
        }
        else
        {
            EventHandler.CallExecuteActionAfterAnimation(mouseWordpos, itemDetails);
        }
    }
(Map)随着时间变化刷新地图显示内容
实现瓦片地图信息的更新和保存
当前地图发生变化时更新瓦片信息
/// <summary>
/// 更新瓦片信息
/// </summary>
/// <param name="tileDetails"></param>
private void UpdateTileDetails(TileDetails tileDetails)
{
    string key = tileDetails.gridX + "x" + tileDetails.gridY + "y" + SceneManager.GetActiveScene().name;
    if (tileDetailsDict.ContainsKey(key))
    {
        tileDetailsDict[key]= tileDetails;
    }
}
实现刷新地图并从字典中读取并生成浇水瓦片和挖坑瓦片的方法
/// <summary>
/// 刷新地图
/// </summary>
private void RefreshMap()
{
    if (digTileMap != null)
    {
        digTileMap.ClearAllTiles();
    }

    if (waterTileMap != null)
    {
        waterTileMap.ClearAllTiles();
    }
    DisPlayMap(SceneManager.GetActiveScene().name);
}
private void DisPlayMap(string sceneName)
{
    foreach (var tile in tileDetailsDict)
    {
        var key = tile.Key;
        var tileDetails = tile.Value;
        if (key.Contains(sceneName))
        {
            if (tileDetails.daySinceDig > -1)
            {
                SetDigGround(tileDetails);
            }

            if (tileDetails.daySinceWatered > -1)
            {
                SetWaterGround(tileDetails);
            }
            //TODO:种子
        }
    }
}
注册随天数改变的事件
public static event Action<int, Season> GameDayEvent;

    public static void CallGameDayEvent(int day,Season season)
    {
        GameDayEvent.Invoke(day,season);
    }
在事件中添加函数,每天更新浇水地块和挖坑地块的状态
private void OnGameDayEvent(int day, Season season)
        {
            currentSeason = season;
            foreach (var tile in tileDetailsDict)
            {
                if (tile.Value.daySinceWatered > -1)
                {
                    tile.Value.daySinceWatered = -1;
                }

                if (tile.Value.daySinceDig > -1)
                {
                    tile.Value.daySinceDig++;
                }
                //超期取消挖坑
                if (tile.Value.daySinceDig > 5 && tile.Value.seedItemID == -1)
                {
                    tile.Value.daySinceDig = -1;
                    tile.Value.canDig = true;
                }
            }
            RefreshMap();
        }
(Crop)种子数据库制作
创建种子的数据文件和数据库文件
[System.Serializable]
public class CropDetails
{
    public int seedItemID;
    [Header(("不同阶段需要的天数"))]
    public int[] growthDays;
    //完整生长周期的所有时间
    public int TotalGrowthDays
    {
        get
        {
            int amount = 0;
            foreach (var days in growthDays)
            {
                amount += days;
            }

            return amount;
        }
    }

    [Header("不同生长阶段物品Prefab")]
    public GameObject[] growthPrefabs;

    [Header("不同阶段的图片")]
    public Sprite[] growthSprites;

    [Header("可种植的季节")]
    public Season[] seasons;

    [Space] [Header("收割工具")]
    public int[] harvestToolItemID;

    [Header("每种工具的使用次数")]
    public int[] requireActionCount;
    [Header("转换新物品ID")]
    public int transferItemID;

    [Space]
    [Header("收割果实信息")]
    public int[] producedItemID;
    public int[] producedMinAmount;
    public int[] producedMaxAmount;
    public Vector2 spawnRadius;
    [Header("再次生长时间")]
    public int daysToRegrow;
    public int regrowTimes;
    [Header("Options")]
    public bool generateAtPlayerPosition;
    public bool hasAnimation;
    public bool hasParticalEffect;
}
(Crop)制作 CropManager 实现撒种子的事件
创建CropManager实现在场景的地块中撒种子的功能
创建播种事件
public static event Action<int,TileDetails> PlantSeedEvent;

    public static void CallPlantSeedEvent(int index, TileDetails tileDetails)
    {
        PlantSeedEvent?.Invoke(index,tileDetails);
    }
在GridManager中添加种子实现功能需要调用的事件函数
				switch (itemDetails.itemType)
                {
                    case ItemType.Seed:
                        EventHandler.CallPlantSeedEvent(itemDetails.itemID, currentTile);
                        EventHandler.CallDropItemEvent(itemDetails.itemID,mouseWorldPos,itemDetails.itemType);
                        break;
在CropMapManager中添加各种事件所需要的函数方法
namespace MFarm.CropPlant
{

    public class CropManager : MonoBehaviour
    {
        public CropDataList_SO cropData;
        private Transform cropParent;
        private Grid currentGrid;
        private Season currentSeason;

        private void OnEnable()
        {
            EventHandler.PlantSeedEvent += OnPlantSeedEvent;
            EventHandler.AfterSceneLoadedEvent += OnAfterSceneLoadedEvent;
            EventHandler.GameDayEvent += OnGameDayEvent;
        }

        private void OnDisable()
        {
            EventHandler.PlantSeedEvent -= OnPlantSeedEvent;
            EventHandler.AfterSceneLoadedEvent -= OnAfterSceneLoadedEvent;
            EventHandler.GameDayEvent -= OnGameDayEvent;
        }

        private void OnAfterSceneLoadedEvent()
        {
            currentGrid = FindObjectOfType<Grid>();
            cropParent = GameObject.FindWithTag("CropParent").transform;
        }

        private void OnGameDayEvent(int day, Season season)
        {
            currentSeason = season;
        }

        private void OnPlantSeedEvent(int ID, TileDetails tileDetails)
        {
            CropDetails currentCrop = GetCropDetails(ID);
            if (currentCrop != null && SeasonAvailable(currentCrop) && tileDetails.seedItemID == -1) //用于第一次种植
            {
                tileDetails.seedItemID = ID;
                tileDetails.growthDays = 0;
                //显示农作物
                DisPlayCropPlant(tileDetails, currentCrop);
            }
            else if (tileDetails.seedItemID != -1) //用于刷新地图
            {
                //显示农作物
                DisPlayCropPlant(tileDetails, currentCrop);

            }
        }

        /// <summary>
        /// 显示农作物
        /// </summary>
        /// <param name="tileDetails"></param>
        /// <param name="cropDetails"></param>
        private void DisPlayCropPlant(TileDetails tileDetails, CropDetails cropDetails)
        {
            //成长阶段
            int growthStages = cropDetails.growthDays.Length;
            int currentStage = 0;
            int dayCounter = cropDetails.TotalGrowthDays;
            for (int i = growthStages - 1; i >= 0; i--)
            {
                //倒序计算当前的成长阶段
                if (tileDetails.growthDays >= dayCounter)
                {
                    currentStage = i;
                    break;
                }

                dayCounter -= cropDetails.growthDays[i];
            }

            //获取当前阶段的Prefab
            GameObject cropPrefab = cropDetails.growthPrefabs[currentStage];
            Sprite cropSprite = cropDetails.growthSprites[currentStage];

            Vector3 pos = new Vector3(tileDetails.gridX + 0.5f, tileDetails.gridY + 0.5f, 0);

            GameObject cropInstance = Instantiate(cropPrefab, pos, Quaternion.identity, cropParent);
            cropInstance.GetComponentInChildren<SpriteRenderer>().sprite = cropSprite;
        }

        /// <summary>
        /// 通过物品ID查找种子信息
        /// </summary>
        /// <param name="ID"></param>
        /// <returns></returns>
        private CropDetails GetCropDetails(int ID)
        {
            return cropData.cropDetailsList.Find(c => c.seedItemID == ID);
        }

        /// <summary>
        /// 判断当前季节是否可以种植
        /// </summary>
        /// <param name="种子信息"></param>
        /// <returns></returns>
        private bool SeasonAvailable(CropDetails crop)
        {
            for (int i = 0; i < crop.seasons.Length; i++)
            {
                if (crop.seasons[i] == currentSeason)
                {
                    return true;
                }
            }

            return false;
        }
    }
}
(Crop)种子成长过程
在GridMapManager中分别为Refresh和DisplayMap方法中添加上种子的更新方法
//在每次Refresh时删除所有crop物品
foreach (var crop in FindObjectsOfType<Crop>())
            {
                Destroy(crop.gameObject);
            }
 //在每次DisPlayMap时触发事件函数重新生成作物
 if (tileDetails.seedItemID > -1)
                    {
                        EventHandler.CallPlantSeedEvent(tileDetails.seedItemID,tileDetails);
                    }
在调用种子方法的时候调用该函数CallDropItemEvent,改变背包中种子的个数
 case ItemType.Seed:
                        EventHandler.CallPlantSeedEvent(itemDetails.itemID, currentTile);
                        EventHandler.CallDropItemEvent(itemDetails.itemID,mouseWorldPos,itemDetails.itemType);
                        break;
(Crop)实现菜篮子收割庄稼的行为
如果要收割一个庄稼,那要判断当前这个格子上的庄稼已经完全成熟了
当当前地块上存储的生长日期大于当前植物生长所需的总日期,则可以收割
			case ItemType.CollectTool:
                  if (currentCrop != null)
                  {
                     if (currentCrop.CheckToolAvailable(currentItem.itemID))
                     {
                        if (currentTile.growthDays >= currentCrop.TotalGrowthDays)
                        {
                           SetCursorValid();
                        }
                        else
                        {
                           SetCursorInValid();
                        }
                     }
                  }
                  else
                  {
                     SetCursorInValid();
                  }
                  break;
使用鼠标点击寻找周围碰撞体的方法去寻找当前作物,并进行收割
		case ItemType.CollectTool:
                        Crop currentCrop = GetCropObject(mouseWorldPos);
                        //执行收割方法
                        currentCrop.ProcessToolAction(itemDetails,currentTile);
                        break;
/// <summary>
/// 通过物理方法判断鼠标点击位置的农作物
/// </summary>
/// <param name="mouseWorldPos"></param>
/// <returns></returns>
        private Crop GetCropObject(Vector3 mouseWorldPos)
        {
            Collider2D[] colliders = Physics2D.OverlapPointAll(mouseWorldPos);
            Crop currentCrop = null;
            for (int i = 0; i < colliders.Length; i++)
            {
                if (colliders[i].GetComponent<Crop>())
                {
                    currentCrop = colliders[i].GetComponent<Crop>();
                }
            }
            return currentCrop;
        }

(Crop)实现收割庄稼产生果实
在CropDetails添加检查当前工具是否可用以及传入工具采集该作物应使用次数的方法
/// <summary>
    /// 检查当前工具是否可用
    /// </summary>
    /// <param name="toolID"></param>
    /// <returns></returns>
    public bool CheckToolAvailable(int toolID)
    {
        foreach (var tool in harvestToolItemID)
        {
            if (tool == toolID)
            {
                return true;
            }
        }
        return false;
    }
    /// <summary>
    /// 查询每种工具收割农作物时的使用次数
    /// </summary>
    /// <param name="toolID"></param>
    /// <returns></returns>
    public int GetTotalRequireCount(int toolID)
    {
        for (int i = 0; i < harvestToolItemID.Length; i++)
        {
            if (harvestToolItemID[i] == toolID)
            {
                return requireActionCount[i];
            }
        }
        return -1;
    }
注册收获农作物事件
/// <summary>
    /// 收获农作物事件
    /// </summary>
    public static event Action<int> HarvestAtPlayerPosition;
    public static void CallHarvestAtPlayerPosition(int ID)
    {
        HarvestAtPlayerPosition?.Invoke(ID);
    }
为事件添加收获作物时把作物添加到任务背包中的函数
private void OnHarvestAtPlayerPosition(int ID)
        {
            var index = GetItemIndexInBag(ID);
            AddItemAtIndex(ID, index, 1);
            //更新UI
            EventHandler.CallUpdateInventoryUI(InventoryLocation.Player, playerBag.itemList);
        }
为事件添加收获作物时在头顶生成作物图片的方法
private void OnHarvestAtPlayerPosition(int ID)
    {
        Sprite itemSprite = InventoryManager.Instance.GetItemDetails(ID).itemOnWorldSprite;
        if (holdItem.enabled == false)
        {
            StartCoroutine(ShowItem(itemSprite));
        }
    }
    private IEnumerator ShowItem(Sprite itemSprite)
    {
        holdItem.sprite = itemSprite;
        holdItem.enabled = true;
        yield return new WaitForSeconds(0.5f);
        holdItem.enabled = false;
    }
(Crop)实现农作物的重复收割
注册事件,保证种子在采集后再生长时地图的更新
 public static event Action RefreshCurrentMap;
    public static void CallRefreshCurrentMap()
    {
        RefreshCurrentMap?.Invoke();
    }
完成使用工具采集作物的方法和采集后作物数量,位置的生成
public CropDetails cropDetails;
   private TileDetails tileDetails;
   private int harvestActionCount;

   /// <summary>
   /// 使用工具采集作物
   /// </summary>
   /// <param name="tool"></param>
   public void ProcessToolAction(ItemDetails tool,TileDetails tile)
   {
      tileDetails = tile;
      //工具使用次数
      int requireActionCount = cropDetails.GetTotalRequireCount(tool.itemID);
      if(requireActionCount==-1) return;
      //判断是否有动画 树木

      //点击计数器
      if (harvestActionCount < requireActionCount)
      {
         harvestActionCount++;
         //播放粒子
         //播放声音
      }
      else
      {
         if (cropDetails.generateAtPlayerPosition)
         {
            //生成农作物
            SpawnHarvestItems();
         }
      }
   }

   public void SpawnHarvestItems()
   {
      //生成作物
      for (int i = 0; i < cropDetails.producedItemID.Length; i++)
      {
         int amountToProduce;
         if (cropDetails.producedMinAmount[i] == cropDetails.producedMaxAmount[i])
         {
            //只生成指定数量
            amountToProduce = cropDetails.producedMaxAmount[i];
         }
         else
         {
            //物品随机数量
            amountToProduce = Random.Range(cropDetails.producedMinAmount[i], cropDetails.producedMaxAmount[i]);
         }
         //生成指定数量的物品
         for (int j = 0; j < amountToProduce; j++)
         {
            if (cropDetails.generateAtPlayerPosition)
            {
               //在人物的位置生成
               EventHandler.CallHarvestAtPlayerPosition(cropDetails.producedItemID[i]);
            }
            else //世界地图上生成物品
            {

            }
         }
      }

      if (tileDetails != null)
      {
         tileDetails.daySinceLastHarvest++;
         //是否可以重复生长
         if (cropDetails.daysToRegrow > 0 && tileDetails.daySinceLastHarvest < cropDetails.regrowTimes)
         {
            tileDetails.growthDays = cropDetails.TotalGrowthDays - cropDetails.daysToRegrow;
            //刷新种子
            EventHandler.CallRefreshCurrentMap();
         }
         else//不可重复生长
         {
            tileDetails.daySinceLastHarvest = -1;
            tileDetails.seedItemID = -1;
         }
         Destroy(gameObject);
      }
   }
}
(Crop)制作可砍伐的树木摇晃和倒下动画
为人物添加斧头的动画

为树木添加左右摇晃的动画和对应的动画状态机

根据人物的位置执行不同方向的动画
if (anim != null && cropDetails.hasAnimation)
         {
            if (PlayerTransform.position.x < transform.position.x)
            {
               anim.SetTrigger("RotateRight");
            }
            else
            {
               anim.SetTrigger("RotateLeft");
            }
         }
(Crop)实现斧子砍树的功能
Crop组件挂载在树的父物体上,与树根处分别使用两个碰撞体,树根处的碰撞体与作物所在的瓦片在同一位置
这就导致了在砍树时,鼠标在树根的瓦片处可以被触发,但是点击后,这部分碰撞体并没有挂载Crop组件,所以此时就会报空
简单的处理逻辑:将总碰撞体扩大到树根处就可以解决,但问题是这样也只有点击树根时才能实现砍树的效果
那要在点击树的其他部分时也实现砍树的效果要怎么做呢?
在一开始创建作物时就为其提供他的瓦片信息
cropInstance.GetComponent<Crop>().tileDetails = tileDetails;
为斧头单独创建鼠标所对应的方法
 			case ItemType.ChopTool:
                  if (crop != null)
                  {
                     if(crop.CanHarvest&&crop.cropDetails.CheckToolAvailable(currentItem.itemID)) SetCursorValid(); else SetCursorInValid();
                  }
                  else SetCursorInValid();
                  break;
在GridManager中添加使用斧头的方法,传入作物当前的瓦片信息(注意是作物的瓦片信息,而不是鼠标当前点击的瓦片信息,因为鼠标点击位置的瓦片和作物所在的瓦片不是同一个
case ItemType.ChopTool:
                        //执行收割方法
                        currentCrop?.ProcessToolAction(itemDetails,currentCrop.tileDetails);
                        break;
(Crop)随机生成收割物品和转化的实现
实现作物被收获后作物的转化
/// <summary>
   /// 进行收获后作物的转化
   /// </summary>
   private void CreateTransferCrop()
   {
      tileDetails.seedItemID = cropDetails.transferItemID;
      tileDetails.daySinceLastHarvest = -1;
      tileDetails.growthDays = 0;
      EventHandler.CallRefreshCurrentMap();
   }
运用协程的方法在动画播放完毕后生成物品和转换物品
private IEnumerator HarvestAfterAnimation()
   {
      while (!anim.GetCurrentAnimatorStateInfo(0).IsName("End"))
      {
         yield return null;
      }
      SpawnHarvestItems();
      //转换新物品
      if (cropDetails.transferItemID>0)
      {
         CreateTransferCrop();
      }
   }
根据人物的位置播放树木倒下时对应的动画
else if (cropDetails.hasAnimation)
         {
            if (PlayerTransform.position.x < transform.position.x)
            {
               anim.SetTrigger("FallingRight");
            }
            else
            {
               anim.SetTrigger("FallingLeft");
            }
            StartCoroutine(HarvestAfterAnimation());
         }
在世界地图上在一定范围内随机生成对应物品
else //世界地图上生成物品
            {
               //判断应该生成的物品方向
               var dirX = transform.position.x >PlayerTransform.position.x ? 1 : -1;
               //一定范围内的随机
               var spawnPos = new Vector3(transform.position.x + Random.Range(dirX, cropDetails.spawnRadius.x * dirX),
                  transform.position.y + Random.Range(-cropDetails.spawnRadius.y, cropDetails.spawnRadius.y), 0);
               EventHandler.CallInstantiateItemInScene(cropDetails.producedItemID[i],spawnPos);
            }
工具栏按钮快捷键
通过键盘来控制物品栏中物品的使用
namespace MFarm.Inventory
{
    [RequireComponent(typeof(SlotUI))]
    public class ActionBarButton : MonoBehaviour
    {
        public KeyCode key;
        private SlotUI slotUI;

        private void Awake()
        {
            slotUI = GetComponent<SlotUI>();
        }
        private void Update()
        {
            if (Input.GetKeyDown(key))
            {
                if (slotUI.itemDetails != null)
                {
                    slotUI.isSelected = !slotUI.isSelected;
                    if (slotUI.isSelected)
                    {
                        slotUI.inventoryUI.UpdateSlotHightlight(slotUI.slotIndex);
                    }
                    else
                    {
                        slotUI.inventoryUI.UpdateSlotHightlight(-1);
                    }
                    EventHandler.CallItemSelectedEvent(slotUI.itemDetails,slotUI.isSelected);
                }
            }
        }
    }
}
使用 Particle System 制作树叶凋落特效
在Unity中创建好叶子掉落的特效并将其保存为预制体
在枚举类型中添加粒子效果的类型,并将该类型添加到CropDetails中
public enum ParticaleEffectType
{
    None,LeavesFalling01,LeavesFalling02,Rock,ReapableScenery
}
使用 Unity 最新 ObjectPool API 制作对象池
运用Unity内置的API完成对象池的逻辑
创建PoolManager脚本
创建列表储存每种粒子效果
创建对象池列表,为每种效果都创建一个对象池
为粒子效果创建一个事件,每次触发事件时传入粒子类型和生成位置
public static event Action<ParticaleEffectType, Vector3> ParticleEffectEvent;

    public static void CallParticleEffectEvent(ParticaleEffectType effectType, Vector3 pos)
    {
        ParticleEffectEvent?.Invoke(effectType,pos);
    }
在树木被砍时播放对应的效果
//播放粒子
         if (cropDetails.hasParticalEffect)
         {
            EventHandler.CallParticleEffectEvent(cropDetails.effectType, transform.position + cropDetails.effectPos);
         }
public class PoolManager : MonoBehaviour
{
    public List<GameObject> poolPrefabs;
    private List<ObjectPool<GameObject>> poolEffectList = new List<ObjectPool<GameObject>>();

    private void OnEnable()
    {
        EventHandler.ParticleEffectEvent += OnParticleEffectEvent;
    }

    private void OnDisable()
    {
        EventHandler.ParticleEffectEvent -= OnParticleEffectEvent;
    }

    private void Start()
    {
        CreatePool();
    }
    private void OnParticleEffectEvent(ParticaleEffectType effectType, Vector3 pos)
    {
        //TODO:根据特效去补全
        ObjectPool<GameObject> objPool = effectType switch
        {
            ParticaleEffectType.LeavesFalling01=>poolEffectList[0],
            ParticaleEffectType.LeavesFalling02=>poolEffectList[1],
            _=>null,
        };

        GameObject obj = objPool.Get();
        obj.transform.position = pos;
        StartCoroutine(Release(objPool, obj));
    }
	/// <summary>
    /// 保证粒子特效在播放完成后再Release
    /// </summary>
    /// <param name="pool"></param>
    /// <param name="obj"></param>
    /// <returns></returns>
    private IEnumerator Release(ObjectPool<GameObject> pool,GameObject obj)
    {
        yield return new WaitForSeconds(1.5f);
        pool.Release(obj);
    }
    /// <summary>
    /// 生成对象池
    /// </summary>
    private void CreatePool()
    {
        foreach (GameObject item in poolPrefabs)
        {
            Transform parent = new GameObject(item.name).transform;//每种对象池在他的父物体下生成
            parent.SetParent(transform);

            var newPool = new ObjectPool<GameObject>(
                () => Instantiate(item,parent),
                e=>{e.SetActive(true);},
                e=>{e.SetActive(false);},
                e=>{Destroy(e);}
                );
            poolEffectList.Add(newPool);
        }
    }
}
(Crop)实现树木、石头、稻草在场景里的预先生成方法
生成树木等作物的预生成
为需要提前生成的作物创建事件
public static event Action GenerateCropEvent;
    public static void CallGenerateCropEvent()
    {
        GenerateCropEvent?.Invoke();
    }
创建字典判断场景是否第一次加载,如果是则加载对应预生成农作物,如果不是第一次加载则不需要重复加载
//场景是否第一次加载
        private Dictionary<string, bool> firstLoadDict = new Dictionary<string, bool>();
为场景加载后生成的方法中触发该事件,保证在场景刷新前生成预生成农作物
if (firstLoadDict[SceneManager.GetActiveScene().name])
            {
                //预先生成农作物
                EventHandler.CallGenerateCropEvent();
                firstLoadDict[SceneManager.GetActiveScene().name] = false;
            }
namespace MFarm.CropPlant
{
    public class CropGenerator : MonoBehaviour
    {//给需要提前生成的作物挂载该代码
        private Grid currentGrid;
        public int seedItemID;
        public int growthDays;

        private void Awake()
        {
            currentGrid = FindObjectOfType<Grid>();
        }

        private void OnEnable()
        {
            EventHandler.GenerateCropEvent += GenerateCrop;
        }

        private void OnDisable()
        {
            EventHandler.GenerateCropEvent -= GenerateCrop;
        }

        private void GenerateCrop()
        {
            Vector3Int cropGridPos = currentGrid.WorldToCell(transform.position); //拿到网格坐标
            //更新地图内容
            if (seedItemID != 0)
            {
                var tile = GridMapManager.Instance.GetTileDetailsOnMousePosition(cropGridPos);
                if (tile == null)
                {
                    tile = new TileDetails();
                }

                tile.daySinceWatered = -1;
                tile.seedItemID = seedItemID;
                tile.growthDays = growthDays;

                GridMapManager.Instance.UpdateTileDetails(tile);
            }
        }
    }
}
为石头和第二种树木也创建对应的逻辑方法
(Crop)制作石头和稻草的粒子特效
创建并在对象池中添加石头和杂草的粒子特效
创建杂草预制体,并将其信息添加到CropManager的数据库中
(Crop)实现割草的全部流程及稻草的互动摇晃
为人物添加Reap对应的动画
创建ReapItem脚本
为脚本添加生成作物和初始化作物信息的代码
namespace MFarm.CropPlant
{
    public class ReapItem : MonoBehaviour
    {
        private CropDetails cropDetails;
        private Transform PlayerTransform => FindObjectOfType<Player>().transform;

        public void InitCropData(int ID)
        {
            cropDetails = CropManager.Instance.GetCropDetails(ID);
        }

        /// <summary>
        /// 生成果实
        /// </summary>
        public void SpawnHarvestItems()
        {
            //生成作物
            for (int i = 0; i < cropDetails.producedItemID.Length; i++)
            {
                int amountToProduce;
                if (cropDetails.producedMinAmount[i] == cropDetails.producedMaxAmount[i])
                {
                    //只生成指定数量
                    amountToProduce = cropDetails.producedMaxAmount[i];
                }
                else
                {
                    //物品随机数量
                    amountToProduce = Random.Range(cropDetails.producedMinAmount[i], cropDetails.producedMaxAmount[i]+1);
                }

                //生成指定数量的物品
                for (int j = 0; j < amountToProduce; j++)
                {
                    if (cropDetails.generateAtPlayerPosition)
                    {
                        //在人物的位置生成
                        EventHandler.CallHarvestAtPlayerPosition(cropDetails.producedItemID[i]);
                    }
                    else //世界地图上生成物品
                    {
                        //判断应该生成的物品方向
                        var dirX = transform.position.x > PlayerTransform.position.x ? 1 : -1;
                        //一定范围内的随机
                        var spawnPos = new Vector3(
                            transform.position.x + Random.Range(dirX, cropDetails.spawnRadius.x * dirX),
                            transform.position.y + Random.Range(-cropDetails.spawnRadius.y, cropDetails.spawnRadius.y),
                            0);
                        EventHandler.CallInstantiateItemInScene(cropDetails.producedItemID[i], spawnPos);
                    }
                }
            }
        }
    }
}
在Item脚本中为ReapableScenery类型的物品在一开始为其添加脚本及初始化数据的方法
if (itemDetails.itemType == ItemType.ReapableScenery)
            {
                gameObject.AddComponent<ReapItem>();
                gameObject.GetComponent<ReapItem>().InitCropData(itemDetails.itemID);
                gameObject.AddComponent<ItemInterActive>();
            }
在GridMapManager中添加方法,实现使用工具时检测并收集工具范围内的杂草的方法

		/// <summary>
        /// 返回工具范围内的杂草
        /// </summary>
        /// <returns></returns>
        public bool HaveReapableItemsInRadius(Vector3 mouseWorldPos,ItemDetails tool)
        {
            itemsInRadius = new List<ReapItem>();
            Collider2D[] colliders = new Collider2D[20];
            Physics2D.OverlapCircleNonAlloc(mouseWorldPos, tool.itemUseRadius, colliders);
            if (colliders.Length>0)
            {
                for (int i = 0; i < colliders.Length; i++)
                {
                    if (colliders[i] != null)
                    {
                        if (colliders[i].GetComponent<ReapItem>())
                        {
                            var item = colliders[i].GetComponent<ReapItem>();
                            itemsInRadius.Add(item);
                        }
                    }
                }
            }
            return itemsInRadius.Count > 0;

        }
在鼠标状态转换中添加镰刀工具的方法
case ItemType.ReapTool:
                  if (GridMapManager.Instance.HaveReapableItemsInRadius(mouseWorldPos, currentItem))
                  {
                     SetCursorValid();
                  }
                  else
                  {
                     SetCursorInValid();
                  }
                  break;
在GridMapManager中执行镰刀工具的方法
case ItemType.ReapTool:
                        var reapCount = 0;
                        for (int i = 0; i < itemsInRadius.Count; i++)
                        {
                            EventHandler.CallParticleEffectEvent(ParticaleEffectType.ReapableScenery,itemsInRadius[i].transform.position+Vector3.up);
                            itemsInRadius[i].SpawnHarvestItems();
                            Destroy(itemsInRadius[i].gameObject);
                            reapCount++;
                            if (reapCount >= Settings.reapAmount)
                            {
                                break;
                            }
                        }
                        break;
为杂草添加动画效果
public class ItemInterActive : MonoBehaviour
{
   private WaitForSeconds pause = new WaitForSeconds(0.04f);
   private bool isAnimating;

   private void OnTriggerEnter2D(Collider2D other)
   {
      if (!isAnimating)
      {
         if (other.transform.position.x < transform.position.x)
         {
            //向右摇晃
            StartCoroutine(RotateRight());
         }
         else
         {
            //向左摇晃
            StartCoroutine(RotateLeft());
         }
      }
   }
   private void OnTriggerExit2D(Collider2D other)
   {
      if (!isAnimating)
      {
         if (other.transform.position.x > transform.position.x)
         {
            //向右摇晃
            StartCoroutine(RotateRight());
         }
         else
         {
            //向左摇晃
            StartCoroutine(RotateLeft());
         }
      }
   }

   private IEnumerator RotateLeft()
   {
      isAnimating = true;
      for (int i = 0; i < 4; i++)
      {
         transform.GetChild(0).Rotate(0,0,2);
         yield return pause;
      }

      for (int i = 0; i < 5; i++)
      {
         transform.GetChild(0).Rotate(0,0,-2);
         yield return pause;
      }
      transform.GetChild(0).Rotate(0,0,2);
      yield return pause;
      isAnimating = false;
   }
   private IEnumerator RotateRight()
   {
      isAnimating = true;
      for (int i = 0; i < 4; i++)
      {
         transform.GetChild(0).Rotate(0,0,-2);
         yield return pause;
      }

      for (int i = 0; i < 5; i++)
      {
         transform.GetChild(0).Rotate(0,0,2);
         yield return pause;
      }
      transform.GetChild(0).Rotate(0,0,-2);
      yield return pause;
      isAnimating = false;
   }
}
(AStar)基础数据创建 Node & GridNodes

创建A*算法中的基础结构
创建每个格子的数据
namespace MFarm.Astar
{
    public class Node : IComparable<Node>
    {
        public Vector2Int gridPosition;//网格坐标
        public int gCost = 0;//距离起始位置的距离
        public int hCost = 0;//距离目的位置的距离
        public int FCost => gCost + hCost;//当前格子的值
        public bool isObstacle = false;//当前格子是否是障碍
        public Node parentNode;

        public Node(Vector2Int pos)
        {
            gridPosition = pos;
            parentNode = null;
        }
        public int CompareTo(Node other)
        {
            //比较选出最低的F值,返回-1,0,1
            int result=FCost.CompareTo(other.FCost);
            if (result == 0)
            {
                result = hCost.CompareTo(other.hCost);
            }

            return result;
        }
    }
}
创建整个地图的格子数据,记录整张地图所有格子的数据
namespace MFarm.Astar
{

    public class GridNodes
    {
        private int width;
        private int height;
        private Node[,] gridNode;

        public GridNodes(int width, int height)
        {
            this.width = width;
            this.height = height;
            gridNode = new Node[width, this.height];
            for (int x = 0; x < width; x++)
            {
                for (int y = 0; y < height; y++)
                {
                    gridNode[x, y] = new Node(new Vector2Int(x, y));
                }
            }
        }

        public Node GetGridNode(int xPos, int yPos)
        {
            if (xPos < width && yPos < height)
            {
                return gridNode[xPos, yPos];
            }
            Debug.Log("超出网格范围");
            return null;
        }
    }

}
(AStar)根据每个地图信息生成节点数据
在GridManager中创建对应方法,根据场景名字构建网格范围,并判断是否有当前场景的信息
/// <summary>
        /// 根据场景名字构建网格范围,输出范围和原点
        /// </summary>
        /// <param name="sceneName"></param>
        /// <param name="gridDimension"></param>
        /// <param name="gridOrigin"></param>
        /// <returns></returns>
        public bool GetGridDimensions(string sceneName, out Vector2Int gridDimension, out Vector2Int gridOrigin)
        {
            gridDimension=Vector2Int.zero;
            gridOrigin = Vector2Int.zero;
            foreach (var mapData in mapDataList)
            {
                gridDimension.x = mapData.gridWidth;
                gridDimension.y = mapData.gridHeight;

                gridOrigin.x = mapData.originX;
                gridOrigin.y = mapData.originY;
                return true;
            }

            return false;
        }
创建Astar脚本
完成构建路径,查找最短路径,构建网格信息初始化列表的方法
namespace MFarm.Astar
{
    public class Astar : MonoBehaviour
    {
        private GridNodes gridNodes;
        private Node startNode;
        private Node targetNode;
        private int gridWidth;
        private int gridHeight;
        private int originX;
        private int originY;

        private List<Node> openNodeList;//当前选中Node周围的8个点
        private HashSet<Node> closeNodeList;//所有被选中的点
        private bool pathFound;

        /// <summary>
        /// 构建路径更新Stack的每一步
        /// </summary>
        /// <param name="sceneName"></param>
        /// <param name="startPos"></param>
        /// <param name="endPos"></param>
        /// <param name="npcMovementStack"></param>
        public void BuildPath(string sceneName, Vector2Int startPos, Vector2Int endPos,Stack<MovementStep> npcMovementStack)
        {
            pathFound = false;
            if (GenerateGridNodes(sceneName, startPos, endPos))
            {
                //查找最短路径
                if (FindShortesPath())
                {
                    //构建NPC移动路径
                    UpdatePathOnMovementStepStack(sceneName,npcMovementStack);
                }
            }
        }
        /// <summary>
        /// 构建网格节点信息,初始化两个列表
        /// </summary>
        /// <param name="sceneName">场景名字</param>
        /// <param name="startPos">起点</param>
        /// <param name="endPos">终点</param>
        /// <returns></returns>
        private bool GenerateGridNodes(string sceneName,Vector2Int startPos,Vector2Int endPos)
        {
            if (GridMapManager.Instance.GetGridDimensions(sceneName, out Vector2Int gridDimension,
                    out Vector2Int gridOrigin))
            {
                //根据瓦片地图范围构建网格移动节点范维数组
                gridNodes = new GridNodes(gridDimension.x, gridDimension.y);
                gridWidth = gridDimension.x;
                gridHeight = gridDimension.y;
                originX = gridOrigin.x;
                originY = gridOrigin.y;

                openNodeList = new List<Node>();
                closeNodeList = new HashSet<Node>();
            }
            else
            {
                return false;
            }
            //gridNodes的范围是0,0开始,所以需要减去原点坐标得到实际位置
            startNode = gridNodes.GetGridNode(startPos.x - originX, startPos.y - originY);
            targetNode = gridNodes.GetGridNode(endPos.x - originX, endPos.y - originY);
            for (int x = 0; x < gridWidth; x++)
            {
                for (int y = 0; y < gridHeight; y++)
                {
                    Vector3Int tilePos = new Vector3Int(x + originX, y + originY, 0);
                    TileDetails tile = GridMapManager.Instance.GetTileDetailsOnMousePosition(tilePos);
                    if (tile != null)
                    {
                        Node node = gridNodes.GetGridNode(x, y);
                        if (tile.isNPCObstacle)
                        {
                            node.isObstacle = true;
                        }
                    }
                }
            }
            return true;
        }

        /// <summary>
        /// 找到最短路径的所有node添加到closeNodeList
        /// </summary>
        /// <returns></returns>
        private bool FindShortesPath()
        {
            //添加起点
            openNodeList.Add(startNode);
            while (openNodeList.Count > 0)
            {//结点排序,Node内涵比较函数
                openNodeList.Sort();

                Node closeNode = openNodeList[0];

                openNodeList.RemoveAt(0);
                closeNodeList.Add(closeNode);
                if (closeNode == targetNode)
                {
                    pathFound = true;
                    break;
                }
                //计算周围8个Node补充到OpenList
                EvaluateNeighbourNodes(closeNode);
            }
            return pathFound;
        }
(AStar)核心功能评估周围节点得到最短路径
在Astar中添加方法
判断节点周围八个点是否是可用节点(GetValidNeighbourNode),并判断每个点的消耗值(GetDistance),选出消耗值最短的加入列表中,依此类推不断循环(EvaluateNeighbourNodes)
		/// <summary>
        /// 评估周围8个点,并生成对应消耗值
        /// </summary>
        /// <param name="currentNode"></param>
        private void EvaluateNeighbourNodes(Node currentNode)
        {
            Vector2Int currentNodePos = currentNode.gridPosition;
            Node validNeighbourNode;
            for (int x = -1;x <= 1;x++)
            {
                for (int y = -1; y <= 1; y++)
                {
                    if (x == 0 && y == 0)
                    {
                        continue;
                    }
                    validNeighbourNode = GetValidNeighbourNode(currentNodePos.x+x,currentNodePos.y+y);
                    if (validNeighbourNode != null)
                    {
                        if (!openNodeList.Contains(validNeighbourNode))
                        {
                            validNeighbourNode.gCost = currentNode.gCost + GetDistance(currentNode, validNeighbourNode);
                            validNeighbourNode.hCost = GetDistance(validNeighbourNode, targetNode);
                            //链接父节点
                            validNeighbourNode.parentNode = currentNode;
                            openNodeList.Add(validNeighbourNode);
                        }
                    }
                }
            }
        }
        /// <summary>
        /// 判断结点是否为有效节点
        /// </summary>
        /// <param name="x"></param>
        /// <param name="y"></param>
        /// <returns></returns>
        private Node GetValidNeighbourNode(int x, int y)
        {
            if (x >= gridWidth || y >= gridHeight || x < 0 || y < 0)
            {
                return null;
            }
            Node neighbourNode = gridNodes.GetGridNode(x, y);
            if (neighbourNode.isObstacle || closeNodeList.Contains(neighbourNode))
            {
                return null;
            }
            else
            {
                return neighbourNode;
            }
        }

        /// <summary>
        /// 返回两点距离值
        /// </summary>
        /// <param name="nodeA"></param>
        /// <param name="nodeB"></param>
        /// <returns></returns>
        private int GetDistance(Node nodeA, Node nodeB)
        {
            int xDistance = Mathf.Abs(nodeA.gridPosition.x - nodeB.gridPosition.x);
            int yDistance = Mathf.Abs(nodeA.gridPosition.y - nodeB.gridPosition.y);
            if (xDistance > yDistance)
            {
                return 14 * yDistance + 10 * (xDistance - yDistance);
            }
            return 14 * xDistance + 10 * (yDistance - xDistance);
        }

        /// <summary>
        /// 更新路径每一步的坐标和场景名字
        /// </summary>
        /// <param name="sceneName"></param>
        /// <param name="npcMovementSteps"></param>
        private void UpdatePathOnMovementStepStack(string sceneName,Stack<MovementStep> npcMovementSteps)
        {
            Node nextNode = targetNode;
            while (nextNode != null)
            {
                MovementStep newStep = new MovementStep();
                newStep.sceneName = sceneName;
                newStep.gridCoordinate =
                    new Vector2Int(nextNode.gridPosition.x + originX, nextNode.gridPosition.y + originY);
                //压入堆栈
                npcMovementSteps.Push(newStep);
                nextNode = nextNode.parentNode;
            }
        }
    }
}
(AStar)测试实现在真实游戏地图上显示最短路径
创建MovementStep类的基本数据
namespace MFarm.Astar
{
    public class MovementStep
    {
        public string sceneName;
        //时间戳
        public int hour;
        public int minute;
        public int second;
        public Vector2Int gridCoordinate;
    }
}
更新Movement堆栈中的数据
将节点从target开始依次压入栈中,直到将路径中所有的节点都压入
		/// <summary>
        /// 更新路径每一步的坐标和场景名字
        /// </summary>
        /// <param name="sceneName"></param>
        /// <param name="npcMovementSteps"></param>
        private void UpdatePathOnMovementStepStack(string sceneName,Stack<MovementStep> npcMovementSteps)
        {
            Node nextNode = targetNode;
            while (nextNode != null)
            {
                MovementStep newStep = new MovementStep();
                newStep.sceneName = sceneName;
                newStep.gridCoordinate =
                    new Vector2Int(nextNode.gridPosition.x + originX, nextNode.gridPosition.y + originY);
                //压入堆栈
                npcMovementSteps.Push(newStep);
                nextNode = nextNode.parentNode;
            }
        }
写出Astar的测试类
namespace MFarm.Astar
{
    public class AStarTest : MonoBehaviour
    {
        private Astar astar;
        [Header("用于测试")]
        public Vector2Int startPos;
        public Vector2Int finishPos;
        public Tilemap displayMap;
        public TileBase displayTile;
        public bool displayStartAndFinish;
        public bool displayPath;
        private Stack<MovementStep> npcMovementStepStack;

        private void Awake()
        {
            astar = GetComponent<Astar>();
            npcMovementStepStack = new Stack<MovementStep>();
        }
        private void Update()
        {
            ShowPathOnGridMap();
        }

        private void ShowPathOnGridMap()
        {
            if (displayMap != null && displayTile != null)
            {
                if (displayStartAndFinish)
                {
                    displayMap.SetTile((Vector3Int)startPos,displayTile);
                    displayMap.SetTile((Vector3Int)finishPos,displayTile);
                }
                else
                {
                    displayMap.SetTile((Vector3Int)startPos,null);
                    displayMap.SetTile((Vector3Int)finishPos,null);
                }

                if (displayPath)
                {
                    var sceneName = SceneManager.GetActiveScene().name;
                    astar.BuildPath(sceneName,startPos,finishPos,npcMovementStepStack);
                    foreach (var step in npcMovementStepStack)
                    {
                        displayMap.SetTile((Vector3Int)step.gridCoordinate,displayTile);
                    }
                }
                else
                {
                    if (npcMovementStepStack.Count > 0)
                    {
                        foreach (var step in npcMovementStepStack)
                        {
                            displayMap.SetTile((Vector3Int)step.gridCoordinate,null);
                        }
                        npcMovementStepStack.Clear();
                    }
                }
            }
        }
    }
}
创建 NPC 基本信息并实现根据场景切换显示
制作NPC的动画逻辑

创建一个类型,包含每个NPC初始的场景和初始的坐标
[System.Serializable]
public class NPCPosition
{
    public Transform npc;
    public string startScene;
    public Vector3 position;
}
在NPCManager中创建列表为每个NPC添加该类信息
[RequireComponent(typeof(Rigidbody2D))]
[RequireComponent(typeof(Animator))]
public class NPCMovement : MonoBehaviour
{
    //临时存储信息
    [SerializeField] private string currentScene;
    private string targetScene;
    private Vector3Int currentGridPosition;
    private Vector3Int tragetGridPosition;

    public string StartScene { set => currentScene = value; }

    [Header("移动属性")]
    public float normalSpeed = 2f;
    private float minSpeed = 1;
    private float maxSpeed = 3;
    private Vector2 dir;
    public bool isMoving;

    //Components
    private Rigidbody2D rb;
    private SpriteRenderer spriteRenderer;
    private BoxCollider2D coll;
    private Animator anim;

    private Stack<MovementStep> movementSteps;

    private void Awake()
    {
        rb = GetComponent<Rigidbody2D>();
        spriteRenderer = GetComponent<SpriteRenderer>();
        coll = GetComponent<BoxCollider2D>();
        anim = GetComponent<Animator>();
    }

    private void OnEnable()
    {
        EventHandler.AfterSceneLoadedEvent += OnAfterSceneLoadedEvent;
    }

    private void OnDisable()
    {
        EventHandler.AfterSceneLoadedEvent -= OnAfterSceneLoadedEvent;
    }

    private void OnAfterSceneLoadedEvent()
    {
        CheckVisiable();
    }

    private void CheckVisiable()
    {
        if (currentScene == SceneManager.GetActiveScene().name)
            SetActiveInScene();
        else
            SetInactiveInScene();
    }


    #region 设置NPC显示情况
    private void SetActiveInScene()
    {
        spriteRenderer.enabled = true;
        coll.enabled = true;
        //TODO:影子关闭
        // transform.GetChild(0).gameObject.SetActive(true);
    }

    private void SetInactiveInScene()
    {
        spriteRenderer.enabled = false;
        coll.enabled = false;
        //TODO:影子关闭
        // transform.GetChild(0).gameObject.SetActive(false);
    }
    #endregion
}
NPC 的 Schedule 数据制作和路径生成
生成NPC的初始化方法
private void InitNPC()
    { //初始化NPC的数据,初次加载需要完成的方法
        targetScene = currentScene;//初次生成时保证人物就在当前场景不会乱跑

        //保持在当前坐标的网格中心点
        currentGridPosition = grid.WorldToCell(transform.position);
        transform.position = new Vector3(currentGridPosition.x + Settings.gridCellSize / 2f,
            currentGridPosition.y + Settings.gridCellSize / 2f, 0);
        targetGridPosition = currentGridPosition;
    }
创建ScheduleDetails数据类,储存NPC的活动数据
[Serializable]
public class ScheduleDetails:IComparable<ScheduleDetails>
{
   public int hour, minute, day;
   public int priority;
   public Season season;
   public string targetScene;
   public Vector2Int targetGridPosition;
   public AnimationClip clipAtStep;
   public bool interactable;

   public ScheduleDetails(int hour, int minute, int day, int priority, Season season, string targetScene, Vector2Int targetGridPosition, AnimationClip clipAtStep, bool interactable)
   {
      this.hour = hour;
      this.minute = minute;
      this.day = day;
      this.priority = priority;//优先级越小优先执行
      this.season = season;
      this.targetScene = targetScene;
      this.targetGridPosition = targetGridPosition;
      this.clipAtStep = clipAtStep;
      this.interactable = interactable;
   }
   public int Time => (hour * 100 ) + minute;
   /// <summary>
   /// 根据不同的数据比较事件优先级
   /// </summary>
   /// <param name="other"></param>
   /// <returns></returns>
   public int CompareTo(ScheduleDetails other)
   {
      if (Time == other.Time)
      {
         if (priority > other.priority)
         {
            return 1;
         }
         else
         {
            return -1;
         }
      }else if (Time > other.Time)
      {
         return 1;
      }else if (Time < other.Time)
      {
         return -1;
      }

      return 0;
   }
}
根据活动事件内的数据为其创建NPC路径,并实现每走一步时间戳的更新
    /// <summary>
    /// 为schedule创建路径
    /// 这里需要调用Astar的BuildPath方法
    /// </summary>
    /// <param name="schedule"></param>
    public void BuildPath(ScheduleDetails schedule)
    {
        movementSteps.Clear();
        currentSchedule = schedule;
        if (schedule.targetScene == currentScene)
        {
            Astar.Instance.BuildPath(schedule.targetScene,(Vector2Int)currentGridPosition,schedule.targetGridPosition,movementSteps);
        }

        if (movementSteps.Count > 1)
        {
            //更新每一步对应的时间戳
            UpdateTimeOnPath();
        }
    }
    /// <summary>
    /// 实现每一步时间戳的更新
    /// </summary>
    private void UpdateTimeOnPath()
    {
        MovementStep previousStep = null;
        //获取当前的游戏时间
        TimeSpan currentGameTime=GameTime;
        foreach (MovementStep step in movementSteps)
        {
            if (previousStep == null)
            {
                previousStep = step;
            }

            step.hour = currentGameTime.Hours;
            step.minute = currentGameTime.Minutes;
            step.second = currentGameTime.Seconds;

            TimeSpan gridMovementStepTime;
            if (MoveInDiagonal(step, previousStep))
            {
                gridMovementStepTime = new TimeSpan(0, 0,
                    (int)(Settings.gridCellDiagonalSize / normalSpeed / Settings.seasonHold));
            }
            else
            {
                gridMovementStepTime = new TimeSpan(0, 0,
                    (int)(Settings.gridCellSize / normalSpeed / Settings.secondThreshold));
            }
            //累加获得下一步的时间戳
            currentGameTime = currentGameTime.Add(gridMovementStepTime);
            //循环下一步
            previousStep = step;
        }
    }

    /// <summary>
    /// 比较当前步和上一步,判断是否在斜线上
    /// </summary>
    /// <param name="currentStep"></param>
    /// <param name="previousStep"></param>
    /// <returns></returns>
    private bool MoveInDiagonal(MovementStep currentStep, MovementStep previousStep)
    {
        return (currentStep.gridCoordinate.x != previousStep.gridCoordinate.x) &&
               (currentStep.gridCoordinate.y != previousStep.gridCoordinate.y);
    }
利用 AStar 实现 NPC 的移动
根据时间的变换在每一分钟里面去比较一下NPC是否在对应的格子里
/// <summary>
    /// 主要移动方法
    /// </summary>
    private void Movement()
    {
        if (!npcMove)
        {
            if (movementSteps.Count > 0)
            {
                MovementStep step = movementSteps.Pop();
                currentScene = step.sceneName;

                CheckVisiable();

                nextGridPosition = (Vector3Int)step.gridCoordinate;//下一步的网格坐标
                TimeSpan stepTime = new TimeSpan(step.hour, step.minute, step.second);

                MoveToGridPosition(nextGridPosition, stepTime);
            }
            else if (!isMoving&&canPlayerStopAnimation)
            {
                StartCoroutine(SetStopAnimation());
            }
        }
    }

    private void MoveToGridPosition(Vector3Int gridPos, TimeSpan stepTime)
    {//根据时间戳判断人物是否已经走到应在的位置,如果没有则瞬移过去,如果有则正常速度移动
        StartCoroutine(MoveRoutine(gridPos, stepTime));
    }

    private IEnumerator MoveRoutine(Vector3Int gridPos, TimeSpan stepTime)
    {
        npcMove = true;
        nextWorldPosition = GetWorldPosition(gridPos);
        //还有时间用来移动
        if (stepTime > GameTime)
        {
            //用来移动的时间差,以秒为单位
            float timeToMove = (float)(stepTime.TotalSeconds - GameTime.TotalSeconds);
            //实际移动距离
            float distance = Vector3.Distance(transform.position, nextWorldPosition);
            float speed = Mathf.Max(minSpeed,(distance/timeToMove/Settings.secondThreshold));
            if (speed <= maxSpeed)
            {
                while (Vector3.Distance(transform.position, nextWorldPosition) > Settings.pixelSize)
                {//人物移动
                    dir = (nextWorldPosition - transform.position).normalized;

                    Vector2 posOffset = new Vector2(dir.x * speed * Time.fixedDeltaTime,
                        dir.y * speed * Time.fixedDeltaTime);
                    rb.MovePosition(rb.position+posOffset);
                    yield return new WaitForFixedUpdate();
                }
            }
        }
        //如果时间已经到了就瞬移
        rb.position = nextWorldPosition;
        currentGridPosition = gridPos;
        nextGridPosition = currentGridPosition;
        npcMove = false;

    }

    /// <summary>
    /// 网格坐标返回世界坐标中心点
    /// </summary>
    /// <param name="gridPos"></param>
    /// <returns></returns>
    private Vector3 GetWorldPosition(Vector3Int gridPos)
    {
        Vector3 worldPos = grid.CellToWorld(gridPos);
        return new Vector3(worldPos.x + Settings.gridCellSize / 2f, worldPos.y + Settings.gridCellSize / 2);
    }
加入 NPC 动画及真实的 Schedule 触发
创建动画控制器并使用代码控制
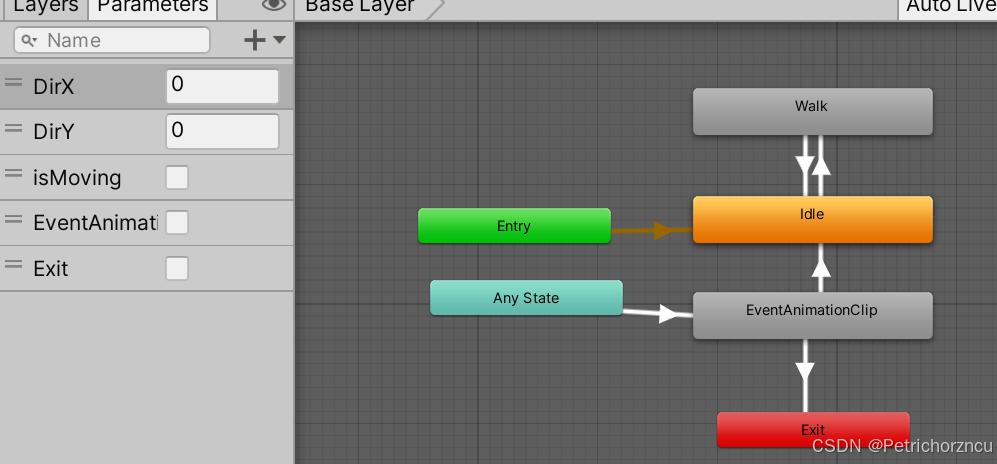
private void SwitchAnimation()
    {
        isMoving = transform.position != GetWorldPosition(targetGridPosition);
        anim.SetBool("isMoving",isMoving);
        if (isMoving)
        {
            anim.SetBool("Exit",true);
            anim.SetFloat("DirX",dir.x);
            anim.SetFloat("DirY",dir.y);
        }
        else
        {
            anim.SetBool("Exit",false);
        }
    }
利用AnimatorOverrideController实现停止动画的切换
private IEnumerator SetStopAnimation()
    {
        //强制面向镜头
        anim.SetFloat("DirX", 0);
        anim.SetFloat("DirY", -1);
        animationBreakTime = Settings.animationBreakTime;
        if (stopAnimationClip != null)
        {
            animOverride[blankAnimationClip] = stopAnimationClip;
            anim.SetBool("EventAnimation",true);
            yield return null;
            anim.SetBool("EventAnimation",false);
        }
        else
        {
            animOverride[stopAnimationClip] = blankAnimationClip;
            anim.SetBool("EventAnimation",false);
        }
    }
实现人物在不同的时间段实现不同的路线和动作
private void OnGameMinuteEvent(int minute, int hour,int day,Season season)
    {
        int time = (hour * 100) + minute;

        ScheduleDetails matchSchedule = null;
        foreach (var schedule in scheduleSet)
        {//寻找schedule中符合当前时间的活动事件
            if (schedule.Time == time)
            {
                if ((schedule.day != day)&&(schedule.day!=0))
                {
                    continue;
                }
                if (schedule.season != season)
                {
                    continue;
                }
                matchSchedule = schedule;
            }else if (schedule.Time > time)
            {
                break;
            }
        }
        if (matchSchedule != null)
        {
            BuildPath(matchSchedule);
        }
    }
跨场景路地图的径数据及生成
创建跨场景传送所需要的数据类
public class SceneRoute
{
    public string fromSceneName;
    public string gotoSceneName;
    public List<ScenePath> scenePathList;
}

[System.Serializable]
public class ScenePath
{
    public string sceneName;
    public Vector2Int fromGridCell;
    public Vector2Int gotoGridCell;
}
创建NPCManager获取到Route信息和初始化Route字典的方法
public class NPCManager :Singleton<NPCManager>
{
    public SceneRouteDataList_SO SceneRouteData;
    public List<NPCPosition> npcPositions;
    private Dictionary<string, SceneRoute> sceneRoutesDict = new Dictionary<string, SceneRoute>();

    protected override void Awake()
    {
        base.Awake();
        InitSceneRouteDict();
    }

    private void InitSceneRouteDict()
    {
        if (SceneRouteData.sceneRouteList.Count > 0)
        {
            foreach (var route in SceneRouteData.sceneRouteList)
            {
                var key = route.fromSceneName + route.gotoSceneName;
                if (sceneRoutesDict.ContainsKey(key))
                {
                    continue;
                }
                else
                {
                    sceneRoutesDict.Add(key,route);
                }
            }
        }
    }
    /// <summary>
    /// 获得两个场景间的路径
    /// </summary>
    /// <param name="formSceneName">起始场景</param>
    /// <param name="gotoSceneName">目标场景</param>
    /// <returns></returns>
    public SceneRoute GetSceneRoute(string formSceneName, string gotoSceneName)
    {
        return sceneRoutesDict[formSceneName + gotoSceneName];
    }
}
实现NPCMovment跨场景传送构建路径的方法
else if (schedule.targetScene != currentScene)
        {
            SceneRoute sceneRoute = NPCManager.Instance.GetSceneRoute(currentScene, schedule.targetScene);
            if (sceneRoute != null)
            {
                for (int i = 0; i < sceneRoute.scenePathList.Count; i++)
                {
                    Vector2Int fromPos, gotoPos;
                    ScenePath path = sceneRoute.scenePathList[i];
                    if (path.fromGridCell.x >= Settings.maxGridSize)
                    {
                        fromPos = (Vector2Int)currentGridPosition;
                    }
                    else
                    {
                        fromPos = path.fromGridCell;
                    }

                    if (path.gotoGridCell.x >= Settings.maxGridSize)
                    {
                        gotoPos = schedule.targetGridPosition;
                    }
                    else
                    {
                        gotoPos = path.gotoGridCell;
                    }
                    Astar.Instance.BuildPath(path.sceneName,fromPos,gotoPos,movementSteps);
                }
            }
        }
修正 CropGenerator 和 AStar 地图节点生成
更正了在场景加载时在如果当前位置瓦片不存在则会在(0,0)位置出现作物的bug,在生成作物时为他赋值一个位置坐标
(Dialogue)制作对话的 UI
在根据文字框的内容调整其高度的这步上出了一些问题,在我添加Vertical Group组件时人物头像的位置也发生了变化,检查后发现人物头像和文本框的父物体应该是同一级,我错误的将人物头像添加到了文本框的父物体下面,所以才导致了这个问题
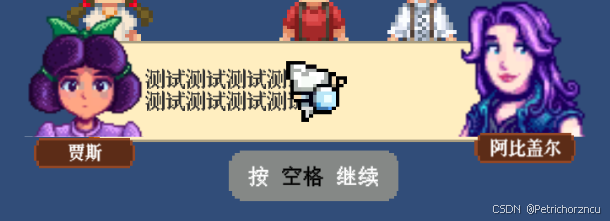
添加控制UI的脚本
public class DialogueUI : MonoBehaviour
{
   public GameObject dialogueBox;
   public Text dialogueText;
   public Image faceLeft, faceRight;
   public Text  nameLeft,nameRight;
   public GameObject continueBox;

   private void Awake()
   {
      continueBox.SetActive(false);
   }
}
(Dialogue)创建对话数据实现对话逻辑
创建对话详情的类
namespace MFarm.Dialogue
{
   [System.Serializable]
   public class DialoguePiece
   {
      [Header("对话详情")] public Sprite faceImage;
      public bool onLeft;
      public string name;
      [TextArea]
      public string dialogueText;
      public bool hasToPause;
      public bool isDone;
   }
}
在NPC身上挂载DialogueControlled脚本,控制NPC在不同时间触发不同对话,并通过触发事件显示对话内容
namespace MFarm.Dialogue
{
    [RequireComponent(typeof(NPCMovement))]
    [RequireComponent(typeof(BoxCollider2D))]
    public class DialogueController : MonoBehaviour
    {
        private NPCMovement npc => GetComponent<NPCMovement>();
        public UnityEvent OnFinishEvent;
        public List<DialoguePiece> dialogueList = new List<DialoguePiece>();

        private Stack<DialoguePiece> dialogueStack;
        private bool canTalk;
        private GameObject uiSign;
        private bool isTalking;

        private void Awake()
        {
            uiSign = transform.GetChild(1).gameObject;
            FillDialogueStack();
        }

        private void OnTriggerEnter2D(Collider2D other)
        {
            if (other.CompareTag("Player"))
            {
                canTalk = !npc.isMoving && npc.interactable;
            }
        }
        private void OnTriggerExit2D(Collider2D other)
        {
            if (other.CompareTag("Player"))
            {
                canTalk = false;
            }
        }

        private void Update()
        {
            uiSign.SetActive(canTalk);
            if (canTalk && Input.GetKeyDown(KeyCode.Space)&&!isTalking)
            {
                StartCoroutine(DialogueRoutine());
            }
        }

        /// <summary>
        /// 构建对话堆栈
        /// </summary>
        private void FillDialogueStack()
        {
            dialogueStack = new Stack<DialoguePiece>();
            for(int i=dialogueList.Count-1;i>-1;i--)
            {
                dialogueList[i].isDone = false;
                dialogueStack.Push(dialogueList[i]);
            }
        }

        private IEnumerator DialogueRoutine()
        {
            isTalking = true;
            if (dialogueStack.TryPop(out DialoguePiece result))
            {
                //传到UI显示对话
                EventHandler.CallShowDialogueEvent(result);
                yield return new WaitUntil(() => result.isDone==true);
                isTalking = false;
            }
            else
            {
                EventHandler.CallShowDialogueEvent(null);
                FillDialogueStack();
                isTalking = false;
                OnFinishEvent?.Invoke();
            }
        }
    }
}
创建将对话内容通过UI显示的事件
  public static event Action<DialoguePiece> ShowDialogueEvent;
    public static void CallShowDialogueEvent(DialoguePiece piece)
    {
        ShowDialogueEvent?.Invoke(piece);
    }
为事件添加显示UI的方法
private void Awake()
   {
      continueBox.SetActive(false);
   }

   private void OnEnable()
   {
      EventHandler.ShowDialogueEvent += OnShowDialogueEvent;
   }
   private void OnDisable()
   {
      EventHandler.ShowDialogueEvent -= OnShowDialogueEvent;
   }

   private void OnShowDialogueEvent(DialoguePiece piece)
   {
      StartCoroutine(ShowDialogue(piece));
   }

   private IEnumerator ShowDialogue(DialoguePiece piece)
   {
      if (piece != null)
      {
         piece.isDone = false;

         dialogueBox.SetActive(true);
         continueBox.SetActive(false);

         dialogueText.text = string.Empty;

         if (piece.name != string.Empty)
         {
            if (piece.onLeft)
            {
               faceRight.gameObject.SetActive(false);
               faceLeft.gameObject.SetActive(true);
               faceLeft.sprite = piece.faceImage;
               nameLeft.text = piece.name;
            }
            else
            {
               faceRight.gameObject.SetActive(true);
               faceLeft.gameObject.SetActive(false);
               faceRight.sprite = piece.faceImage;
               nameRight.text = piece.name;
            }
         }
         else
         {
            faceLeft.gameObject.SetActive(false);
            faceRight.gameObject.SetActive(false);
            nameLeft.gameObject.SetActive(false);
            nameRight.gameObject.SetActive(false);
         }
         yield return dialogueText.DOText(piece.dialogueText, 1f).WaitForCompletion();
         piece.isDone = true;

         if (piece.hasToPause && piece.isDone)
         {
            continueBox.SetActive(true);
         }
      }
      else
      {
         dialogueBox.SetActive(false);
         yield break;
      }
   }
创建 NPCFunction 和 通用 UI 实现对话后打开商店
创建通用UI
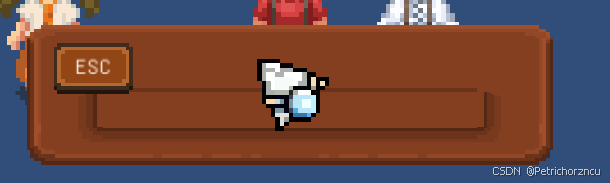
public static event Action<SlotType, InventoryBag_SO> BaseBagOpenEvent;
    public static void CallBaseBagOpenEvent(SlotType slotType, InventoryBag_SO bag_SO)
    {
        BaseBagOpenEvent?.Invoke(slotType,bag_SO);
    }
为事件添加打开通用背包的方法,并为背包的更新添加其他背包种类的更新
private void OnBaseBagOpenEvent(SlotType slotType, InventoryBag_SO bagData)
        {
            //TODO:通用箱子prefab
            GameObject prefab = slotType switch
            {
                SlotType.Shop => shopSlotPrefab,
                _ => null,
            };
            //生成背包UI
            baseBag.SetActive(true);

            baseBagSlots = new List<SlotUI>();
            for (int i = 0; i < bagData.itemList.Count; i++)
            {
                var slot = Instantiate(prefab, baseBag.transform.GetChild(0)).GetComponent<SlotUI>();
                slot.slotIndex = i;
                baseBagSlots.Add(slot);
            }
            LayoutRebuilder.ForceRebuildLayoutImmediate(baseBag.GetComponent<RectTransform>());
            OnUpdateInventory(InventoryLocation.Box,bagData.itemList);
        }

         case InventoryLocation.Box:
                    for (int i = 0; i < baseBagSlots.Count; i++)
                    {
                        if (list[i].itemAmount > 0)
                        {
                            var item = InventoryManager.Instance.GetItemDetails(list[i].itemID);
                            baseBagSlots[i].UpdateSlot(item, list[i].itemAmount);
                        }
                        else
                        {
                            baseBagSlots[i].UpdateEmptySlot();
                        }
                    }
                    break;
创建NPC打开商店执行商店交易功能的方法
public class NPCFunction : MonoBehaviour
{
   public InventoryBag_SO shopData;
   private bool isOpen;

   private void Update()
   {
      if (isOpen && Input.GetKeyDown(KeyCode.Escape))
      {
         //关闭背包
      }
   }
   public void OpenShop()
   {
      isOpen = true;
      EventHandler.CallBaseBagOpenEvent(SlotType.Shop,shopData);
   }
}
创建交易窗口 UI 并实现拖拽交易打开交易窗口
创建关上背包的事件方法
 public static event Action<SlotType, InventoryBag_SO> BaseBagCloseEvent;
    public static void CallBaseBagCloseEvent(SlotType slotType, InventoryBag_SO bag_SO)
    {
        BaseBagCloseEvent?.Invoke(slotType,bag_SO);
    }
在inventory中添加关闭交易窗口的函数方法
private void OnBaseBagCloseEvent(SlotType slotType, InventoryBag_SO bagData)
        {
            baseBag.SetActive(false);
            itemTooltip.gameObject.SetActive(false);
            UpdateSlotHightlight(-1);

            foreach (var slot in baseBagSlots)
            {
                Destroy(slot.gameObject);
            }
            baseBagSlots.Clear();
            if (slotType == SlotType.Shop)
            {
                bagUI.GetComponent<RectTransform>().pivot = new Vector2(0.5f, 0.5f);
                bagUI.SetActive(false);
                bagOpened = false;
            }
        }
创建切换游戏状态的事件方法
public static event Action<GameState> UpdateGameStateEvent;

    public static void CallUpdateGameStateEvent(GameState gameState)
    {
        UpdateGameStateEvent?.Invoke(gameState);
    }
在NPC执行功能的函数中触发打开交易界面时切换游戏状态的事件方法
public void OpenShop()
   {
      isOpen = true;
      EventHandler.CallBaseBagOpenEvent(SlotType.Shop,shopData);
      EventHandler.CallUpdateGameStateEvent(GameState.Pause);
   }

   public void CloseShop()
   {
      isOpen = false;
      EventHandler.CallBaseBagCloseEvent(SlotType.Shop,shopData);
      EventHandler.CallUpdateGameStateEvent(GameState.GamePlay);
   }
```C
在控制Player移动的方法中添加根据游戏状态控制人物输入的方法,同时也添加在交易开始时关闭ActionBar的输入方法
```cpp
private void OnUpdateGameStateEvent(GameState gameState)
    {
        switch (gameState)
        {
            case GameState.Pause:
                inputDisable = true;
                break;
            case GameState.GamePlay:
                inputDisable = false;
                break;
        }
    }
在打开商店交易UI的方法中添加将玩家背包同时打开放置在交易UI旁
if (slotType == SlotType.Shop)
            {
                bagUI.GetComponent<RectTransform>().pivot = new Vector2(-0.25f, 0.5f);
                baseBag.GetComponent<RectTransform>().pivot = new Vector2(1f, 0.5f);
                bagUI.SetActive(true);
                bagOpened = true;
            }
```C
创建控制UI显示的事件
```cpp
public static event Action<ItemDetails, bool> ShowTradeUI;
    public static void CallShowTradeUI(ItemDetails item, bool isSell)
    {
        ShowTradeUI?.Invoke(item,isSell);
    }

创建TradeUI,实现初始化TradeUI,读取输入数据及关闭Ui等方法
namespace MFarm.Inventory
{
    public class TradeUI : MonoBehaviour
    {
        public Image itemIcon;
        public Text itemName;
        public InputField tradeAmount;
        public Button submitButton;
        public Button cancelButton;

        private ItemDetails item;
        private bool isSellTrade;

        private void Awake()
        {
            cancelButton.onClick.AddListener(CancelTrade);
            submitButton.onClick.AddListener(TradeItem);
        }

        /// <summary>
        /// 设置TradeUI显示详情
        /// </summary>
        /// <param name="item"></param>
        /// <param name="isSell"></param>
        public void SetupTradeUI(ItemDetails item, bool isSell)
        {
            this.item = item;
            itemIcon.sprite = item.itemIcon;
            itemName.text = item.itemName;
            isSellTrade = isSell;
            tradeAmount.text = string.Empty;
        }

        private void TradeItem()
        {
            var amount = Convert.ToInt32(tradeAmount.text);
            InventoryManager.Instance.TradeItem(item,amount,isSellTrade);
            CancelTrade();
        }
        private void CancelTrade()
        {
            this.gameObject.SetActive(false);
        }
    }
}
实现买卖交易的完整流程
实现交易物品时金额和物品数量的变化
        /// <summary>
        /// 交易物品
        /// </summary>
        /// <param name="itemDetails"></param>
        /// <param name="amount"></param>
        /// <param name="isSellTrade"></param>
        public void TradeItem(ItemDetails itemDetails, int amount, bool isSellTrade)
        {
            int cost = itemDetails.itemPrice * amount;
            //获得物品背包位置
            int index = GetItemIndexInBag(itemDetails.itemID);
            if (isSellTrade)//卖
            {
                if (playerBag.itemList[index].itemAmount >= amount)
                {
                    RemoveItem(itemDetails.itemID,amount);
                    //卖出总价
                    cost = (int)(cost * itemDetails.sellPercentage);
                    playerMoney += cost;
                }
            }else if (playerMoney - cost >= 0)//买
            {
                if (CheckBagCapacity())
                {
                    AddItemAtIndex(itemDetails.itemID,index,amount);
                }

                playerMoney -= cost;
            }
            //刷新UI
            EventHandler.CallUpdateInventoryUI(InventoryLocation.Player,playerBag.itemList);
        }
建造图纸数据及 ItemTooltip 显示资源物品
在Item Editor中添加图纸数据
创建蓝图数据类和数据库类
[CreateAssetMenu(fileName = "BluePrintDataList_SO", menuName = "Inventory/BluePrintDataList_SO")]
public class BluePrintDataList_SO : ScriptableObject
{
    public List<BluePrintDetails> bluePrintDetailsList;
    public BluePrintDetails GetBluePrintDetails(int itemID)
    {
        return bluePrintDetailsList.Find(b => b.ID == itemID);
    }
}
[System.Serializable]
public class BluePrintDetails
{
    public int ID;
    public InventoryItem[] resourceItem = new InventoryItem[4];
    public GameObject buildPrefab;
}
选中图纸物品时在ItemToolltip上方显示需要物品的数量
public void SetupResourcePanel(int ID)
    {
        var bluePrintDetails = InventoryManager.Instance.bluePrintData.GetBluePrintDetails(ID);
        for (int i = 0; i < resourceItem.Length; i++)//UI的数量
        {
            if (i < bluePrintDetails.resourceItem.Length)//资源的实际数量
            {
                var item = bluePrintDetails.resourceItem[i];
                resourceItem[i].gameObject.SetActive(true);
                resourceItem[i].sprite = InventoryManager.Instance.GetItemDetails(item.itemID).itemIcon;
                resourceItem[i].transform.GetChild(0).GetComponent<Text>().text = item.itemAmount.ToString();
            }
            else
            {
                resourceItem[i].gameObject.SetActive(false);
            }
        }
    }
完成建造的流程和逻辑
在鼠标方法中添加选中图纸物品时,在场景中生成该物品的图片并跟随鼠标移动的方法
这部份有点碎,就不一句一句粘了
在InventoryManager中添加检查生成物品时背包中材料是否足够的代码,如果足够则能正常显示,如果不够则不能
/// <summary>
        /// 检查建造资源物品库存
        /// </summary>
        /// <param name="ID"></param>
        /// <returns></returns>
        public bool CheckStock(int ID)
        {
            var bluePrintDetails = bluePrintData.GetBluePrintDetails(ID);
            foreach (var resourceItem in bluePrintDetails.resourceItem)
            {
                var itemStock = playerBag.GetInventoryItem(resourceItem.itemID);
                if (itemStock.itemAmount >= resourceItem.itemAmount)
                {
                    continue;
                }
                else
                {
                    return false;
                }
            }
            return true;
        }
 private void CheckCursorValid()
             {

               case ItemType.Furniture:
                    buildImage.gameObject.SetActive(true);    //需要添加此命令
                    var bluePrintDetails = InventoryManager.Instance.bluePrintData.GetBluePrintDetails(currentItem.itemID);

                    if (currentTile.canPlaceFurniture && InventoryManager.Instance.CheckStock(currentItem.itemID) && !HaveFurnitureInRadius(bluePrintDetails))
                        SetCursorValid();
                    else
                        SetCursorInValid();
                    break;
             }
添加建造家具的事件
 //建造
    public static event Action<int,Vector3> BuildFurnitureEvent;
    public static void CallBuildFurnitureEvent(int ID,Vector3 pos)
    {
        BuildFurnitureEvent?.Invoke(ID,pos);
    }
在Item Manager中为该事件添加函数方法
 private void OnBuildFurnitureEvent(int ID, Vector3 mousePos)
      {
         BluePrintDetails bluePrint = InventoryManager.Instance.bluePrintData.GetBluePrintDetails(ID);
         var buildItem = Instantiate(bluePrint.buildPrefab, mousePos, Quaternion.identity, itemParent);
      }
在InventoryManager中为该事件添加方法
private void OnBuildFurnitureEvent(int ID, Vector3 mousePos)
        {
           RemoveItem(ID,1);
           BluePrintDetails bluePrint = bluePrintData.GetBluePrintDetails(ID);
           foreach (var item in bluePrint.resourceItem)
           {
               RemoveItem(item.itemID,item.itemAmount);
           }
        }
实现切换场景保存和读取场景中的建造物品
保存场景种创建的所有家具的类
创建Furniture类
在ItemManager中添加字典存储当前场景中家具的信息
创建在字典中添加信息,读取字典中信息生成家具的方法
 public Dictionary<string, List<SceneFurniture>> sceneFurnitureDict =
         new Dictionary<string, List<SceneFurniture>>();
     /// <summary>
      /// 获得场景所有家具
      /// </summary>
      private void GetAllSceneFurniture()
      {
         List<SceneFurniture> currentSceneFurniture = new List<SceneFurniture>();
         foreach (var item in FindObjectsOfType<Furniture>())
         {
            SceneFurniture sceneFurniture = new SceneFurniture
            {
               itemID = item.itemID,
               position = new SerializableVector3(item.transform.position),
            };
            currentSceneFurniture.Add(sceneFurniture);
         }

         if (sceneFurnitureDict.ContainsKey(SceneManager.GetActiveScene().name))
         {
            // 更新当前场景的物品列表
            sceneFurnitureDict[SceneManager.GetActiveScene().name] = currentSceneFurniture;
         }
         else
         {
            // 添加新的场景和物品列表
            sceneFurnitureDict.Add(SceneManager.GetActiveScene().name, currentSceneFurniture);
         }
      }

       /// <summary>
      /// 重建当前场景家具
      /// </summary>
      private void RebuildFurniture()
      {
         List<SceneFurniture> currentSceneFurniture = new List<SceneFurniture>();
         if (sceneFurnitureDict.TryGetValue(SceneManager.GetActiveScene().name, out currentSceneFurniture))
         {
            if (currentSceneFurniture != null)
            {
               foreach (SceneFurniture sceneFurniture in currentSceneFurniture)
               {
                  OnBuildFurnitureEvent(sceneFurniture.itemID,sceneFurniture.position.ToVector3());
               }
            }
         }
      }
在场景当中创建箱子存储物品
创建Box类实现打开背包的方法
        namespace MFarm.Inventory
{
    public class Box : MonoBehaviour
    {
        public InventoryBag_SO boxBagTemplate;
        public InventoryBag_SO boxBagData;

        public GameObject mouseIcon;
        private bool canOpen = false;
        private bool isOpen;

        private void OnEnable()
        {
            if (boxBagData == null)
            {
                boxBagData = Instantiate(boxBagTemplate);
            }
        }

        private void OnTriggerEnter2D(Collider2D other)
        {
            if (other.CompareTag("Player"))
            {
                canOpen = true;
                mouseIcon.SetActive(true);
            }
        }

        private void OnTriggerExit2D(Collider2D other)
        {
            if (other.CompareTag("Player"))
            {
                canOpen = false;
                mouseIcon.SetActive(false);
            }
        }

        private void Update()
        {
            if (!isOpen && canOpen && Input.GetMouseButtonDown(1))
            {
                //打开箱子
                EventHandler.CallBaseBagOpenEvent(SlotType.Box, boxBagData);
                isOpen = true;
            }

            if (!canOpen && isOpen)
            {
                //关闭箱子
                EventHandler.CallBaseBagCloseEvent(SlotType.Box,boxBagData);
                isOpen = false;
            }

            if (isOpen && Input.GetKeyDown(KeyCode.Escape))
            {
                //关闭箱子
                EventHandler.CallBaseBagCloseEvent(SlotType.Box,boxBagData);
                isOpen = false;
            }
        }

    }
}
实现箱子储物空间的保存和数据交换
实现往箱子里存储物品的方法
在拖拽物体的方法中添加背包与箱子交换物品的方法
else if (slotType != SlotType.Shop && targetSlot.slotType != SlotType.Shop &&
                          slotType != targetSlot.slotType)
                {
                    //跨背包数据交换物品
                    InventoryManager.Instance.SwapItem(Location,slotIndex,targetSlot.Location,targetSlot.slotIndex);
                }
                inventoryUI.UpdateSlotHightlight(-1);
```C
添加获取箱子数据的事件函数
```cpp
private void OnBaseBagOpenEvent(SlotType slotType, InventoryBag_SO bag_SO)
        {
            currentBoxBag = bag_SO;
        }
创建根据位置返回背包数据列表
/// <summary>
        /// 根据位置返回背包数据列表
        /// </summary>
        /// <param name="location"></param>
        /// <returns></returns>
        private List<InventoryItem> GetItemList(InventoryLocation location)
        {
            return location switch
            {
                InventoryLocation.Player => playerBag.itemList,
                InventoryLocation.Box => currentBoxBag.itemList,
                _ => null
            };
        }
为SwapItem添加跨背包交换数据的重载方法
 /// <summary>
        /// 跨背包交换数据
        /// </summary>
        /// <param name="locationFrom"></param>
        /// <param name="formIndex"></param>
        /// <param name="locationTarget"></param>
        /// <param name="targetIndex"></param>

        public void SwapItem(InventoryLocation locationFrom, int formIndex, InventoryLocation locationTarget,
            int targetIndex)
        {
            var currentList = GetItemList(locationFrom);
            var targetList = GetItemList(locationTarget);
            InventoryItem currentItem = currentList[formIndex];

            if (targetIndex < targetList.Count)
            {
                InventoryItem targetItem = targetList[targetIndex];
                if (targetItem.itemID != 0 && currentItem.itemID != targetItem.itemID)//有不相同的两个物品
                {
                    currentList[formIndex] = targetItem;
                    targetList[targetIndex] = currentItem;
                }else if (currentItem.itemID == targetItem.itemID)//相同的两个物品
                {
                    targetItem.itemAmount += currentItem.itemAmount;
                    targetList[targetIndex] = targetItem;
                    currentList[formIndex] = new InventoryItem();
                }
                else//目标空格子
                {
                    targetList[targetIndex] = currentItem;
                    currentList[formIndex] = new InventoryItem();
                }
                EventHandler.CallUpdateInventoryUI(locationFrom,currentList);
                EventHandler.CallUpdateInventoryUI(locationTarget,targetList);
            }
        }
实现保存箱子中数据的方法
添加在字典中查找箱子数据和添加箱子数据的方法
/// <summary>
        /// 查找箱子数据
        /// </summary>
        /// <param name="key"></param>
        /// <returns></returns>
        public List<InventoryItem> GetBoxDataList(string key)
        {
            if (boxDataDict.ContainsKey(key))
            {
                return boxDataDict[key];
            }
            return null;
        }

        public void AddBoxDataDict(Box box)
        {
            var key = box.name + box.index;
            if (!boxDataDict.ContainsKey(key))
            {
                boxDataDict.Add(key,box.boxBagData.itemList);
            }
            Debug.Log(key);
        }
创建箱子的初始化逻辑
public void InitBox(int boxIndex)
        {
            index = boxIndex;
            var key = this.name + index;
            if (InventoryManager.Instance.GetBoxDataList(key) != null)
            {
                boxBagData.itemList = InventoryManager.Instance.GetBoxDataList(key);
            }
            else //新建箱子
            {
                InventoryManager.Instance.AddBoxDataDict(this);
            }
        }
在创建家具时初始化箱子的编号
private void OnBuildFurnitureEvent(int ID, Vector3 mousePos)
      {
         BluePrintDetails bluePrint = InventoryManager.Instance.bluePrintData.GetBluePrintDetails(ID);
         var buildItem = Instantiate(bluePrint.buildPrefab, mousePos, Quaternion.identity, itemParent);
         if (buildItem.GetComponent<Box>())
         {
            buildItem.GetComponent<Box>().index = InventoryManager.Instance.BoxDataAmount;
            buildItem.GetComponent<Box>().InitBox(buildItem.GetComponent<Box>().index);
         }
      }
(2D Light)升级到 URP 并创建灯光数据结构
创建2DURP渲染管线
实现根据时间切换灯光的方法
创建灯光的数据类型
[CreateAssetMenu(fileName = "LightPattenList_SO",menuName = "Light/Light Patten")]
public class LightPattenList_SO : ScriptableObject
{
    public List<LightDetails> lightPattenList;
    /// <summary>
    /// 根据季节和周期返回灯光详情
    /// </summary>
    /// <param name="season"></param>
    /// <param name="lightShift"></param>
    /// <returns></returns>
    public LightDetails GetLightDetails(Season season, LightShift lightShift)
    {
        return lightPattenList.Find(l => l.season == season && l.lightShift == lightShift);
    }
}
[System.Serializable]
public class LightDetails
{
    public Season season;
    public LightShift lightShift;
    public Color lightColor;
    public float lightAmount;
}
(2D Light)实现跟随游戏时间触发切换场景光效(昼夜交替)
创建早晚时间戳
public static TimeSpan morningTime=new TimeSpan(5,0,0);
    public static TimeSpan nightTime=new TimeSpan(19,0,0);
根据游戏时间返回灯光状态
private LightShift GetCurrentLightShift()
    {
        if (GameTime >= Settings.morningTime && GameTime <= Settings.nightTime)
        {
            timeDifference = (float)(GameTime - Settings.morningTime).TotalMinutes;
            return LightShift.Morning;
        }
        if (GameTime < Settings.morningTime || GameTime >= Settings.nightTime)
        {
            timeDifference = Mathf.Abs((float)(GameTime - Settings.nightTime).TotalMinutes);
            return LightShift.Night;
        }

        return LightShift.Morning;
    }
创建控制灯光切换的类
根据目前游戏时间与时间戳之间的距离切换游戏内灯光
public class LightControl : MonoBehaviour
{
    public LightPattenList_SO lightData;
    private Light2D currentLight;
    private LightDetails currentLightDetails;

    private void Awake()
    {
        currentLight = GetComponent<Light2D>();
    }
    //实际切换灯光
    public void ChangeLightShift(Season season, LightShift lightShift, float timeDifference)
    {
        currentLightDetails = lightData.GetLightDetails(season, lightShift);
        if (timeDifference < Settings.lightChangeDuration)
        {
            var colorOffset = (currentLightDetails.lightColor - currentLight.color) / Settings.lightChangeDuration *
                              timeDifference;
            currentLight.color += colorOffset;
            DOTween.To(()=>currentLight.color,c=>currentLight.color=c,currentLightDetails.lightColor,Settings.lightChangeDuration-timeDifference);
            DOTween.To(()=>currentLight.intensity,i=>currentLight.intensity=i,currentLightDetails.lightAmount,Settings.lightChangeDuration-timeDifference);
        }

        if (timeDifference >= Settings.lightChangeDuration)
        {
            currentLight.color = currentLightDetails.lightColor;
            currentLight.intensity = currentLightDetails.lightAmount;
        }
    }
创建管理灯光效果的类
public class LightManager : MonoBehaviour
{
   private LightControl[] sceneLight;
   private LightShift currentLightShift;
   private Season currentSeason;
   private float timeDifference;

   private void OnEnable()
   {
      EventHandler.AfterSceneLoadedEvent+= OnAfterSceneLoadedEvent;
      EventHandler.LightShiftChangeEvent += OnLightShiftChangeEvent;
   }
   private void OnDisable()
   {
      EventHandler.AfterSceneLoadedEvent-= OnAfterSceneLoadedEvent;
      EventHandler.LightShiftChangeEvent -= OnLightShiftChangeEvent;
   }
    //为灯光状态改变的事件添加方法
   private void OnLightShiftChangeEvent(Season season, LightShift lightShift, float timeDifference)
   {
      currentSeason = season;
      this.timeDifference = timeDifference;
      if (currentLightShift != lightShift)
      {
         currentLightShift = lightShift;
         foreach (LightControl light in sceneLight)
         {
            light.ChangeLightShift(currentSeason,currentLightShift,this.timeDifference);
         }
      }
   }

   private void OnAfterSceneLoadedEvent()
   {
      sceneLight = FindObjectsOfType<LightControl>();
      foreach (LightControl light in sceneLight)
      {
         light.ChangeLightShift(currentSeason,currentLightShift,this.timeDifference);
      }
   }

}
(Audio)创建声音数据结构实现不同场景播放不同音乐和音效
创建声音数据结构和声音数据库
public class SoundDetailsList_SO :ScriptableObject
{
    public List<SoundDetails> soundDetailsList;

    public SoundDetails GetSoundDetails(SoundName name)
    {
        return soundDetailsList.Find(s => s.soundName == name);
    }
}
[System.Serializable]
public class SoundDetails
{
    public SoundName soundName;
    public AudioClip soundClip;
    [Range(0.1f,1.5f)]
    public float soundPitchMin;
    [Range(0.1f,1.5f)]
    public float soundPitchMax;
    [Range(0.1f,1f)]
    public float soundVolume;
}
添加场景音效数据结构及数据库
public class SceneSoundList_SO : ScriptableObject
{
    public List<SceneSoundItem> sceneSoundList;

    public SceneSoundItem GetSceneSoundItem(string name)
    {
        return sceneSoundList.Find(s => s.sceneName == name);
    }
}
[System.Serializable]
public class SceneSoundItem
{
    [SceneName] public string sceneName;
    public SoundName ambient;
    public SoundName music;
}
创建Manager控制游戏内音效,实现在场景切换时播放对应场景的音乐
public class AudioManager : MonoBehaviour
{
   [Header("音乐数据库")]
   public SoundDetailsList_SO soundDetailsData;
   public SceneSoundList_SO sceneSoundData;
   [Header("Audio Source")]
   public AudioSource ambientSource;
   public AudioSource gameSource;

   private Coroutine soundRoutine;


   public float MusicStarSecond => Random.Range(2f, 6f);

   private void OnEnable()
   {
      EventHandler.AfterSceneLoadedEvent+= OnAfterSceneLoadedEvent;
   }

   private void OnDisable()
   {
      EventHandler.AfterSceneLoadedEvent-= OnAfterSceneLoadedEvent;
   }
   /// <summary>
   /// 通过协程实现音乐切换时有时间间隔的效果
   /// </summary>
   /// <param name="music"></param>
   /// <param name="ambient"></param>
   /// <returns></returns>
   private IEnumerator PlaySoundRoutine(SoundDetails music, SoundDetails ambient)
   {
      if (music != null && ambient != null)
      {
         PlayAmbientClip(ambient,1f);
         yield return new WaitForSeconds(MusicStarSecond);
         PlayMusicClip(music,musicTransitionSecond);
      }
   }

   private void OnAfterSceneLoadedEvent()
   {
      string currentScene = SceneManager.GetActiveScene().name;
      SceneSoundItem sceneSound = sceneSoundData.GetSceneSoundItem(currentScene);
      if (sceneSound == null)
      {
         return;
      }
      SoundDetails ambient = soundDetailsData.GetSoundDetails(sceneSound.ambient);
      SoundDetails music = soundDetailsData.GetSoundDetails(sceneSound.music);
      if (soundRoutine != null)
      {
         StopCoroutine(soundRoutine);
      }
      soundRoutine = StartCoroutine(PlaySoundRoutine(music, ambient));
   }

   /// <summary>
   /// 播放背景音乐
   /// </summary>
   /// <param name="soundDetails"></param>
   private void PlayMusicClip(SoundDetails soundDetails,float transitionTime)
   {
      audioMixer.SetFloat("MusicVolume", ConvertSoundVolume(soundDetails.soundVolume));
      gameSource.clip = soundDetails.soundClip;
      if (gameSource.isActiveAndEnabled)
      {
         gameSource.Play();
      }
      normalSnapshot.TransitionTo(transitionTime);
   }
   /// <summary>
   /// 播放环境音效
   /// </summary>
   /// <param name="soundDetails"></param>
   private void PlayAmbientClip(SoundDetails soundDetails,float transitionTime)
   {
      audioMixer.SetFloat("AmbientVolume", ConvertSoundVolume(soundDetails.soundVolume));
      ambientSource.clip = soundDetails.soundClip;
      if (ambientSource.isActiveAndEnabled)
      {
         ambientSource.Play();
      }
      ambientSnapshot.TransitionTo(transitionTime);
   }


}
(Audio)创建 AudioMixer 实现音乐音效的控制和切换
通过AudioMixer实现场景音效的渐变切换
创建AudioMixer相关的变量,并在播放音乐的代码中添加控制音量和在某段时间后切换节点的代码
 [Header("Audio Mixer")]
   public AudioMixer audioMixer;

   [Header("Snapshots")]
   public AudioMixerSnapshot normalSnapshot;
   public AudioMixerSnapshot ambientSnapshot;
   public AudioMixerSnapshot muteSnapshot;
   private float musicTransitionSecond = 3f;

   //将传入的音量转换为AudioMixer中的参数
   private float ConvertSoundVolume(float amount)
   {
      return (amount * 100 - 80);
   }
(Audio)利用对象池播放所有音效
创建Sound脚本实现播放对应音效
[RequireComponent(typeof(AudioSource))]
public class Sound : MonoBehaviour
{
    [SerializeField]
    private AudioSource audioSource;

    public void SetSound(SoundDetails soundDetails)
    {
        audioSource.clip = soundDetails.soundClip;
        audioSource.volume = soundDetails.soundVolume;
        audioSource.pitch = Random.Range(soundDetails.soundPitchMin, soundDetails.soundPitchMax);
    }
}
在PoolManager中添加音效对象池相关的函数
private void CreateSoundPool()
    {
        var parent = new GameObject(poolPrefabs[4].name).transform;
        parent.SetParent(transform);

        for (int i = 0; i < 20; i++)
        {
            GameObject newObj = Instantiate(poolPrefabs[4], parent);
            newObj.SetActive(false);
            soundQueue.Enqueue(newObj);
        }
    }

    private GameObject GetPoolObject()
    {
        if (soundQueue.Count < 2)
        {
            CreateSoundPool();
        }
        return soundQueue.Dequeue();
    }

    private void InitSoundEffect(SoundDetails soundDetails)
    {
        var obj = GetPoolObject();
        obj.GetComponent<Sound>().SetSound(soundDetails);
        obj.SetActive(true);
        StartCoroutine(DisableSound(obj, soundDetails.soundClip.length));
    }

    private IEnumerator DisableSound(GameObject obj, float duration)
    {
        yield return new WaitForSeconds(duration);
        obj.SetActive(false);
        soundQueue.Enqueue(obj);
    }
创建音效事件并在脚本中为其添加函数方法
public static event Action<SoundDetails> InitSoundEffect;
    public static void CallInitSoundEffect(SoundDetails soundDetails)
    {
        InitSoundEffect?.Invoke(soundDetails);
    }
 public static event Action<SoundName> PlaySoundEvent;
    public static void CallPlaySoundEvent(SoundName soundName)
    {
        PlaySoundEvent?.Invoke(soundName);
    }
private void OnPlaySoundEvent(SoundName soundName)
   {
      var soundDetails = soundDetailsData.GetSoundDetails(soundName);
      if (soundDetails != null)
      {
         EventHandler.CallInitSoundEffect(soundDetails);
      }
   }
```C
在人物走路的第二帧和第六帧添加关键帧实现脚步声
```cpp
public class AnimationEvent : MonoBehaviour
{
    public void FootstepSound()
    {
        EventHandler.CallPlaySoundEvent(SoundName.FootStepSoft);
    }
}
为各类工具添加其对应的音效
Timeline创建
创建 Timeline 的对话
因为Timeline中无法添加对话轨道,所以需要在代码中自定义这些类型
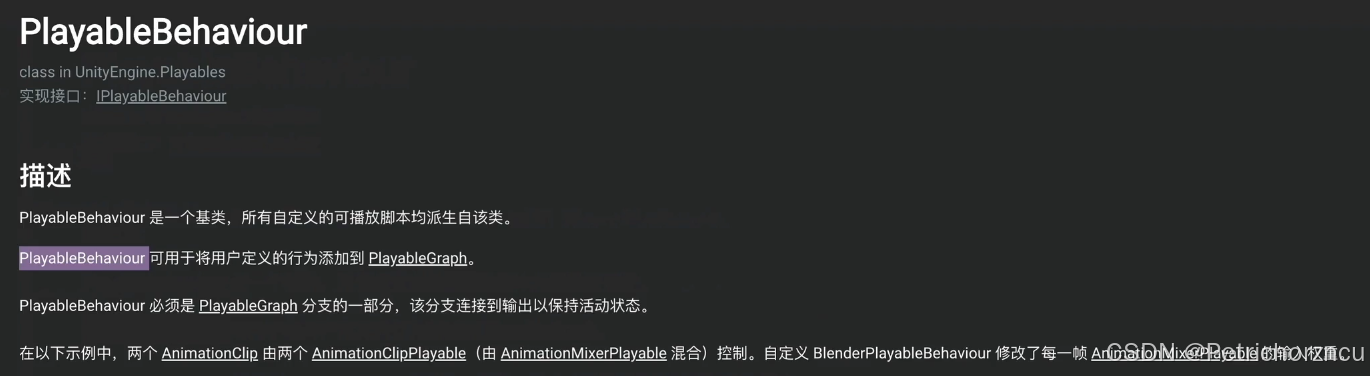
//对话所需的数据
[System.Serializable]
public class DialogueBehaviour : PlayableBehaviour
{
    private PlayableDirector director;
    public DialoguePiece dialoguePiece;

    /// <summary>
    /// 通过当前播放的graph反向查找director
    /// </summary>
    /// <param name="playable"></param>
    public override void OnPlayableCreate(Playable playable)
    {
        director = (playable.GetGraph().GetResolver() as PlayableDirector);
    }

    public override void OnBehaviourPlay(Playable playable, FrameData info)
    {
        EventHandler.CallShowDialogueEvent(dialoguePiece);
        if (Application.isPlaying)
        {
            if (dialoguePiece.hasToPause)
            {
                //暂停Timeline
                TimelineManager.Instance.PauseTimeline(director);
            }
            else
            {
                EventHandler.CallShowDialogueEvent(null);
            }
        }
    }
    //在Timeline播放期间每帧执行
    public override void ProcessFrame(Playable playable, FrameData info, object playerData)
    {
        if (Application.isPlaying)
        {
            TimelineManager.Instance.IsDone = dialoguePiece.isDone;
        }
    }

    public override void OnBehaviourPause(Playable playable, FrameData info)
    {
        EventHandler.CallShowDialogueEvent(null);
    }

    public override void OnGraphStart(Playable playable)
    {
        EventHandler.CallUpdateGameStateEvent(GameState.Pause);
    }

    public override void OnGraphStop(Playable playable)
    {
        EventHandler.CallUpdateGameStateEvent(GameState.GamePlay);
    }
}
public class DialogueClip : PlayableAsset,ITimelineClipAsset
{
    /// <summary>
    /// 在每一条轨道上添加小方块
    /// </summary>
    public DialogueBehaviour dialogue = new DialogueBehaviour();
    public ClipCaps clipCaps => ClipCaps.None;
    public override Playable CreatePlayable(PlayableGraph graph, GameObject owner)
    {
        var playable = ScriptPlayable<DialogueBehaviour>.Create(graph, dialogue);
        return playable;
    }
}
//轨道
[TrackClipType(typeof(DialogueClip))]
public class DialogueTrack : TrackAsset
{

}
控制 Timeline 的启动和暂停
创建TimelineManager管理对话的播放和暂停
public class TimelineManager : Singleton<TimelineManager>
{
   public PlayableDirector startDirector;
   private PlayableDirector currentDirector;
   private bool isPause;
   private bool isDone;
   public bool IsDone
   {
      set => isDone = value;
   }

   protected override void Awake()
   {
      base.Awake();
      currentDirector = startDirector;
   }

   private void OnEnable()
   {
      EventHandler.AfterSceneLoadedEvent += OnAfterSceneLoadedEvent;
   }

   private void OnDisable()
   {
      EventHandler.AfterSceneLoadedEvent -= OnAfterSceneLoadedEvent;
   }
   private void OnAfterSceneLoadedEvent()
   {
      currentDirector = FindObjectOfType<PlayableDirector>();
      if (currentDirector != null)
      {
         currentDirector.Play();
      }
   }

   private void Update()
   {
      if (isPause && Input.GetKeyDown(KeyCode.Space)&&isDone)
      {
         isPause = false;
         currentDirector.playableGraph.GetRootPlayable(0).SetSpeed(1d);
      }
   }

   public void PauseTimeline(PlayableDirector director)
   {
      currentDirector = director;
      currentDirector.playableGraph.GetRootPlayable(0).SetSpeed(0d);
      isPause = true;
   }
创建主菜单 UI
实现点击按钮切换对应的Panel
public class MenuUI : MonoBehaviour
{
    public GameObject[] panels;

    public void SwitchPanel(int index)
    {
        for (int i = 0; i < panels.Length; i++)
        {
            if (i == index)
            {
                panels[i].transform.SetAsLastSibling();
            }
        }
    }

    public void ExitGame()
    {
        Application.Quit();
        Debug.Log("EXIT");
    }
}
创建读档按钮实现点击时读取对应的存档
public class SaveSlotUI : MonoBehaviour
{
    public Text dataTime, dataScene;
    public Button currentButton;
    //GetSiblingIndex() 是 Transform 类的一个方法,用于获取当前对象在其父对象下的兄弟索引(Sibling Index)。即,它返回当前对象在同一父级下的排序位置(以0为起始索引)。
    private int Index => transform.GetSiblingIndex();

    private void Awake()
    {
        currentButton = GetComponent<Button>();
        currentButton.onClick.AddListener(LoadGameData);
    }
    private void LoadGameData()
    {
        Debug.Log(Index);
    }
}
(Save)创建游戏数据存储结构框架
Newtonsoft Json Unity Package
创建需要保存的数据类型
namespace MFarm.Save
{
    [System.Serializable]
    public class GameSaveData
    {
        public string dataSceneName;
        /// <summary>
        /// 存储人物名字,人物坐标
        /// </summary>
        public Dictionary<string, SerializableVector3> characterPosDict;

        public Dictionary<string, List<SceneItem>> sceneItemDict;

        public Dictionary<string, List<SceneFurniture>> sceneFurnitureDict;

        public Dictionary<string, TileDetails> tileDetailsDict;

        public Dictionary<string, bool> firstLoadDict;

        public Dictionary<string, List<InventoryItem>> inventoryDict;

        public Dictionary<string, int> timeDict;

        public int playerMoney;

        //NPC
        public string targetScene;
        public bool interactable;
        public int animationInstanceID;
    }
}
创建ISaveable接口
public interface ISaveable
{
    string GUID { get; }
    void RegisterSaveable()
    {
        SaveLoadManager.Instance.RegisterSaveable(this);
    }
    GameSaveData GenerateSaveData();
    void RestoreData(GameSaveData saveData);
}
创建GUID,用这个唯一性的字符串存储每一个需要保存的物品
[ExecuteAlways]
public class DataGUID : MonoBehaviour
{
    public string guid;

    private void Awake()
    {
        if (guid == string.Empty)
        {
            guid = System.Guid.NewGuid().ToString();
        }
    }
}
在每个需要保存物品的Manager中添加该接口并实现对应的方法
(Save)实现数据存储和加载的逻辑
创建SaveLoadManager实现存储功能
namespace MFarm.Save
{
    public class SaveLoadManager : Singleton<SaveLoadManager>
    {
        private List<ISaveable> saveableList = new List<ISaveable>();
        public List<DataSlot> dataSlots = new List<DataSlot>(new DataSlot[3]);
        private string jsonFolder;
        private int currentDataIndex;
        protected override void Awake()
        {
            base.Awake();
            jsonFolder = Application.persistentDataPath + "/SAVE DATA/";
        }

        private void Update()
        {
            if (Input.GetKey(KeyCode.I))
            {
                Save(currentDataIndex);
            }
            if (Input.GetKey(KeyCode.O))
            {
                Load(currentDataIndex);
            }
        }

        public void RegisterSaveable(ISaveable saveable)
        {
            if (!saveableList.Contains(saveable))
            {
                saveableList.Add(saveable);
            }
        }

        private void Save(int index)
        {
            DataSlot data = new DataSlot();//存储了所有Manager中的数据
            foreach (var saveable in saveableList)
            {
                data.dataDict.Add(saveable.GUID,saveable.GenerateSaveData());
            }
            dataSlots[index] = data;
            var resultPath = jsonFolder + "data" + index + ".json";
            var jsonData = JsonConvert.SerializeObject(dataSlots[index],Formatting.Indented);

            if (!File.Exists(resultPath))
            {
                Directory.CreateDirectory(jsonFolder);
            }
            File.WriteAllText(resultPath,jsonData);
        }

        private void Load(int index)
        {
            currentDataIndex = index;
            var resultPath = jsonFolder + "data" + index + ".json";
            var stringData = File.ReadAllText(resultPath);
            var jsonData = JsonConvert.DeserializeObject<DataSlot>(stringData);
            foreach (var saveable in saveableList)
            {
                saveable.RestoreData(jsonData.dataDict[saveable.GUID]);
            }
        }
    }
}
在TransactionManager中添加保存和读取当前场景的方法
因为打包成游戏时只能显示一个场景,所以需要在游戏一开始就加载UI场景
 private void Awake()
        {
            SceneManager.LoadScene("UI", LoadSceneMode.Additive);
        }
private IEnumerator LoadSaveDataScene(string sceneName)
        {
            yield return Fade(1f);
            if(SceneManager.GetActiveScene().name!="PersistentScene")//在游戏过程中加载另外的游戏进度
            {
                EventHandler.CallBeforeSceneUnLoadedEvent();
                yield return SceneManager.UnloadSceneAsync(SceneManager.GetActiveScene().buildIndex);
            }

            yield return LoadSceneSetActive(sceneName);
            EventHandler.CallAfterSceneLoadedEvent();
            yield return Fade(0);
        }
        public GameSaveData GenerateSaveData()
        {
            GameSaveData saveData = new GameSaveData();
            saveData.dataSceneName = SceneManager.GetActiveScene().name;
            return saveData;
        }

        public void RestoreData(GameSaveData saveData)
        {
            //加载游戏进度场景
            StartCoroutine(LoadSaveDataScene(saveData.dataSceneName));
        }
(Save)实现数据读取开始新游戏和加载进度
在DataSlot中创建获取当前存档的时间和地点的方法
public class DataSlot
{
    /// <summary>
    /// 进度条,String是GUID
    /// </summary>
    public Dictionary<string, GameSaveData> dataDict = new Dictionary<string, GameSaveData>();

    #region 用来UI显示进度详情
    public string DataTime
    {
        get
        {
            var key = TimeManager.Instance.GUID;
            if (dataDict.ContainsKey(key))
            {
                var timeData = dataDict[key];
                return timeData.timeDict["gameYear"] + "年/" + (Season)timeData.timeDict["gameSeason"] + "月/" +
                       timeData.timeDict["gameDay"] + "日/";
            }
            else return string.Empty;
        }
    }
    #endregion

    #region
    public string DataScene
    {
        get
        {
            var key = TransitionManager.Instance.GUID;
            if (dataDict.ContainsKey(key))
            {
                var transitionData = dataDict[key];
                return transitionData.dataSceneName switch
                {
                    "01.Field" => "农场",
                    "02.Home" => "农舍",
                    _ => string.Empty
                };
            }
            else return string.Empty;
        }
    }
    #endregion
}
在SaveLoadManager中实现读取文件中的数据的方法
private void ReadSaveData()
        {
            if (Directory.Exists(jsonFolder))
            {
                for (int i = 0; i < dataSlots.Count; i++)
                {
                    var resultPath = jsonFolder + "data" + i + ".json";
                    if (File.Exists(resultPath))
                    {
                        var stringData = File.ReadAllText(resultPath);
                        var jsonData = JsonConvert.DeserializeObject<DataSlot>(stringData);
                        dataSlots[i] = jsonData;
                    }
                }
            }
        }
实现点击按钮开始新游戏或读取存档
private void LoadGameData()
    {

        if (currentData != null)
        {//读取存档
            SaveLoadManager.Instance.Load(Index);
        }
        else
        {//开始新游戏
            EventHandler.CallStartNewGameEvent(Index);
        }
    }
创建新游戏开始时启动的事件,将其注册到各个Manager脚本中并添加对应的方法
制作暂停菜单和返回逻辑
根据拿到的游戏进度创建一个新的Schedule,场景加载后运行一下,只要不是第一次加载游戏,就让他执行已经存储的进度
if (!isFirstLoad)
        {
            currentGridPosition = grid.WorldToCell(transform.position);
            var schedule = new ScheduleDetails(0, 0, 0, 0, currentSeason, targetScene, (Vector2Int)targetGridPosition,
                stopAnimationClip, interactable);
            BuildPath(schedule);
            isFirstLoad = true;
        }
制作暂停UI面板
创建UIManager,实现暂停面板的功能
public class UIManager : MonoBehaviour
{
   private GameObject menuCanvas;
   public GameObject menuPrefab;

   public Button settingBtn;
   public GameObject pausePanel;
   public Slider volumeSlider;

   private void Awake()
   {
      settingBtn.onClick.AddListener(TogglePausePanel);
      volumeSlider.onValueChanged.AddListener(AudioManager.Instance.SetMasterVolume);
   }

   private void OnEnable()
   {
      EventHandler.AfterSceneLoadedEvent+= OnAfterSceneLoadedEvent;
   }

   private void OnDisable()
   {
      EventHandler.AfterSceneLoadedEvent-= OnAfterSceneLoadedEvent;
   }

   private void Start()
   {
      menuCanvas = GameObject.FindWithTag("MenuCanvas");
      Instantiate(menuPrefab, menuCanvas.transform);
   }

   private void OnAfterSceneLoadedEvent()
   {
      if (menuCanvas.transform.childCount > 0)
      {
         Destroy(menuCanvas.transform.GetChild(0).gameObject);
      }
   }

   private void TogglePausePanel()
   {
      bool isOpen = pausePanel.activeInHierarchy;
      if (isOpen)
      {
         pausePanel.SetActive(false);
         Time.timeScale = 1;
      }
      else
      {
         System.GC.Collect();
         pausePanel.SetActive(true);
         Time.timeScale = 0;
      }
   }
   public void ReturnMenuCanvas()
   {
      Time.timeScale = 1;
      StartCoroutine(BackToMenu());
   }

   private IEnumerator BackToMenu()
   {
      pausePanel.SetActive(false);
      EventHandler.CallEndGameEvent();
      yield return new WaitForSeconds(1f);
      Instantiate(menuPrefab, menuCanvas.transform);
   }
}
逻辑调整及补充内容
创建结束游戏事件,并在各个Manager代码中为其注册函数方法
 public static event Action EndGameEvent;
    public static void CallEndGameEvent()
    {
        EndGameEvent?.Invoke();
    }
检查要生成的家具附近有没有别的家具
如果周围有家具则不能生成家具,避免造成遮挡
private bool HaveFurnitureInRadius(BluePrintDetails bluePrintDetails)
      {
         var buildItem = bluePrintDetails.buildPrefab;
         Vector2 point = mouseWorldPos;
         var size = buildItem.GetComponent<BoxCollider2D>().size;

         var otherColl = Physics2D.OverlapBox(point, size, 0);
         if (otherColl != null)
         {
            return otherColl.GetComponent<Furniture>();
         }
         return false;
      }


 1272
1272

 被折叠的 条评论
为什么被折叠?
被折叠的 条评论
为什么被折叠?
 到【灌水乐园】发言


