


YOLO: Real-Time Object Detection
只看一次 (YOLO)是一个实时对象检测系统。在 Titan X 上处理速度可以达到 40-90 FPS ,在 VOC 2007 上mAP(平均准确率)为78.6% ,在COCO test-dev上平均准确率为48.1%。
| Model | Train | Test | mAP | FLOPS | FPS | Cfg | Weights |
|---|---|---|---|---|---|---|---|
| Old YOLO | VOC 2007+2012 | 2007 | 63.4 | 40.19 Bn | 45 | link | |
| SSD300 | VOC 2007+2012 | 2007 | 74.3 | - | 46 | link | |
| SSD500 | VOC 2007+2012 | 2007 | 76.8 | - | 19 | link | |
| YOLOv2 | VOC 2007+2012 | 2007 | 76.8 | 34.90 Bn | 67 | cfg | weights |
| YOLOv2 544x544 | VOC 2007+2012 | 2007 | 78.6 | 59.68 Bn | 40 | cfg | weights |
| Tiny YOLO | VOC 2007+2012 | 2007 | 57.1 | 6.97 Bn | 207 | cfg | weights |
|
| |||||||
| SSD300 | COCO trainval | test-dev | 41.2 | - | 46 | link | |
| SSD500 | COCO trainval | test-dev | 46.5 | - | 19 | link | |
| YOLOv2 608x608 | COCO trainval | test-dev | 48.1 | 62.94 Bn | 40 | cfg | weights |
| Tiny YOLO | COCO trainval | - | - | 7.07 Bn | 200 | cfg | weights |
YOLO是如何工作的
(Prior detection systems repurpose classifiers or localizers to perform detection)以前的检测系统重新赋予分类或定位新的意义进行检测。它们将模型应用于一个图像的多个位置和不同的尺度。图像得分高的区域被认为是检测有效区域。
我们使用完全不同的方法。我们把一个单一的神经网络应用于全像。该网络将图像分割成区域,并预测包围盒和每个区域的概率。这些包围盒由预测概率加权。

我们的模型和基于分类器的系统比有很多优点。它着眼于整个图像所以它的预测是结合图像整个上下文内容的。预测使用的一个单一的网络,不像R-CNN需要上千个网络。这使得它非常快,比R-CNN快1000倍,比Fast R-CNN快100X以上。更多的信息,请参见我们的论文(paper)。
版本2的创新点是什么?
YOLOv2使用了一些技巧来提高训练和增加性能。像overfeat和SSD一样,我们使用了一个完全卷积模型,但我们还是在整个图像上训练,不难否定。像Faster R-CNN一样我们调整了包围盒的priors来代替完全的预测宽度和高度。但是,我们仍然直接预测x和y坐标。详细的细节请参见论文(paper)!
使用预先训练好的模型进行检测(Detection Using A Pre-Trained Model)
这边博文将会指导你使用预先训练好的YOLO模型进行检测. 如果你还没哟安装 Darknet, 请先进行 安装. 或者直接运行下面的命令:
git clone https://github.com/pjreddie/darknet
cd darknet
make
简单吧!
YOLO 的配置文件目录为 cfg/ 子目录. 下载预先训练好的权因子文件 here (258 MB). 或直接运行如下命令:
wget https://pjreddie.com/media/files/yolo.weights
然后进行检测!
./darknet detect cfg/yolo.cfg yolo.weights data/dog.jpg
你将会看到类似下面的输出:
layer     filters    size              input                output
    0 conv     32  3 x 3 / 1   416 x 416 x   3   ->   416 x 416 x  32
    1 max          2 x 2 / 2   416 x 416 x  32   ->   208 x 208 x  32
    .......
   29 conv    425  1 x 1 / 1    13 x  13 x1024   ->    13 x  13 x 425
   30 detection
Loading weights from yolo.weights...Done!
data/dog.jpg: Predicted in 0.016287 seconds.
car: 54%
bicycle: 51%
dog: 56%

Darknet 会输出检测到的对象, 对象的可信度,以及检测的时间消耗. 便宜Darknet 的时候没有使用OpenCV 所以不能只能图片呈现检测结果. 但是可以早保存的文件predictions.png中查看. 因为我们使用CPU版 Darknet 所以每幅图像消耗大约 6-12. 如果使用GPU版本的将会比较快.
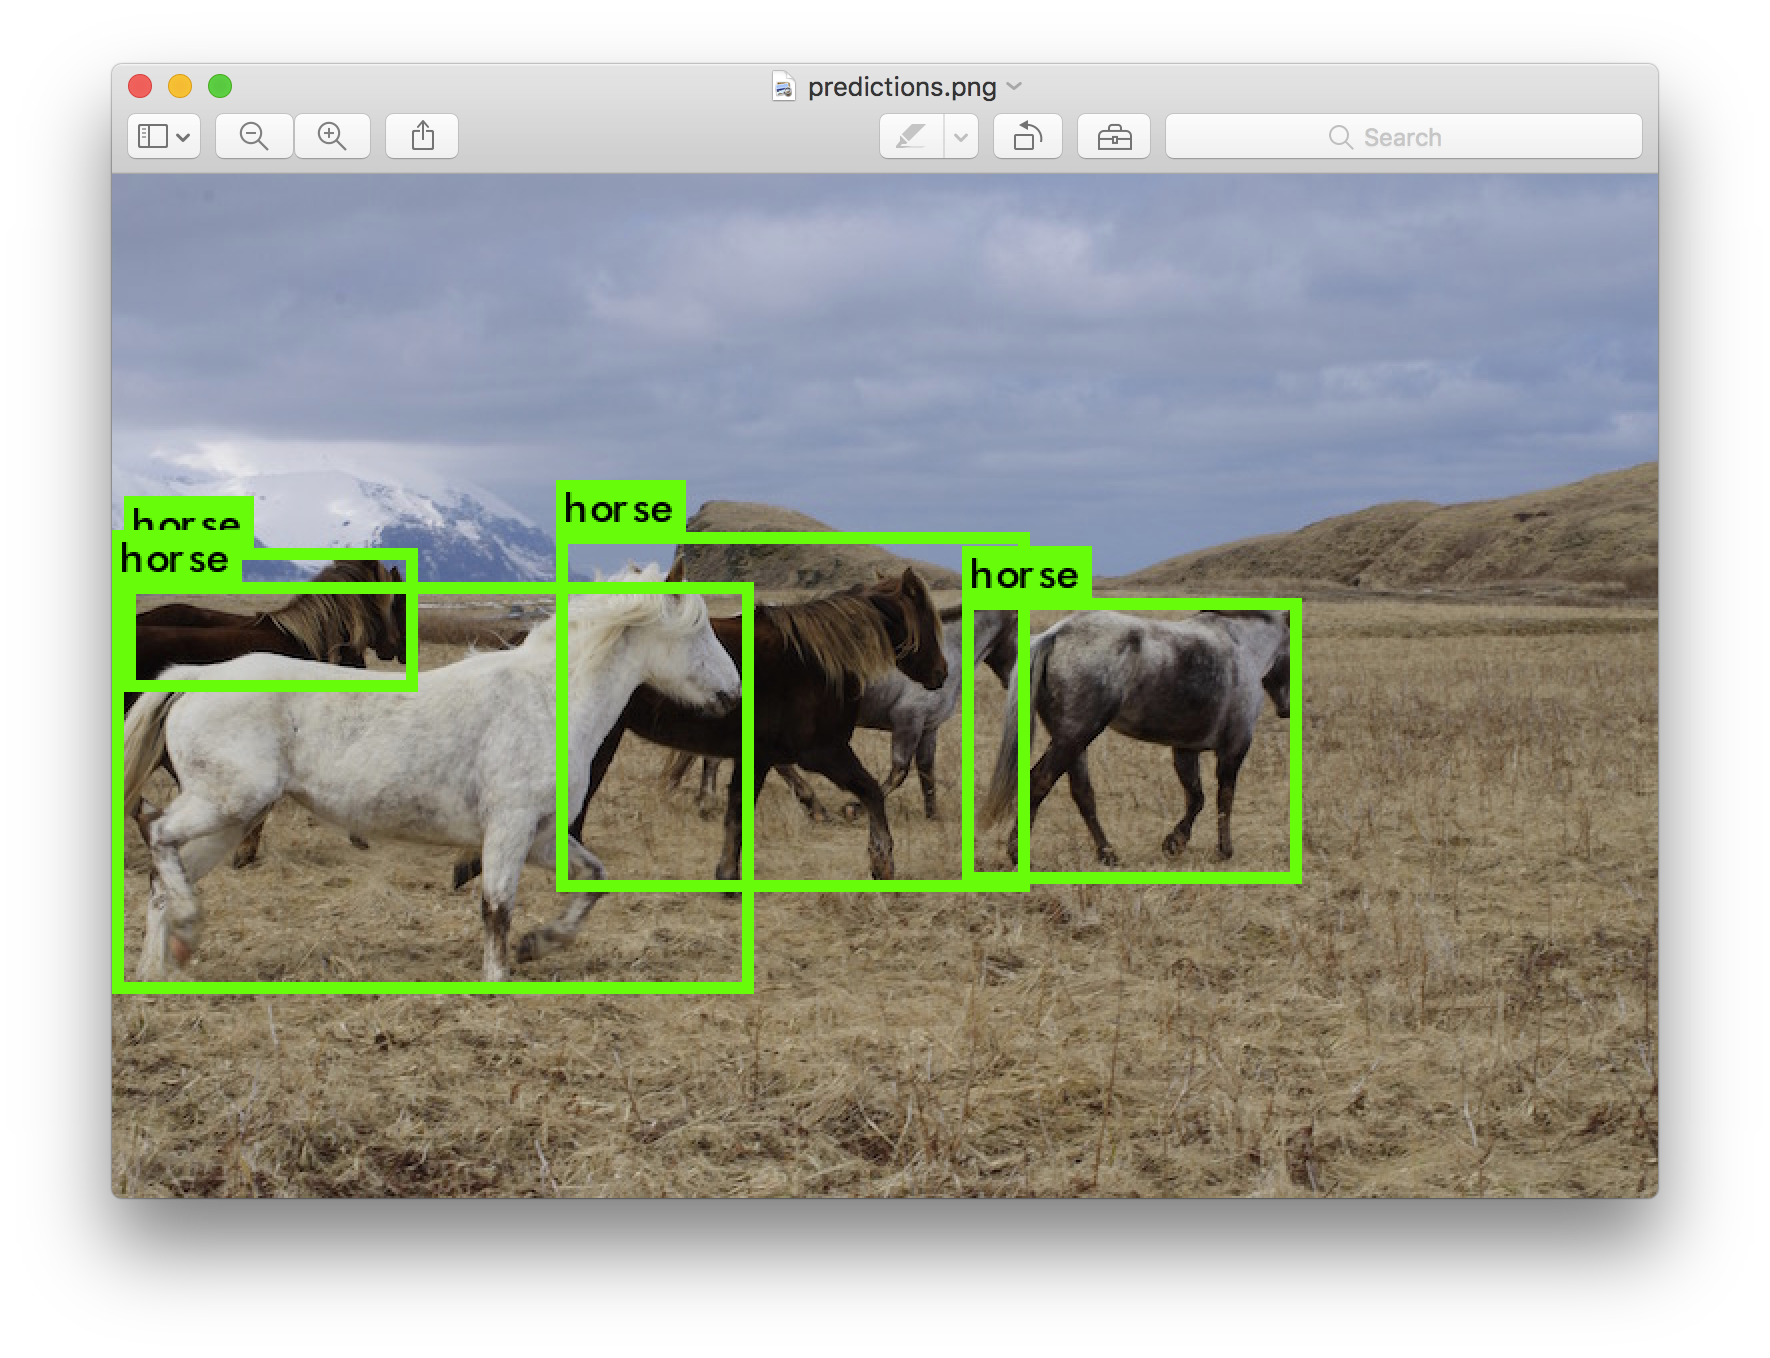
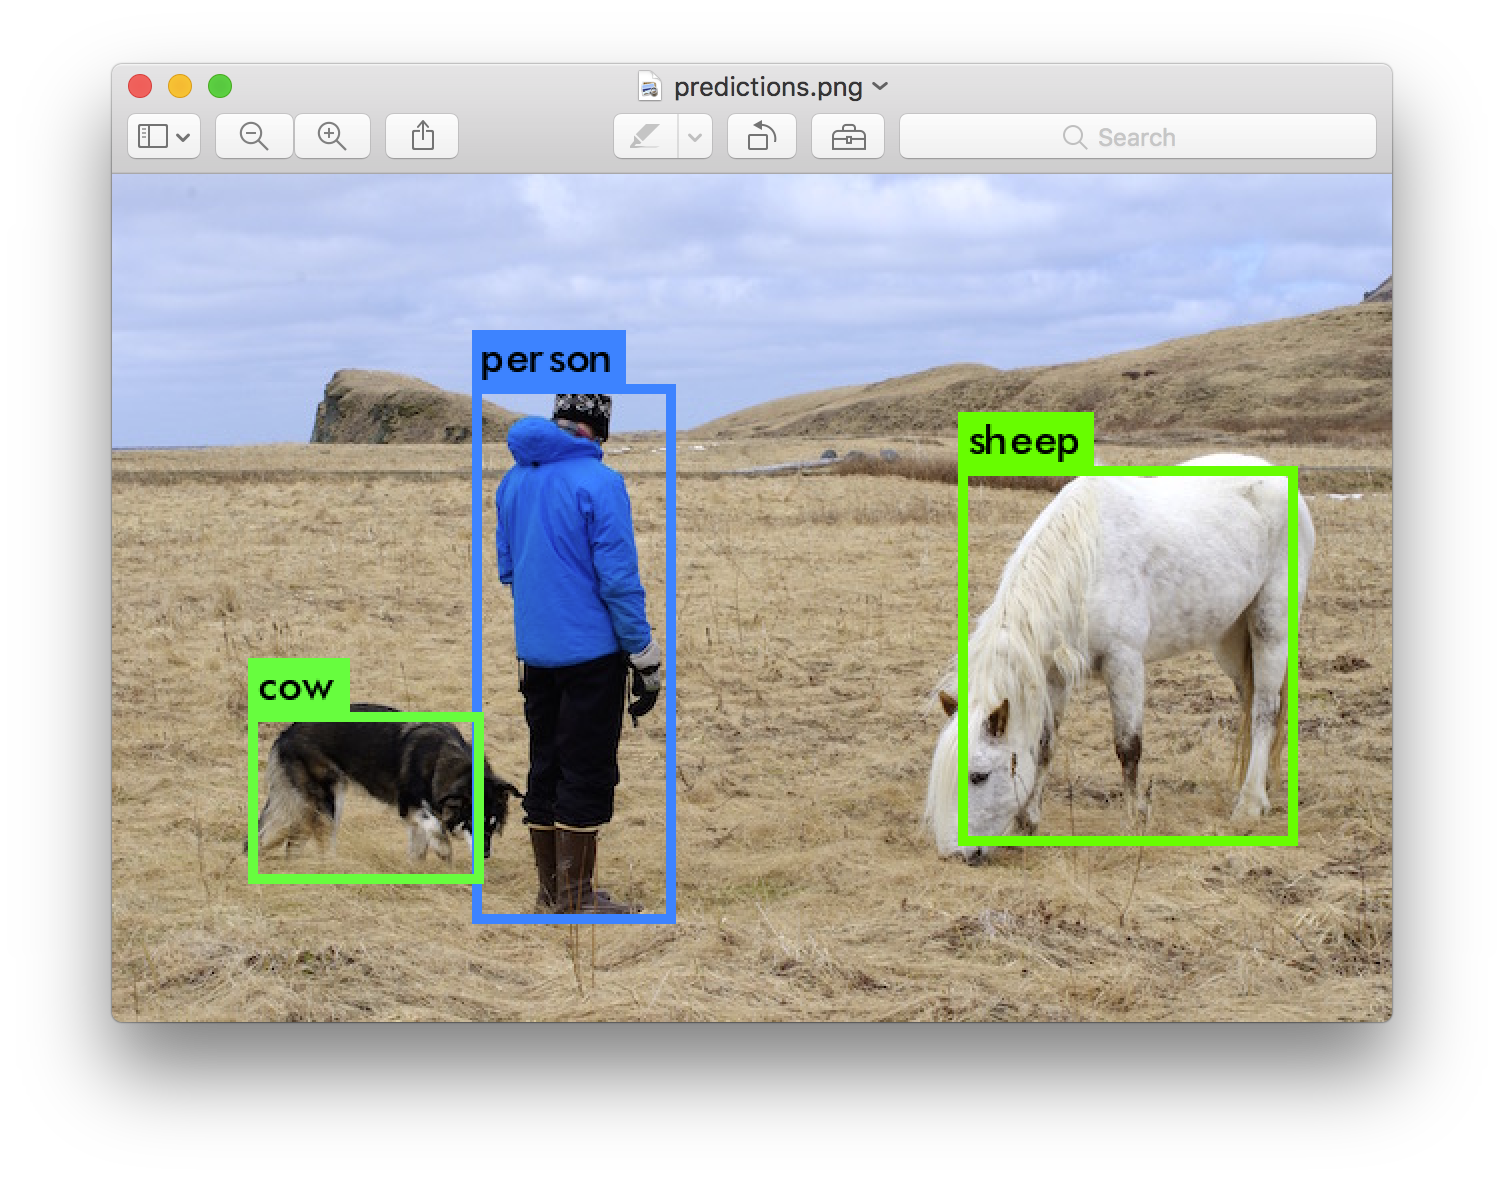
我已经存储了一些示例测试图片,尝试 data/eagle.jpg, data/dog.jpg, data/person.jpg, or data/horses.jpg !
检测命令是命令的更一般版本的简写。它相当于命令::
./darknet detector test cfg/coco.data cfg/yolo.cfg yolo.weights data/dog.jpg
除了上面那样,也可以通过摄像头做实时检测(which you will see later on).
多图像(Multiple Images)
与其在命令行上提供图像,还可以将其留空以尝试多个图像。相反,当配置和权重完成加载时,您将看到一个提示符:
./darknet detect cfg/yolo.cfg yolo.weights
layer     filters    size              input                output
    0 conv     32  3 x 3 / 1   416 x 416 x   3   ->   416 x 416 x  32
    1 max          2 x 2 / 2   416 x 416 x  32   ->   208 x 208 x  32
    .......
   29 conv    425  1 x 1 / 1    13 x  13 x1024   ->    13 x  13 x 425
   30 detection
Loading weights from yolo.weights ...Done!
Enter Image Path:
输入一个图像的路径,如 data/horses.jpg 获取图像预测的包围盒
一旦检测完成,它会提示你输入更多的路径尝试不同的图像。使用Ctrl-C退出程序.
改变检测的阈值(Changing The Detection Threshold)
默认, YOLO 只能显示可信度大于等于.25的检测对象. 这个可以通过传递参数 -thresh <val> 改变.例如,显示所有的检测可以设置 threshold 为0:
./darknet detect cfg/yolo.cfg yolo.weights data/dog.jpg -thresh 0
将会产生如下效果
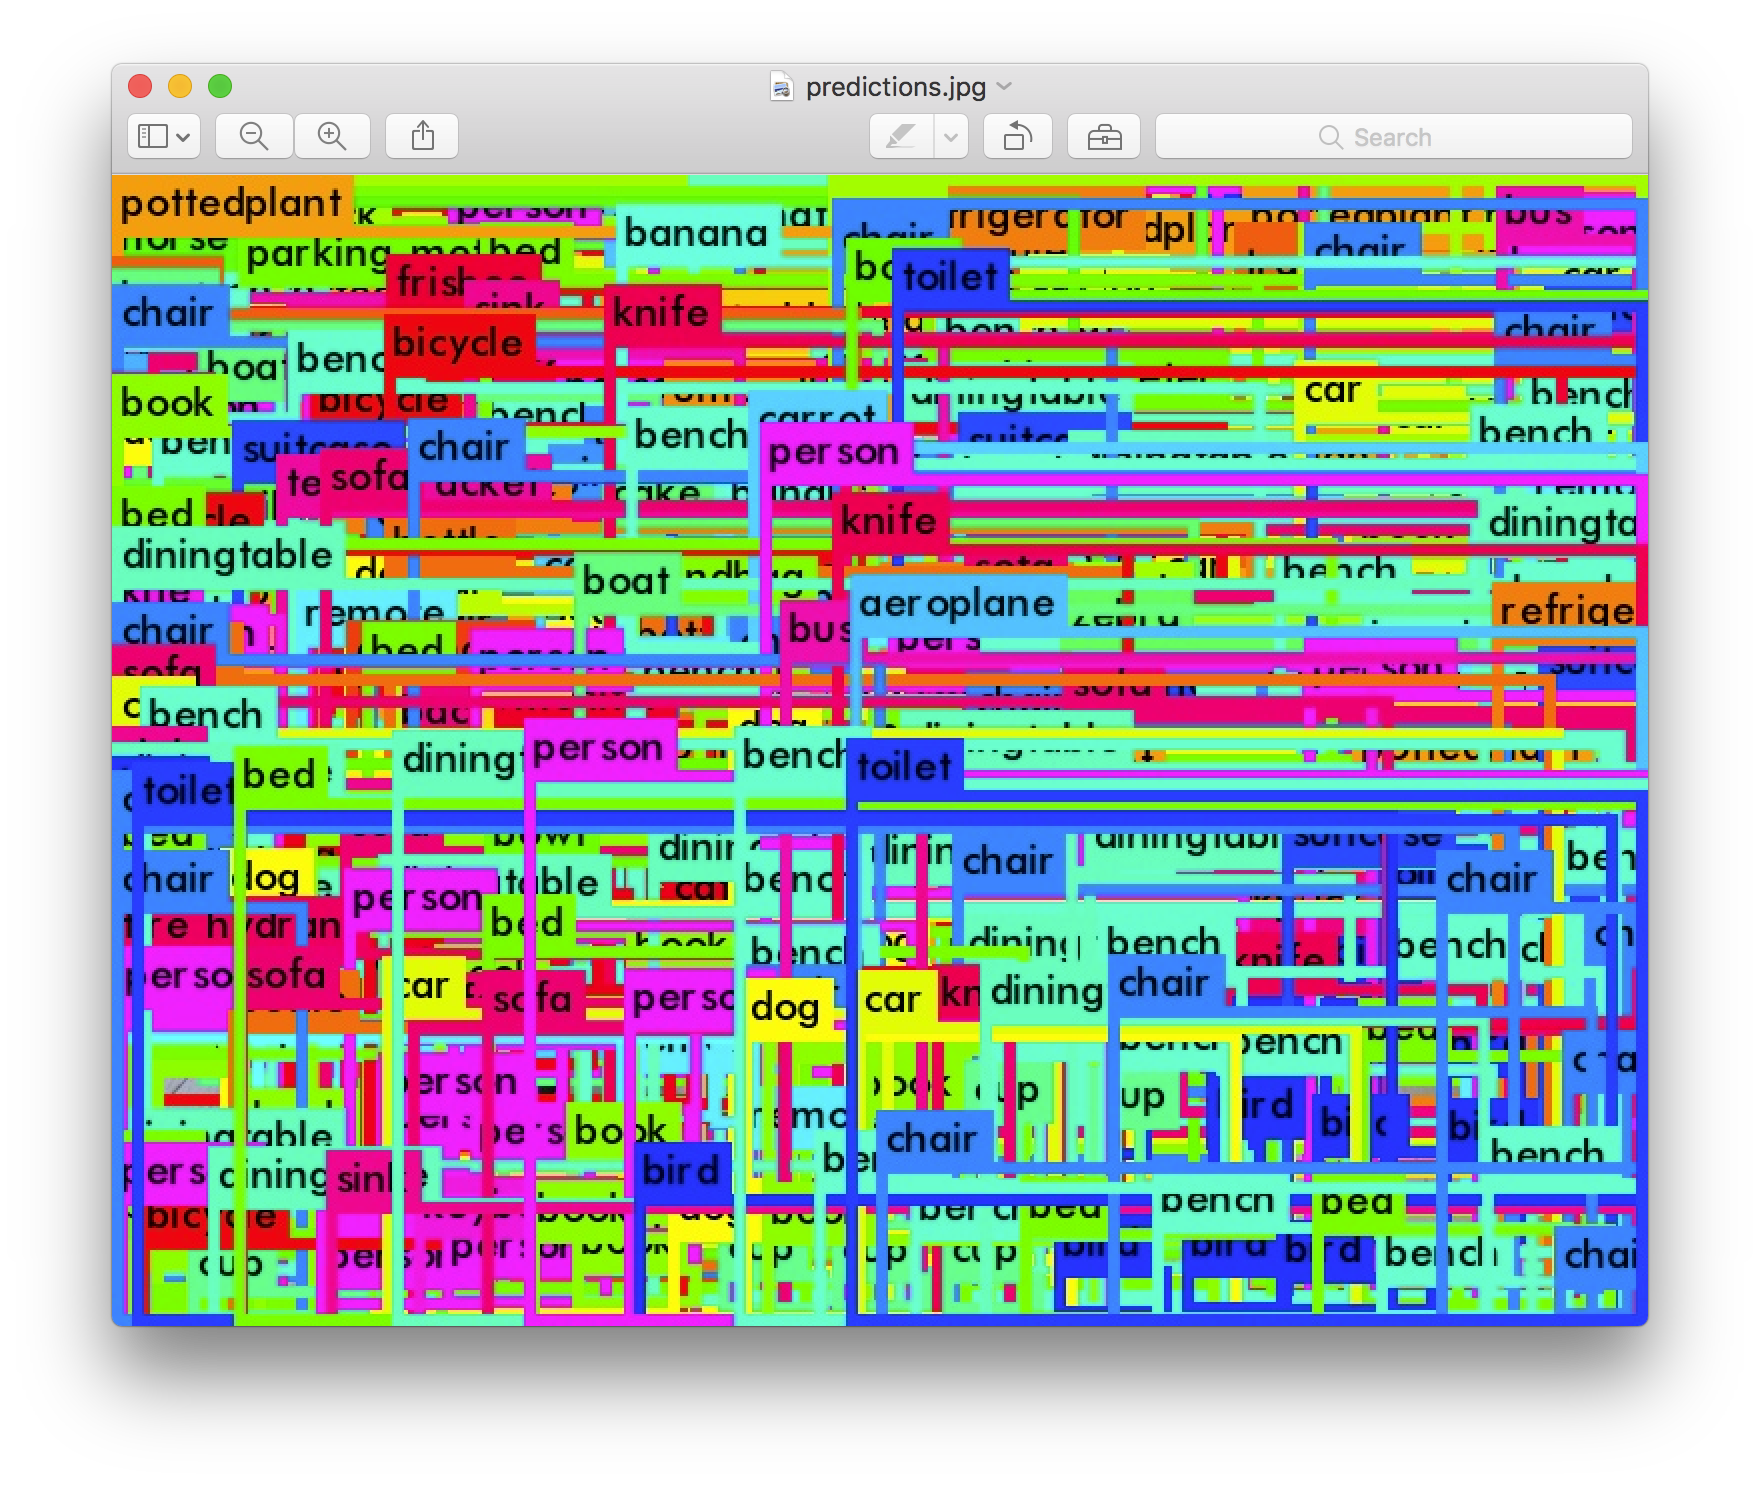
所以,显然不是超级有用,但你可以将它设置为不同的值来控制得到的阈值模型。
Tiny YOLO
Tiny YOLO 基于 Darknet reference network 并且非常快,但是精确度较正常的 YOLO 模型低. 使用基于VOC训练的模型:
wget https://pjreddie.com/media/files/tiny-yolo-voc.weights
./darknet detector test cfg/voc.data cfg/tiny-yolo-voc.cfg tiny-yolo-voc.weights data/dog.jpg
不精确,但是确实快. 在GPU上>200 FPS.
使用摄像头进行实时检测(Real-Time Detection on a Webcam)
为了使用摄像头,你需要在编译 Darknet 的时候使用 CUDA 和 OpenCV. 然后运行下面的命令:
./darknet detector demo cfg/coco.data cfg/yolo.cfg yolo.weights
YOLO将会像是当前的 FPS和预测的分类 并在图像上用包围框画出来.
运行的时候需要有摄像头连接到计算机上,如果你有多个摄像头你需要通错参数选择一个 -c <num> (OpenCV uses webcam0 by default).
也可以使用视频文件:
./darknet detector demo cfg/coco.data cfg/yolo.cfg yolo.weights <video file>
That's how we made the YouTube video above.
在VOC上训练YOLO模型(Training YOLO on VOC)
You can train YOLO from scratch if you want to play with different training regimes, hyper-parameters, or datasets. Here's how to get it working on the Pascal VOC dataset.
Get The Pascal VOC Data
训练 YOLO 需要 2007 到2012年的VOC数据. 也可以点这里下载here. 可以直接运行下面的命令:
curl -O https://pjreddie.com/media/files/VOCtrainval_11-May-2012.tar
curl -O https://pjreddie.com/media/files/VOCtrainval_06-Nov-2007.tar
curl -O https://pjreddie.com/media/files/VOCtest_06-Nov-2007.tar
tar xf VOCtrainval_11-May-2012.tar
tar xf VOCtrainval_06-Nov-2007.tar
tar xf VOCtest_06-Nov-2007.tar
There will now be a VOCdevkit/ subdirectory with all the VOC training data in it.
Generate Labels for VOC
Now we need to generate the label files that Darknet uses. Darknet wants a .txt file for each image with a line for each ground truth object in the image that looks like:
<object-class> <x> <y> <width> <height>
Where x, y, width, and height are relative to the image's width and height. To generate these file we will run thevoc_label.py script in Darknet's scripts/ directory. Let's just download it again because we are lazy.
curl -O https://pjreddie.com/media/files/voc_label.py
python voc_label.py
After a few minutes, this script will generate all of the requisite files. Mostly it generates a lot of label files inVOCdevkit/VOC2007/labels/ and VOCdevkit/VOC2012/labels/. In your directory you should see:
ls
2007_test.txt   VOCdevkit
2007_train.txt  voc_label.py
2007_val.txt    VOCtest_06-Nov-2007.tar
2012_train.txt  VOCtrainval_06-Nov-2007.tar
2012_val.txt    VOCtrainval_11-May-2012.tar
The text files like 2007_train.txt list the image files for that year and image set. Darknet needs one text file with all of the images you want to train on. In this example, let's train with everything except the 2007 test set so that we can test our model. Run:
cat 2007_train.txt 2007_val.txt 2012_*.txt > train.txt
Now we have all the 2007 trainval and the 2012 trainval set in one big list. That's all we have to do for data setup!
Modify Cfg for Pascal Data
Now go to your Darknet directory. We have to change the cfg/voc.data config file to point to your data:
  1 classes= 20
  2 train  = <path-to-voc>/train.txt
  3 valid  = <path-to-voc>2007_test.txt
  4 names = data/voc.names
  5 backup = backup
You should replace <path-to-voc> with the directory where you put the VOC data.
Download Pretrained Convolutional Weights
For training we use convolutional weights that are pre-trained on Imagenet. We use weights from theExtraction model. You can just download the weights for the convolutional layershere (76 MB).
curl -O https://pjreddie.com/media/files/darknet19_448.conv.23
If you want to generate the pre-trained weights yourself, download the pretrainedDarknet19 448x448 model and run the following command:
./darknet partial cfg/darknet19_448.cfg darknet19_448.weights darknet19_448.conv.23 23
But if you just download the weights file it's way easier.
Train The Model
Now we can train! Run the command:
./darknet detector train cfg/voc.data cfg/yolo-voc.cfg darknet19_448.conv.23
Training YOLO on COCO
You can train YOLO from scratch if you want to play with different training regimes, hyper-parameters, or datasets. Here's how to get it working on theCOCO dataset.
Get The COCO Data
To train YOLO you will need all of the COCO data and labels. The script scripts/get_coco_dataset.sh will do this for you. Figure out where you want to put the COCO data and download it, for example:
cp scripts/get_coco_dataset.sh data
cd data
bash get_coco_dataset.sh
Now you should have all the data and the labels generated for Darknet.
Modify cfg for COCO
Now go to your Darknet directory. We have to change the cfg/coco.data config file to point to your data:
  1 classes= 80
  2 train  = <path-to-coco>/trainvalno5k.txt
  3 valid  = <path-to-coco>/5k.txt
  4 names = data/coco.names
  5 backup = backup
You should replace <path-to-coco> with the directory where you put the COCO data.
You should also modify your model cfg for training instead of testing. cfg/yolo.cfg should look like this:
[net]
# Testing
# batch=1
# subdivisions=1
# Training
batch=64
subdivisions=8
....
Train The Model
Now we can train! Run the command:
./darknet detector train cfg/coco.data cfg/yolo.cfg darknet19_448.conv.23
If you want to use multiple gpus run:
./darknet detector train cfg/coco.data cfg/yolo.cfg darknet19_448.conv.23 -gpus 0,1,2,3
If you want to stop and restart training from a checkpoint:
./darknet detector train cfg/coco.data cfg/yolo.cfg backup/yolo.backup -gpus 0,1,2,3
What Happened to the Old YOLO Site?
If you are using YOLO version 1 you can still find the site here: https://pjreddie.com/darknet/yolov1/
Cite
If you use YOLOv2 in your work please cite our paper!
@article{redmon2016yolo9000,
  title={YOLO9000: Better, Faster, Stronger},
  author={Redmon, Joseph and Farhadi, Ali},
  journal={arXiv preprint arXiv:1612.08242},
  year={2016}
}


 4774
4774

 被折叠的 条评论
为什么被折叠?
被折叠的 条评论
为什么被折叠?
 到【灌水乐园】发言


