


OpenCV 五种滤波使用实战(均值、盒状、中值、高斯、双边)
〇、Coding实战内容
- 滤波、核和卷积
- 图片边界填充实战
- 均值滤波使用实战
- Box滤波使用实战
- 中值滤波使用实战
- 高斯滤波使用实战
- 双边滤波使用实战
一、滤波、核和卷积
1.1 滤波
一、公式:图片A => 滤波 => 图片B
二、通俗概念:
1. 一张图片,经过滤波的过程,处理成了另外一种图片。
2. 在图像上的每个位置利用邻域信息更新其本身的信息
三、应用场景:
1.图像增强:去噪,锐化,模糊
2.提取信息:纹理,边缘检测等
1.2 核 & 滤波器
一、滤波器:绿波过程中使用的算法即:滤波器
滤波器即由一副图像I(x,y) 根据像素点x, y附近的区域计算得到一副新图像I’(x,y)的算法。
二、核:Color(x,y) => Array[w,h] - 核 => Color’(x,y)

说明:
- 核是一个多维数组
- 有宽和高属性,宽等于高则为BoxFilter
- A,和B的区别为B做了归一化,如果不做归一化,则滤波后的颜色值会溢出
1.3 公式

对于任何一个形状的盒,取其(i, j)的值K(i, j)并与原始图像中相对于像素点(x, y)偏移(i, j) 的值I(x+i, y+j)进行点乘。最后求和就可以得到原始I(x, y) 经过滤波后的新值I’(x, y)
1.4 例子


(0 * 1/9 + 0 * 1/9 + 0 * 1/9 + 0 * 1/9 + 0 * 1/9 + 0 * 1/9 + 0 * 1/9 + 90 * 1/9 + 90 * 1/9) = 20
二、图片边界填充实战
2.1 解决问题
- 原始图[w+p , h+q]经过滤波器[2p+1, 2q+1] 得到的新图[w, h]
- 因此如果要使输出的图和原始图保障一样的Size,则需要在原始图上添加虚拟像素
2.2 相关OpenCV函数
/**
The function copies the source image into the middle of the destination image. The areas to the
left, to the right, above and below the copied source image will be filled with extrapolated
pixels. This is not what filtering functions based on it do (they extrapolate pixels on-fly), but
what other more complex functions, including your own, may do to simplify image boundary handling.
*/
CV_EXPORTS_W void copyMakeBorder(InputArray src, OutputArray dst,
                                 int top, int bottom, int left, int right,
                                 int borderType, const Scalar& value = Scalar() );

//常用BorderTypes
enum BorderTypes {
    BORDER_CONSTANT    = 0, //!< `iiiiii|abcdefgh|iiiiiii`  with some `i`
    BORDER_REPLICATE   = 1, //!< `aaaaaa|abcdefgh|hhhhhhh`
    BORDER_REFLECT     = 2, //!< `fedcba|abcdefgh|hgfedcb`
    BORDER_WRAP        = 3, //!< `cdefgh|abcdefgh|abcdefg`
};
2.3 Code
int main(int argc, char *argv[])
{
      // root Path
    std::string filePath = std::string(__FILE__);
    size_t pos = filePath.find_last_of("/\\");
    std::string rootPath = filePath.substr(0, pos); // string path = string(__BASE_FILE__)+"/img.webp";
    cout << rootPath;
    Mat image = imread(rootPath+"/img.webp",IMREAD_COLOR);


    //填黑边, BORDER_CONSTANT
    Mat borderImageBlack;
    copyMakeBorder(image,borderImageBlack,200,200,200,200,BORDER_CONSTANT,Scalar(0,0,0));


    Mat borderReplicate;
    copyMakeBorder(image,borderReplicate,200,200,200,200,BORDER_REPLICATE);


    Mat borderReflect;
    copyMakeBorder(image,borderReflect,400,400,400,400,BORDER_REFLECT);

    Mat borderWrap;
    copyMakeBorder(image,borderWrap,200,200,200,200,BORDER_WRAP);

}


三. 均值滤波实战
3.1 理论

3.2 Blur
可以使用OpenCV中的blur()方法来实现
CV_EXPORTS_W void blur( InputArray src, OutputArray dst,
                        Size ksize, Point anchor = Point(-1,-1),
                        int borderType = BORDER_DEFAULT );
参数说明:
- src原图像
- dst目标图像
- ksize:核的size大小
- anchor:核中心点位置,默认-1,-1在核的最中心,一版都用默认值
- borderType:边界填充类型,用默认值即可
3.3 Code
int main(int argc, char *argv[])
{
      // root Path
    std::string filePath = std::string(__FILE__);
    size_t pos = filePath.find_last_of("/\\");
    std::string rootPath = filePath.substr(0, pos); // string path = string(__BASE_FILE__)+"/img.webp";
    cout << rootPath;
    Mat image = imread(rootPath+"/img_1.jpeg",IMREAD_COLOR);

    Mat blurImg;
    blur(image,blurImg,Size(5,5));

 	namedWindow("originImg");
    imshow("originImg", image);
    waitKey(0);
    destroyWindow("originImg");

 	namedWindow("blurImg");
    imshow("blurImg", blurImg);
    waitKey(0);
    destroyWindow("blurImg");
    return 0;


说明:
- 均值滤波即对该图像周边的像素计算均值,用于模糊图片
- 上面显示了原图,33,55,7*7的均值滤波。
四. 盒状滤波实战
4.1 理论
- 均值滤波要求盒的均值加起来为1
- 盒装滤波则没有该要求。
4.2 实战:实现Sobel 滤波器

int main(int argc, char *argv[])
{
      // root Path
    std::string filePath = std::string(__FILE__);
    size_t pos = filePath.find_last_of("/\\");
    std::string rootPath = filePath.substr(0, pos); // string path = string(__BASE_FILE__)+"/img.webp";
    cout << rootPath;

    Mat dstImage;
    //
    Mat sobel(3,3,CV_32S);
    sobel.at<int>(0,0) = 1;
    sobel.at<int>(0,1) = 0;
    sobel.at<int>(0,2) = -1;

    sobel.at<int>(1,0) = 2;
    sobel.at<int>(1,1) = 0;
    sobel.at<int>(1,2) = -2;

    sobel.at<int>(2,0) = 1;
    sobel.at<int>(2,1) = 0;
    sobel.at<int>(2,2) = -1;

    Mat sobel_horizion(3,3,CV_32S);
    sobel_horizion.at<int>(0,0) = 1;
    sobel_horizion.at<int>(0,1) = 2;
    sobel_horizion.at<int>(0,2) = 1;

    sobel_horizion.at<int>(1,0) = 0;
    sobel_horizion.at<int>(1,1) = 0;
    sobel_horizion.at<int>(1,2) = 0;

    sobel_horizion.at<int>(2,0) = -1;
    sobel_horizion.at<int>(2,1) = -2;
    sobel_horizion.at<int>(2,2) = -1;

    filter2D(image,dstImage,CV_8UC3,sobel);
    namedWindow("sobel");    // 创建一个标题为 "hello" 的窗口
    imshow("sobel", dstImage); // 在窗口 "hello" 中显示图片
    waitKey(0);              // 等待用户按下键盘
    destroyWindow("sobel");  // 销毁窗口 "hello"
    return 0;
}


五、中值滤波实战
5.1 Concept
适用于去噪声,该滤波器选取核对应的图像中的终值
原图

5.2 Code
    Mat mediaImage;
    medianBlur(image,mediaImage,3);


以上分别为核是33,55,77,99的中值滤波器的效果
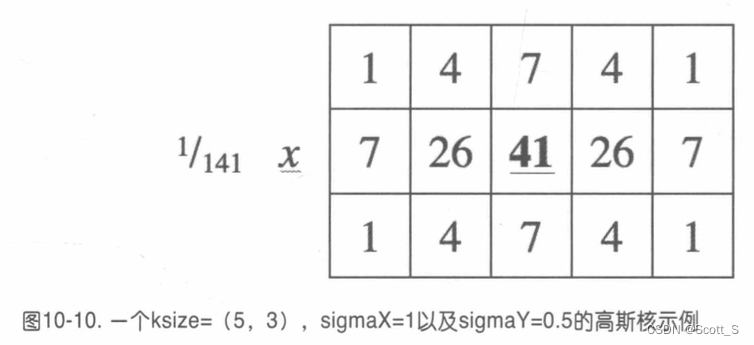
六、高斯滤波实战
6.1 Concept
思路:离(x,y)越远的像素,和(x,y)的相关性越低
/** @brief Blurs an image using a Gaussian filter.

The function convolves the source image with the specified Gaussian kernel. In-place filtering is
supported.

@param src input image;

@param dst output image of the same size and type as src.

@param ksize Gaussian kernel size. ksize.width and ksize.height can differ but they both must be
positive and odd.

@param sigmaX Gaussian kernel standard deviation in X direction.

@param sigmaY Gaussian kernel standard deviation in Y direction; if
 */
CV_EXPORTS_W void GaussianBlur( InputArray src, OutputArray dst, Size ksize,
                                double sigmaX, double sigmaY = 0,
                                int borderType = BORDER_DEFAULT );
6.2 Code
    Mat gauss;
    GaussianBlur(image,gauss,Size(7,7),2,1.5);


七、双边滤波实战
7.1 Concept
CV_EXPORTS_W void bilateralFilter( InputArray src, OutputArray dst, int d,
                                   double sigmaColor, double sigmaSpace,
                                   int borderType = BORDER_DEFAULT );
高斯滤波:
- 在做模糊处理的时候,会把明显的边界也模糊掉,双边滤波不会
- 减缓像素在空间上的变化。
双边滤波:
- 边缘保持平滑
- 对每个像素及其领域内的像素进行加权平均。
- 不是基于其他滤波器的空间距离,而是基于色彩强度进行计算平滑。即sigmaColor参数。
- 主要三个参数:
d: 领域直径距离,设为-1,会根据sigmaColor进行自动计算
sigmaColor:与高斯滤波器类似。指越大,平滑的色彩强度也越大。
sigmaSpace:坐标空间的滤波器的sigma指
7.2 Code
    Mat bilateral;
    bilateralFilter(image,bilateral,-1,100,11);

没开出来处理前后显著的差异,可能选图不是很符合吧。


 1268
1268

 被折叠的 条评论
为什么被折叠?
被折叠的 条评论
为什么被折叠?
 到【灌水乐园】发言


