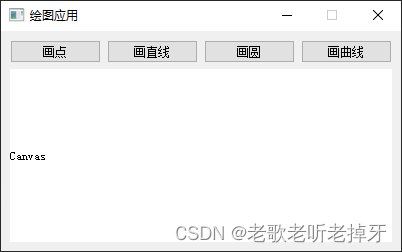
使用PyQt5设计一个界面,其中点击不同的按钮可以在画布上画出点、直线、圆和样条曲线
from PyQt5.QtWidgets import QApplication, QMainWindow, QPushButton,QHBoxLayout,QVBoxLayout,QWidget,QLabel
from PyQt5.QtGui import QPainter, QPen, QColor
from PyQt5.QtCore import Qt
class MainWindow(QMainWindow):
    def __init__(self):
        super().__init__()
        self.setWindowTitle("绘图应用")
        self.setGeometry(100, 100, 400, 400)
        self.button_point = QPushButton("画点", self)
        self.button_line = QPushButton("画直线", self)
        self.button_circle = QPushButton("画圆", self)
        self.button_curve = QPushButton("画曲线", self)
        self.button_point.clicked.connect(self.draw_point)
        self.button_line.clicked.connect(self.draw_line)
        self.button_circle.clicked.connect(self.draw_circle)
        self.button_curve.clicked.connect(self.draw_curve)

        # 将按钮添加到布局中
        hlayout = QHBoxLayout()
        hlayout.addWidget(self.button_point)
        hlayout.addWidget(self.button_line)
        hlayout.addWidget(self.button_circle)
        hlayout.addWidget(self.button_curve)

        # 创建画布控件(标签)并设置其占位符文本和样式表(使其不显示边框)
        self.canvas = QLabel()
        self.canvas.setText('Canvas')
        self.canvas.setStyleSheet("border: 0px solid white; background-color: white;")
        # self.canvas.setFixedSize(280, 180)  # 设置画布大小(示例值)

        # 将画布控件添加到布局的底部,并设置其占据主窗口的大部分位置
        vlayout = QVBoxLayout()
        vlayout.addLayout(hlayout)
        vlayout.addWidget(self.canvas)

        # 创建一个容器,将其布局设置为垂直布局,并将其添加到主窗口的顶部区域(不使用setCentralWidget)
        container = QWidget()
        container.setLayout(vlayout)
        self.setFixedHeight(220)  # 设置主窗口的高度,以适应容器的布局
        self.setCentralWidget(container)  # 将容器设置为中央窗口部件(中心区域)

    def draw_point(self):
        # 实现画点功能的方法
        pass

    def draw_line(self):
        # 实现画直线功能的方法
        pass

    def draw_circle(self):
        # 实现画圆功能的方法
        pass

    def draw_curve(self):
        # 实现画曲线功能的方法
        pass
def paintEvent(self, event):
    painter = QPainter(self)
    pen = QPen()
    pen.setWidth(2)
    painter.setPen(pen)

    if self.draw_point_flag:
        painter.drawPoint(self.last_pos)

    if self.draw_line_flag:
        painter.drawLine(self.start_pos, self.end_pos)

    if self.draw_circle_flag:
        radius = max(abs(self.start_pos.x() - self.end_pos.x()), abs(self.start_pos.y() - self.end_pos.y()))
        painter.drawEllipse(self.start_pos, radius, radius)

    if self.draw_curve_flag:
        # 实现画曲线的方法
        pass
def draw_point(self):
    self.draw_point_flag = True
    self.draw_line_flag = False
    self.draw_circle_flag = False
    self.draw_curve_flag = False

def draw_line(self):
    self.draw_point_flag = False
    self.draw_line_flag = True
    self.draw_circle_flag = False
    self.draw_curve_flag = False

def draw_circle(self):
    self.draw_point_flag = False
    self.draw_line_flag = False
    self.draw_circle_flag = True
    self.draw_curve_flag = False

def draw_curve(self):
    self.draw_point_flag = False
    self.draw_line_flag = False
    self.draw_circle_flag = False
    self.draw_curve_flag = True
if __name__ == '__main__':
    app = QApplication([])
    window = MainWindow()
    window.show()
    app.exec()


 547
547


 被折叠的 条评论
为什么被折叠?


