


因为太多的博客并没有深入理解,本文是自己学习后加入自己深入理解的总结记录,方便自己以后查看。
DeeplabV3+中decoder的详解以及对decoder的边界定位优化设计。
学习前言
一起来学习DeeplabV3+解码的原理,如果有用的话,请记得点赞+关注哦。
参考链接:
DeeplabV3+解码器复现(二)_卷积解码器设计-CSDN博客
一、DeeplabV3+解码器的原理
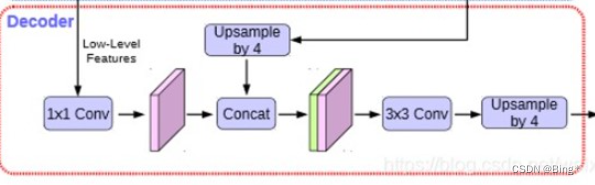
# 解码器1:deeplabv3设计的解码器
class Decoderv3(nn.Module):
    def __init__(self, low_level_channels=24, num_classes=1):
        super(Decoderv3, self).__init__()
        # 浅层语义处理卷积
        self.shortcut_conv = nn.Sequential(
            nn.Conv2d(low_level_channels, 48, 1),
            nn.BatchNorm2d(48),
            nn.ReLU(inplace=True)
        )
        # 对深层语义做上采样
        # self.upsample_pol =F.interpolate()
        # 对深浅语义堆叠后的语义做特征提取和通道数调整卷积
        self.cat_conv = nn.Sequential(
            # 3X3卷积做特征提取以及通道数调整
            nn.Conv2d(48 + 256, 256, 3, stride=1, padding=1),
            nn.BatchNorm2d(256),
            nn.ReLU(inplace=True),
            nn.Dropout(0.5),  # 防止过拟合,每个神经元有0。5可能性不被激活
            # 再次进行3x3卷积特征提取
            nn.Conv2d(256, 256, 3, stride=1, padding=1),
            nn.BatchNorm2d(256),
            nn.ReLU(inplace=True),
            nn.Dropout(0.1),  # 防止过拟合,每个神经元有0。1可能性不被激活
        )
        # 调整通道数和分类一样
        self.cls_conv = nn.Conv2d(256, num_classes, 1, stride=1)

    def forward(self, x, low_level_features, two_level_features):
        low_level_features = self.shortcut_conv(low_level_features)  # 用1x1卷积对浅层语义做通道数调整
        H = low_level_features.size(2)
        W = low_level_features.size(3)
        # 对深层语义信息做上采样,使它的H和W和浅层特征一样
        x = F.interpolate(x, size=(H, W), mode='bilinear', align_corners=True)
        # 将深层语义和浅层语义做堆叠后,#对深浅语义堆叠后的语义做特征提取和通道数调整卷积
        x = self.cat_conv(torch.cat((x, low_level_features), dim=1))
        x = self.cls_conv(x)  # 将1x1卷积通道数调整为NUM_Class,通道数调整和分类的数量一样
        return x
二、解码器边界定位优化设计
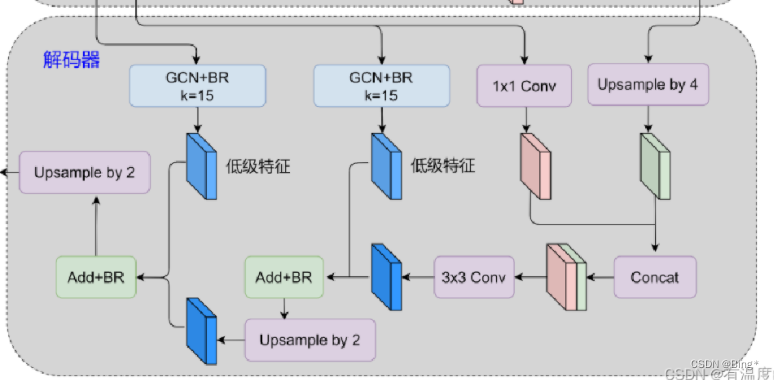
# 解码器2:Decoder_GCN_BR,添加GCN\BR模块
class Decoder_GCN_BR(nn.Module):
    def __init__(self, two_level_channels=16, low_level_channels=24, num_classes=1):
        super(Decoder_GCN_BR, self).__init__()
        # 第三层语义(实际主干7层特征)处理卷积,1x1卷积做通道数调整
        self.shortcut_conv = nn.Sequential(
            nn.Conv2d(low_level_channels, 48, 1),
            nn.BatchNorm2d(48),
            nn.ReLU(inplace=True)
        )
        # 第一次堆叠后的卷积特征提取
        self.cat_conv = nn.Sequential(
            # 3X3卷积做特征提取以及通道数调整
            nn.Conv2d(48 + 256, 256, 3, stride=1, padding=1),
            nn.BatchNorm2d(256),
            nn.ReLU(inplace=True),
            nn.Dropout(0.5),  # 防止过拟合,每个神经元有0。5可能性不被激活
            # 再次进行3x3卷积特征提取
            nn.Conv2d(256, 256, 3, stride=1, padding=1),
            nn.BatchNorm2d(256),
            nn.ReLU(inplace=True),
            nn.Dropout(0.1),  # 防止过拟合,每个神经元有0。1可能性不被激活
        )
        # GCN1全局卷积
        self.gcnbranch1_0 = nn.Sequential(
            nn.Conv2d(low_level_channels, 3, (11, 1), 1, (5, 0)),
            nn.Conv2d(3, 3, (1, 11), 1, (0, 5))
        )
        self.gcnbranch1_1 = nn.Sequential(
            nn.Conv2d(low_level_channels, 3, (1, 11), 1, (0, 5)),
            nn.Conv2d(3, 3, (11, 1), 1, (5, 0))
        )
        # GCN2全局卷积
        self.gcnbranch2_0 = nn.Sequential(
            nn.Conv2d(two_level_channels, 3, (11, 1), 1, (5, 0)),
            nn.Conv2d(3, 3, (1, 11), 1, (0, 5))
        )
        self.gcnbranch2_1 = nn.Sequential(
            nn.Conv2d(two_level_channels, 3, (1, 11), 1, (0, 5)),
            nn.Conv2d(3, 3, (11, 1), 1, (5, 0))
        )
        # BR边缘细化卷积
        self.br = nn.Sequential(
            nn.Conv2d(3, 3, 3, 1, 1),
            nn.ReLU(),
            nn.Conv2d(3, 3, 3, 1, 1)
        )
        # 调整通道数和分类一样
        self.cls_conv = nn.Conv2d(256, num_classes, 1, stride=1)

    def forward(self, x, low_level_features, two_level_features):
        # 用1x1卷积对第三层语义做通道数调整
        low_level_features1 = self.shortcut_conv(low_level_features)  # 150*150*24>150*150*48
        low_H = low_level_features1.size(2)
        low_W = low_level_features1.size(3)
        # 对深层语义做上采样,使它的H、W和浅层语义一样
        x = F.interpolate(x, size=(low_H, low_W), mode='bilinear', align_corners=True)  # 38*38*256>150*150*256
        # 将深层语义和浅层语义第三层做堆叠,再对堆叠后的语义做特征提取和通道数调整
        x = self.cat_conv(torch.cat((x, low_level_features1), dim=1))  # 150*150*(48+256)>150*150*256
        x = self.cls_conv(x)# 150*150*256>150*150*3
        # ---------------------------------------------------------------------------------第一层处理结束:和v3一样
        # GCN模块使用全局卷积,利用非对称卷积获得大感受野来解决定位分类问题
        gcn_branch1_0 = self.gcnbranch1_0(low_level_features)  # 150*150*24>150*150*4
        gcn_branch1_1 = self.gcnbranch1_1(low_level_features)  # 150*150*24>150*150*4
        gcn_branch1 = gcn_branch1_0 + gcn_branch1_1  # 150*150*4
        # BR模块使用边缘细化模块更好的提取边界信息
        br_branch1 = self.br(gcn_branch1)  # 150*150*4>150*150*4
        branch1 = br_branch1 + gcn_branch1  # 150*150*4
        # 加上边界信息1
        x = x + branch1  # 150*150*4
        # br卷积对语义信息提取
        x = self.br(x)  # 150*150*4
        # ---------------------------------------------------------------------------------第二层处理结束:加入low层的边界信息
        # GCN模块,对主干网络中浅层语义第二层做卷积处理,
        gcn_branch2_0 = self.gcnbranch2_0(two_level_features)  # 300*300*16>300*300*4
        gcn_branch2_1 = self.gcnbranch2_1(two_level_features)  # 300*300*16>300*300*4
        gcn_branch2 = gcn_branch2_0 + gcn_branch2_1  # 300*300*4
        # BR模块使用边缘细化模块更好的提取边界信息
        br_branch2 = self.br(gcn_branch2)  # 300*300*4>300*300*4
        branch2 = br_branch2 + gcn_branch2  # 300*300*4
        two_H = branch2.size(2)
        two_W = branch2.size(3)
        # 对语义信息做上采样,使它的H\W和第二层语义一样
        x = F.interpolate(x, (two_H, two_W), mode="bilinear", align_corners=True)  # 150*150*4>300*300*4
        # 加上边界信息2
        x = x + branch2  # 300*300*4
        # br卷积对语义信息做提取
        x = self.br(x)
        # 将1x1卷积通道数调整为NUM_Class,通道数调整和分类的数量一样
        # x = self.cls_conv(x)
        return x
三、Deeplab网络封装设计
方便我们可以根据不同的项目选择不同backbone、aspp、decoder的网络设计
# Deeplab2:神经网络设计
class DeepLab(nn.Module):
    def __init__(self, num_classes, backbone="mobilenet", encoderaspp="aspp", decoder="v3", pretrained=True,
                 downsample_factor=16):
        super(DeepLab, self).__init__()

        # -----------------------------------#
        # Encoder主干特征提取模块DCNN
        # 目前融合了xception\mobilenetv2等网络
        # -----------------------------------#
        if backbone == "xception":
            # ----------------------------------#
            #   获得两个特征层
            #   浅层特征    [128,128,256]
            #   主干部分    [30,30,2048]
            # ----------------------------------#
            self.backbone = xception(downsample_factor=downsample_factor, pretrained=pretrained)
            in_channels = 2048
            two_level_channels = 16
            low_level_channels = 256
        elif backbone == "mobilenet":
            # ----------------------------------#
            #   获得两个特征层
            #   浅层特征    [128,128,24]
            #   主干部分    [30,30,320]
            # ----------------------------------#
            self.backbone = MobileNetV2(downsample_factor=downsample_factor, pretrained=pretrained)
            in_channels = 320
            two_level_channels = 16
            low_level_channels = 24

        else:
            raise ValueError('Unsupported backbone - `{}`, Use mobilenet, xception.'.format(backbone))

        # -----------------------------------------#
        #   Encoder加强特征提取模块ASPP
        #   利用不同膨胀率的膨胀卷积进行特征提取
        # -----------------------------------------#
        if encoderaspp == "aspp":
            # 使用aspp
            self.aspp = ASPP(dim_in=in_channels, dim_out=256, rate=16 // downsample_factor)
        elif encoderaspp == "denseaspp":
            # 使用denseaspp
            self.aspp = DenseASPP(dim_in=in_channels, dim_mid1=512, dim_mid2=256)
        else:
            raise ValueError('Unsupported backbone - `{}`,Use aspp,denseaspp'.format(encoderaspp))

        # ---------------------------------------------------#
        # Decoder解码器模块
        # 利用解码器恢复边界信息,本文中重构了一下几种边界信息恢复解码器
        # ---------------------------------------------------#
        if decoder == "v3":
            # 使用deeplabv3的解码器
            self.decoder = Decoderv3(low_level_channels=low_level_channels, num_classes=num_classes)
        elif decoder == "v3+GNC+BR":
            # 使用自己设计的解码器v3+GCN+BR,理论上边界信息提取更好,定位和分类精度更高
            self.decoder = Decoder_GCN_BR(low_level_channels=low_level_channels, two_level_channels=two_level_channels,
                                          num_classes=num_classes)
        else:
            raise ValueError('Unsupported decoder - `{}`,Use v3,v3+GNC+BR'.format(encoderaspp))

    def forward(self, x):
        H, W = x.size(2), x.size(3)
        # -----------------------------------------#
        #   获得两个特征层
        #   low_level_features: 浅层特征-进行卷积处理
        #   x : 主干部分-利用ASPP结构进行加强特征提取
        # -----------------------------------------#
        # 主干网络DNN(mobilenetv2/xceptionnet) 用mobilenetv2做深度卷积,更加轻量化根据计算机配置选择
        the_two_features, low_level_features, the_three_features, the_four_features, x = self.backbone(x)
        # 加强特征提取网络(aspp/denseaspp)denseaspp更多特征层提取
        x = self.aspp(x)
        # 解码器decoder恢复边界信息
        x = self.decoder(x, low_level_features, the_two_features)
        # 做上采样,使H、W值恢复到输入图片的大小
        x = F.interpolate(x, size=(H, W), mode='bilinear', align_corners=True)
        return x


 13万+
13万+


 被折叠的 条评论
为什么被折叠?
被折叠的 条评论
为什么被折叠?
 到【灌水乐园】发言


