


成像模型
这篇博客介绍得很详细,链接
其中,opencv鱼眼相机标定后,畸变参数是4个,链接里博客的畸变参数是五个,应该是使k0=1.

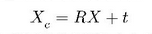
1)世界坐标系->相机坐标系
2)相机坐标系->图像物理坐标系
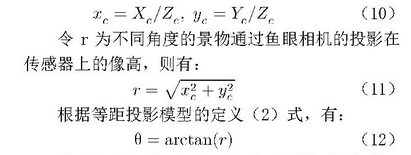
注意使用的是归一化的坐标,鱼眼模型好像都是近似为单位球面投影模型,这点还是比较困惑,为什么不直接用f,而是在单位球面上建模。
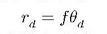
径向畸变坐标


xd,yd这个公式不太明白,括号内应该是rd才对吧?不过如果是单位球面、等距投影,rd=theta_d,这样就说的通了。
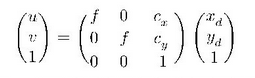
3)图像物理坐标系->图像像素坐标系
综合:

鱼眼相机标定与调整显示范围
#include "LearnBasic.h"
#include "stdio.h"
#include <iostream>
#include <fstream>
#include <io.h>
void getFiles(string path, vector<string>& files)
{
	//文件句柄
	intptr_t hFile = 0;
	//文件信息
	struct _finddata_t fileinfo;
	string p;
	if ((hFile = _findfirst(p.assign(path).append("\\*").c_str(), &fileinfo)) != -1)
	{
		do
		{
			//如果是目录,迭代之
			//如果不是,加入列表
			if ((fileinfo.attrib &  _A_SUBDIR))
			{
				if (strcmp(fileinfo.name, ".") != 0 && strcmp(fileinfo.name, "..") != 0)
					getFiles(p.assign(path).append("\\").append(fileinfo.name), files);
			}
			else
			{
				//cout << fileinfo.name << endl;
				files.push_back(p.assign(path).append("\\").append(fileinfo.name));
			}
		} while (_findnext(hFile, &fileinfo) == 0);
		_findclose(hFile);
	}
}

void FishEyeCalibration()
{
	string filePath = "C:\\zyk\\cv_calibration";
	vector<string> files;
	//获取该路径下的所有文件
	int Rownum = 7;
	int Colnum = 9;
	double space = 15.0;
	Size PicSize(2592,1944);
	vector<vector<Point2f>> ImgPoints;
	vector<vector<Point3f>> WorldPoints;
	vector<cv::Point2f> ImgPoint;
	vector<Point3f> WorldPoint;
	Mat	   cameraMatrix;//相机内参,最好不要指定类型,否则某些算子类型不符合的话报错
	Mat    distCoeffs;//相机畸变系数
	vector<Mat> rvecs;//旋转矩阵
	vector<Mat> tvecs;

	getFiles(filePath, files);
	int flag = cv::fisheye::CALIB_RECOMPUTE_EXTRINSIC | cv::fisheye::CALIB_CHECK_COND |
		cv::fisheye::CALIB_FIX_SKEW;
	int picnum = files.size();
	Mat img, img_Gray, result;
	//构建棋盘坐标点
	int NPoints = Rownum * Colnum;
	for (int j = 0; j < NPoints; j++)
	{
		WorldPoint.push_back(Point3f((j % Colnum) * space, (j / Colnum) * space, 0));
	}
	//检测棋盘点
	namedWindow("img", WINDOW_NORMAL);
	for (int i = 0; i < picnum; i++)
	{
		img = imread(files.at(i));
		cvtColor(img, img_Gray, COLOR_BGR2GRAY);
		if (cv::findChessboardCorners(img_Gray, cv::Size(Colnum, Rownum), ImgPoint, 0) == 0)
		{
			cout << "drop out:" << files.at(i) << endl;
			continue;
		}
		WorldPoints.push_back(WorldPoint);
		cornerSubPix(img_Gray, ImgPoint, cv::Size(3, 3), cv::Size(-1, -1),
					cv::TermCriteria(cv::TermCriteria::MAX_ITER + TermCriteria::EPS, 30, 0.1));
//		drawChessboardCorners(img, cv::Size(Colnum, Rownum), ImgPoint, true);
// 		imshow("img", img);
// 		waitKey(0);
		ImgPoints.push_back(ImgPoint);
	}
	//标定
	cv::fisheye::calibrate(WorldPoints, ImgPoints, PicSize, cameraMatrix, distCoeffs,
		rvecs, tvecs, flag, cv::TermCriteria(3, 20, 1e-6));
	cout << cameraMatrix << endl;
	cout << distCoeffs << endl;


	//调整相机显示
	double MechineW = 540;//设置想要的幅面宽,高按比例转换
	double ChessboardW =(Colnum-1)* space;//棋盘点范围,范围外畸变校正的效果应该比较差
	double Chessboardh = (Rownum-1)* space;

	vector<Point2f> undistort_imgpts;
	vector<Point2f> prj_imgpts;
	Mat newcameraMatrix = cameraMatrix.clone();
	cv::fisheye::projectPoints(WorldPoints[0], prj_imgpts, rvecs[0], tvecs[0], cameraMatrix, distCoeffs,0,noArray());
	cv::fisheye::undistortPoints(prj_imgpts, undistort_imgpts, cameraMatrix, distCoeffs, cv::noArray(), cameraMatrix);
	double ChessboardW_Pix = fabs(undistort_imgpts.at(0).x - undistort_imgpts.at(Rownum*Colnum - 1).x);
	double ChessboardH_Pix = fabs(undistort_imgpts.at(0).y - undistort_imgpts.at(Rownum*Colnum - 1).y);
	double pixsize = sqrt((pow(ChessboardW, 2) + pow(ChessboardW, 2)) / (pow(ChessboardW_Pix, 2) + pow(ChessboardH_Pix, 2)));
	cout << "畸变校正后像素精度:" << pixsize<< endl;

	double scale = MechineW / pixsize /PicSize.width;//缩放比例,确定新的内参,可以想象为把靶面尺寸缩放
	cout << "scale:"<<scale << endl;
	newcameraMatrix.at<double>(0, 0) = cameraMatrix.at<double>(0, 0) /scale;
	newcameraMatrix.at<double>(1, 1) = cameraMatrix.at<double>(1, 1) /scale;

	Mat mapx, mapy;
	cv::fisheye::initUndistortRectifyMap(cameraMatrix, distCoeffs, cv::Matx33d::eye(), newcameraMatrix,
		PicSize, CV_16SC2, mapx, mapy);
	for (int i = 0; i < picnum; i++)
	{
		img = imread(files.at(i));
		remap(img, result, mapx, mapy, INTER_LINEAR,BORDER_CONSTANT);
		imshow("img", result);
		waitKey(0);
	}
}
调整显示后,大致就是我需要的一个540宽左右区域的范围


 8225
8225


 被折叠的 条评论
为什么被折叠?
被折叠的 条评论
为什么被折叠?
 到【灌水乐园】发言


