


真实的水面模拟在三维游戏领域一直是一个非常热门的问题,因为在大型的场景中,流体总是不可避免地会存在的。在这一方面,我也查了不少资料,总结而言,水面模拟一般有这么几个方法:
绘制部分:
1.比较简单的,就是贴图置换(或者是直着拖着一张贴图平移)(真的,确实有游戏是这么干的...)
2.基于网格绘制,通过物理模拟(各种波动方程)来计算网格点位置,达到动态效果(本次demo的做法就是这样)
3.使用动态的凹凸纹理映射(法线贴图),计算量相比物理模拟大大减少(看到了不少渲染图,都非常好看,可惜不会做贴图)
4.使用粒子系统模拟水面
渲染部分:
1.反射和折射效果的实现
2.高光(亮斑)的添加
3.半透明
4.……
理论部分,参考的是《Mathematics for 3D Game Programming and Computer Graphics》一书中的实时流体模拟中的数学方法。最终只完成了绘制部分,还没有实现水面的渲染,因为渲染部分已经算的上是比模拟绘制更复杂的另一个大课题了。所以原作者给出的法线向量和切线向量就暂时被我舍弃了(因为它们是用在光照计算中的)
原理概述
原文包含了大量的推导过程, 对于没有兴趣看的人,我总结一下全文表达的意思:
1.水波的运动位移(z)满足偏微分方程:
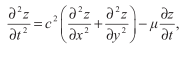
其中,c是波速,u是描述阻力大小的系数,x,y,z是空间坐标,t是时间。
2.这个方程求解很麻烦,我们用近似的方法得到运动位移的公式:
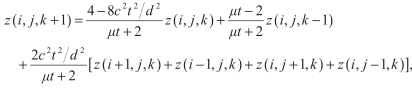
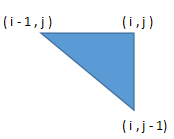
在这里,我们用三角形网格来表达水面,如下图,i,j代表点位置的索引,k是时间。

3.为了保证迭代方程收敛,t,和c要满足:

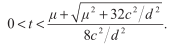
总而言之,就是一个公式(2)和两个约束条件(3),就算你看不懂推导,也可以直接使用结论了。
绘制三角形网格
原理中有一张三角形网格图,首先,我们要把这个网格绘制出来。
对于实体建模有所了解的人应该都知道,在计算机中,我们一般是用三维网格来表达各种物体的,具体而言,就是许多三角形面片。所以说,这里的网格和三维建模是统一的,它们的绘制方法也是一致的。当然我们可以直接用OpenGL中的顶点数组来完成这一切,但是在这里不引入过多其余的东西,所以直接调用了glBegin(GL_TRIANGLES)的方法来绘制三角形。
我们需要输入的信息包括:
1.每个顶点的坐标
2. 每个顶点的法向量(在这里省略了)
3.顶点的下标索引(描述一个三角形由哪几个顶点组成,只存索引,不存具体的顶点坐标)
4.纹理坐标(描述纹理图片是如何映射到三角形上的)
我们用一个数组indices来存放顶点下标索引,很显然,我们可以把三角形网格分成两部分,一组是直角在左下角的三角形集合,一组是直角在右上角的三角形集合。
对于前者:
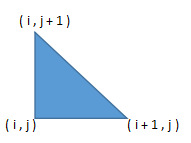
我们从(0,0)顶点扫描到(width-2,height-2)顶点,每扫描到一个点(i,j),就把它所在三角形对应的三个点的索引放到索引数组。
同理,对于后者:
我们从(1,1)顶点扫描到(width -1 ,height -1)顶点,每扫描到一个点(i,j),就把它所在三角形对应的三个点的索引放到索引数组。
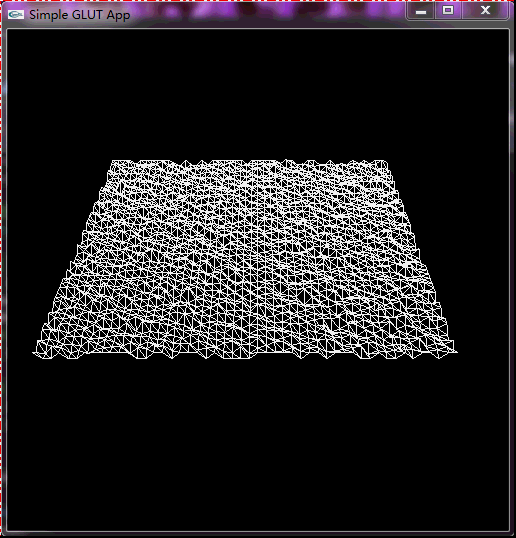
注意初始的时候,要给某些点高度值,如果全是0的话,那么按迭代方程来看,所有的计算结果也都是0。然后我们直接利用原理中给出的公式重新计算每个点的波位移,最终可以得到这样的效果:
纹理映射
其实到了这一步,我们的绘制已经算是完成了。我又加了点最简单的纹理映射,让它看起来稍微好一点。
纹理映射和索引下标一样,也是由一个数组来维护,它包含了每个三角形中,三角形各个顶点与纹理图片上的点一一对应的关系。
对于纹理图片而言,它的四个点的坐标是(0,0)(1,0)(0,1)(1,1)。由于我们希望的是把一整张纹理图直接盖到网格上,所以纹理映射中存的数据分布在[0,1]之间。
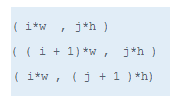
假设网格为mxn规格,那么纹理图中单位长度width = 1/n,height = 1/m,同样的,我们按索引数组中的两组三角形来填充:
三个顶点对应的纹理坐标:
三个顶点对应的纹理坐标:

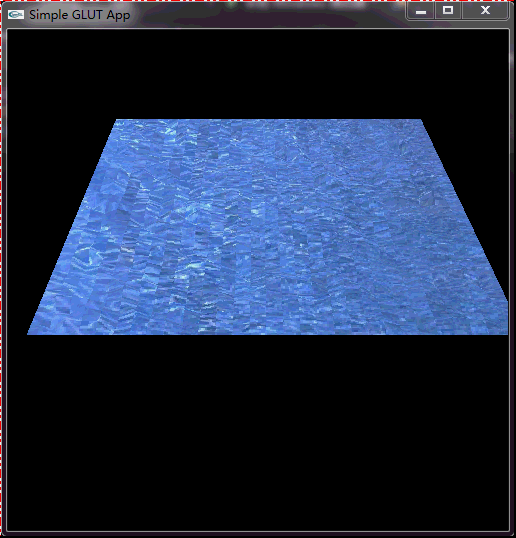
实际效果中的过度变化比截图软件显示得更平滑。因为没有加入渲染(光照,阴影,反射,折射,透明度等等),所以看起来并不那么真实。缺陷在于网格之间的分界线过于明显,要解决这个问题,又是另外一个话题啦。
代码
| fluid.h (流体) test.h (纹理) VectorClasses.h (顶点) fluid.cpp texture.cpp main.cpp |
请注意修改main中drawScene的count值来适应你计算机的速度,具体的参数也是可以调节的。
VectorClasses.h 可以在这里拿到,运行之后会报错未定义标识符Sqrt之类的……把它改成math.h里的sqrt就好啦
fluid.h
#pragma once
#include "VectorClasses.h"


class Fluid
{
private:

	long            width; //宽
	long            height; //高

	Vector3D        *buffer[2]; //缓冲区
	long            renderBuffer;  //当前渲染的缓冲区

	//Vector3D        *normal; //法线
	//Vector3D        *tangent; //切线

	int             *indices[3]; //索引
	float       *texcoords[3][2]; //纹理坐标
	float           k1, k2, k3; //多项式系数

	int texture;
public:

	//n:网格宽 m:网格高 d:网格点之间的距离
	//t:时间 c:波速 mu:阻力系数

	Fluid(long n, long m, float d, float t, float c, float mu,int tex);
	~Fluid();

	void Evaluate(void);
	void draw();
};
test.h
#pragma once
#define GLUT_DISABLE_ATEXIT_HACK
#include "GL/GLUT.H"
void loadTex(int i, char *filename, GLuint* texture);
fluid.cpp(注释部分为切线和法线的计算,用于渲染)
#include<stdlib.h>
#include"fluid.h"
#include"test.h"
Fluid::Fluid(long n, long m, float d, float t, float c, float mu,int tex)
{

	texture = tex;
	width = n; //宽度
	height = m;  //高度
	long count = n * m;  //网格点个数

	buffer[0] = new Vector3D[count];  //缓冲区1
	buffer[1] = new Vector3D[count];  //缓冲区2
	renderBuffer = 0;  //渲染缓冲区

	//normal = new Vector3D[count]; //法线
	//tangent = new Vector3D[count]; //切线


	for (int i = 0; i < 3; i++) {
		indices[i] = new int[2 * (n - 1)*(m - 1)];
	}
	for (int i = 0; i < 6; i++) {
		texcoords[i % 3][i / 3] = new float[2 * (n - 1)*(m - 1)];
	}

	// Precompute constants for Equation (15.25).
	//预先计算:流体表面方程的多项式系数
	float f1 = c * c * t * t / (d * d);
	float f2 = 1.0F / (mu * t + 2);
	k1 = (4.0F - 8.0F * f1) * f2;
	k2 = (mu * t - 2) * f2;
	k3 = 2.0F * f1 * f2;

	// Initialize buffers.
	//初始化缓冲区
	long a = 0;

	for (long j = 0; j < m; j++)
	{
		float y = d * j;
		for (long i = 0; i < n; i++)
		{
			if(i==0||j==0||i==n-1||j==m-1)buffer[0][a].Set(d * i, y, 0.0F);
			else {
				int r = rand() % 2;
				if (r == 0)buffer[0][a].Set(d * i, y, 1.0F);
				else buffer[0][a].Set(d * i, y, 0.0F);
			}
			buffer[1][a] = buffer[0][a];
		//	normal[a].Set(0.0F, 0.0F, 2.0F * d);
		//	tangent[a].Set(2.0F * d, 0.0F, 0.0F);
			a++;
		}
	}

	a = 0;
	float w = 1.0f / width;
	float h = 1.0f / height;
	for (int i = 0; i < n - 1; i++) {
		for (int j = 0; j < m - 1; j++ ) {
			long t = i*n + j;
			indices[0][a] = t;
			indices[1][a] = t + 1;
			indices[2][a] = t + n;

			texcoords[0][0][a] = i*w;
			texcoords[0][1][a] = j*h;

			texcoords[1][0][a] = (i + 1)*w;
			texcoords[1][1][a] = j*h;

			texcoords[2][0][a] = i*w;
			texcoords[2][1][a] = (j + 1)*h;

			a++;
		}
	}

	for (int i = 1; i < n; i++) {
		for (int j = 1; j < m; j++) {
			long t = i*n + j;
			indices[0][a] = t;
			indices[1][a] = t - 1;
			indices[2][a] = t - n;

			texcoords[0][0][a] = i*w;
			texcoords[0][1][a] = j*h;

			texcoords[1][0][a] = (i - 1)*w;
			texcoords[1][1][a] = j*h;

			texcoords[2][0][a] = i*w;
			texcoords[2][1][a] = (j - 1)*h;

			a++;
		}
	}
}

Fluid::~Fluid()
{
	//delete[] tangent;
	//delete[] normal;
	delete[] buffer[1];
	delete[] buffer[0];
}

void Fluid::Evaluate(void)
{
	// Apply Equation (15.25).
	//调用流体表面方程
	for (long j = 1; j < height - 1; j++)
	{
		//当前顶点位移
		const Vector3D *crnt = buffer[renderBuffer] + j * width;
		//前一顶点位移
		Vector3D *prev = buffer[1 - renderBuffer] + j * width;

		// z(i,j,k+1) = k1 * z(i,j,k) + k2 * z(i,j,k-1) +
		//     k3 * (z(i+1,j,k) + z(i-1,j,k) + z(i,j+1,k) + z(i,j-1,k)

		for (long i = 1; i < width - 1; i++)
		{
			prev[i].z = k1 * crnt[i].z + k2 * prev[i].z +
				k3 * (crnt[i + 1].z + crnt[i - 1].z +
					crnt[i + width].z + crnt[i - width].z);
		}
	}

	// Swap buffers.
	//交换缓冲区
	renderBuffer = 1 - renderBuffer;

	// Calculate normals and tangents.
	//计算法线和切线
	/*
	for (long j = 1; j < height - 1; j++)
	{
		const Vector3D *next = buffer[renderBuffer] + j * width;
		Vector3D *nrml = normal + j * width;
		Vector3D *tang = tangent + j * width;

		for (long i = 1; i < width - 1; i++)
		{
			nrml[i].x = next[i - 1].z - next[i + 1].z;
			nrml[i].y = next[i - width].z - next[i + width].z;
			tang[i].z = next[i + 1].z - next[i - 1].z;
		}
	}
	*/
}

void Fluid::draw()
{
	glEnable(GL_TEXTURE_2D);
	glBindTexture(GL_TEXTURE_2D, texture);  //选择纹理texture[status]
	glBegin(GL_TRIANGLES);

	for (int i = 0; i < 2*(height-1)*(width-1); i++) {
	/*	glNormal3f(normal[(int)indices[i].x].x,
			normal[(int)indices[i].x].y,
			normal[(int)indices[i].x].z);*/
		glTexCoord2f(texcoords[0][0][i],texcoords[0][1][i]);
		glVertex3f(buffer[renderBuffer][indices[0][i]].x,
			buffer[renderBuffer][indices[0][i]].y,
			buffer[renderBuffer][indices[0][i]].z);
	/*	glNormal3f(normal[(int)indices[i].y].x,
			normal[(int)indices[i].y].y,
			normal[(int)indices[i].y].z);*/
		glTexCoord2f(texcoords[1][0][i], texcoords[1][1][i]);
		glVertex3f(buffer[renderBuffer][indices[1][i]].x,
			buffer[renderBuffer][indices[1][i]].y,
			buffer[renderBuffer][indices[1][i]].z);
	/*	glNormal3f(normal[(int)indices[i].z].x,
			normal[(int)indices[i].z].y,
			normal[(int)indices[i].z].z);*/
		glTexCoord2f(texcoords[2][0][i], texcoords[2][1][i]);
		glVertex3f(buffer[renderBuffer][indices[2][i]].x,
			buffer[renderBuffer][indices[2][i]].y,
			buffer[renderBuffer][indices[2][i]].z);
	}

	glEnd();
	glDisable(GL_TEXTURE_2D);
}
texture.cpp
#define _CRT_SECURE_NO_WARNINGS
#include<stdio.h>
#include<windows.h>
#include"test.h"
#define BITMAP_ID 0x4D42


//读纹理图片
static unsigned char *LoadBitmapFile(char *filename, BITMAPINFOHEADER *bitmapInfoHeader)
{

	FILE *filePtr;    // 文件指针
	BITMAPFILEHEADER bitmapFileHeader;    // bitmap文件头
	unsigned char    *bitmapImage;        // bitmap图像数据
	int    imageIdx = 0;        // 图像位置索引
	unsigned char    tempRGB;    // 交换变量

								 // 以“二进制+读”模式打开文件filename
	filePtr = fopen(filename, "rb");
	if (filePtr == NULL) {
		printf("file not open\n");
		return NULL;
	}
	// 读入bitmap文件图
	fread(&bitmapFileHeader, sizeof(BITMAPFILEHEADER), 1, filePtr);
	// 验证是否为bitmap文件
	if (bitmapFileHeader.bfType != BITMAP_ID) {
		fprintf(stderr, "Error in LoadBitmapFile: the file is not a bitmap file\n");
		return NULL;
	}
	// 读入bitmap信息头
	fread(bitmapInfoHeader, sizeof(BITMAPINFOHEADER), 1, filePtr);
	// 将文件指针移至bitmap数据
	fseek(filePtr, bitmapFileHeader.bfOffBits, SEEK_SET);
	// 为装载图像数据创建足够的内存
	bitmapImage = new unsigned char[bitmapInfoHeader->biSizeImage];
	// 验证内存是否创建成功
	if (!bitmapImage) {
		fprintf(stderr, "Error in LoadBitmapFile: memory error\n");
		return NULL;
	}

	// 读入bitmap图像数据
	fread(bitmapImage, 1, bitmapInfoHeader->biSizeImage, filePtr);
	// 确认读入成功
	if (bitmapImage == NULL) {
		fprintf(stderr, "Error in LoadBitmapFile: memory error\n");
		return NULL;
	}
	//由于bitmap中保存的格式是BGR,下面交换R和B的值,得到RGB格式
	for (imageIdx = 0; imageIdx < bitmapInfoHeader->biSizeImage; imageIdx += 3) {
		tempRGB = bitmapImage[imageIdx];
		bitmapImage[imageIdx] = bitmapImage[imageIdx + 2];
		bitmapImage[imageIdx + 2] = tempRGB;
	}
	// 关闭bitmap图像文件
	fclose(filePtr);
	return bitmapImage;
}

//加载纹理的函数
void loadTex(int i, char *filename, GLuint* texture)
{

	BITMAPINFOHEADER bitmapInfoHeader;                                 // bitmap信息头
	unsigned char*   bitmapData;                                       // 纹理数据

	bitmapData = LoadBitmapFile(filename, &bitmapInfoHeader);

	glBindTexture(GL_TEXTURE_2D, texture[i]);
	// 指定当前纹理的放大/缩小过滤方式
	glTexParameteri(GL_TEXTURE_2D, GL_TEXTURE_MAG_FILTER, GL_NEAREST);
	glTexParameteri(GL_TEXTURE_2D, GL_TEXTURE_MIN_FILTER, GL_NEAREST);

	glTexImage2D(GL_TEXTURE_2D,
		0,         //mipmap层次(通常为,表示最上层)
		GL_RGB,    //我们希望该纹理有红、绿、蓝数据
		bitmapInfoHeader.biWidth, //纹理宽带,必须是n,若有边框+2
		bitmapInfoHeader.biHeight, //纹理高度,必须是n,若有边框+2
		0, //边框(0=无边框, 1=有边框)
		GL_RGB,    //bitmap数据的格式
		GL_UNSIGNED_BYTE, //每个颜色数据的类型
		bitmapData);    //bitmap数据指针

}
main.cpp
#define _CRT_SECURE_NO_WARNINGS

#include <stdio.h>
#include <string.h>
#include<time.h>
#include <stdlib.h>
#include"test.h"
#include"fluid.h"

//纹理缓冲区
GLuint texture[13];

//视区
float whRatio;
int wHeight = 0;
int wWidth = 0;
//流体
Fluid *f;

//视点
float center[] = {27, 10, 0 };
float eye[] = { 27,-50, 50 };


void drawScene()
{
	static int count = 0;
	count++;
	if (count > 1000) {
		count = 0;
		f->Evaluate();
	}
	f->draw();
}

void updateView(int height, int width)
{
	glViewport(0, 0, width, height);
	glMatrixMode(GL_PROJECTION);//设置矩阵模式为投影
	glLoadIdentity();   //初始化矩阵为单位矩阵
	whRatio = (GLfloat)width / (GLfloat)height;  //设置显示比例
	gluPerspective(45.0f, whRatio, 1.0f, 150.0f); //透视投影
												  //glFrustum(-3, 3, -3, 3, 3,100);
	glMatrixMode(GL_MODELVIEW);  //设置矩阵模式为模型
}

void reshape(int width, int height)
{
	if (height == 0)      //如果高度为0
	{
		height = 1;   //让高度为1(避免出现分母为0的现象)
	}

	wHeight = height;
	wWidth = width;

	updateView(wHeight, wWidth); //更新视角
}


void idle()
{
	glutPostRedisplay();
}


void init()
{
	srand(unsigned(time(NULL)));
	glEnable(GL_DEPTH_TEST);//开启深度测试

	glEnable(GL_LIGHTING);  //开启光照模式

//	Fluid(long n, long m, float d, float t, float c, float mu);

	glGenTextures(1, texture);
	loadTex(0, "water.bmp", texture);
	/*
	   n = 10
	   m = 10
	   d = 1
	   t = 1
	   c = 0.5
	   u = 0
	*/
	f = new Fluid(30, 30, 2, 1, 0.2, 0, texture[0]);
}

void redraw()
{
	glClear(GL_COLOR_BUFFER_BIT | GL_DEPTH_BUFFER_BIT);//清除颜色和深度缓存
	glMatrixMode(GL_MODELVIEW);
	glLoadIdentity();   //初始化矩阵为单位矩阵
	gluLookAt(eye[0], eye[1], eye[2], center[0], center[1], center[2], 0, 1, 0);                // 场景(0,0,0),Y轴向上
	glPolygonMode(GL_FRONT_AND_BACK, GL_FILL);

	glShadeModel(GL_SMOOTH);
	glFrontFace(GL_CCW);
	glEnable(GL_CULL_FACE);
	// 启用光照计算
	glEnable(GL_LIGHTING);
	// 指定环境光强度(RGBA)
	GLfloat ambientLight[] = { 2.0f, 2.0f, 2.0f, 1.0f };

	// 设置光照模型,将ambientLight所指定的RGBA强度值应用到环境光
	glLightModelfv(GL_LIGHT_MODEL_AMBIENT, ambientLight);
	// 启用颜色追踪
	glEnable(GL_COLOR_MATERIAL);
	// 设置多边形正面的环境光和散射光材料属性,追踪glColor
	glColorMaterial(GL_FRONT, GL_AMBIENT_AND_DIFFUSE);

	drawScene();//绘制场景
	glutSwapBuffers();//交换缓冲区
}

int main(int argc, char *argv[])
{

	glutInit(&argc, argv);//对glut的初始化
	glutInitDisplayMode(GLUT_RGBA | GLUT_DEPTH | GLUT_DOUBLE);
	//初始化显示模式:RGB颜色模型,深度测试,双缓冲
	glutInitWindowSize(500, 500);//设置窗口大小
	int windowHandle = glutCreateWindow("Simple GLUT App");//设置窗口标题
	glutDisplayFunc(redraw); //注册绘制回调函数
	glutReshapeFunc(reshape);   //注册重绘回调函数

	glutIdleFunc(idle);//注册全局回调函数:空闲时调用

	init();
	glutMainLoop();  // glut事件处理循环
	return 0;
}
water.bmp


 4936
4936


 被折叠的 条评论
为什么被折叠?
被折叠的 条评论
为什么被折叠?
 到【灌水乐园】发言


